Create a form(创建表单)
:::callout{theme="warning"} Foundry Forms is no longer the recommended approach for data entry or writeback workflows on Foundry. Instead, build user input workflows with the Foundry Ontology, representing the relevant data structures as object types and configuring the writeback interaction with Actions. Learn more in the Forms overview documentation. :::
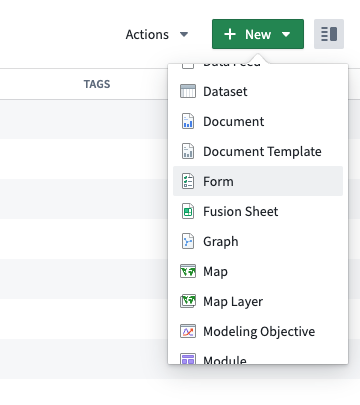
To create a new form, first open the Forms application from the Foundry navigation sidebar. You will be prompted to create a new form or open an existing one. Alternatively, navigate to a Project in the filesystem view, then select + New > Form.
Once you create a new form, you will be prompted to choose a response destination:
- Fusion spreadsheet
- Ontology object type (if permissioned
You may also create a form now and decide the response destination later.
While both destination options write to datasets, Fusion writes directly to the spreadsheet every time a change is made. Object storage in Foundry requires users to schedule a build of the writeback dataset configured in the Ontology. This decision can be changed later.
Create and configure a new form
Complete the following steps to create a simple form:
-
First, navigate to the form creation screen.
-
Next, choose the response destination for your new form.

-
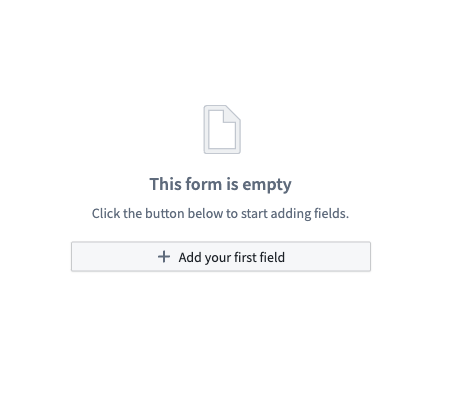
Then, select Add your first field.
-
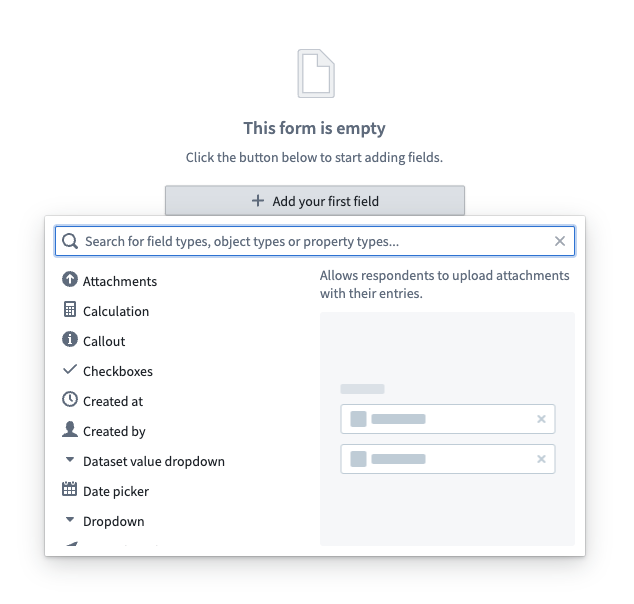
Select the desired field type from the available list of options.
-
Now, modify the field as needed using the Visual Editor sidebar to the right of the form.
-
Then, select the + above or below an existing field to continue adding more fields.
-
Finally, select the green Save button in the top right to save your form.

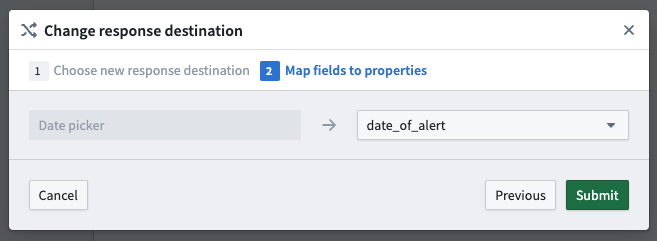
Change the response destination
To change the response destination of your form, follow these steps:
-
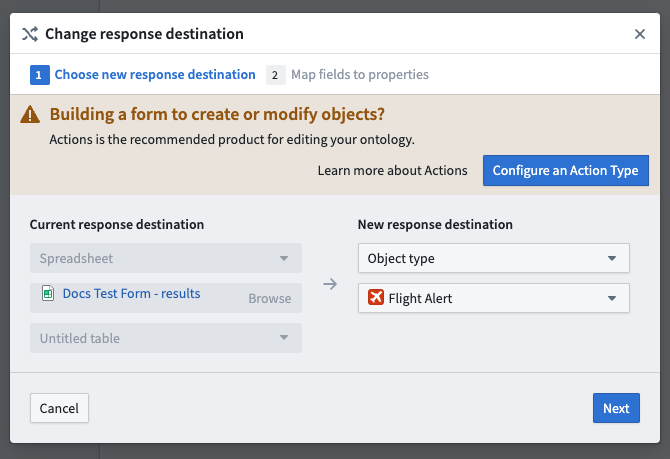
From the Response data tab to the right of your screen, select Change response destination.
-
Choose the new response destination for your form.
-
Map any added fields to properties available in the new destination.
-
Select the green Submit button to save.
Sheets and fields
Forms are comprised of sheets and different types of fields:
- Simple fields ask for basic input from the respondent.
- Data-backed fields link a form to data that already exists in Foundry.
- Auto-populating fields allow users to capture metadata about the form, such as who created it and when.
- The Attachments field is a special type of simple field that supplements responses with files.
Modify sheets and fields
To modify an item:
- Open the Visual Editor. This can be done by either:
- Hovering over the item and selecting the gray settings wheel in the top right, or
- Double-clicking the item (for sheets, double-click the header).
- Explore and modify the available configuration options, which are grouped under the tabs:
- Properties
- Validators (for fields only)
- Transforms
- Select the green Save button at the bottom of the panel.
:::callout{theme="neutral"} To unlock additional configuration options, use the Code Editor. :::
Reorder sheets and fields
To reorder an item:
- Hover over the item to be reordered.
- Select either of the arrows in the top left to shift the field up or down one position.
There is also a drag-and-drop handle to the left of the field.
Remove sheets and fields
To remove an item:
- Hover over the item to be deleted.
- Select the red x within a circle in the top right.
- Confirm the deletion by selecting the same icon once more.
A field can also be removed with the Visual Editor:
- Double-click the field to open the Visual Editor.
- From the Properties tab, select Delete sheet/field at the bottom of the panel.
Finally, an item can be drag-and-dropped to the Drop here to delete button at the bottom of the form.
中文翻译
创建表单
:::callout{theme="warning"} Foundry Forms 已不再是 Foundry 平台上数据录入或写回工作流的推荐方案。建议改用 Foundry Ontology 构建用户输入工作流,将相关数据结构表示为对象类型,并通过 Actions 配置写回交互。更多信息请参阅 Forms 概述 文档。 :::
要创建新表单,首先从 Foundry 导航侧边栏打开 Forms 应用程序。系统将提示您创建新表单或打开现有表单。或者,在文件系统视图中导航至某个项目,然后选择 + New > Form。
创建新表单后,系统将提示您选择响应目标:
- Fusion 电子表格
- Ontology 对象类型(需具备权限)
您也可以先创建表单,稍后再决定响应目标。
虽然两种目标选项都会写入数据集,但 Fusion 会在每次更改时直接写入电子表格。Foundry 中的对象存储要求用户调度在 Ontology 中配置的写回数据集的构建。此决定可在之后更改。
创建并配置新表单
完成以下步骤以创建简单表单:
-
首先,导航至表单创建界面。
-
接着,为新表单选择响应目标。
-
然后,选择 添加第一个字段。
-
从可用选项列表中选择所需的字段类型。
-
现在,使用表单右侧的可视化编辑器侧边栏根据需要修改字段。
-
然后,选择现有字段上方或下方的 + 继续添加更多字段。
-
最后,选择右上角的绿色 保存 按钮保存表单。
更改响应目标
要更改表单的响应目标,请按以下步骤操作:
-
从屏幕右侧的 响应数据 选项卡中,选择 更改响应目标。
-
为表单选择新的响应目标。
-
将已添加的字段映射到新目标中可用的属性。
-
选择绿色 提交 按钮保存。
工作表与字段
表单由工作表和不同类型的字段组成:
- 简单字段:向受访者询问基本输入。
- 数据支持字段:将表单链接到 Foundry 中已存在的数据。
- 自动填充字段:允许用户捕获表单的元数据,例如创建者和创建时间。
- 附件字段:一种特殊类型的简单字段,用于补充响应文件。
修改工作表与字段
要修改项目:
- 打开可视化编辑器。可通过以下任一方式操作:
- 悬停在项目上并选择右上角的灰色设置齿轮,或
- 双击项目(对于工作表,双击标题)。
- 浏览并修改可用的配置选项,这些选项分组在以下选项卡下:
- 属性
- 验证器(仅限字段)
- 转换
- 选择面板底部的绿色 保存 按钮。
:::callout{theme="neutral"} 要解锁更多配置选项,请使用代码编辑器。 :::
重新排序工作表与字段
要重新排序项目:
- 悬停在要重新排序的项目上。
- 选择左上角的任一箭头,将字段向上或向下移动一个位置。
字段左侧还有一个拖放手柄。
删除工作表与字段
要删除项目:
- 悬停在要删除的项目上。
- 选择右上角红色圆圈内的 x。
- 再次选择同一图标确认删除。
也可以通过可视化编辑器删除字段:
- 双击字段打开可视化编辑器。
- 从 属性 选项卡中,选择面板底部的 删除工作表/字段。
最后,可以将项目拖放到表单底部的 拖放至此以删除 按钮上。