Development(开发)
What is dev mode?
Dev mode is a development feature that allows you to preview widgets using non-production code directly within Foundry applications. When dev mode is active, your development server (running either locally or in Foundry) overrides the published widget assets, letting you see your code and configuration changes without needing to publish a new version.
Key characteristics of dev mode:
- Personal: Only affects your user account and other users continue to see the published version.
- Temporary: Automatically expires after 24 hours.
- Live updates: Code changes from your development server immediately appear in the widget.
- Context-aware: Works in both the custom widgets playground and host applications like Workshop.
Set up a project
:::callout{theme="neutral"} A widget no longer needs to be published before you can develop on it. You can preview an unpublished widget in the custom widgets playground and in Code Workspaces. To use a brand-new widget in Workshop, publish the widget once so that it becomes selectable in the Widget setup panel. Dev mode then previews your live changes against the published widget. :::
If you chose to use a Foundry Code Repository to store your source code, first follow the "Work locally" instructions in VS Code Workspace or the Code Repositories application to clone the repository to your local machine.
Set the FOUNDRY_TOKEN environment variable in your terminal with a user-generated token with the following command, or the equivalent for your operating system.
export FOUNDRY_TOKEN=<token>
In the project directory, run the following commands to install dependencies and start the dev server:
npm install
npm run dev
A link will be printed to the terminal which you can open to set up dev mode for your widget set. This will redirect the browser to the widget set overview page once complete, from which you can select a widget to start developing against. The live code running from your development server will now be displayed in the widget playground and any changes to your code will immediately update the widget on the page.

Dev mode environments
Once your dev server is running, you can preview your widgets in the different environments outlined below.
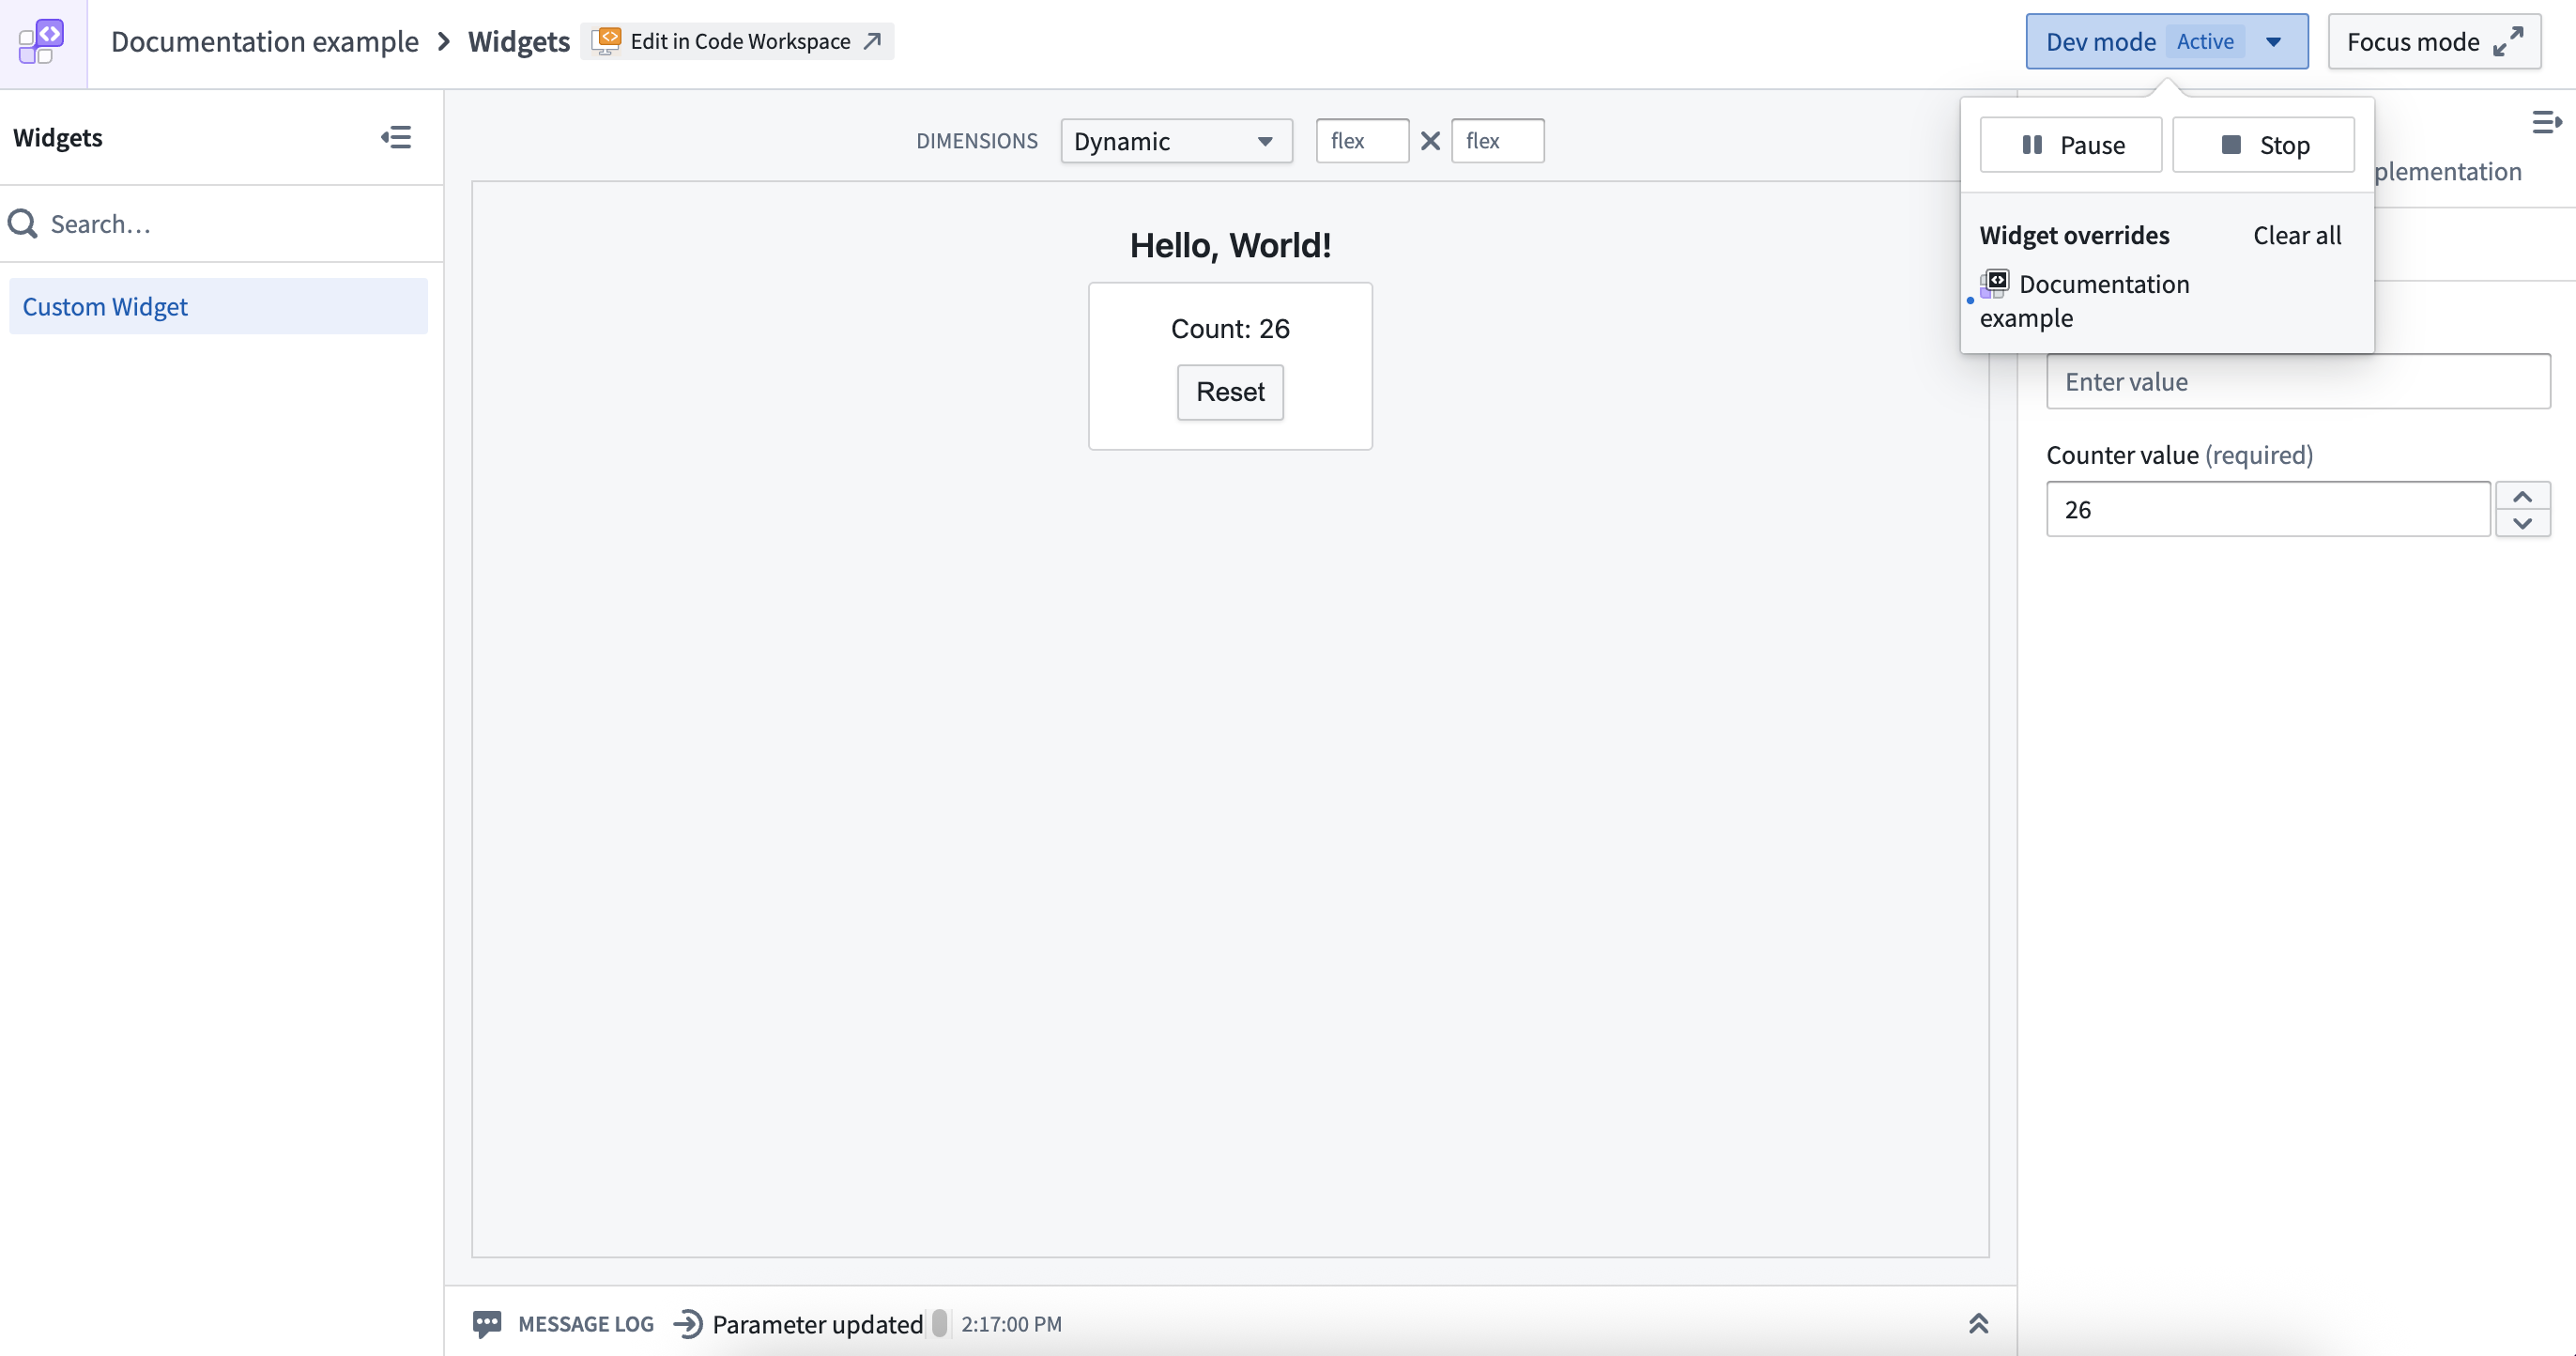
Custom widgets playground
The custom widgets playground is a dedicated development environment for testing individual widgets which provides:
- Isolated testing: Preview widgets in different dimensions and configurations.
- Parameter controls: Interactive controls to test widget parameters you have defined.
- Event monitoring: A message log showing widget events and parameter updates from Foundry.
- Dev mode integration: When dev mode is active, the playground displays your development code.
Workshop integration
When developing Workshop widgets, dev mode extends beyond the playground to actual Workshop applications. This allows you to:
- Preview widget changes in the full context where the widget will be used
- Test interactions with other Workshop components
- Validate the widget's behavior in real application scenarios
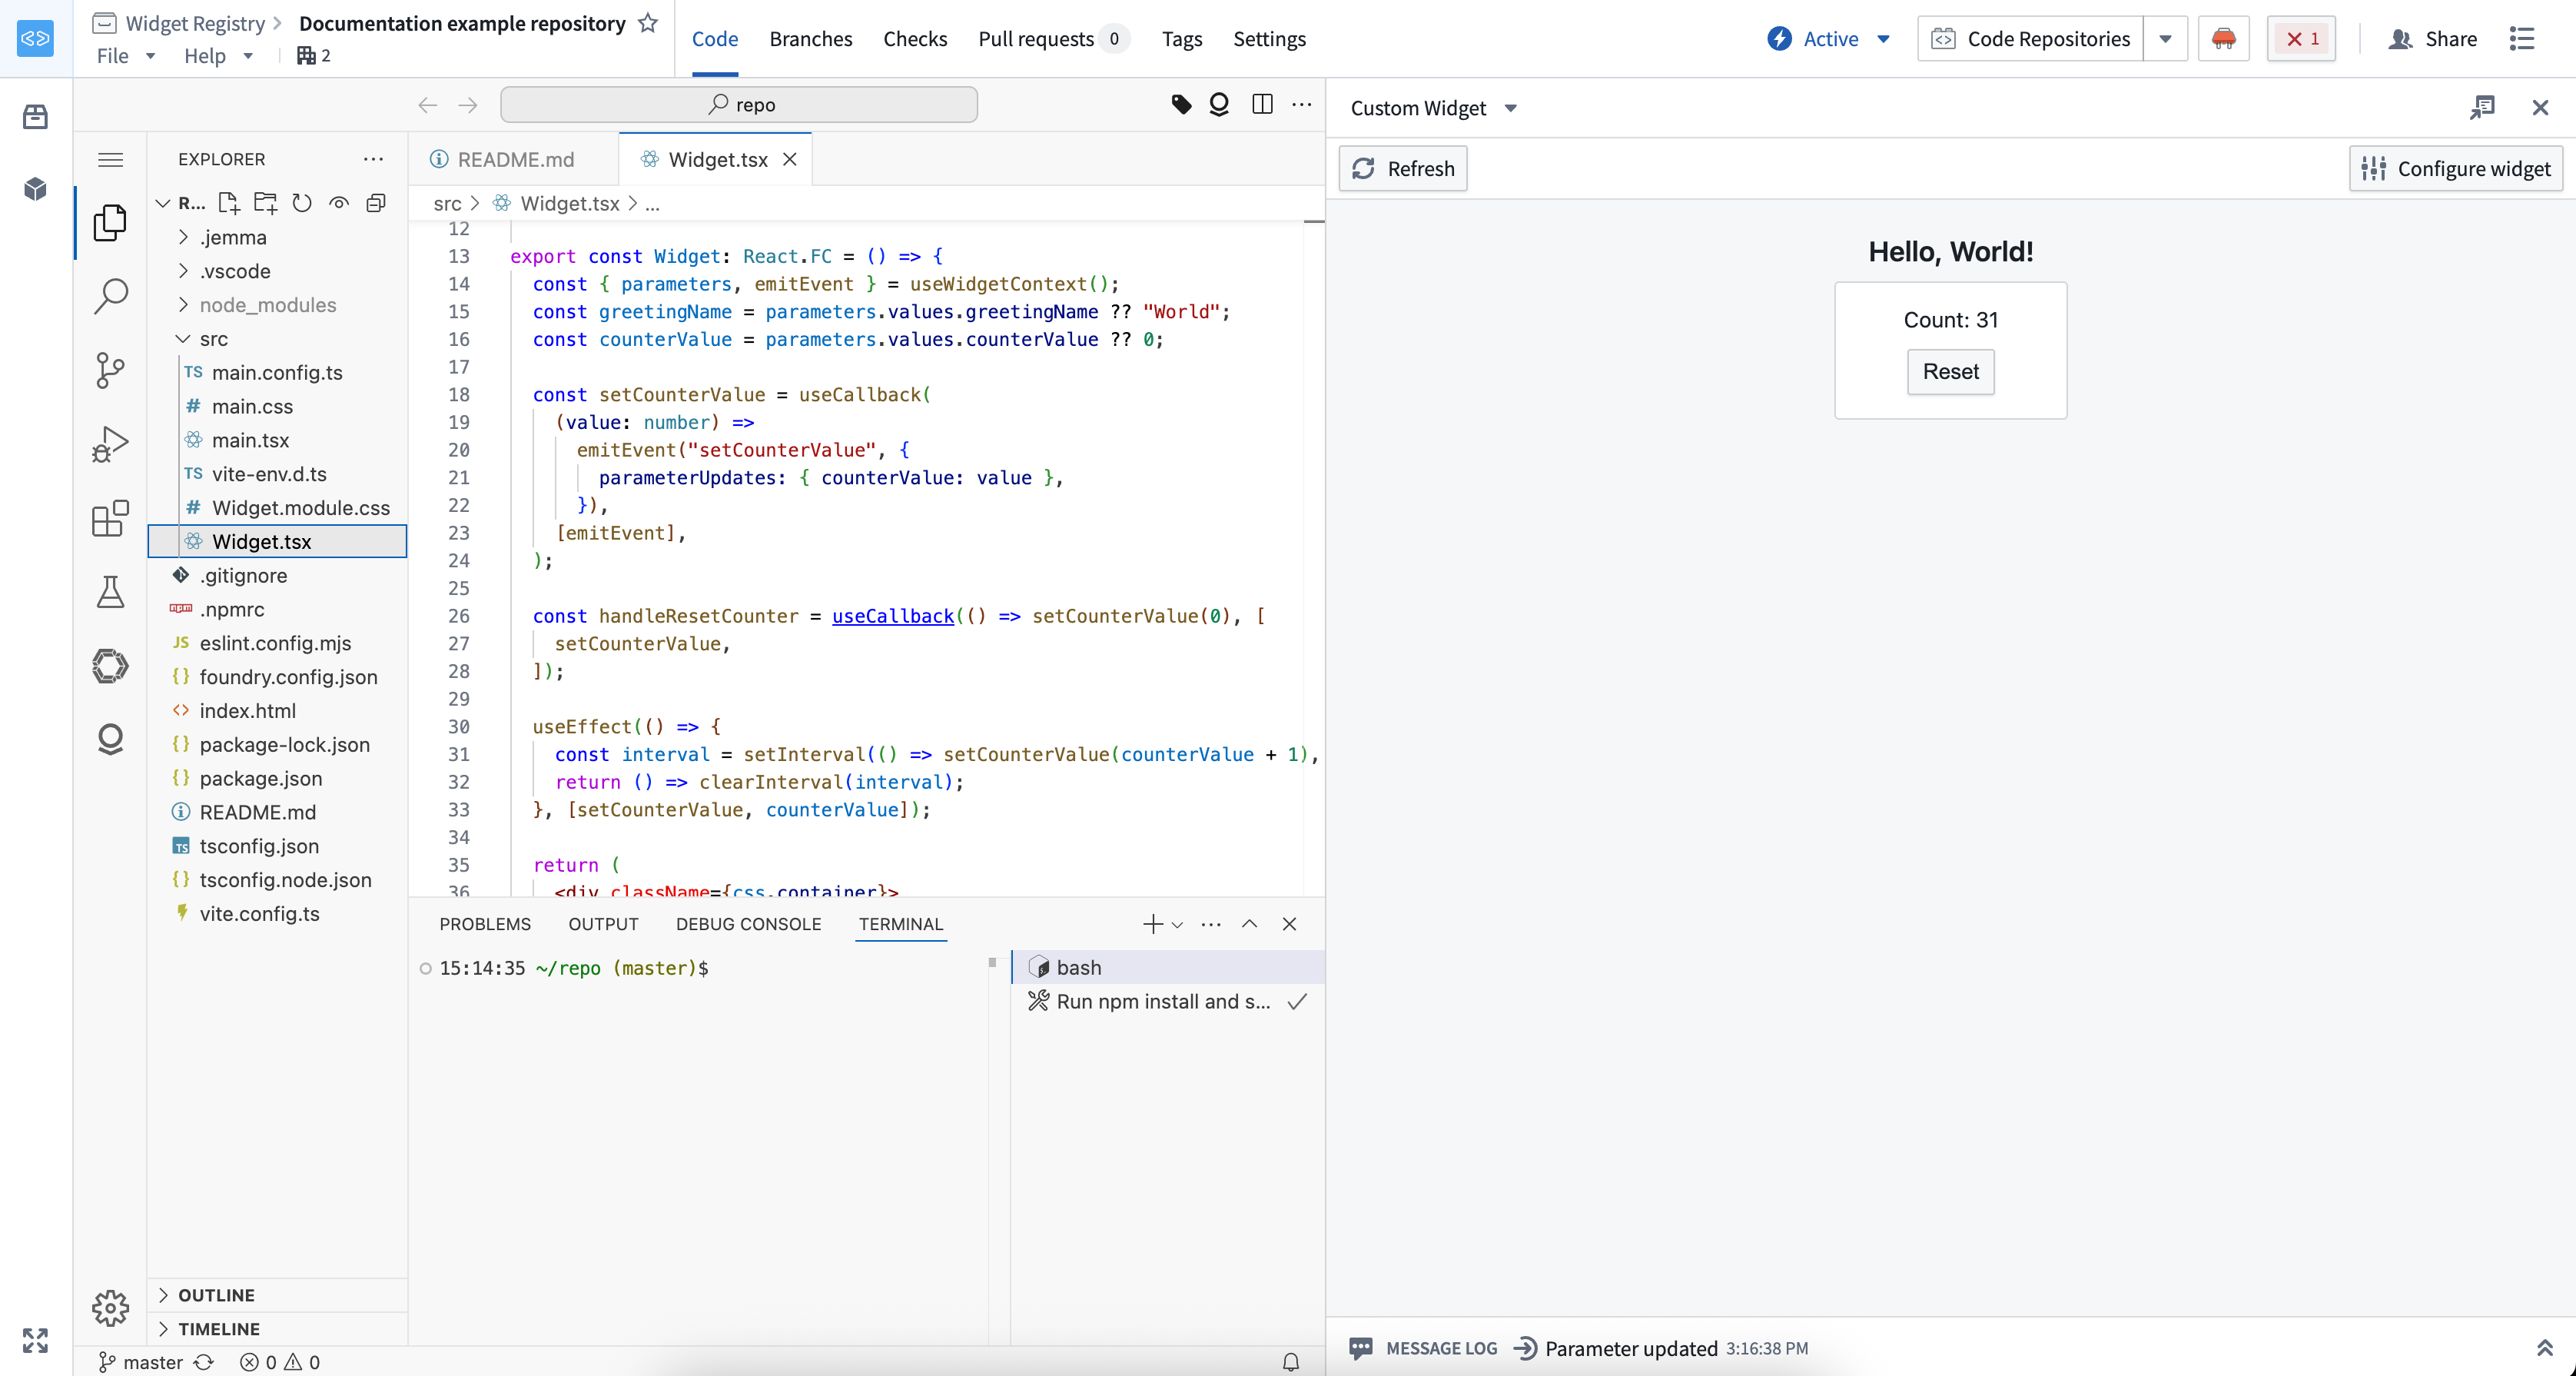
VS Code Workspaces integration
The development server can run directly from the terminal in a VS Code workspace. This is done automatically when the workspace starts, but can also be done manually using the following command in the terminal:
npm run dev:remote
The VS Code preview panel can then be used to select a widget to preview from the development server. A development server running in a VS Code workspace can also be used to preview changes in the custom widgets playground and in Workshop applications, just like a development server running on your local machine.
Dev mode controls and states
Dev mode can be controlled through the custom widgets playground interface. The controls indicate the current state and allow you to enable, disable, or pause dev mode as needed.
Disabled state (default)
Dev mode is disabled by default. You can enable it through the playground controls, but it will remain inactive unless your dev server is running and has overrides for the current widget.

Enabled state
When active, dev mode displays content from your development server instead of the published widget version. This state confirms that your local changes are being previewed.
The controls display whether the source is a development server running on localhost:

Or a VS Code workspace:

Enabled (inactive) state
This state indicates dev mode is enabled but no development server overrides exist for the current widget, so the published version is still displayed. This typically happens when your dev server is not running or does not include the widget you are viewing.

Paused state
The paused state temporarily disables dev mode while keeping the controls visible in host applications like Workshop, making it easy to resume development when needed.

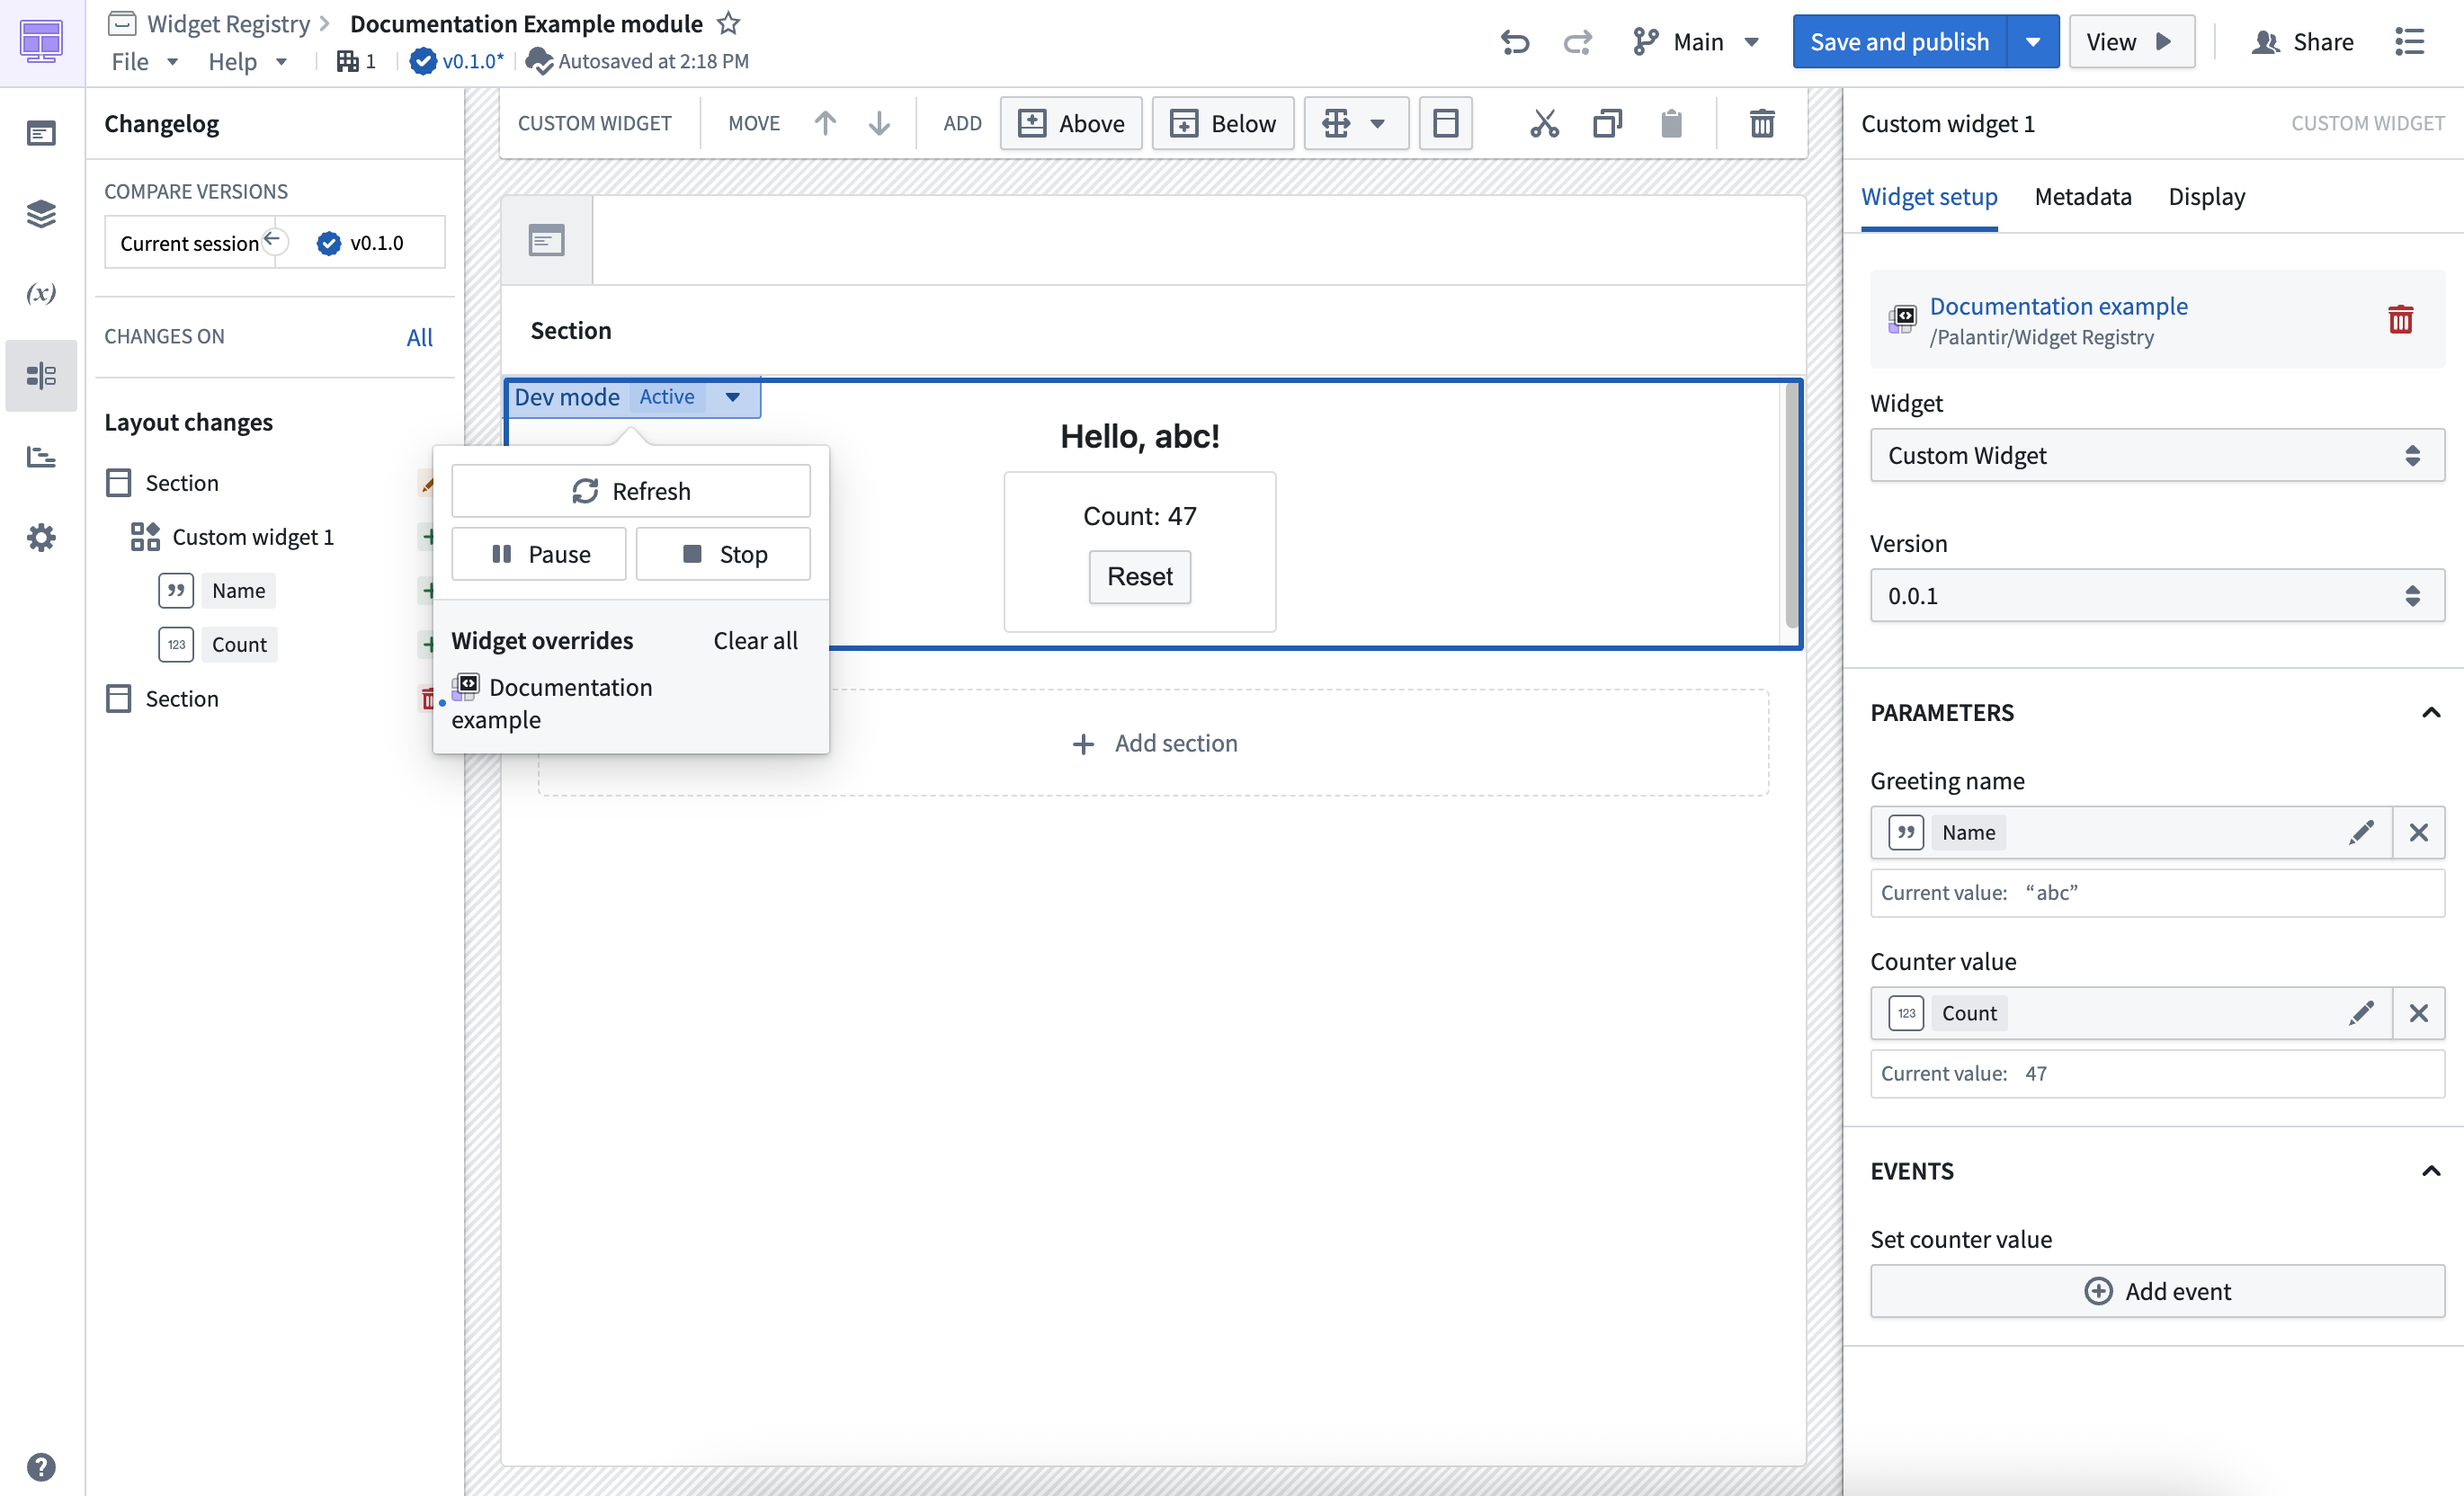
Add and modify parameters and events
The parameters and events for a widget are typically defined in a main.config.ts file. This is type-safe so adding or modifying parameters and events can be done easily without errors. For more information on supported parameter types and events, see parameters and events.
// main.config.ts
import { defineConfig } from "@osdk/widget.client";

export default defineConfig({
  id: "<Widget ID>", // The unique identifier of the widget within your project
  name: "<Widget Name>", // A user friendly name for your widget
  description: "<Widget Description>", // A user friendly description of your widget
  type: "workshop",
  parameters: {
    headerText: {
      displayName: "Widget title",
      type: "string",
    },
    showWarning: {
      displayName: "Show warning callout",
      type: "boolean",
    },
    todoItems: {
      displayName: "Todo items",
      type: "array",
      subType: "string",
    },
  },
  events: {
    updateHeader: {
      displayName: "Update header",
      parameterUpdateIds: ["headerText"],
    },
    updateTodoItems: {
      displayName: "Update todo items",
      parameterUpdateIds: ["todoItems"],
    },
  },
});
:::callout{theme="neutral" title="Previewing parameter and event changes"}
With @osdk/widget.vite-plugin version 3.34.0 or later, dev mode previews changes to parameters and events without publishing a new version. Updated parameters and events appear in the custom widgets playground, in Code Workspaces, and in Workshop.
Parameter and event changes do not hot-reload like code changes. After you edit a configuration file, reapply dev mode to preview the changes. When developing locally, open the setup link printed in your terminal again. When developing in Code Workspaces, refresh the preview panel. :::
Unsupported features
The custom widgets runtime does not support certain browser APIs for persisting data such as:
- Web Storage API ↗ (
localStorage,sessionStorage) - IndexedDB API ↗
To share state between multiple widgets on the page, use parameters configured through the host application (for example, variables in Workshop). To persist state, you may use saved states for Workshop variables, or write data to the ontology.
Non-Ontology APIs are also not supported in the custom widgets runtime.
The content security policy (CSP) of the custom widget runtime cannot be configured and is restrictive by design; no external requests are allowed. You may use Foundry resources to wrap external requests, such as functions and webhooks.
中文翻译
开发
什么是开发模式(dev mode)?
开发模式是一项开发功能,允许您直接在 Foundry 应用中使用非生产代码预览微件(widget)。当开发模式激活时,您的开发服务器(在本地或 Foundry 中运行)会覆盖已发布的微件资源,让您无需发布新版本即可查看代码和配置更改。
开发模式的主要特点:
- 个人化: 仅影响您的用户账户,其他用户仍看到已发布的版本。
- 临时性: 24 小时后自动过期。
- 实时更新: 开发服务器上的代码更改会立即反映在微件中。
- 上下文感知: 在自定义微件测试平台(playground)和 Workshop 等宿主应用中均可使用。
设置项目
:::callout{theme="neutral"} 微件不再需要先发布才能进行开发。您可以在自定义微件测试平台和代码工作区(Code Workspaces)中预览未发布的微件。若要在 Workshop 中使用全新微件,请先发布一次该微件,使其在微件设置面板中可选。然后开发模式会根据已发布的微件预览您的实时更改。 :::
如果您选择使用 Foundry 代码仓库(Code Repository)存储源代码,请先按照 VS Code 工作区或代码仓库应用中的"本地工作"说明,将仓库克隆到本地计算机。
在终端中使用以下命令(或您操作系统的等效命令)设置 FOUNDRY_TOKEN 环境变量,使用用户生成的令牌。
export FOUNDRY_TOKEN=<token>
在项目目录中,运行以下命令安装依赖并启动开发服务器:
npm install
npm run dev
终端将打印一个链接,打开该链接可为您的微件集设置开发模式。完成后,浏览器将重定向到微件集概览页面,您可以在其中选择一个微件开始开发。开发服务器运行的实时代码将显示在微件测试平台中,对代码的任何更改都会立即更新页面上的微件。
开发模式环境
开发服务器运行后,您可以在以下不同环境中预览微件。
自定义微件测试平台(Custom widgets playground)
自定义微件测试平台是一个专用的开发环境,用于测试单个微件,提供以下功能:
- 隔离测试: 在不同尺寸和配置下预览微件。
- 参数控件: 交互式控件,用于测试您定义的微件参数。
- 事件监控: 消息日志,显示来自 Foundry 的微件事件和参数更新。
- 开发模式集成: 开发模式激活时,测试平台会显示您的开发代码。
Workshop 集成
开发 Workshop 微件时,开发模式会扩展到实际的 Workshop 应用。这允许您:
- 在微件将使用的完整上下文中预览微件更改
- 测试与其他 Workshop 组件的交互
- 在实际应用场景中验证微件行为
VS Code 工作区集成
开发服务器可以直接从 VS Code 工作区的终端运行。工作区启动时会自动执行此操作,但也可以在终端中使用以下命令手动执行:
npm run dev:remote
然后可以使用 VS Code 预览面板从开发服务器中选择要预览的微件。在 VS Code 工作区中运行的开发服务器也可用于在自定义微件测试平台和 Workshop 应用中预览更改,就像在本地计算机上运行的开发服务器一样。
开发模式控件与状态
开发模式可通过自定义微件测试平台界面进行控制。控件指示当前状态,并允许您根据需要启用、禁用或暂停开发模式。
禁用状态(默认)
开发模式默认禁用。您可以通过测试平台控件启用它,但除非您的开发服务器正在运行并且对当前微件有覆盖,否则它将保持非活动状态。
启用状态
激活时,开发模式会显示来自开发服务器的内容,而不是已发布的微件版本。此状态确认您的本地更改正在被预览。
控件会显示源是运行在 localhost 上的开发服务器:
还是 VS Code 工作区:
启用(非活动)状态
此状态表示开发模式已启用,但当前微件没有开发服务器覆盖,因此仍显示已发布的版本。这通常发生在您的开发服务器未运行或未包含您正在查看的微件时。
暂停状态
暂停状态会临时禁用开发模式,同时在 Workshop 等宿主应用中保持控件可见,方便在需要时恢复开发。
添加和修改参数与事件
微件的参数和事件通常在 main.config.ts 文件中定义。这是类型安全的,因此添加或修改参数和事件可以轻松完成而不会出错。有关支持的参数类型和事件的更多信息,请参阅参数和事件。
// main.config.ts
import { defineConfig } from "@osdk/widget.client";

export default defineConfig({
  id: "<Widget ID>", // 微件在项目中的唯一标识符
  name: "<Widget Name>", // 微件的用户友好名称
  description: "<Widget Description>", // 微件的用户友好描述
  type: "workshop",
  parameters: {
    headerText: {
      displayName: "微件标题",
      type: "string",
    },
    showWarning: {
      displayName: "显示警告标注",
      type: "boolean",
    },
    todoItems: {
      displayName: "待办事项",
      type: "array",
      subType: "string",
    },
  },
  events: {
    updateHeader: {
      displayName: "更新标题",
      parameterUpdateIds: ["headerText"],
    },
    updateTodoItems: {
      displayName: "更新待办事项",
      parameterUpdateIds: ["todoItems"],
    },
  },
});
:::callout{theme="neutral" title="预览参数和事件更改"}
使用 @osdk/widget.vite-plugin 版本 3.34.0 或更高版本时,开发模式无需发布新版本即可预览参数和事件的更改。更新后的参数和事件会出现在自定义微件测试平台、代码工作区和 Workshop 中。
参数和事件的更改不会像代码更改那样热重载。编辑配置文件后,请重新应用开发模式以预览更改。在本地开发时,再次打开终端中打印的设置链接。在代码工作区中开发时,刷新预览面板。 :::
不支持的功能
自定义微件运行时不支持某些用于持久化数据的浏览器 API,例如:
- Web 存储 API ↗(
localStorage、sessionStorage) - IndexedDB API ↗
要在页面上的多个微件之间共享状态,请使用通过宿主应用配置的参数(例如 Workshop 中的变量)。要持久化状态,您可以使用 Workshop 变量的已保存状态,或将数据写入本体(ontology)。
自定义微件运行时也不支持非本体 API。
自定义微件运行时的内容安全策略(CSP)无法配置,并且设计上具有限制性;不允许任何外部请求。您可以使用 Foundry 资源来封装外部请求,例如函数(functions)和 webhook。