Access values with Handlebars(使用 Handlebars 访问值)
Slate uses Handlebars ↗ for templating in queries, functions, and widgets. Handlebars templates are wrapped in {{ }} and can access Slate objects like widgets, variables, and query/function results. For example, if you have a drop down widget w1, you can access the selected value with the template {{w1.selectedValue}}. Slate automatically evaluates the template and replaces it with the evaluated value.
Handlebars templates can also call helper functions. For more information, see Helpers.
Which Slate objects can be referenced?
Variables
You can access variables defined in the Variables editor with {{variableName}}. For example, if you have a variable var1 = {"a": [1,2,3]}, then the template {{var1.a.[0]}} evaluates to 1.
You can also access Slate environment variables, including information about the current application user or user-dedicated storage. For example, using the template {{$global.user.firstName}} will display the first name of the user.
Queries
You can access query results. For example, {{myQuery}} contains the results from the SQL or HttpJson query. There is also a hidden _response field that contains some metadata.
{"name": ["Ceres","Pallas"],"earthmoid": [1.59376,1.23071],"pha": [false,false],"datefirstobs": ["1830-04-18","1825-03-23"]"_response": {"hasRun": true,"message": "Unable to parse query.","success": false}}
Functions
You can access the return value of a function by enclosing the function name in handlebars. For example, {{myFunction}}.
Widget properties
You can access certain widget properties. Specifically, templates can access the leaf properties (including arrays and their sub-properties). For example, assume we have a chart widget.
These are the properties listed in the widget’s raw JSON tab:
{"allowSelection": true,"animate": true,"datasets": [{"name": "dataset1","renderer": "bar","xValues": "{{yearToObsNum.name}}","yValues": "{{yearToObsNum.numofobs}}"}],"labelsEnabled": false,"panZoomEnabled": false,"selection": {"indices": [],"xMax": null,"xMin": null,"xValues": [],"yMax": null,"yMin": null,"yValues": []},"tooltipsEnabled": false,"xAxes": [{"gridlinesEnabled": false,"label": "first observed {{w9.selectedValue}}","name": "x1","position": "bottom","scale": "category"}],"yAxes": [{"gridlinesEnabled": false,"label": "Number of Observations","name": "y1","position": "left","scale": "linear"}]}
These are the properties that you can and cannot access:
{{w1.allowSelection}}             (leaf property)
{{w1.animate}}                    (leaf property)
{{w1.datasets}}                   (array)
{{w1.datasets.[0]}}               (subproperty inside array)
{{w1.datasets.[0].xValues}}       (array subproperty inside array)
{{w1.datasets.[0].xValues.[0]}}   (subproperty inside array)
{{w1.labelsEnabled}}              (leaf property)
{{w1.panZoomEnabled}}             (leaf property)
{{w1.selection.indices}}          (array)
{{w1.selection.xMax}}             (leaf property)
{{w1.selection.xMin}}             (leaf property)
{{w1.selection.xValues}}          (array)
{{w1.selection.yMax}}             (leaf property)
{{w1.selection.yMin}}             (leaf property)
{{w1.selection.yValues}}          (array)
{{w1.tooltipsEnabled}}            (leaf property)
{{w1.xAxes}}                      (array)
{{w1.yAxes}}                      (array)
{{w1.yAxes.[0]}}                  (subproperty inside array)


{{w1}}                            (not accessible, not leaf)
{{w1.selection}}                  (not accessible, not leaf)
Where can Handlebars be used?
Queries editor
Handlebars templates in the Queries editor are always replaced with a string values. If the template does not evaluate to a string, then the value is first converted to a string. This is because the query itself is always a string. For example:
SELECT {{column w8.selectedValues}} FROM allNamed WHERE name = {{param w12.selection.xValues}};
:::callout{theme="neutral"}
Non-string values are converted with the toString method. This generally works fine for integers and booleans but could produce unexpected output on more complex objects. For example, running toString on an object evaluates to [object Object], which is probably not what you want. You can use helpers like {{jsonStringify myObject}} to get around this.
:::
Functions editor
Unlike Queries, Handlebars templates in the Functions editor are always replaced with their evaluated value. For example:
var a = {{query1}};  // query1 is an object
var b = a.results[0];  // You can access its properties.
Helper functions cannot be used in the Functions editor, you must reference Slate objects directly. Also, you cannot set variables or property values because you cannot change any state outside of the function. For example:
var c = {{jsonStringify query1}}; //invalid - cannot use helpers
{{var1}} = [1,2,3];  // invalid - cannot set global variables
Widget properties editor
You can use handlebars in a widget’s properties editor when the application is in Edit mode. In widgets, Handlebars templates must always be enclosed in double quotes "" because curly braces are not valid JSON syntax.
{
  "property1": "{{variable1}}",
  "property2": "Hello, my name is {{var1}}",
  "property3": [1, 2, "{{var3}}"],
  "property4": {{variable1}}  //Invalid: JSON parse error
}
In general, templates in widgets are replaced with strings. If the evaluated value is not a string, then Slate will run toString on the value. There are a few exceptions to this rule. Slate directly replaces the template with the evaluated value when the following conditions are true:
- There is only one set of brackets
{{}}AND - There are no other characters (including white spaces) outside of the brackets.
Let’s look at a few examples:
{
  // value replacement examples
  "property1": "{{var1}}",
  "property2": "{{ var1 }}",  // whitespace is inside the handlebars
  "property3": "{{ add 2 (add 1 var1) }}",  // helpers, can be nested
  "property4": ["{{var1}}", "{{w1.property.[0]}"],

  // string replacement examples
  "property5": "Hello {{var1}}!",
  "property6": " {{var1}} ",  // whitespace outside of brackets
  "property7": "{{#if 0}}3{{else}}4{{/if}}"  // more than one set of brackets
}
Where can Handlebars NOT be used?
- Handlebars cannot be used in the Variables editor.
- Handlebars cannot be used in the Styles editor.
- Handlebars cannot be used in the view mode of an application. If you enter handlebars into a widget or text field, the expression is neither evaluated nor substituted.
Tutorial: Link widgets
The following tutorial will teach you how to create a button that gives a user the option to learn more about an aircraft for a specific flight. This requires us to create a link between two widgets.
To link widgets, you must know the name of the widget and the property that you want to link. In our case, we want to get the tail_num value for the selected row in our original table, but we configured the selection in the table to use the flight_id as the primary key.
This is an ideal time to use another helper function. As getting column values for a selected table row is a common pattern, we can use a function to implement this:
function getRowData(s){
    var returnObj = {};
    var index = data[selectionColumn].indexOf(s);

    //this iterates through each array in the object data
    //value is the actual array, and key is the key for that array
    _.forOwn(data, function(value, key){
        returnObj[key] = value[index];
    });

    return returnObj;
}

// The same data as is fed into the table
var data = {{f_data}};

// The current selection in the table
var selection = {{w_mainTable.selectedRowKeys}};

// The column configured as the table primary key
var selectionColumn = {{w_mainTable.selectionIdentityColumnId}}

var rowData = _.map(selection, getRowData);

return rowData;
Add a new function called f_selectedRowValues to the code above. Change the Handlebar template for the value of var data to point to {{q_allFlights}} and the selectionColumn and selection variables to point to our w_flightTable.
To understand what selectedRowKeys is, look back at the code for the table widget. We set "selectionIdentityColumnId" to "flight_id". This means that the column flight_id is used as the unique key for a given row. Once the user selects a row in the table, that unique key (the flight ID number) is added to selectedRowKeys.
selectedRowKeys is a property of table widgets that can only be modified by user interaction. When editing a widget, you can see read-only values of user-interaction properties below the JSON editor.
Now, we can make a selection in the table by selecting Test to verify the function behavior.
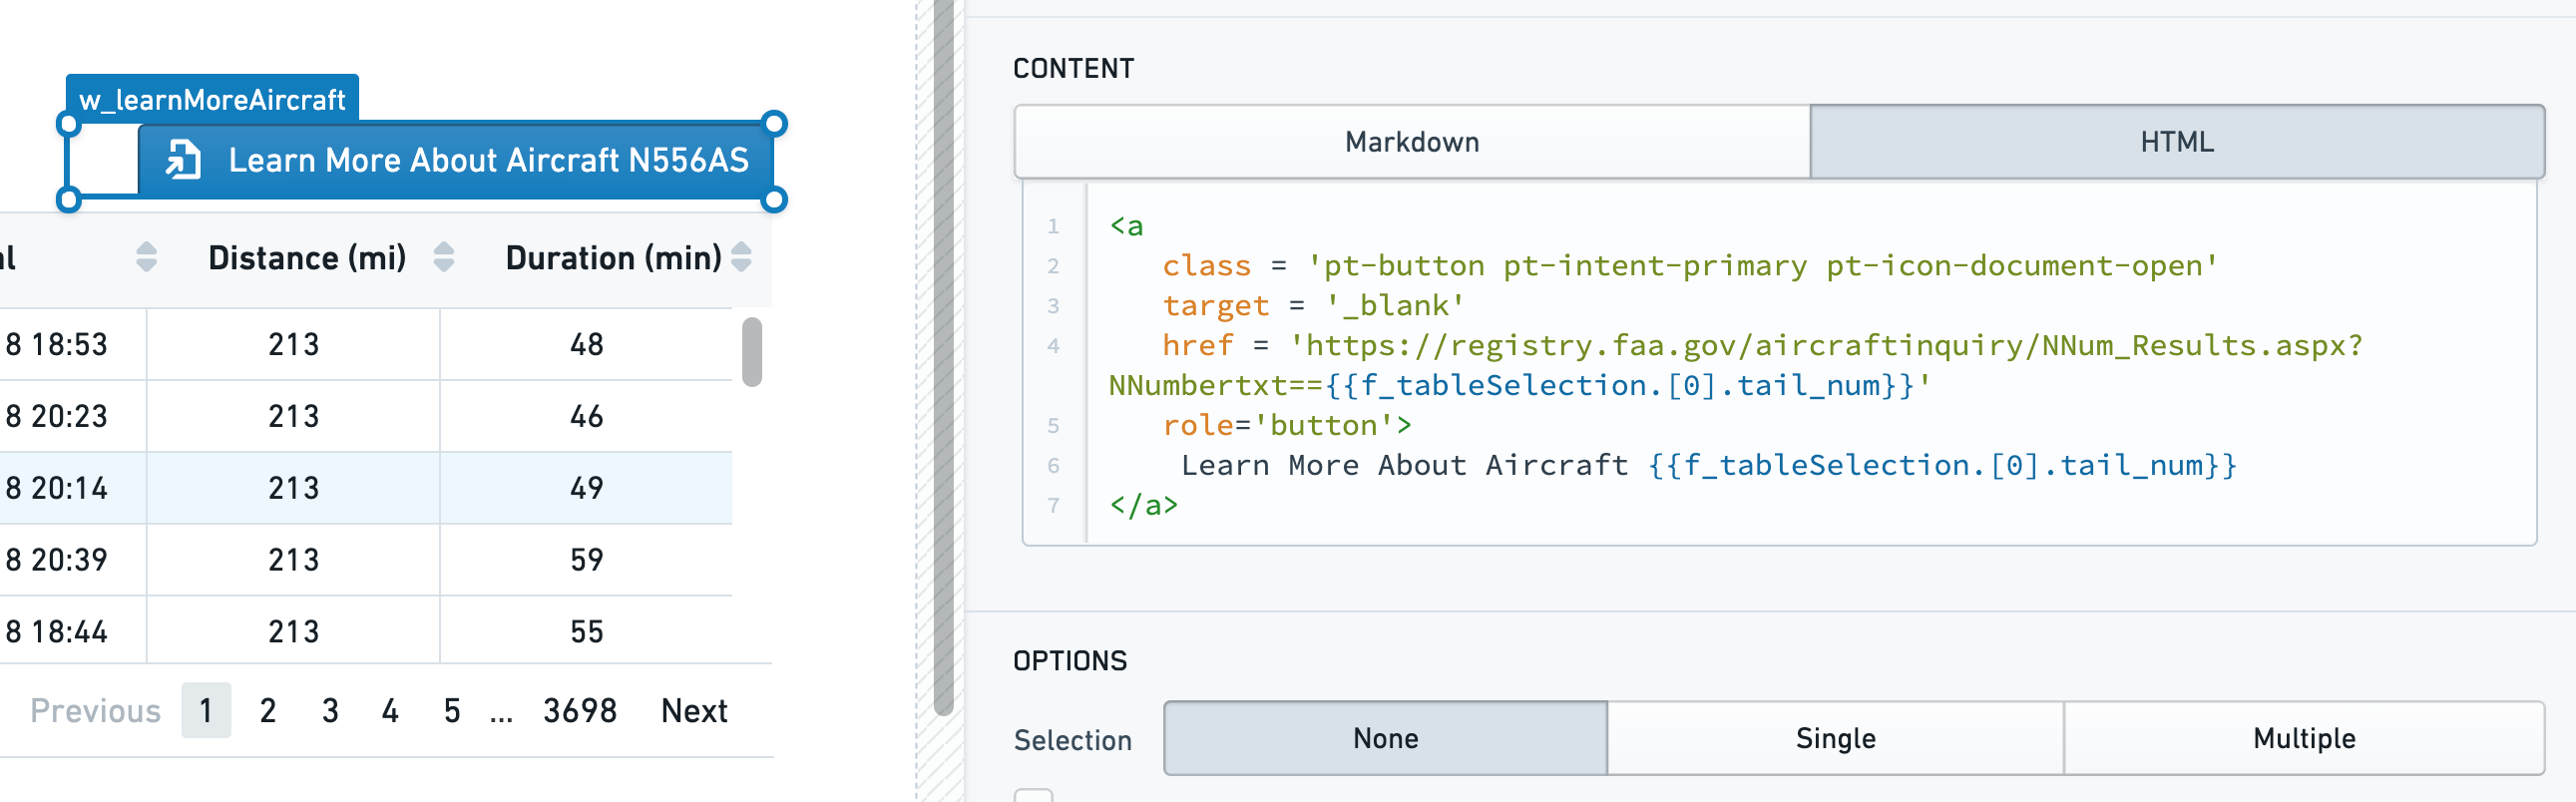
With our selection function configured, we can add a Text widget, name it w_linkingButton and move it above the table. In the property editor for the widget, switch to the HTML tab under Content and enter the following:
<a
     class = 'pt-button pt-intent-primary pt-icon-document-open'
     target = '_blank'
     href = 'https://registry.faa.gov/AircraftInquiry/Search/NNumberResult?nNumberTxt={{f_selectedRowValues.[0].tail_num}}'
     role='button'>
        Learn More About Aircraft {{f_selectedRowValues.[0].tail_num}}
</a>
The code above has two functionalities. Adding pt-button gives the widget the appearance of a button, and adding pt-intent-primary turns the background blue. Adding "pt-icon-document-open" adds a Blueprint icon to the button. You can review the full list of icons from the Blueprint documentation ↗.
Next, we build a link by adding user input to a base URL. Then, we set the display text.
Additionally, we can add a snippet of styling to right-justify the widget for easier alignment:
sl-text {text-align: right}
Both the text and the link rely on the selection function configured above: {{f_selectedRowValues.[0].tail_num}}. f_selectedRowValues refers to the function that is reading from the table selection that we created earlier in the tutorial.
When nothing is selected, the text widget will indicate Learn More About Aircraft. Selecting it at this point would take you to a broken link.
Once a row in the table is selected, the button text updates to reflect the name of the selection; selecting the button takes you to the correct webpage.

Make sure to save your application, and select X from the top right corner to exit into View mode.

中文翻译
使用 Handlebars 访问值
Slate 在查询、函数和微件中使用 Handlebars ↗ 进行模板化。Handlebars 模板包裹在 {{ }} 中,可以访问 Slate 对象,如微件、变量以及查询/函数结果。例如,如果你有一个下拉微件 w1,可以使用模板 {{w1.selectedValue}} 访问选中的值。Slate 会自动评估模板并将其替换为评估后的值。
Handlebars 模板也可以调用辅助函数。更多信息,请参阅辅助函数。
哪些 Slate 对象可以被引用?
变量
你可以使用 {{variableName}} 访问在变量编辑器中定义的变量。例如,如果你有一个变量 var1 = {"a": [1,2,3]},那么模板 {{var1.a.[0]}} 会评估为 1。
你还可以访问 Slate 环境变量,包括当前应用程序用户或用户专用存储的信息。例如,使用模板 {{$global.user.firstName}} 将显示用户的名字。
查询
你可以访问查询结果。例如,{{myQuery}} 包含来自 SQL 或 HttpJson 查询的结果。还有一个隐藏的 _response 字段,包含一些元数据。
{"name": ["Ceres","Pallas"],"earthmoid": [1.59376,1.23071],"pha": [false,false],"datefirstobs": ["1830-04-18","1825-03-23"]"_response": {"hasRun": true,"message": "Unable to parse query.","success": false}}
函数
你可以通过将函数名称包裹在 Handlebars 中来访问函数的返回值。例如,{{myFunction}}。
微件属性
你可以访问某些微件属性。具体来说,模板可以访问叶子属性(包括数组及其子属性)。例如,假设我们有一个图表微件。
以下是微件原始 JSON 选项卡中列出的属性:
{"allowSelection": true,"animate": true,"datasets": [{"name": "dataset1","renderer": "bar","xValues": "{{yearToObsNum.name}}","yValues": "{{yearToObsNum.numofobs}}"}],"labelsEnabled": false,"panZoomEnabled": false,"selection": {"indices": [],"xMax": null,"xMin": null,"xValues": [],"yMax": null,"yMin": null,"yValues": []},"tooltipsEnabled": false,"xAxes": [{"gridlinesEnabled": false,"label": "first observed {{w9.selectedValue}}","name": "x1","position": "bottom","scale": "category"}],"yAxes": [{"gridlinesEnabled": false,"label": "Number of Observations","name": "y1","position": "left","scale": "linear"}]}
以下是你可以访问和不能访问的属性:
{{w1.allowSelection}}             (叶子属性)
{{w1.animate}}                    (叶子属性)
{{w1.datasets}}                   (数组)
{{w1.datasets.[0]}}               (数组内的子属性)
{{w1.datasets.[0].xValues}}       (数组内的数组子属性)
{{w1.datasets.[0].xValues.[0]}}   (数组内的子属性)
{{w1.labelsEnabled}}              (叶子属性)
{{w1.panZoomEnabled}}             (叶子属性)
{{w1.selection.indices}}          (数组)
{{w1.selection.xMax}}             (叶子属性)
{{w1.selection.xMin}}             (叶子属性)
{{w1.selection.xValues}}          (数组)
{{w1.selection.yMax}}             (叶子属性)
{{w1.selection.yMin}}             (叶子属性)
{{w1.selection.yValues}}          (数组)
{{w1.tooltipsEnabled}}            (叶子属性)
{{w1.xAxes}}                      (数组)
{{w1.yAxes}}                      (数组)
{{w1.yAxes.[0]}}                  (数组内的子属性)


{{w1}}                            (不可访问,非叶子)
{{w1.selection}}                  (不可访问,非叶子)
在哪里可以使用 Handlebars?
查询编辑器
查询编辑器中的 Handlebars 模板总是被替换为字符串值。如果模板评估结果不是字符串,则该值会先被转换为字符串。这是因为查询本身始终是一个字符串。例如:
SELECT {{column w8.selectedValues}} FROM allNamed WHERE name = {{param w12.selection.xValues}};
:::callout{theme="neutral"}
非字符串值会使用 toString 方法进行转换。这对于整数和布尔值通常没问题,但对于更复杂的对象可能会产生意外的输出。例如,对对象执行 toString 会评估为 [object Object],这很可能不是你想要的。你可以使用像 {{jsonStringify myObject}} 这样的辅助函数来解决这个问题。
:::
函数编辑器
与查询不同,函数编辑器中的 Handlebars 模板总是被替换为它们的评估值。例如:
var a = {{query1}};  // query1 是一个对象
var b = a.results[0];  // 你可以访问它的属性。
辅助函数不能在函数编辑器中使用,你必须直接引用 Slate 对象。此外,你不能设置变量或属性值,因为你无法更改函数外部的任何状态。例如:
var c = {{jsonStringify query1}}; //无效 - 不能使用辅助函数
{{var1}} = [1,2,3];  // 无效 - 不能设置全局变量
微件属性编辑器
当应用程序处于编辑模式时,你可以在微件的属性编辑器中使用 Handlebars。在微件中,Handlebars 模板必须始终用双引号 "" 括起来,因为花括号不是有效的 JSON 语法。
{
  "property1": "{{variable1}}",
  "property2": "Hello, my name is {{var1}}",
  "property3": [1, 2, "{{var3}}"],
  "property4": {{variable1}}  //无效:JSON 解析错误
}
一般来说,微件中的模板会被替换为字符串。如果评估值不是字符串,Slate 会对该值执行 toString。这条规则有几个例外。当以下条件同时满足时,Slate 会直接将模板替换为评估值:
- 只有一组括号
{{}}并且 - 括号外没有其他字符(包括空格)。
让我们看几个例子:
{
  // 值替换示例
  "property1": "{{var1}}",
  "property2": "{{ var1 }}",  // 空格在 Handlebars 内部
  "property3": "{{ add 2 (add 1 var1) }}",  // 辅助函数,可以嵌套
  "property4": ["{{var1}}", "{{w1.property.[0]}}"],

  // 字符串替换示例
  "property5": "Hello {{var1}}!",
  "property6": " {{var1}} ",  // 空格在括号外部
  "property7": "{{#if 0}}3{{else}}4{{/if}}"  // 多于一组括号
}
在哪里不能使用 Handlebars?
- Handlebars 不能在变量编辑器中使用。
- Handlebars 不能在样式编辑器中使用。
- Handlebars 不能在应用程序的查看模式下使用。如果你在微件或文本字段中输入 Handlebars,表达式既不会被评估也不会被替换。
教程:链接微件
以下教程将教你如何创建一个按钮,让用户可以选择了解特定航班的飞机信息。这需要我们在两个微件之间创建链接。
要链接微件,你必须知道微件的名称以及你想要链接的属性。在我们的案例中,我们想要获取原始表格中选中行的 tail_num 值,但我们配置表格的选择使用 flight_id 作为主键。
这是使用另一个辅助函数的好时机。由于获取选中表格行的列值是一种常见模式,我们可以使用一个函数来实现:
function getRowData(s){
    var returnObj = {};
    var index = data[selectionColumn].indexOf(s);

    // 遍历对象数据中的每个数组
    // value 是实际的数组,key 是该数组的键
    _.forOwn(data, function(value, key){
        returnObj[key] = value[index];
    });

    return returnObj;
}

// 与输入到表格中的数据相同
var data = {{f_data}};

// 表格中的当前选择
var selection = {{w_mainTable.selectedRowKeys}};

// 配置为表格主键的列
var selectionColumn = {{w_mainTable.selectionIdentityColumnId}}

var rowData = _.map(selection, getRowData);

return rowData;
添加一个名为 f_selectedRowValues 的新函数到上述代码中。将 var data 的 Handlebar 模板改为指向 {{q_allFlights}},并将 selectionColumn 和 selection 变量改为指向我们的 w_flightTable。
要理解 selectedRowKeys 是什么,请回顾表格微件的代码。我们将 "selectionIdentityColumnId" 设置为 "flight_id"。这意味着 flight_id 列被用作给定行的唯一键。一旦用户在表格中选择了一行,该唯一键(航班 ID 号)就会被添加到 selectedRowKeys 中。
selectedRowKeys 是表格微件的一个属性,只能通过用户交互来修改。编辑微件时,你可以在 JSON 编辑器下方看到用户交互属性的只读值。
现在,我们可以通过选择测试来在表格中进行选择,以验证函数行为。
配置好选择函数后,我们可以添加一个文本微件,将其命名为 w_linkingButton 并移动到表格上方。在微件的属性编辑器中,切换到内容下的 HTML 选项卡,并输入以下内容:
<a
     class = 'pt-button pt-intent-primary pt-icon-document-open'
     target = '_blank'
     href = 'https://registry.faa.gov/AircraftInquiry/Search/NNumberResult?nNumberTxt={{f_selectedRowValues.[0].tail_num}}'
     role='button'>
        了解更多关于飞机 {{f_selectedRowValues.[0].tail_num}} 的信息
</a>
上述代码有两个功能。添加 pt-button 使微件呈现按钮外观,添加 pt-intent-primary 将背景变为蓝色。添加 pt-icon-document-open 会在按钮上添加一个 Blueprint 图标。你可以从 Blueprint 文档 ↗ 查看完整的图标列表。
接下来,我们通过将用户输入添加到基础 URL 来构建一个链接。然后,我们设置显示文本。
此外,我们可以添加一段样式代码,将微件右对齐以便于对齐:
sl-text {text-align: right}
文本和链接都依赖于上面配置的选择函数:{{f_selectedRowValues.[0].tail_num}}。f_selectedRowValues 指的是从我们在本教程前面创建的表格选择中读取数据的函数。
当没有选择任何内容时,文本微件将显示了解更多关于飞机。此时点击它会跳转到无效链接。
一旦在表格中选择了一行,按钮文本会更新以反映选择的内容;点击按钮会跳转到正确的网页。
确保保存你的应用程序,然后从右上角选择 X 退出到查看模式。