Drag and drop between Ontology SDK applications(在 Ontology SDK 应用之间拖放)
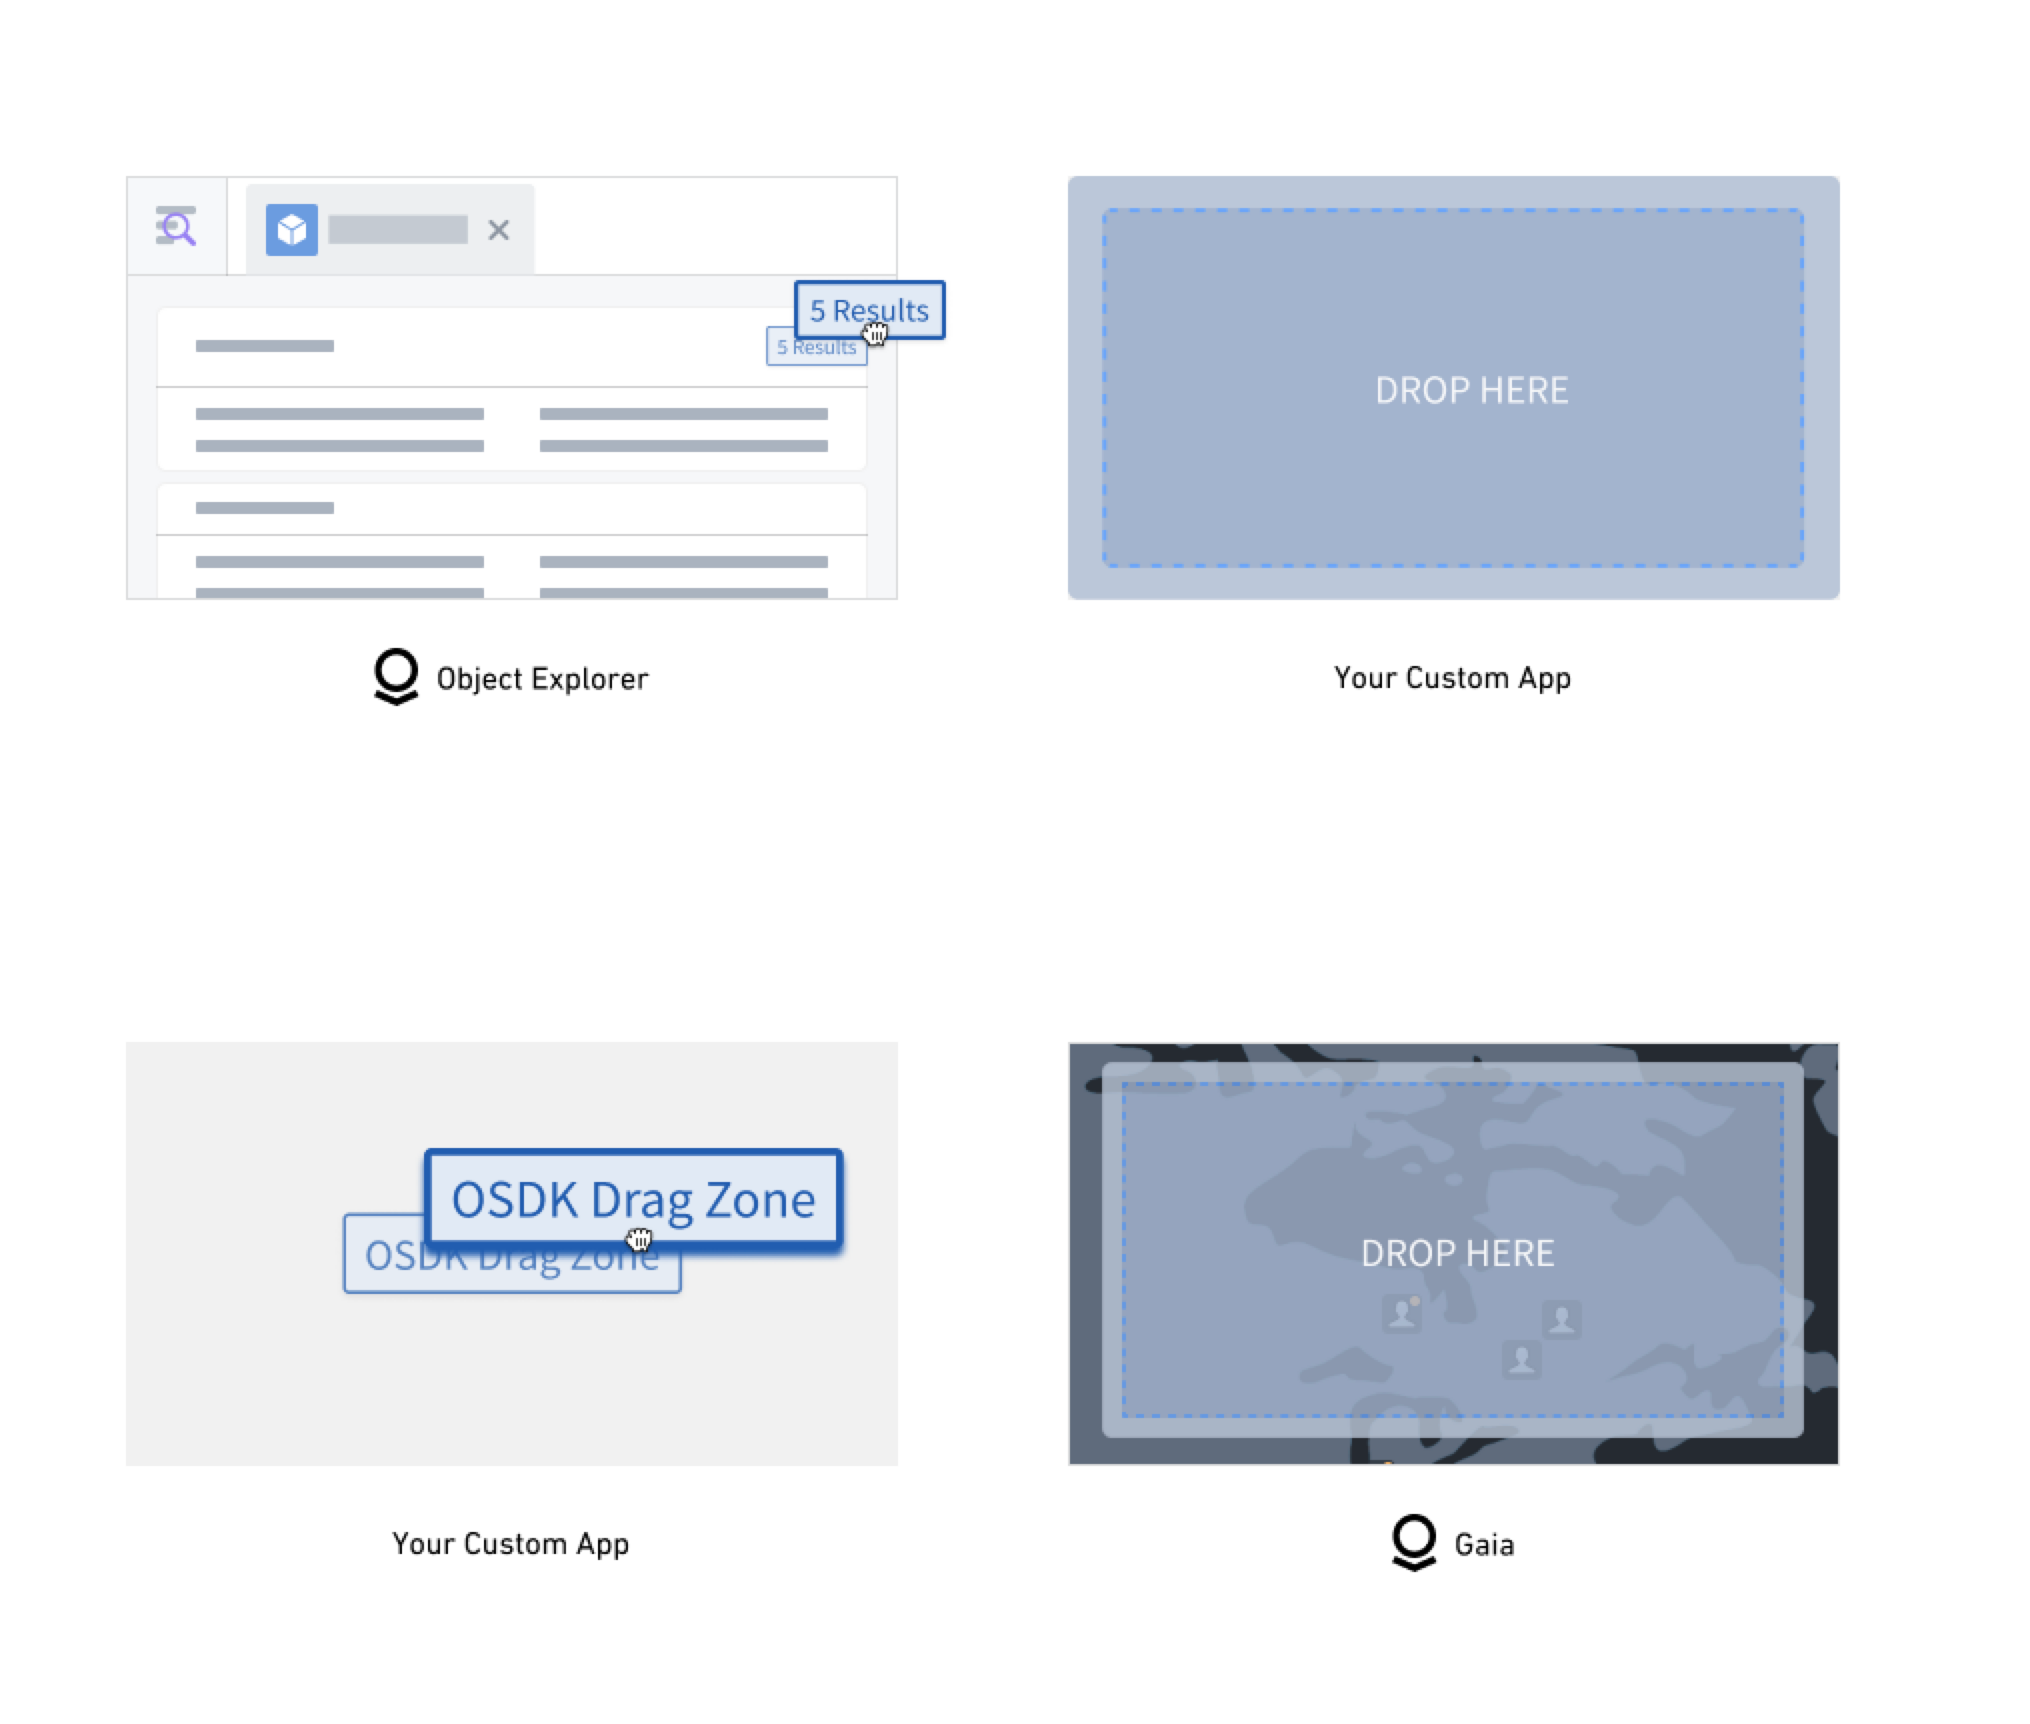
Palantir provides a React ↗ library you can integrate with the Ontology SDK (OSDK), enabling you to create and implement drag and drop functionality between custom applications. The @palantir/dnd-osdk-react library provides type-safe components and hooks you can use to configure drag and drop zones to transfer objects and object sets between different parts of your application and other Palantir platform applications, such as Workshop, Object Explorer, or Gaia.
Core library features and key concepts
- OSDK integration: Built specifically for Palantir's OSDK with automatic object set hydration and metadata handling.
- Flexible data support and serialization: Accepts both OSDK objects and object sets as well as custom data types in the same drop zone. Additionally, the library serializes all object and object set data.
- Performance optimization: Uses deep comparison memoization to prevent unnecessary backend calls.
- Customizable visual feedback: Offers built-in, customizable support for styling drop zones based on drag state.
- Object type definition: You can define which object types your drag and drop zones accept.
- Object set conversion and transportation: All dropped objects are automatically converted to object sets for consistent handling across application boundaries.
- Client integration: The library requires that you generate an OSDK client to enable metadata fetching and object set operations.
Add the library to Code Workspaces
:::callout{theme="neutral"}
Contact Palantir Support if you are unable to locate the @palantir/dnd-osdk-react library in Code Workspaces.
:::
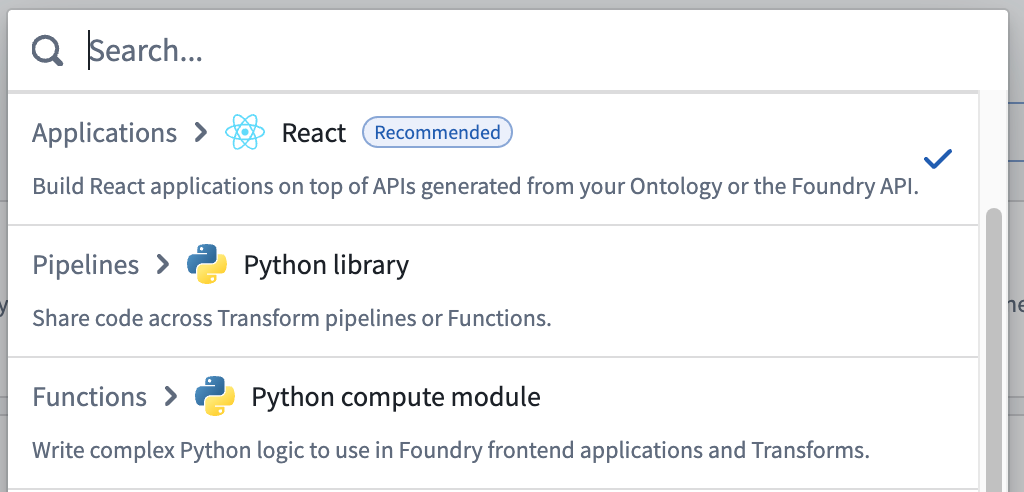
To begin building with the OSDK and the @palantir/dnd-osdk-react library, navigate to Code Workspaces and create a new VS Code workspace with React as the repository type.
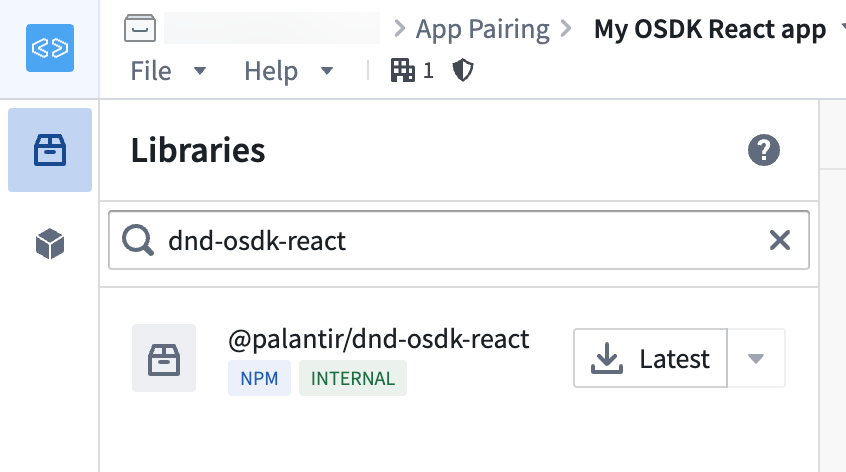
Search for and select the @palantir/dnd-osdk-react library from your workspace's Libraries panel.
Once you add the library to your workspace, you will be able to use its hooks and components to handle drag and drop workflows across custom OSDK and Palantir platform applications. Review the examples below to help you get started.
Example: Create a drag zone
Use the OsdkObjectDragZone component to render OSDK object data as draggable. When your application's users drag the content, then the associated object data is automatically included in the drag payload.
To create a drag zone with an object set, you can reference the code sample below which:
- Imports the specific object types from your generated OSDK, which you will use to construct object sets or singular objects for your drag zone.
- Uses a generated OSDK client to create object sets that represent queries or collections of objects. Alternatively, you can use previously fetched object instances.
- Places relevant JSX ↗ content inside the
OsdkObjectDragZonecomponent, ensuring the content is draggable. - Configures the
clientto reference a generated OSDK client and anobjectSetthat will be included in the drag payload.
import { MyObjectType } from "@my-osdk-lib/sdk"; // Import your object type
import { OsdkObjectDragZone } from "@palantir/dnd-osdk-react";
import client from "./client";
import { ObjectSet } from "@osdk/api";

// create an object set from MyObjectType
const objectSet = client(MyObjectType);

function ObjectSetDragExample() {
    return (
        <div>
            <OsdkObjectDragZone client={client} objectSets={objectSet}>
                <p>Drag me!</p>
            </OsdkObjectDragZone>
        </div>
    );
}

export default ObjectSetDragExample;
Example: Create a drop zone
Use the OsdkObjectDropZone component to render OSDK object data as droppable. When your application's users drop the content, then the component automatically handles object data deserialization and provides the dropped object data.
To create a drop zone with an object set, you can reference the code sample below which, like the drag example above, imports an object type and generated OSDK client.
import { MyObjectType } from "@my-osdk-lib/sdk"; // Import your object type
import { OsdkObjectDropZone } from "@palantir/dnd-osdk-react";
import client from "./client";
import { ObjectSet } from "@osdk/api";

// Restrict drop zone to only accept MyObjectType
const acceptedObjectTypes = [MyObjectType];

// Define actions that occur when objects are dropped
const handleObjectSetsDrop = React.useCallback<
  OnOsdkObjectSetsDrop<[MyObjectType]>
>(async (objectSetsByApiName) => {
  // Access dropped object sets by their API name
  const myObjectObjectSets = objectSetsByApiName.MyObjectType;
  ...
}, []);
Next, configure the drop zone component.
import styles from "./DropZoneExample.module.css";

<OsdkObjectDropZone
    client={client} // Your OSDK client instance
    acceptedObjectTypes={acceptedObjectTypes} // Defines which object types to accept
    onObjectSetsDrop={handleObjectSetsDrop} // Serves as a drop handler function
    className={styles.dropZone} // Sets drop zone base styling
    acceptedClassName={styles.dropZoneAccepted} // Sets drop zone styling when drag payload is accepted
>
    <p>Drop objects here!</p>
</OsdkObjectDropZone>;
The full example below creates a drop zone that accepts objects and object sets within the MyObjectType object type. When objects are dropped, the zone fetches the first 100 objects from the dropped object set and displays them in a list alongside a Clear button. The example uses the @blueprintjs/core library for all user interface components, such as the Clear button.
import {
    OnOsdkObjectSetsDrop,
    OsdkInstanceObjects,
    OsdkObjectDropZone,
} from "@palantir/dnd-osdk-react";
import { MyObjectType } from "@my-osdk-lib/sdk";
import React from "react";
import client from "./client";
import { Button, Card, CardList } from "@blueprintjs/core";
import styles from "./DropZoneExample.module.css";

// Accept only MyObjectTypes
const acceptedObjectTypes = [MyObjectType];

export function MyObjectTypeDropZoneExample() {
    const [loadedObjects, setLoadedObjects] = React.useState<
        OsdkInstanceObjects<[typeof MyObjectType]>
    >([]);

    const handleObjectSetsDrop = React.useCallback<
        OnOsdkObjectSetsDrop<[MyObjectType]>
    >(async (objectSetsByApiName) => {
        // Access dropped object sets by their API name
        const myCoolObjectObjectSets = objectSetsByApiName.MyObjectType;

        const firstObjectSet = myCoolObjectObjectSets?.[0];

        // If no object set was dropped, exit early
        if (firstObjectSet == null) {
            return;
        }

        // Fetch the first 100 objects from the dropped object set
        const objects = (
            await firstObjectSet.fetchPage({
                $pageSize: 100,
                $includeRid: true,
            })
        ).data;

        // Update state with the loaded objects
        setLoadedObjects(objects);
    }, []);

    const handleClear = React.useCallback(() => {
        // Clear the loaded objects when the clear button is clicked
        setLoadedObjects([]);
    }, []);

    return (
        <div>
            <h2>Drop Zone Example</h2>
            <div>
                <OsdkObjectDropZone
                    client={client} // OSDK client instance
                    className={styles.dropZone} // Base styling for the drop zone
                    acceptedClassName={styles.dropZoneAccepted} // Styling when drag payload is accepted
                    acceptedObjectTypes={acceptedObjectTypes} // Which object types to accept
                    onObjectSetsDrop={handleObjectSetsDrop} // Drop handler function
                >
                    <p>Drop MyObjectTypes here!</p>
                </OsdkObjectDropZone>

                <div>
                    {/* Conditionally render either a clear button or empty state message */}
                    {loadedObjects.length > 0 ? (
                        // If objects have been dropped and loaded, show a clear button with count
                        <Button onClick={handleClear} intent="primary">
                            Clear ({loadedObjects.length} objects)
                        </Button>
                    ) : (
                        // If no objects have been loaded yet, show instructional text
                        <div className={styles.emptyState}>
                            Dropped objects will appear here once you drop them
                            into the drop zone.
                        </div>
                    )}

                    {/* Render the list of dropped objects using Blueprint CardList */}
                    <CardList bordered={true}>
                        {loadedObjects.map((object) => (
                            <Card key={object.$rid} interactive={true}>
                                {/* Display the object's title using the $title property */}
                                <h4>{object.$title}</h4>
                            </Card>
                        ))}
                    </CardList>
                </div>
            </div>
        </div>
    );
}
Learn more about building custom OSDK React applications.
中文翻译
在 Ontology SDK 应用之间拖放
Palantir 提供了一个 React ↗ 库,可与 Ontology SDK (OSDK) 集成,使您能够在自定义应用之间创建和实现拖放功能。@palantir/dnd-osdk-react 库提供了类型安全的组件和钩子(Hooks),您可以使用它们配置拖放区域,以便在应用的不同部分与其他 Palantir 平台应用(如 Workshop、Object Explorer 或 Gaia)之间传输对象和对象集(Object Sets)。
核心库功能与关键概念
- OSDK 集成: 专为 Palantir 的 OSDK 构建,支持自动对象集填充和元数据处理。
- 灵活的数据支持与序列化: 在同一放置区域中同时接受 OSDK 对象和对象集以及自定义数据类型。此外,该库会对所有对象和对象集数据进行序列化。
- 性能优化: 使用深度比较记忆化(Deep Comparison Memoization)来避免不必要的后端调用。
- 可自定义的视觉反馈: 提供内置的可自定义支持,用于根据拖拽状态设置放置区域的样式。
- 对象类型定义: 您可以定义拖放区域接受的对象类型。
- 对象集转换与传输: 所有放置的对象会自动转换为对象集,以确保跨应用边界的一致处理。
- 客户端集成: 该库要求您生成一个 OSDK 客户端,以启用元数据获取和对象集操作。
将库添加到 Code Workspaces
:::callout{theme="neutral"}
如果您在 Code Workspaces 中找不到 @palantir/dnd-osdk-react 库,请联系 Palantir 支持。
:::
要开始使用 OSDK 和 @palantir/dnd-osdk-react 库进行开发,请导航至 Code Workspaces 并创建一个新的 VS Code 工作区,将 React 作为仓库类型。
在工作区的 Libraries 面板中搜索并选择 @palantir/dnd-osdk-react 库。
将库添加到工作区后,您将能够使用其钩子和组件来处理跨自定义 OSDK 和 Palantir 平台应用的拖放工作流。请参考下面的示例以帮助您入门。
示例:创建拖拽区域
使用 OsdkObjectDragZone 组件将 OSDK 对象数据渲染为可拖拽的。当应用用户拖拽内容时,相关的对象数据会自动包含在拖拽负载(Drag Payload)中。
要使用对象集创建拖拽区域,您可以参考以下代码示例,该示例:
- 从生成的 OSDK 中导入特定的对象类型,您将使用这些对象类型来构建拖拽区域的对象集或单个对象。
- 使用生成的 OSDK 客户端创建代表查询或对象集合的对象集。或者,您也可以使用之前获取的对象实例。
- 将相关的 JSX ↗ 内容放置在
OsdkObjectDragZone组件内部,确保内容可拖拽。 - 配置
client以引用生成的 OSDK 客户端,以及一个将包含在拖拽负载中的objectSet。
import { MyObjectType } from "@my-osdk-lib/sdk"; // 导入您的对象类型
import { OsdkObjectDragZone } from "@palantir/dnd-osdk-react";
import client from "./client";
import { ObjectSet } from "@osdk/api";

// 从 MyObjectType 创建一个对象集
const objectSet = client(MyObjectType);

function ObjectSetDragExample() {
    return (
        <div>
            <OsdkObjectDragZone client={client} objectSets={objectSet}>
                <p>拖拽我!</p>
            </OsdkObjectDragZone>
        </div>
    );
}

export default ObjectSetDragExample;
示例:创建放置区域
使用 OsdkObjectDropZone 组件将 OSDK 对象数据渲染为可放置的。当应用用户放置内容时,该组件会自动处理对象数据的反序列化并提供放置的对象数据。
要使用对象集创建放置区域,您可以参考下面的代码示例,该示例与上面的拖拽示例类似,导入了对象类型和生成的 OSDK 客户端。
import { MyObjectType } from "@my-osdk-lib/sdk"; // 导入您的对象类型
import { OsdkObjectDropZone } from "@palantir/dnd-osdk-react";
import client from "./client";
import { ObjectSet } from "@osdk/api";

// 将放置区域限制为仅接受 MyObjectType
const acceptedObjectTypes = [MyObjectType];

// 定义对象被放置时发生的操作
const handleObjectSetsDrop = React.useCallback<
  OnOsdkObjectSetsDrop<[MyObjectType]>
>(async (objectSetsByApiName) => {
  // 通过 API 名称访问放置的对象集
  const myObjectObjectSets = objectSetsByApiName.MyObjectType;
  ...
}, []);
接下来,配置放置区域组件。
import styles from "./DropZoneExample.module.css";

<OsdkObjectDropZone
    client={client} // 您的 OSDK 客户端实例
    acceptedObjectTypes={acceptedObjectTypes} // 定义要接受的对象类型
    onObjectSetsDrop={handleObjectSetsDrop} // 作为放置处理函数
    className={styles.dropZone} // 设置放置区域的基础样式
    acceptedClassName={styles.dropZoneAccepted} // 设置拖拽负载被接受时的放置区域样式
>
    <p>在此处放置对象!</p>
</OsdkObjectDropZone>;
下面的完整示例创建了一个放置区域,该区域接受 MyObjectType 对象类型内的对象和对象集。当对象被放置时,该区域会从放置的对象集中获取前 100 个对象,并将其与一个 清除 按钮一起显示在列表中。该示例使用 @blueprintjs/core 库来处理所有用户界面组件,例如 清除 按钮。
import {
    OnOsdkObjectSetsDrop,
    OsdkInstanceObjects,
    OsdkObjectDropZone,
} from "@palantir/dnd-osdk-react";
import { MyObjectType } from "@my-osdk-lib/sdk";
import React from "react";
import client from "./client";
import { Button, Card, CardList } from "@blueprintjs/core";
import styles from "./DropZoneExample.module.css";

// 仅接受 MyObjectTypes
const acceptedObjectTypes = [MyObjectType];

export function MyObjectTypeDropZoneExample() {
    const [loadedObjects, setLoadedObjects] = React.useState<
        OsdkInstanceObjects<[typeof MyObjectType]>
    >([]);

    const handleObjectSetsDrop = React.useCallback<
        OnOsdkObjectSetsDrop<[MyObjectType]>
    >(async (objectSetsByApiName) => {
        // 通过 API 名称访问放置的对象集
        const myCoolObjectObjectSets = objectSetsByApiName.MyObjectType;

        const firstObjectSet = myCoolObjectObjectSets?.[0];

        // 如果没有放置对象集,则提前退出
        if (firstObjectSet == null) {
            return;
        }

        // 从放置的对象集中获取前 100 个对象
        const objects = (
            await firstObjectSet.fetchPage({
                $pageSize: 100,
                $includeRid: true,
            })
        ).data;

        // 使用加载的对象更新状态
        setLoadedObjects(objects);
    }, []);

    const handleClear = React.useCallback(() => {
        // 点击清除按钮时清除已加载的对象
        setLoadedObjects([]);
    }, []);

    return (
        <div>
            <h2>放置区域示例</h2>
            <div>
                <OsdkObjectDropZone
                    client={client} // OSDK 客户端实例
                    className={styles.dropZone} // 放置区域的基础样式
                    acceptedClassName={styles.dropZoneAccepted} // 拖拽负载被接受时的样式
                    acceptedObjectTypes={acceptedObjectTypes} // 要接受的对象类型
                    onObjectSetsDrop={handleObjectSetsDrop} // 放置处理函数
                >
                    <p>在此处放置 MyObjectTypes!</p>
                </OsdkObjectDropZone>

                <div>
                    {/* 根据条件渲染清除按钮或空状态消息 */}
                    {loadedObjects.length > 0 ? (
                        // 如果已放置并加载了对象,显示带有计数的清除按钮
                        <Button onClick={handleClear} intent="primary">
                            清除 ({loadedObjects.length} 个对象)
                        </Button>
                    ) : (
                        // 如果尚未加载任何对象,显示说明文字
                        <div className={styles.emptyState}>
                            将对象放入放置区域后,放置的对象将显示在此处。
                        </div>
                    )}

                    {/* 使用 Blueprint CardList 渲染放置的对象列表 */}
                    <CardList bordered={true}>
                        {loadedObjects.map((object) => (
                            <Card key={object.$rid} interactive={true}>
                                {/* 使用 $title 属性显示对象的标题 */}
                                <h4>{object.$title}</h4>
                            </Card>
                        ))}
                    </CardList>
                </div>
            </div>
        </div>
    );
}