AIP Architect
AIP Architect brings LLM-powered capabilities to Solution Designer, enabling you to turn a set of workflow requirements into a step-by-step implementation plan for building a solution with the Palantir platform. You can use Solution Designer to explore options, plan workflows, and accelerate the building process with AIP Architect as an AI guide.
If you can provide AIP Architect with a description of what you want to accomplish with the platform - such as the problem, any constraints or requirements, or even thoughts on a desired solution or output - then AIP Architect will create an implementation plan for you in the form of a workflow graph. Drawing on a library of components and implementation patterns, an AIP Architect workflow graph describes the pieces of the workflow and how they fit together as a solution architecture, giving you a plan for how to build effectively in the platform.
Get started with AIP Architect
There are several ways to use AIP Architect as part of Solution Designer.
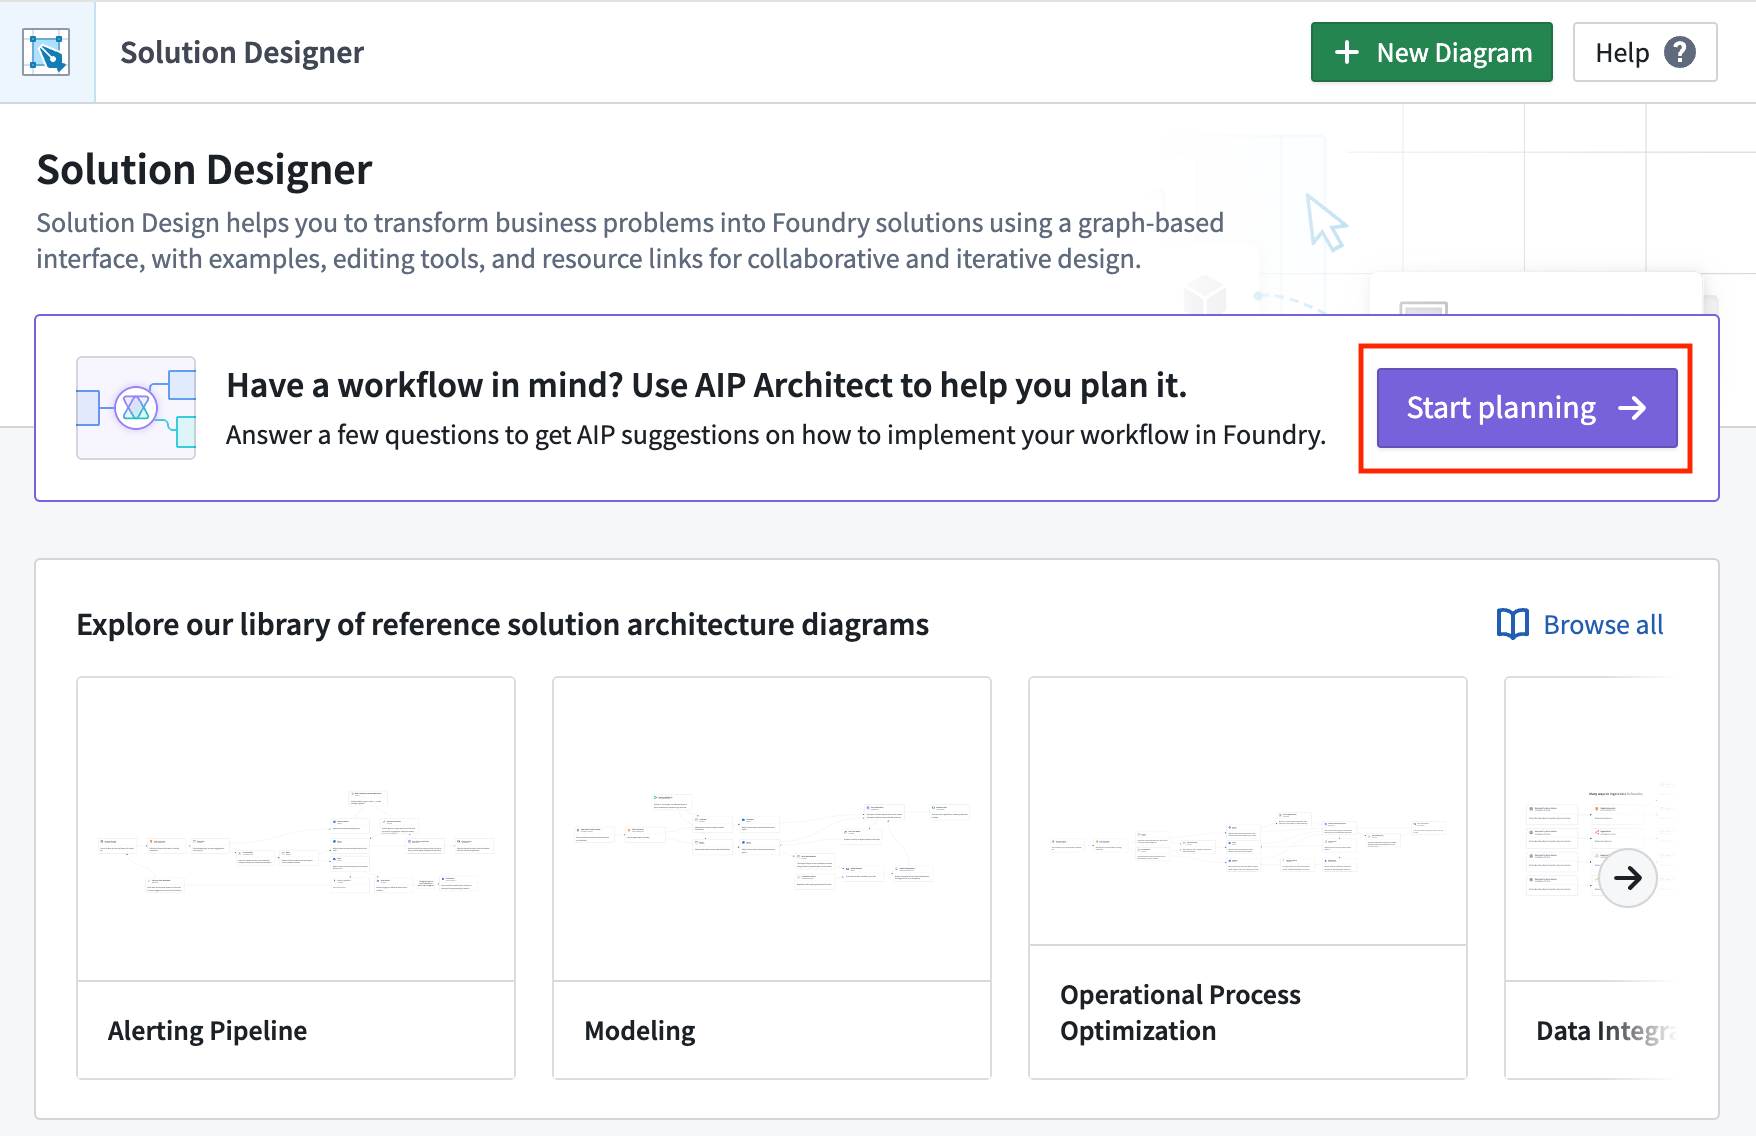
From the initial Solution Designer home page, you can select Start planning to open the AIP Architect wizard.
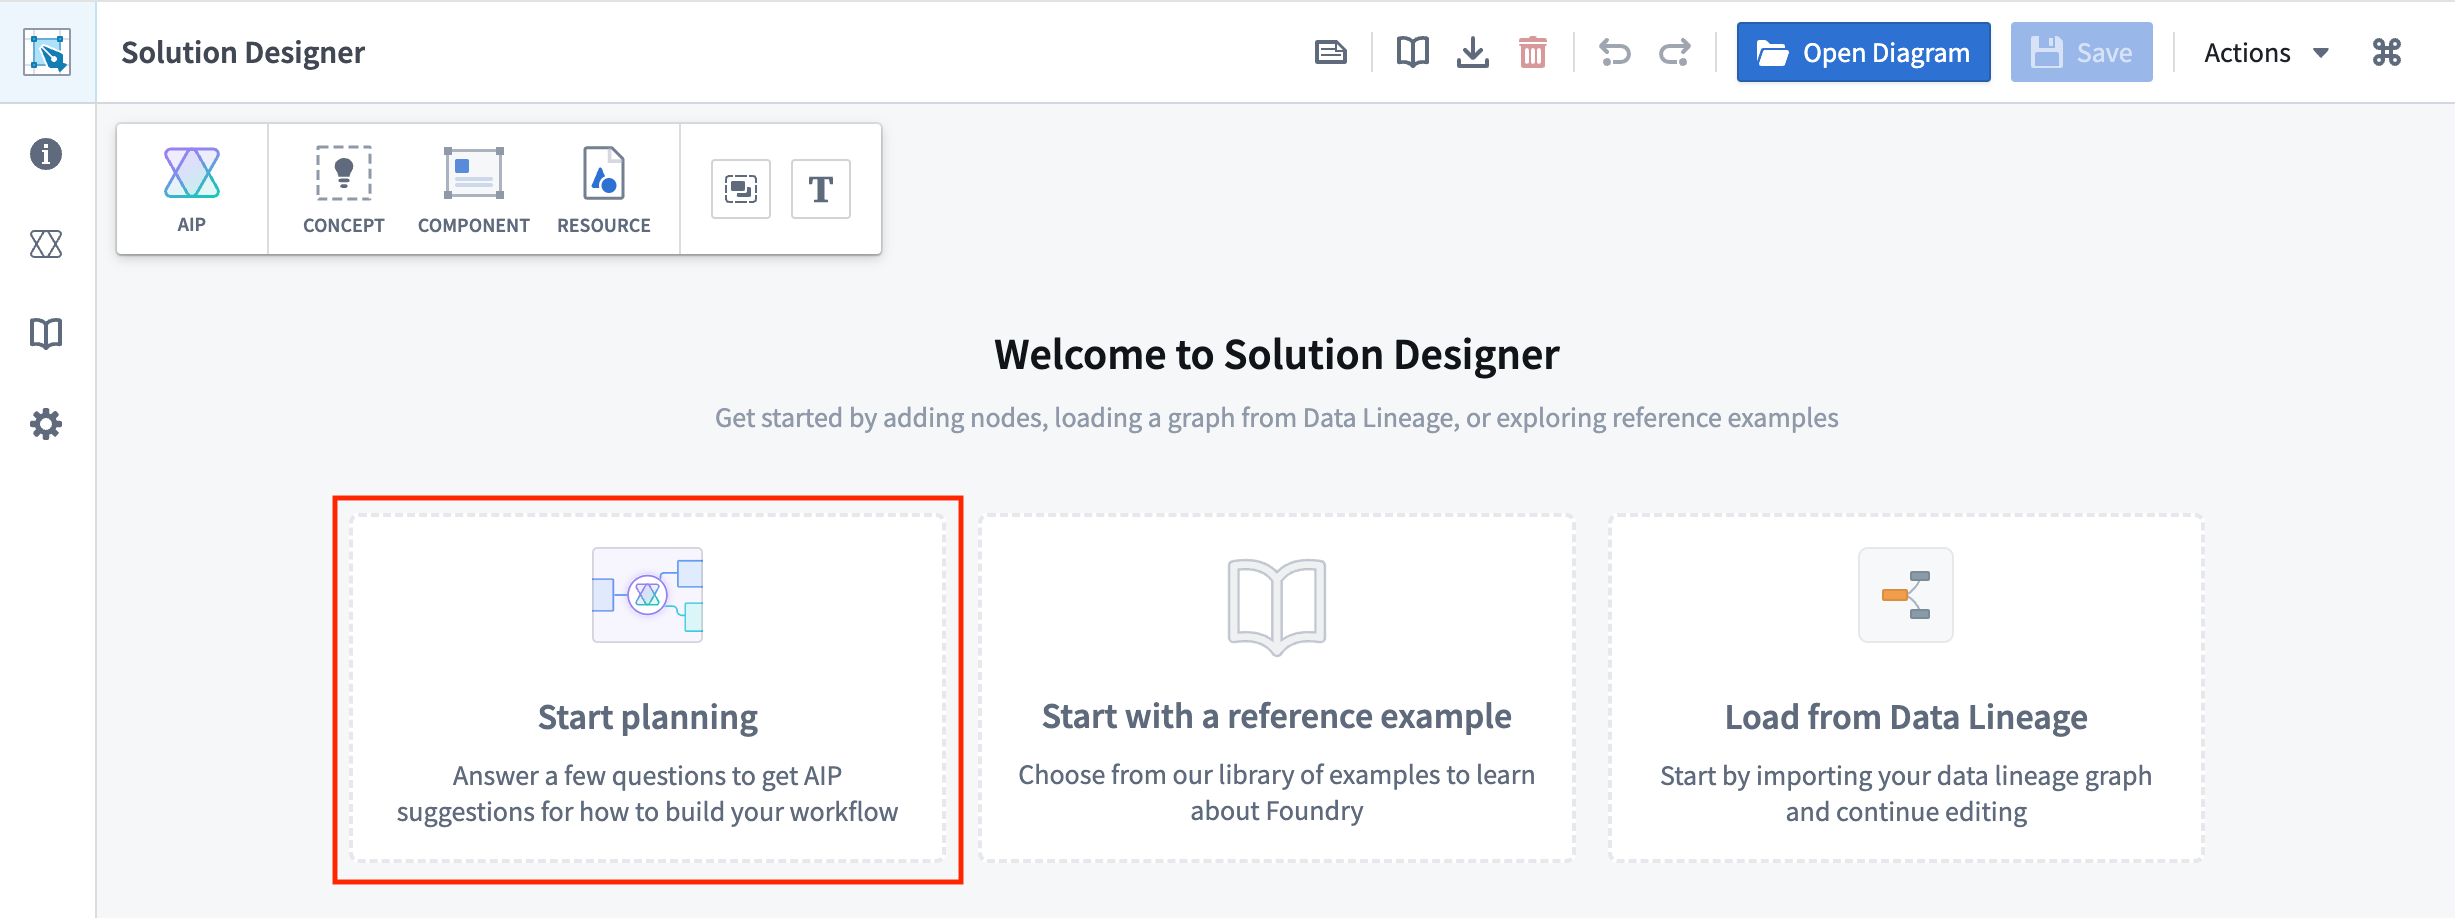
Or, from a new Solution Designer diagram, select Start planning to launch the AIP Architect wizard.
Alternatively, from an existing Solution Designer diagram, you can select the Concept icon in the top toolbar to add an AIP Architect concept node and use that as a starting point to auto-generate an implementation plan, skipping the AIP Architect wizard.
AIP Architect wizard
After opening the AIP Architect wizard, you will be guided through several prompts to provide information to AIP Architect, such as:
- What you are trying to build (that is, the end product or artifact)
- The source of data for this workflow
- How you'd like to build the workflow (specifically, how much code you would like to use)
Describe the end product or artifact for your workflow
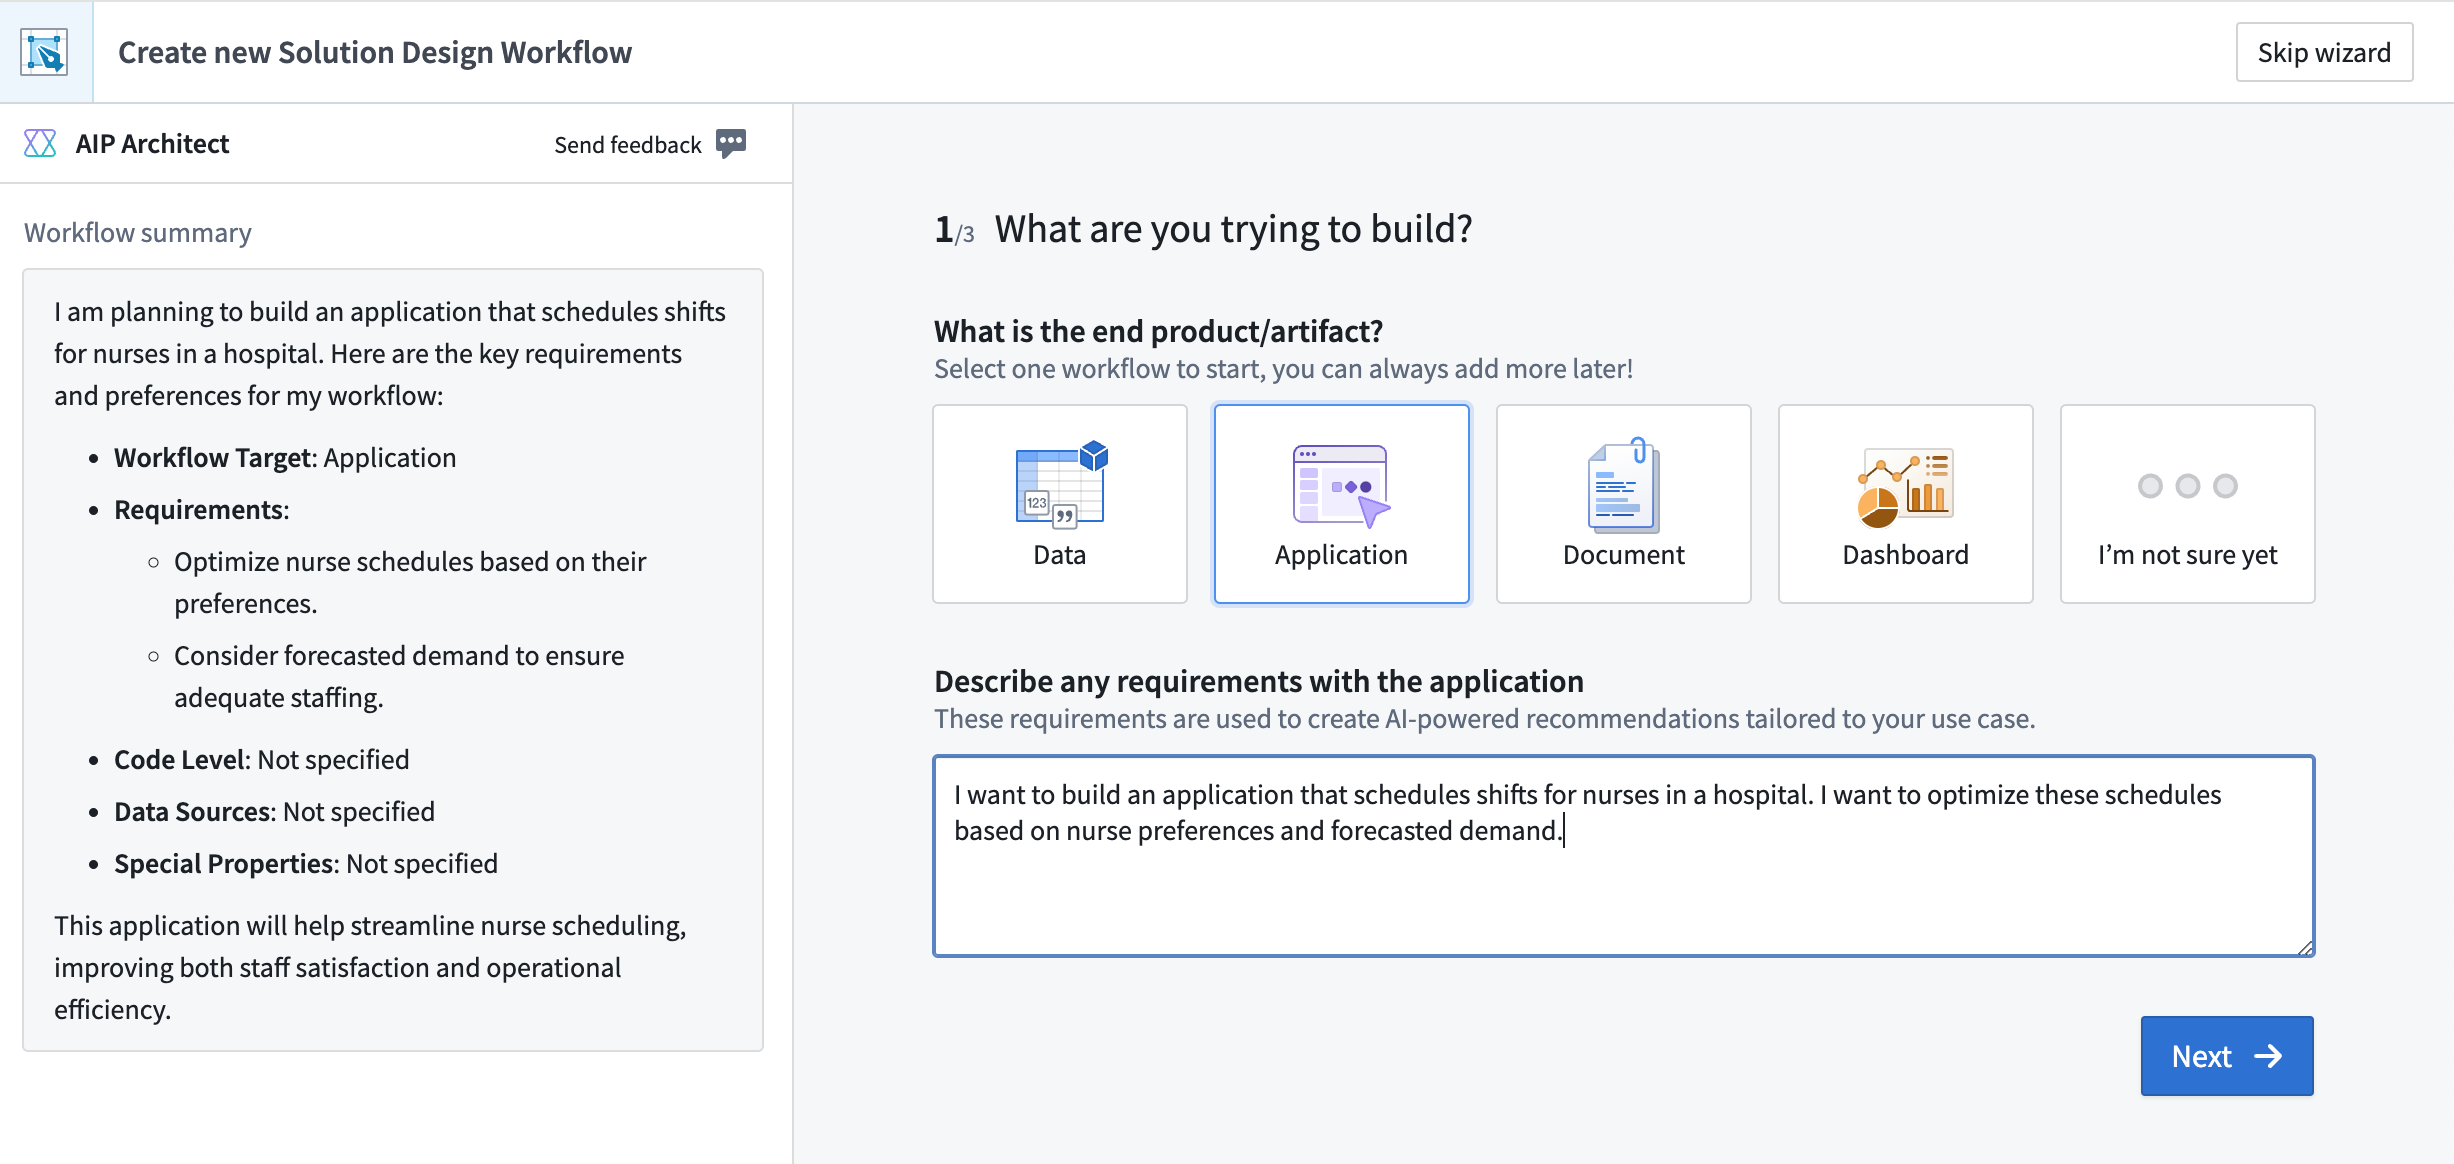
The first step in the AIP Architect wizard is to provide information about what you are trying to build. This could be a dataset, an application, a document, a dashboard, or something else.
After selecting the end product or artifact of your workflow, you will be prompted to describe any workflow requirements you might have; in this space, summarize the workflow that you have in mind.
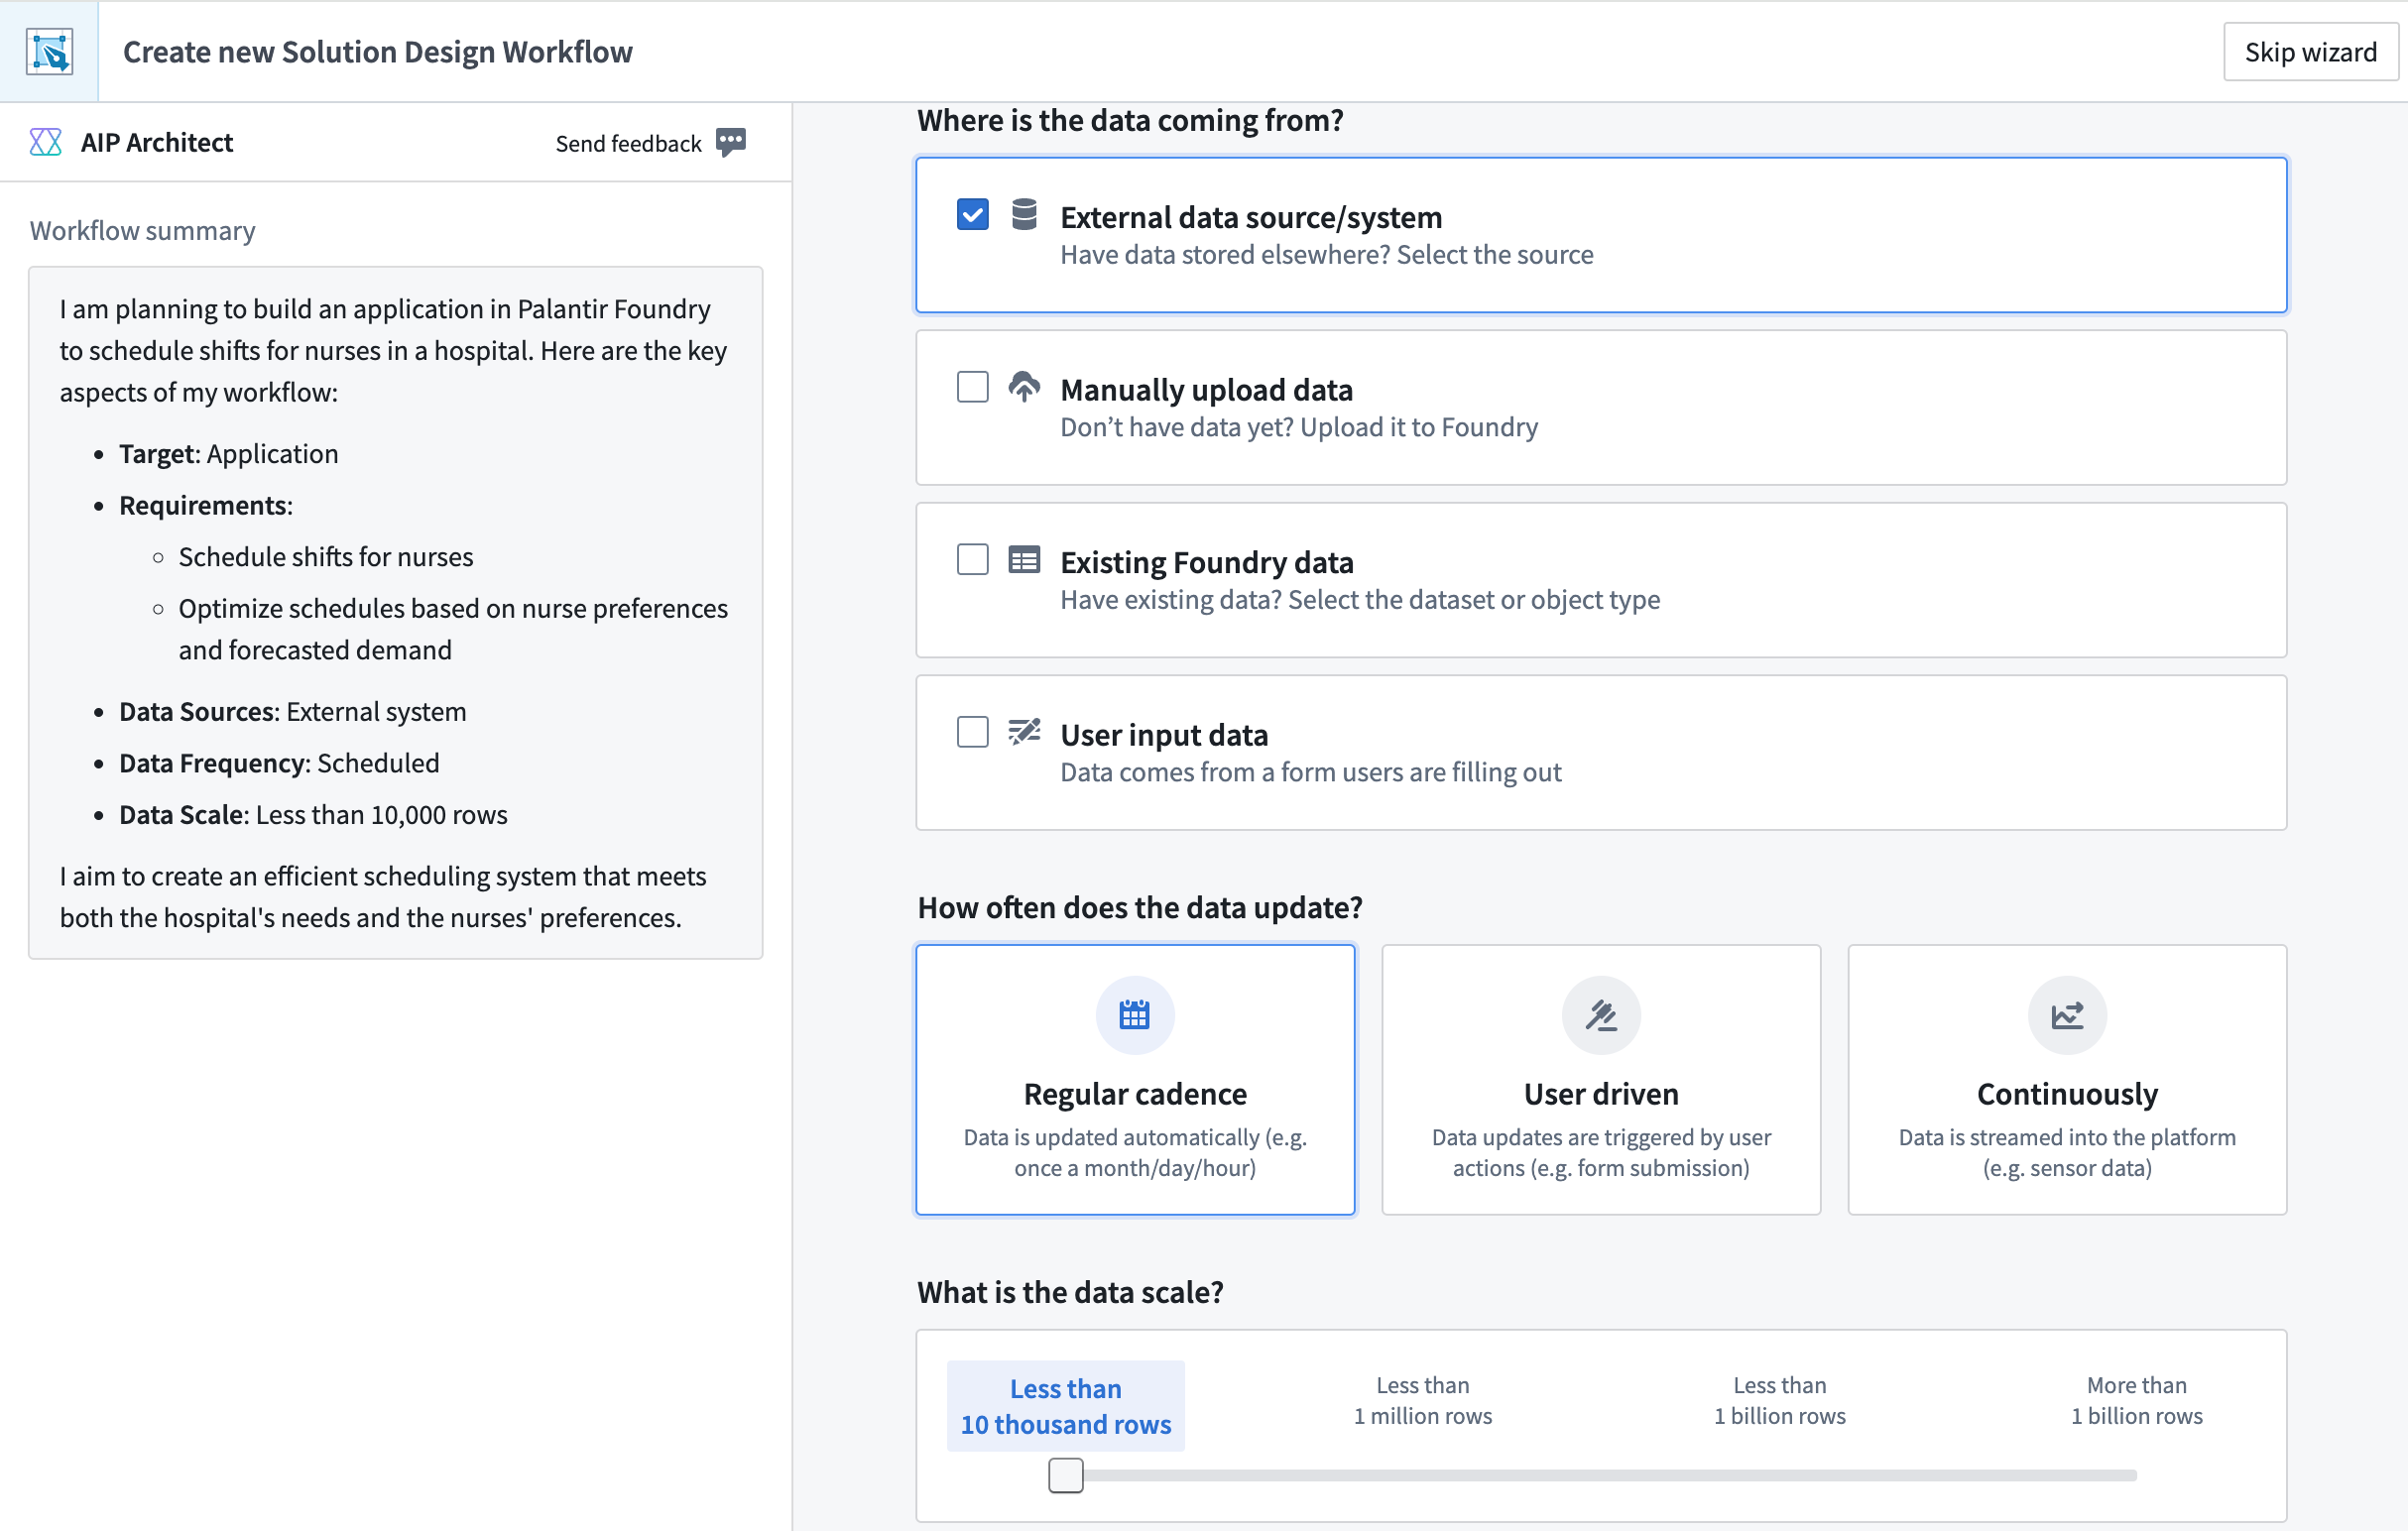
For example, assume you want to build an application to schedule nurse shifts in a hospital. The screenshot below shows the wizard after entering a prompt containing these workflow requirements.
:::callout{theme="neutral"} AIP Architect uses the workflow summary you provide to generate suggestions when constructing your solution design graph. You can modify your summary later in the process in order to update these suggestions. :::
Your workflow prompt could be something simple, as in the prompt used in the nurse shift scheduling example:
I want to build an application that schedules shifts for nurses in a hospital. I want to optimize these schedules based on nurse preferences and forecasted demand.
You can also provide a more detailed set of workflow requirements to AIP Architect, such as the following prompt:
I work at a manufacturing company and we need to generate demand forecasts across the entire SKU base. I need to determine the best strategy for each SKU, leveraging both internal data, such as historical sales and inventory, and external data, such as weather patterns.
Beyond just a forward-looking forecast, I also want to look at "what-if" simulations for relevant inputs. I want to use natural-language prompts, such as "what if the weather is colder than expected next month?" or "what if I increase prices by 10%?". Then, I want to orchestrate the parameter changes to perform the simulation.
Key Features:
- Live demand simulation: Leverage model outputs, such as coefficients of correlation or confidence intervals to provide executives and planners with an easy-to-use simulation cockpit.
- Business-user-focused interface: Help non-technical business experts drive model iteration and validation against real data using their business experience.
- Highly-configurable modeling: Implement forecasts that make sense for the business at a daily, weekly, monthly or yearly cadence across customers, SKUs and product lines.
Describe the source data for the workflow
After providing the initial workflow information to AIP Architect, the AIP Architect wizard will ask you about the data that will be powering this workflow. First, you will be prompted to select the source of the data for this workflow. Options include:
- External data source/system
- Manual upload
- Existing Foundry data
- User input data (for example, from a user-submitted form)
Then, you can provide information about how often the data is updated, the data scale, and any special properties about the data (whether the data is geospatial, time series, media, and so on). This information helps AIP Architect suggest the most appropriate platform applications to execute the workflow and deliver the desired outcome or output.
Describe how you want to build the workflow
Finally, AIP Architect asks how you would prefer to build your Workflow - the options here are "no code" (point-and-click), "low code" (writing basic functions), and "pro code" (working primarily in a code editor). Based on your response to this question, AIP Architect will select platform applications that fit the amount of code you want to use when building a workflow. After making your selection, select Generate workflow graph to create your workflow graph.
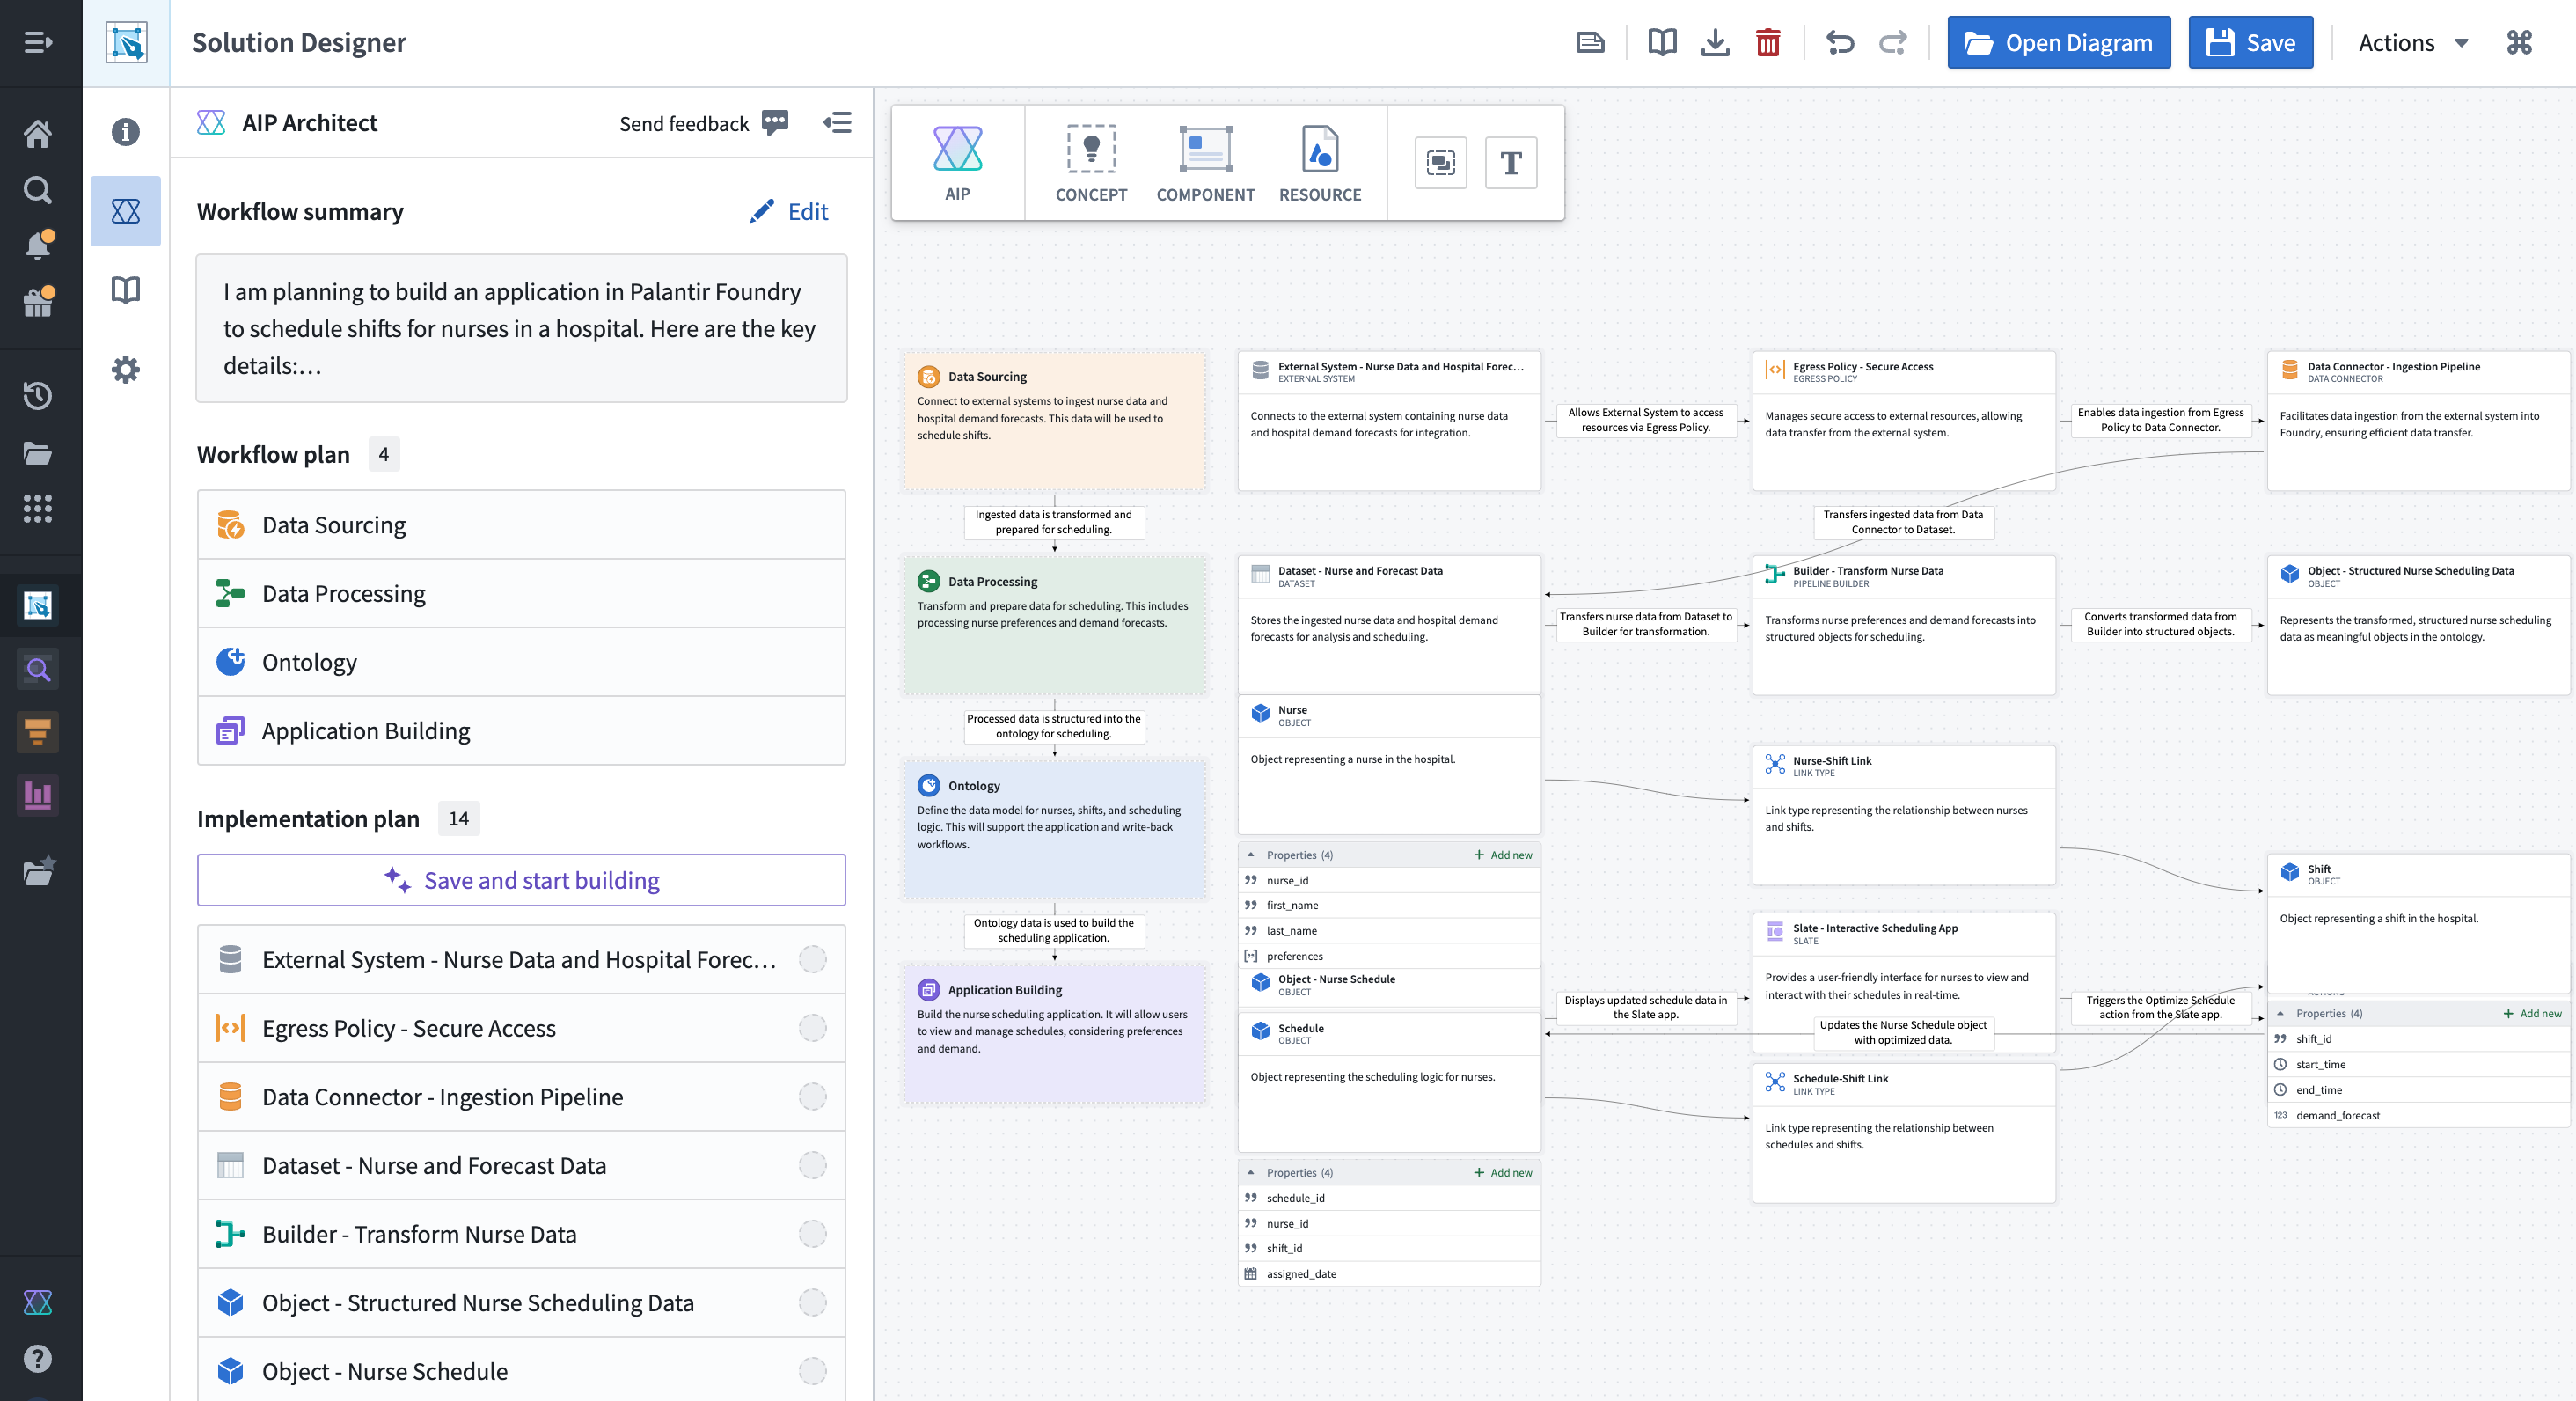
Plan your workflow
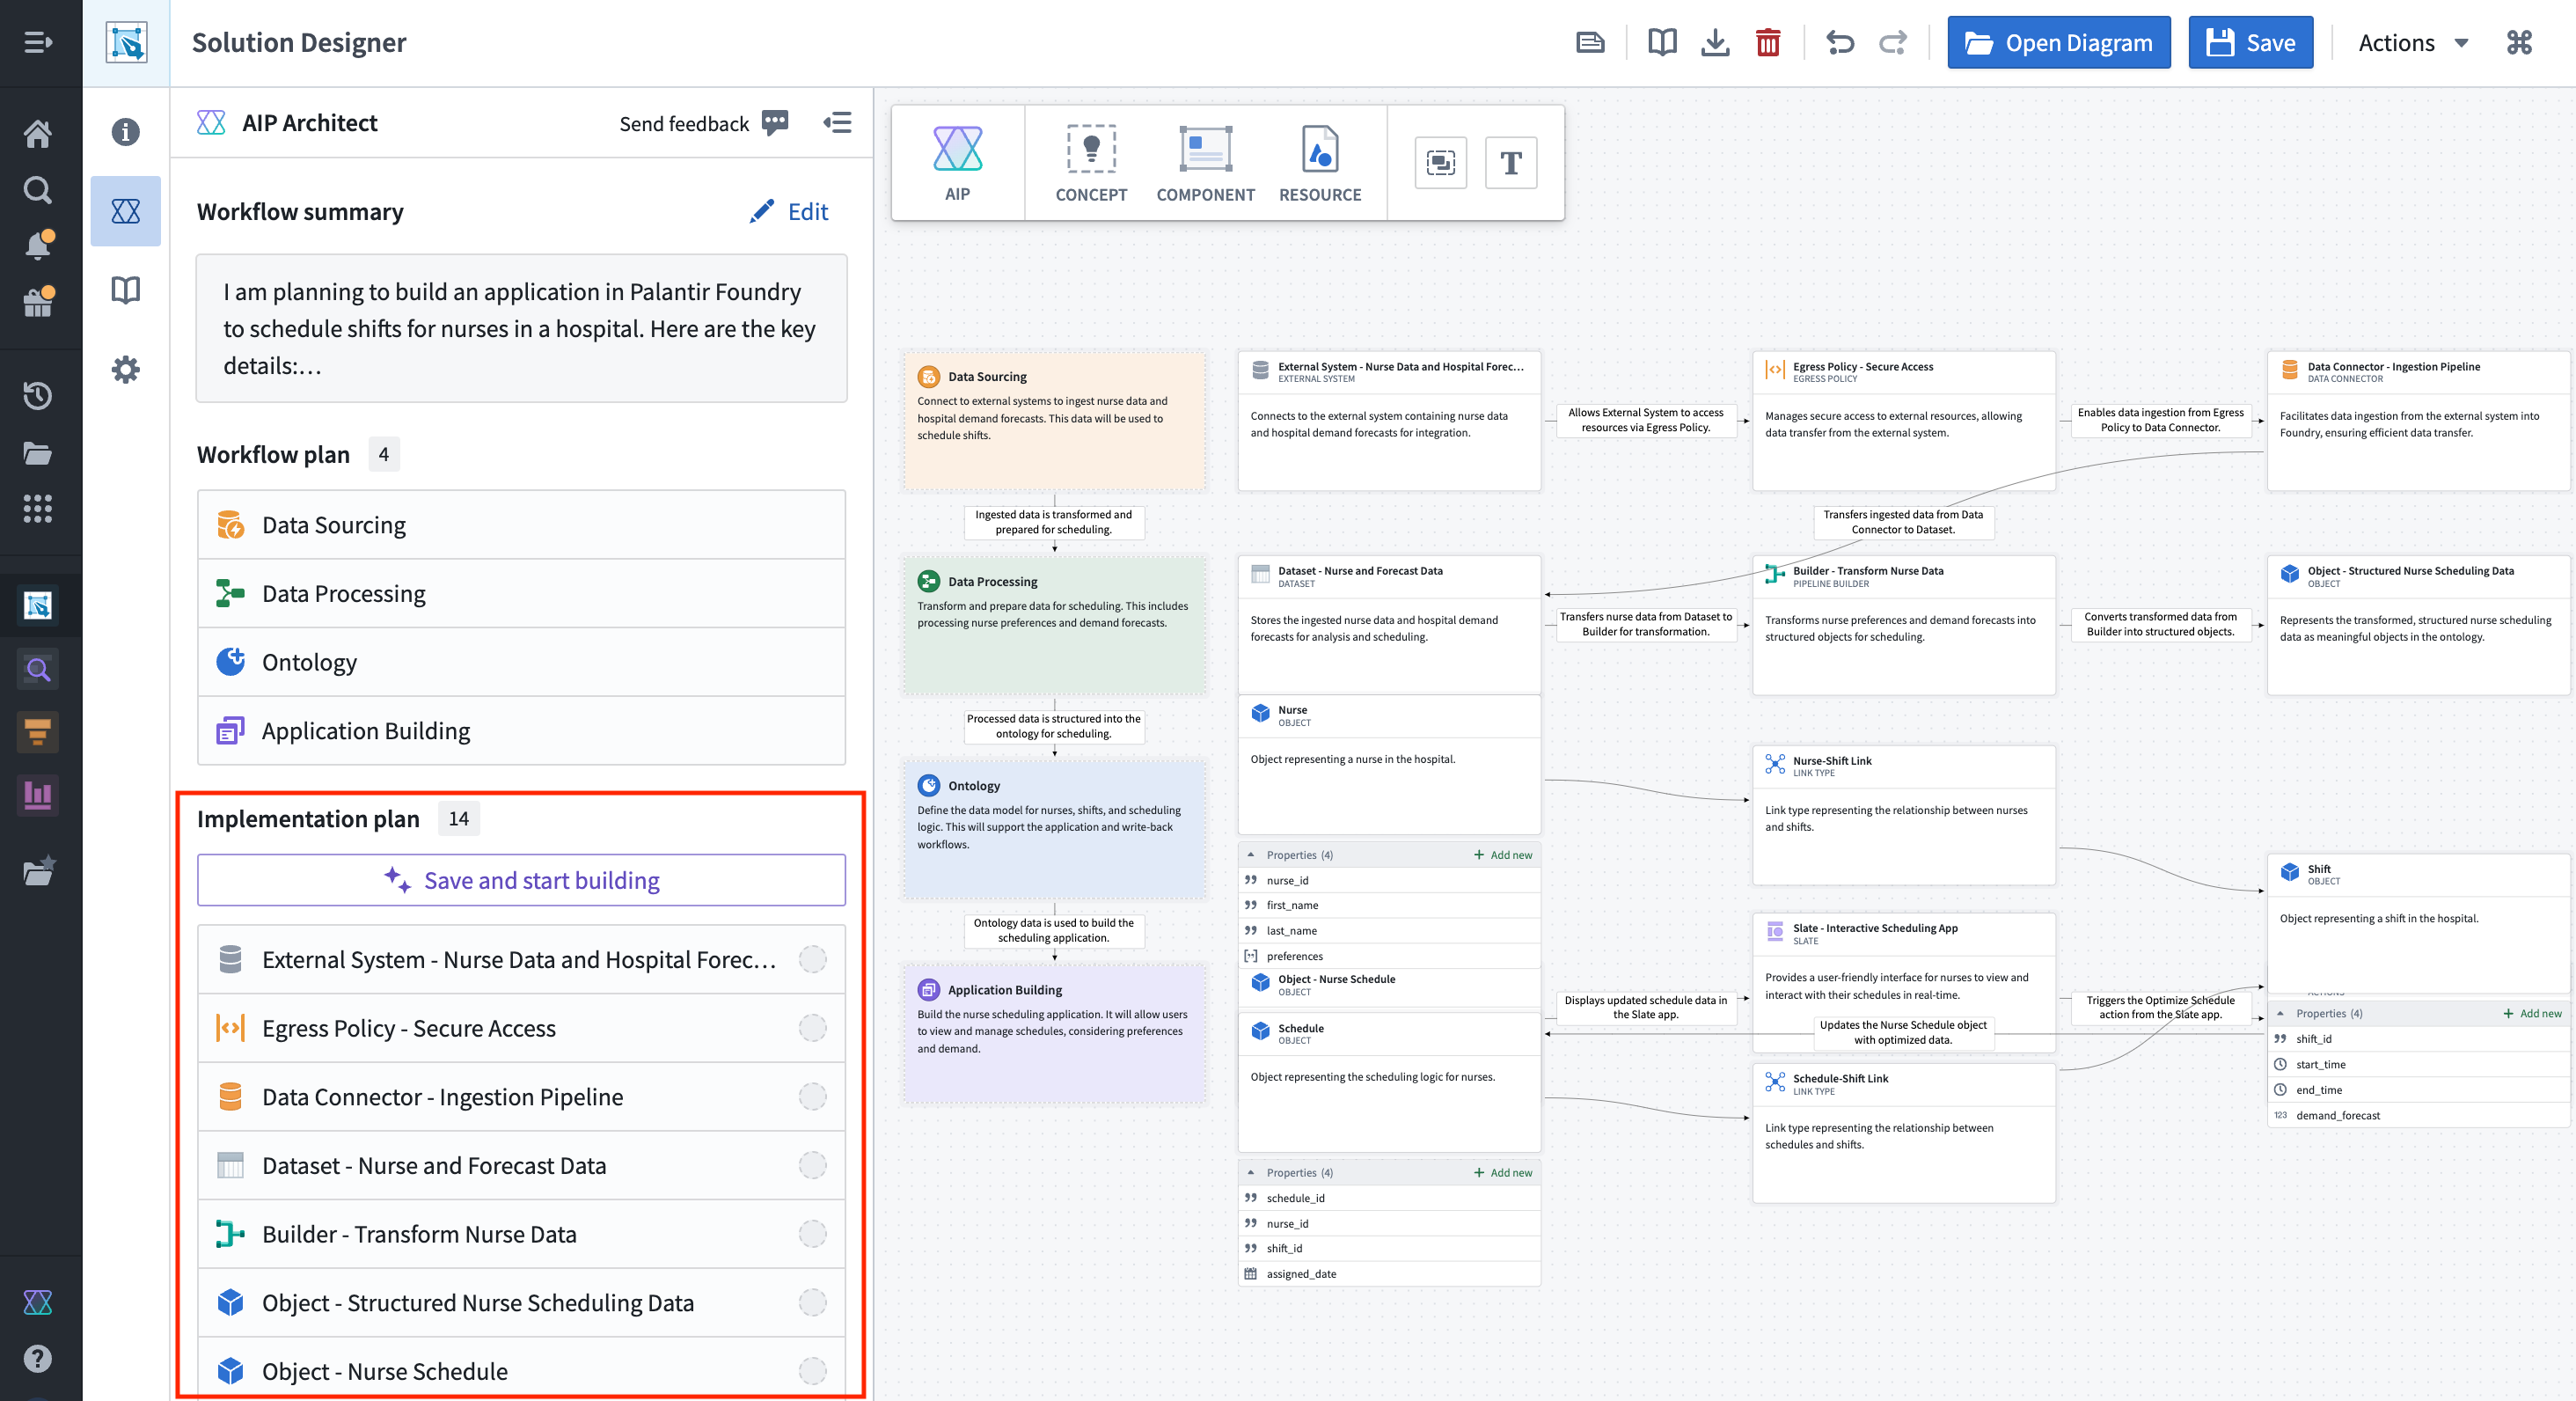
After your workflow graph has been generated, you will see an abstract representation of your workflow as a series of "concept nodes" connected by arrows. Each concept node represents a general part of the target workflow, such as data sourcing, data processing, Ontology, or application building.
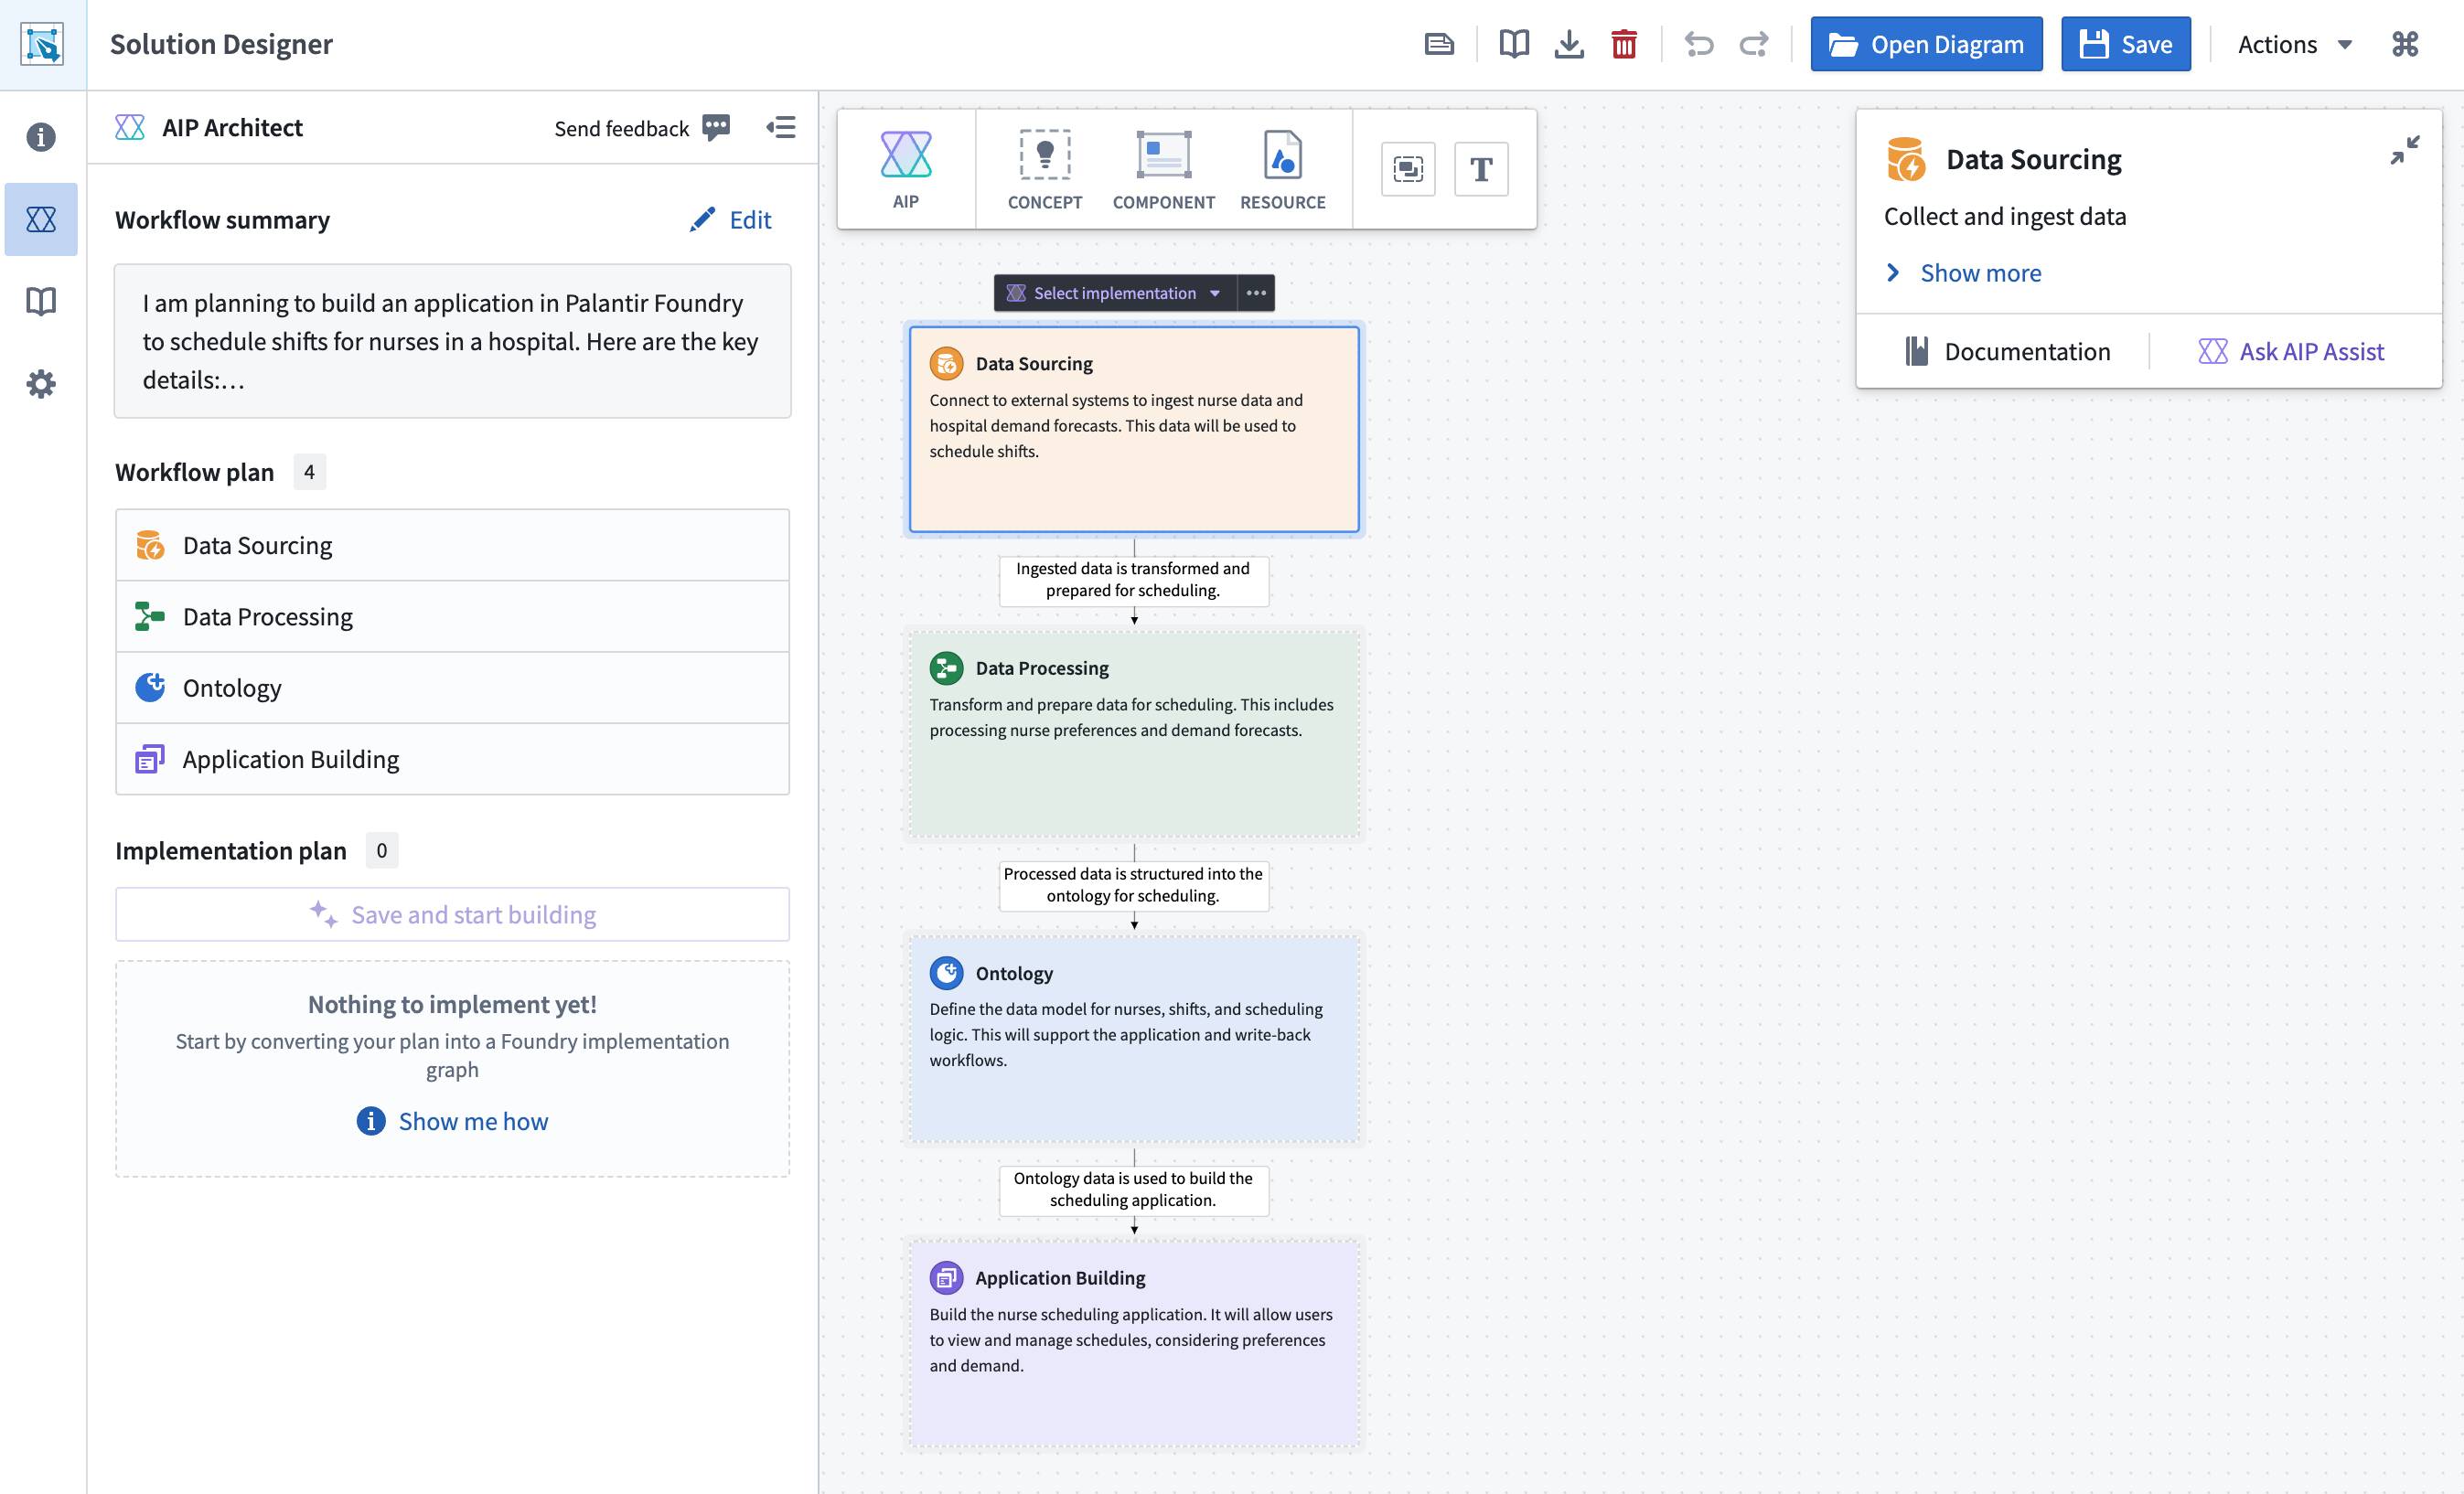
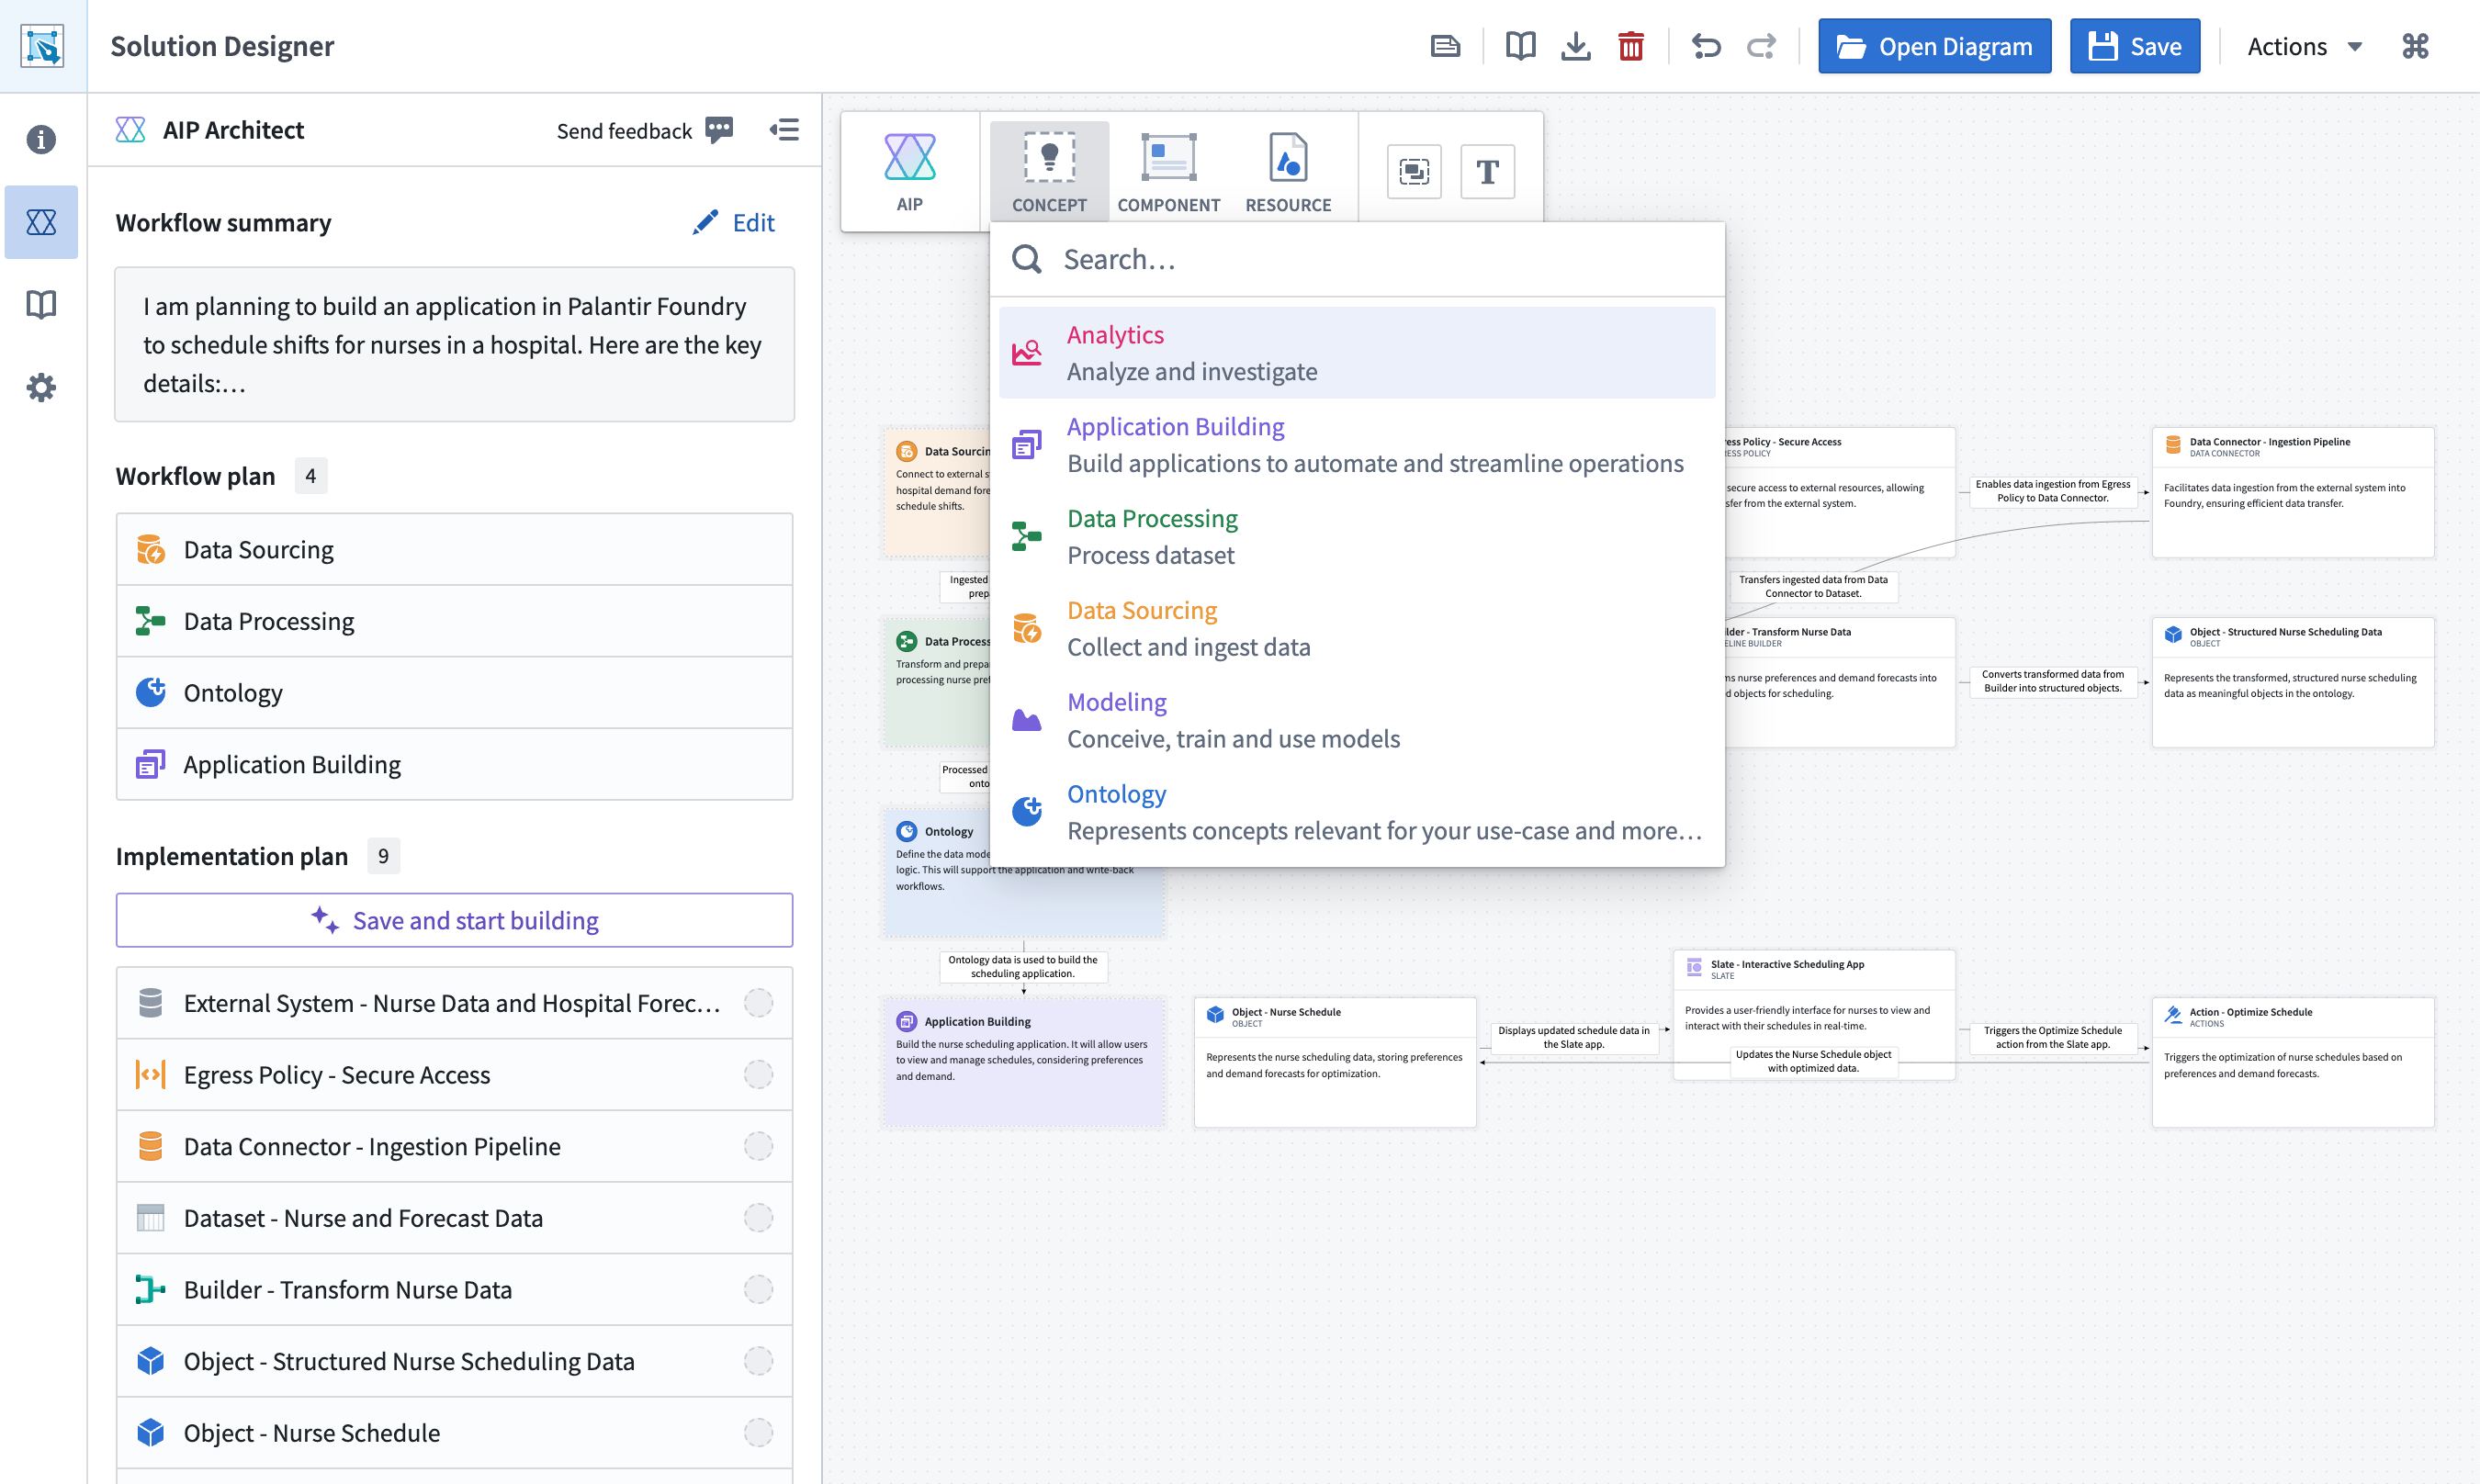
Concept nodes
These concept nodes serve as a reference for the implementation of your workflow. To instruct AIP Architect to generate a more detailed workflow implementation, select a concept node (other than than the Ontology node, which is discussed below) and choose the Select implementation dropdown. AIP Architect will suggest potential implementation plans for your workflow; you can preview an implementation plan on your graph, along with AI-generated context, before adding it to your workflow graph by selecting Insert into graph.

You can add implementation plans to all of the non-Ontology concept nodes; AIP Architect will automatically connect nodes together based on the provided context. You can also add additional concept nodes, such as an analytics or modeling node, to your workflow (and thereby generate additional implementation plans) by selecting the Concept icon in the top toolbar.
Plans generated by AIP Architect can be modified by users. AIP Architect will take any changes made by users into account when generating implementations for other parts of the workflow.
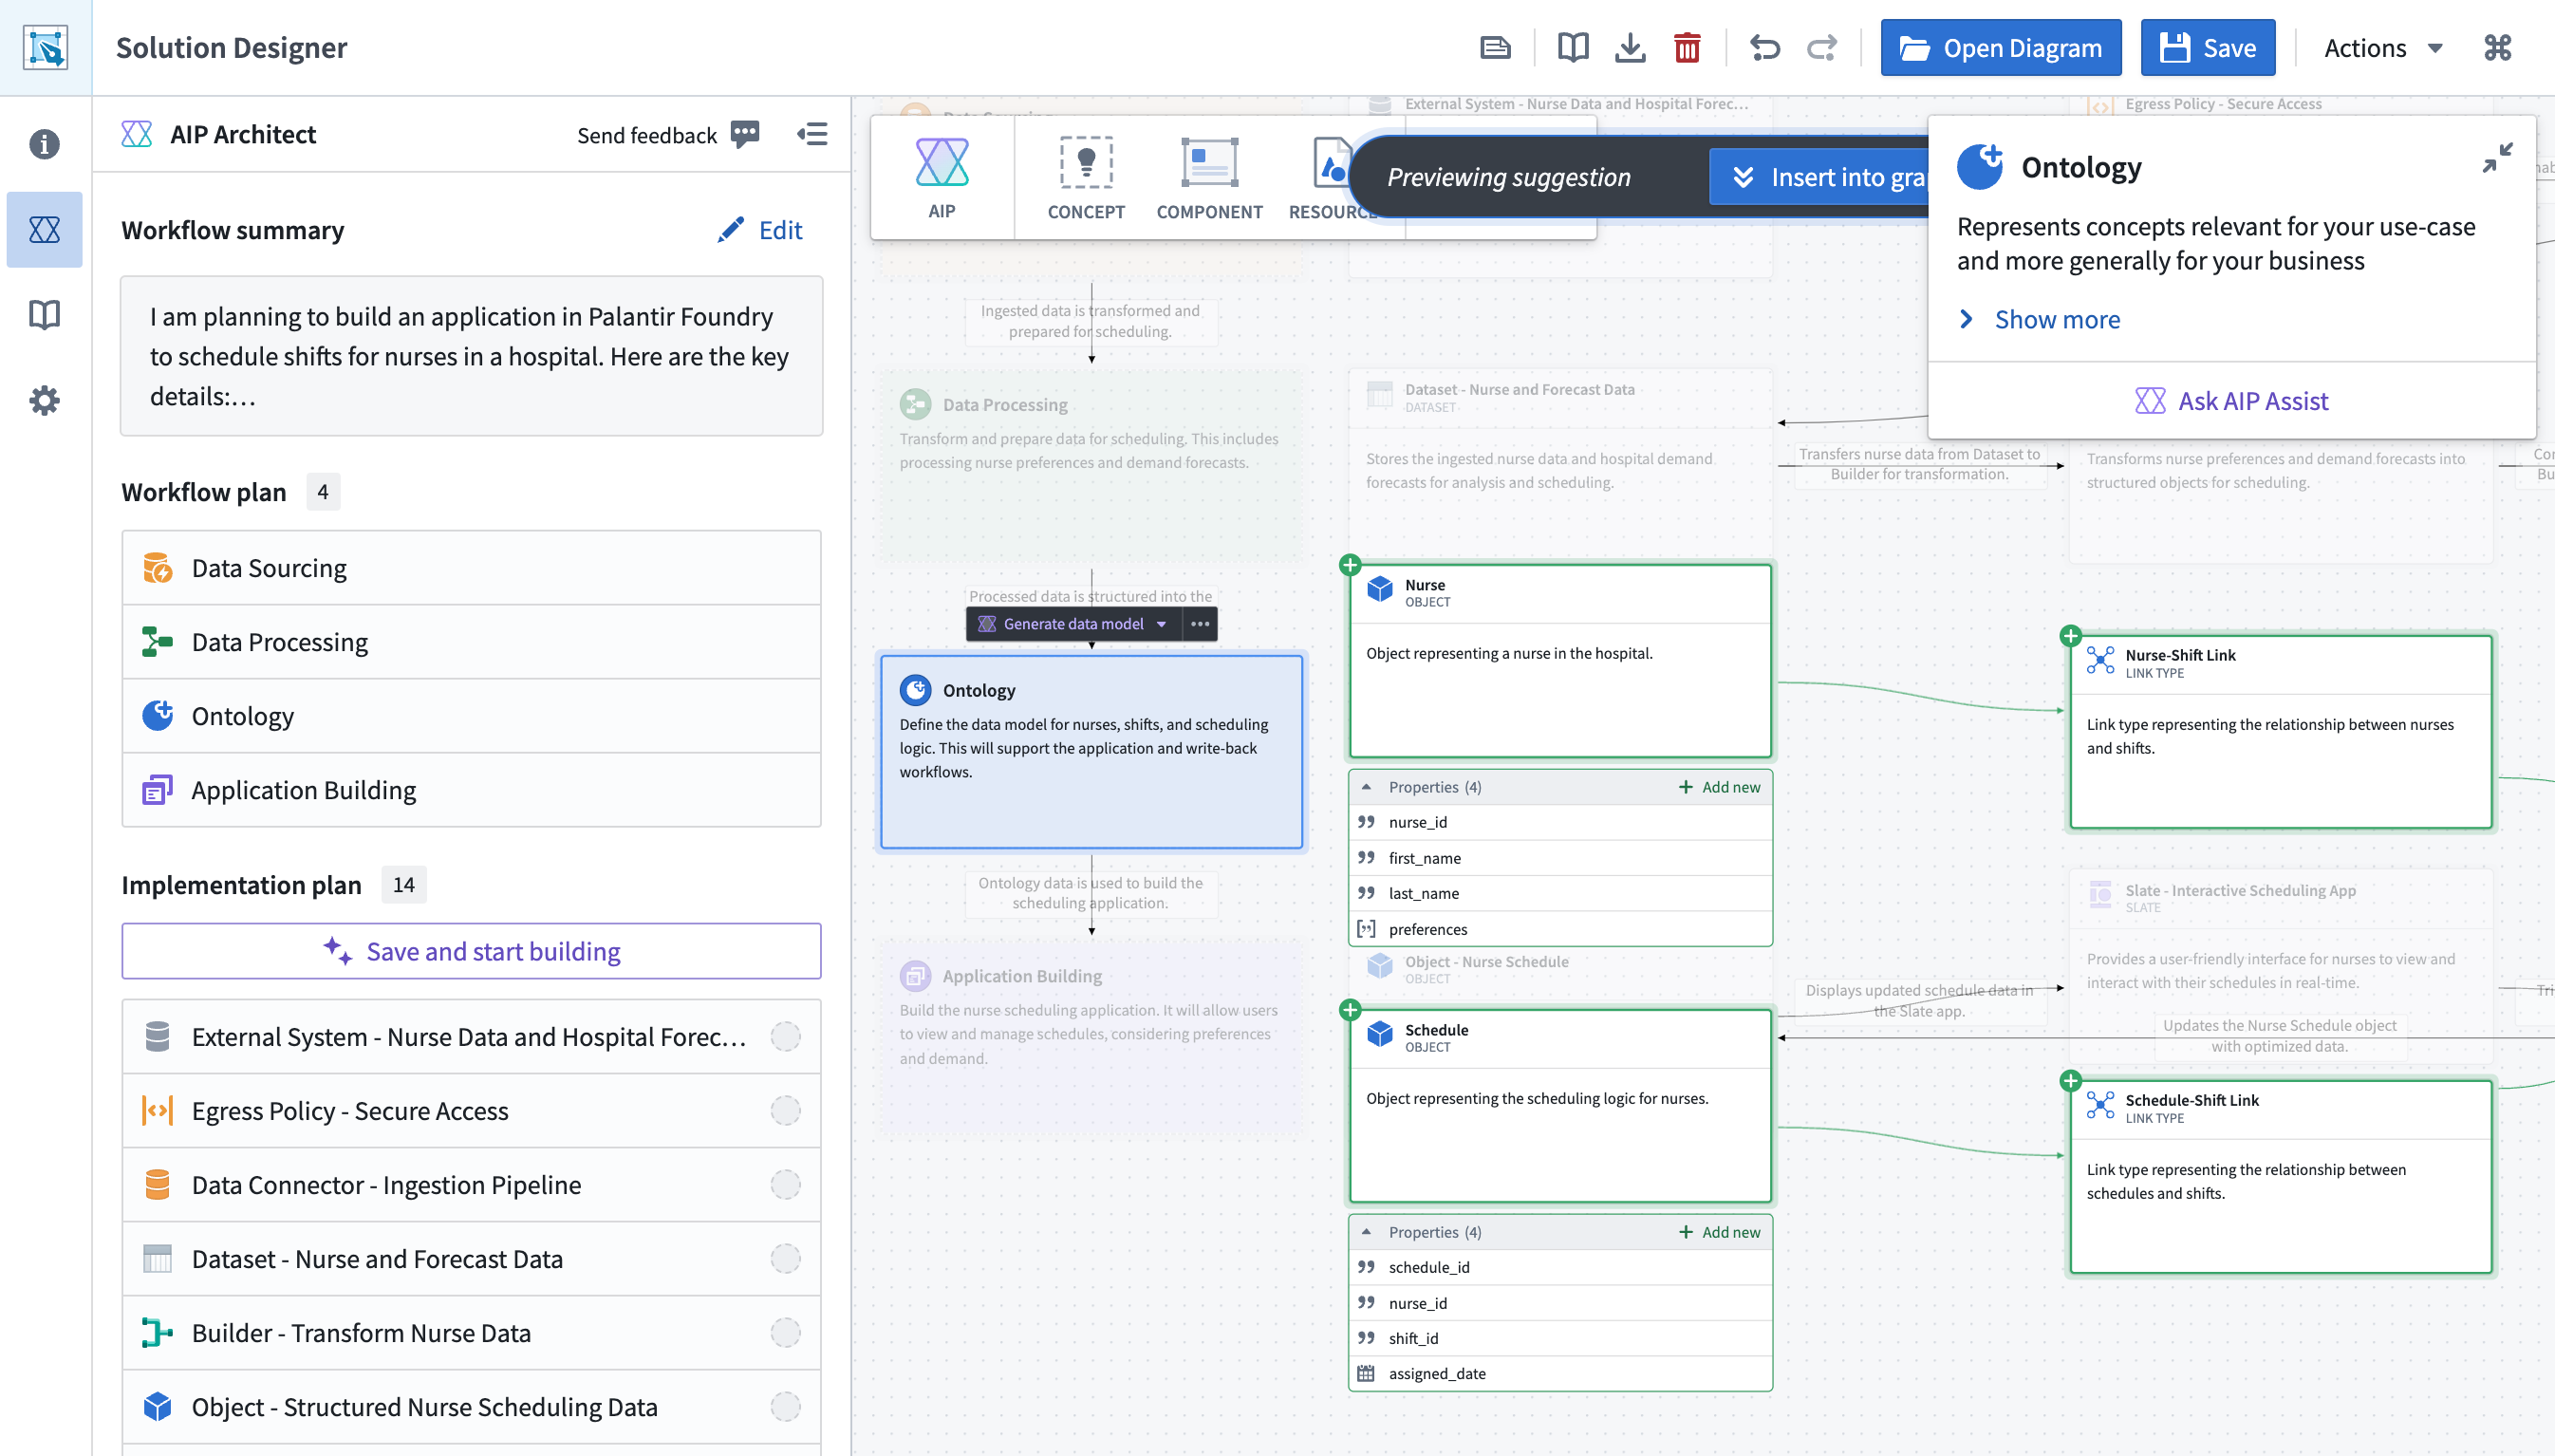
Ontology node
The Ontology node differs from other concept nodes in that the Select implementation dropdown is replaced by a Generate data model dropdown. The Generate data model dropdown provides a user-editable prompt where you can describe what you want your Ontology model to look like; based on this prompt, AIP Architect will generate a set of object types, object type properties, and link types on the graph.
Build your planned workflow
After generating a workflow plan, you can begin to actually build the workflow with AIP Architect. The left-hand AIP Architect sidebar displays an overview of your workflow’s implementation plan, automatically generated based on the workflow graph.
AIP Architect will guide you through the process of creating your workflow using the Walkthrough helper. To begin, select Save and Start Building.
At this point, an AIP Architect Walkthrough panel will appear to provide you with a step-by-step guide through the actual implementation process. You can skip to any part of the walkthrough, or navigate the steps in order with the Next and Previous navigation buttons at the top.
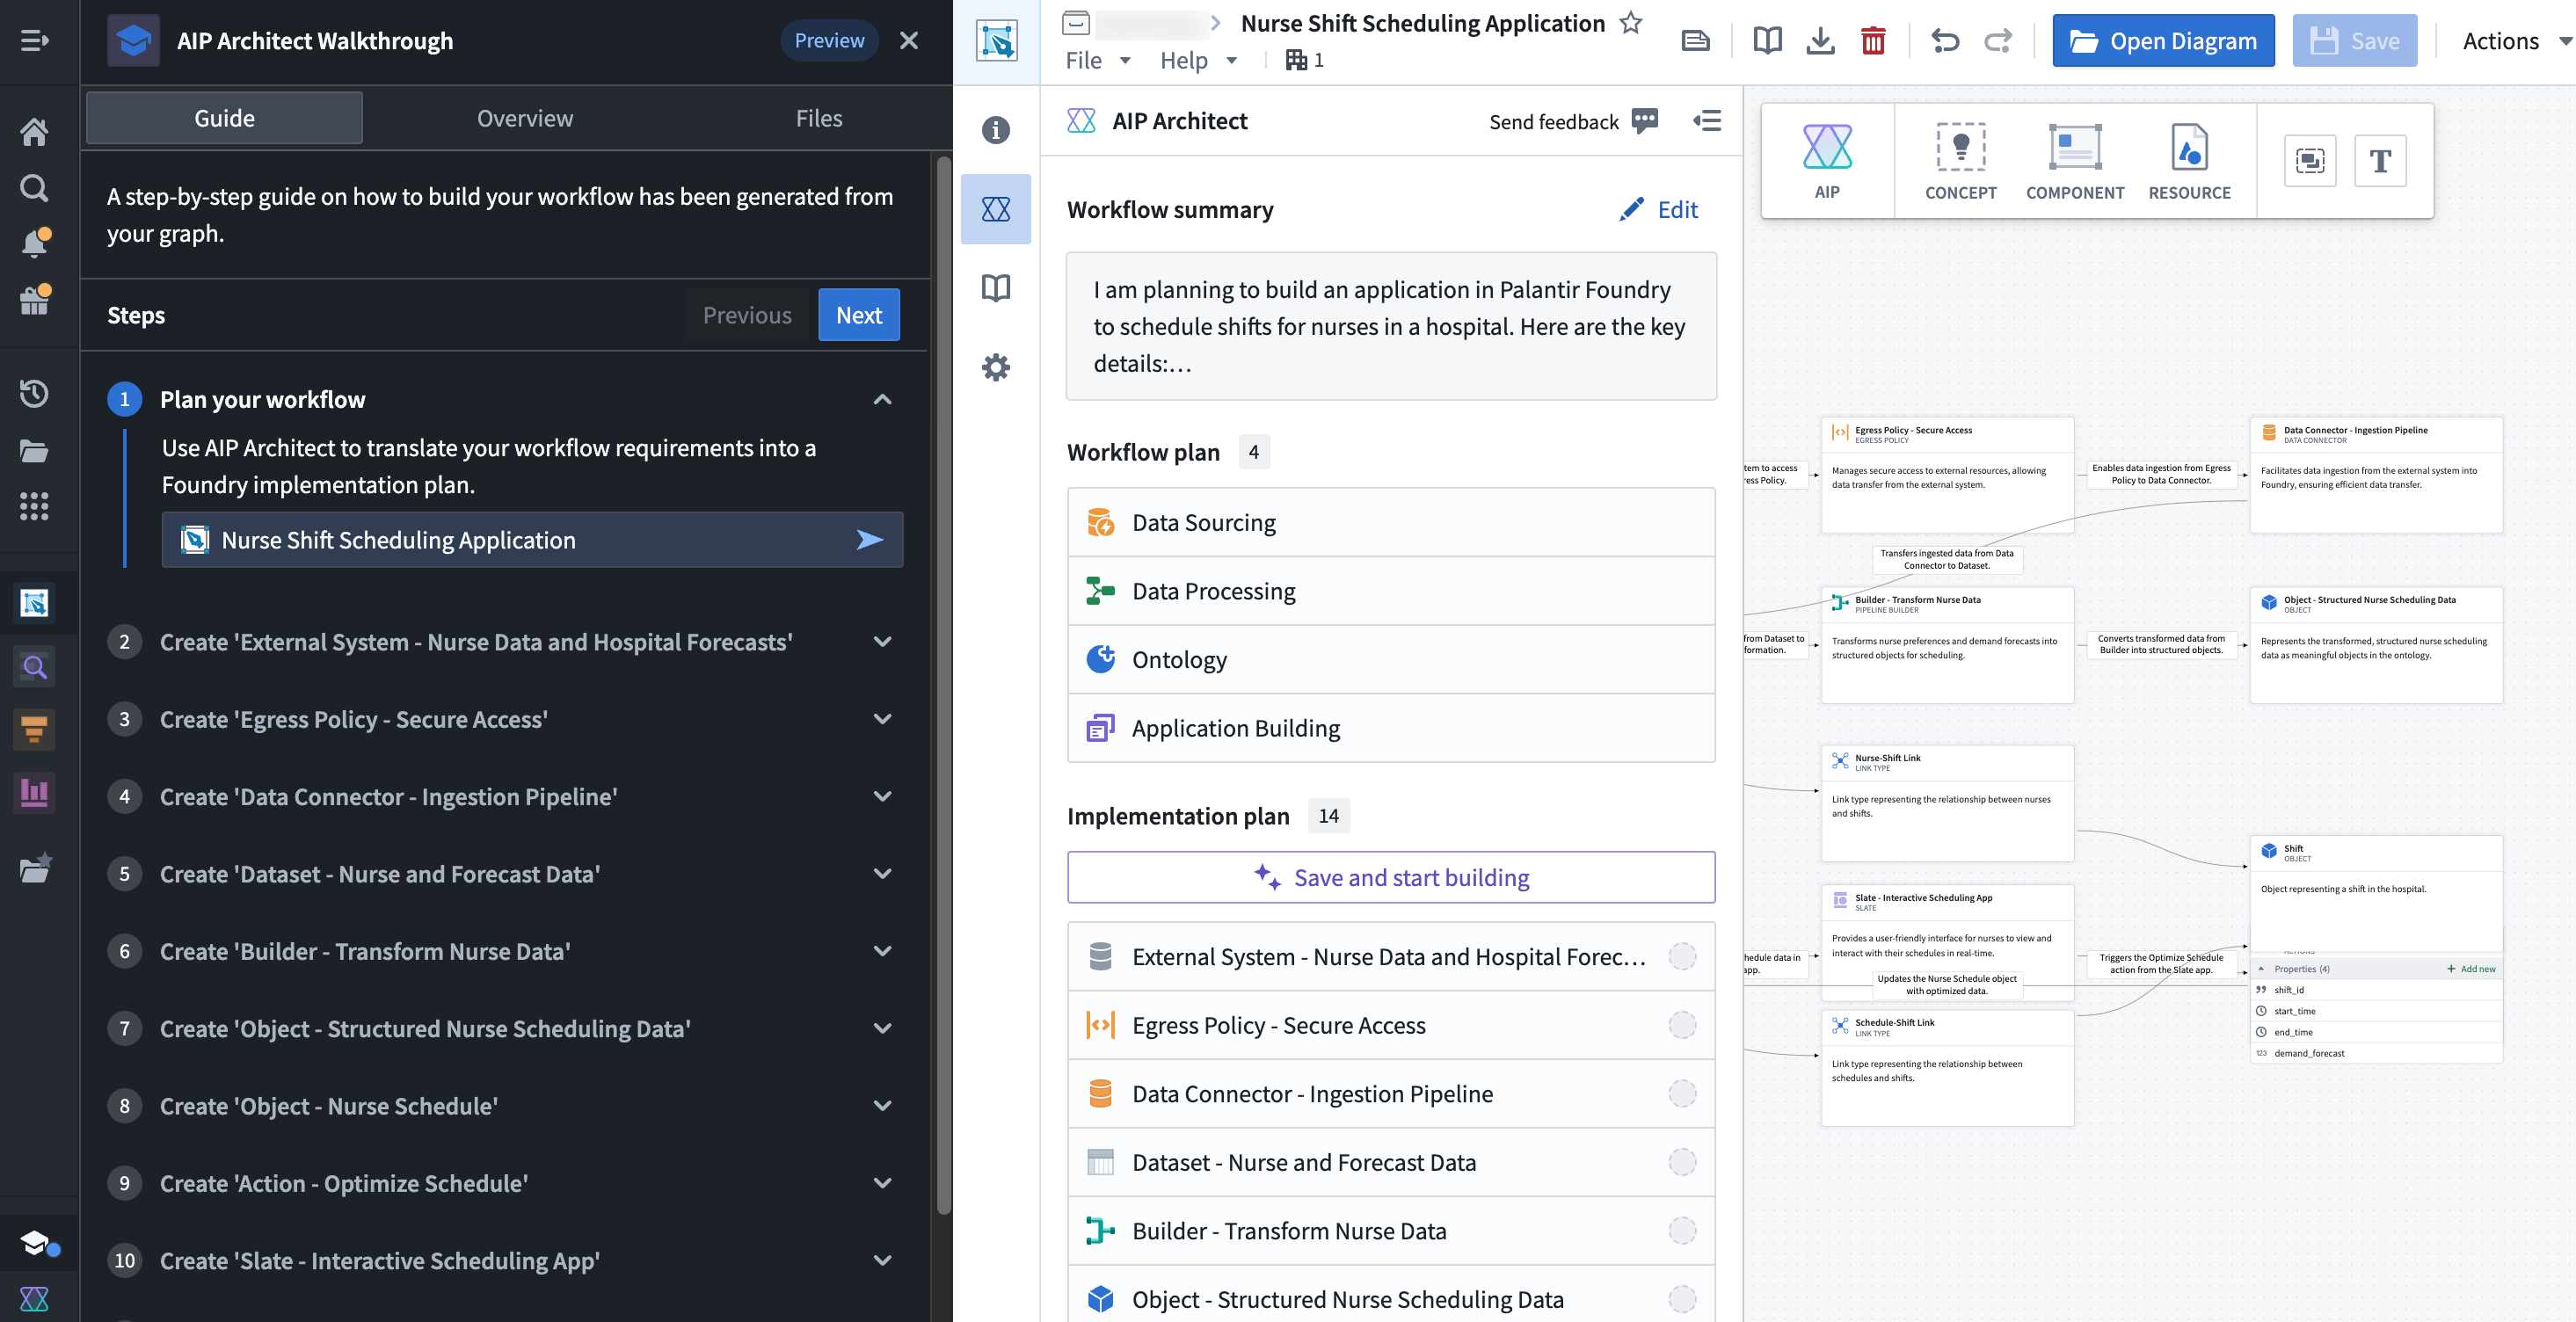
From here, you can use the indicated applications to build an operational workflow.
中文翻译
AIP Architect
AIP Architect 为 Solution Designer 带来了基于大语言模型(LLM)的功能,使您能够将一组工作流需求转化为在 Palantir 平台上构建解决方案的分步实施计划。您可以使用 Solution Designer 探索选项、规划工作流,并借助 AIP Architect 作为 AI 向导加速构建过程。
如果您能向 AIP Architect 描述您希望在平台上实现的目标——例如问题、任何约束或需求,甚至是对所需解决方案或输出的想法——那么 AIP Architect 将以工作流图(workflow graph)的形式为您创建实施计划。借助组件和实施模式库,AIP Architect 工作流图描述了工作流的各个部分以及它们如何组合成解决方案架构,为您提供在平台上高效构建的计划。
开始使用 AIP Architect
有几种方式可以在 Solution Designer 中使用 AIP Architect。
从 Solution Designer 初始首页,您可以选择 开始规划(Start planning) 打开 AIP Architect 向导。
或者,从新的 Solution Designer 图表中,选择 开始规划(Start planning) 启动 AIP Architect 向导。
另外,从现有的 Solution Designer 图表中,您可以选择顶部工具栏中的 概念(Concept) 图标来添加 AIP Architect 概念节点(concept node),并将其作为起点自动生成实施计划,从而跳过 AIP Architect 向导。
AIP Architect 向导
打开 AIP Architect 向导后,系统将引导您完成多个提示,向 AIP Architect 提供信息,例如:
- 您要构建的内容(即最终产品或工件)
- 此工作流的数据来源
- 您希望如何构建工作流(具体来说,您希望使用多少代码)
描述工作流的最终产品或工件
AIP Architect 向导的第一步是提供关于您要构建内容的信息。这可以是数据集、应用程序、文档、仪表板或其他内容。
选择工作流的最终产品或工件后,系统将提示您描述可能有的任何工作流需求;在此空间中,总结您心目中的工作流。
例如,假设您要构建一个用于安排医院护士排班的应用程序。以下截图显示了输入包含这些工作流需求的提示后的向导界面。
:::callout{theme="neutral"} AIP Architect 使用您提供的工作流摘要来生成构建解决方案设计图时的建议。您可以在后续过程中修改摘要以更新这些建议。 :::
您的工作流提示可以很简单,就像护士排班示例中使用的提示:
我想构建一个用于安排医院护士排班的应用程序。我希望根据护士的偏好和预测需求来优化这些排班。
您也可以向 AIP Architect 提供更详细的工作流需求,例如以下提示:
我在一家制造公司工作,我们需要为整个 SKU 基础生成需求预测。我需要确定每个 SKU 的最佳策略,利用内部数据(如历史销售和库存)和外部数据(如天气模式)。
除了前瞻性预测,我还希望查看相关输入的"假设"模拟。我想使用自然语言提示,例如"如果下个月天气比预期的冷怎么办?"或"如果我将价格提高 10% 会怎样?"。然后,我想协调参数变化来执行模拟。
关键特性:
- 实时需求模拟:利用模型输出(如相关系数或置信区间)为高管和规划人员提供易于使用的模拟驾驶舱。
- 面向业务用户的界面:帮助非技术业务专家利用其业务经验,针对真实数据进行模型迭代和验证。
- 高度可配置的建模:以每日、每周、每月或每年的节奏,跨客户、SKU 和产品线实施对业务有意义的预测。
描述工作流的源数据
向 AIP Architect 提供初始工作流信息后,AIP Architect 向导将询问您为工作流提供支持的数据。首先,系统会提示您选择此工作流的数据来源。选项包括:
- 外部数据源/系统
- 手动上传
- 现有的 Foundry 数据
- 用户输入数据(例如,来自用户提交的表单)
然后,您可以提供关于数据更新频率、数据规模以及数据任何特殊属性(数据是否为地理空间数据、时间序列数据、媒体数据等)的信息。这些信息有助于 AIP Architect 建议最合适的平台应用程序来执行工作流并交付所需的结果或输出。
描述您希望如何构建工作流
最后,AIP Architect 询问您希望如何构建工作流——这里的选项是"无代码(no code)"(点击操作)、"低代码(low code)"(编写基本函数)和"专业代码(pro code)"(主要在代码编辑器中工作)。根据您对此问题的回答,AIP Architect 将选择适合您在构建工作流时希望使用的代码量的平台应用程序。做出选择后,选择 生成工作流图(Generate workflow graph) 来创建您的工作流图。
规划您的工作流
生成工作流图后,您将看到工作流的抽象表示,即一系列由箭头连接的"概念节点(concept nodes)"。每个概念节点代表目标工作流的一个通用部分,例如数据源、数据处理、本体论(Ontology)或应用程序构建。
概念节点
这些概念节点作为工作流实施的参考。要指示 AIP Architect 生成更详细的工作流实施,请选择一个概念节点(本体论节点除外,下文将讨论)并选择 选择实施(Select implementation) 下拉菜单。AIP Architect 将为您的工作流建议潜在的实施计划;您可以在图表上预览实施计划以及 AI 生成的上下文,然后通过选择 插入到图表(Insert into graph) 将其添加到工作流图中。
您可以为所有非本体论的概念节点添加实施计划;AIP Architect 将根据提供的上下文自动连接节点。您还可以通过选择顶部工具栏中的 概念(Concept) 图标,向工作流添加额外的概念节点(例如分析或建模节点),从而生成额外的实施计划。
AIP Architect 生成的计划可以由用户修改。AIP Architect 在生成工作流其他部分的实施时,会考虑用户所做的任何更改。
本体论节点
本体论节点与其他概念节点的不同之处在于,选择实施(Select implementation) 下拉菜单被替换为 生成数据模型(Generate data model) 下拉菜单。生成数据模型(Generate data model) 下拉菜单提供了一个用户可编辑的提示,您可以在其中描述您希望本体论模型的外观;基于此提示,AIP Architect 将在图表上生成一组对象类型、对象类型属性和链接类型。
构建您规划的工作流
生成工作流计划后,您可以开始使用 AIP Architect 实际构建工作流。左侧的 AIP Architect 侧边栏显示了工作流实施计划的概览,该计划基于工作流图自动生成。
AIP Architect 将使用 Walkthrough 助手引导您完成创建工作流的过程。首先,选择 保存并开始构建(Save and Start Building)。
此时,将出现一个 AIP Architect Walkthrough 面板,为您提供实际实施过程的分步指南。您可以跳转到 Walkthrough 的任何部分,或使用顶部的 下一步(Next) 和 上一步(Previous) 导航按钮按顺序浏览步骤。
从这里,您可以使用指示的应用程序来构建一个可操作的工作流。