Connecting to Foundry datasets from MicroStrategy(从 MicroStrategy 连接到 Foundry 数据集)
The MicroStrategy analytics platform includes a MicroStrategy-certified connector that enables users to easily create MicroStrategy reports and dossiers backed by Foundry datasets. The connector offers compatibility with Foundry access controls, including granular permissions.
Supported products:
- MicroStrategy Workstation as preview feature (2021 Update 8 release)
- MicroStrategy Workstation (2021 Update 9 release or later)
- MicroStrategy Library (2021 Update 9 release or later)
Authentication methods
- User-generated tokens
Installation
Part 1: Verify connector is installed in MicroStrategy
If you are on the 2021 Update 8 release of MicroStrategy, the Palantir Foundry connector should already be installed as a preview feature ↗. Verify this with the following steps:
- Open the Microstrategy Workstation and enable preview features.
- Select the plus sign beside Data Sources, found under the Administration section of the left sidebar.
- Search for "Palantir Foundry" in the list of supported data sources. If you find it in the list, proceed to Part 2 to install the JDBC driver.
If you are on the 2021 Update 9 release or later, the Palantir Foundry connector should already be installed in your version of MicroStrategy. Verify this with the following steps:
- Open the Microstrategy Workstation.
- Select Data Sources under the Administration section of the left sidebar.
- Search for "Palantir Foundry" in the list of supported data sources. If you find it in the list, you do not need to install the JDBC driver separately; proceed to the Usage section below.
If you do not see Palantir Foundry in the list of supported data sources, contact your MicroStrategy support representative for next steps. You may need to upgrade to the latest MicroStrategy release and MicroStrategy Workstation.
Part 2: Install Palantir Foundry JDBC driver
If you are on the 2021 Update 8 release, complete the setup of the Foundry MicroStrategy integration by first installing the JDBC driver for Foundry datasets. Navigate to Downloads: Foundry Datasets JDBC Driver to download and install the driver.
If you are on the 2021 Update 9 release or later, the Foundry JDBC driver is pre-installed in the MicroStrategy Windows Workstation and MicroStrategy Intelligence Server. You only need to install the JDBC driver for MicroStrategy Mac Workstation if you want to access Foundry data using a local dossier.
:::callout{theme="neutral"} Contact your Palantir representative if you encounter any issues with installation. :::
Now that the connector is installed, you are ready to build reports and dossiers in MicroStrategy backed by Foundry datasets.
Usage
This guide will explain how to authenticate with Foundry through MicroStrategy, select a dataset, and get started building your first dossier.
Part 1: Create Foundry data source
There are two options for creating a Foundry data source in MicroStrategy:
- Option 1: Create Foundry data source in MicroStrategy Workstation
- Option 2: Create Foundry data source using MicroStrategy datasets
Option 1: Create Foundry data source in MicroStrategy Workstation
- If you are on the 2021 Update 8 release of MicroStrategy, enable Preview Features in the Help menu. If you are on the 2021 Update 9 release or later, proceed with the next step.

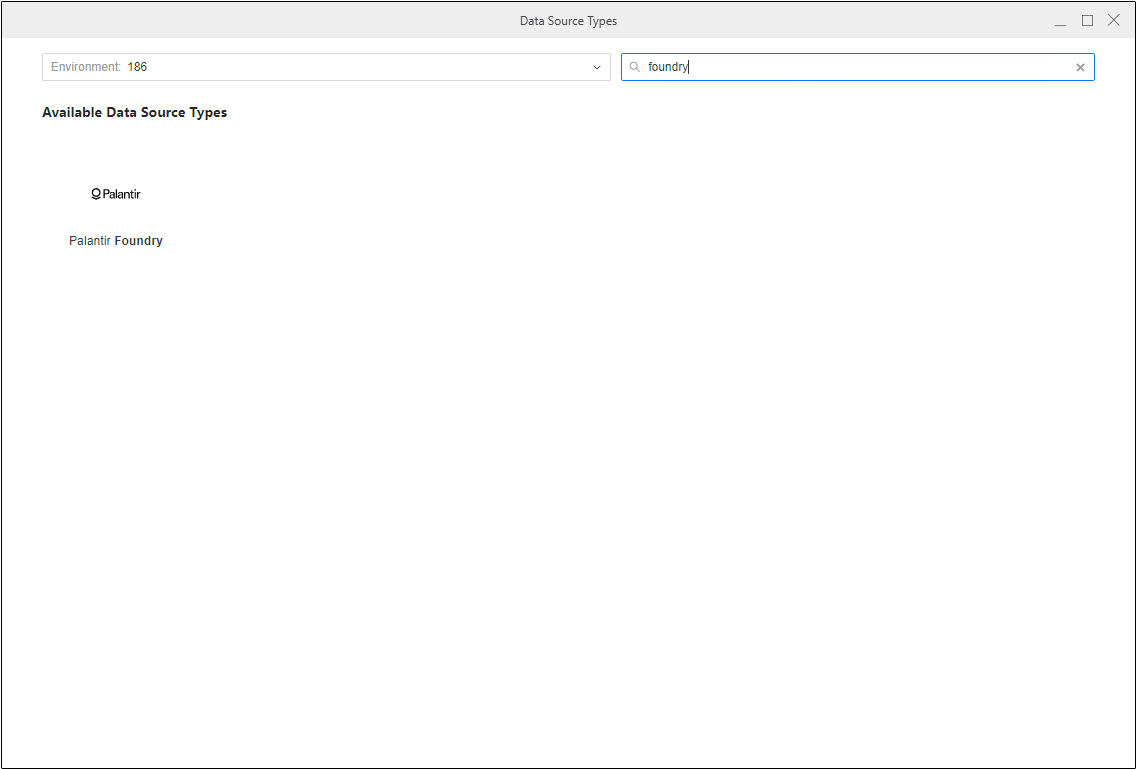
- Under the Administration section of the Workstation sidebar, click on the plus icon next to Data Sources.
- Find and select "Palantir Foundry" from the list of supported data sources.
\
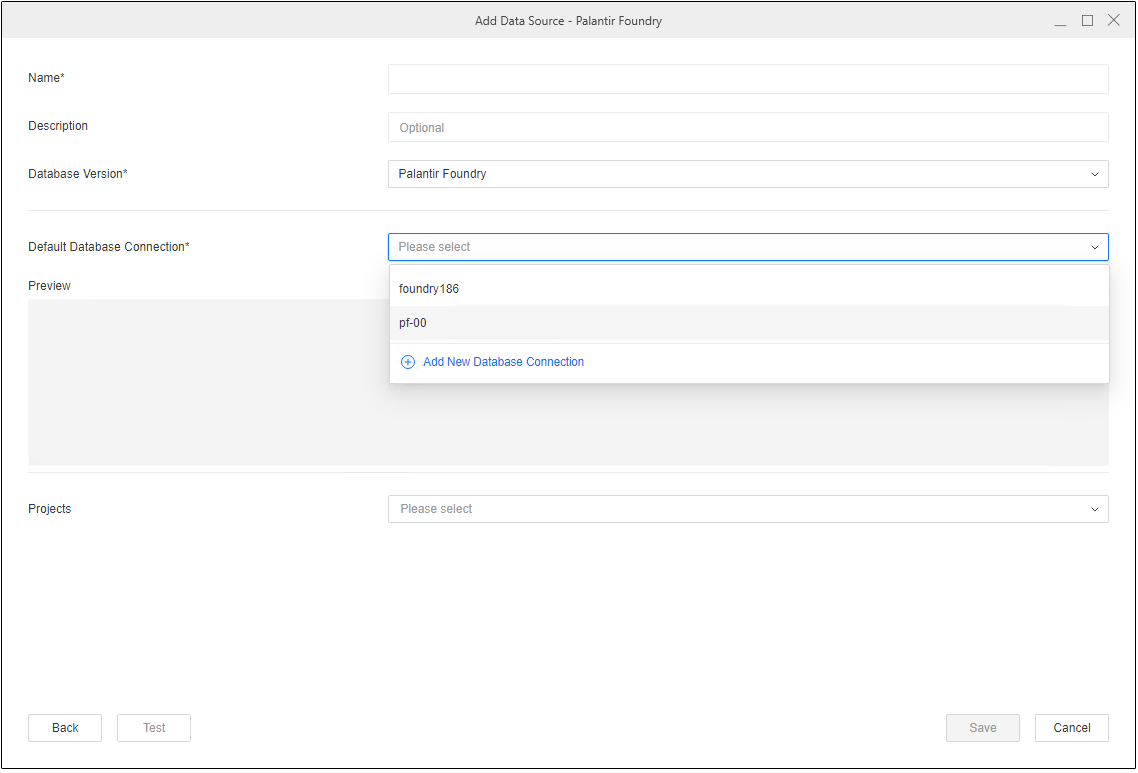
- Specify a name for the data source and keep the database version unchanged. Then, choose the MicroStrategy project where you will be using the connection. Select the Default Database Connection dropdown, then Add New Database Connection.
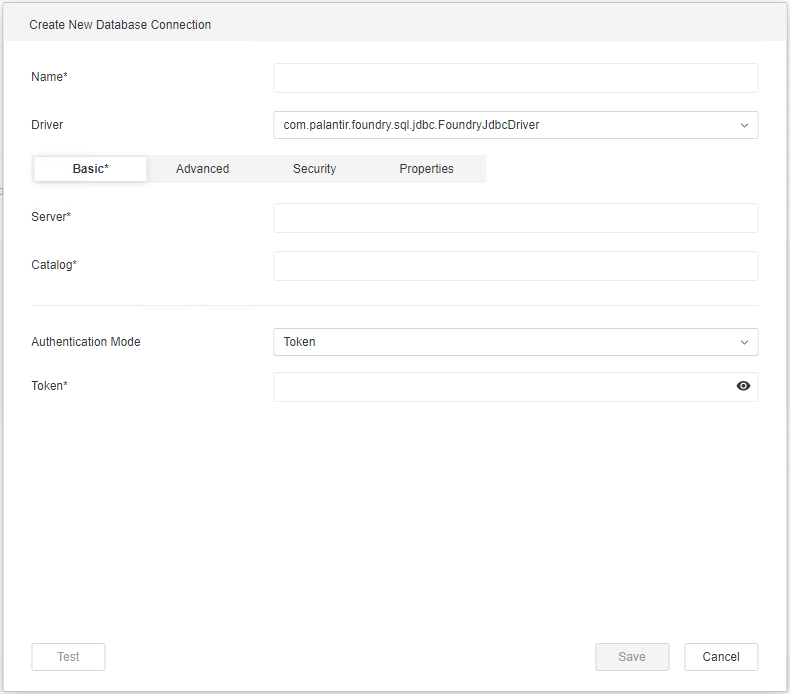
- Follow the prompts to add details about your Foundry connection, including connection properties.
Option 2: Create Foundry data source using MicroStrategy datasets
- If you are on the 2021 Update 9 release or later, you can create a Foundry data source using MicroStrategy datasets. Disable Enable New Data Import Experience in the Help menu of your Workstation.

- Under the Analysis section, select the plus icon next to Datasets, then choose Data Import Cube in the Create Dataset dialog.

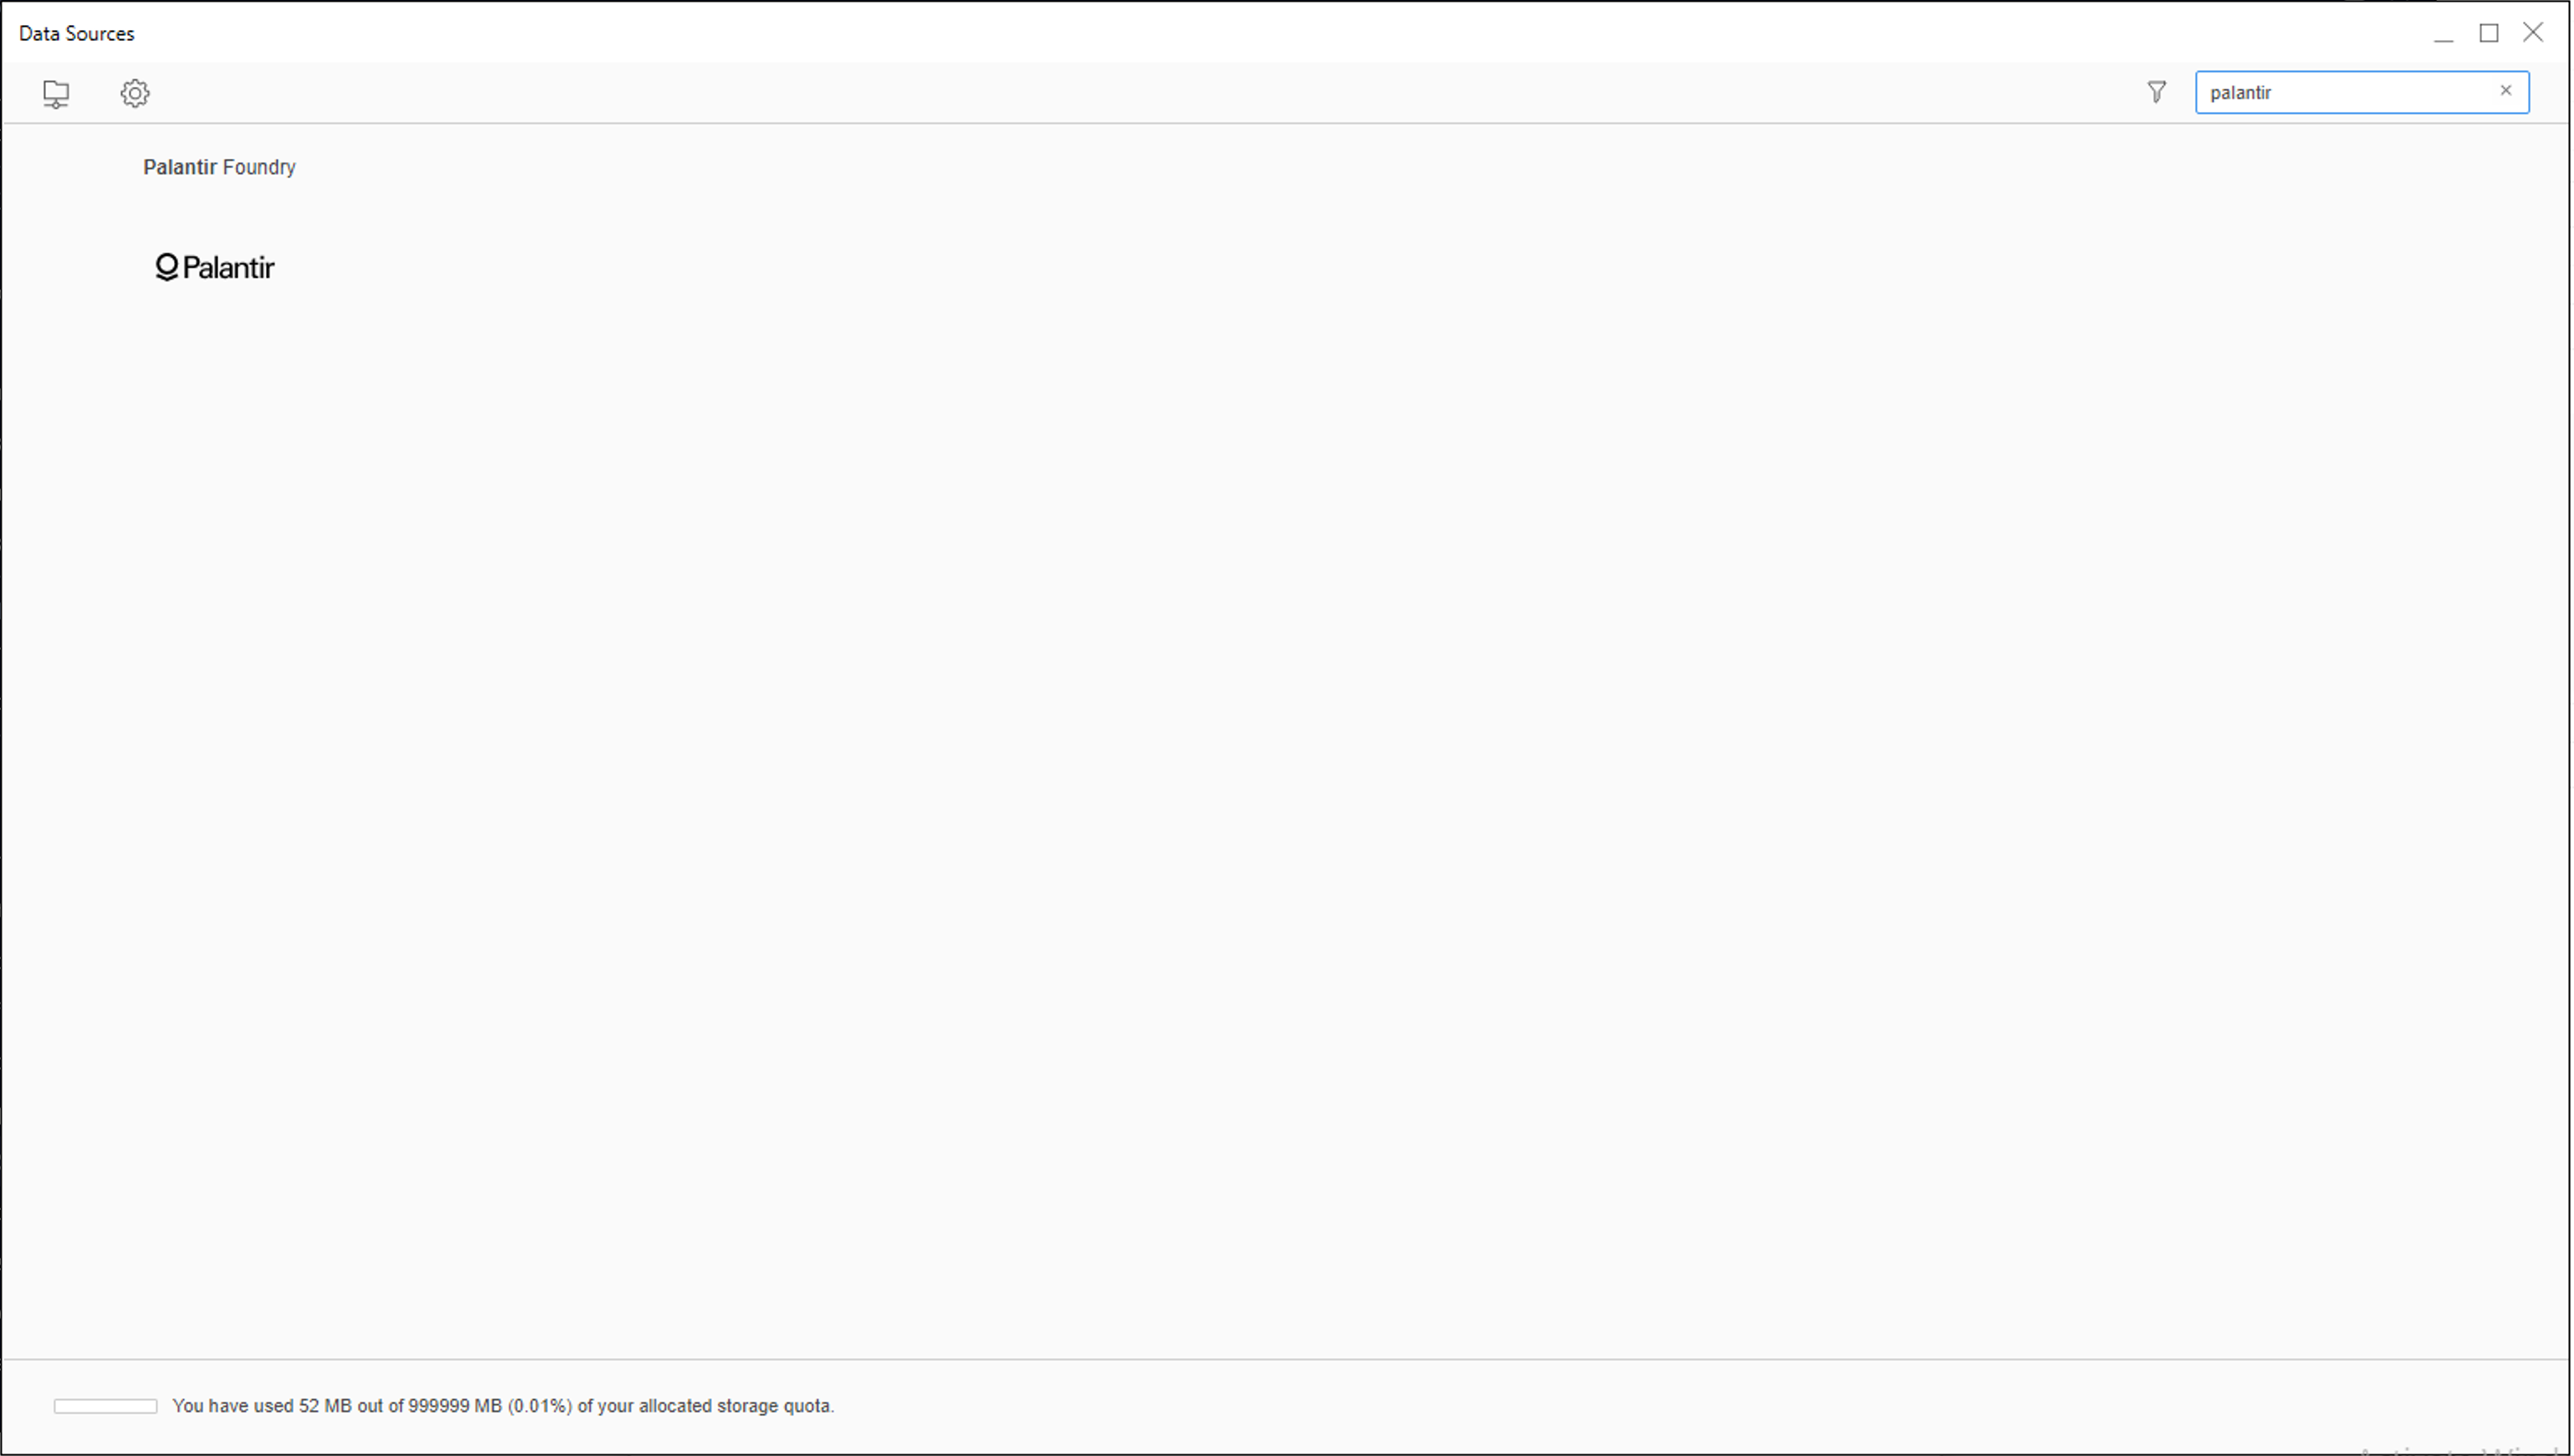
- Search for "Palantir Foundry" in the Data Sources window and select it from the list.
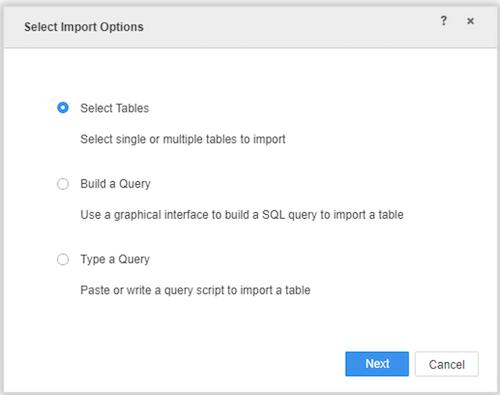
- Select any of the options in the Select Import Options window, then select Next. For this guide, we will choose the Select Tables option.
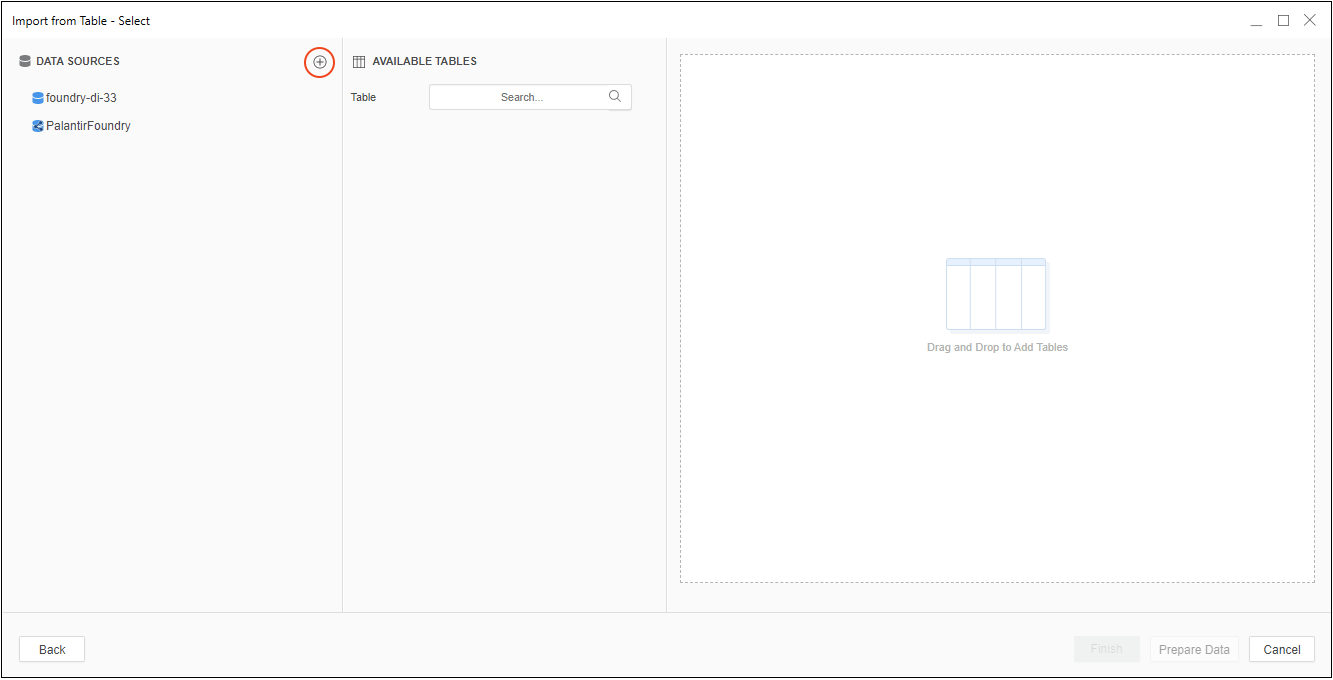
- Create a data source in the Import from Table window by selecting the plus icon next to Data Sources.
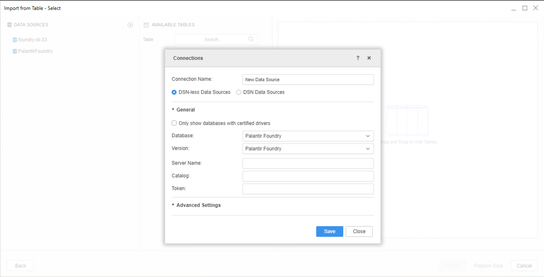
- Provide connection properties using the steps shown below in Part 2.
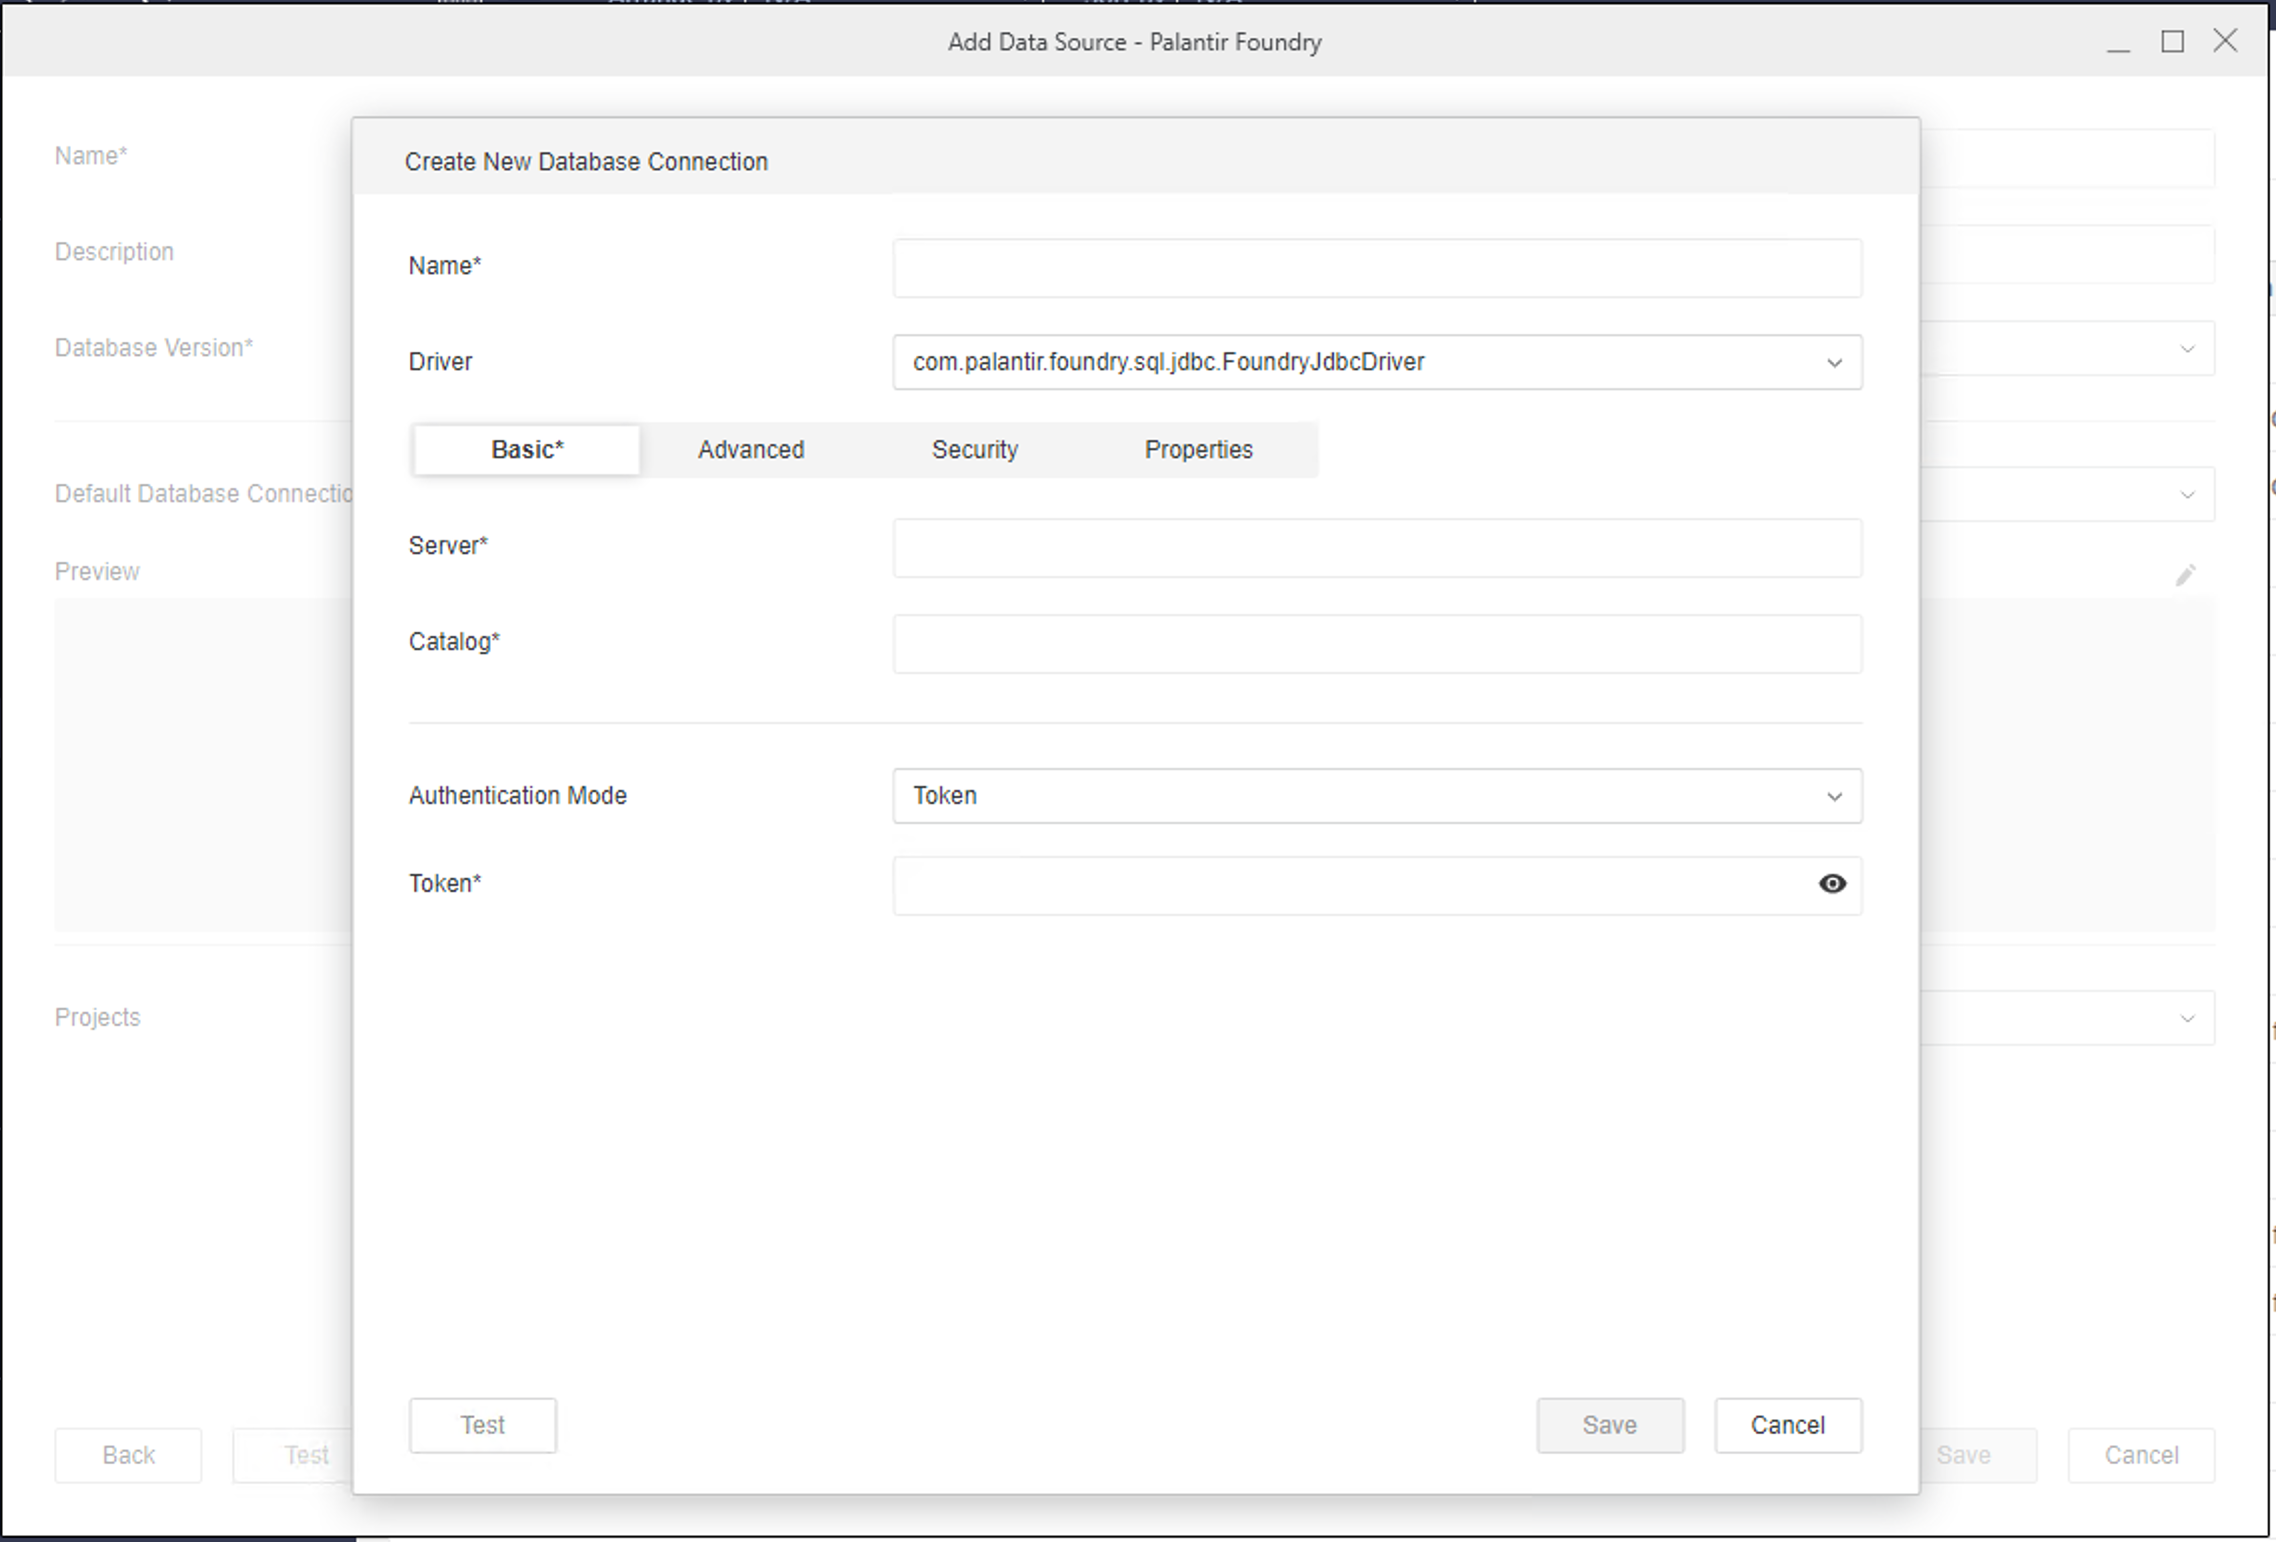
Part 2: Configure Foundry connection settings
To create a connection to Foundry, you must provide the following connection properties:
- Server: The URL you normally use to access Foundry, such as
<subdomain>.palantirfoundry.com. - Catalog: The path of a Foundry Project, such as
/MyOrg/MyProject. This field is only required in the 2021 Update 9 release or later. Setting this property can resolve table browsing issues in MicroStrategy. If you are on the 2021 Update 8 release, switch to the Advanced tab and add the parameter in Additional Connection String Parameters. - Token: A valid user token generated in Foundry. See the User-generated tokens documentation for instructions on how to obtain a token.
:::callout{theme="neutral"} The MicroStrategy connector supports only token-based authentication. :::
- Additional Connection String Parameters (Optional): Switch to the Advanced tab and specify any other connection parameters. Parameters should be separated by the
&symbol, such asOptionalParam1=<VALUE>&OptionalParam2=<VALUE>. Find the full list of connection parameters in the Parameter reference documentation for the JDBC driver for Foundry Datasets. If you are on the 2021 Update 9 release or later,Dialectis set to the recommended value ofSPARKfor optimal integration of Foundry within MicroStrategy, and this cannot be changed.
Part 3: Connect to Foundry and select dataset
- Use the navigation sidebar to the left to select Datasets, then Data Import Cube or Intelligent Cube.
- Connect to Foundry and select a dataset:
- If you are on the 2021 Update 8 release, choose to Enable New Data Import Experience under the Help menu. Select the Foundry data source you created in the previous steps, connect to it, then import your Foundry datasets.
- If you are on the 2021 Update 9 release or later, search for "Palantir Foundry" in the data sources list, select it, and then select any options in the Select Import Options window. In the Import from Table window, select the Foundry data source you created earlier, connect to it, and import your Foundry datasets.
- Proceed with building your report within MicroStrategy.
中文翻译
从 MicroStrategy 连接到 Foundry 数据集
MicroStrategy 分析平台包含一个经过 MicroStrategy 认证的连接器(connector),使用户能够轻松创建由 Foundry 数据集支持的 MicroStrategy 报表和档案(dossiers)。该连接器兼容 Foundry 访问控制,包括细粒度权限(granular permissions)。
支持的产品:
- MicroStrategy Workstation(作为预览功能,2021 Update 8 版本)
- MicroStrategy Workstation(2021 Update 9 或更高版本)
- MicroStrategy Library(2021 Update 9 或更高版本)
认证方法
- 用户生成的令牌(User-generated tokens)
安装
第 1 部分:确认 MicroStrategy 中已安装连接器
如果您使用的是 MicroStrategy 2021 Update 8 版本,Palantir Foundry 连接器应已作为预览功能 ↗安装。请按照以下步骤确认:
- 打开 Microstrategy Workstation 并启用预览功能(preview features)。
- 在左侧边栏的 管理(Administration) 部分下,点击 数据源(Data Sources) 旁边的加号。
- 在支持的数据源列表中搜索"Palantir Foundry"。如果找到,请继续执行第 2 部分安装 JDBC 驱动程序。
如果您使用的是 MicroStrategy 2021 Update 9 或更高版本,Palantir Foundry 连接器应已安装在您的 MicroStrategy 版本中。请按照以下步骤确认:
- 打开 Microstrategy Workstation。
- 在左侧边栏的 管理(Administration) 部分下,选择 数据源(Data Sources)。
- 在支持的数据源列表中搜索"Palantir Foundry"。如果找到,则无需单独安装 JDBC 驱动程序;请直接进入下方的使用部分。
如果在支持的数据源列表中未看到 Palantir Foundry,请联系您的 MicroStrategy 支持代表以获取后续步骤。您可能需要升级到最新的 MicroStrategy 版本和 MicroStrategy Workstation。
第 2 部分:安装 Palantir Foundry JDBC 驱动程序
如果您使用的是 2021 Update 8 版本,请先下载并安装 Foundry 数据集的 JDBC 驱动程序,以完成 Foundry MicroStrategy 集成的设置。请访问下载:Foundry 数据集 JDBC 驱动程序下载并安装驱动程序。
如果您使用的是 2021 Update 9 或更高版本,Foundry JDBC 驱动程序已预装在 MicroStrategy Windows Workstation 和 MicroStrategy Intelligence Server 中。仅当您希望通过本地档案(local dossier)访问 Foundry 数据时,才需要为 MicroStrategy Mac Workstation 安装 JDBC 驱动程序。
:::callout{theme="neutral"} 如果在安装过程中遇到任何问题,请联系您的 Palantir 代表。 :::
连接器安装完成后,您就可以开始在 MicroStrategy 中构建由 Foundry 数据集支持的报表和档案了。
使用
本指南将说明如何通过 MicroStrategy 进行 Foundry 身份验证、选择数据集以及开始构建您的第一个档案。
第 1 部分:创建 Foundry 数据源
在 MicroStrategy 中创建 Foundry 数据源有两种方式:
方式 1:在 MicroStrategy Workstation 中创建 Foundry 数据源
- 如果您使用的是 MicroStrategy 2021 Update 8 版本,请在 帮助(Help) 菜单中启用 预览功能(Preview Features)。如果您使用的是 2021 Update 9 或更高版本,请继续执行下一步。
- 在 Workstation 侧边栏的 管理(Administration) 部分下,点击 数据源(Data Sources) 旁边的加号图标。
- 在支持的数据源列表中找到并选择"Palantir Foundry"。
- 为数据源指定名称,并保持数据库版本不变。然后,选择您将使用该连接的 MicroStrategy 项目。选择 默认数据库连接(Default Database Connection) 下拉菜单,然后选择 添加新数据库连接(Add New Database Connection)。
- 按照提示添加您的 Foundry 连接详情,包括连接属性。
方式 2:使用 MicroStrategy 数据集创建 Foundry 数据源
- 如果您使用的是 2021 Update 9 或更高版本,可以使用 MicroStrategy 数据集创建 Foundry 数据源。在 Workstation 的 帮助(Help) 菜单中禁用 启用新数据导入体验(Enable New Data Import Experience)。
- 在 分析(Analysis) 部分下,选择 数据集(Datasets) 旁边的加号图标,然后在 创建数据集(Create Dataset) 对话框中选择 数据导入多维数据集(Data Import Cube)。
- 在 数据源(Data Sources) 窗口中搜索"Palantir Foundry"并从列表中选择它。
- 在 选择导入选项(Select Import Options) 窗口中选择任意选项,然后选择 下一步(Next)。在本指南中,我们将选择 选择表(Select Tables) 选项。
- 在 从表导入(Import from Table) 窗口中,通过选择 数据源(Data Sources) 旁边的加号图标来创建数据源。
- 使用下方第 2 部分中显示的步骤提供连接属性。
第 2 部分:配置 Foundry 连接设置
要创建与 Foundry 的连接,您必须提供以下连接属性:
- 服务器(Server): 您通常用于访问 Foundry 的 URL,例如
<subdomain>.palantirfoundry.com。 - 目录(Catalog): Foundry 项目的路径,例如
/MyOrg/MyProject。此字段仅在 2021 Update 9 或更高版本中为必填项。设置此属性可以解决 MicroStrategy 中的表浏览问题。如果您使用的是 2021 Update 8 版本,请切换到 高级(Advanced) 选项卡,并在 其他连接字符串参数(Additional Connection String Parameters) 中添加该参数。 - 令牌(Token): 在 Foundry 中生成的有效用户令牌。有关如何获取令牌的说明,请参阅用户生成的令牌文档。
:::callout{theme="neutral"} MicroStrategy 连接器仅支持基于令牌的身份验证(token-based authentication)。 :::
- 其他连接字符串参数(可选): 切换到 高级(Advanced) 选项卡并指定任何其他连接参数。参数应使用
&符号分隔,例如OptionalParam1=<VALUE>&OptionalParam2=<VALUE>。有关完整连接参数列表,请参阅 Foundry 数据集 JDBC 驱动程序的参数参考文档。如果您使用的是 2021 Update 9 或更高版本,Dialect已设置为推荐值SPARK,以实现 Foundry 在 MicroStrategy 中的最佳集成,并且此值不可更改。
第 3 部分:连接到 Foundry 并选择数据集
- 使用左侧导航栏选择 数据集(Datasets),然后选择 数据导入多维数据集(Data Import Cube) 或 智能多维数据集(Intelligent Cube)。
- 连接到 Foundry 并选择数据集:
- 如果您使用的是 2021 Update 8 版本,请在 帮助(Help) 菜单下选择 启用新数据导入体验(Enable New Data Import Experience)。选择您在前述步骤中创建的 Foundry 数据源,连接到它,然后导入您的 Foundry 数据集。
- 如果您使用的是 2021 Update 9 或更高版本,在数据源列表中搜索"Palantir Foundry",选择它,然后在 选择导入选项(Select Import Options) 窗口中选择任意选项。在 从表导入(Import from Table) 窗口中,选择您之前创建的 Foundry 数据源,连接到它,然后导入您的 Foundry 数据集。
- 继续在 MicroStrategy 中构建您的报表。