Add content(添加内容)
Add text in a report
If the report is empty
- (If needed) Switch to Editing mode.
- (If needed) In the report body, click on the “Start typing, or” message.
- Start typing.
If the report already has content
- (If needed) Switch to Editing mode.
- Move your cursor above or below any widget or row of widgets.
- Click the
+icon (Widget Creator) element that appears on hover. - Start typing.
Edit text in a report
Report text can be freely formatted while the report is in Editing mode. In particular, text can be styled using both block styles, which affect how an entire text block is formatted, and inline styles, which affect how a particular word or string of text is formatted.
Inline styles
Use inline styles to emphasize snippets of text within a larger block.
Add inline styles
You can apply an inline style in two ways: via a keyboard shortcut or by selecting text and clicking the appropriate button in the formatting toolbar.
Reports supports the following inline styles:
| Style | Keyboard shortcut | Button | Example |
|---|---|---|---|
| Bold | Cmd + B |  |
 |
| Italic | Cmd + I |  |
 |
| Underline | Cmd + U |  |
 |
| Strike through | Cmd + Shift + X |  |
 |
| Code snippet | Cmd + Shift + K |  |
 |
| Link | Cmd + K |  |
 |
| Highlight | None |  |
 |
Remove inline styles
To remove a particular inline style, click its corresponding button in the toolbar or use the corresponding keyboard shortcut again.
Block styles
Block styles affect how an entire text block is formatted, such as in paragraphs, headings, lists, blockquotes, or code blocks.
Paragraphs
Text blocks are formatted as paragraphs by default. Paragraphs have no special styling other than a bottom margin when other paragraphs follow. To style or restyle a block as a paragraph:
- Select some text.
- Click the block-style button in the inline toolbar.
- Click Paragraph in the menu that appears.
Headings
You can add up to six levels of headings in a report. Headings add visual structure to your report, and they will also appear and indent content in the report Outline. To create a heading:
- Type one of the following at the beginning of a line:
#for Heading 1 (the most prominent)##for Heading 2###for Heading 3####for Heading 4######for Heading 5#######for Heading 6 (the least prominent)- Use the Spacebar key.
or
- Select some text.
- Click the block-style button in the inline toolbar.
- Click Header one or Header two in the menu that appears.
:::callout{theme="neutral"} Although Reports supports six levels of headings, only the first two are shown in the block-style menu. :::
Lists
Numbered List
To add an ordered/numbered list to a report:
- Type
1.at the beginning of a line. - Use the Spacebar key.
or
- Select some text.
- Click the block-style button in the inline toolbar.
- Click Numbered list in the menu that appears.
:::callout{theme="neutral"} Numbered lists will always start at 1. :::
Bulleted List
To add a bulleted (or “unordered”) list to a report:
- Type
-or*at the beginning of a line. - Use the Spacebar key.
or
- Select some text.
- Click the block-style button in the inline toolbar.
- Click Bulleted list in the menu that appears.
Bulleted lists support up to 11 levels of indentation:
- To indent a bullet, use the Tab key.
- To de-indent a bullet, use the Shift+Tab keyboard shortcut.
Checklist
Use a checklist to track to-do's, follow-ups, and other action items. To create a checklist:
- Type
[]at the beginning of a line. - Use the Spacebar key.
or
- Select some text.
- Click the block-style button in the inline toolbar.
- Click Checklist in the menu that appears.
Blockquotes
Use a blockquote to present quotations, excerpts, and other callouts. To create a blockquote:
- Type
>at the beginning of a line. - Use the Spacebar key.
or
- Select some text.
- Click the block-style button in the inline toolbar.
- Click Blockquote in the menu that appears.
Code block
Use a code block to present multiple lines of code or other fixed-width text. To create a code block:
- Type ``` (three back-ticks) at the beginning of a line.
- Use the Enter key.
or
- Select some text.
- Click the block-style button in the inline toolbar.
- Click Code block in the menu that appears.
Other styling options
Horizontal line
To insert a horizontal line (also known as a horizontal rule or horizontal divider) into a report:
- Type
---on a blank line. - Use the Enter key.
Inline parameters
You may wish to display the current value of a parameter within a block of text (learn more about parameters). To do this:
- Select some text.
- Click the Parameter button in the formatting toolbar to create a new string parameter.
- Merge the new parameter into the desired Contour parameter (learn more about merging parameters).
The current value of the merged parameter will now appear inline when in Viewing mode (in Editing mode, only the name of the parameter will appear inline).
Add a table to a report
Reports supports several different types of tables. Table widgets are the most basic: you can create them inside of a report to format manually inputted information into a simple row-and-column layout.
Table widgets are different from data-backed tables from other Palantir Foundry applications. For instance, a report can also contain:
- Contour Table boards to see a preview of a particular dataset, or
- Fusion spreadsheets to show richly formatted tables optionally backed by a dataset.
Steps
You can add a Table widget to a report at any time. Once you've added a table, you can type freely into its cells and also change its size (for details, see Resize a table in a report).
If the report is empty
-
(If needed) Switch to Editing mode.
-
Click the table icon next to the “Start typing, or” message.

-
Drag out the initial number of rows and columns the table should have.
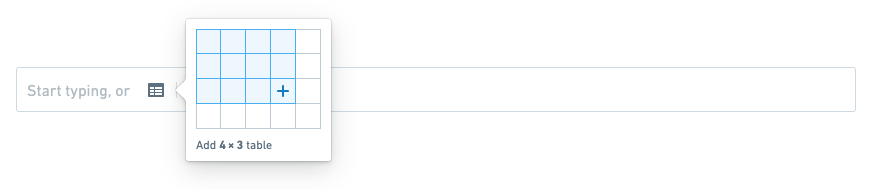
-
Click to create the table.

If the report already has content
-
(If needed) Switch to Editing mode.
-
Move your cursor above or below any row of widgets, and click the Widget Creator element that appears on hover.

-
Click the table icon next to the “Start typing, or” message.
-
Drag out the initial number of rows and columns the table should have.
-
Click to confirm.
Resize a table in a report
After adding a Table widget, you can easily add or remove rows and columns within it.
:::callout{theme="neutral"} Table widgets always have a single header row. You can insert rows above any row except the header row. :::
Insert rows and columns
Insert a single row or column
Rows and columns can be inserted below or to the right of the currently focused cell.
- (If needed) Switch to Editing mode.
- (If needed) Click a cell to clear the current selection.
- Right-click the cell.
-
Click any of the available insert options to insert a row or column where appropriate:
-
Insert column left
- Insert column right
- Insert row above
- Insert row below
Insert multiple rows or columns
You can insert multiple rows or columns by selecting a larger region first. In particular, if there are N rows and M columns in your current selection, then you can insert N rows or M columns at once.
- (If needed) Switch to Editing mode.
- Select a region of N rows and/or M columns.
- Right-click any cell in the selected region.
-
Click any of the available insert options to insert a row or column where appropriate:
-
Insert M columns left
- Insert M columns right
- Insert N rows above
- Insert N rows below
Delete rows and columns
Delete a single row or column
- (If needed) Switch to Editing mode.
- (If needed) Click a cell to clear the current selection.
- Right-click the cell.
- Click Delete row or Delete column.
Delete multiple rows or columns
You can delete multiple rows or columns by selecting a larger region first. In particular, if there are N rows and M columns in your current selection, then you can delete N rows or M columns at once.
:::callout{theme="neutral"} Table widgets always have a single header row. The header row cannot be deleted. :::
- (If needed) Switch to Editing mode.
- Select a region of N rows and/or M columns.
- Right-click any cell in the selected region.
- Click Delete N rows or Delete M columns.
Change row and column sizes
Changing row height
Changing row heights is not supported at this time. Table widgets will display only a single line of text per cell.
Changing column width
- (If needed) Switch to Editing mode.
- Move your mouse cursor over the right edge of a column's header cell (the top-most cell in the column).
- Click and drag to resize the column.
- Release the mouse button to save.
Add a new image or video to a report
There are three different ways to add images, video, and other resources to a report:
- Upload media directly to a report. Media will be stored within the report resource and will appear with no additional background, footer, or borders. Only images and video can be uploaded in this way.
- Link to a resource in your files directory. Resources already in Foundry can be added to a report, appearing with a footer linking back to the original resource. For more information on this approach, see Link to a Foundry resource in a report below.
- Upload a resource to Foundry within a report, then link to it. This is an old and outdated approach for adding media to a report. It is functionally identical to linking to a resource, though it has been superseded by 1 above.
Upload to a report
You can upload images and videos directly to a report. With this approach, the images and videos will be “bundled” with the report, so they won't appear as separate files in Foundry.
To upload an image or video directly to a report:
-
(If needed) Switch to Editing mode.
-
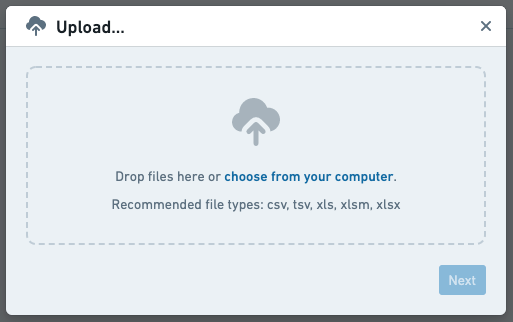
Click the image icon next to the “Start typing, or” message.

-
Click the drop zone to choose a file, or drag a file from your computer into the drop zone.

Upload to Foundry and link from a report [Deprecated]
:::callout{theme="warning"} This approach has been deprecated in favor of the approach described above in Upload to a report. :::
From a report, you can also upload an image and video to Foundry as a standalone resource—and then link to the resource (as described in Link to a Foundry resource in a report below).
To do this:
-
(If needed) Switch to Editing mode.
-
Click the upload icon next to the “Start typing, or” message.

-
Select a file to upload via the dialog that appears.
-
Click Next to upload the image to Foundry. The resource should then appear in the report automatically (if it doesn't appear, you can link to it as described in Link to a Foundry resource in a report).
Supported file types
Images
The following file types are supported for direct image uploads:
- BMP
- GIF
- JPG/JPEG
- PNG
Videos
The following file types are supported for direct video uploads:
- MOV
- MP4
Link to a Foundry resource in a report
You can link to images, videos, and other types of files from your files directory in Foundry. Linked images and videos will appear in the report, whereas other resource types like data sets, PDFs, or DOCX documents will appear as minimal representations (a clickable resource title with a corresponding resource icon).
To link to an image, video, or other resource from your files directory in Foundry:
-
(If needed) Switch to Editing mode.
-
Click the link icon next to the “Start typing, or” message.

-
Select a resource from the dialog that appears.
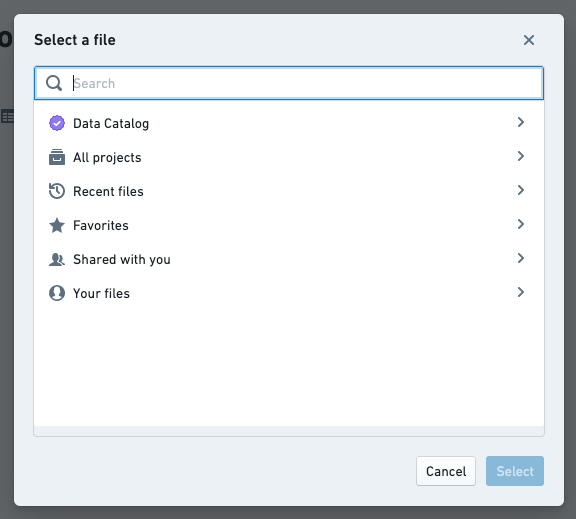
-
Click Select in the dialog to link the resource in your report. Some examples:
-
A Foundry dataset:

-
A Contour analysis:

-
Another report:

-
An image:
-
A video:

Duplicate content within a report
You can make a copy of any widget contained in a report (e.g. a block of text, an image, or a Contour table).
To duplicate a widget:
- (If needed) Switch to Editing mode.
- Click the gear icon in the top-right corner of the widget you'd like to duplicate.
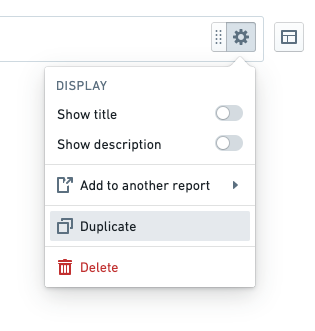
The duplicated widget will be added immediately beneath the original widget.
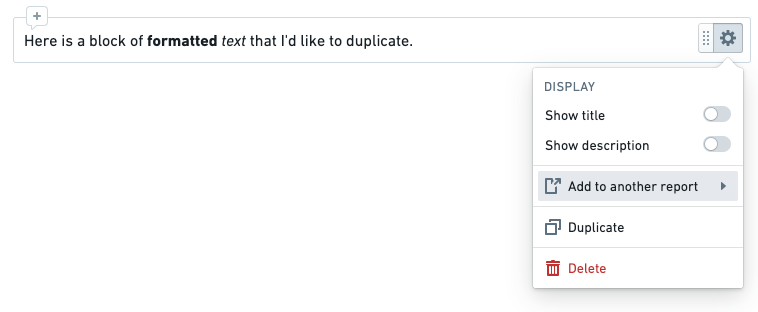
Add content from another report
You can copy any widget (e.g. a block of text, an image, a Contour table) from one report to another, provided you have edit permissions on both reports.
To copy a widget from one report to another:
-
(If needed) Switch to Editing mode.
-
Click the gear icon in the top-right corner of the widget you'd like to duplicate.
-
Click Add to another report in the menu that appears.
-
Select a report from the menu that appears.
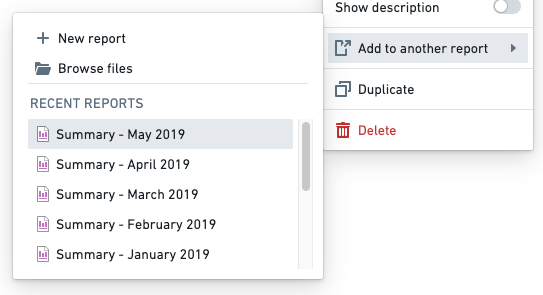
You should see a confirmation toast when the widget has been successfully copied to the report that you selected.

The copied widget will be added to the bottom of the other report.
中文翻译
添加内容
在报告中添加文本
如果报告为空
- (如有需要) 切换到编辑模式(Editing mode)。
- (如有需要) 在报告正文中,点击"开始输入,或"消息。
- 开始输入。
如果报告已有内容
- (如有需要) 切换到编辑模式。
- 将光标移动到任意小组件(widget)或小组件行的上方或下方。
- 点击悬停时出现的
+图标(小组件创建器 Widget Creator)。 - 开始输入。
编辑报告中的文本
在编辑模式下,报告文本可以自由格式化。具体来说,文本可以使用块样式(block styles)和内联样式(inline styles)进行样式设置。块样式影响整个文本块的格式,而内联样式则影响特定单词或文本字符串的格式。
内联样式
使用内联样式来强调较大文本块中的片段。
添加内联样式
您可以通过两种方式应用内联样式:使用键盘快捷键,或选中文本后点击格式工具栏中的相应按钮。
报告支持以下内联样式:
| 样式 | 键盘快捷键 | 按钮 | 示例 |
|---|---|---|---|
| 加粗(Bold) | Cmd + B | |
|
| 斜体(Italic) | Cmd + I | |
|
| 下划线(Underline) | Cmd + U | |
|
| 删除线(Strike through) | Cmd + Shift + X | |
|
| 代码片段(Code snippet) | Cmd + Shift + K | |
|
| 链接(Link) | Cmd + K | |
|
| 高亮(Highlight) | 无 | |
|
移除内联样式
要移除特定的内联样式,请点击工具栏中对应的按钮,或再次使用相应的键盘快捷键。
块样式
块样式影响整个文本块的格式,例如段落、标题、列表、块引用或代码块。
段落
文本块默认格式化为段落。段落除了在后续有其他段落时会有底部边距外,没有特殊样式。要将文本块设置为或重新设置为段落样式:
- 选中一些文本。
- 点击内联工具栏中的块样式按钮。
- 在出现的菜单中点击段落(Paragraph)。
标题
您可以在报告中添加最多六级标题。标题为报告增加了视觉结构,并且它们也会出现在报告大纲(Outline)中并缩进内容。要创建标题:
- 在一行开头输入以下之一:
#表示标题 1(最突出)##表示标题 2###表示标题 3####表示标题 4######表示标题 5#######表示标题 6(最不突出)- 按空格键。
或者
- 选中一些文本。
- 点击内联工具栏中的块样式按钮。
- 在出现的菜单中点击标题一(Header one)或标题二(Header two)。
:::callout{theme="neutral"} 虽然报告支持六级标题,但块样式菜单中仅显示前两级。 :::
列表
编号列表
要向报告添加有序/编号列表:
- 在一行开头输入
1.。 - 按空格键。
或者
- 选中一些文本。
- 点击内联工具栏中的块样式按钮。
- 在出现的菜单中点击编号列表(Numbered list)。
:::callout{theme="neutral"} 编号列表始终从 1 开始。 :::
项目符号列表
要向报告添加项目符号(或"无序")列表:
- 在一行开头输入
-或*。 - 按空格键。
或者
- 选中一些文本。
- 点击内联工具栏中的块样式按钮。
- 在出现的菜单中点击项目符号列表(Bulleted list)。
项目符号列表最多支持 11 级缩进:
- 要增加项目符号的缩进,请使用 Tab 键。
- 要减少项目符号的缩进,请使用 Shift+Tab 键盘快捷键。
复选框列表
使用复选框列表(checklist)来跟踪待办事项、后续跟进和其他行动项。要创建复选框列表:
- 在一行开头输入
[]。 - 按空格键。
或者
- 选中一些文本。
- 点击内联工具栏中的块样式按钮。
- 在出现的菜单中点击复选框列表(Checklist)。
块引用
使用块引用(blockquote)来呈现引文、摘录和其他标注。要创建块引用:
- 在一行开头输入
>。 - 按空格键。
或者
- 选中一些文本。
- 点击内联工具栏中的块样式按钮。
- 在出现的菜单中点击块引用(Blockquote)。
代码块
使用代码块(code block)来呈现多行代码或其他等宽文本。要创建代码块:
- 在一行开头输入 ```(三个反引号)。
- 按回车键。
或者
- 选中一些文本。
- 点击内联工具栏中的块样式按钮。
- 在出现的菜单中点击代码块(Code block)。
其他样式选项
水平线
要在报告中插入水平线(也称为水平分隔线):
- 在空白行输入
---。 - 按回车键。
内联参数
您可能希望在文本块中显示参数的当前值(了解更多关于参数的信息)。操作如下:
- 选中一些文本。
- 点击格式工具栏中的参数(Parameter)按钮以创建一个新的字符串参数。
- 将新参数合并到所需的 Contour 参数中(了解更多关于合并参数的信息)。
在查看模式(Viewing mode)下,合并后的参数的当前值将以内联方式显示(在编辑模式下,仅参数名称会以内联方式显示)。
向报告添加表格
报告支持多种不同类型的表格。表格小组件(Table widgets)是最基础的:您可以在报告内部创建它们,将手动输入的信息格式化为简单的行列布局。
表格小组件不同于来自其他 Palantir Foundry 应用程序的基于数据的表格。例如,报告还可以包含:
- 来自 Contour 的 Contour 表格面板(Contour Table boards),用于预览特定数据集,或
- 来自 Fusion 的 Fusion 电子表格(Fusion spreadsheets),用于显示可选地由数据集支持的、格式丰富的表格。
步骤
您可以随时向报告添加表格小组件。添加表格后,您可以自由地在单元格中输入内容,并更改其大小(详情请参阅调整报告中的表格大小)。
如果报告为空
-
(如有需要) 切换到编辑模式。
-
点击"开始输入,或"消息旁边的表格图标。
-
拖拽出表格应具有的初始行数和列数。
-
点击以创建表格。
如果报告已有内容
-
(如有需要) 切换到编辑模式。
-
将光标移动到任意小组件行的上方或下方,然后点击悬停时出现的小组件创建器(Widget Creator)元素。
-
点击"开始输入,或"消息旁边的表格图标。
-
拖拽出表格应具有的初始行数和列数。
-
点击以确认。
调整报告中的表格大小
添加表格小组件后,您可以轻松地在其中添加或删除行和列。
:::callout{theme="neutral"} 表格小组件始终有一个标题行。您可以在除标题行之外的任何行上方插入行。 :::
插入行和列
插入单行或单列
可以在当前焦点单元格的下方或右侧插入行和列。
- (如有需要) 切换到编辑模式。
- (如有需要) 点击一个单元格以清除当前选择。
- 右键单击该单元格。
-
点击任何可用的插入选项以在适当位置插入行或列:
-
在左侧插入列(Insert column left)
- 在右侧插入列(Insert column right)
- 在上方插入行(Insert row above)
- 在下方插入行(Insert row below)
插入多行或多列
您可以通过先选择更大的区域来插入多行或多列。具体来说,如果当前选择中有 N 行和 M 列,那么您可以一次插入 N 行或 M 列。
- (如有需要) 切换到编辑模式。
- 选择一个包含 N 行和/或 M 列的区域。
- 右键单击所选区域中的任意单元格。
-
点击任何可用的插入选项以在适当位置插入行或列:
-
在左侧插入 M 列
- 在右侧插入 M 列
- 在上方插入 N 行
- 在下方插入 N 行
删除行和列
删除单行或单列
- (如有需要) 切换到编辑模式。
- (如有需要) 点击一个单元格以清除当前选择。
- 右键单击该单元格。
- 点击删除行(Delete row)或删除列(Delete column)。
删除多行或多列
您可以通过先选择更大的区域来删除多行或多列。具体来说,如果当前选择中有 N 行和 M 列,那么您可以一次删除 N 行或 M 列。
:::callout{theme="neutral"} 表格小组件始终有一个标题行。标题行不能被删除。 :::
- (如有需要) 切换到编辑模式。
- 选择一个包含 N 行和/或 M 列的区域。
- 右键单击所选区域中的任意单元格。
- 点击删除 N 行或删除 M 列。
更改行和列的大小
更改行高
目前不支持更改行高。表格小组件每个单元格仅显示一行文本。
更改列宽
- (如有需要) 切换到编辑模式。
- 将鼠标光标移动到列标题单元格(该列最顶部的单元格)的右边缘。
- 点击并拖拽以调整列宽。
- 松开鼠标按钮以保存。
向报告添加新图片或视频
有三种不同的方式可以向报告添加图片、视频和其他资源:
- 直接将媒体上传到报告。 媒体将存储在报告资源内,并且显示时没有额外的背景、页脚或边框。只有图片和视频可以通过这种方式上传。
- 链接到文件目录中的资源。 已经存在于 Foundry 中的资源可以添加到报告中,并显示一个链接回原始资源的页脚。有关此方法的更多信息,请参见下文链接到报告中的 Foundry 资源。
- 在报告内将资源上传到 Foundry,然后链接到它。 这是一种向报告添加媒体的旧有过时方法。它在功能上与链接到资源相同,但已被上述方法 1 取代。
上传到报告
您可以直接将图片和视频上传到报告。通过这种方式,图片和视频将与报告"捆绑"在一起,因此它们不会作为单独的文件出现在 Foundry 中。
要将图片或视频直接上传到报告:
-
(如有需要) 切换到编辑模式。
-
点击"开始输入,或"消息旁边的图片图标。
-
点击放置区域以选择文件,或将文件从您的计算机拖拽到放置区域中。
上传到 Foundry 并从报告链接 [已弃用]
:::callout{theme="warning"} 此方法已弃用,请改用上文上传到报告中描述的方法。 :::
您也可以从报告中将图片和视频作为独立资源上传到 Foundry,然后链接到该资源(如下文链接到报告中的 Foundry 资源所述)。
操作如下:
-
(如有需要) 切换到编辑模式。
-
点击"开始输入,或"消息旁边的上传图标。
-
通过出现的对话框选择要上传的文件。
-
点击下一步(Next)将图片上传到 Foundry。该资源应自动出现在报告中(如果未出现,您可以按照链接到报告中的 Foundry 资源中的描述链接到它)。
支持的文件类型
图片
支持直接上传的图片文件类型如下:
- BMP
- GIF
- JPG/JPEG
- PNG
视频
支持直接上传的视频文件类型如下:
- MOV
- MP4
链接到报告中的 Foundry 资源
您可以链接到 Foundry 文件目录中的图片、视频和其他类型的文件。链接的图片和视频将显示在报告中,而其他资源类型(如数据集、PDF 或 DOCX 文档)将显示为最小化表示(一个可点击的资源标题及相应的资源图标)。
要链接到 Foundry 文件目录中的图片、视频或其他资源:
-
(如有需要) 切换到编辑模式。
-
点击"开始输入,或"消息旁边的链接图标。
-
从出现的对话框中选择一个资源。
-
在对话框中点击选择(Select)以在报告中链接该资源。一些示例:
-
Foundry 数据集:
-
Contour 分析:
-
另一个报告:
-
一张图片:
-
一个视频:
复制报告中的内容
您可以复制报告中包含的任何小组件(例如,文本块、图片或 Contour 表格)。
要复制小组件:
- (如有需要) 切换到编辑模式。
- 点击您要复制的小组件右上角的齿轮图标。
复制的小组件将立即添加到原始小组件的下方。
从另一个报告添加内容
只要您对两个报告都有编辑权限,就可以将任何小组件(例如,文本块、图片、Contour 表格)从一个报告复制到另一个报告。
要将小组件从一个报告复制到另一个报告:
-
(如有需要) 切换到编辑模式。
-
点击您要复制的小组件右上角的齿轮图标。
-
在出现的菜单中点击添加到另一个报告(Add to another report)。
-
从出现的菜单中选择一个报告。
当小组件成功复制到您选择的报告时,您应该会看到一个确认提示。
复制的小组件将添加到另一个报告的底部。