Add Ontology data to Gaia(将 Ontology 数据添加到 Gaia)
You can add geospatial data configured as part of your Foundry Ontology to Gotham's Gaia application through varying methods based on your use case. To make Foundry Ontology data accessible to Gotham, you will need to establish a unified representation of your ontology across both by type mapping the object types of interest using Foundry's Ontology Manager.
:::callout{theme="neutral" title="Note"}
If your enrollment contains Map Rendering Service (MRS), then you do not need to complete the type mapping process to view Foundry objects in Gaia. You can create new ontology objects from or add existing objects to Gotham without additional configuration. Follow the instructions here to check if your enrollment contains MRS. If your enrollment does not contain MRS, then you can complete the type mapping process by following the existing instructions as part of Foundry's Ontology documentation
Contact Palantir Support with questions about MRS availability, installation, or its additional documentation present in Gotham.
:::
Comparing available methods to add Foundry data to Gaia
There are six methods you can use to add data in your Foundry Ontology to Gaia once you type-map an object type in Foundry to enable Gotham integration:
- Drag and drop individual objects and saved explorations
- Search for your Foundry object type in Gaia
- Create a search template
- Configure a real-time geotemporal series sync in Foundry
- Use a Function-backed Enterprise Map Layer
- Use a versioned object set-backed Enterprise Map Layer
More information about each method is available in the table below:
| Drag and drop | Foundry object search | Search templates | Geotemporal series sync | Function-backed Enterprise Map Layer | Versioned object set-backed Enterprise Map Layer | |
|---|---|---|---|---|---|---|
| Object quantity supported | 1 object at a time or 1 object set with up to 5,000 objects | 5,000 | 5,000 | 5,000,000 | 5,000 | 5,000 |
| Data refresh latency | Static | Static or 30 seconds | Static or 30 seconds | Real time | Configurable | Configurable |
| Data filtering capability | Within Foundry's Object Explorer | Within a Gaia map's left-hand panel | Within a Gaia map's left-hand panel | Within a Gaia map's left-hand panel | Within a Gaia map's left-hand panel or Foundry's Code Repositories | Within Foundry's Object Explorer |
| Recommended use cases | Quickly move objects from Foundry's Object Explorer into Gaia | Perform simple object searches | Create a specific set of filters through YAML on an object set for reuse across Gaia maps | Integrate high-scale data which updates in real time | Leverage flexibility and power of Foundry Ontology Functions | Ensure map layer updates when objects are added or removed from Foundry |
| User administrative prerequisites | None | None | Access to Gaia admin application | None | Access to Gaia admin application | Access to Gaia admin application |
| Level of effort to implement | Low | Low | Medium | High | High | High |
:::callout{theme="neutral"} To add Foundry data to Gaia via search templates, function-backed Enterprise Map Layers, or versioned object set-backed Enterprise Map Layers, you will need access to Gaia's admin application. Contact Palantir Support with questions about admin application access. :::
The sections below provide detailed instructions to implement each integration method.
Drag and drop individual objects and saved explorations
You can drag and drop individual objects or object sets derived from saved explorations (which may contain up to 5,000 objects) from Foundry onto a Gaia map.
To drag and drop individual objects from Foundry to your Gaia map:
- Launch Object Explorer in Foundry.
- Search for an object type.
- Select an object from the Results panel on the far right side of the Object Explorer screen.
- Select the object's icon in the upper left corner of the Object Explorer screen.
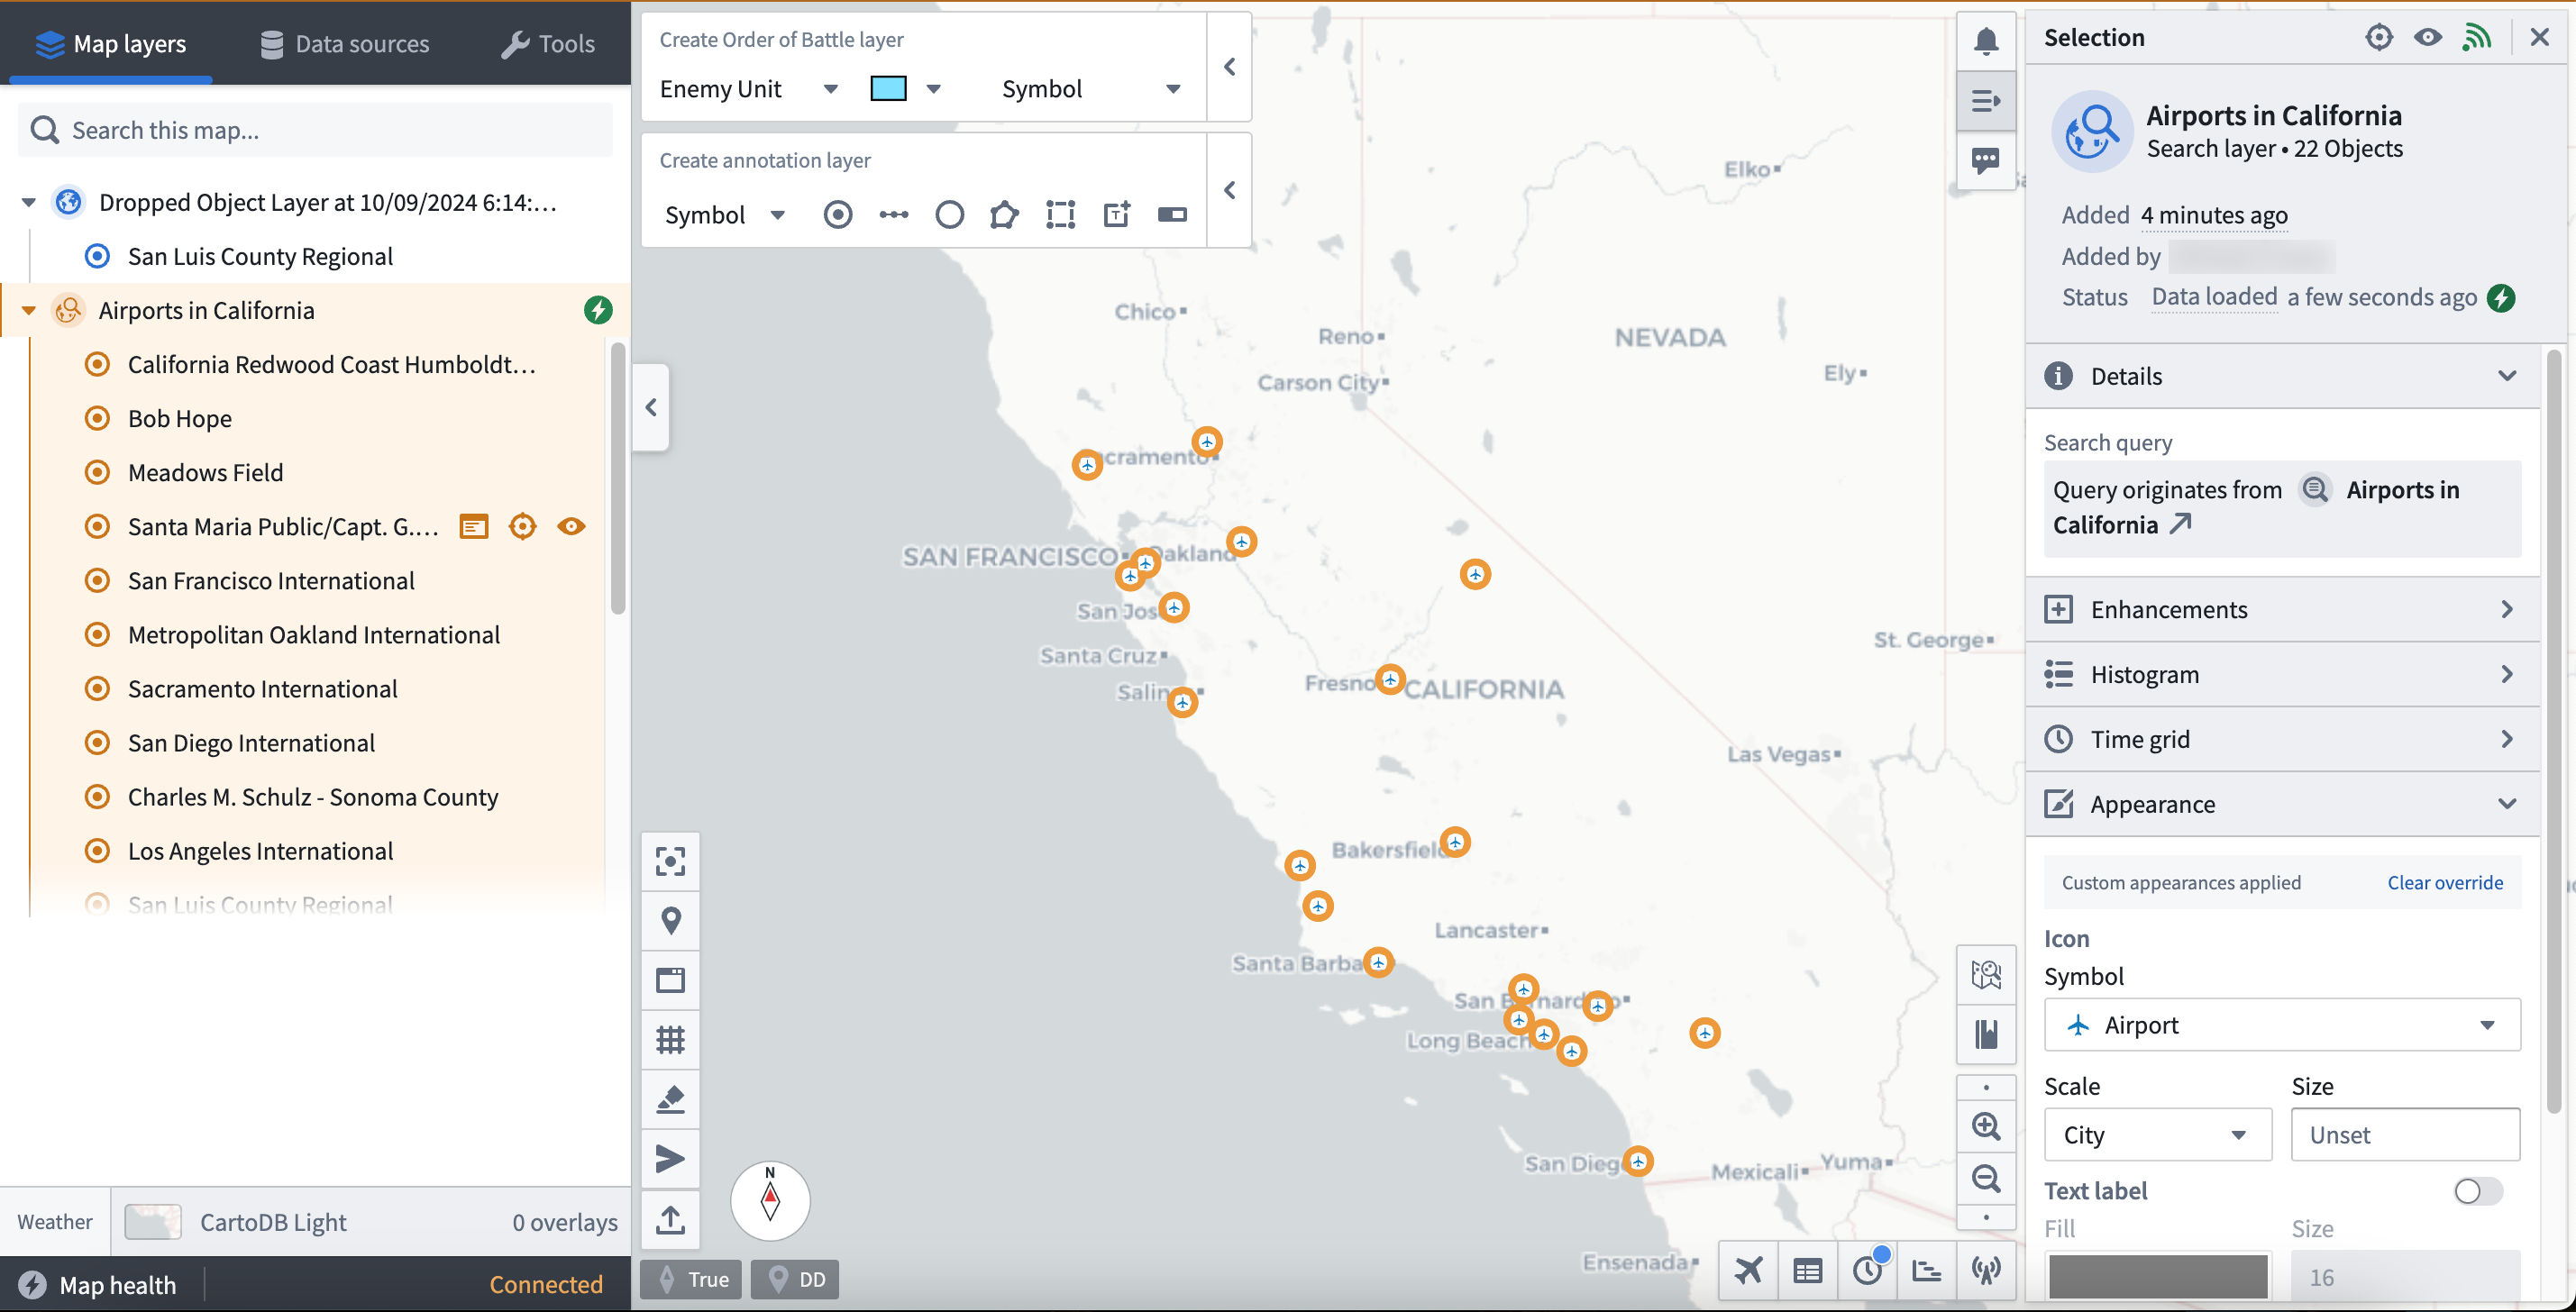
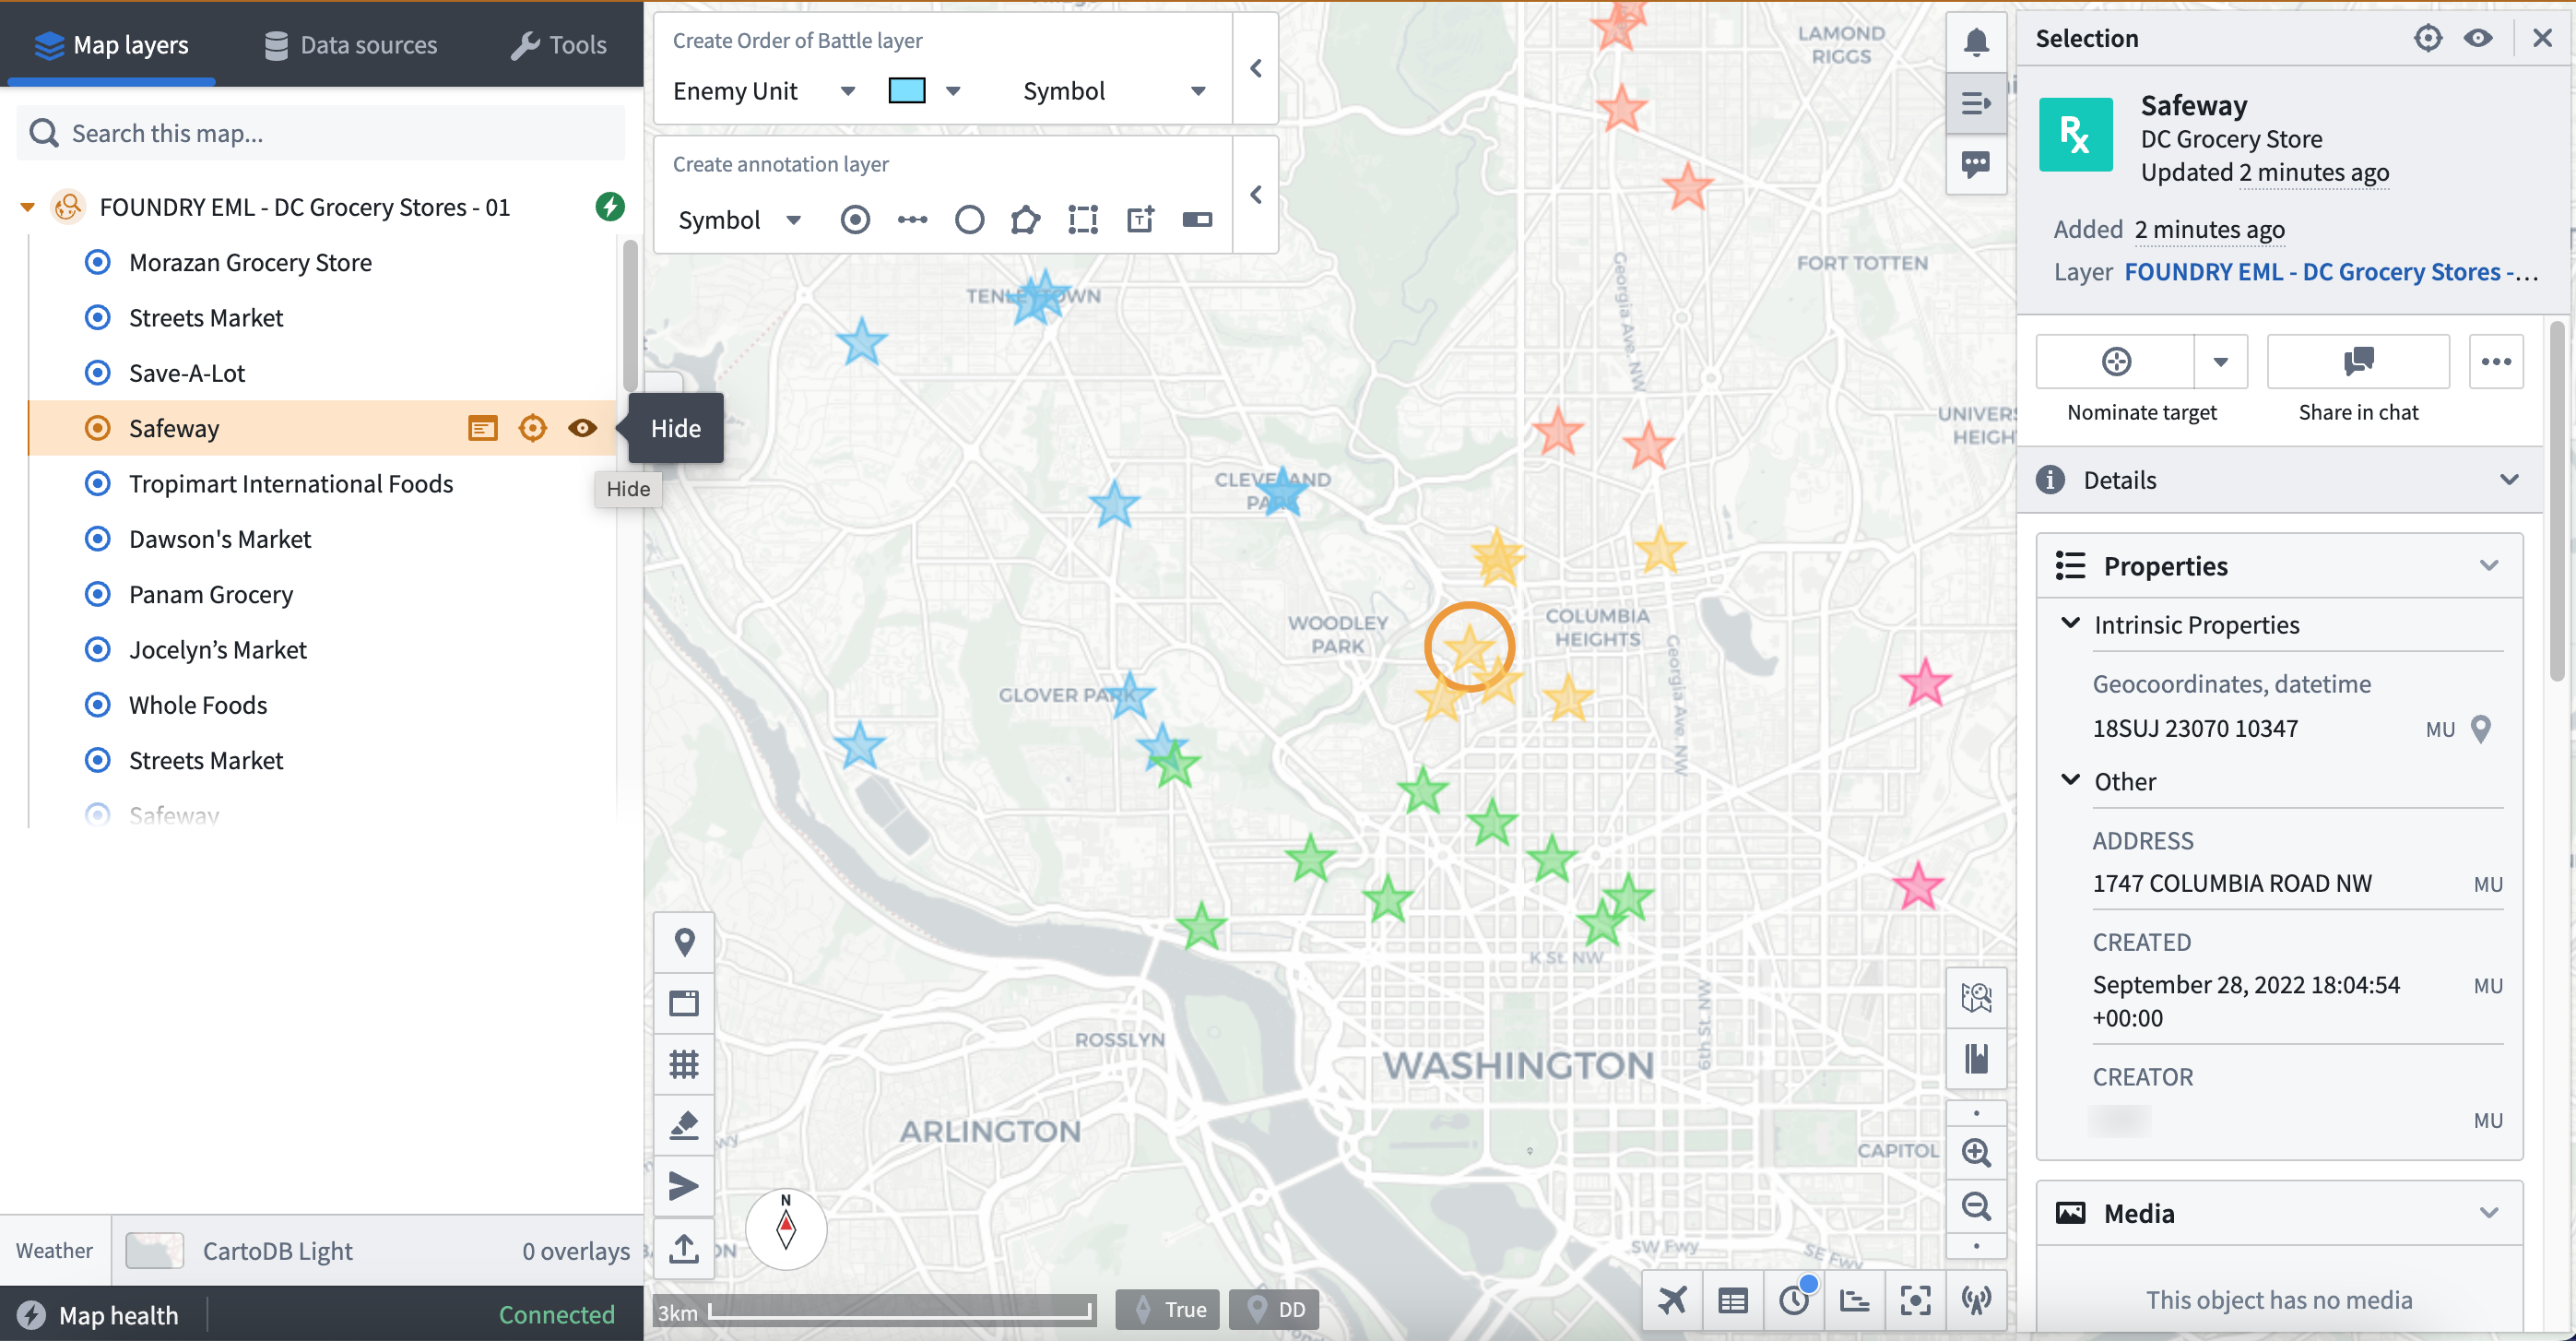
- Drag the object from Foundry and drop it anywhere on your Gaia map - you can now view the object on your map and within the left-hand panel as part of a default layer titled
Dropped Object Layer [Date] [Time].
Before you can drag and drop object sets from Foundry to your Gaia map, you must first create a versioned object set from an existing object type. To create a versioned object set:
- Launch Object Explorer in Foundry.
- Search for and select your object type.
- Select Results in the middle of the top ribbon of the Object Explorer screen.
- Filter for objects to add to your object set using the search bar to narrow your selection by your object type's properties.
- As an example, if your object type captures a location defined by a
nameproperty, you can filter for a selection oflocationobjects by enteringwhere name is location_1 or where name is location_2and pressingenterorreturnon your keyboard. - Select the blue Save button to save your selected objects as an Exploration within a public project.
:::callout{theme="success"} You can also filter for objects by applying object filters directly within charts and graphs on the object type's Ontology Explorer view. :::

After you create and save a versioned object set as an Exploration, you can follow the steps below to drag and drop the it to your Gaia map:
- Select New exploration from the top ribbon of the Object Explorer view.
- Search for and select your object set based on the name you gave it upon creation. The object set may also appear below the Object Explorer search bar under My Explorations & Lists.
- Select the object set's icon in the upper left corner of the Object Explorer screen.
- Drag the object set from Foundry and drop it anywhere on your Gaia map. Objects will individually propagate on the map and in the left-hand panel nested within a search layer automatically named after your saved exploration.
:::callout{theme="success"} You can also drag and drop objects to your Gaia map from other object views within Gotham. :::
Search for your Foundry object type in Gaia
You can search for Foundry object types within the Data sources section of Gaia's left-hand panel. Additionally, you can apply geometric and time-based filters to objects before you add them to your map. To search for Foundry object types from Gaia:
- Select Data Sources within the left-hand panel on your map.
- Search for your object type based on its name within Foundry, and it will appear at the bottom of the left-hand panel under Object types.
- Select Search for objects next to your object type.
- Choose the object(s) you want to add to your map and apply any necessary geometric filters available in the top ribbon of the object search panel.
Allwill add all objects from the discovered object type to your map.Viewwill only add the objects that are available within your current map view.Drawwill add objects to the map that reside within a drawn shape you can configure and add from the search panel.Selectenables you to select an item from the active map.- Apply any necessary time filters to load objects active within a
Static rangeorRolling window. - Optionally toggle on Live update search results, which will update your object or object set every 30 seconds based on newly created objects that match your filtering parameters.
- Enter a name for your object search within Search title and select Search.

:::callout{theme="neutral"}
* If you are unable to view an object after loading your search results, then you should verify that the object type contains a geospatial property indicating its location, such as geopoint or geoshape.
* If you are unable to search for your objects in Gotham after completing the prerequisite type mapping in Foundry, then the Foundry search feature may not be enabled in your Gotham enrollment. Contact Palantir Support for help enabling this capability.
:::
Create a search template
You can create a search template in the Gaia admin application to pre-configure a custom object search interface when adding Foundry objects to a map through the left-hand panel's Data sources tab.
To create and implement a search template, launch the Gaia admin application and follow the steps below:
- Locate the Geo Search panel and select Show to view all active geo searches in your Gotham enrollment.
- Scroll to the bottom of the geo search list and select Add.
- Title your search and populate each configuration input box.
Descriptionwill appear at the top of the search template interface.Tab IDwill enable mapping between your geo search and search template.Tab iconwill appear in the Data sources tab upon user search.Template IDwill matchTab IDand enable mapping between your geo search and search template.Classification, which may be optional depending on your enrollment.ACL Groupswill set permissions for group access.- Input additional configurations, as needed.
- Select Preview and save in the top right ribbon to save your geo search in the Gaia admin application before you configure a search template.
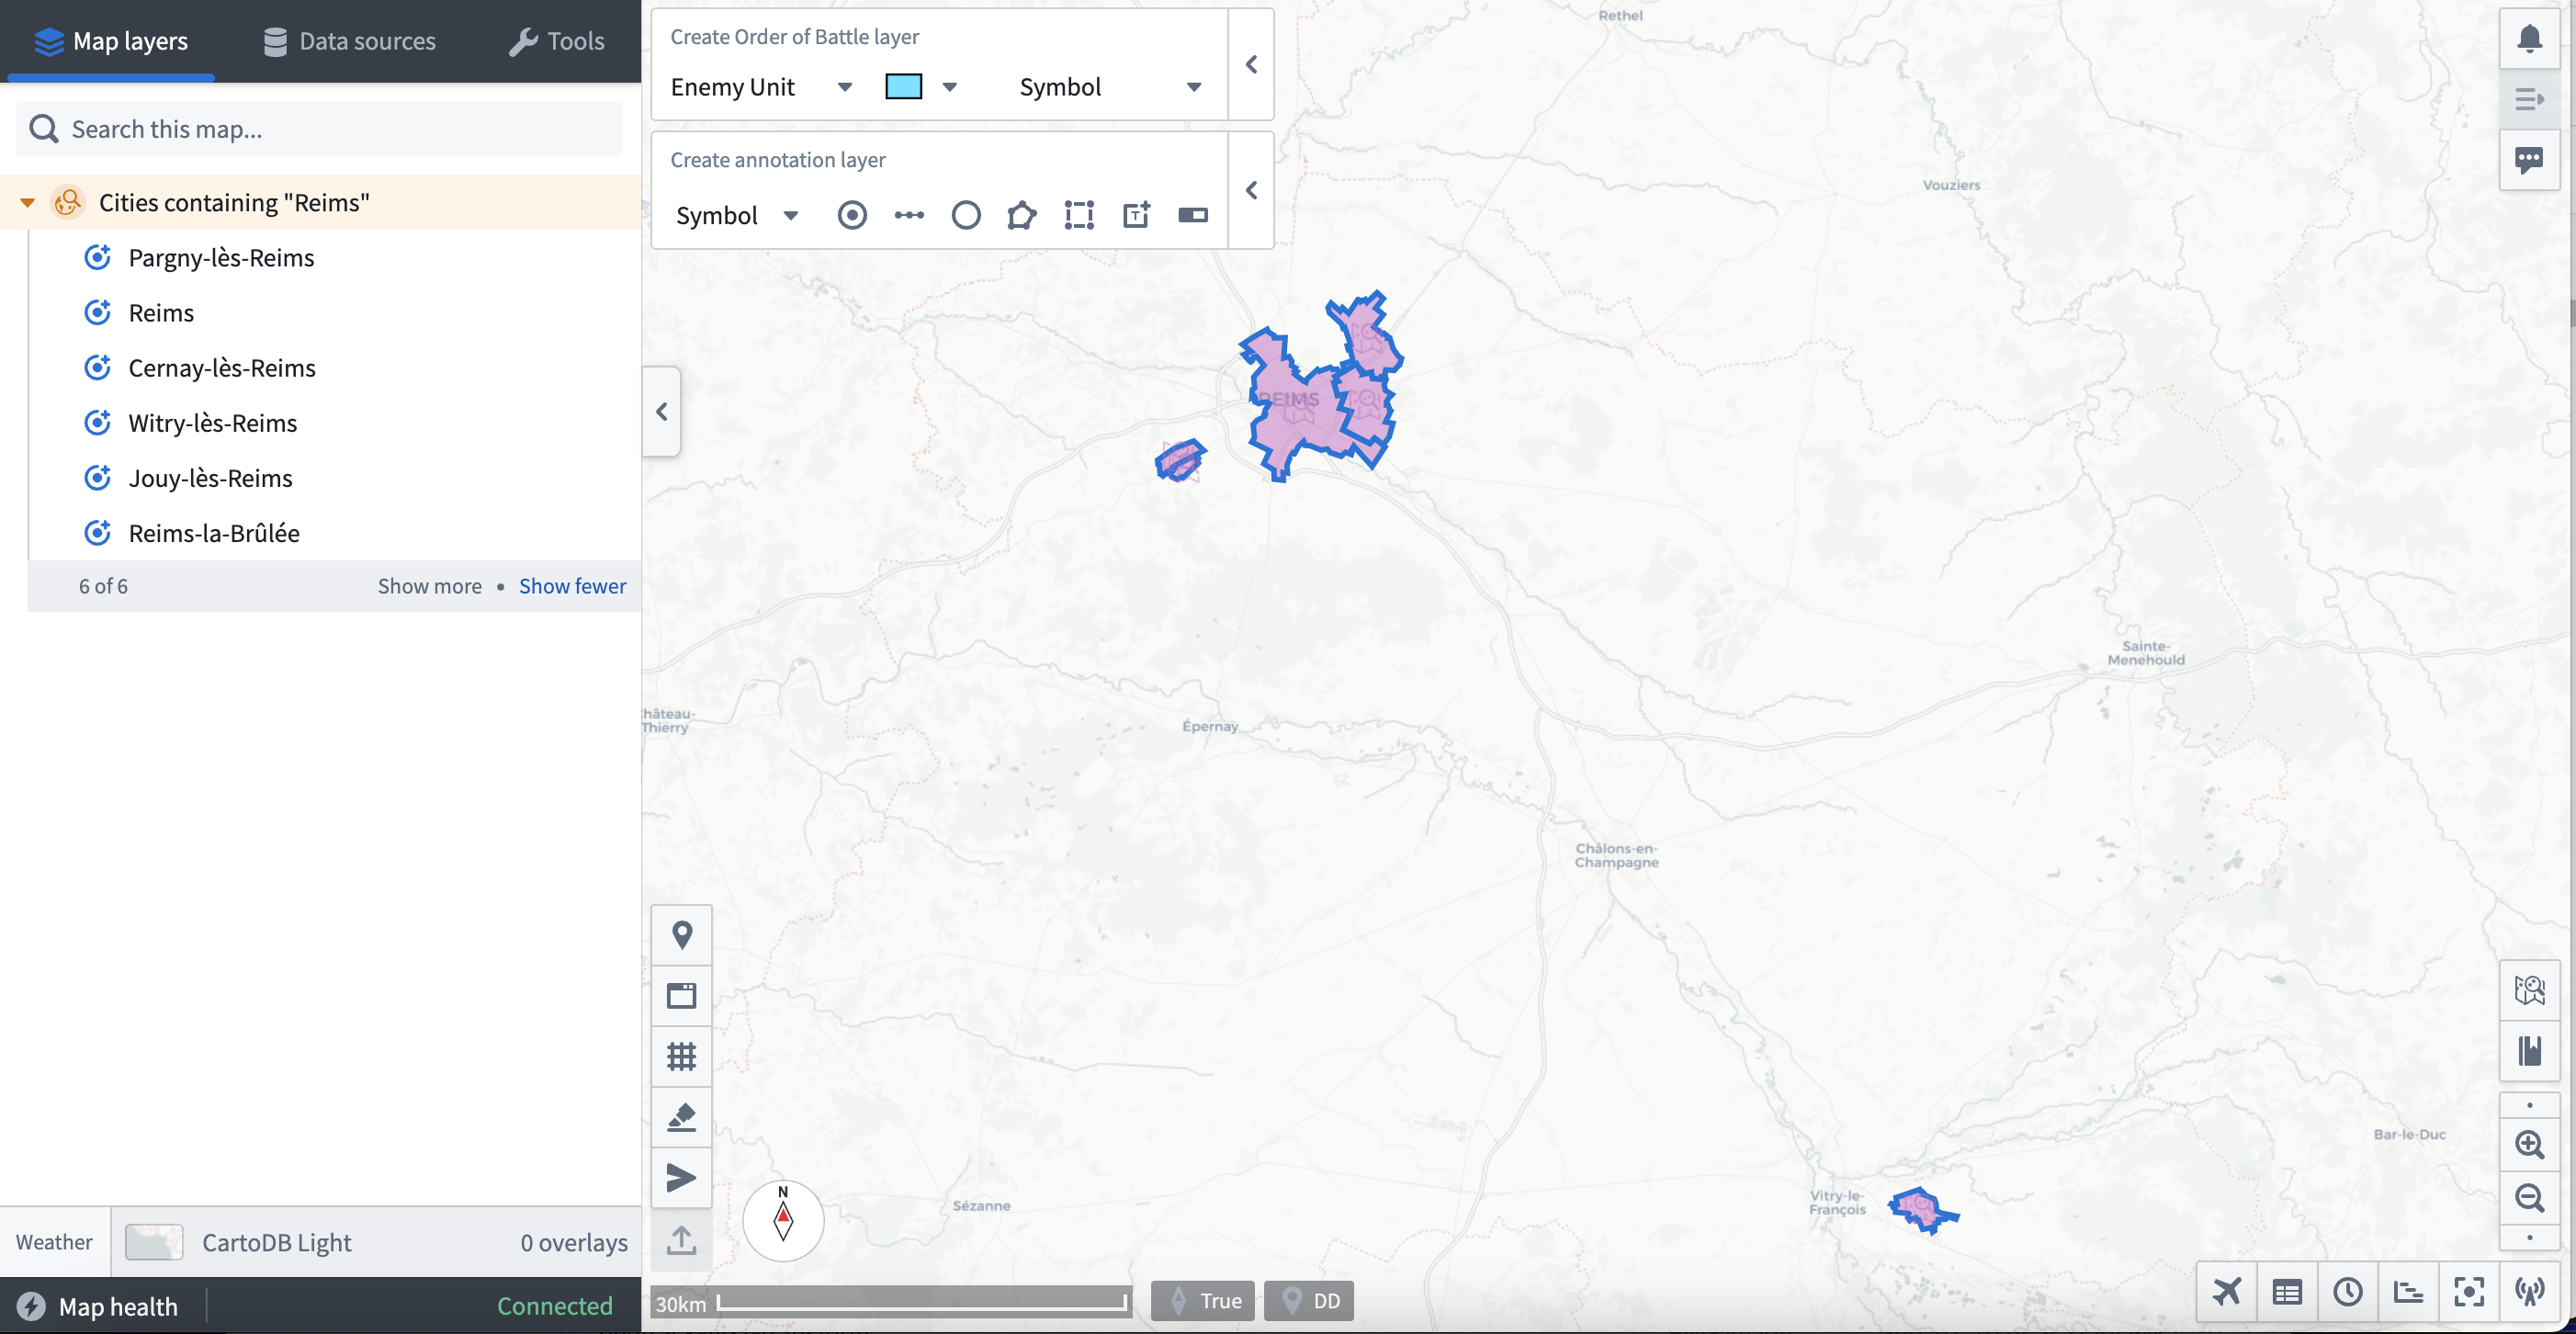
You can reference an example geo search that enables a user to search for cities in France and display their geographic boundaries on a Gaia map once paired with a search template.

- Locate the Search Template panel and select Show to view all active search templates in your Gotham enrollment.
- Scroll to the bottom of the existing
templates:and insert YAML code containing your search template configurations and geo search mapping. You can reference an example search template YAML code block below.
- id: french_cities # Matches the `Tab ID` and `Template ID` fields from geo search.
    title: French cities # Search template name as it will appear in the `Data sources` panel.
    query:
      queryType: AND # Define your query type and insert relevant subqueries.
      subqueries:
        - inputId: keyword
          queryType: KEYWORD
        - field: object_type
          queryType: OBJECT_TYPE
          value:
            - # Object Type's RID
    dataSource: foundry-federation
    namespaces:
      - foundry-federation
    description: Search for French cities and display their boundaries.
    integratedDataSetIds: []
    inputs:
      - hint: Type a keyword...
        id: keyword
        inputType: TEXTFIELD # Enables free text search.
        label: Keyword
    aggregations: []
- Select Preview and save in the top right ribbon to save your search template.
You can navigate back to your Gaia map to test your search template. Type the name of your search template in the Data sources tab in the left-hand panel, or select it manually from the Integrated data sources sub-section. Select your search template to launch the pre-configured interface backed by your geo search and YAML configurations. Search for objects using the Keyword search bar or any other custom configurations made in your YAML code, then enter a Search title before you select the blue Search button at the bottom of the left-hand panel.
The results of your search will then appear on your Gaia map for additional exploration.
Configure a real-time geotemporal series sync in Foundry
You can use Foundry's Pipeline Builder to create a geotemporal series sync from an existing dataset, enabling you to add high-scale, real-time geotemporal data to your Gaia map without additional configurations.
To create a geotemporal series sync in Foundry:
- Navigate to your dataset and ensure it contains all prerequisite fields to enable a geotemporal series sync.
- Select All actions > Create new pipeline to launch Pipeline Builder.
- Select your dataset node and choose Transform at the top of the vertical pop-up menu.
- Search for and select Construct GeoPoint column to map your
latitudeandlongitudefields and create a newgeo_pointcolumn. - Rename your transform
Create GeoPointthrough the edit box in the top left corner of your transform. - Select the green arrow icon in the top right of your screen to Save your transform.
- Choose Back to graph in the top right of your transform to navigate back to your Pipeline Builder graph.
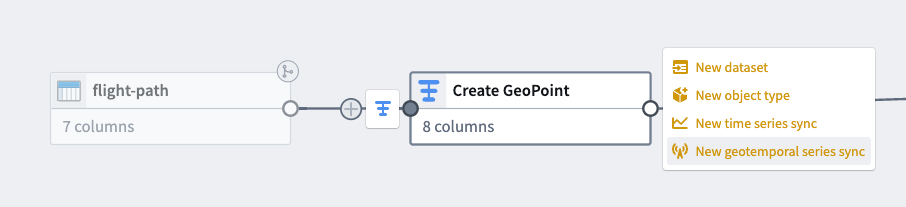
- Select the
Greate GeoPointtransform node's Add output button and select New geotemporal series sync. The image below shows the menu of output types available in Pipeline Builder.
- Give your new output a name and assign its Destination namespace, such as
Local System. - Configure all Primary fields to ensure the sync references the correct column in its backing dataset.
- Clear all unmapped properties by selecting the
Xicon to the right of each or the Clear unmapped properties button. - Leave Observation schema blank under Properties - Foundry will auto-populate it as the name you assigned your series sync output above in Metadata.
- Verify that the Source system under Advanced settings maps to your pipeline's name. The image below depicts all configurations necessary for your sync output.

- Select the green arrow icon in the top right of your screen to Save your sync.
- Select the hammer icon next to Save to Deploy pipeline.
- Navigate Back to graph. You will see a new geotemporal series sync output node to the right of your
Create GeoPointtransform with greenDeployment up-to-datetext at the bottom of the node confirming successful deployment.
To add your newly created geotemporal series sync to your Gaia map:
- Open the Data sources tab in Gaia's left-hand panel.
- Search for the name of your geotemporal series sync and select Tracks and observations search.
- Apply any necessary geometric filters available in the top ribbon of the object search panel.
Allwill add all objects from the discovered object type to your map.Viewwill only add the objects that are available within your current map view.Drawwill add objects to the map which reside within a drawn shape you can configure and add from the search panel.Selectenables you to select an item from the active map.- Select your appropriate time window by choosing either Historic search or Live feed.
- Select Add to map.
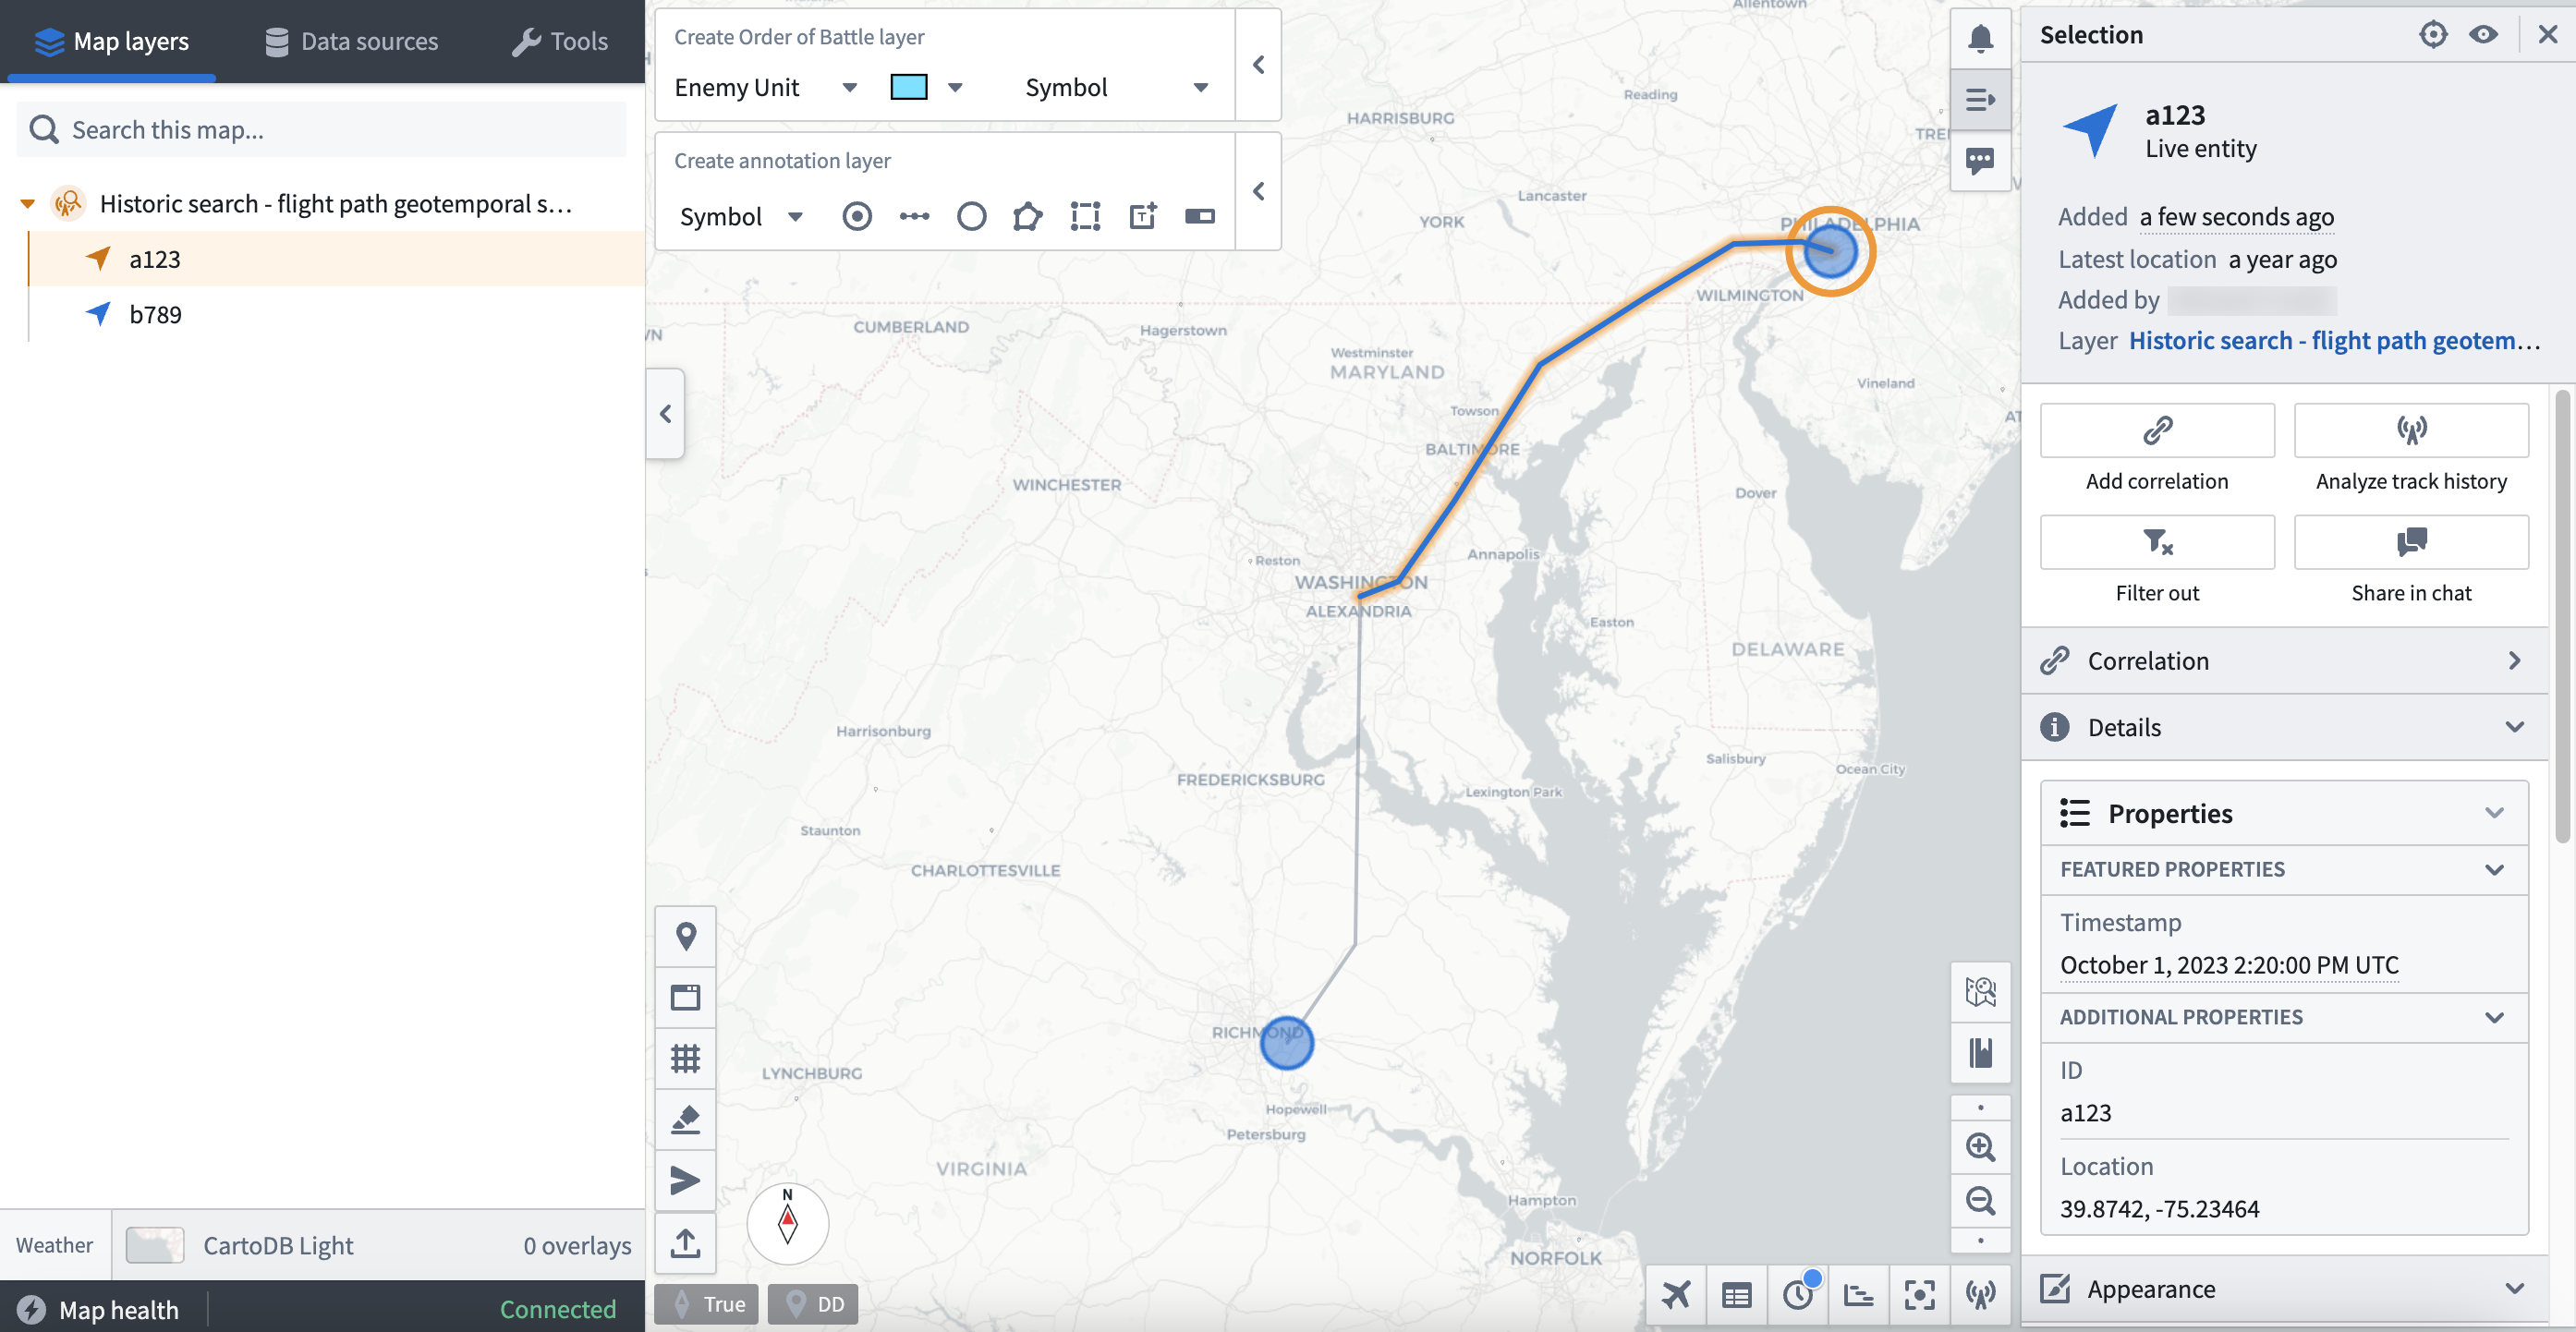
Once your geotemporal series sync loads as part of Gaia's Map layers, you can select individual entities - such as a specific flight path - and make additional configurations.
Use a Function-backed Enterprise Map Layer
You can add data to your Gaia map as a part of an Enterprise Map Layer (EML) backed by a Function written in Foundry and published to your ontology.
To create a TypeScript Function which outputs an object set from an existing object type to back a Gaia EML:
- Navigate to the project folder which contains your object type's backing dataset.
- Select New > Code repository.
- Choose the Functions options beneath
What are you building?and select TypeScript Functions as your language. - Name your repository and save it in a public project folder to enable Foundry Ontology API access before you select Initialize repository at the bottom of your screen.
- Select the green Go to index.ts button on the right side of your screen to write your function.
- Follow the writing prompts embedded in the draft
index.tsfile and insert your own function; you can reference the example code below.
import { Function, Integer } from "@foundry/functions-api";
import { Objects, ObjectSet, ObjectTypeName };

export class MyEmlFunction{

    @Function()
    public myFunctionName(): ObjectSet<ObjectTypeName> {
        return Objects.search().ObjectTypeName().filter(location => location.propertyTypeToSearch.exactMatch("match-parameter"));

    }
}
- Select Commit in the top ribbon.
- Select Tag version to release the function to the Foundry Ontology.
- View your newly created function within the Foundry Ontology Manager's Functions tab.
Next, launch Gaia's admin application to establish a Foundry Function-backed EML. Once you navigate to the Gaia admin app, you can:
- Search for and select the Enterprise Map Layers page.
- Select Add at the bottom of the page to create a new EML.
- Set the EML type as
Foundry function EML. - Enter a Description for the EML and indicate its Capabilities.
- Optionally input a Tab icon.
- Indicate the EML's Classification.
- Add ACL Groups to limit EML access, as necessary.
- Insert your Function rid - you can copy this to your clipboard from the Function's Overview tab in Foundry's Ontology Manager application.
- Optionally set a Refresh interval (seconds) for the EML - the EML will not refresh if left blank.
- Optionally insert a Geo filter property id to enable object geo-filtering in Gaia when you add the EML as a reference data layer; you can use the
geopointproperty ID from your object type.
:::callout{theme="neutral"}
You can locate and copy a property ID from your object type Properties page in Ontology Manager; to do so, select the ellipsis icon to the right of your geopoint property and choose Copy property id.
:::
You can now add your Foundry Function-backed EML to your Gaia map by searching for its name using the Data sources tab in the left-hand panel. Gaia groups EMLs as Reference data layers under Curated data sources.
You can select or hide individual objects from your EML using the left-hand panel or by choosing on object's icon from your current view.
Use a versioned object set-backed Enterprise Map Layer
You can add data to your Gaia map as a part of an EML backed by a versioned object set you create from an object type in the Foundry Ontology.
To create a versioned object set, follow the instructions above in the Drag and drop individual objects and saved explorations section.
To establish a versioned object set-backed EML in the Gaia admin applications, follow the instructions above in the Use a Function-backed Enterprise Map Layer section. Set the EML type as Versioned object set EML instead of Foundry function EML; you will not need to insert a Function rid.
You can now add your versioned object set-backed EML to your Gaia map by searching for its name using the Data sources tab in the left-hand panel; Gaia groups EMLs as Reference data layers under Curated data sources.
中文翻译
将 Ontology 数据添加到 Gaia
您可以根据具体用例,通过不同方法将配置为 Foundry Ontology(本体)一部分的地理空间数据添加到 Gotham 的 Gaia 应用程序中。要使 Gotham 能够访问 Foundry Ontology 数据,您需要使用 Foundry 的 Ontology Manager(本体管理器)对感兴趣的对象类型进行类型映射,从而在两者之间建立统一的表示。
:::callout{theme="neutral" title="注意"}
如果您的注册环境包含 Map Rendering Service (MRS)(地图渲染服务),则无需完成类型映射过程即可在 Gaia 中查看 Foundry 对象。您可以直接从 Gaia 创建新的 Ontology 对象,或将现有对象添加到 Gotham,无需额外配置。请按照此处的说明检查您的注册环境是否包含 MRS。如果您的注册环境不包含 MRS,则可以按照 Foundry Ontology 文档中的现有说明完成类型映射过程。
如有关于 MRS 可用性、安装或 Gotham 中提供的其他文档的问题,请联系 Palantir 支持团队。
:::
比较将 Foundry 数据添加到 Gaia 的可用方法
在 Foundry 中对对象类型进行类型映射以启用 Gotham 集成后,您可以使用以下六种方法将 Foundry Ontology 中的数据添加到 Gaia:
- 拖放单个对象和已保存的探索
- 在 Gaia 中搜索您的 Foundry 对象类型
- 创建搜索模板
- 在 Foundry 中配置实时地理时间序列同步
- 使用基于 Function 的企业地图图层
- 使用基于版本化对象集的企业地图图层
下表提供了每种方法的更多信息:
| 拖放 | Foundry 对象搜索 | 搜索模板 | 地理时间序列同步 | 基于 Function 的企业地图图层 | 基于版本化对象集的企业地图图层 | |
|---|---|---|---|---|---|---|
| 支持的对象数量 | 每次 1 个对象 或 1 个最多包含 5,000 个对象的对象集 | 5,000 | 5,000 | 5,000,000 | 5,000 | 5,000 |
| 数据刷新延迟 | 静态 | 静态 或 30 秒 | 静态 或 30 秒 | 实时 | 可配置 | 可配置 |
| 数据过滤能力 | 在 Foundry 的 Object Explorer(对象浏览器)中 | 在 Gaia 地图的左侧面板中 | 在 Gaia 地图的左侧面板中 | 在 Gaia 地图的左侧面板中 | 在 Gaia 地图的左侧面板或 Foundry 的 Code Repositories(代码仓库)中 | 在 Foundry 的 Object Explorer 中 |
| 推荐用例 | 快速将对象从 Foundry 的 Object Explorer 移动到 Gaia | 执行简单的对象搜索 | 通过 YAML 在对象集上创建一组特定过滤器,以便在多个 Gaia 地图中重复使用 | 集成实时更新的大规模数据 | 利用 Foundry Ontology Functions(函数)的灵活性和强大功能 | 确保在从 Foundry 添加或移除对象时地图图层更新 |
| 用户管理前提条件 | 无 | 无 | 访问 Gaia 管理应用程序 | 无 | 访问 Gaia 管理应用程序 | 访问 Gaia 管理应用程序 |
| 实施工作量 | 低 | 低 | 中 | 高 | 高 | 高 |
:::callout{theme="neutral"} 要通过搜索模板、基于 Function 的企业地图图层或基于版本化对象集的企业地图图层将 Foundry 数据添加到 Gaia,您需要访问 Gaia 的管理应用程序。如有关于管理应用程序访问权限的问题,请联系 Palantir 支持团队。 :::
以下各节提供了实施每种集成方法的详细说明。
拖放单个对象和已保存的探索
您可以将单个对象或源自已保存探索(最多可包含 5,000 个对象)的对象集从 Foundry 拖放到 Gaia 地图上。
要将单个对象从 Foundry 拖放到您的 Gaia 地图:
- 在 Foundry 中启动 Object Explorer(对象浏览器)。
- 搜索对象类型。
- 从 Object Explorer 屏幕最右侧的 Results(结果)面板中选择一个对象。
- 选择 Object Explorer 屏幕左上角的对象图标。
- 将对象从 Foundry 拖放到您的 Gaia 地图上的任意位置 - 您现在可以在地图上以及左侧面板中查看该对象,它位于一个名为
Dropped Object Layer [Date] [Time](拖放对象图层 [日期] [时间])的默认图层中。
在将对象集从 Foundry 拖放到您的 Gaia 地图之前,您必须首先从现有对象类型创建一个版本化对象集。要创建版本化对象集:
- 在 Foundry 中启动 Object Explorer。
- 搜索并选择您的对象类型。
- 选择 Object Explorer 屏幕顶部功能区中间的 Results(结果)。
- 使用搜索栏根据对象类型的属性进行过滤,以选择要添加到对象集中的对象。
- 例如,如果您的对象类型捕获了一个由
name属性定义的位置,您可以通过输入where name is location_1 or where name is location_2并按键盘上的enter或return键来过滤选择location对象。 - 选择蓝色的 Save(保存)按钮,将您选择的对象作为 Exploration(探索)保存在公共项目中。
:::callout{theme="success"} 您还可以通过直接在对象类型的 Ontology Explorer(本体浏览器)视图中的图表上应用对象过滤器来过滤对象。 :::
创建并保存版本化对象集作为探索后,您可以按照以下步骤将其拖放到您的 Gaia 地图:
- 从 Object Explorer 视图的顶部功能区中选择 New exploration(新建探索)。
- 根据创建时指定的名称搜索并选择您的对象集。该对象集也可能出现在 Object Explorer 搜索栏下方的 My Explorations & Lists(我的探索和列表)中。
- 选择 Object Explorer 屏幕左上角的对象集图标。
- 将对象集从 Foundry 拖放到您的 Gaia 地图上的任意位置。对象将逐个显示在地图上和左侧面板中,嵌套在一个以您保存的探索自动命名的搜索图层中。
:::callout{theme="success"} 您还可以从 Gotham 内的其他对象视图将对象拖放到您的 Gaia 地图。 :::
在 Gaia 中搜索您的 Foundry 对象类型
您可以在 Gaia 左侧面板的 Data sources(数据源)部分搜索 Foundry 对象类型。此外,您可以在将对象添加到地图之前对其应用几何和时间过滤器。要从 Gaia 搜索 Foundry 对象类型:
- 在地图上的左侧面板中选择 Data Sources(数据源)。
- 根据对象类型在 Foundry 中的名称进行搜索,它将出现在左侧面板底部的 Object types(对象类型)下。
- 选择对象类型旁边的 Search for objects(搜索对象)。
- 选择要添加到地图的对象,并根据需要应用对象搜索面板顶部功能区中提供的几何过滤器。
All(全部)会将发现的对象类型中的所有对象添加到您的地图。View(视图)仅会将当前地图视图中可用的对象添加到地图。Draw(绘制)会将位于您可以从搜索面板配置和添加的绘制形状内的对象添加到地图。Select(选择)使您能够从活动地图中选择一个项目。- 根据需要应用时间过滤器,以加载在
Static range(静态范围)或Rolling window(滚动窗口)内活动的对象。 - 可选地,打开 Live update search results(实时更新搜索结果),这将根据与您的过滤参数匹配的新创建对象,每 30 秒更新一次您的对象或对象集。
- 在 Search title(搜索标题)中输入您的对象搜索名称,然后选择 Search(搜索)。
:::callout{theme="neutral"}
* 如果在加载搜索结果后无法查看对象,则应验证对象类型是否包含指示其位置的地理空间属性,例如 geopoint 或 geoshape。
* 如果在完成 Foundry 中的前提条件类型映射后无法在 Gotham 中搜索对象,则您的 Gotham 注册环境可能未启用 Foundry 搜索功能。请联系 Palantir 支持团队以获取启用此功能的帮助。
:::
创建搜索模板
您可以在 Gaia 管理应用程序中创建搜索模板,以便在通过左侧面板的 Data sources(数据源)选项卡将 Foundry 对象添加到地图时,预先配置自定义的对象搜索界面。
要创建和实施搜索模板,请启动 Gaia 管理应用程序并按照以下步骤操作:
- 找到 Geo Search(地理搜索)面板,选择 Show(显示)以查看您的 Gotham 注册环境中的所有活动地理搜索。
- 滚动到地理搜索列表的底部,选择 Add(添加)。
- 为您的搜索命名,并填写每个配置输入框。
Description(描述)将出现在搜索模板界面的顶部。Tab ID(选项卡 ID)将启用地理搜索和搜索模板之间的映射。Tab icon(选项卡图标)将在用户搜索时出现在 Data sources(数据源)选项卡中。Template ID(模板 ID)将与Tab ID匹配,并启用地理搜索和搜索模板之间的映射。Classification(分类),根据您的注册环境,可能是可选的。ACL Groups(ACL 组)将设置组访问权限。- 根据需要输入其他配置。
- 在配置搜索模板之前,选择顶部右侧功能区中的 Preview and save(预览并保存),以在 Gaia 管理应用程序中保存您的地理搜索。
您可以参考一个示例地理搜索,该搜索使用户能够搜索法国的城市,并在与搜索模板配对后在 Gaia 地图上显示其地理边界。
- 找到 Search Template(搜索模板)面板,选择 Show(显示)以查看您的 Gotham 注册环境中的所有活动搜索模板。
- 滚动到现有
templates:的底部,插入包含您的搜索模板配置和地理搜索映射的 YAML 代码。您可以参考下面的示例搜索模板 YAML 代码块。
- id: french_cities # 匹配地理搜索中的 `Tab ID` 和 `Template ID` 字段。
    title: French cities # 搜索模板名称,将显示在 `Data sources` 面板中。
    query:
      queryType: AND # 定义您的查询类型并插入相关的子查询。
      subqueries:
        - inputId: keyword
          queryType: KEYWORD
        - field: object_type
          queryType: OBJECT_TYPE
          value:
            - # 对象类型的 RID
    dataSource: foundry-federation
    namespaces:
      - foundry-federation
    description: 搜索法国城市并显示其边界。
    integratedDataSetIds: []
    inputs:
      - hint: 输入关键字...
        id: keyword
        inputType: TEXTFIELD # 启用自由文本搜索。
        label: 关键字
    aggregations: []
- 选择顶部右侧功能区中的 Preview and save(预览并保存)以保存您的搜索模板。
您可以导航回您的 Gaia 地图来测试您的搜索模板。在左侧面板的 Data sources(数据源)选项卡中键入您的搜索模板名称,或从 Integrated data sources(集成数据源)子部分手动选择它。选择您的搜索模板以启动由您的地理搜索和 YAML 配置支持的预配置界面。使用 Keyword(关键字)搜索栏或您在 YAML 代码中进行的任何其他自定义配置来搜索对象,然后在选择左侧面板底部的蓝色 Search(搜索)按钮之前输入 Search title(搜索标题)。
您的搜索结果将随后显示在您的 Gaia 地图上,以供进一步探索。
在 Foundry 中配置实时地理时间序列同步
您可以使用 Foundry 的 Pipeline Builder(管道构建器)从现有数据集创建地理时间序列同步,从而无需额外配置即可将大规模、实时的地理时间数据添加到您的 Gaia 地图。
要在 Foundry 中创建地理时间序列同步:
- 导航到您的数据集,并确保它包含所有先决条件字段以启用地理时间序列同步。
- 选择 All actions(所有操作)> Create new pipeline(创建新管道)以启动 Pipeline Builder。
- 选择您的数据集节点,然后在垂直弹出菜单的顶部选择 Transform(转换)。
- 搜索并选择 Construct GeoPoint column(构建 GeoPoint 列)以映射您的
latitude(纬度)和longitude(经度)字段,并创建一个新的geo_point列。 - 通过转换左上角的编辑框,将您的转换重命名为
Create GeoPoint。 - 选择屏幕右上角的绿色箭头图标以 Save(保存)您的转换。
- 选择转换右上角的 Back to graph(返回图形)以导航回您的 Pipeline Builder 图形。
- 选择
Create GeoPoint转换节点的 Add output(添加输出)按钮,然后选择 New geotemporal series sync(新建地理时间序列同步)。下图显示了 Pipeline Builder 中可用的输出类型菜单。
- 为您的输出命名,并指定其 Destination namespace(目标命名空间),例如
Local System(本地系统)。 - 配置所有 Primary fields(主字段),以确保同步引用其支持数据集中的正确列。
- 通过选择每个未映射属性右侧的
X图标或选择 Clear unmapped properties(清除未映射属性)按钮来清除所有未映射的属性。 - 在 Properties(属性)下将 Observation schema(观测模式)留空 - Foundry 将根据您在 Metadata(元数据)中为同步输出指定的名称自动填充它。
- 验证 Advanced settings(高级设置)下的 Source system(源系统)是否映射到您的管道名称。下图描述了同步输出所需的所有配置。
- 选择屏幕右上角的绿色箭头图标以 Save(保存)您的同步。
- 选择 Save(保存)旁边的锤子图标以 Deploy pipeline(部署管道)。
- 导航 Back to graph(返回图形)。您将在
Create GeoPoint转换的右侧看到一个新的地理时间序列同步输出节点,节点底部有绿色的Deployment up-to-date(部署已是最新)文本,确认部署成功。
要将您新创建的地理时间序列同步添加到您的 Gaia 地图:
- 打开 Gaia 左侧面板中的 Data sources(数据源)选项卡。
- 搜索您的地理时间序列同步的名称,然后选择 Tracks and observations search(轨迹和观测搜索)。
- 根据需要应用对象搜索面板顶部功能区中提供的几何过滤器。
All(全部)会将发现的对象类型中的所有对象添加到您的地图。View(视图)仅会将当前地图视图中可用的对象添加到地图。Draw(绘制)会将位于您可以从搜索面板配置和添加的绘制形状内的对象添加到地图。Select(选择)使您能够从活动地图中选择一个项目。- 通过选择 Historic search(历史搜索)或 Live feed(实时推送)来选择适当的时间窗口。
- 选择 Add to map(添加到地图)。
一旦您的地理时间序列同步作为 Gaia 的 Map layers(地图图层)的一部分加载,您可以选择单个实体(例如特定的飞行路径)并进行其他配置。
使用基于 Function 的企业地图图层
您可以将数据作为企业地图图层 (EML) 的一部分添加到您的 Gaia 地图,该图层由在 Foundry 中编写并发布到您的 Ontology 的 Function(函数)支持。
要创建一个 TypeScript Function(TypeScript 函数),该函数从现有对象类型输出一个对象集以支持 Gaia EML:
- 导航到包含您的对象类型支持数据集的项目文件夹。
- 选择 New(新建)> Code repository(代码仓库)。
- 在
What are you building?(您要构建什么?)下选择 Functions(函数)选项,然后选择 TypeScript Functions(TypeScript 函数)作为您的语言。 - 为您的仓库命名,并将其保存在公共项目文件夹中,以启用 Foundry Ontology API 访问,然后选择屏幕底部的 Initialize repository(初始化仓库)。
- 选择屏幕右侧的绿色 Go to index.ts(转到 index.ts)按钮来编写您的函数。
- 按照草稿
index.ts文件中嵌入的编写提示进行操作,并插入您自己的函数;您可以参考下面的示例代码。
import { Function, Integer } from "@foundry/functions-api";
import { Objects, ObjectSet, ObjectTypeName };

export class MyEmlFunction{

    @Function()
    public myFunctionName(): ObjectSet<ObjectTypeName> {
        return Objects.search().ObjectTypeName().filter(location => location.propertyTypeToSearch.exactMatch("match-parameter"));

    }
}
- 选择顶部功能区中的 Commit(提交)。
- 选择 Tag version(标记版本)以将函数发布到 Foundry Ontology。
- 在 Foundry Ontology Manager(本体管理器)的 Functions(函数)选项卡中查看您新创建的函数。
接下来,启动 Gaia 的管理应用程序以建立基于 Foundry Function 的 EML。导航到 Gaia 管理应用程序后,您可以:
- 搜索并选择 Enterprise Map Layers(企业地图图层)页面。
- 选择页面底部的 Add(添加)以创建新的 EML。
- 将 EML 类型设置为
Foundry function EML(Foundry 函数 EML)。 - 为 EML 输入 Description(描述),并指明其 Capabilities(能力)。
- 可选地输入 Tab icon(选项卡图标)。
- 指明 EML 的 Classification(分类)。
- 根据需要添加 ACL Groups(ACL 组)以限制 EML 访问。
- 插入您的 Function rid(函数 RID) - 您可以从 Foundry 的 Ontology Manager 应用程序中函数的 Overview(概览)选项卡将其复制到剪贴板。
- 可选地为 EML 设置 Refresh interval (seconds)(刷新间隔(秒)) - 如果留空,EML 将不会刷新。
- 可选地插入 Geo filter property id(地理过滤器属性 ID),以便在您将 EML 添加为参考数据图层时在 Gaia 中启用对象地理过滤;您可以使用对象类型中的
geopoint属性 ID。
:::callout{theme="neutral"}
您可以在 Ontology Manager 的对象类型 Properties(属性)页面中找到并复制属性 ID;为此,请选择 geopoint 属性右侧的省略号图标,然后选择 Copy property id(复制属性 ID)。
:::
您现在可以通过在左侧面板中使用 Data sources(数据源)选项卡搜索其名称,将基于 Foundry Function 的 EML 添加到您的 Gaia 地图。Gaia 将 EML 分组为 Curated data sources(精选数据源)下的 Reference data layers(参考数据图层)。
您可以使用左侧面板或从当前视图中选择对象的图标来选择或隐藏 EML 中的单个对象。
使用基于版本化对象集的企业地图图层
您可以将数据作为 EML 的一部分添加到您的 Gaia 地图,该图层由您从 Foundry Ontology 中的对象类型创建的版本化对象集支持。
要创建版本化对象集,请按照上面拖放单个对象和已保存的探索部分中的说明进行操作。
要在 Gaia 管理应用程序中建立基于版本化对象集的 EML,请按照上面使用基于 Function 的企业地图图层部分中的说明进行操作。将 EML 类型设置为 Versioned object set EML(版本化对象集 EML),而不是 Foundry function EML(Foundry 函数 EML);您无需插入 Function rid(函数 RID)。
您现在可以通过在左侧面板中使用 Data sources(数据源)选项卡搜索其名称,将基于版本化对象集的 EML 添加到您的 Gaia 地图;Gaia 将 EML 分组为 Curated data sources(精选数据源)下的 Reference data layers(参考数据图层)。