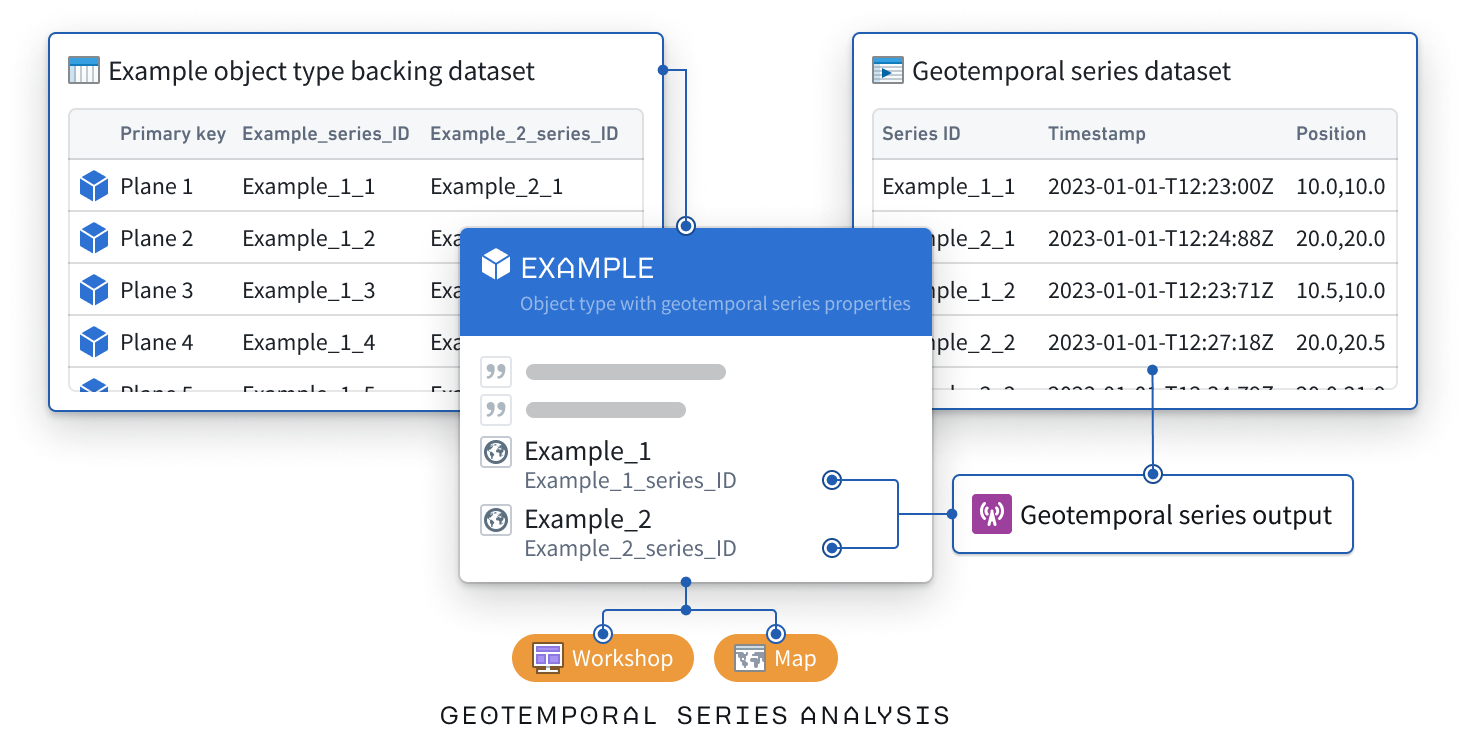
Integrate geotemporal series with the Ontology(将地理时间序列与本体集成)
To establish a geotemporal series in the Ontology that drives analysis and visualization within Palantir applications, such as a Gaia map, you will use Pipeline Builder to:
- Create a geotemporal series sync using the geotemporal series output. The output will contain a geotemporal series reference property (GTSR) to capture movement over time.
- Create a geotemporal series object type using the object type pipeline output. The object type will contain the GTSR and static information about the tracked entity, such as a vessel's call sign or name.
- Map the geotemporal series reference property from your geotemporal series sync to your single geotemporal series object type.
:::callout{theme="neutral"}
If you plan to add data from the Ontology to a Foundry map and not Gaia, use time series to view and analyze data associated with geospatial or geotemporal objects. Learn more about this in our geospatial time series use case tutorial..
Review the geospatial FAQ page or contact Palantir Support with additional questions about which integration type you should use to index your geotemporal data into the Ontology based on your enrollment and specific use case.
:::
Follow the instructions below to add a geotemporal series sync output as a reference to a geotemporal series object type.
Create a new pipeline in Pipeline Builder
- Navigate to Pipeline Builder and select the green New pipeline button.
- Name your pipeline and select a project where it will be saved.
- Choose Streaming pipeline before selecting Create pipeline.
Import and transform your geotemporal datasets
:::callout{theme="neutral"} Review the existing documentation on geotemporal data modeling before proceeding. :::
Identify the streaming and static datasets that will back your geotemporal series sync and object type and follow the instructions below to add them to your pipeline. While you can create both a geotemporal series object type and geotemporal series sync from one dataset, the steps below provide instructions using two: a live stream to back the geotemporal series sync and a static dataset to back the object type.
- Select Add Foundry data if you have already ingested your data into the platform.
- Search for your files in the Add data modal and select the + icon to add each dataset to your pipeline.
- Select Add data in the bottom right corner of the Add data modal.
![]()
Transform your streaming dataset
:::callout{theme="neutral"}
At a minimum, your streaming dataset should contain columns that capture a tracked entity's movement over time, such as its latitude and longitude at a given timestamp, as well as a string column that enables you to join the geotemporal series sync to the object type. Columns that contain data that changes over time are referred to as live fields, whereas those that remain consistent (such as an entity's name) are called static.
:::
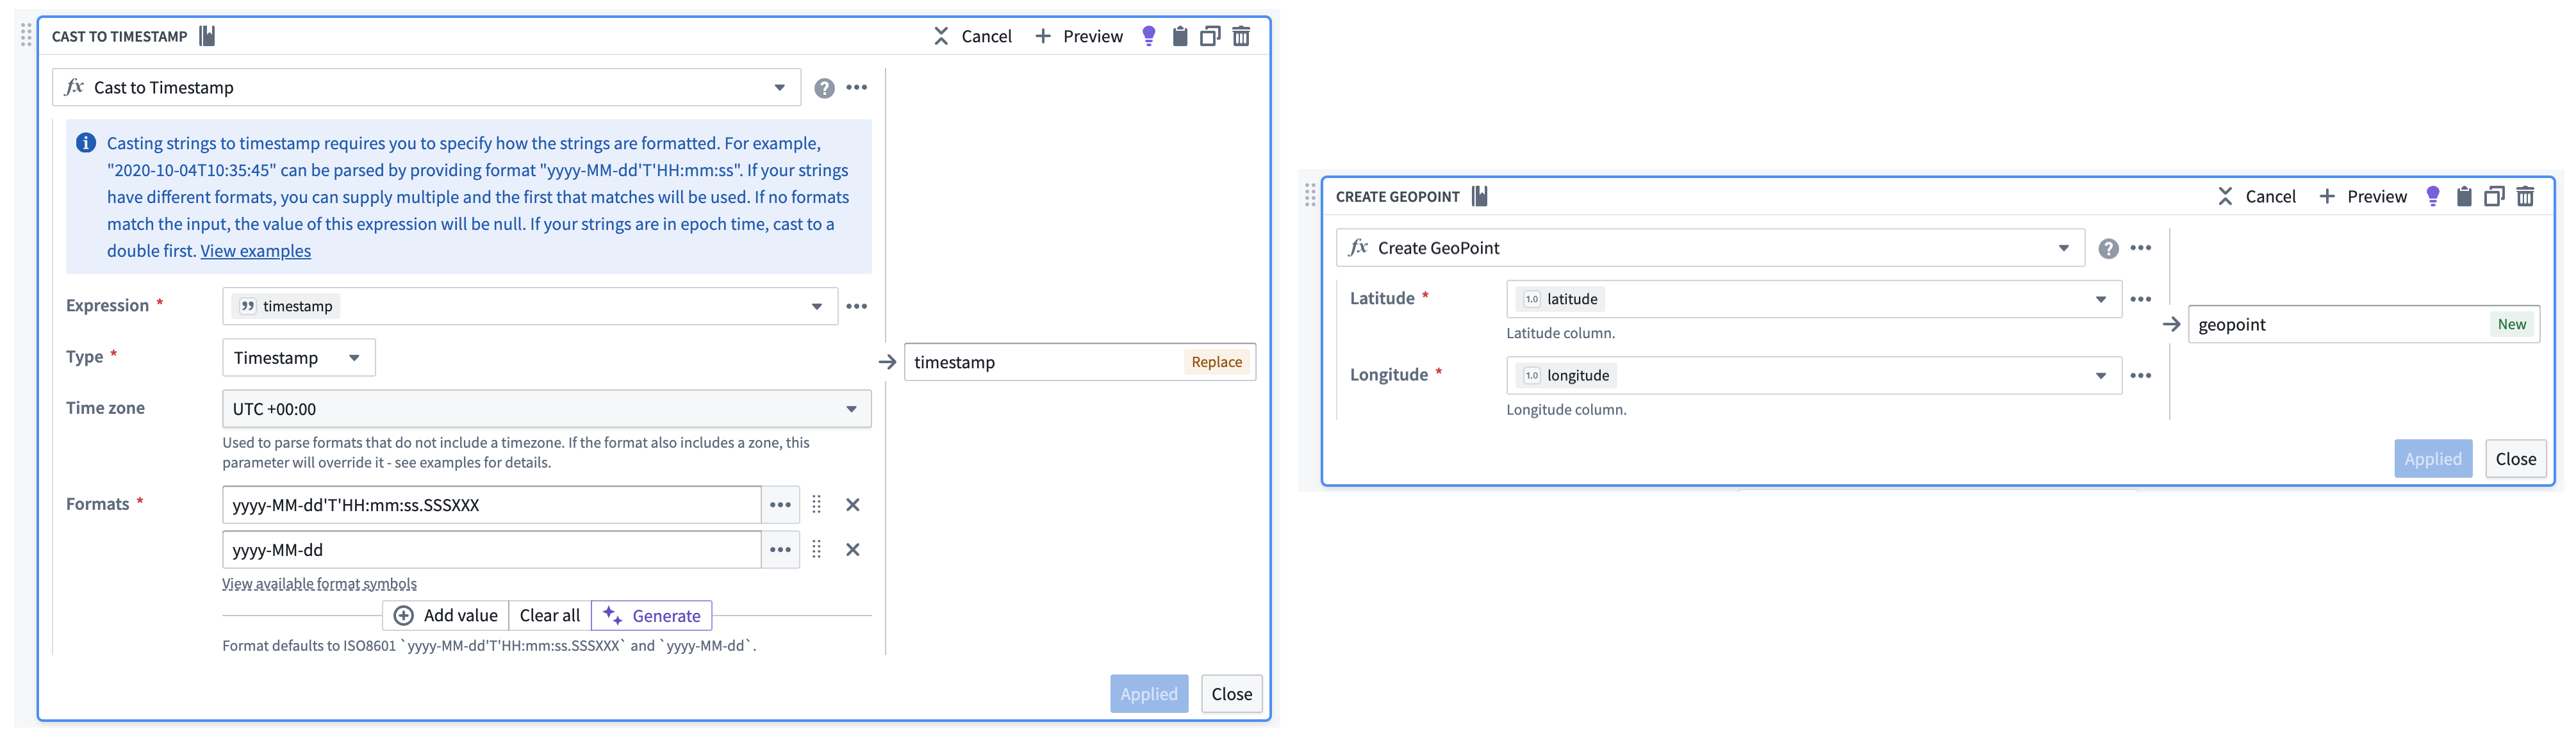
Your transform needs may vary depending on your streaming dataset's raw state upon ingest into Foundry. The example data outlined below contains the following columns that map to the sync's primary fields:
- Series_ID: A
stringcolumn used to join the geotemporal series sync to the static dataset-backed object type. Learn more about configuring a series ID. - Timestamp: A
timestampcolumn containing the time recorded for the entity's location. - Geopoint: A
geopointcolumn containing the entity's latitude and longitude pair.
The dataset contains additional columns which will map to the geotemporal series sync's Properties but are not required for the sync to function in a Palantir map application.
If necessary, use Pipeline Builder's Cast and Create GeoPoint transforms to prepare your raw streaming dataset for output as a geotemporal series sync.
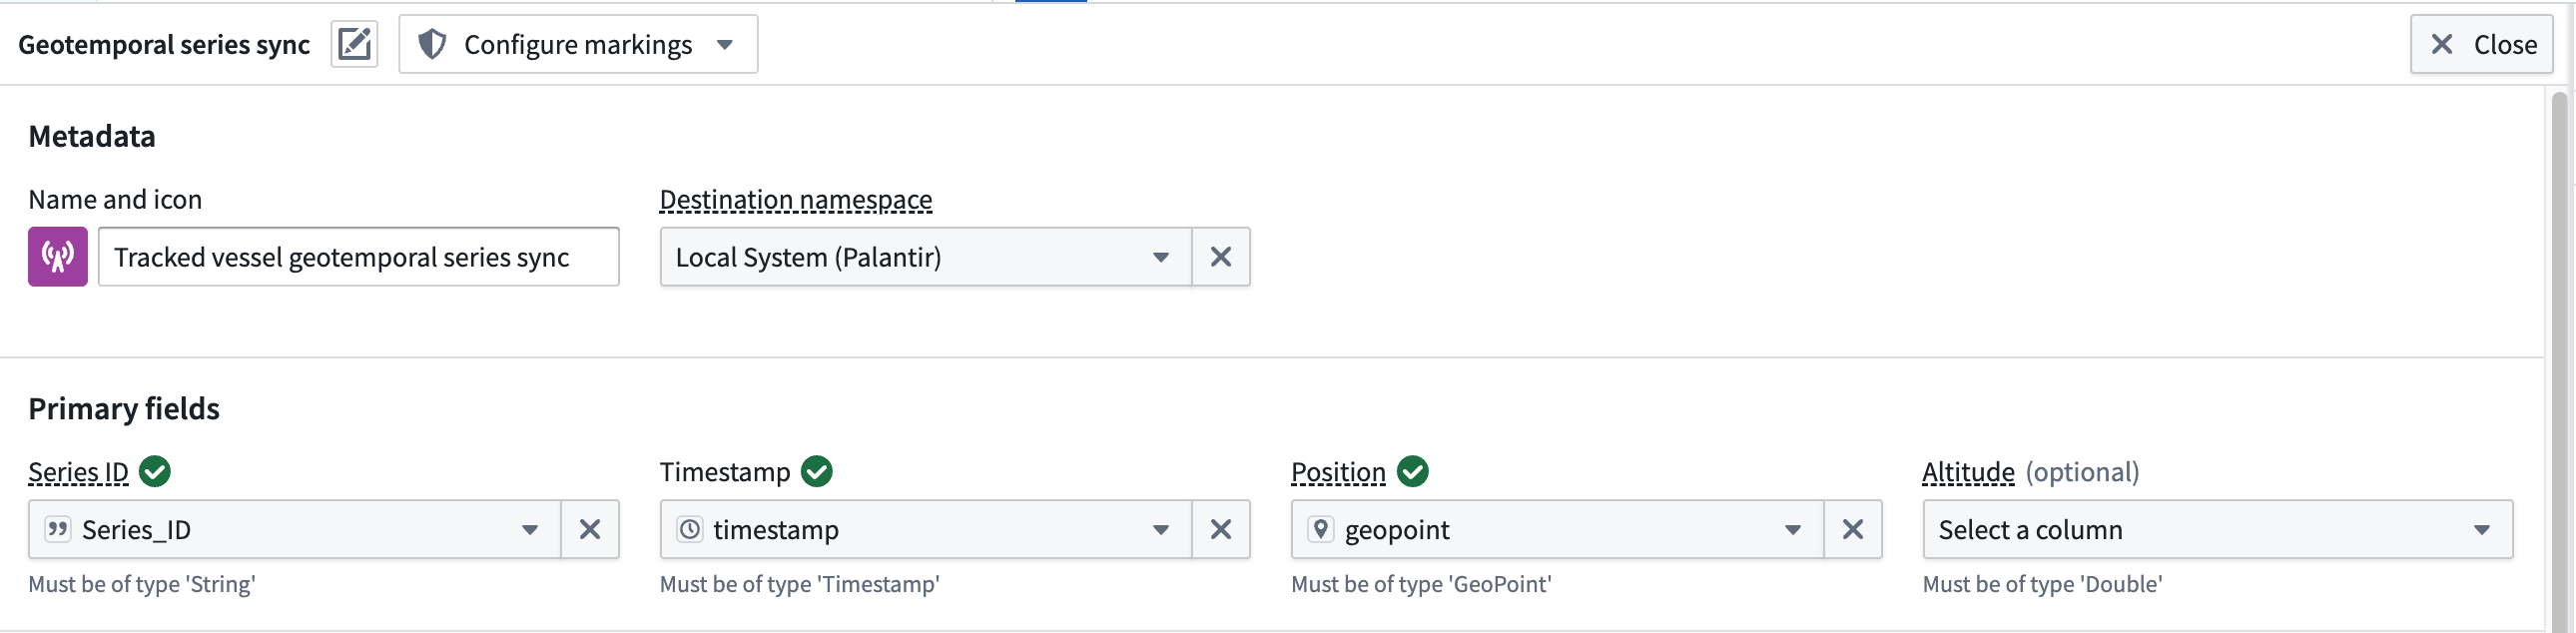
Follow the instructions below to create a geotemporal series sync output from your transformed streaming data:
- Select the streaming dataset or transform node to render the vertical menu bar, where you will choose the gold + icon to add a New geotemporal series sync output.
- Enter a name and optionally change the default icon for your sync in Name and icon.
- Select your Destination namespace to which Foundry will write the sync.
- Assign the relevant columns from your streaming dataset to the sync's Primary fields.
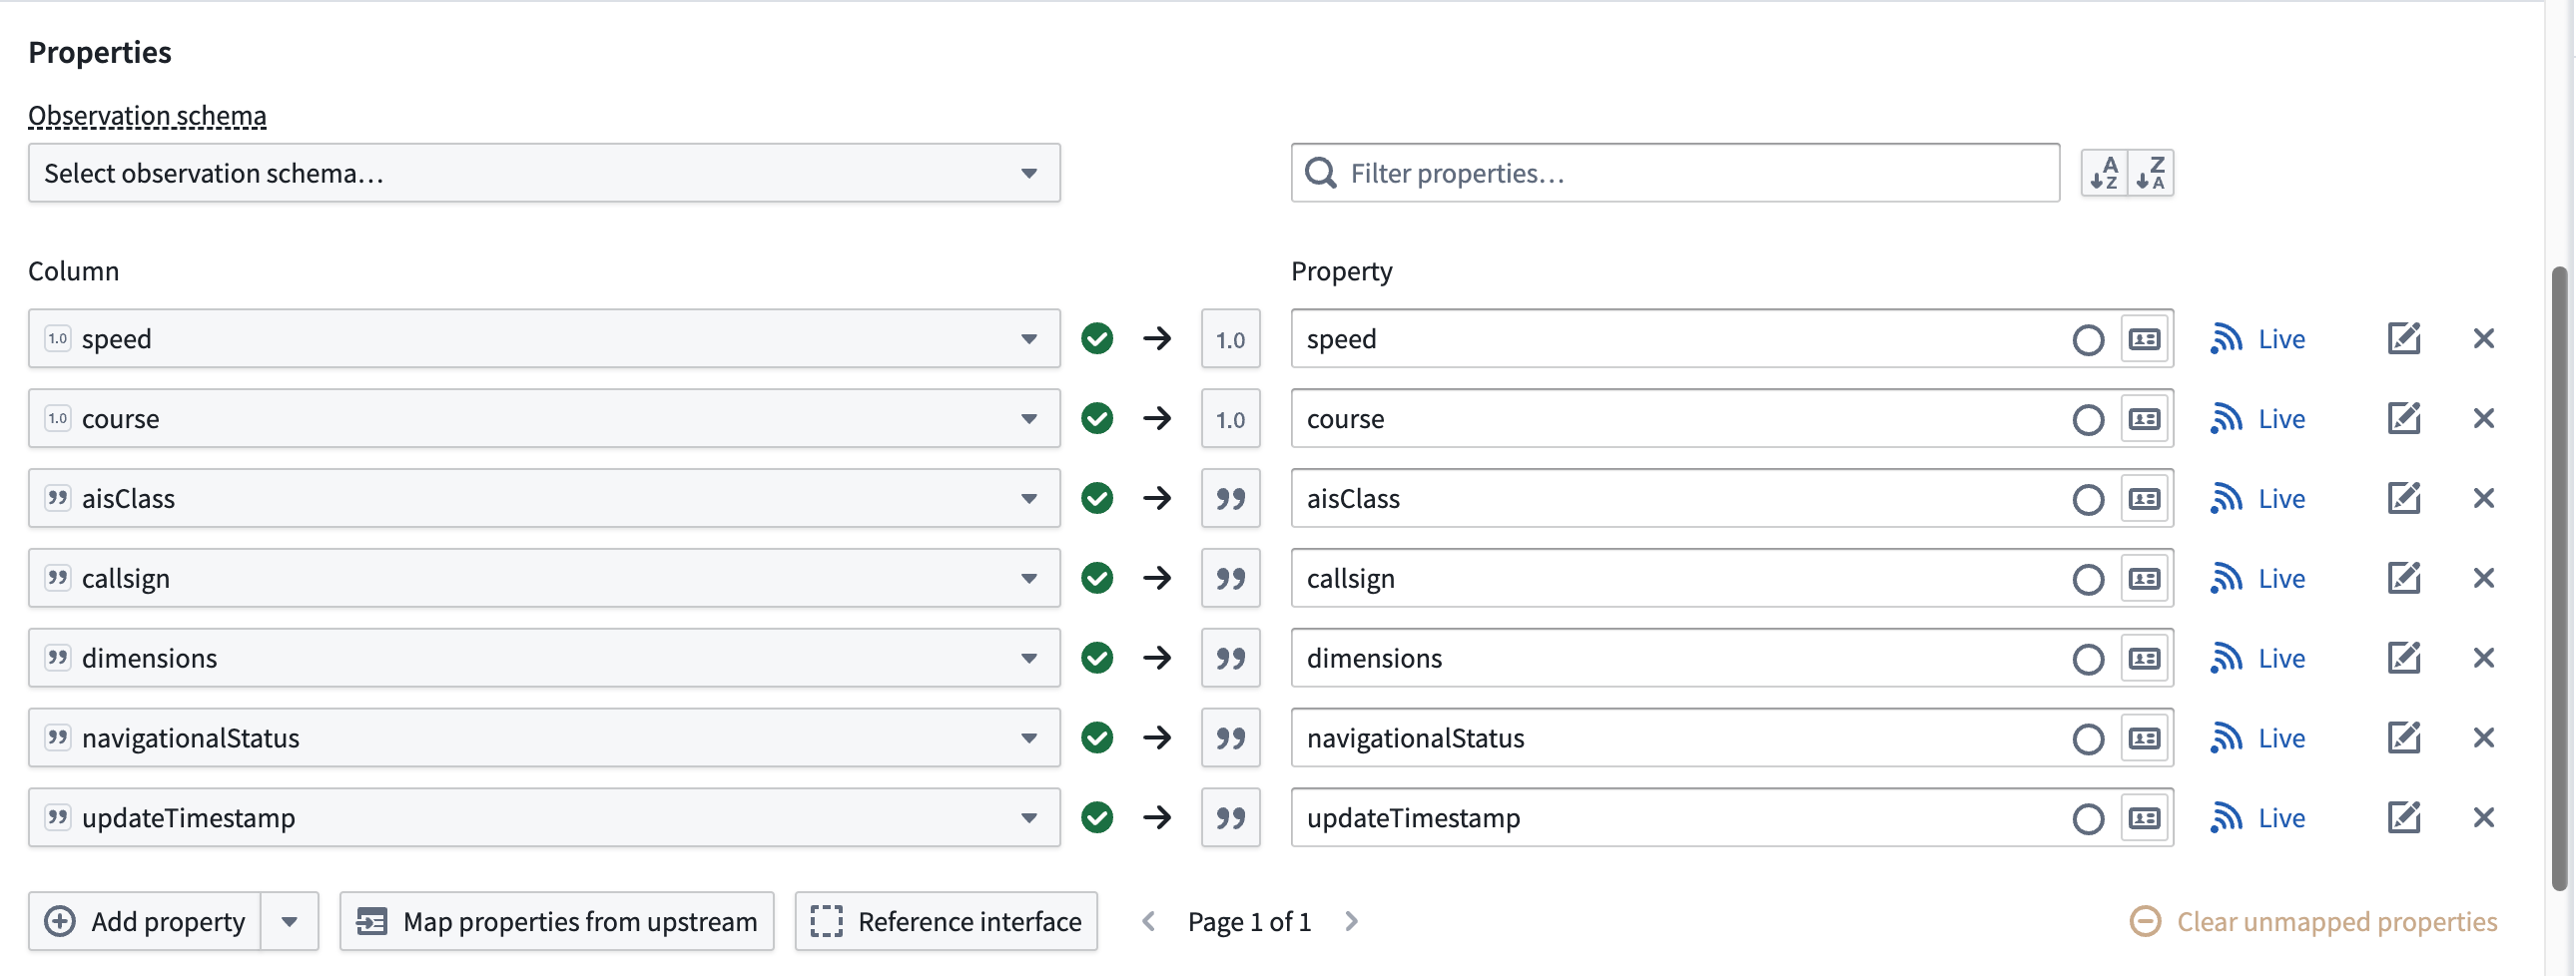
- Set your sync's Observation schema if one already exists. If one does not exist, then you can leave this field empty; Foundry will generate a new one from your sync's mapped properties. Learn more about observation schema.
- Optionally toggle the Live icon to the right of any additional Properties to mark one or multiple as static.
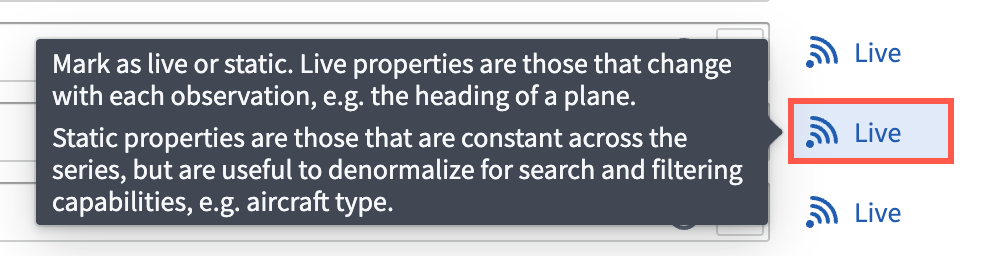
:::callout{theme="neutral"} Foundry records a Live property value for every new observation, such as an entity's velocity at a given timestamp. If you mark a property as static, then Foundry records and applies the latest value of that property for all observations in the series. :::
- Optionally configure any Styles for your sync to control its downstream rendering.
- Optionally select Dataset archive in Advanced settings to retain all your sync's data in a long-term historical archive beyond the default live retention window of 14 days.
:::callout{theme="neutral"} Contact Palantir Support with questions about expanding or contracting the default live retention window. :::
- Select Save to save your geotemporal series sync.
Transform your static dataset
:::callout{theme="neutral"} At a minimum, your static dataset should contain the same unique identifier for the tracked entity as the streaming dataset, such as a name or call sign. :::
Next, you will transform your object type backing dataset to ensure it can be linked to your geotemporal series sync though a geotemporal series reference (GTSR).
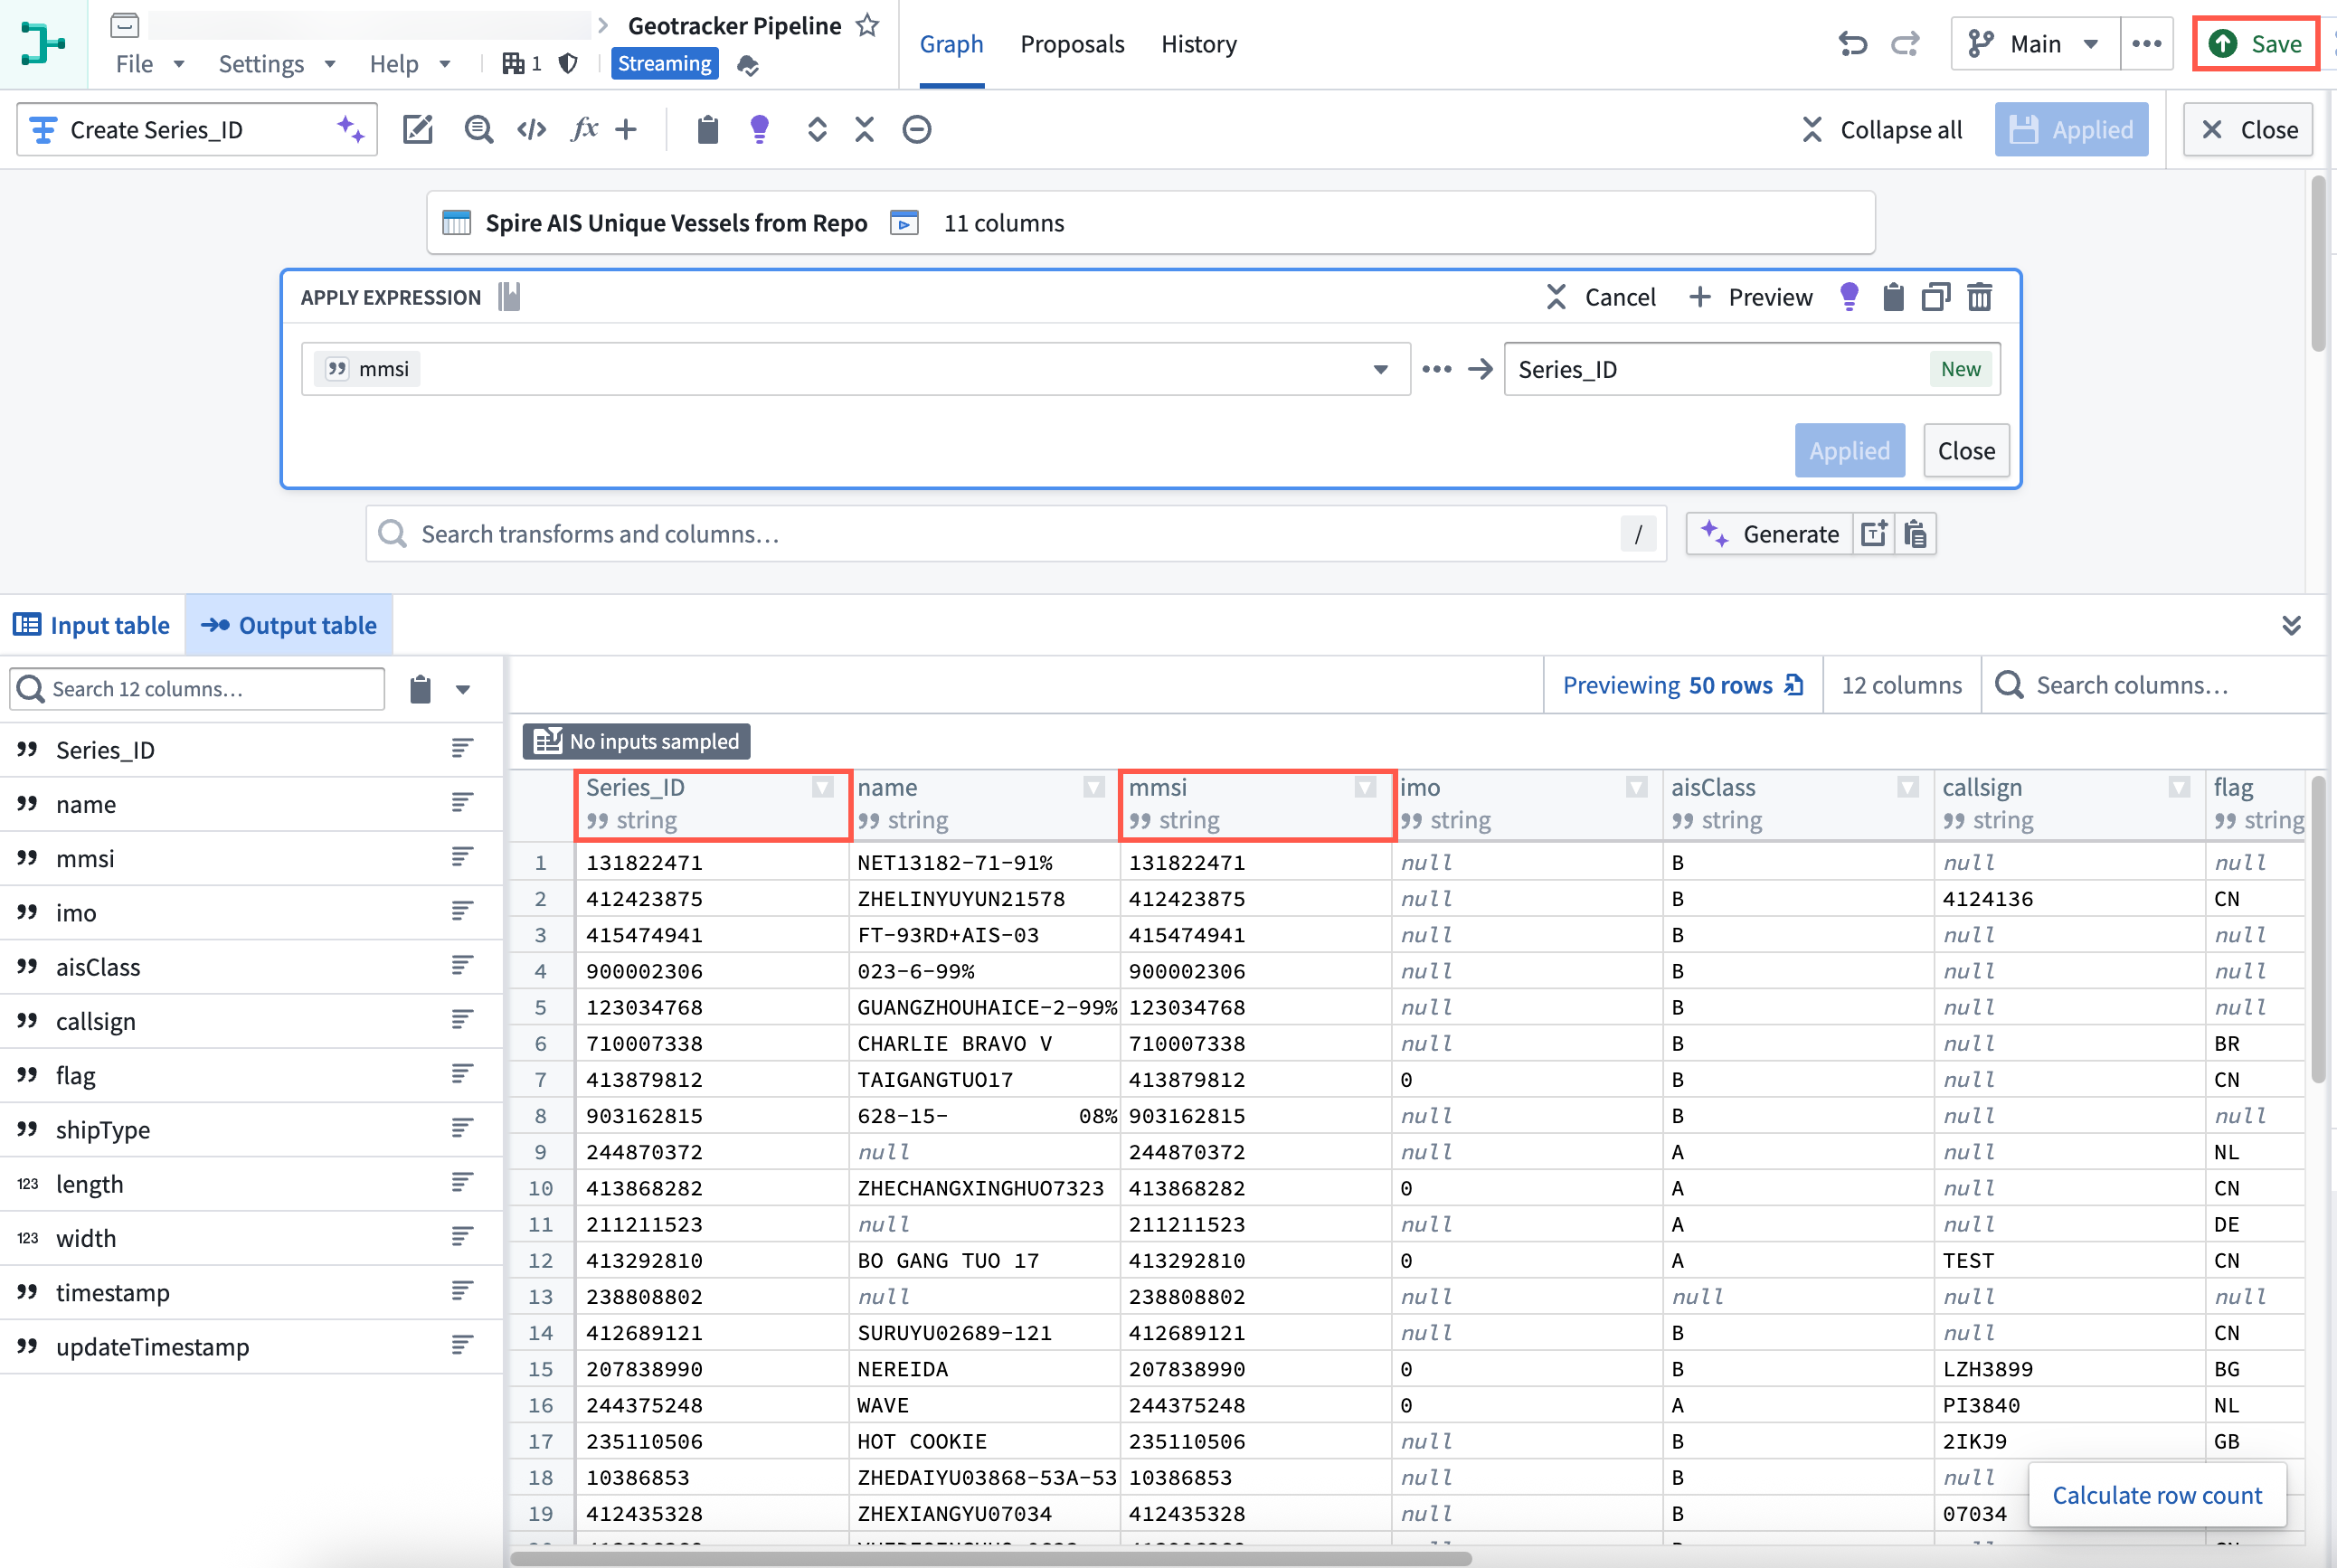
- Select the static dateset in your pipeline and choose Transform to insert a new transform.
- Search for and select Apply expression.
- Select the input field labeled
Column, expression, or valueand choose your dataset's primary key column from Columns. In this example, the dataset'smmsicolumn contains a unique vessel identifier that can be used as the primary key. - Create a new column titled
Series_IDthat is a copy of the dataset's unique identifier, such asmmsi. You will use this new column to link your geotemporal series sync to the object type.

- Select Apply before saving the changes to your pipeline and previewing your data.
Create an object type output
After transforming your static dataset, follow the instructions below to create an object type output and implement the Tracked Entity interface.
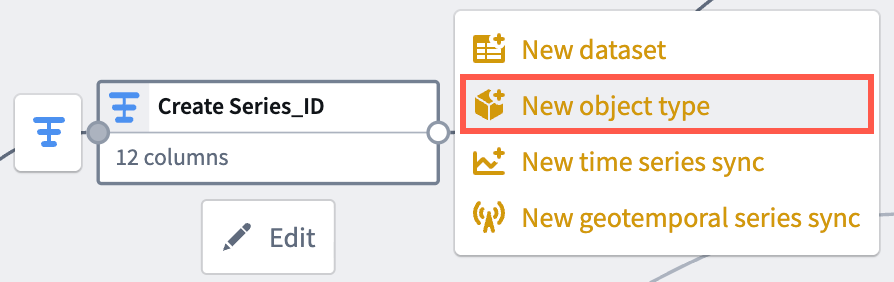
- Select the transform node you just created to render the vertical menu bar, where you will choose the gold + icon to add a New object type output.
- Enter a name and optionally change the default icon for your sync in Name and icon.
- Select the ellipsis icon on the right side of a displayed property to set your primary key and title properties.
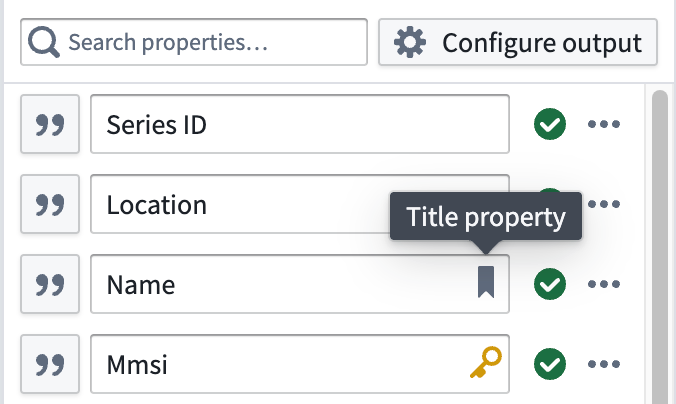
- Select the link icon next to your
Series_IDproperty to map the GTSR property to your object type by choosing Geotemporal series > From this pipeline.
:::callout{theme="neutral"} If you do not see Geotemporal series as an option, verify that Pipeline Builder's advanced geotemporal capabilities have not been disabled by another editor of your pipeline, as they are generally available and enabled by default. Select Settings > Pipeline feature flags... from the top ribbon. Next, ensure that Enable advanced geotemporal series features is set to Enabled before you close out of the Pipeline feature flags window. :::

- Select Implement interface at the bottom of your screen and choose the
Tracked Entityinterface from the Palantir Core Ontology.
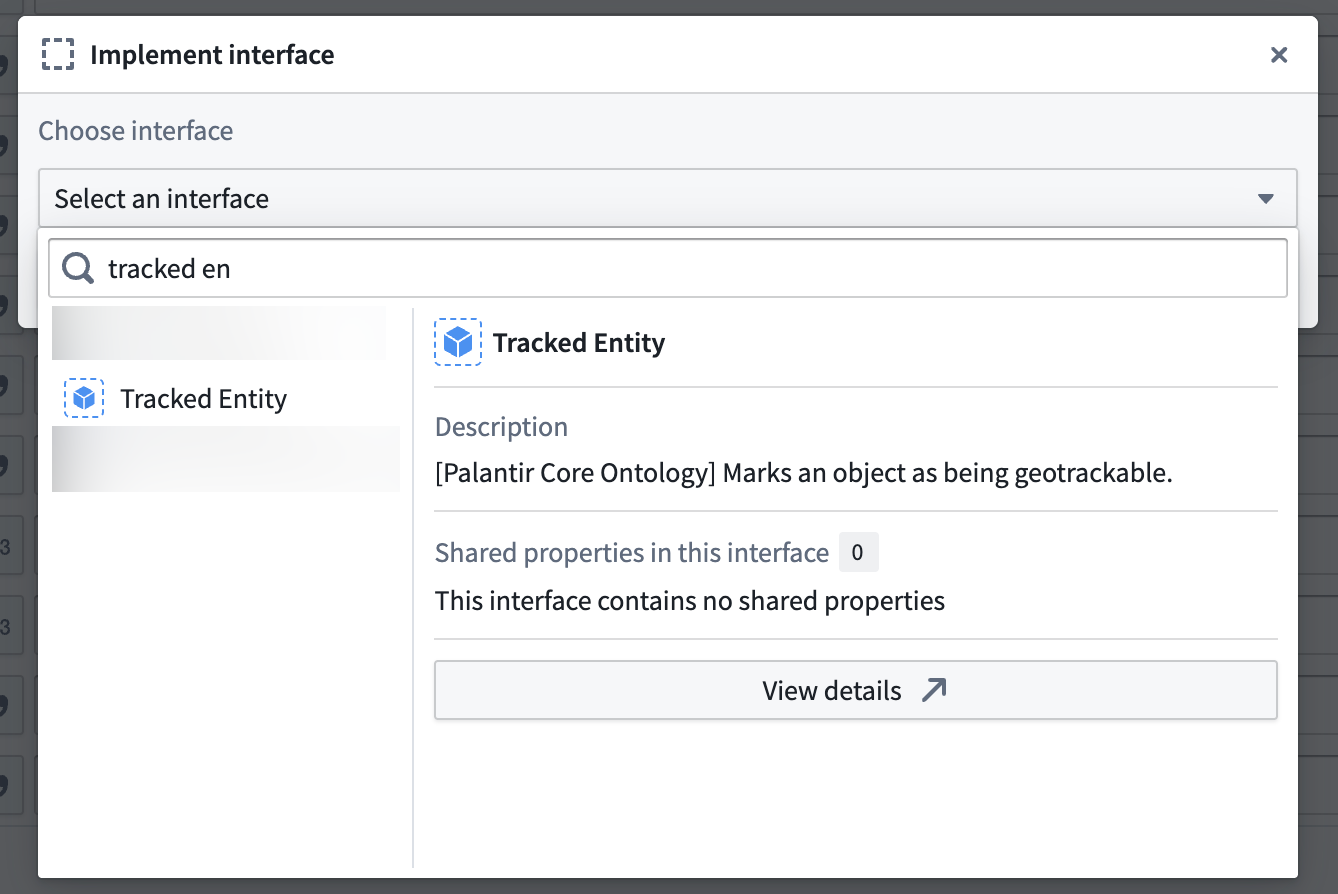
:::callout{theme="neutral"}
Contact Palantir Support to install the Tracked Entity interface on your enrollment if you are unable to access it in Ontology Manager.
:::
- Choose Implement and go to mapping to navigate back to the object type creation window in Pipeline Builder before saving your changes.
Deploy your pipeline
After configuring your geotemporal series sync, creating an object type and interface, and establishing a link between the two via the GTSR, follow the instructions below to deploy your pipeline:
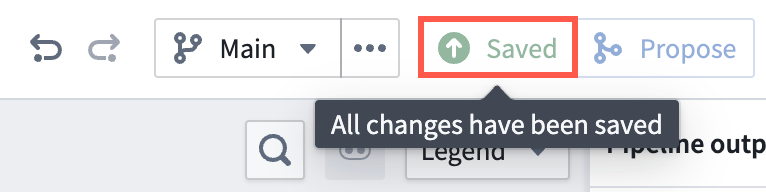
- Ensure all changes made to your pipeline are saved.
- Select Deploy to render the Deploy this pipeline panel.
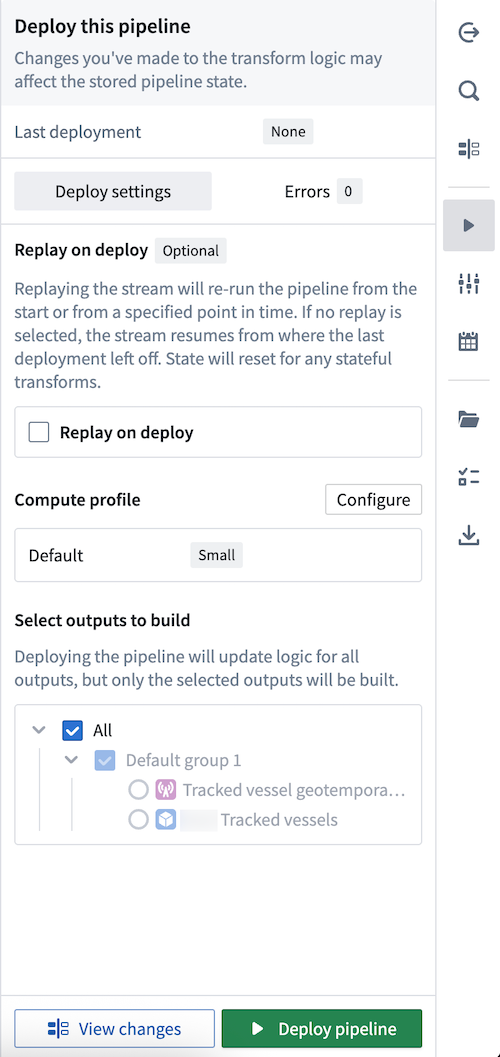
- Optionally Replay on deploy to re-run your pipeline from a specified point in time. Depending on your stream's size, replaying a pipeline may impact the pipeline's deployment speed. Learn more about additional options for streaming pipelines in Pipeline Builder.
- Select Deploy pipeline.
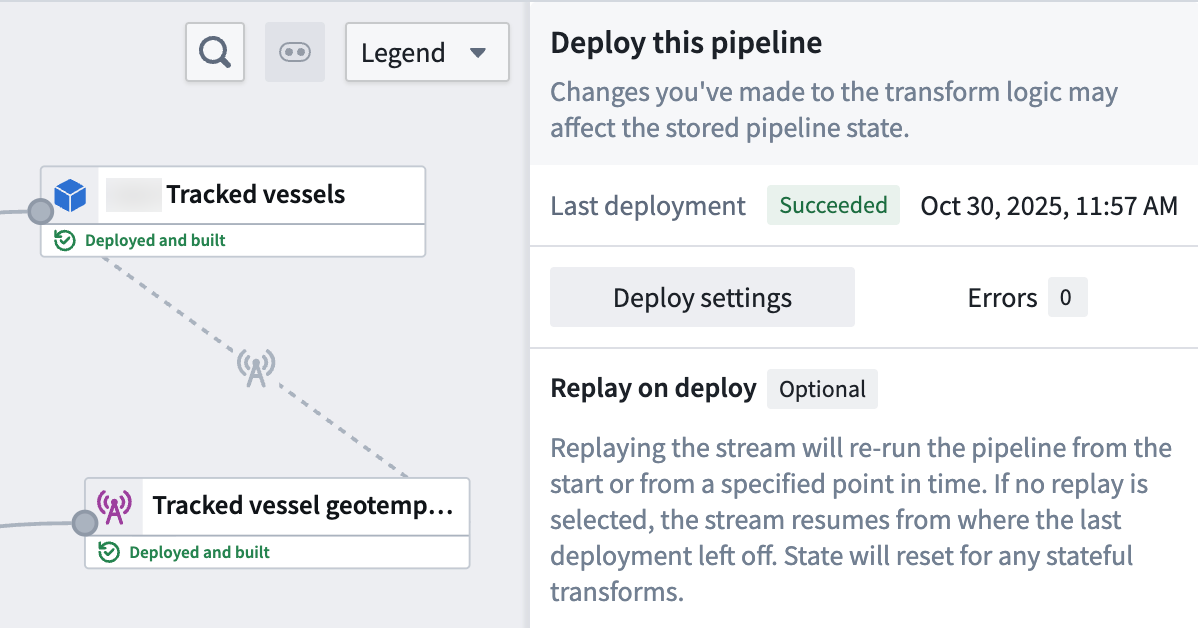
Once your pipeline deploys and your object type is created in your ontology, you can visualize its observations on a map.
Visualize your geotemporal data
:::callout{theme="neutral"} Gaia is only accessible if your enrollment contains Gotham. Contact Palantir Support with questions about access to Gaia or its additional documentation available in platform. :::
Once your geotemporal series is integrated with the ontology, you can add its associated object type to your Gaia map.
In addition to adding data from your ontology, you can review the existing documentation to learn more about creating ontology data from Gaia.
中文翻译
将地理时间序列与本体集成
要在 Palantir 应用中(如 Gaia 地图)建立驱动分析和可视化的地理时间序列(geotemporal series),您需要使用 Pipeline Builder 完成以下操作:
- 使用地理时间序列输出创建地理时间序列同步(geotemporal series sync)。该输出将包含一个地理时间序列引用属性(GTSR),用于捕捉随时间变化的移动轨迹。
- 使用对象类型管道输出创建地理时间序列对象类型(geotemporal series object type)。该对象类型将包含 GTSR 以及被追踪实体的静态信息,例如船舶的呼号或名称。
- 将地理时间序列同步中的地理时间序列引用属性映射到单个地理时间序列对象类型。
:::callout{theme="neutral"}
如果您计划将本体中的数据添加到 Foundry 地图而非 Gaia,请使用时间序列来查看和分析与地理空间或地理时间对象关联的数据。更多信息请参阅我们的地理空间时间序列用例教程。
请查阅地理空间常见问题页面,或联系 Palantir 支持团队,了解根据您的注册情况和具体用例应使用哪种集成类型将地理时间数据索引到本体中。
:::
按照以下说明将地理时间序列同步输出添加为地理时间序列对象类型的引用。
在 Pipeline Builder 中创建新管道
- 导航至 Pipeline Builder,选择绿色的 New pipeline 按钮。
- 为管道命名,并选择保存位置的项目。
- 选择 Streaming pipeline,然后点击 Create pipeline。
导入并转换地理时间数据集
:::callout{theme="neutral"} 在继续操作前,请先查阅现有的地理时间数据建模文档。 :::
确定将用于支持地理时间序列同步和对象类型的流式数据集(streaming dataset)和静态数据集(static dataset),然后按照以下说明将其添加到管道中。虽然您可以从一个数据集同时创建地理时间序列对象类型和地理时间序列同步,但以下步骤使用两个数据集进行说明:一个实时流用于支持地理时间序列同步,一个静态数据集用于支持对象类型。
- 如果已将数据导入平台,请选择 Add Foundry data。
- 在 Add data 弹窗中搜索文件,点击 + 图标将每个数据集添加到管道。
- 在 Add data 弹窗右下角选择 Add data。
![]()
转换流式数据集
:::callout{theme="neutral"}
您的流式数据集至少应包含捕捉被追踪实体随时间移动的列,例如在特定时间戳的纬度和经度,以及一个 string 类型的列,用于将地理时间序列同步连接到对象类型。包含随时间变化数据的列称为实时字段(live fields),而保持不变的列(如实体名称)称为静态字段(static fields)。
:::
根据流式数据集导入 Foundry 时的原始状态,您的转换需求可能有所不同。以下示例数据包含映射到同步主要字段的以下列:
- Series_ID: 一个
string类型的列,用于将地理时间序列同步连接到基于静态数据集的对象类型。了解更多关于配置系列 ID 的信息。 - Timestamp: 一个
timestamp类型的列,包含记录实体位置的时间。 - Geopoint: 一个
geopoint类型的列,包含实体的纬度和经度对。
该数据集包含额外的列,这些列将映射到地理时间序列同步的属性,但并非同步在 Palantir 地图应用中运行所必需。
如有必要,使用 Pipeline Builder 的 Cast 和 Create GeoPoint 转换来准备原始流式数据集,以便输出为地理时间序列同步。
按照以下说明从转换后的流式数据创建地理时间序列同步输出:
- 选择流式数据集或转换节点以显示垂直菜单栏,点击金色 + 图标添加 New geotemporal series sync 输出。
- 在 Name and icon 中输入名称,并可选择更改同步的默认图标。
- 选择 Destination namespace,Foundry 将在此写入同步。
- 将流式数据集中的相关列分配给同步的 Primary fields。
- 如果已存在,设置同步的 Observation schema。如果不存在,则可以留空;Foundry 将根据同步映射的属性生成新的 schema。了解更多关于观察模式的信息。
- 可选择切换任何附加 Properties 右侧的 Live 图标,将一个或多个属性标记为静态。
:::callout{theme="neutral"} Foundry 会为每个新观察记录一个 Live 属性值,例如实体在特定时间戳的速度。如果将属性标记为静态,则 Foundry 会记录该属性的最新值,并将其应用于系列中的所有观察。 :::
- 可选择为同步配置任何 Styles,以控制其下游渲染效果。
- 可选择在 Advanced settings 中启用 Dataset archive,以在默认的 14 天实时保留窗口之外,将所有同步数据保留在长期历史归档中。
:::callout{theme="neutral"} 如有关于扩展或缩短默认实时保留窗口的问题,请联系 Palantir 支持团队。 :::
- 选择 Save 保存地理时间序列同步。
转换静态数据集
:::callout{theme="neutral"} 您的静态数据集至少应包含与流式数据集相同的被追踪实体唯一标识符,例如名称或呼号。 ::>
接下来,您将转换对象类型的支持数据集,确保其能够通过地理时间序列引用(GTSR)链接到地理时间序列同步。
- 在管道中选择静态数据集,然后选择 Transform 插入新的转换。
- 搜索并选择 Apply expression。
- 选择标有
Column, expression, or value的输入字段,然后从 Columns 中选择数据集的主键列。在本示例中,数据集的mmsi列包含唯一的船舶标识符,可用作主键。 - 创建一个名为
Series_ID的新列,该列是数据集唯一标识符(如mmsi)的副本。您将使用此新列将地理时间序列同步链接到对象类型。
- 选择 Apply,然后保存对管道的更改并预览数据。
创建对象类型输出
转换静态数据集后,按照以下说明创建对象类型输出并实现 Tracked Entity 接口。
- 选择刚刚创建的转换节点以显示垂直菜单栏,点击金色 + 图标添加 New object type 输出。
- 在 Name and icon 中输入名称,并可选择更改同步的默认图标。
- 选择显示属性右侧的省略号图标,设置主键和标题属性。
- 选择
Series_ID属性旁边的链接图标,通过选择 Geotemporal series > From this pipeline 将 GTSR 属性映射到对象类型。
:::callout{theme="neutral"} 如果未看到 Geotemporal series 选项,请确认管道的其他编辑者未禁用 Pipeline Builder 的高级地理时间功能(这些功能通常可用且默认启用)。从顶部功能区选择 Settings > Pipeline feature flags...,然后确保 Enable advanced geotemporal series features 设置为 Enabled,最后关闭 Pipeline feature flags 窗口。 :::
- 选择屏幕底部的 Implement interface,然后从 Palantir Core Ontology 中选择
Tracked Entity接口。
:::callout{theme="neutral"}
如果您无法在 Ontology Manager 中访问 Tracked Entity 接口,请联系 Palantir 支持团队在您的注册环境中安装该接口。
:::
- 选择 Implement and go to mapping 返回 Pipeline Builder 中的对象类型创建窗口,然后保存更改。
部署管道
配置地理时间序列同步、创建对象类型和接口,并通过 GTSR 建立两者之间的链接后,按照以下说明部署管道:
- 确保对管道所做的所有更改均已保存。
- 选择 Deploy 以显示 Deploy this pipeline 面板。
- 可选择启用 Replay on deploy,从指定时间点重新运行管道。根据流的大小,重放管道可能会影响部署速度。了解更多关于 Pipeline Builder 中流式管道的其他选项。
- 选择 Deploy pipeline。
管道部署完成且对象类型在您的本体中创建后,您可以在地图上可视化其观察数据。
可视化地理时间数据
:::callout{theme="neutral"} 仅当您的注册环境包含 Gotham 时,才能访问 Gaia。如有关于 Gaia 访问权限或平台内其他文档的问题,请联系 Palantir 支持团队。 :::
地理时间序列与本体集成后,您可以将其关联的对象类型添加到 Gaia 地图。
除了从本体添加数据外,您还可以查阅现有文档,了解如何从 Gaia 创建本体数据。