Advanced setup(高级设置)
:::callout{theme="warning"} We recommend setting up your time series pipeline using Pipeline Builder as explained in the time series setup page. Doing so will automatically apply the transform optimizations described below.
Contact your Palantir representative before proceeding with an advanced setup configuration. :::
If you require low-level transform control or advanced functionality not yet provided by Pipeline Builder, this page describes how to manually set up your time series pipeline with Code Repositories used for data transformations.
To set up time series with Code Repositories, you must complete the following:
- Create and optimize the time series input data.
- Set up a time series sync.
- Create the time series object type backing dataset.
- Set up the time series object type.
1. Create and optimize the time series input data
Time series syncs can be built on top of either datasets or streams. This choice often depends on throughput and latency considerations. Review the comparison of streaming and batch processes for a more detailed analysis.
In both cases, when you manually set up your pipeline, you must explicitly generate a time series dataset or stream that contains your formatted time series data; this is required to create a time series sync. The dataset or stream must contain Series ID, Value, and Timestamp columns as specified in the glossary so that these values can be mapped in the time series sync.
Dataset time series
Time series datasets are typically configured to build incrementally when there is live data. Incremental builds allow you to save on compute costs and achieve a much shorter latency from when raw data is ingested to when up-to-date data can be read.
:::callout{theme="neutral"} For more information about the benefits of incremental time series builds, see the FAQ documentation. :::
All values for a series ID should be contained in the same dataset. Since values are fetched by their series ID, a single time series dataset can contain all values for multiple series IDs. For example:
+------------------------+---------------------+---------+
| series_id              | timestamp           | value   |
+------------------------+---------------------+---------+
| Machine123_temperature | 01/01/2023 12:00:00 | 100     |
| Machine123_temperature | 01/01/2023 12:01:00 | 99      |
| Machine123_temperature | 01/01/2023 12:02:00 | 101     |
| Machine463_temperature | 01/01/2023 12:00:00 | 105     |
| Machine123_pressure    | 01/01/2023 12:00:00 | 3       |
| ...                    | ...                 | ...     |
+------------------------+---------------------+---------+
When generating the time series dataset in code, format the dataset before writing as follows:
Python
from transforms.api import transform, Input, Output

@transform(
    output_dataset=Output("/path/to/output/dataset"),
    input_dataset=Input("/path/to/input/dataset")
)
def my_compute_function(output_dataset, input_dataset):
    output_dataframe = (
        input_dataset
        .dataframe()
        .repartitionByRange('seriesId')
        .sortWithinPartitions('seriesId', 'timestamp')
    )

    output_dataset.write_dataframe(output_dataframe, output_format='soho')
Java
package myproject.datasets;

import com.palantir.transforms.lang.java.api.Compute;
import com.palantir.transforms.lang.java.api.FoundryInput;
import com.palantir.transforms.lang.java.api.FoundryOutput;
import com.palantir.transforms.lang.java.api.Input;
import com.palantir.transforms.lang.java.api.Output;
import com.palantir.foundry.spark.api.DatasetFormatSettings;
import org.apache.spark.sql.Dataset;
import org.apache.spark.sql.Row;

import java.util.Collections;

public final class TimeSeriesWriter {
    @Compute
    public void writePartitioned(
            @Input("/path/to/input/dataset") FoundryInput inputDataset,
            @Output("/path/to/output/dataset") FoundryOutput outputDataset) {
        Dataset<Row> inputDataframe = inputDataset.asDataFrame().read();

        Dataset<Row> outputDataframe = inputDataframe
            .repartitionByRange(inputDataframe.col('seriesId'))
            .sortWithinPartitions('seriesId', 'timestamp');

        outputDataset.getDataFrameWriter(outputDataframe)
            .setFormatSettings(DatasetFormatSettings.builder()
                .format('soho')
                .build())
            .write();
    }
}
Running this repartition and sort will optimize your dataset for performant usage as time series. At a minimum, your dataset should also be formatted as Soho (as shown) for new data to be indexed to the time series database when it is not yet projected. You should also configure the number of partitions written by repartitionByRange() ↗ to an appropriate number for your pipeline, based on the following guidance:
- Write as few partitions as possible.
- Partitions should be greater than 128 MB.
- Generally, partitions should be less than 5 billion rows.
:::callout{theme="neutral"} The limit for the lowest number of partitions you can write is informed by writing small enough partitions that they fit on an executor, but enough partitions that your job will parallelize sufficiently for the pipeline latency that you desire. Writing more partitions results in smaller partitions and faster jobs but will not be as optimal as larger partitions. :::
View optimization on time series syncs
When syncing a significant volume of data, we recommend segmenting your data into smaller datasets using discrete time intervals such as hourly, daily, or weekly partitions. You can then consolidate these partitions into a unified view that can be synced to a time series. This approach helps ensure good performance when requesting time series data downstream in the FoundryTS library or in Quiver. The smaller datasets are ultimately consolidated into a single time series sync through the unified view.
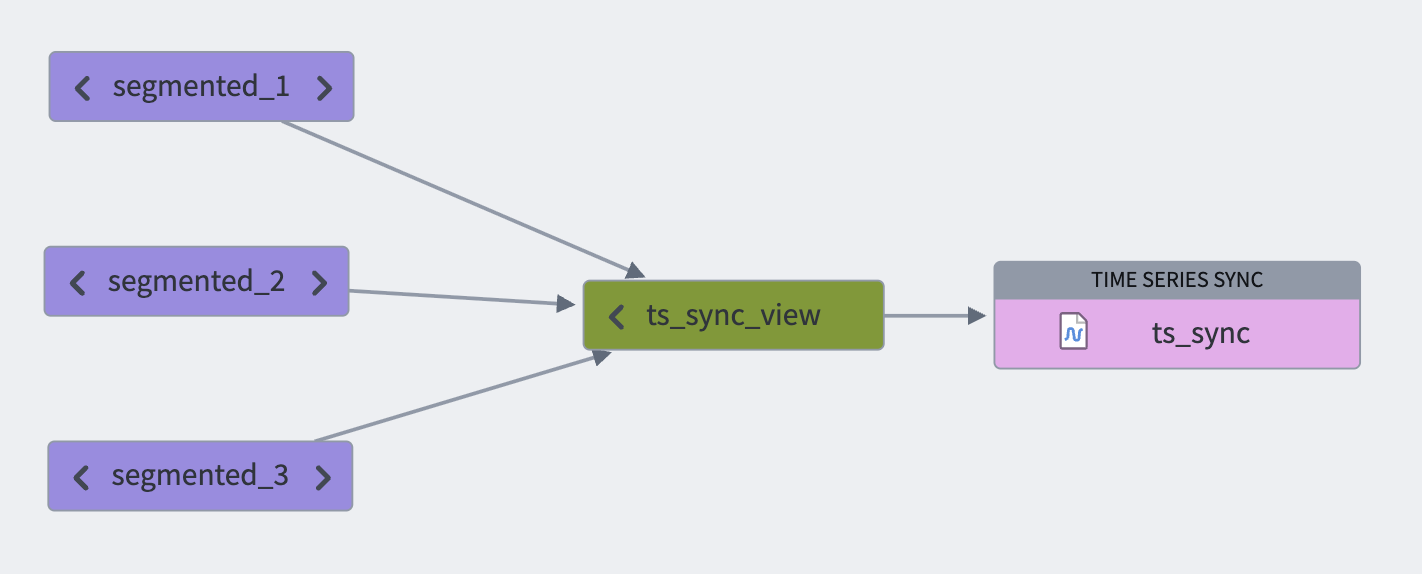
Note that since a view contains all segmented backing datasets, it is permissible for series IDs to be distributed or staggered across backing datasets.
You can configure view optimization usage in the time series sync advanced settings.
Follow the steps below to configure view optimization:
- Set up the view containing the backing series datasets.
- Use that view as an input to the time series sync you are setting up.
- Toggle the Index view dataset inputs option in the Advanced settings section of the time series set up dialog.
Streaming time series
To optimize streaming time series performance, we recommend taking the following steps:
- Keying your stream using the Series ID column; this ensures that the platform will read from the fewest number of partitions while indexing time series data. For more information on streaming keys, see the Streaming Keys documentation.
- Setting a higher number of partitions, we recommend configuring at least 3 partitions for streaming time series syncs with higher throughput requirements.
:::callout{theme="warning"} Make sure that your stream is only keyed by the Series ID column, and not by any other columns. This ensures optimal ordering guarantees for time series indexing. :::
Streaming pipelines
We recommend setting up streaming time series syncs using streaming pipelines. You can do so by making a time series sync the output of your pipeline.
- Key your stream using the
Series IDcolumn: Create a Key by transform using only theSeries IDcolumn. - Set the number of partitions: Customize the streaming profile under Build settings > Advanced configuration > Number of Output Partitions.

Streaming syncs
Another way to configure a streaming time series input is to set up a streaming sync.
- Key your stream using the
Series IDcolumn: Under Configuration > Keys, select theSeries IDcolumn. - Set the number of partitions: Under Throughput, select Very high and select a value based on throughput requirements.

:::callout{theme="warning"} If your stream has already ingested records, changing the keying or partitioning will require resetting the stream. :::
2. Set up a time series sync
If you are following the setup assistant, select Go to Builder.
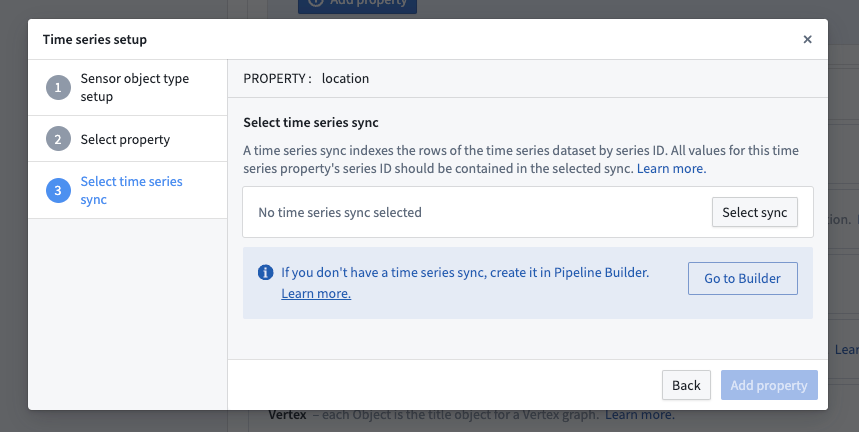
Refer to the create time series sync using Time Series Catalog documentation for more details.
Once you have created a time series sync, return to Ontology Manager and add this time series sync as a data source to the time series property. If your sync contains all of your series IDs, then you can select the same sync for the new time series properties instead of creating a new one.
Be sure to select Save in Ontology Manager to save your changes. If you created a new object type and this is your first time saving a change, you will need to wait until initial indexing is complete before you can analyze TSPs. Check the index status by navigating to the Datasources tab for the object type in Ontology Manager.
Learn more about how you can analyze your newly configured time series data
3. Create the time series object type backing dataset
You may generate the time series object type backing dataset by your preferred method, and it should conform to the schema specified in the glossary.
To automatically generate the time series object type backing dataset, you can generate it in the same transform as your time series dataset where you can take the distinct set of series IDs and extract/map metadata from/to them. In an incremental pipeline, you can use the merge and append pattern to achieve this.
4. Set up the time series object type
Follow the standard process to create an object type on your time series object type backing dataset. It is also possible to generate the object type directly from the dataset by selecting All actions > Create object type in the dataset preview. When creating the object type, configure it for time series by specifying which properties should be time series properties.
中文翻译
高级设置
:::callout{theme="warning"} 我们建议按照时间序列设置页面中的说明,使用Pipeline Builder来设置时间序列管道。这样做会自动应用下文所述的转换优化。
在进行高级设置配置之前,请联系您的Palantir代表。 :::
如果您需要对转换进行底层控制,或需要使用Pipeline Builder尚未提供的高级功能,本页面将介绍如何通过代码仓库(Code Repositories)手动设置时间序列管道。
要使用代码仓库设置时间序列,您必须完成以下步骤:
1. 创建并优化时间序列输入数据
时间序列同步可以基于数据集(datasets)或流(streams)构建。这一选择通常取决于吞吐量和延迟方面的考量。请参阅流处理与批处理对比以获取更详细的分析。
在这两种情况下,当您手动设置管道时,必须显式生成一个包含格式化时间序列(time series)数据的时间序列数据集或流;这是创建时间序列同步的必要条件。该数据集或流必须包含术语表中指定的Series ID、Value和Timestamp列,以便这些值可以在时间序列同步中进行映射。
数据集时间序列
时间序列数据集通常配置为在有实时数据时进行增量构建(incrementally)。增量构建可以节省计算成本,并显著缩短从原始数据摄入到读取最新数据之间的延迟。
:::callout{theme="neutral"} 有关增量时间序列构建优势的更多信息,请参阅常见问题文档。 :::
同一系列ID的所有值应包含在同一个数据集中。由于值是通过系列ID获取的,单个时间序列数据集可以包含多个系列ID的所有值。例如:
+------------------------+---------------------+---------+
| series_id              | timestamp           | value   |
+------------------------+---------------------+---------+
| Machine123_temperature | 01/01/2023 12:00:00 | 100     |
| Machine123_temperature | 01/01/2023 12:01:00 | 99      |
| Machine123_temperature | 01/01/2023 12:02:00 | 101     |
| Machine463_temperature | 01/01/2023 12:00:00 | 105     |
| Machine123_pressure    | 01/01/2023 12:00:00 | 3       |
| ...                    | ...                 | ...     |
+------------------------+---------------------+---------+
在代码中生成时间序列数据集时,请按如下方式在写入前格式化数据集:
Python
from transforms.api import transform, Input, Output

@transform(
    output_dataset=Output("/path/to/output/dataset"),
    input_dataset=Input("/path/to/input/dataset")
)
def my_compute_function(output_dataset, input_dataset):
    output_dataframe = (
        input_dataset
        .dataframe()
        .repartitionByRange('seriesId')
        .sortWithinPartitions('seriesId', 'timestamp')
    )

    output_dataset.write_dataframe(output_dataframe, output_format='soho')
Java
package myproject.datasets;

import com.palantir.transforms.lang.java.api.Compute;
import com.palantir.transforms.lang.java.api.FoundryInput;
import com.palantir.transforms.lang.java.api.FoundryOutput;
import com.palantir.transforms.lang.java.api.Input;
import com.palantir.transforms.lang.java.api.Output;
import com.palantir.foundry.spark.api.DatasetFormatSettings;
import org.apache.spark.sql.Dataset;
import org.apache.spark.sql.Row;

import java.util.Collections;

public final class TimeSeriesWriter {
    @Compute
    public void writePartitioned(
            @Input("/path/to/input/dataset") FoundryInput inputDataset,
            @Output("/path/to/output/dataset") FoundryOutput outputDataset) {
        Dataset<Row> inputDataframe = inputDataset.asDataFrame().read();

        Dataset<Row> outputDataframe = inputDataframe
            .repartitionByRange(inputDataframe.col('seriesId'))
            .sortWithinPartitions('seriesId', 'timestamp');

        outputDataset.getDataFrameWriter(outputDataframe)
            .setFormatSettings(DatasetFormatSettings.builder()
                .format('soho')
                .build())
            .write();
    }
}
执行此重分区和排序操作将优化您的数据集,使其作为时间序列使用时性能更佳。至少,您的数据集还应格式化为Soho(如图所示),以便在尚未投影时新数据能被索引到时间序列数据库。您还应根据以下指导原则,将repartitionByRange() ↗写入的分区数配置为适合您管道的数量:
- 尽可能少地写入分区。
- 分区应大于128 MB。
- 通常,分区应少于50亿行。
:::callout{theme="neutral"} 可写入的最小分区数受限于以下因素:分区要足够小以适合执行器(executor),同时分区数量要足够多,以便作业能够充分并行化,达到您期望的管道延迟。写入更多分区会产生更小的分区和更快的作业,但不如较大分区那样优化。 :::
时间序列同步的视图优化
在同步大量数据时,我们建议使用离散的时间间隔(如每小时、每天或每周分区)将数据分割成较小的数据集。然后,您可以将这些分区合并为一个统一的视图(view),该视图可以同步到时间序列。这种方法有助于确保在FoundryTS库或Quiver中下游请求时间序列数据时获得良好的性能。较小的数据集最终通过统一视图合并到单个时间序列同步中。
请注意,由于视图包含所有分段支持数据集,因此系列ID可以跨支持数据集分布或交错排列。
您可以在时间序列同步的高级设置中配置视图优化的使用。
请按照以下步骤配置视图优化:
- 设置包含系列支持数据集的视图。
- 将该视图作为输入用于您正在设置的时间序列同步。
- 在时间序列设置对话框的高级设置部分中,启用索引视图数据集输入选项。
流式时间序列
为优化流式时间序列性能,我们建议采取以下步骤:
- 使用系列ID列作为流的键(key);这确保平台在索引时间序列数据时从最少的分区读取数据。有关流键的更多信息,请参阅流键文档。
- 设置更多的分区(partitions),对于吞吐量要求较高的流式时间序列同步,我们建议至少配置3个分区。
:::callout{theme="warning"} 确保您的流仅以系列ID列作为键,而不使用任何其他列。这确保了时间序列索引的最佳排序保证。 :::
流式管道
我们建议使用流式管道(streaming pipelines)设置流式时间序列同步。您可以通过将时间序列同步设置为管道的输出来实现。
- 使用
Series ID列作为流的键: 创建一个Key by转换,仅使用Series ID列。 - 设置分区数: 在构建设置 > 高级配置 > 输出分区数下自定义流式配置文件(streaming profile)。
流式同步
配置流式时间序列输入的另一种方法是设置流式同步。
- 使用
Series ID列作为流的键: 在配置 > 键下,选择Series ID列。 - 设置分区数: 在吞吐量下,选择非常高,并根据吞吐量要求选择一个值。
:::callout{theme="warning"} 如果您的流已经摄入了记录,更改键或分区将需要重置流。 :::
2. 设置时间序列同步
如果您正在使用设置助手,请选择前往构建器。
有关更多详细信息,请参阅使用时间序列目录创建时间序列同步文档。
创建时间序列同步后,返回Ontology Manager并将此时间序列同步作为数据源添加到时间序列属性。如果您的同步包含所有系列ID,则可以为新的时间序列属性选择相同的同步,而无需创建新的同步。
请务必在Ontology Manager中选择保存以保存更改。如果您创建了新的对象类型并且这是您第一次保存更改,则需要等待初始索引完成,然后才能分析TSP。通过导航到Ontology Manager中对象类型的数据源选项卡来检查索引状态。
3. 创建时间序列对象类型支持数据集
您可以通过首选方法生成时间序列对象类型支持数据集,并且它应符合术语表中指定的模式。
要自动生成时间序列对象类型支持数据集,您可以在与时间序列数据集相同的转换中生成它,在此转换中您可以获取系列ID的不同集合,并从中提取/映射元数据。在增量管道中,您可以使用合并和追加(merge and append)模式来实现这一点。
4. 设置时间序列对象类型
按照标准流程在您的时间序列对象类型支持数据集上创建对象类型。也可以通过在数据集预览中选择所有操作 > 创建对象类型直接从数据集生成对象类型。创建对象类型时,通过指定哪些属性应为时间序列属性(time series properties)来配置时间序列。