Set up time series alerting(设置时序告警)
This page will walk you through creating a time series alerting automation that identifies time periods when the pressure loss for machines on a hypothetical Machine root object type is above 120 kPa.
1. Create a new time series condition in Automate
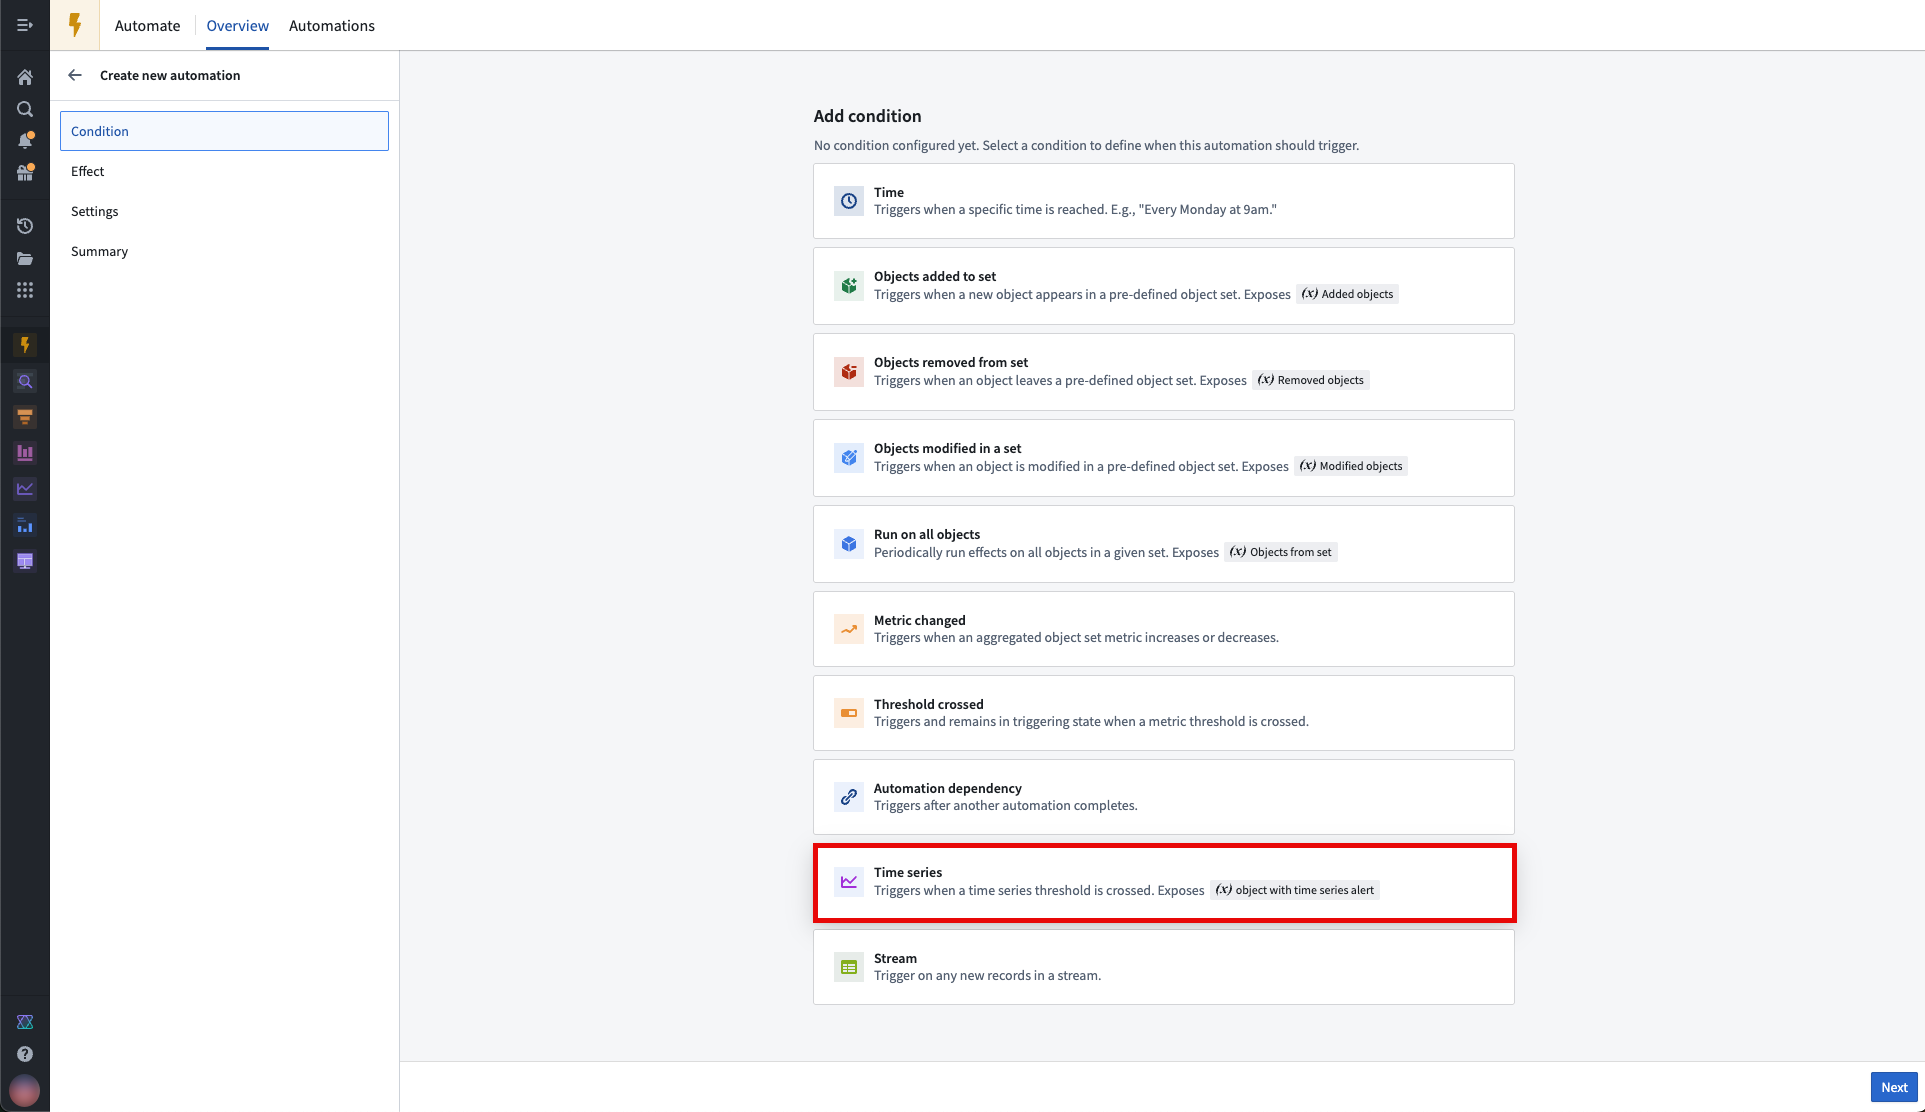
In the Automate application, create a new automation and add a Time series condition to the automation.
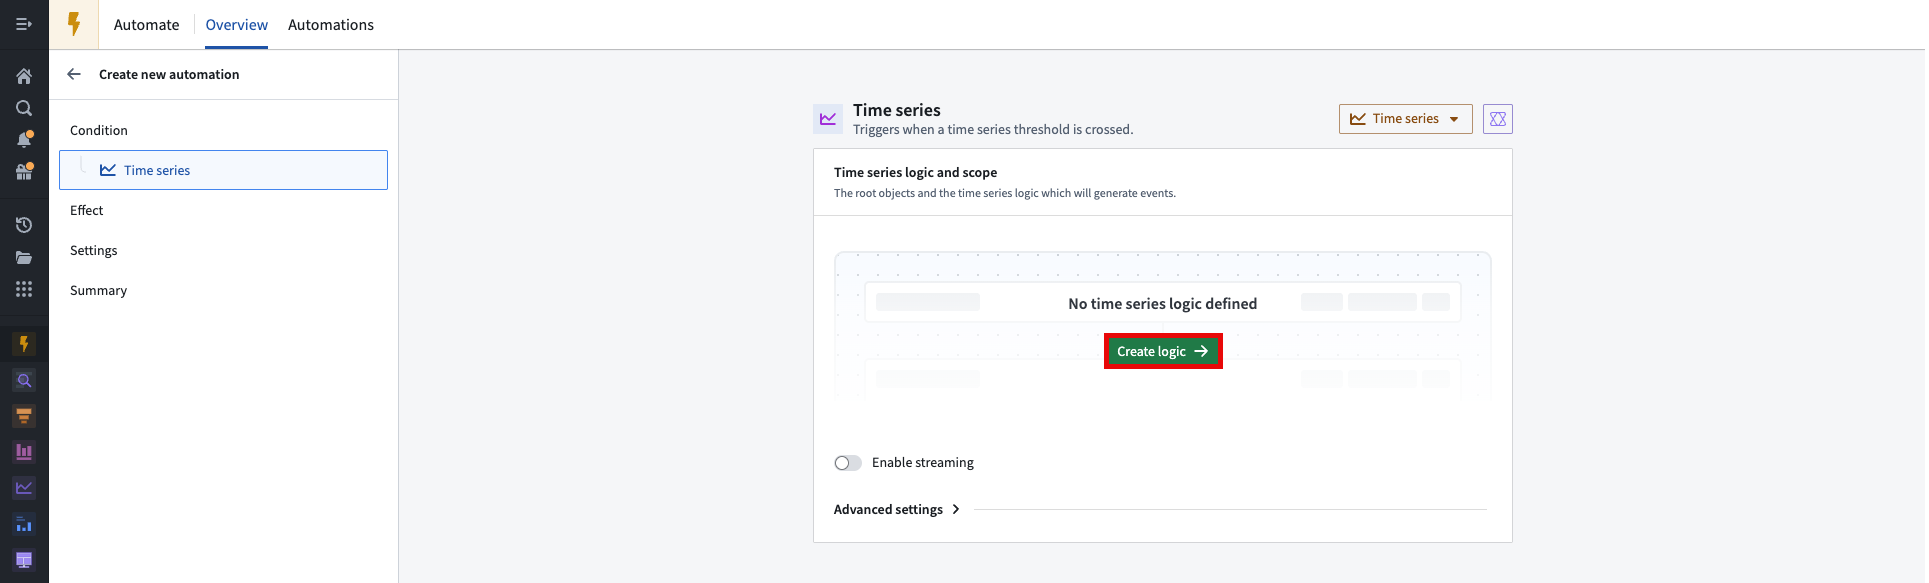
From the time series condition overview page, define the time series logic and scope of the automation by selecting Create logic.
Select time series alert output type
When setting up a time series alert, you can choose the alert output type to control the latency of alerting:
- Batch alerting: Inputs and outputs are updated on each deploy of inputs. Use this to create alerts that are sent out periodically.
- Streaming alerting: Inputs and outputs are updated continuously as new data is made available. Use this to create alerts that are sent out with low latency.
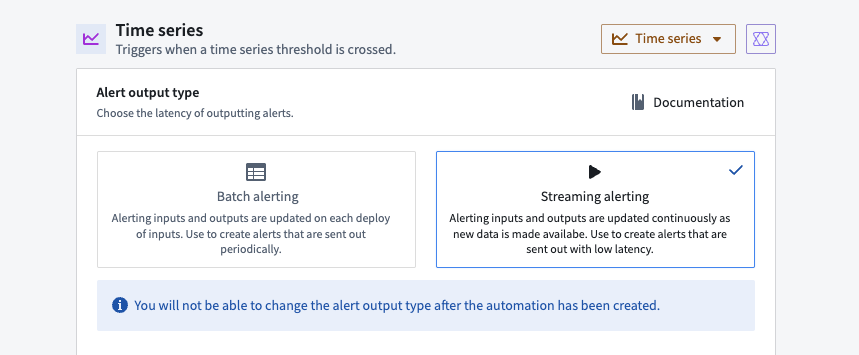
:::callout{theme="warning"} You will not be able to change the alert output type after the automation has been created. :::
2. Select time series alert object type
Now, you need to choose an object type where new events will be added as objects. From the edit view of the time series condition page, navigate to the Select time series alert object type section. If you do not already have an object type that supports time series alerting automations, choose to Create new object type. You must have permissions to perform Marketplace installations and create object types with backing datasets to create new object types. Additionally, your object type and the time series alerting automation must be stored in the same Project.
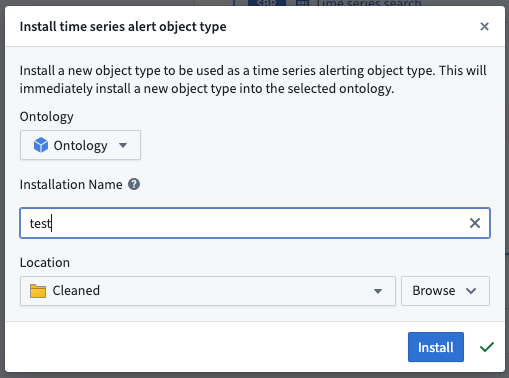
If you create a new object type, you must wait for it to fully index into the Ontology before you can proceed with setting up your automation. We recommend waiting up to ten minutes.
An existing object type can be used if it has properties with the following type classes:
timeseries:alert_event_idtimeseries:automation_ridtimeseries:automation_versiontimeseries:root_object_pktimeseries:root_object_type_api_nametimeseries:start_timetimeseries:end_timetimeseries:generation_timetimeseries:event_start_cause(streaming only)timeseries:event_end_cause(streaming only)
3. Select a root object type
Upon opening the time series logic editor, you will be prompted to select the relevant object type from which to create alerts. In this example, we will select the Machine object type. Select Get started to continue.

A skeleton time series logic path will then be populated, including a starting card of the path (Object time series property card), and the required output card (Time series search card). A default object of the given object type will be set at the top of the path. You can change this object to another object of the given object type. In this example, we are previewing the Machine 1 object.
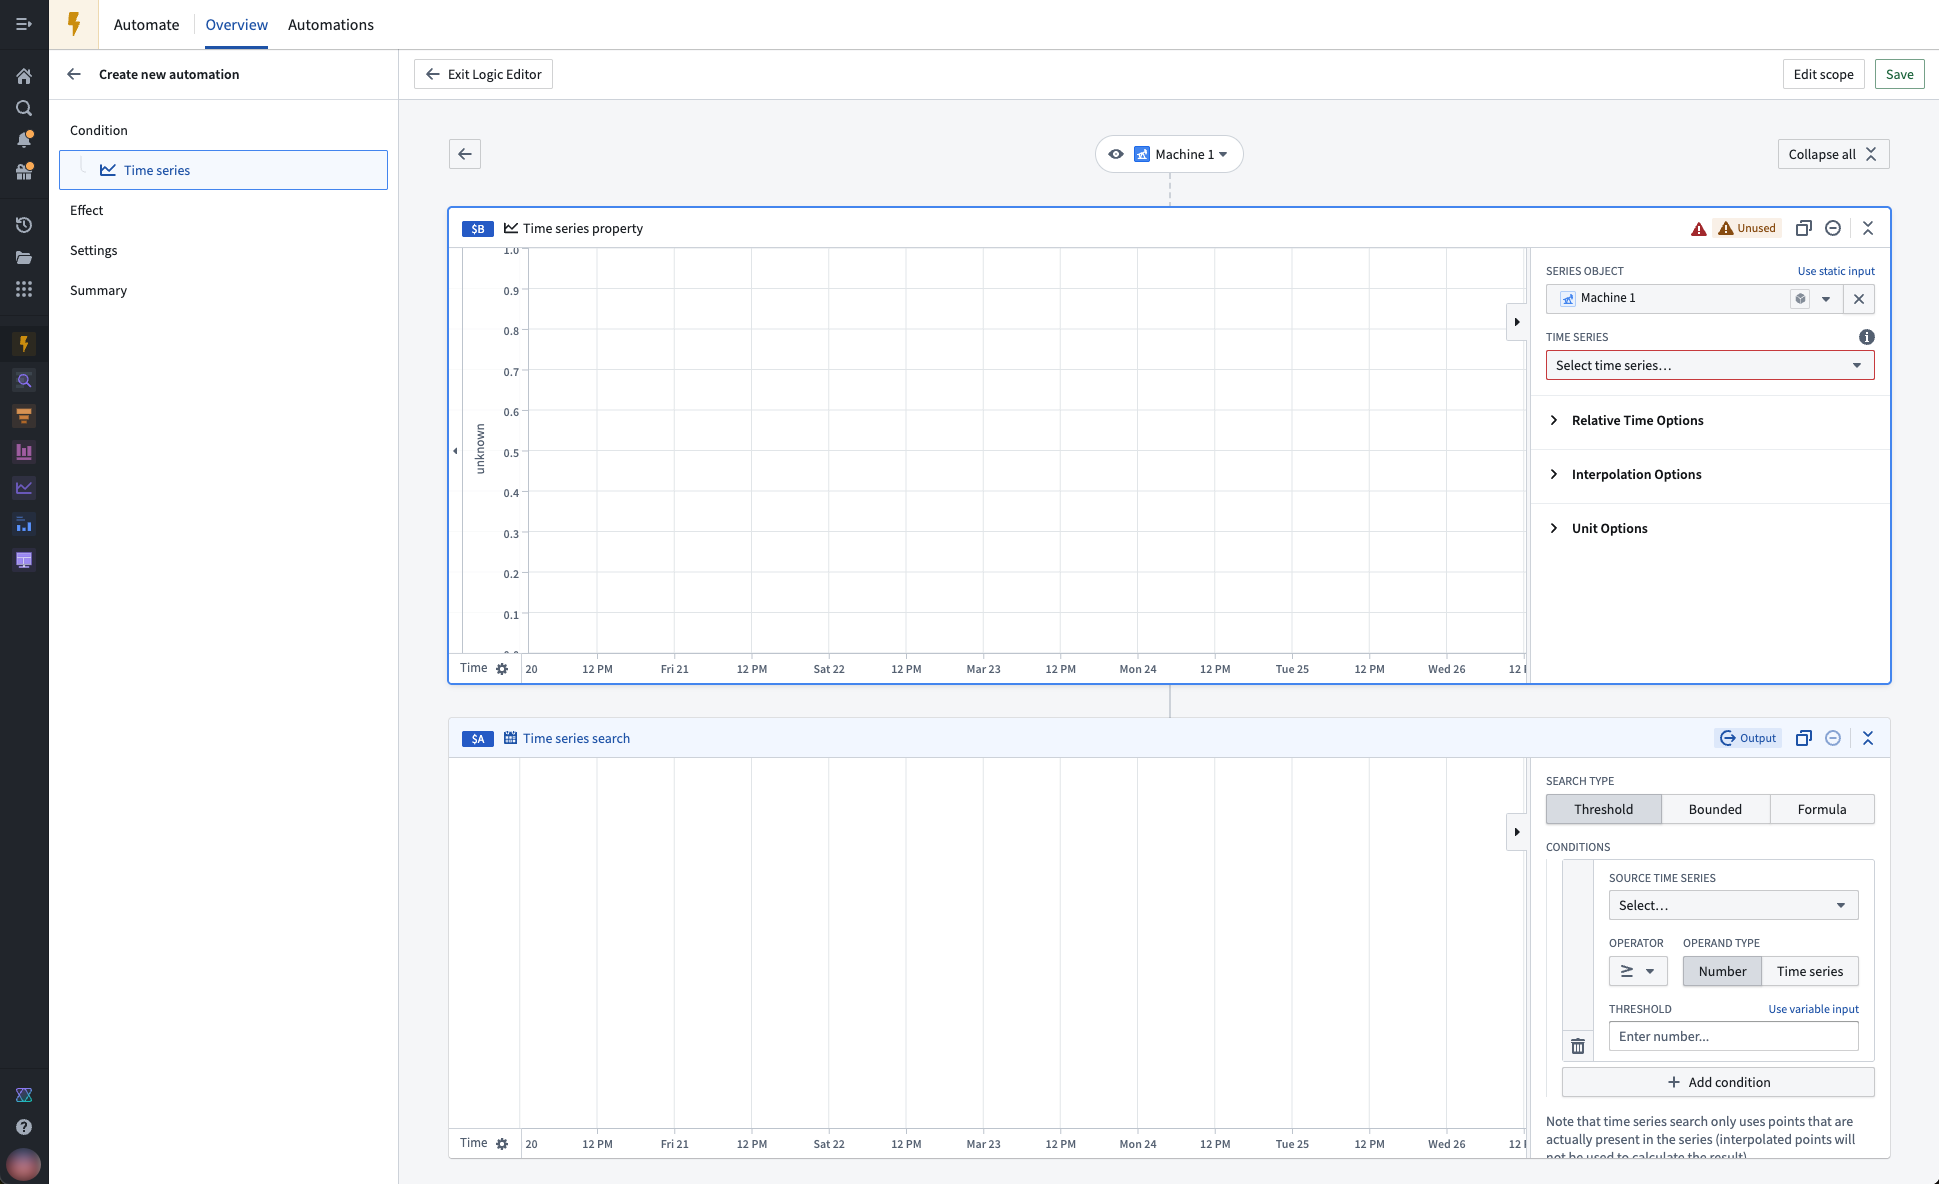
:::callout{theme="neutral"} The preview object is only used as an example to visualize the time series transformations in the logic editor, and does not affect which objects the time series alert will evaluate on. :::
4. Select time series properties as inputs
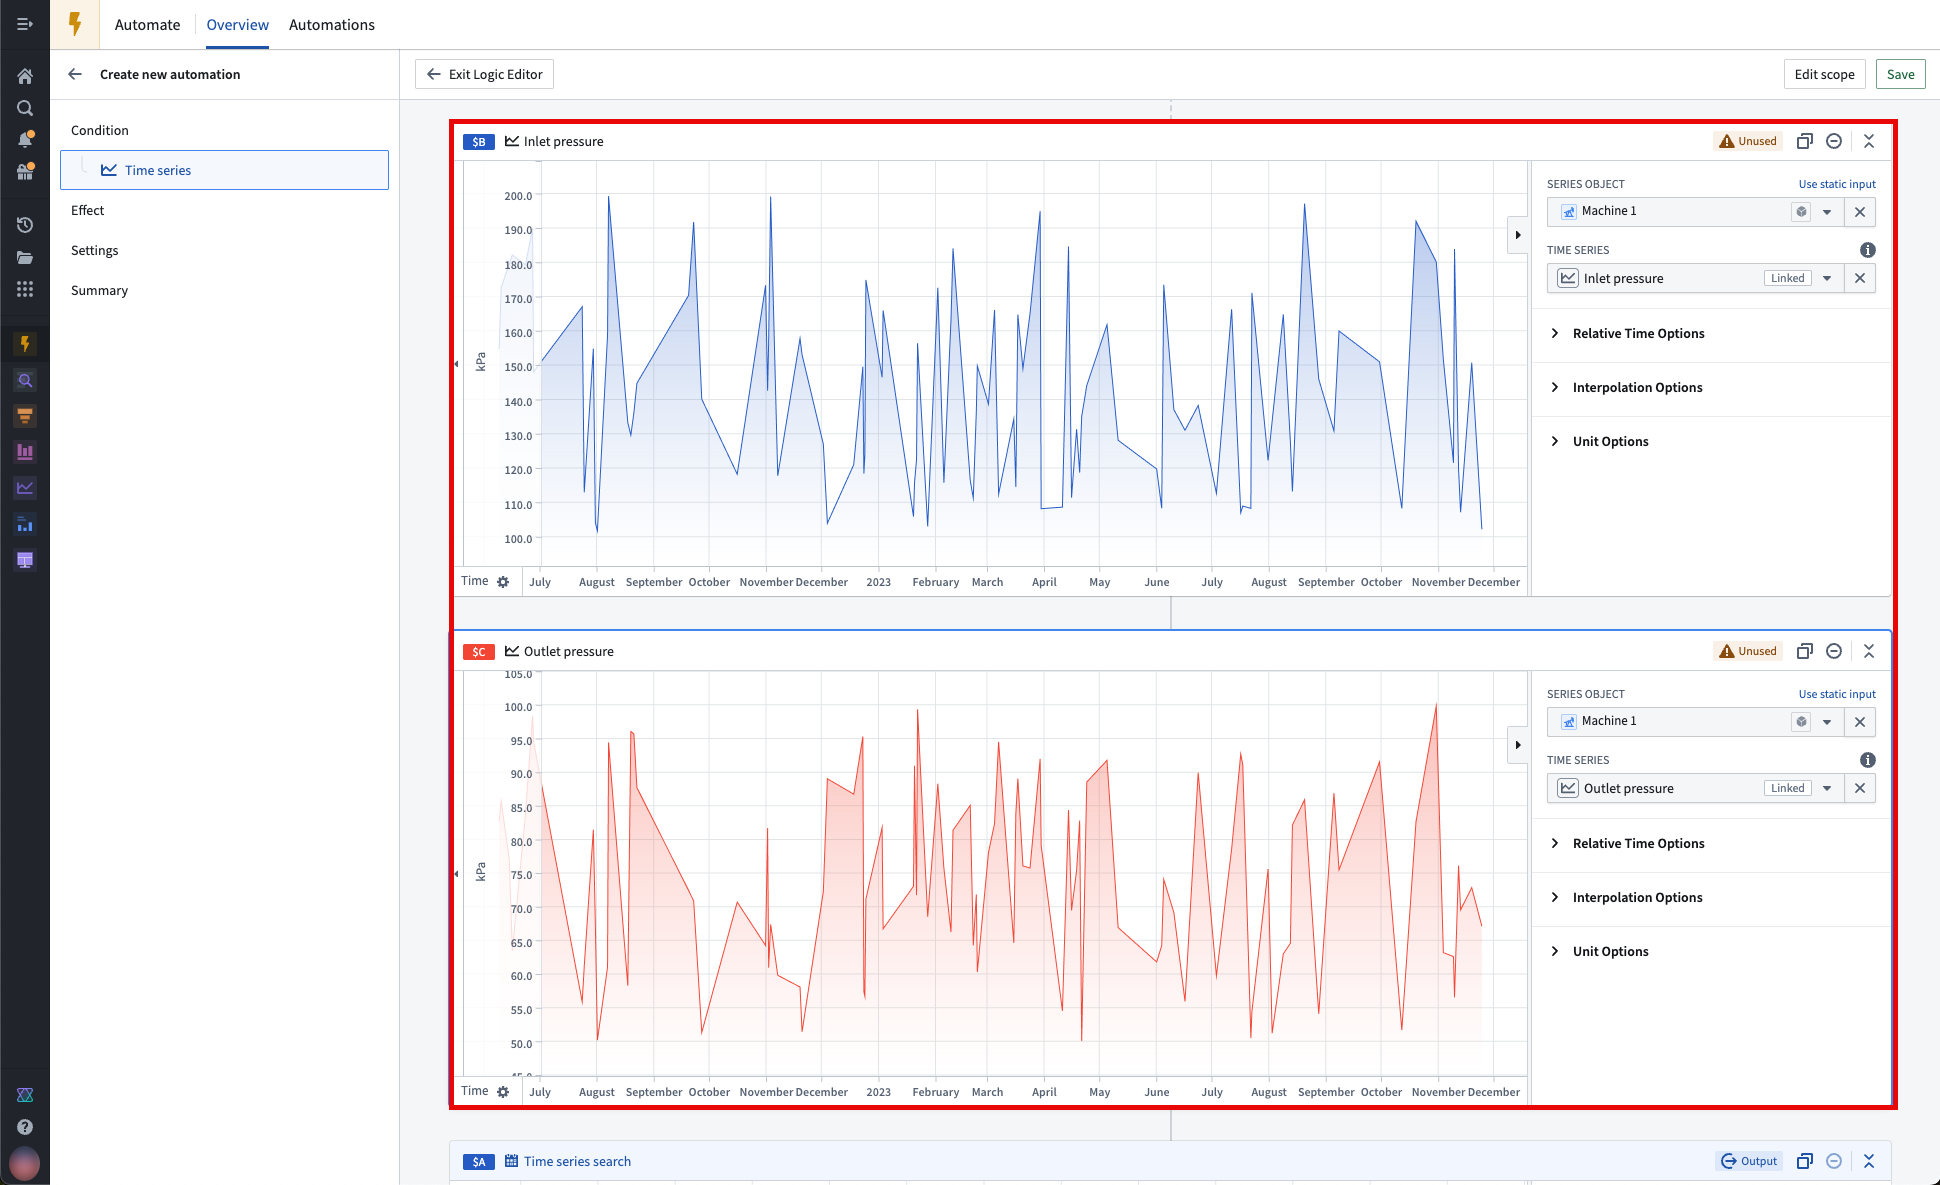
In our example below, the Machine object type has two time series properties (TSPs): Inlet pressure and Outlet pressure. Add your desired TSPs to the logic path with the Object time series property card. These TSPs will become the inputs to our calculations in the next step.
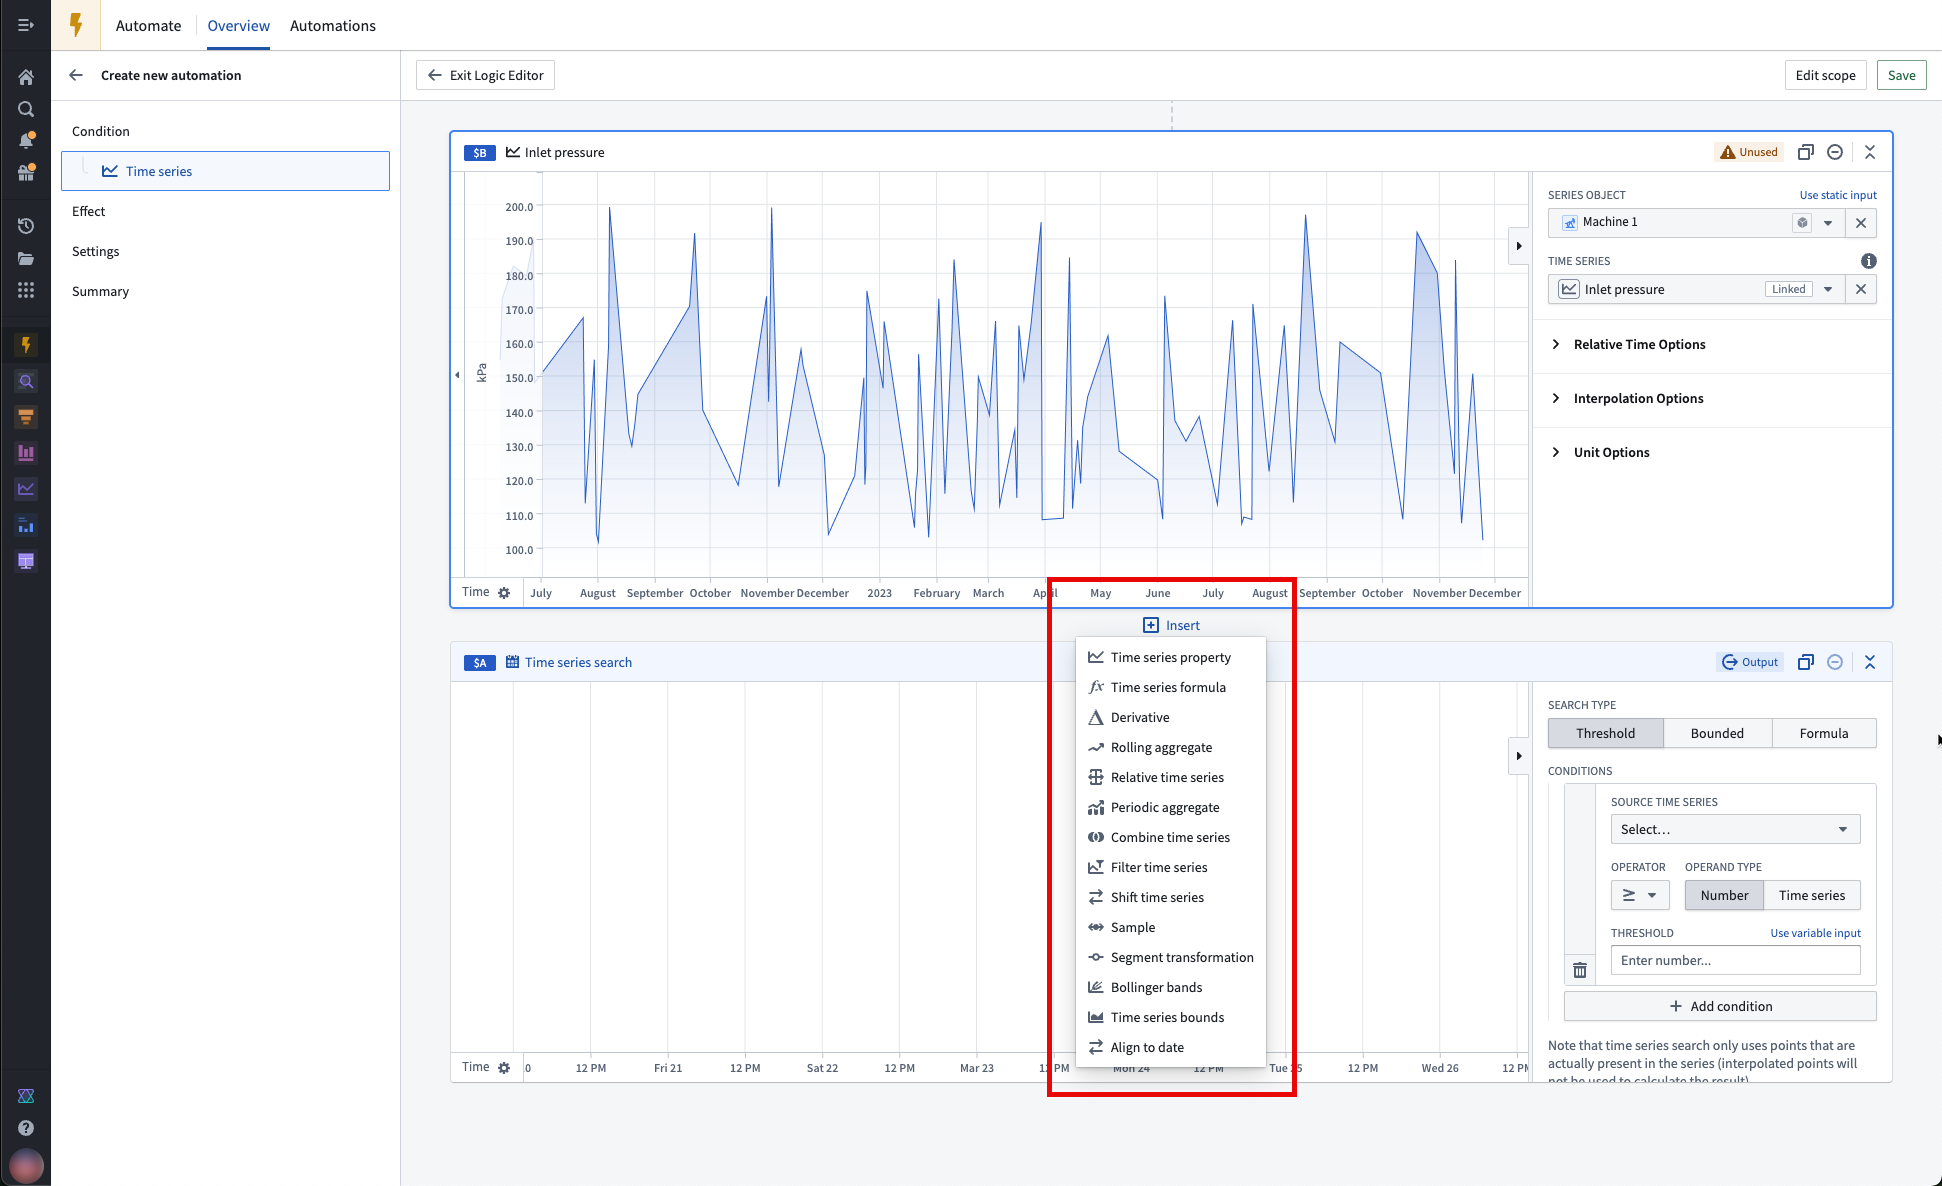
:::callout{theme="neutral"} You can add new cards to the logic path by hovering between two cards, selecting Insert, and choosing the card you would like to add. :::
:::callout{theme="neutral"} Both raw and derived series can be used as inputs to time series alerting automations. :::
5. Apply time series transforms (optional)
A wide range of Quiver time series transforms are supported, such as derivatives and rolling averages. See the full list of supported operations.
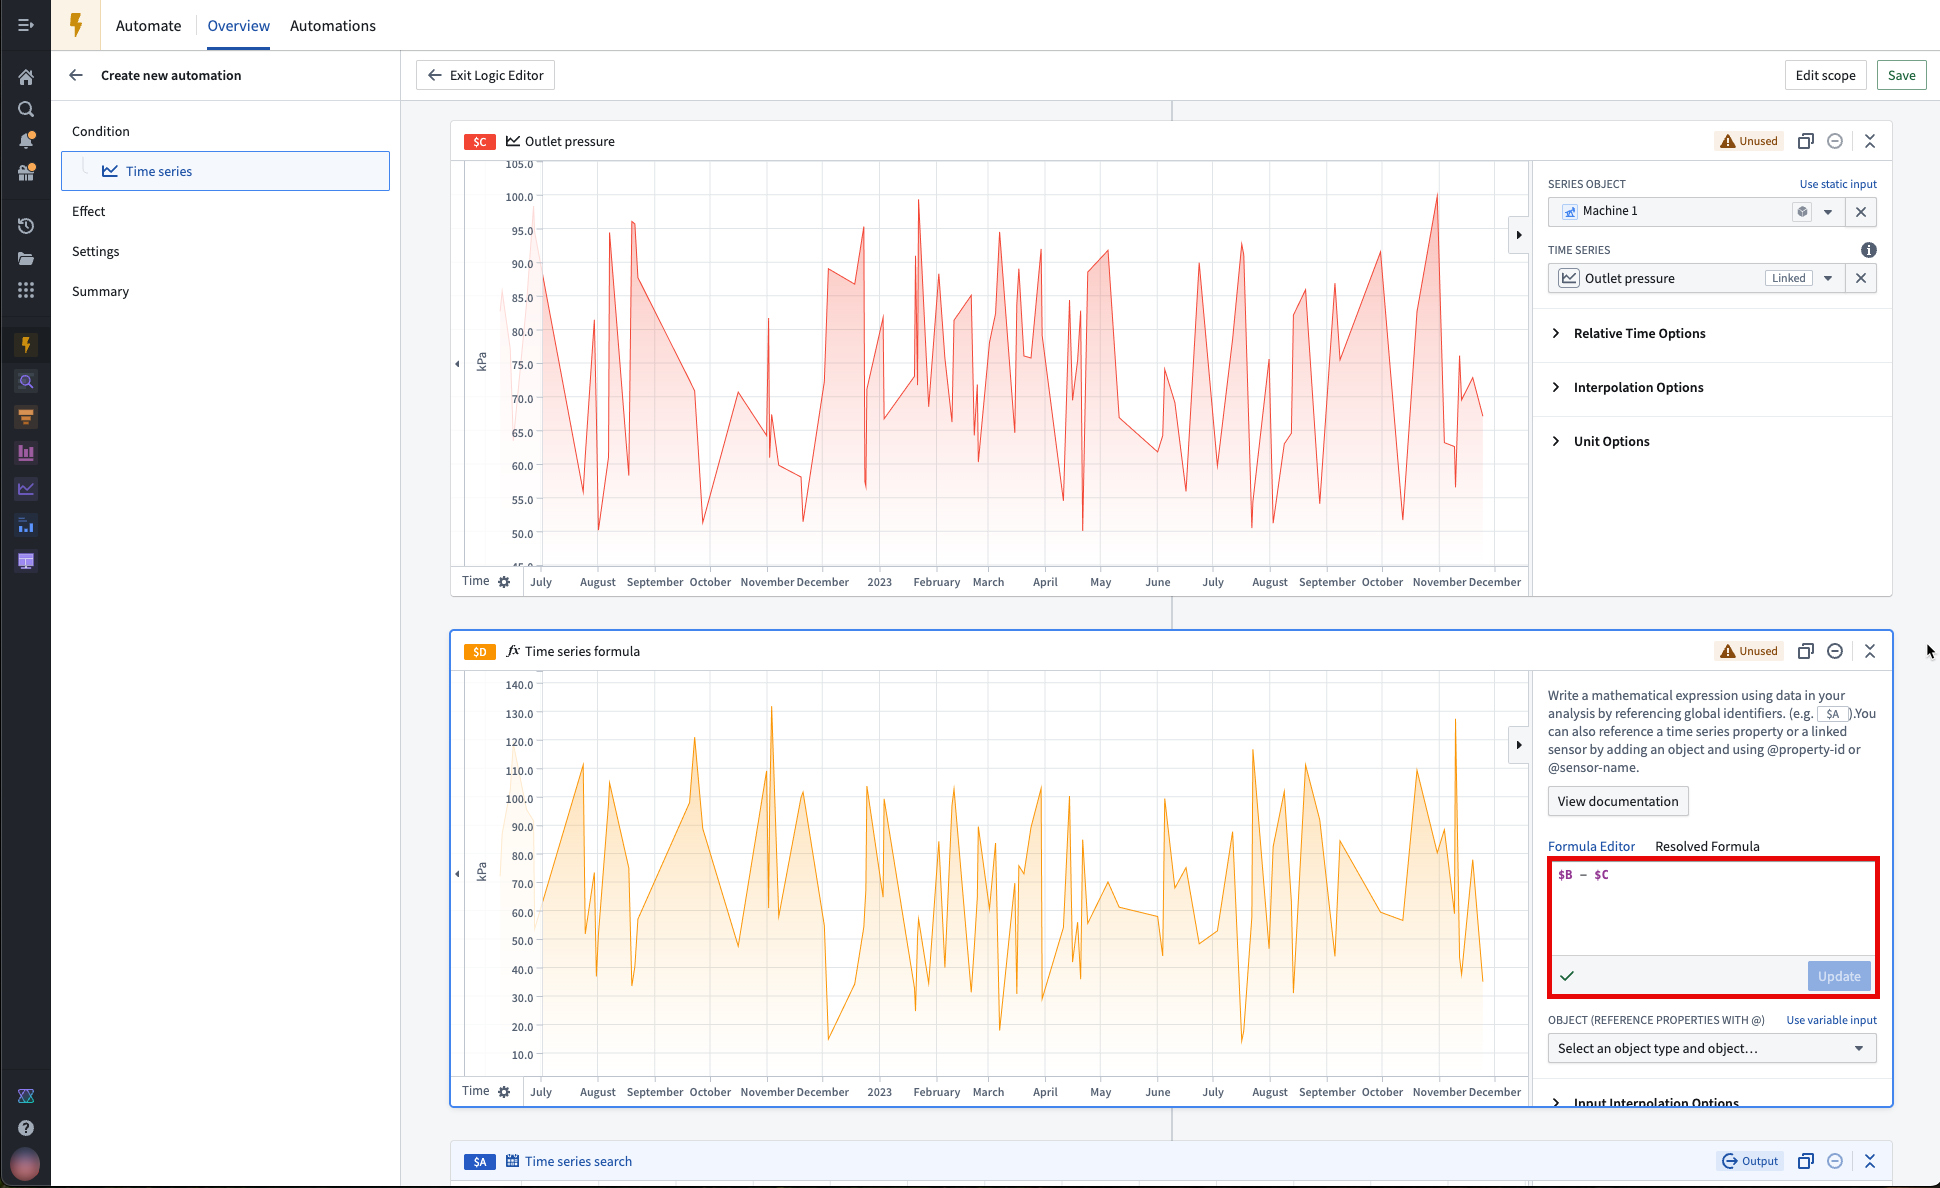
In our example, we will use a Time series formula card to add a transformation that calculates the difference between the inlet and outlet pressure of the Machine 1 object.
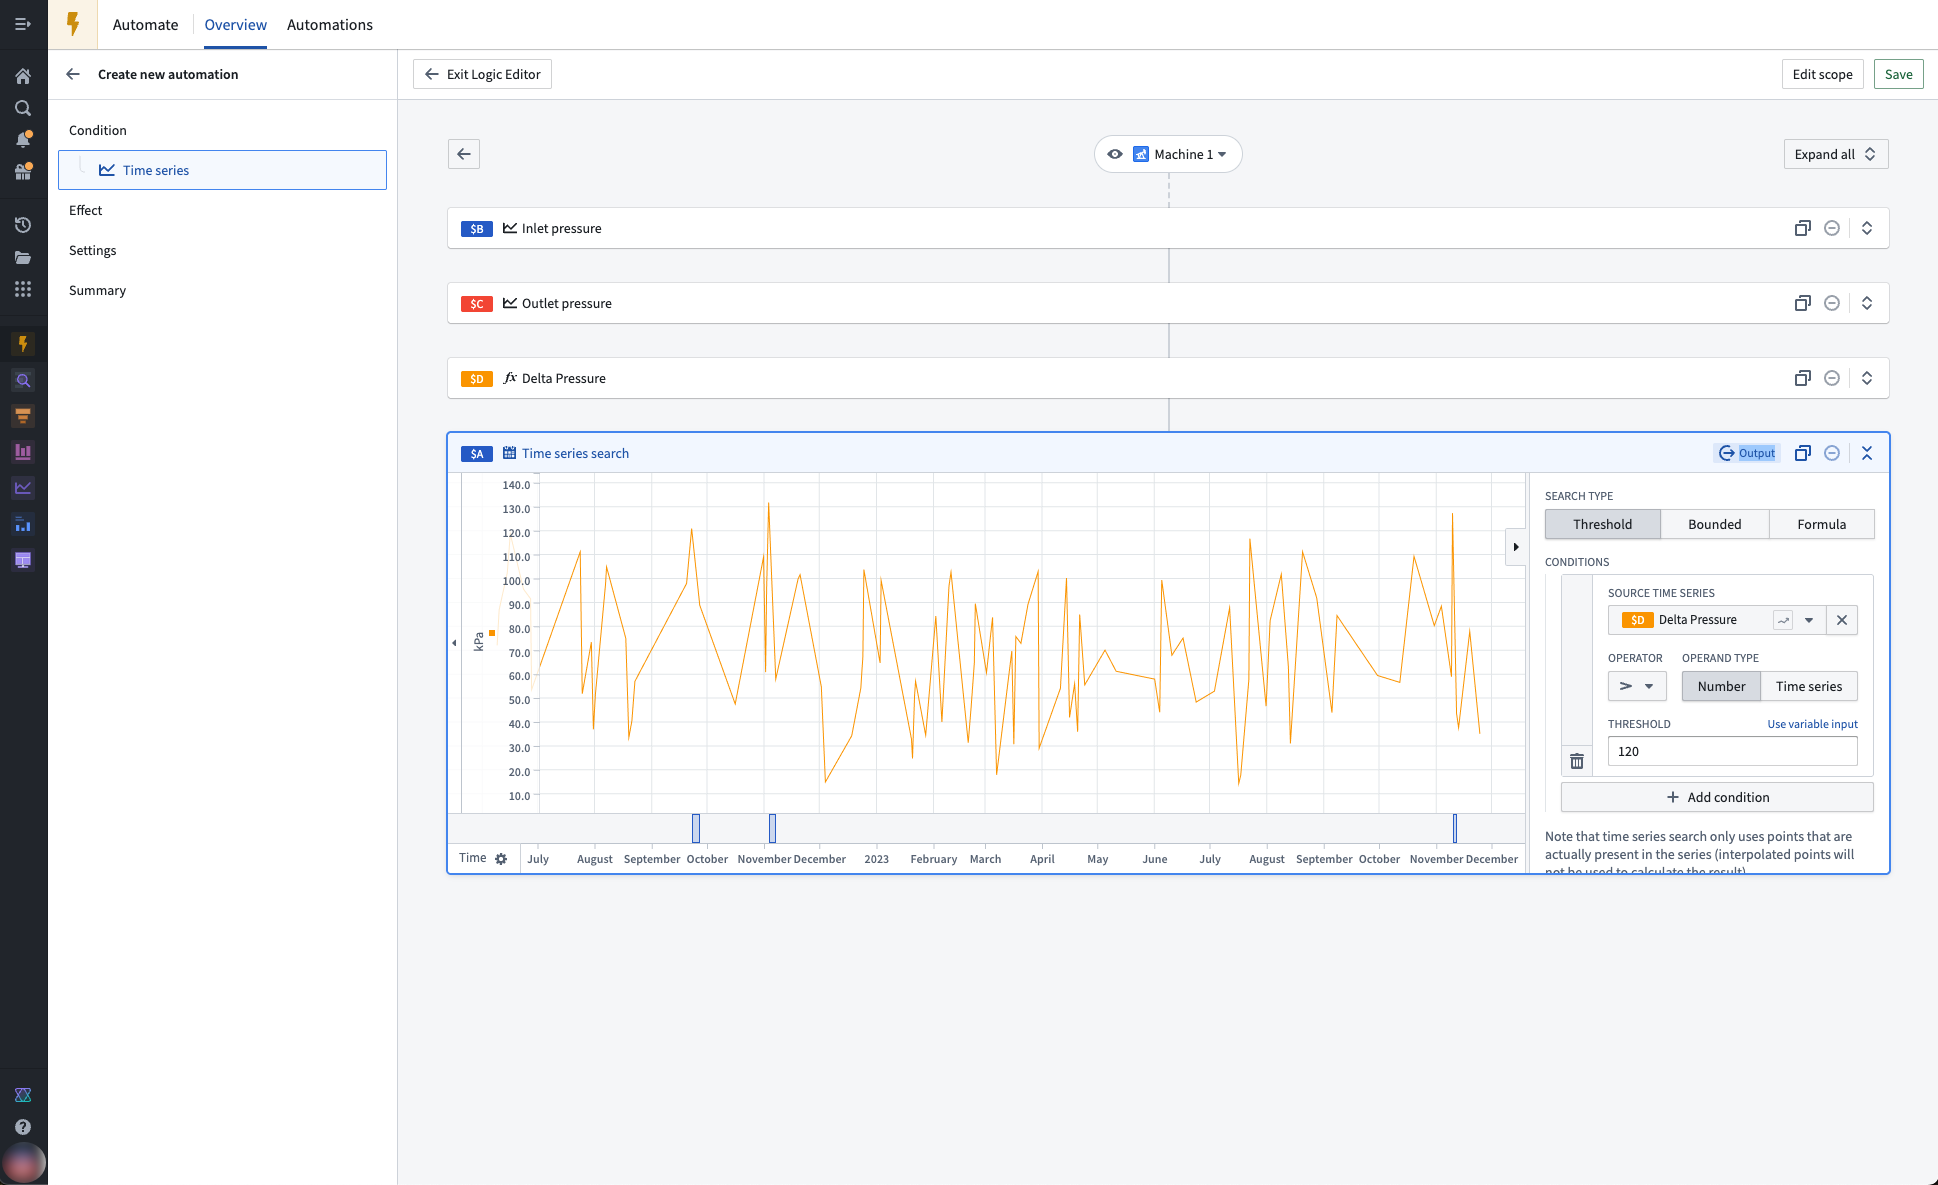
6. Apply a time series search
Connect your final transform to the output Time series search card in the path to identify periods of interest in a time series. In our example, we will identify periods when the change in pressure was greater than 120 kPa.
:::callout{theme="neutral"} Currently, time series alerting automations only support basic time series searches. Automations cannot be saved if any of the following configurations are used:
- The Multi time series search formula type
- Multiple conditions (use
&&or||in one condition instead)
The following configurations will be ignored in automations:
- The Defined search time range
- Minimum and maximum durations :::
7. Modify the automation scope (optional)
By default, the time series search logic will be applied to all objects in the selected root object type. In our example, the pressure drop of 10 machines will be analyzed. You can preview the logic on a different root object by selecting the dropdown menu at the top of the logic tree.
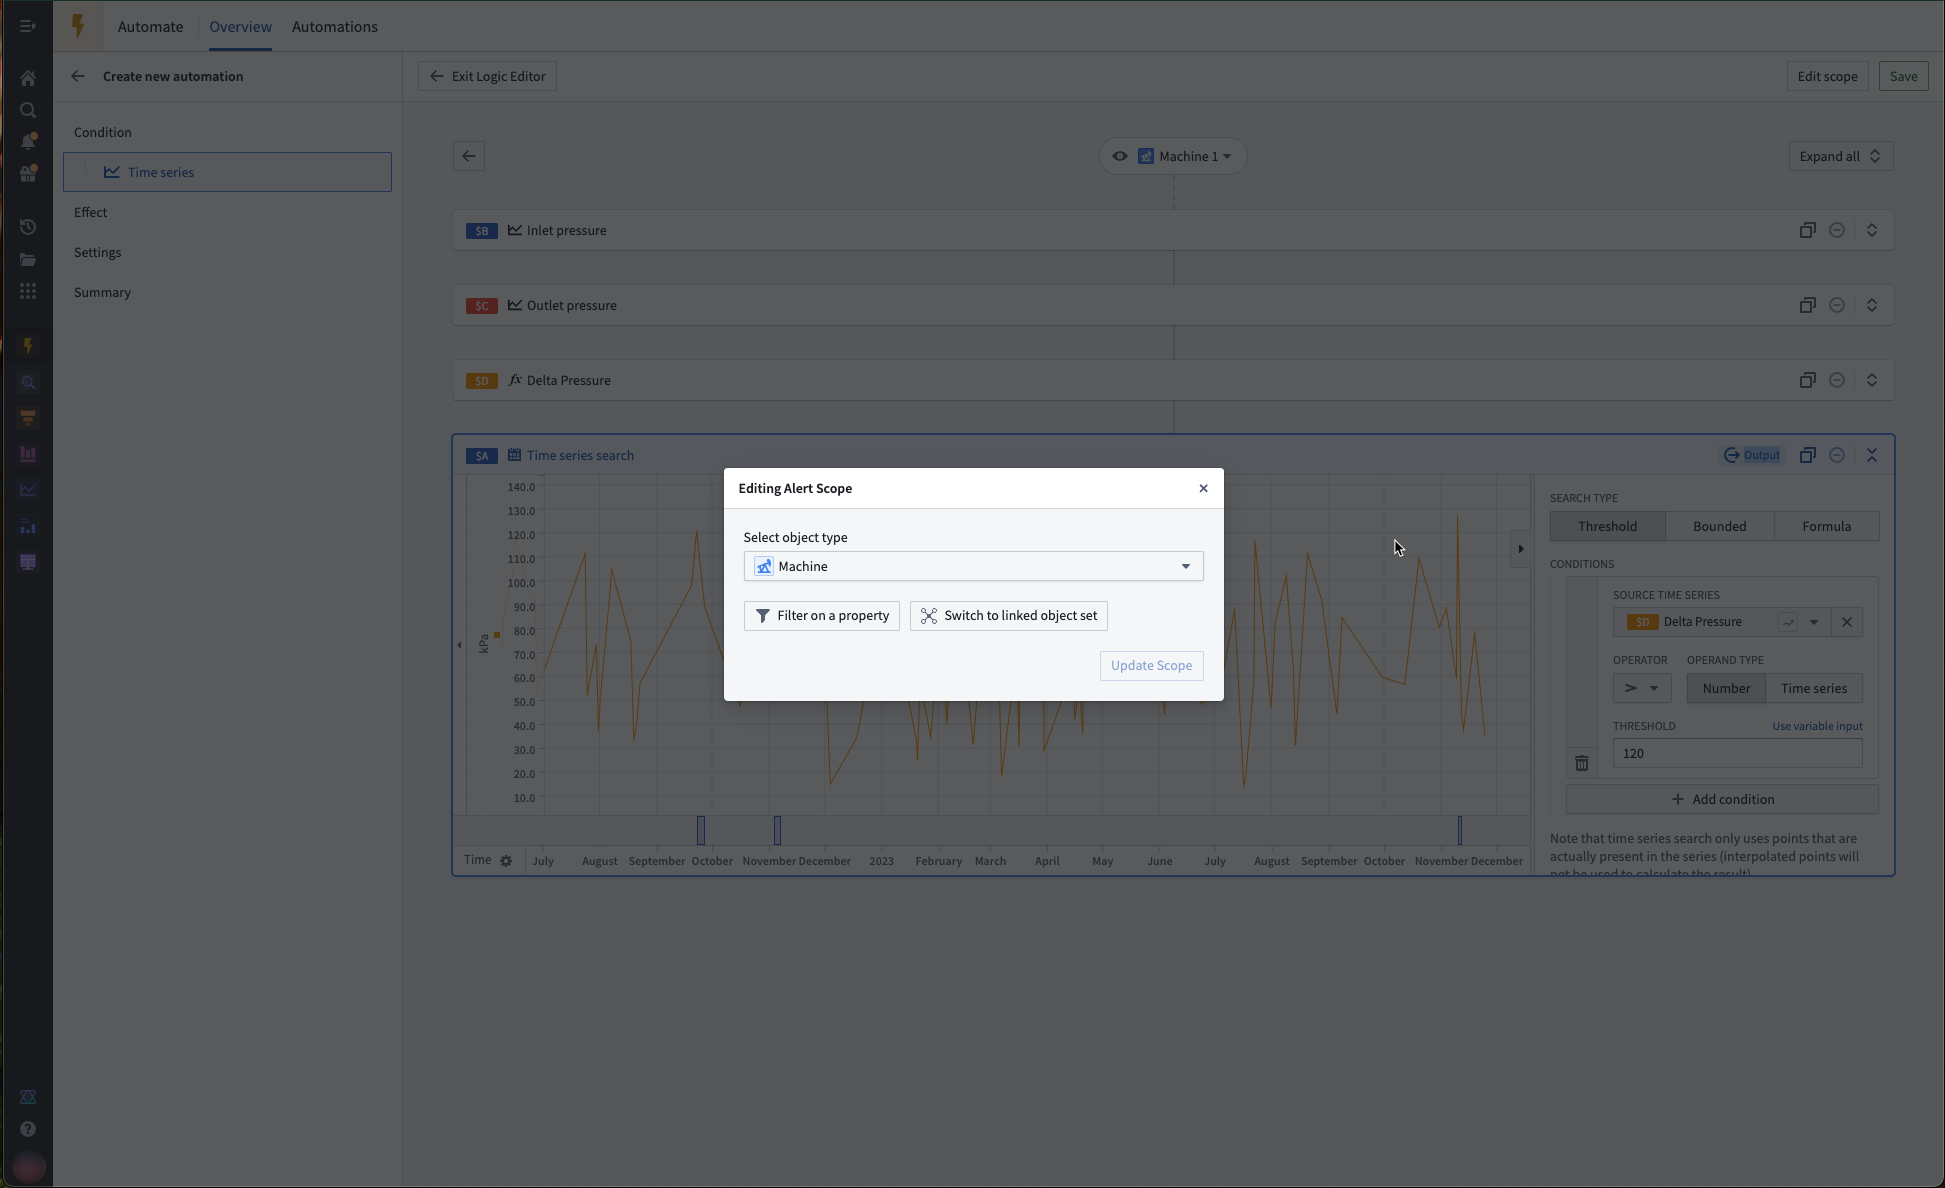
To limit the scope of your automation, select Edit scope. Remember to also select Update Scope after adding your filter.
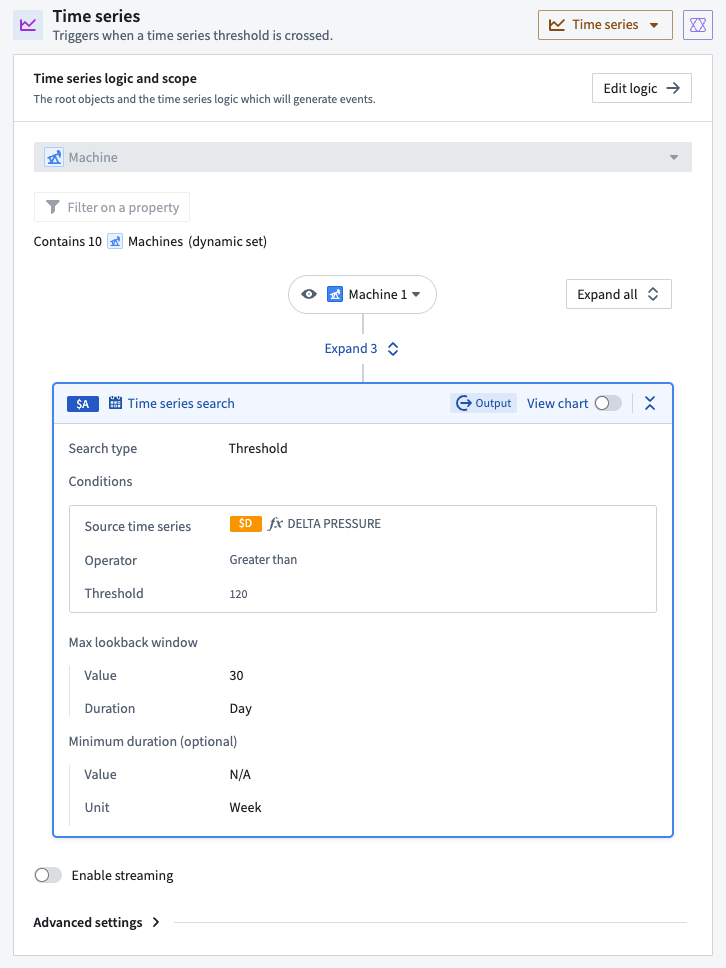
8. Save the time series search logic as an automation
For additional configuration options, review our additional time series alerting configurations documentation.
Select Save in the upper right of the path. You will then be redirected back to the main time series condition page and shown the summary of the time series logic and scope you just defined.
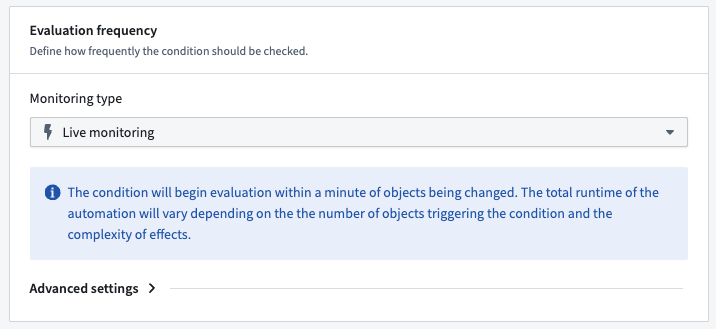
9. Modify evaluation frequency as desired
As mentioned in the overview documentation, the time series alert object type can store alerts from one or many automations. This object type relates to exactly one evaluation job. Therefore, one job can relate to many automations. A job is a Spark (batch alerting) or Flink (streaming alerting) job and can be viewed in the Builds application. Specifically, the job outputs a dataset or stream which backs the alert object type, where each row is an alert.
The job execution behavior depends on the alerting type you selected:
- Batch alerting: By default, the job runs whenever there is new data in the datasets backing the time series used in your alerting logic. However, after you save your automation, you can put the evaluation job on a time-based schedule if you prefer.
- Streaming alerting: The job runs continuously on a schedule to process streaming data as it arrives, providing low-latency alerting.
The evaluation frequency mentioned at this stage in the automation setup is not the same as the evaluation job schedule. The evaluation frequency defines how often the automation will trigger any included effects. As effects are optional, it is possible that this evaluation frequency will have no effect on your automation.
10. Modify remaining fields as desired
The automation can be saved without any effects or custom settings. Modify any of the remaining configuration sections as desired and select Next until you reach the Summary page.
11. Create your automation
Name your automation and select a save location. Your automation must be saved in the same Project as your selected alerting object type. Fix any issues highlighted in the Security settings section. Finally, choose Create automation.
中文翻译
设置时序告警
本文将引导您创建一个时序告警自动化,用于识别假设的 Machine 根对象类型中机器压力损失超过 120 kPa 的时间段。
1. 在 Automate 中创建新的时序条件
在 Automate 应用中,创建一个新的自动化,并为其添加一个 Time series(时序)条件。
在时序条件概览页面中,选择 Create logic(创建逻辑)来定义时序逻辑和自动化范围。
选择时序告警输出类型
设置时序告警时,您可以选择告警输出类型来控制告警延迟:
- Batch alerting(批量告警): 每次输入部署时更新输入和输出。用于创建定期发送的告警。
- Streaming alerting(流式告警): 随着新数据的可用性持续更新输入和输出。用于创建低延迟发送的告警。
:::callout{theme="warning"} 自动化创建后将无法更改告警输出类型。 :::
2. 选择时序告警对象类型
现在,您需要选择一个对象类型,新事件将作为对象添加到其中。在时序条件页面的编辑视图中,导航到 Select time series alert object type(选择时序告警对象类型)部分。如果您还没有支持时序告警自动化的对象类型,请选择 Create new object type(创建新对象类型)。您必须拥有执行 Marketplace 安装和创建带有支持数据集的对象类型的权限,才能创建新对象类型。此外,您的对象类型和时序告警自动化必须存储在同一项目中。
如果您创建新对象类型,必须等待其完全索引到本体(Ontology)后才能继续设置自动化。建议等待最多十分钟。
如果现有对象类型具有以下类型类的属性,则可以使用:
timeseries:alert_event_idtimeseries:automation_ridtimeseries:automation_versiontimeseries:root_object_pktimeseries:root_object_type_api_nametimeseries:start_timetimeseries:end_timetimeseries:generation_timetimeseries:event_start_cause(仅流式)timeseries:event_end_cause(仅流式)
3. 选择根对象类型
打开时序逻辑编辑器后,系统会提示您选择要从中创建告警的相关对象类型。在本示例中,我们将选择 Machine 对象类型。选择 Get started(开始)继续。
随后将填充一个时序逻辑路径骨架,包括路径的起始卡片(Object time series property(对象时序属性)卡片)和所需的输出卡片(Time series search(时序搜索)卡片)。路径顶部将设置一个给定对象类型的默认对象。您可以将此对象更改为给定对象类型的其他对象。在本示例中,我们预览的是 Machine 1 对象。
:::callout{theme="neutral"} 预览对象仅用作示例,帮助可视化逻辑编辑器中的时序转换,不会影响时序告警将评估的对象。 :::
4. 选择时序属性作为输入
在下面的示例中,Machine 对象类型有两个时序属性(TSP):Inlet pressure(入口压力)和 Outlet pressure(出口压力)。使用 Object time series property(对象时序属性)卡片将所需的 TSP 添加到逻辑路径中。这些 TSP 将成为下一步计算的输入。
:::callout{theme="neutral"} 您可以通过将鼠标悬停在两张卡片之间,选择 Insert(插入),然后选择要添加的卡片,来向逻辑路径添加新卡片。 :::
:::callout{theme="neutral"} 原始序列和派生序列都可以用作时序告警自动化的输入。 :::
5. 应用时序转换(可选)
支持多种 Quiver 时序转换,例如导数和滚动平均值。请查看支持的操作的完整列表。
在本示例中,我们将使用 Time series formula(时序公式)卡片添加一个转换,计算 Machine 1 对象的入口和出口压力之间的差值。
6. 应用时序搜索
将最终转换连接到路径中的输出 Time series search(时序搜索)卡片,以识别时序中的感兴趣时间段。在本示例中,我们将识别压力变化大于 120 kPa 的时间段。
:::callout{theme="neutral"} 目前,时序告警自动化仅支持基本的时序搜索。如果使用以下任何配置,自动化将无法保存:
- Multi(多)时序搜索公式类型
- 多个条件(请改用
&&或||在一个条件中)
以下配置在自动化中将被忽略:
- Defined(已定义)搜索时间范围
- 最小和最大持续时间 :::
7. 修改自动化范围(可选)
默认情况下,时序搜索逻辑将应用于所选根对象类型中的所有对象。在本示例中,将分析 10 台机器的压降。您可以通过选择逻辑树顶部的下拉菜单来预览不同根对象上的逻辑。
要限制自动化范围,请选择 Edit scope(编辑范围)。添加过滤器后,请记得选择 Update Scope(更新范围)。
8. 将时序搜索逻辑保存为自动化
有关其他配置选项,请查看我们的其他时序告警配置文档。
选择路径右上角的 Save(保存)。您将被重定向回时序条件主页面,并显示您刚刚定义的时序逻辑和范围摘要。
9. 根据需要修改评估频率
如概览文档中所述,时序告警对象类型可以存储来自一个或多个自动化的告警。此对象类型与一个评估作业相关联。因此,一个作业可以关联多个自动化。作业是 Spark(批量告警)或 Flink(流式告警)作业,可以在 Builds 应用中查看。具体来说,该作业输出一个数据集或流,作为告警对象类型的支撑,其中每一行都是一个告警。
作业执行行为取决于您选择的告警类型:
- Batch alerting(批量告警): 默认情况下,当告警逻辑中使用的时序所支撑的数据集中有新数据时,作业会运行。但是,保存自动化后,如果您愿意,可以将评估作业置于基于时间的计划上。
- Streaming alerting(流式告警): 作业按计划持续运行,以处理到达的流式数据,提供低延迟告警。
在自动化设置的此阶段提到的评估频率不同于评估作业计划。评估频率定义了自动化触发任何包含的效果的频率。由于效果是可选的,因此此评估频率可能对您的自动化没有影响。
10. 根据需要修改其余字段
自动化可以在没有任何效果或自定义设置的情况下保存。根据需要修改任何剩余的配置部分,然后选择 Next(下一步),直到到达 Summary(摘要)页面。
11. 创建您的自动化
为您的自动化命名并选择保存位置。您的自动化必须与您选择的告警对象类型保存在同一项目中。修复 Security settings(安全设置)部分中突出显示的任何问题。最后,选择 Create automation(创建自动化)。