Sensor object type setup(传感器对象类型设置)
This page contains instructions on how to set up and configure a sensor object type.
:::callout{theme="neutral" title="Sensor objects or TSP"} If you expect time series data to appear on only a subset of objects of a given object type, you should proceed with creating sensor objects linked back to those root object types. However, if you expect time series data to appear for (nearly) all objects of a given object type, you should add a TSP directly on that object type. Learn more about these setup options in the time series documentation. :::
Prerequisites: Time series object type backing dataset
To begin, follow the instructions for creating a new time series object type. Your time series object type backing dataset should have the following schema:
| Column | Type | Description |
|---|---|---|
| Primary key | String |
[Required] A primary key for each row. |
| Series ID | String |
[Required] A series ID for the sole TSP. Note that if your sensor object type is backed by multiple time series syncs, you will need a qualified series ID. TSPs cannot be a primary key or title property. |
| Sensor name | String |
[Required] A name identifying what the time series data for a given sensor object represents. The sensor names of all sensor objects linked to a single root object must be unique. |
| Foreign key | String |
[Required] A foreign key used to link the sensor object type to a root object type. The primary key may serve this purpose, but at least one link type is required for a sensor object type. |
| Is categorical | Boolean |
[Required if the TSP is backed by multiple syncs of both numerical and categorical types] A Boolean value of true indicates a given sensor object has categorical time series data, otherwise the data are assumed to be numerical. If you are migrating from the Measures setup, this was previously referred to as is_enum. |
| Units | String |
[Optional] The unit which should be displayed for a given sensor object. |
| Internal interpolation | String |
[Optional] The internal interpolation which should be used for a given sensor object. |
Set up sensor object type
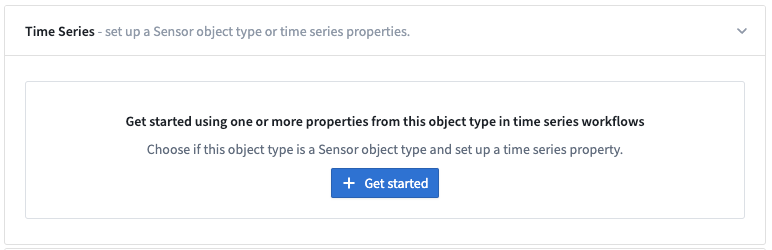
In the Capabilities page of the Ontology Manager, select Get started within the Time series section.
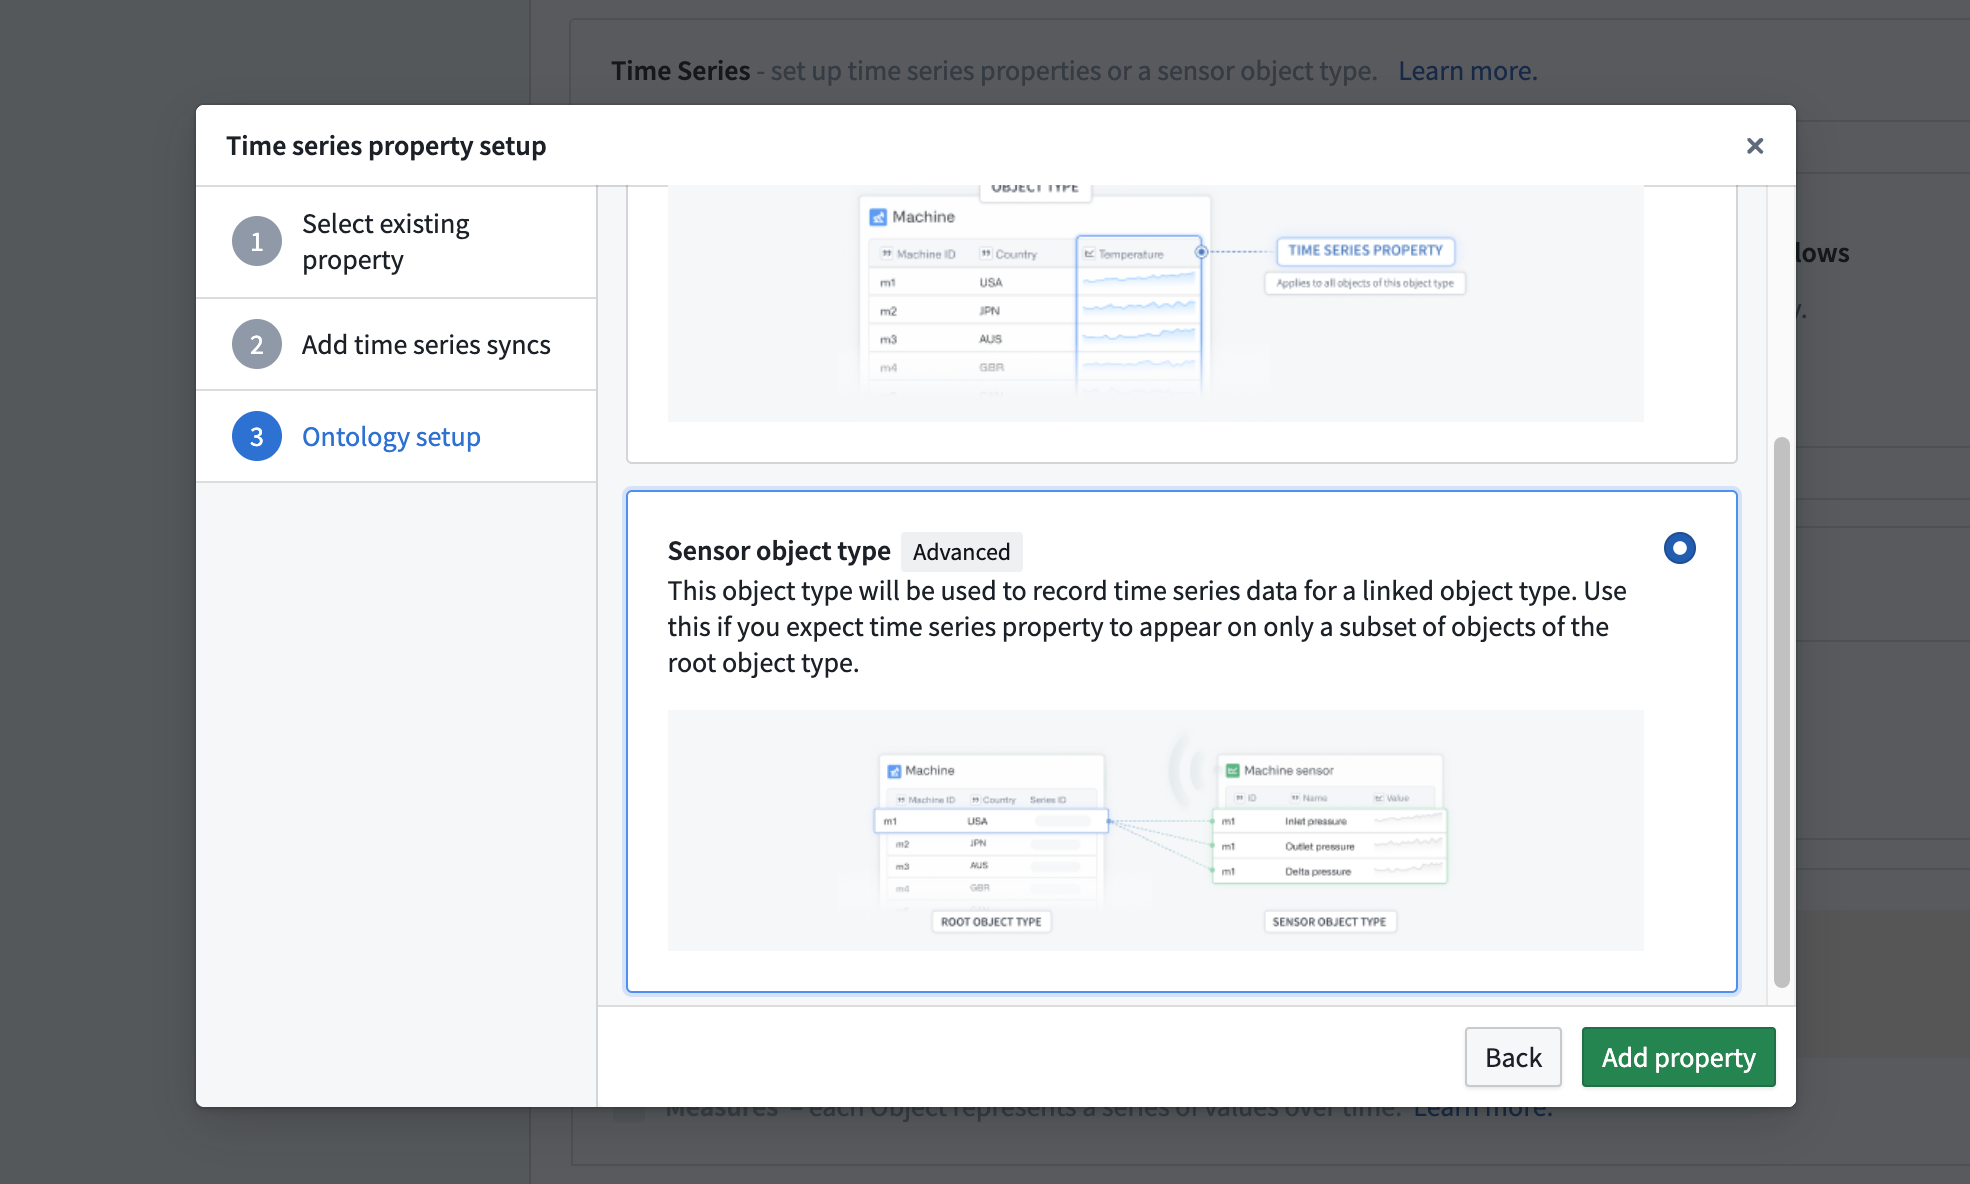
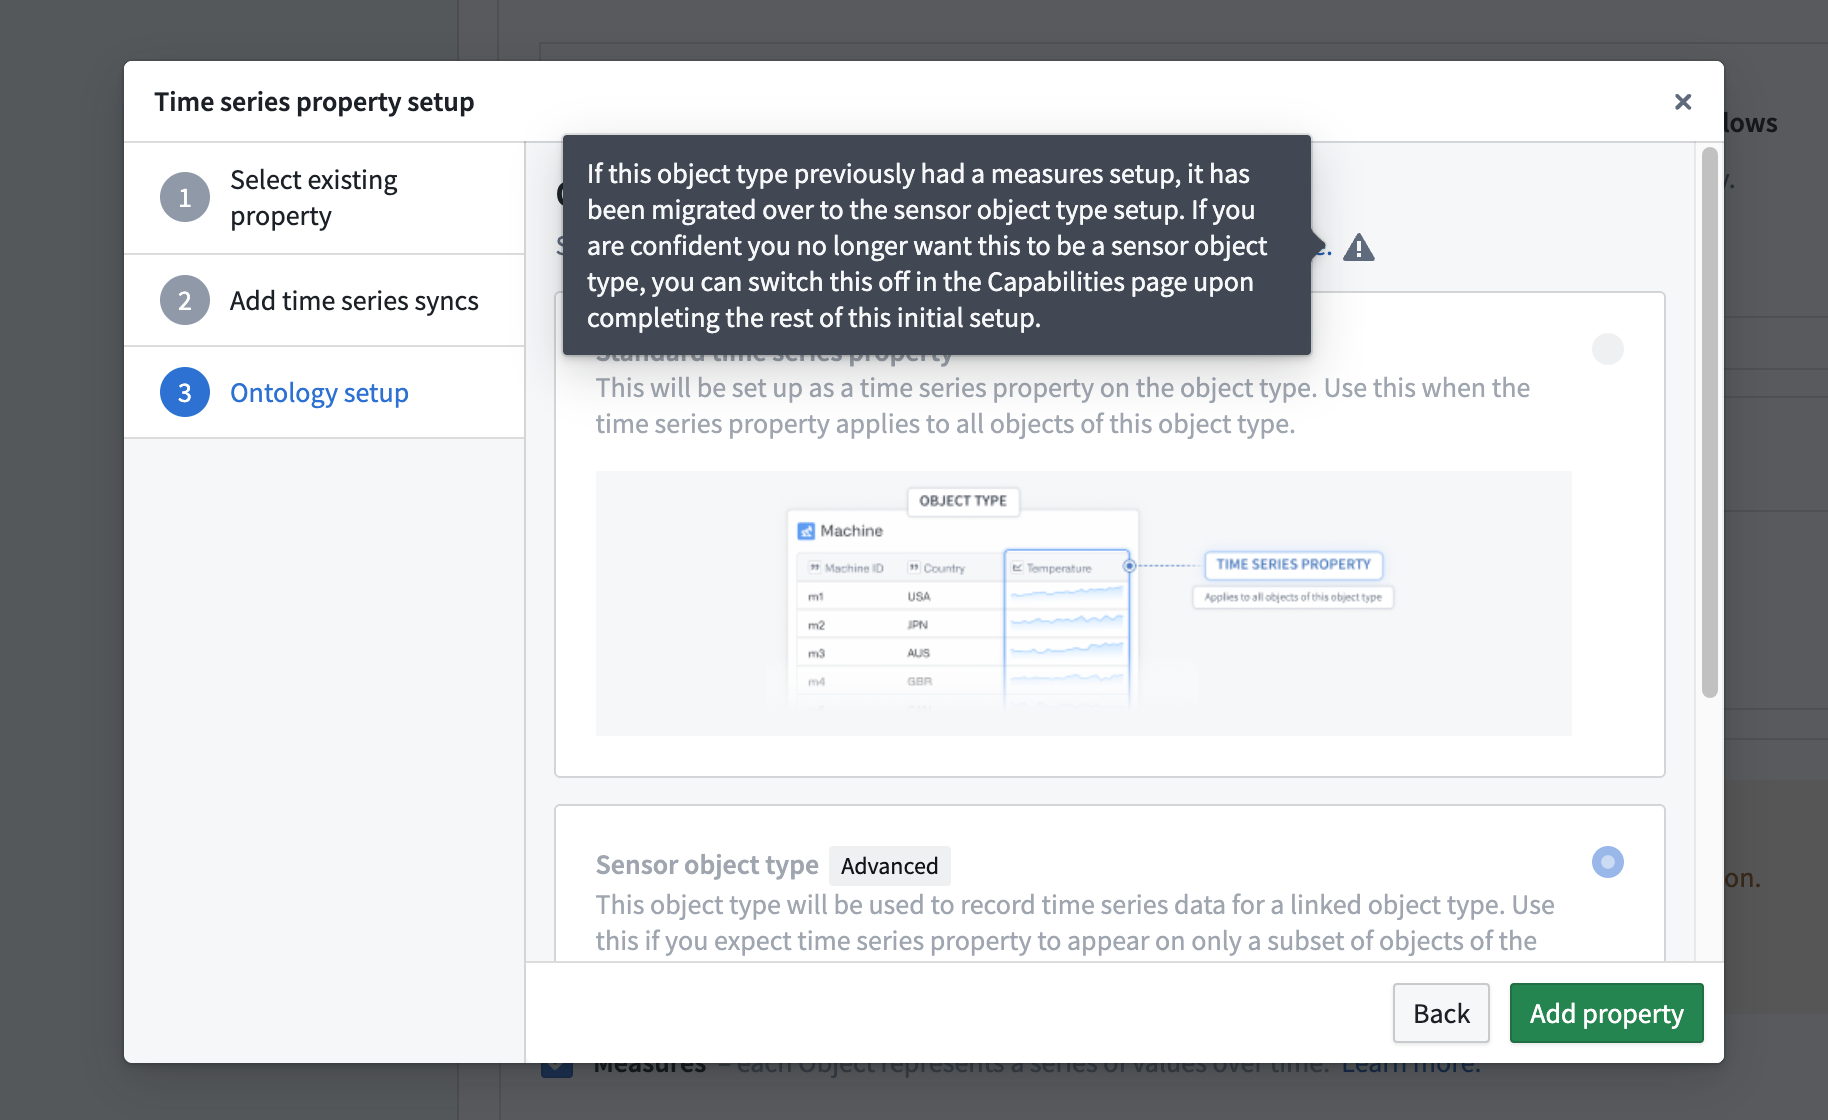
Follow the first two steps in the dialog to set up your TSP. In the last step of the Time series setup dialog, choose the Sensor object type option:
Sensor object type configuration options
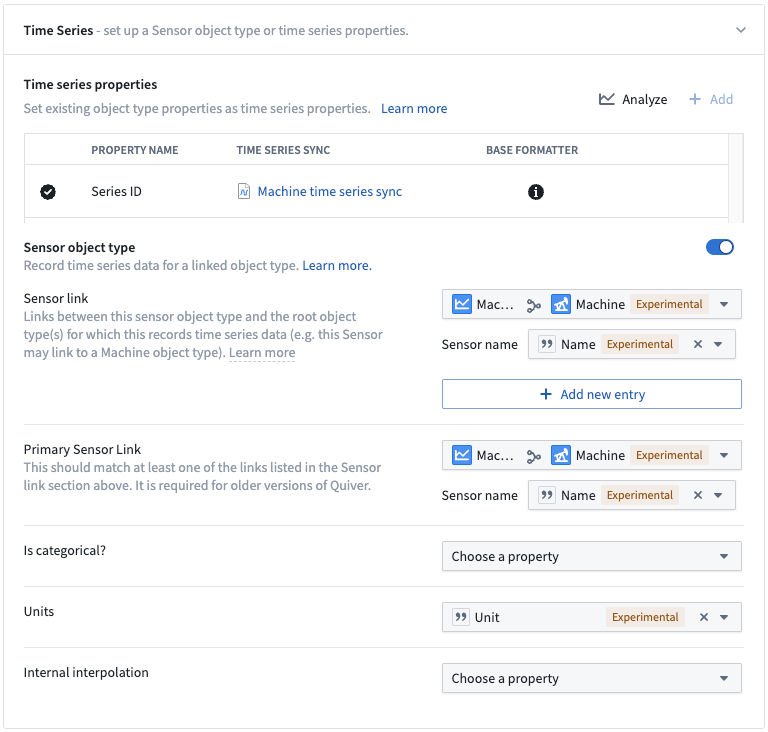
Upon adding the property, you will see an expanded Sensor object type configuration section beneath the Time series properties table with the following configuration options:
- Sensor link (required)
- You must select at least one link type which links this sensor object type to a root object type for which this records time series data.
- You must also select the property containing the Sensor name for this link type.
- Primary sensor link (required if present)
- This will only appear if you still have old versions of Quiver accessible in your Foundry instance.
- If this appears, you must select a link type and sensor name to match one of your configured entries under the Sensor link section above.
- Is categorical? (required if the TSP is backed by multiple syncs of different types)
- If your TSP is backed by multiple syncs which are a mix of both numerical and categorical syncs, you must select a boolean property used to indicate whether a sensor object has categorical time series data.
- Units (optional, recommended)
- Optionally select a property which contains the units for each sensor object’s time series data.
- Internal interpolation (optional)
- Optionally select a property which contains the type of internal interpolation which should be used for each sensor object’s time series data.
- Valid values are:
LINEAR: Linearly interpolate between the two points. Only applicable to numerical time series.NEAREST: Take the value of the nearest point.PREVIOUS: Take the value of the previous point.NEXT: Take the value of the next point.NONE: Never interpolate.
:::callout{theme="warning"} The units and interpolation for sensor object types should be set in the sensor object type configuration section rather than through the base formatter.
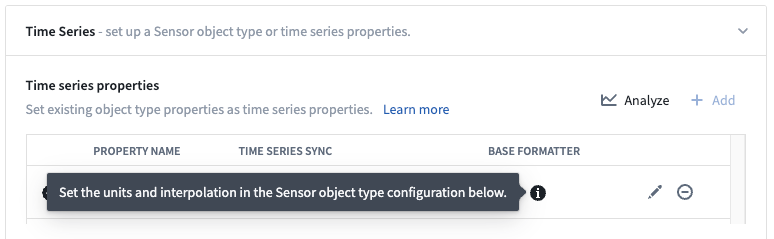 :::
:::
Migrate from Measures
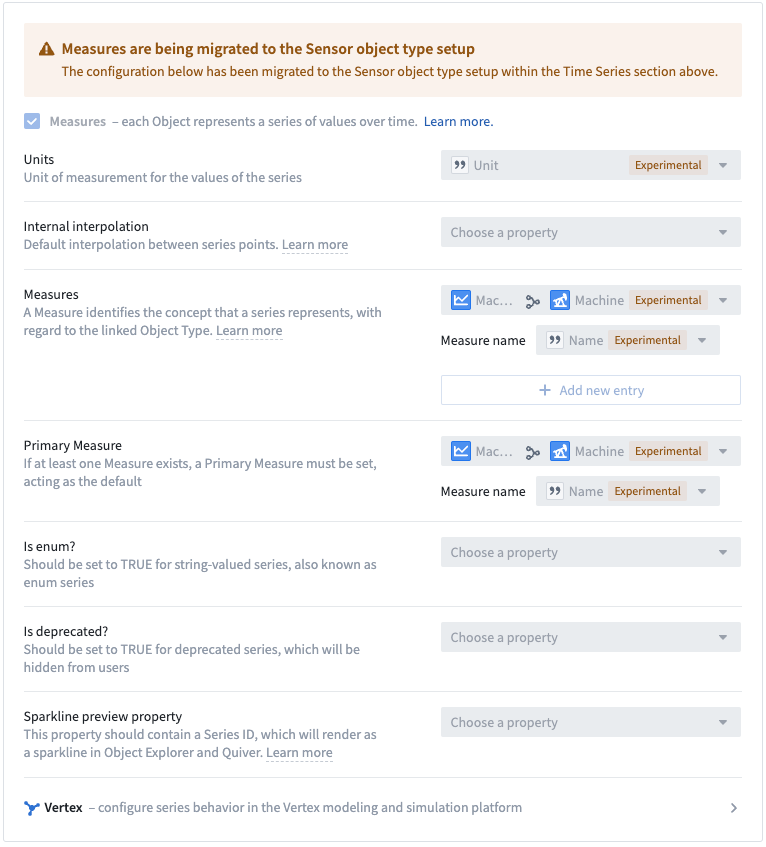
If you see the warning shown below in the Capabilities page of an object type in Ontology Manager, this object type was previously configured as a Measure. Measures are being deprecated. You can use sensor object types in similar workflows instead.
Your object type may already be fully or partially migrated to a sensor object type. If you see a Get started button in the Time Series section of the Capabilities page in Ontology Manager, your Measure has not been migrated. To migrate your Measure to a sensor object type, follow the steps below. If you see a green check mark followed by All complete in the Sensor object type portion of this section, your object type is fully migrated. An example is included at the bottom of this page. If your setup doesn't match either of these descriptions, you are partially migrated. Follow the onscreen prompts to complete your migration.
:::callout{theme="warning"} We do not recommend migrating unless you are confident that you know which time series syncs back your Measure. If you are unsure of which time series syncs back your Measure but still want to migrate, reach out to Palantir Support. :::
- Determine which time series sync(s) back your Measure. If you have multiple time series syncs backing your Measure, you will need to generate a qualified series ID. Learn more about setting up a qualified series ID.
- In Measure object types, the series ID column was likely used as the primary key. This is not allowed for sensor object types, since TSPs cannot be used as primary keys. Depending on the column used as the primary key, you have the following options:
- Option 1: If you can use a column that is not the series ID as a primary key, no further action is necessary.
- Option 2: If you were using the series ID column as the primary key for your Measure, you will need to create a new column to use as the primary key.
- The easiest way to create this column is to open the Pipeline Builder pipeline or Code Repository where the backing dataset was generated and create a column that is a duplicate of the series ID.
- Note: Any non-time series property without duplicates can be used as the primary key. Use what makes the most sense for your use case.
- Option 3: If you had to reformat your series ID column because your Measure is backed by more than one time series sync, you can use the column that was formerly your series ID as your primary key as long as it is a unique identifier.
- Open the Measure in Ontology Manager and open the Capabilities page. Select Get started and fill out the flow as described above. Note that the Sensor object type toggle should be on, and many of the selections may already be filled in for you.
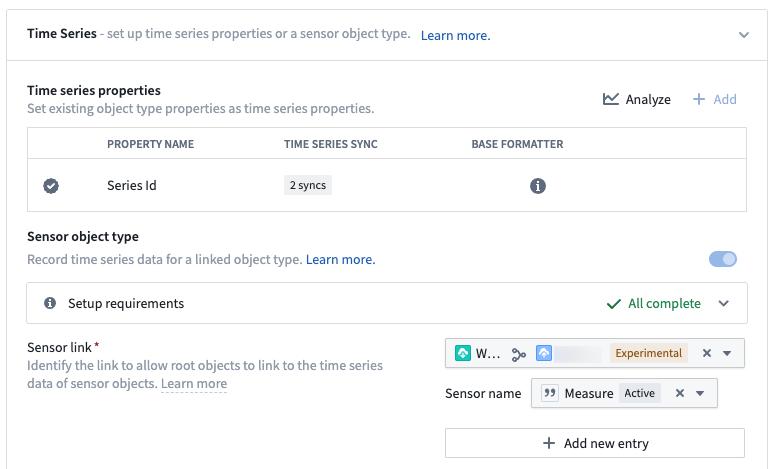
Don't forget to save your changes to the Ontology. At the end of your setup, you should see a green check mark followed by All complete in the Sensor object type portion of the Time Series section in the Capabilities page in Ontology Manager. An example is shown below:
中文翻译
传感器对象类型设置
本文档包含如何设置和配置传感器对象类型(sensor object type)的说明。
:::callout{theme="neutral" title="传感器对象或TSP"} 如果您预期时间序列数据仅出现在特定对象类型的部分对象上,则应创建传感器对象并将其链接回这些根对象类型(root object types)。然而,如果您预期时间序列数据将出现在特定对象类型的(几乎)所有对象上,则应直接在该对象类型上添加TSP。有关这些设置选项的更多信息,请参阅时间序列文档。 :::
前提条件:时间序列对象类型支持数据集
首先,按照创建新的时间序列对象类型的说明进行操作。您的时间序列对象类型支持数据集应具有以下模式:
| 列 | 类型 | 描述 |
|---|---|---|
| 主键(Primary key) | String |
[必需] 每行的主键。 |
| 序列ID(Series ID) | String |
[必需] 唯一TSP的序列ID。请注意,如果您的传感器对象类型由多个时间序列同步(time series syncs)支持,则需要使用限定序列ID(qualified series ID)。TSP不能作为主键或标题属性(title property)。 |
| 传感器名称(Sensor name) | String |
[必需] 用于标识给定传感器对象的时间序列数据所代表内容的名称。链接到单个根对象的所有传感器对象的传感器名称必须唯一。 |
| 外键(Foreign key) | String |
[必需] 用于将传感器对象类型链接到根对象类型的外键。主键可以用于此目的,但传感器对象类型至少需要一种链接类型。 |
| 是否为分类数据(Is categorical) | Boolean |
[如果TSP由数值和分类类型的多个同步支持,则为必需] 布尔值true表示给定传感器对象具有分类时间序列数据,否则数据被视为数值数据。如果您从Measures设置迁移,此字段之前称为is_enum。 |
| 单位(Units) | String |
[可选] 应为给定传感器对象显示的单位。 |
| 内部插值(Internal interpolation) | String |
[可选] 应为给定传感器对象使用的内部插值方法。 |
设置传感器对象类型
在Ontology Manager的功能(Capabilities)页面中,选择时间序列(Time series)部分中的开始使用(Get started)。
按照对话框中的前两个步骤设置您的TSP。在时间序列设置(Time series setup)对话框的最后一步中,选择传感器对象类型(Sensor object type)选项:
传感器对象类型配置选项
添加属性后,您将在时间序列属性(Time series properties)表格下方看到一个展开的传感器对象类型配置(Sensor object type configuration)部分,其中包含以下配置选项:
- 传感器链接(Sensor link)(必需)
- 您必须选择至少一种链接类型,将该传感器对象类型链接到记录时间序列数据的根对象类型。
- 您还必须为此链接类型选择包含传感器名称的属性。
- 主传感器链接(Primary sensor link)(如果存在则为必需)
- 仅当您的Foundry实例中仍可访问旧版本的Quiver时,此选项才会出现。
- 如果出现此选项,您必须选择一种链接类型和传感器名称,以匹配上方传感器链接部分中配置的条目之一。
- 是否为分类数据?(Is categorical?)(如果TSP由不同类型的多个同步支持,则为必需)
- 如果您的TSP由数值和分类同步混合的多个同步支持,则必须选择一个布尔属性,用于指示传感器对象是否具有分类时间序列数据。
- 单位(Units)(可选,推荐)
- 可选地选择一个包含每个传感器对象时间序列数据单位的属性。
- 内部插值(Internal interpolation)(可选)
- 可选地选择一个包含应为每个传感器对象时间序列数据使用的内部插值类型的属性。
- 有效值包括:
LINEAR:在两个数据点之间进行线性插值。仅适用于数值时间序列。NEAREST:取最近数据点的值。PREVIOUS:取前一个数据点的值。NEXT:取后一个数据点的值。NONE:从不进行插值。
:::callout{theme="warning"} 传感器对象类型的单位和插值应在传感器对象类型配置部分中设置,而不是通过基础格式化器(base formatter)设置。
:::
从Measures迁移
如果您在Ontology Manager的对象类型的功能(Capabilities)页面中看到如下所示的警告,则表示该对象类型之前已配置为Measure。Measures正在被弃用。您可以改用传感器对象类型执行类似的工作流程。
您的对象类型可能已完全或部分迁移到传感器对象类型。如果您在Ontology Manager的功能(Capabilities)页面的时间序列(Time Series)部分中看到开始使用(Get started)按钮,则表示您的Measure尚未迁移。要迁移您的Measure到传感器对象类型,请按照以下步骤操作。如果您在此部分的传感器对象类型(Sensor object type)部分中看到绿色勾选标记后跟全部完成(All complete),则表示您的对象类型已完全迁移。本页底部包含一个示例。如果您的设置与上述描述均不匹配,则表示您已部分迁移。请按照屏幕上的提示完成迁移。
:::callout{theme="warning"} 除非您确信知道哪些时间序列同步支持您的Measure,否则我们不建议进行迁移。如果您不确定哪些时间序列同步支持您的Measure但仍想迁移,请联系Palantir支持。 :::
- 确定哪些时间序列同步支持您的Measure。如果有多个时间序列同步支持您的Measure,则需要生成限定序列ID(qualified series ID)。了解更多关于设置限定序列ID的信息。
- 在Measure对象类型中,序列ID列可能被用作主键。传感器对象类型不允许这样做,因为TSP不能用作主键。根据用作主键的列,您有以下选项:
- 选项1: 如果您可以使用非序列ID的列作为主键,则无需进一步操作。
- 选项2: 如果您将序列ID列用作Measure的主键,则需要创建一个新列作为主键。
- 创建此列的最简单方法是打开生成支持数据集的Pipeline Builder管道或代码仓库(Code Repository),然后创建一个与序列ID重复的列。
- 注意: 任何没有重复的非时间序列属性都可以用作主键。请根据您的用例选择最合适的属性。
- 选项3: 如果因为您的Measure由多个时间序列同步支持而需要重新格式化序列ID列,则只要该列是唯一标识符,就可以将原先的序列ID列用作主键。
- 在Ontology Manager中打开Measure,然后打开功能(Capabilities)页面。选择开始使用(Get started)并按照上述描述填写流程。请注意,传感器对象类型(Sensor object type)开关应处于打开状态,并且许多选择可能已为您预先填写。
不要忘记保存对Ontology的更改。在设置结束时,您应该在Ontology Manager的功能(Capabilities)页面的时间序列(Time Series)部分的传感器对象类型(Sensor object type)部分中看到绿色勾选标记后跟全部完成(All complete)。示例如下: