Create derived series(创建派生时序)
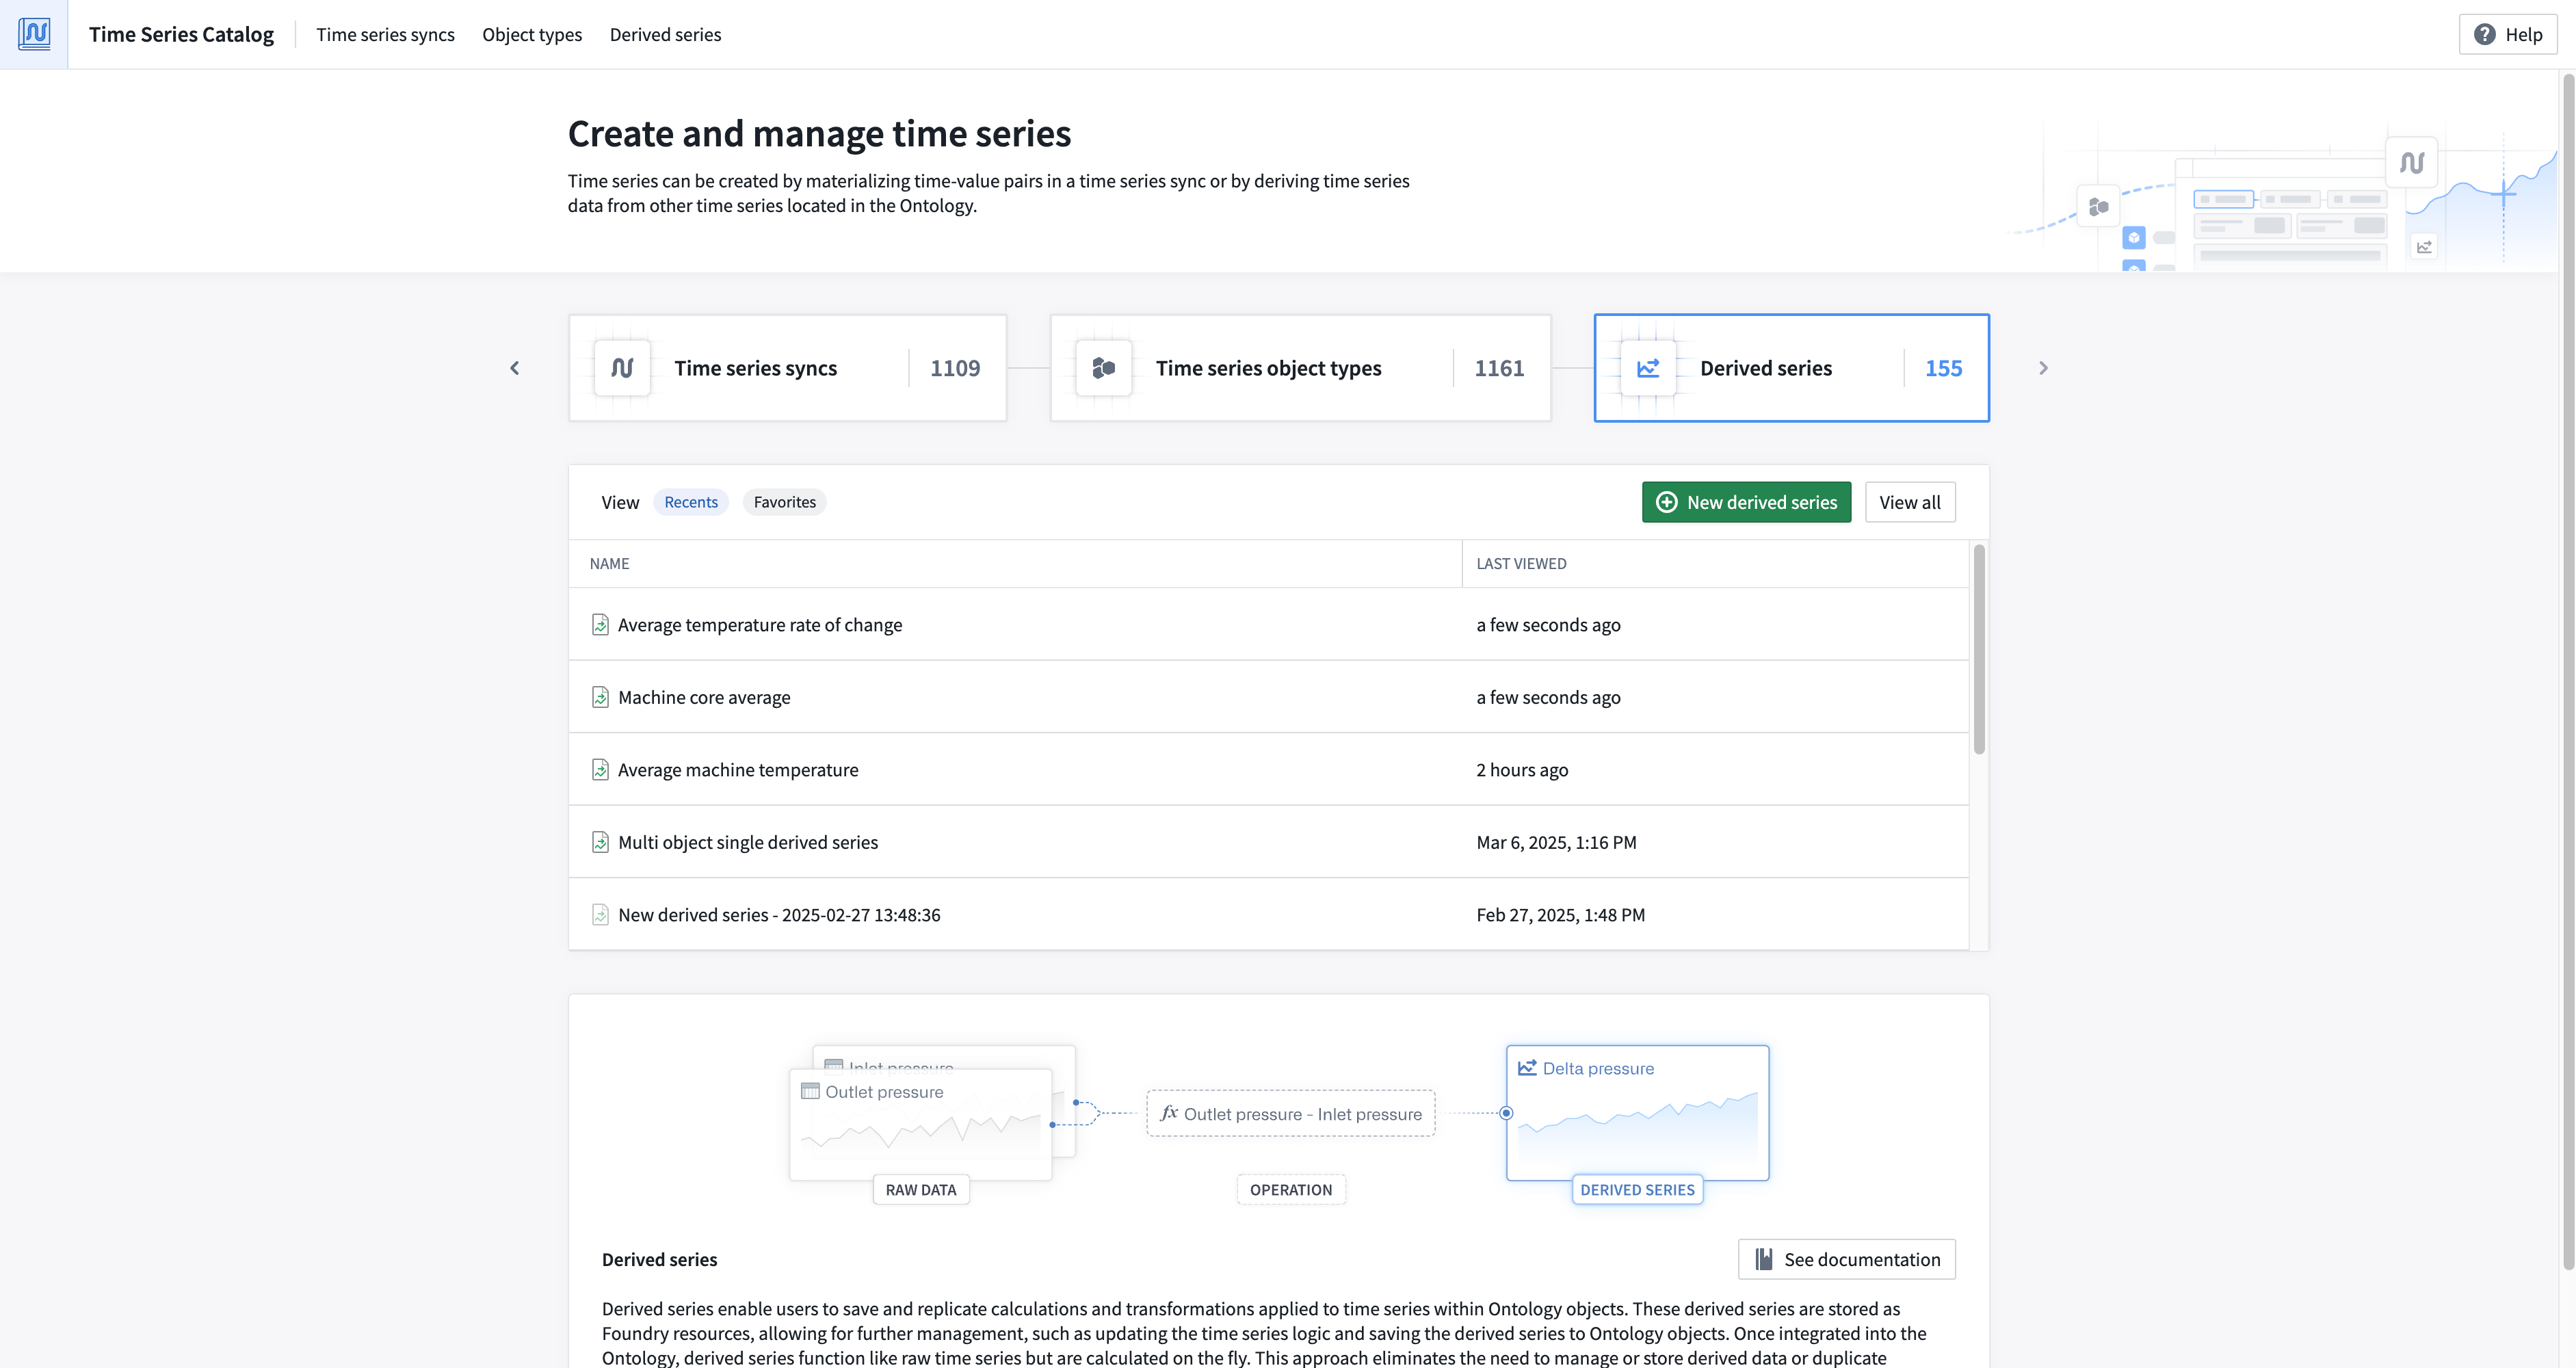
Create derived series from the Time Series Catalog application. From the starting page of the Time Series Catalog, select Derived series from the top left corner. From the next page, select + New derived series from the top right corner. Follow the steps below to continue creating your derived series.
1. Select derived series type
Select whether you would like to configure a templated or single derived series. Templated derived series should be used when you are deriving a new time series that would benefit all objects of a given type. Single derived series should be used when you want to construct a derivation that relies on many objects.

For templated derived series, after selecting a root object type you will be brought to the logic view with a single preview object of the specified type selected. You can update the preview root object at the top of the page.
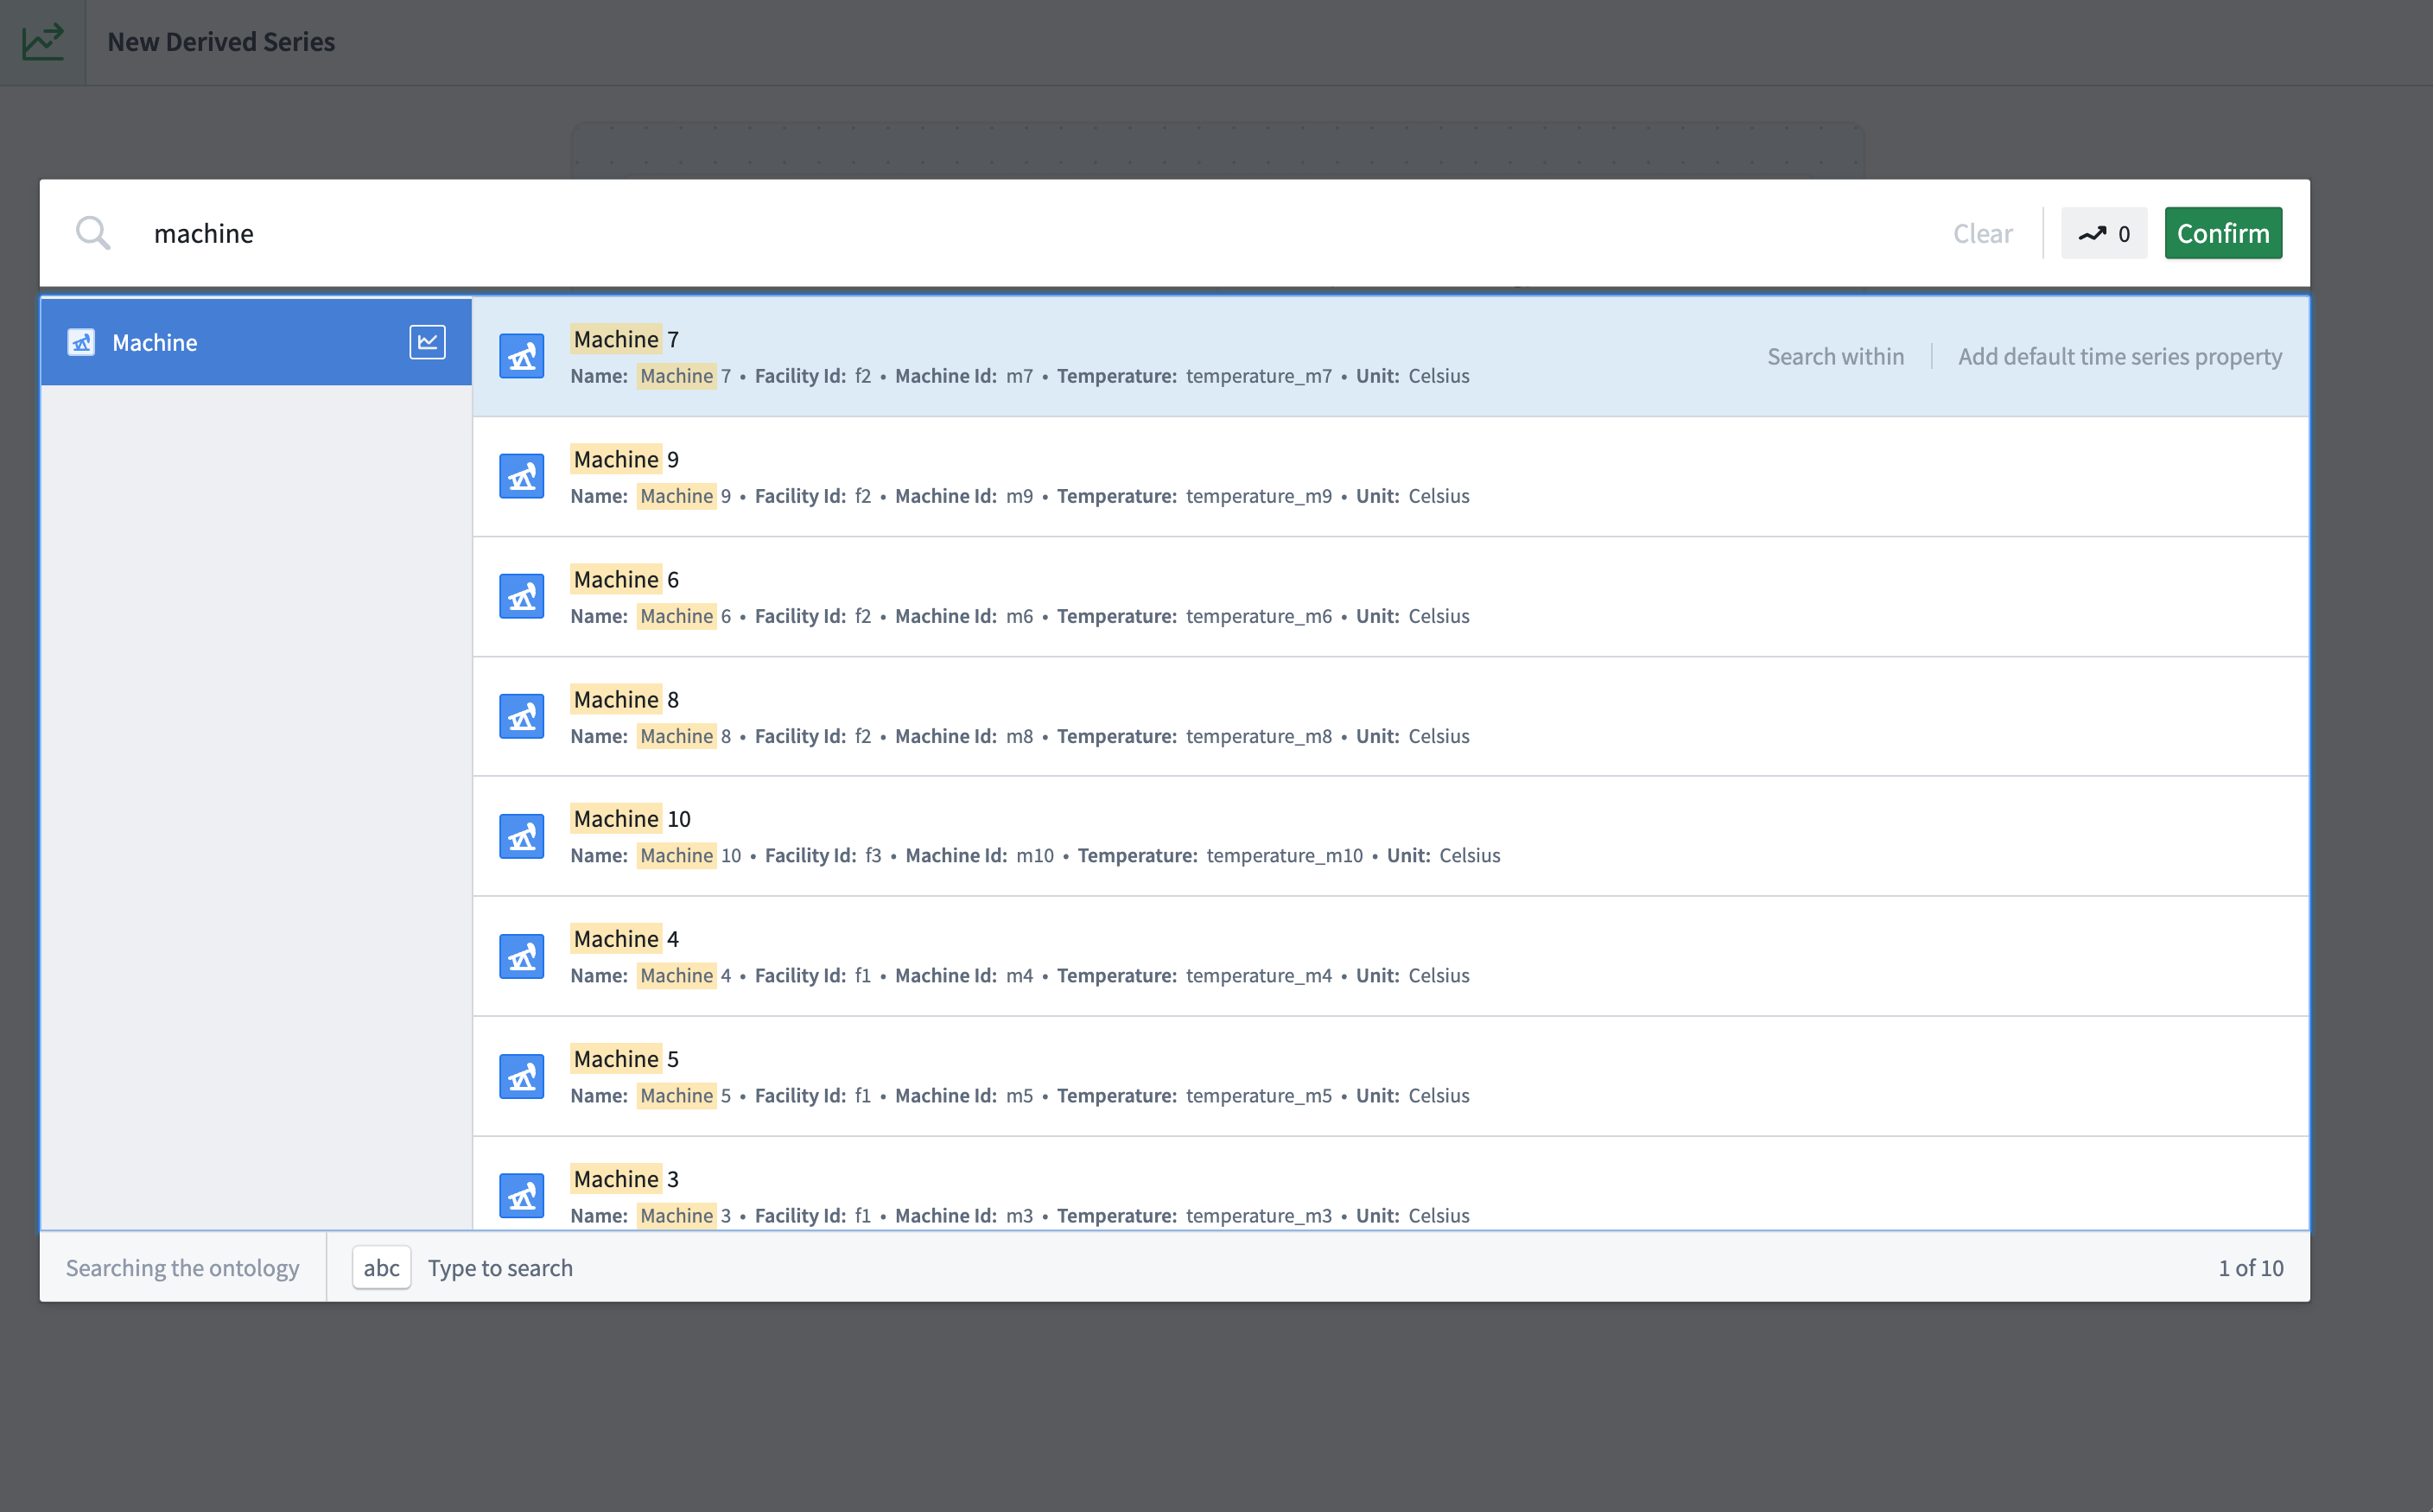
For single derived series, you will be prompted to select starting objects for your logic. Note that single derived series do not have a preview object as there could be many objects involved in the logic.
After confirming, you will be directed to the logic view with a Time series property card for each selected object.
2. Add time series data
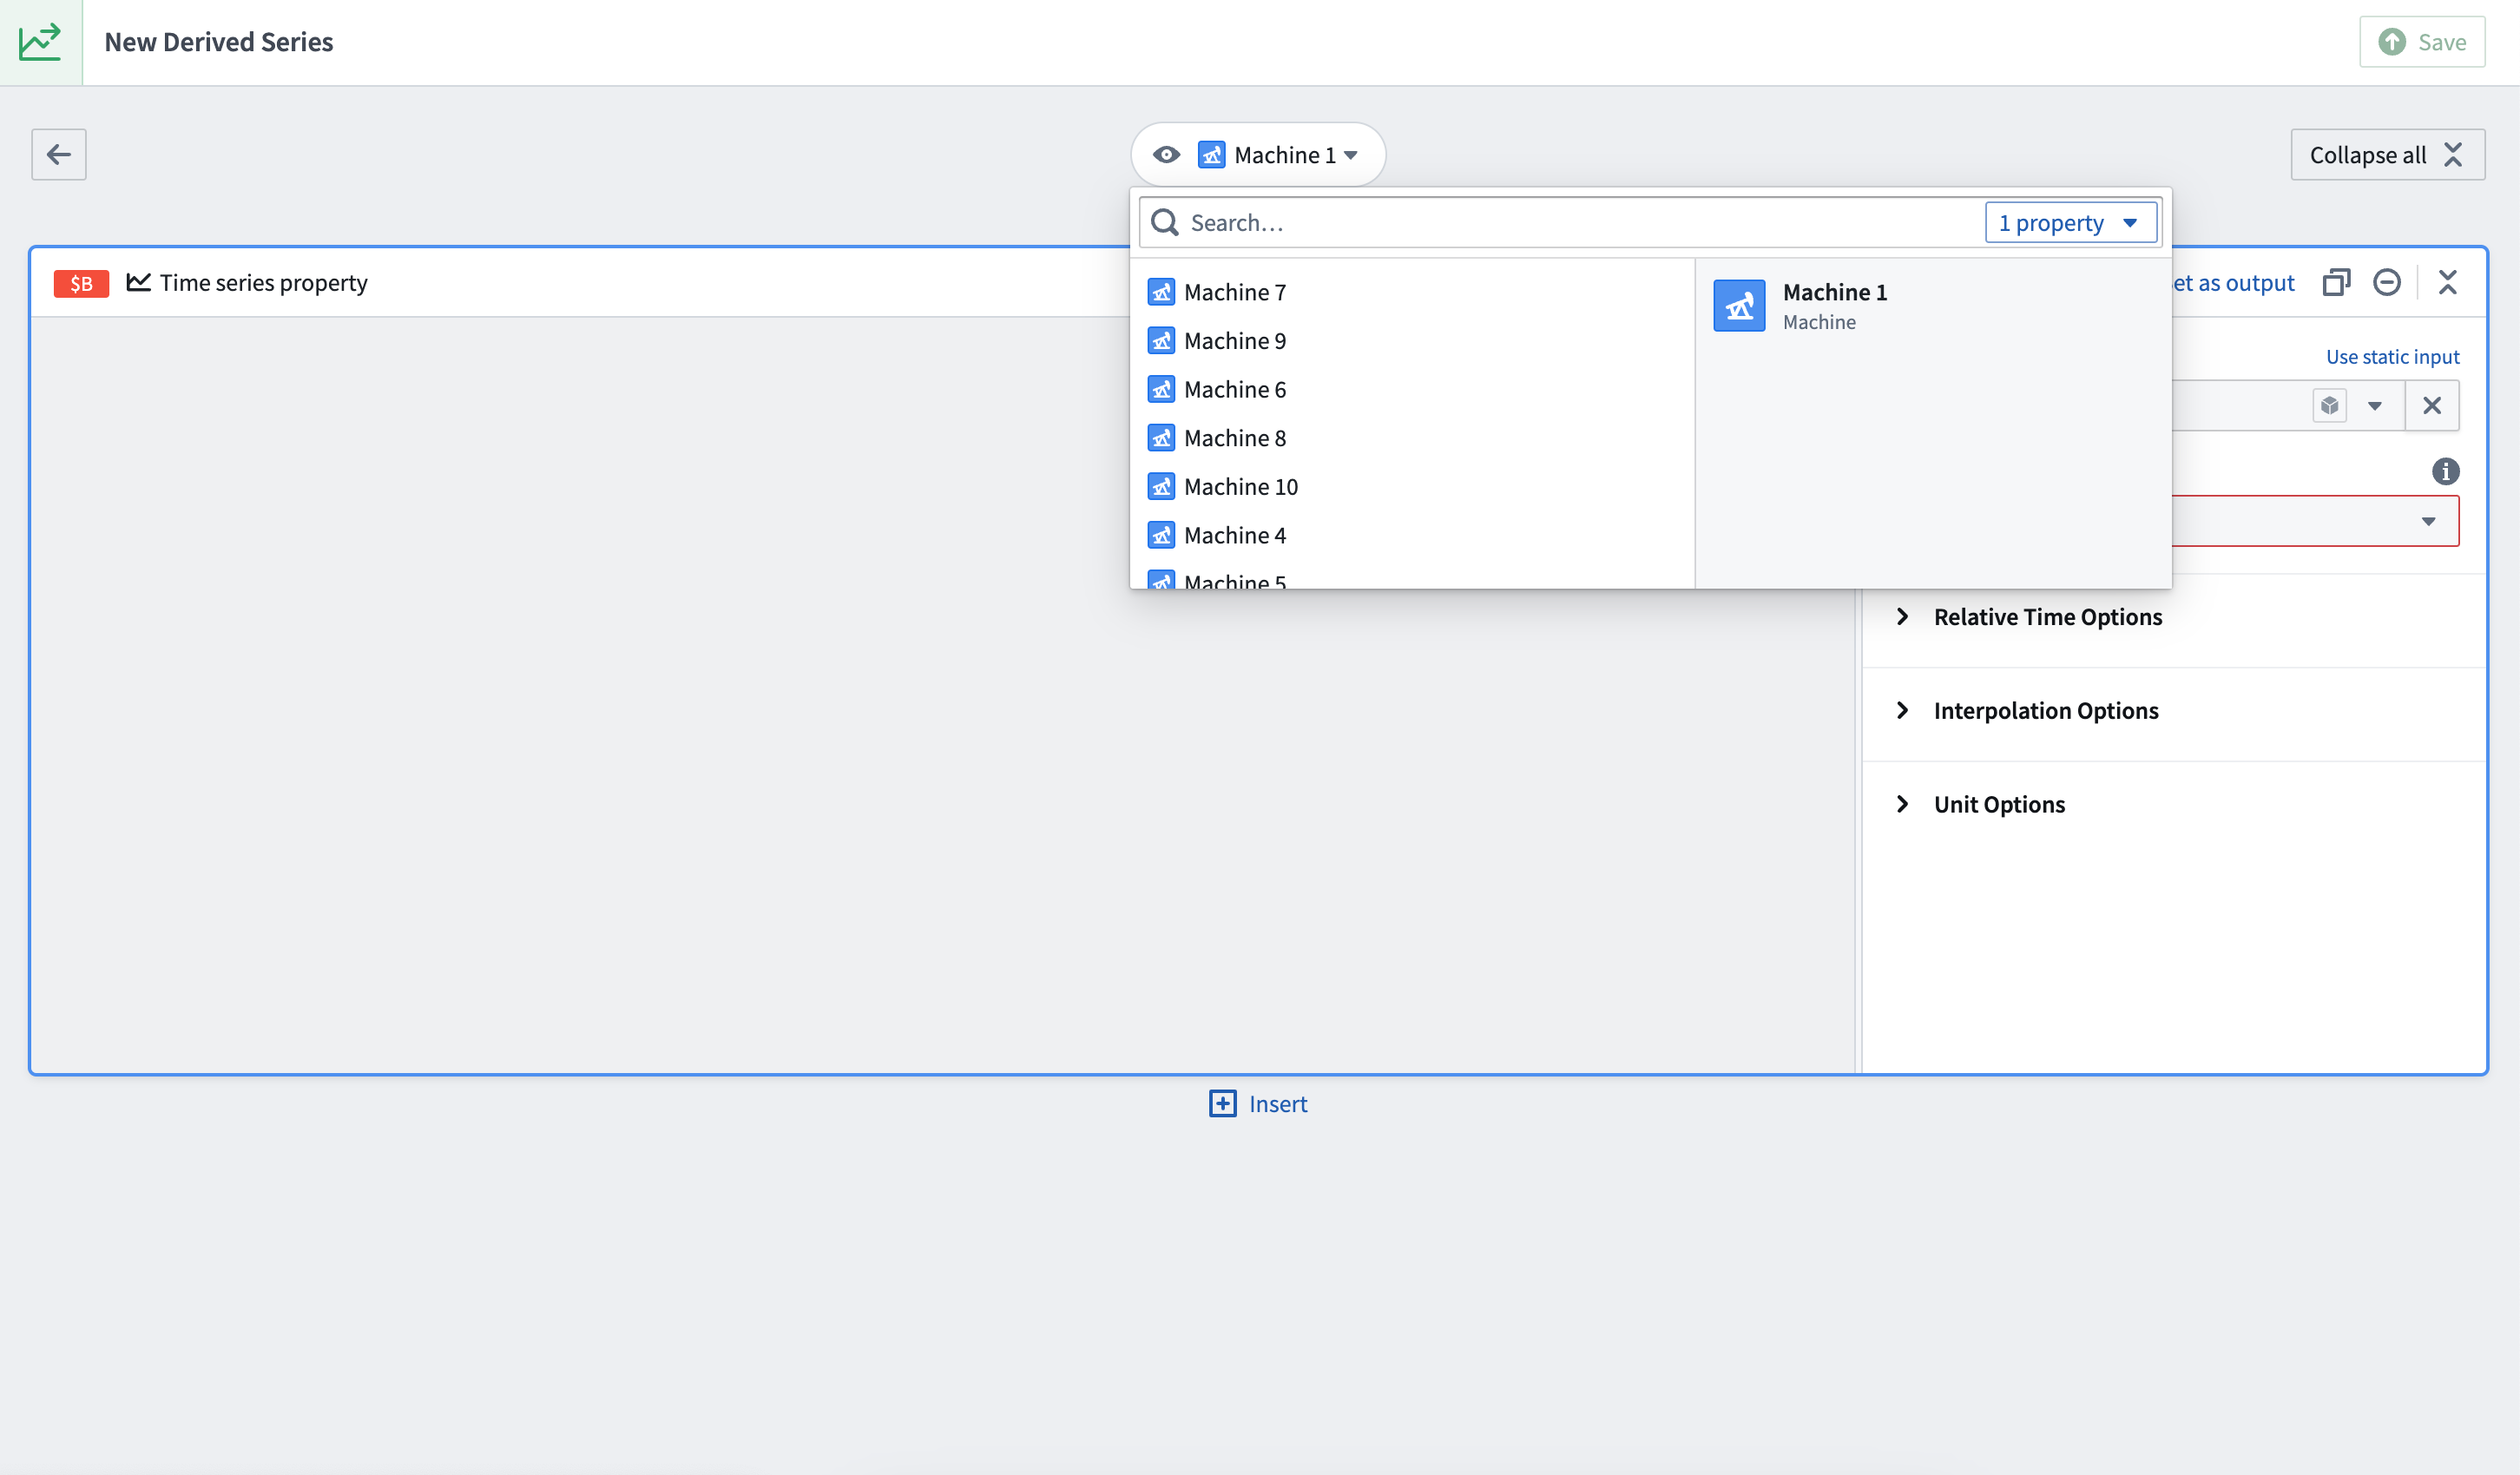
Use the Time series property card to select time series from objects for templated and single derived series.
This card allows you to select time series properties on the object as well as any linked sensors if they exist.
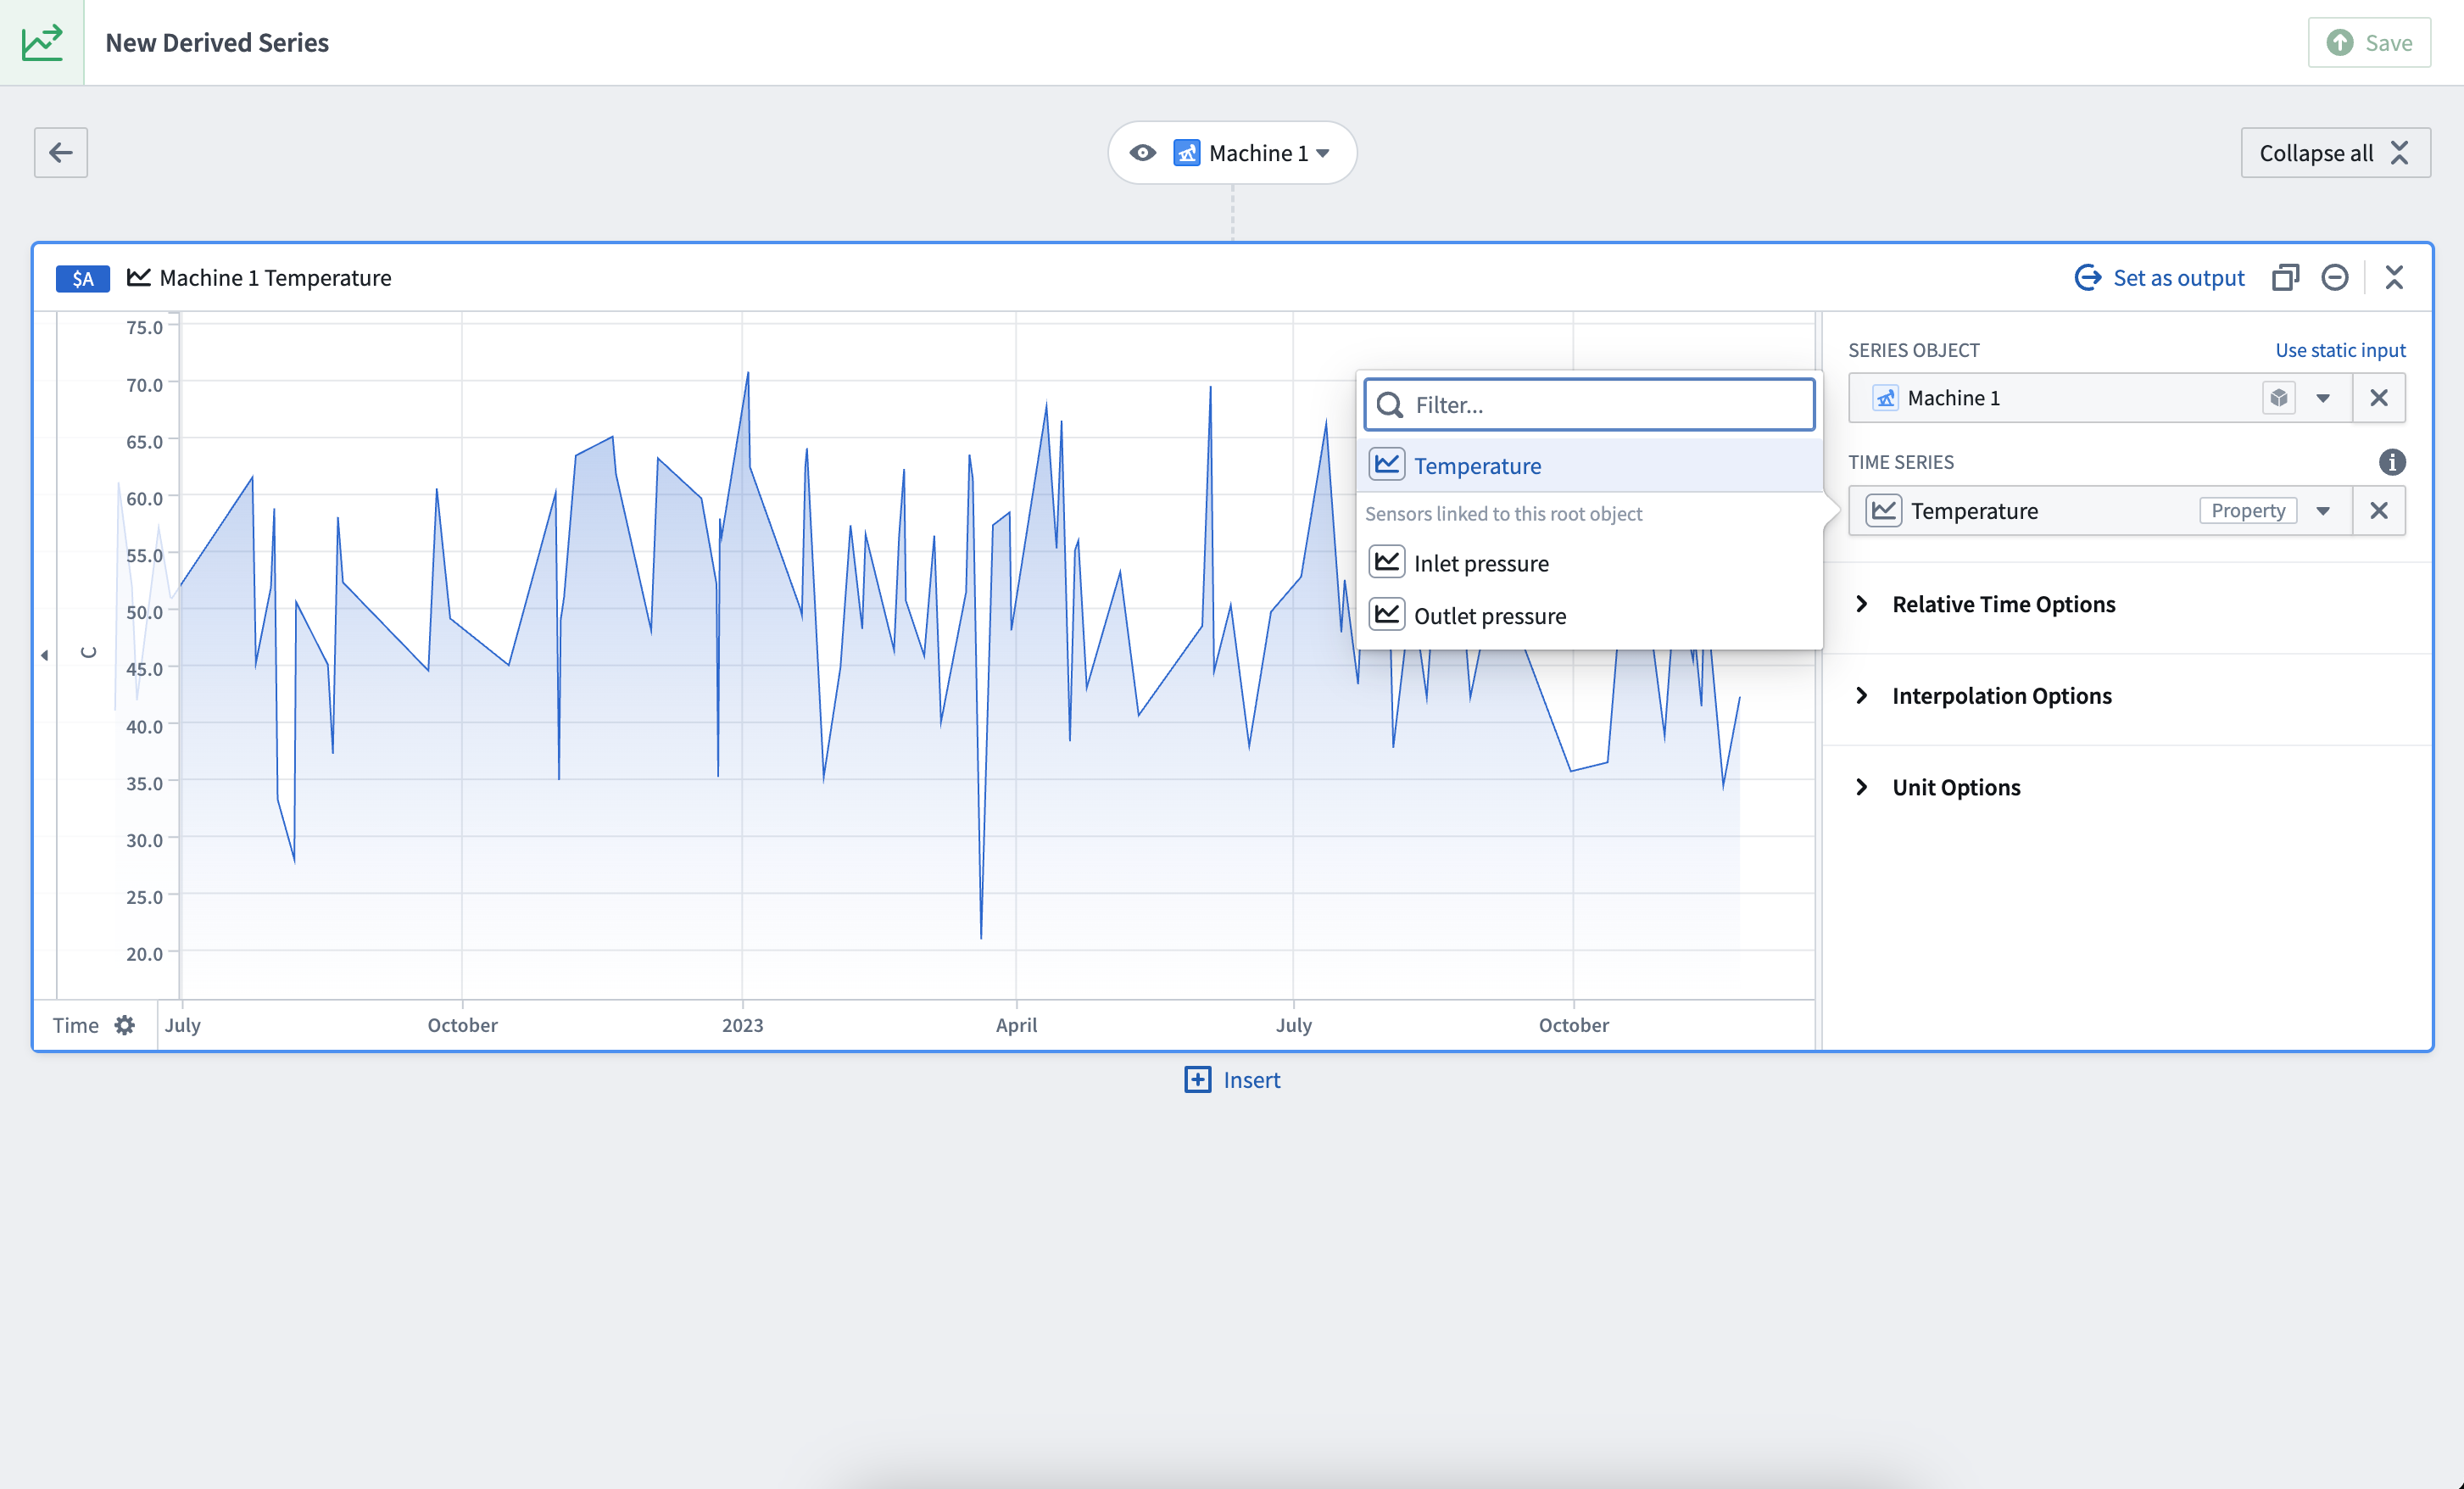
Remember, templated derived series must operate on a single root object; the Time Series Catalog interface will prevent you from adding more than one object to the logic when creating a templated derived series.
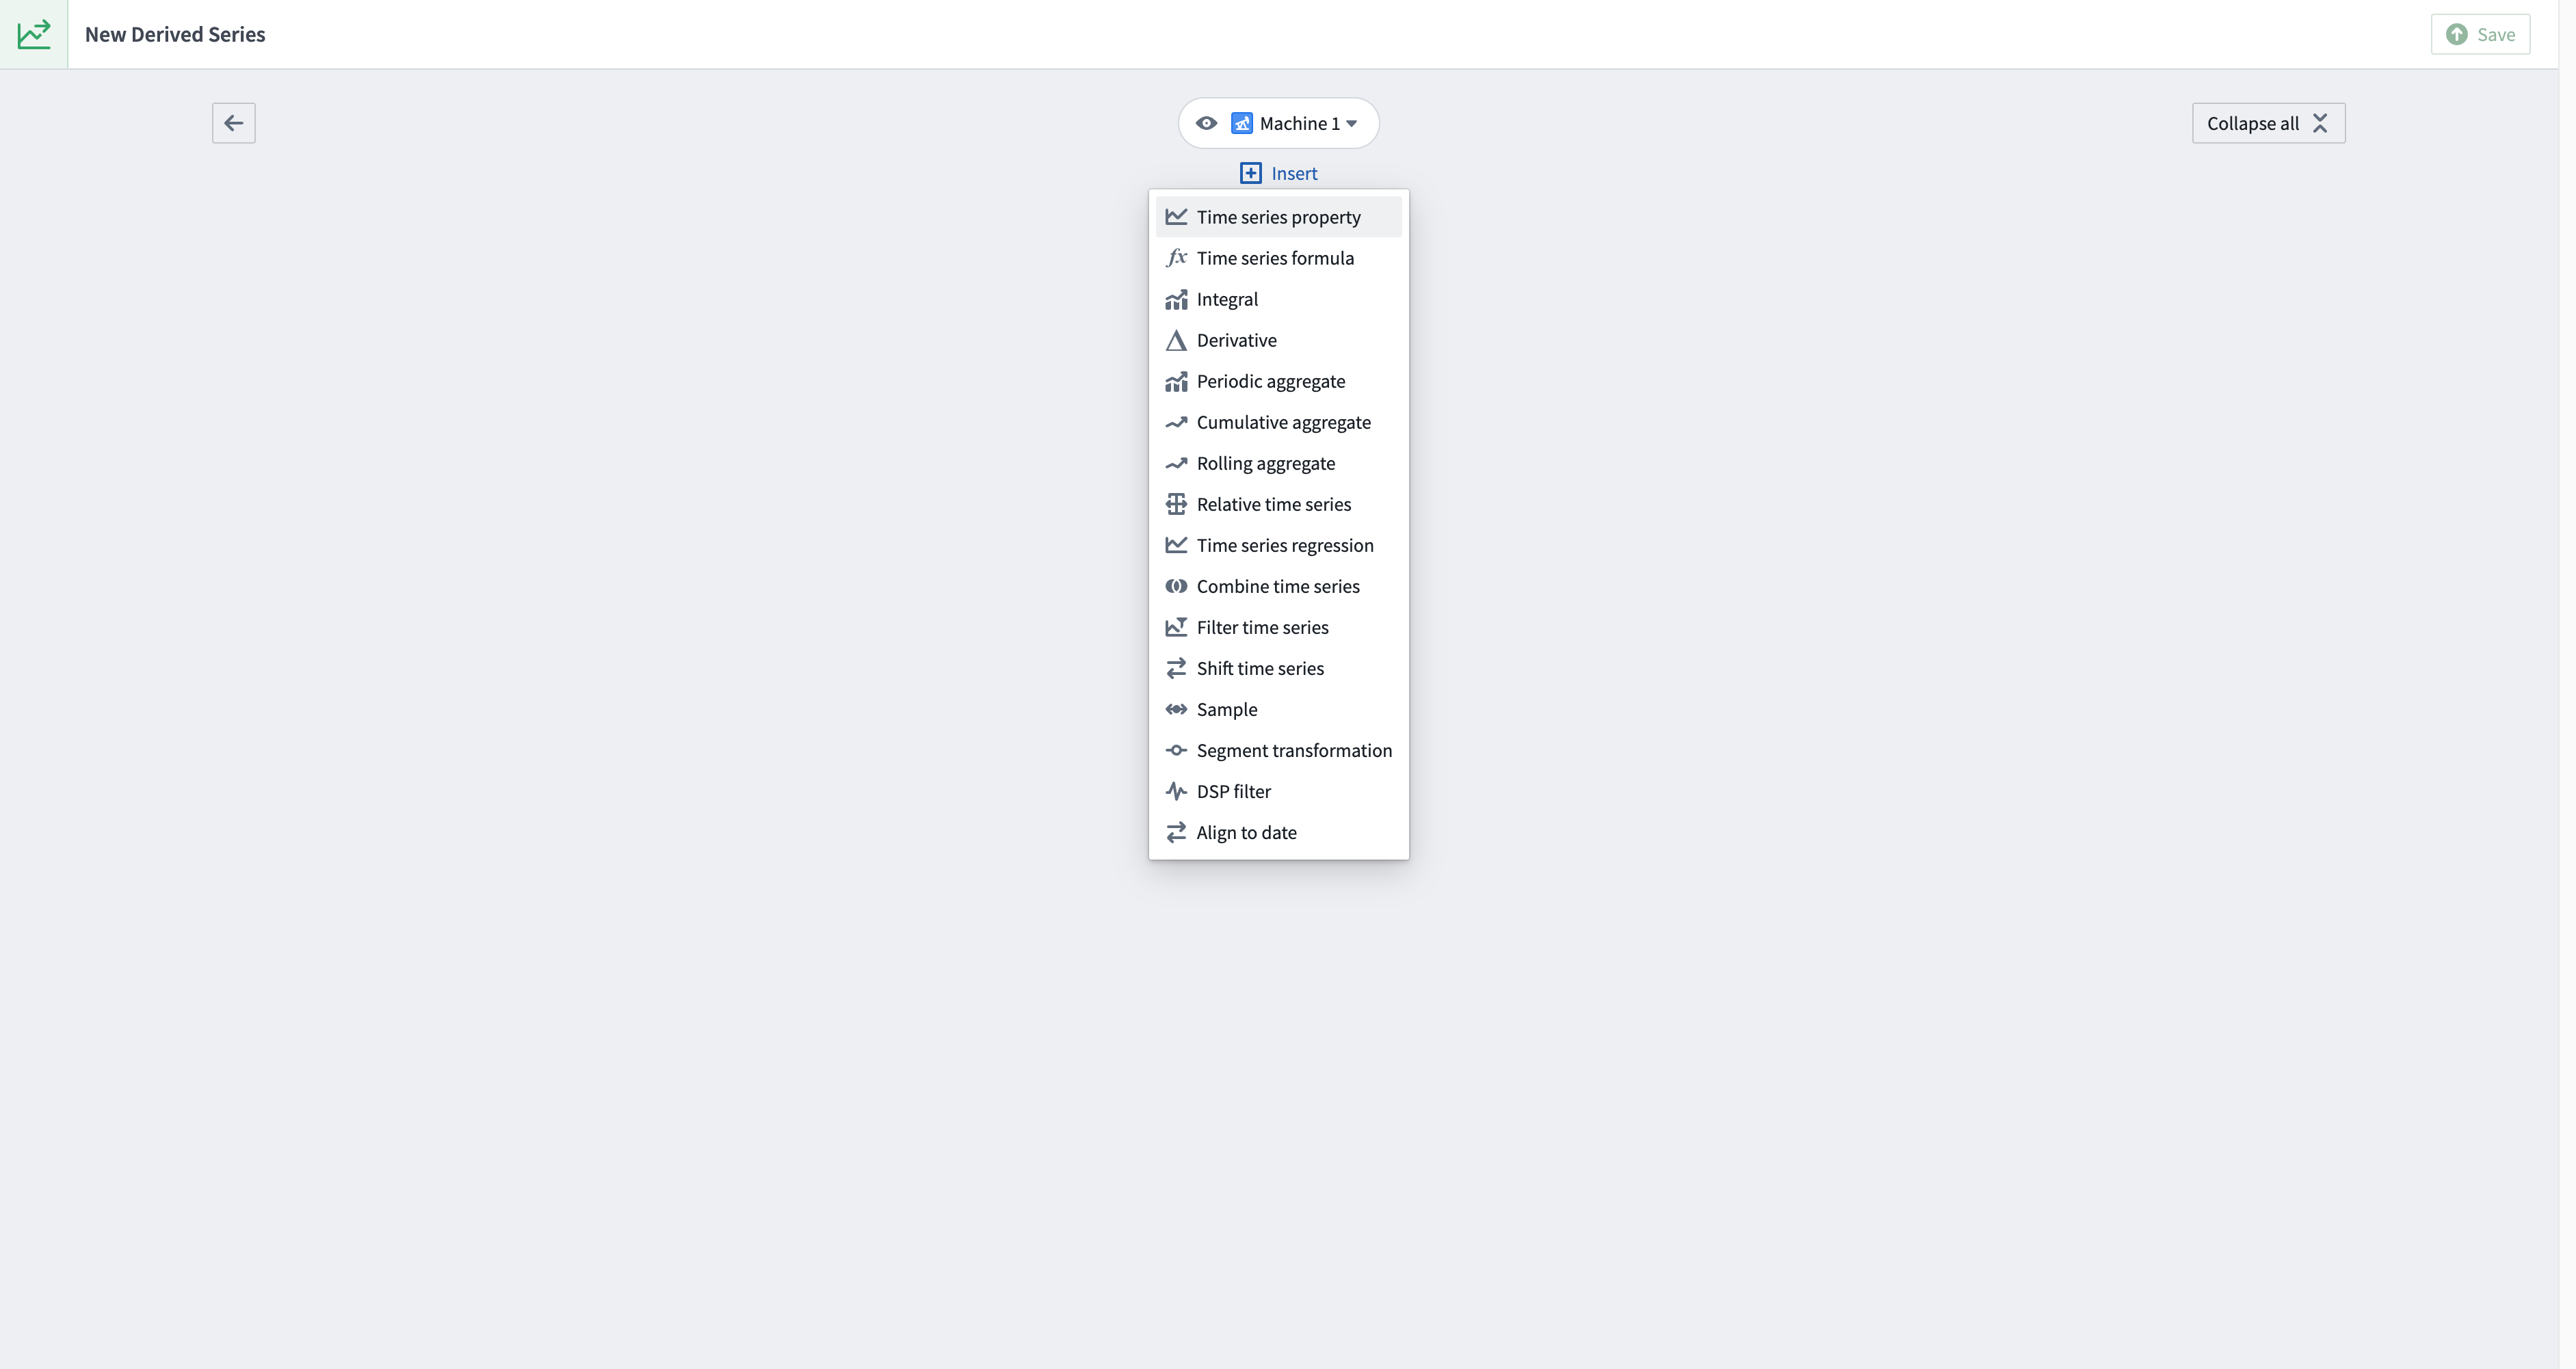
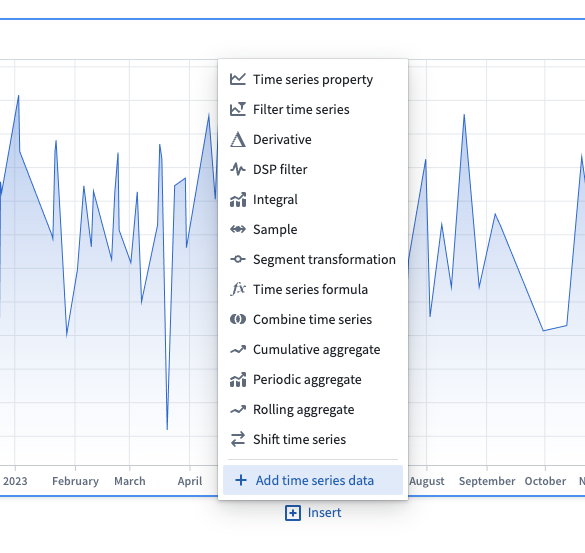
When creating or editing single derived series, you can add more data at any time from the logic view by using the Add time series data option from the top right corner. Alternatively, select Insert above or below a card and choose + Add time series data.
After confirming the time series object(s) in the pop-up window, a Time series property card will be created for each selected object.
3. Apply transforms
Apply relevant transforms to your time series by inserting new cards.
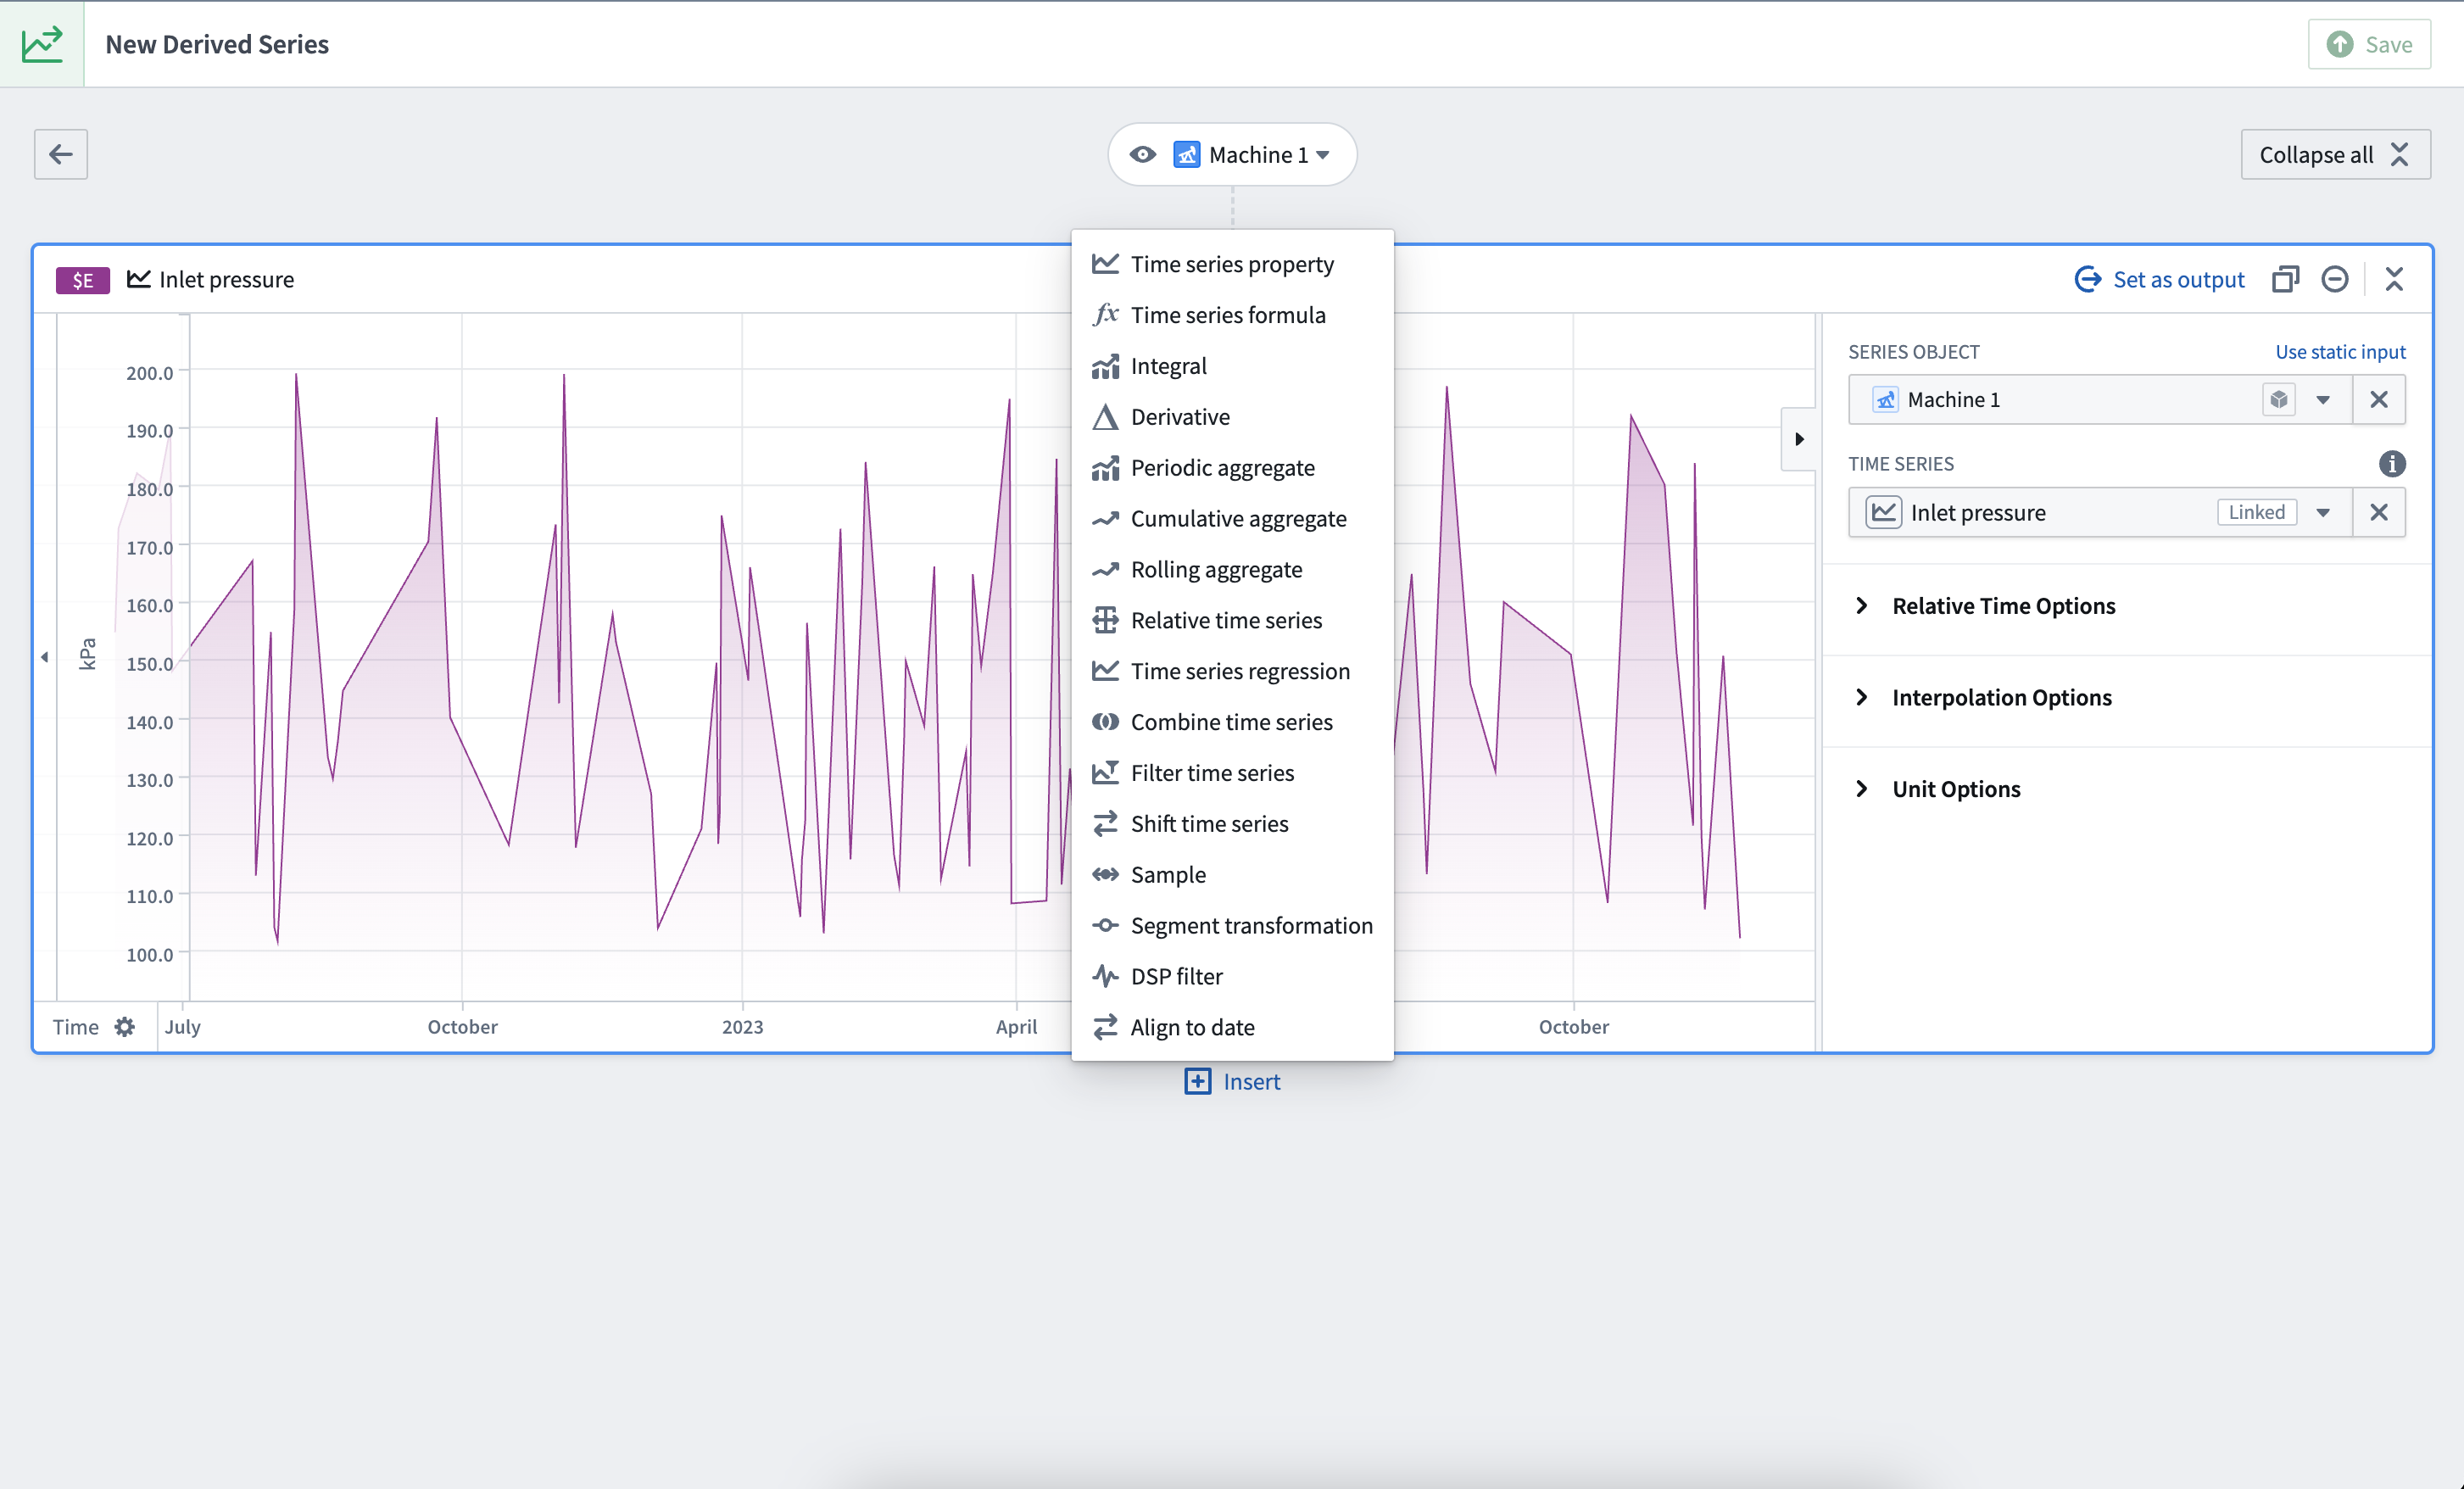
For example, to calculate pressure loss on a hypothetical Machine object type with Inlet pressure and Outlet pressure sensors, add the following cards:
- A Time series property card with
Inlet pressureselected - A Time series property card with
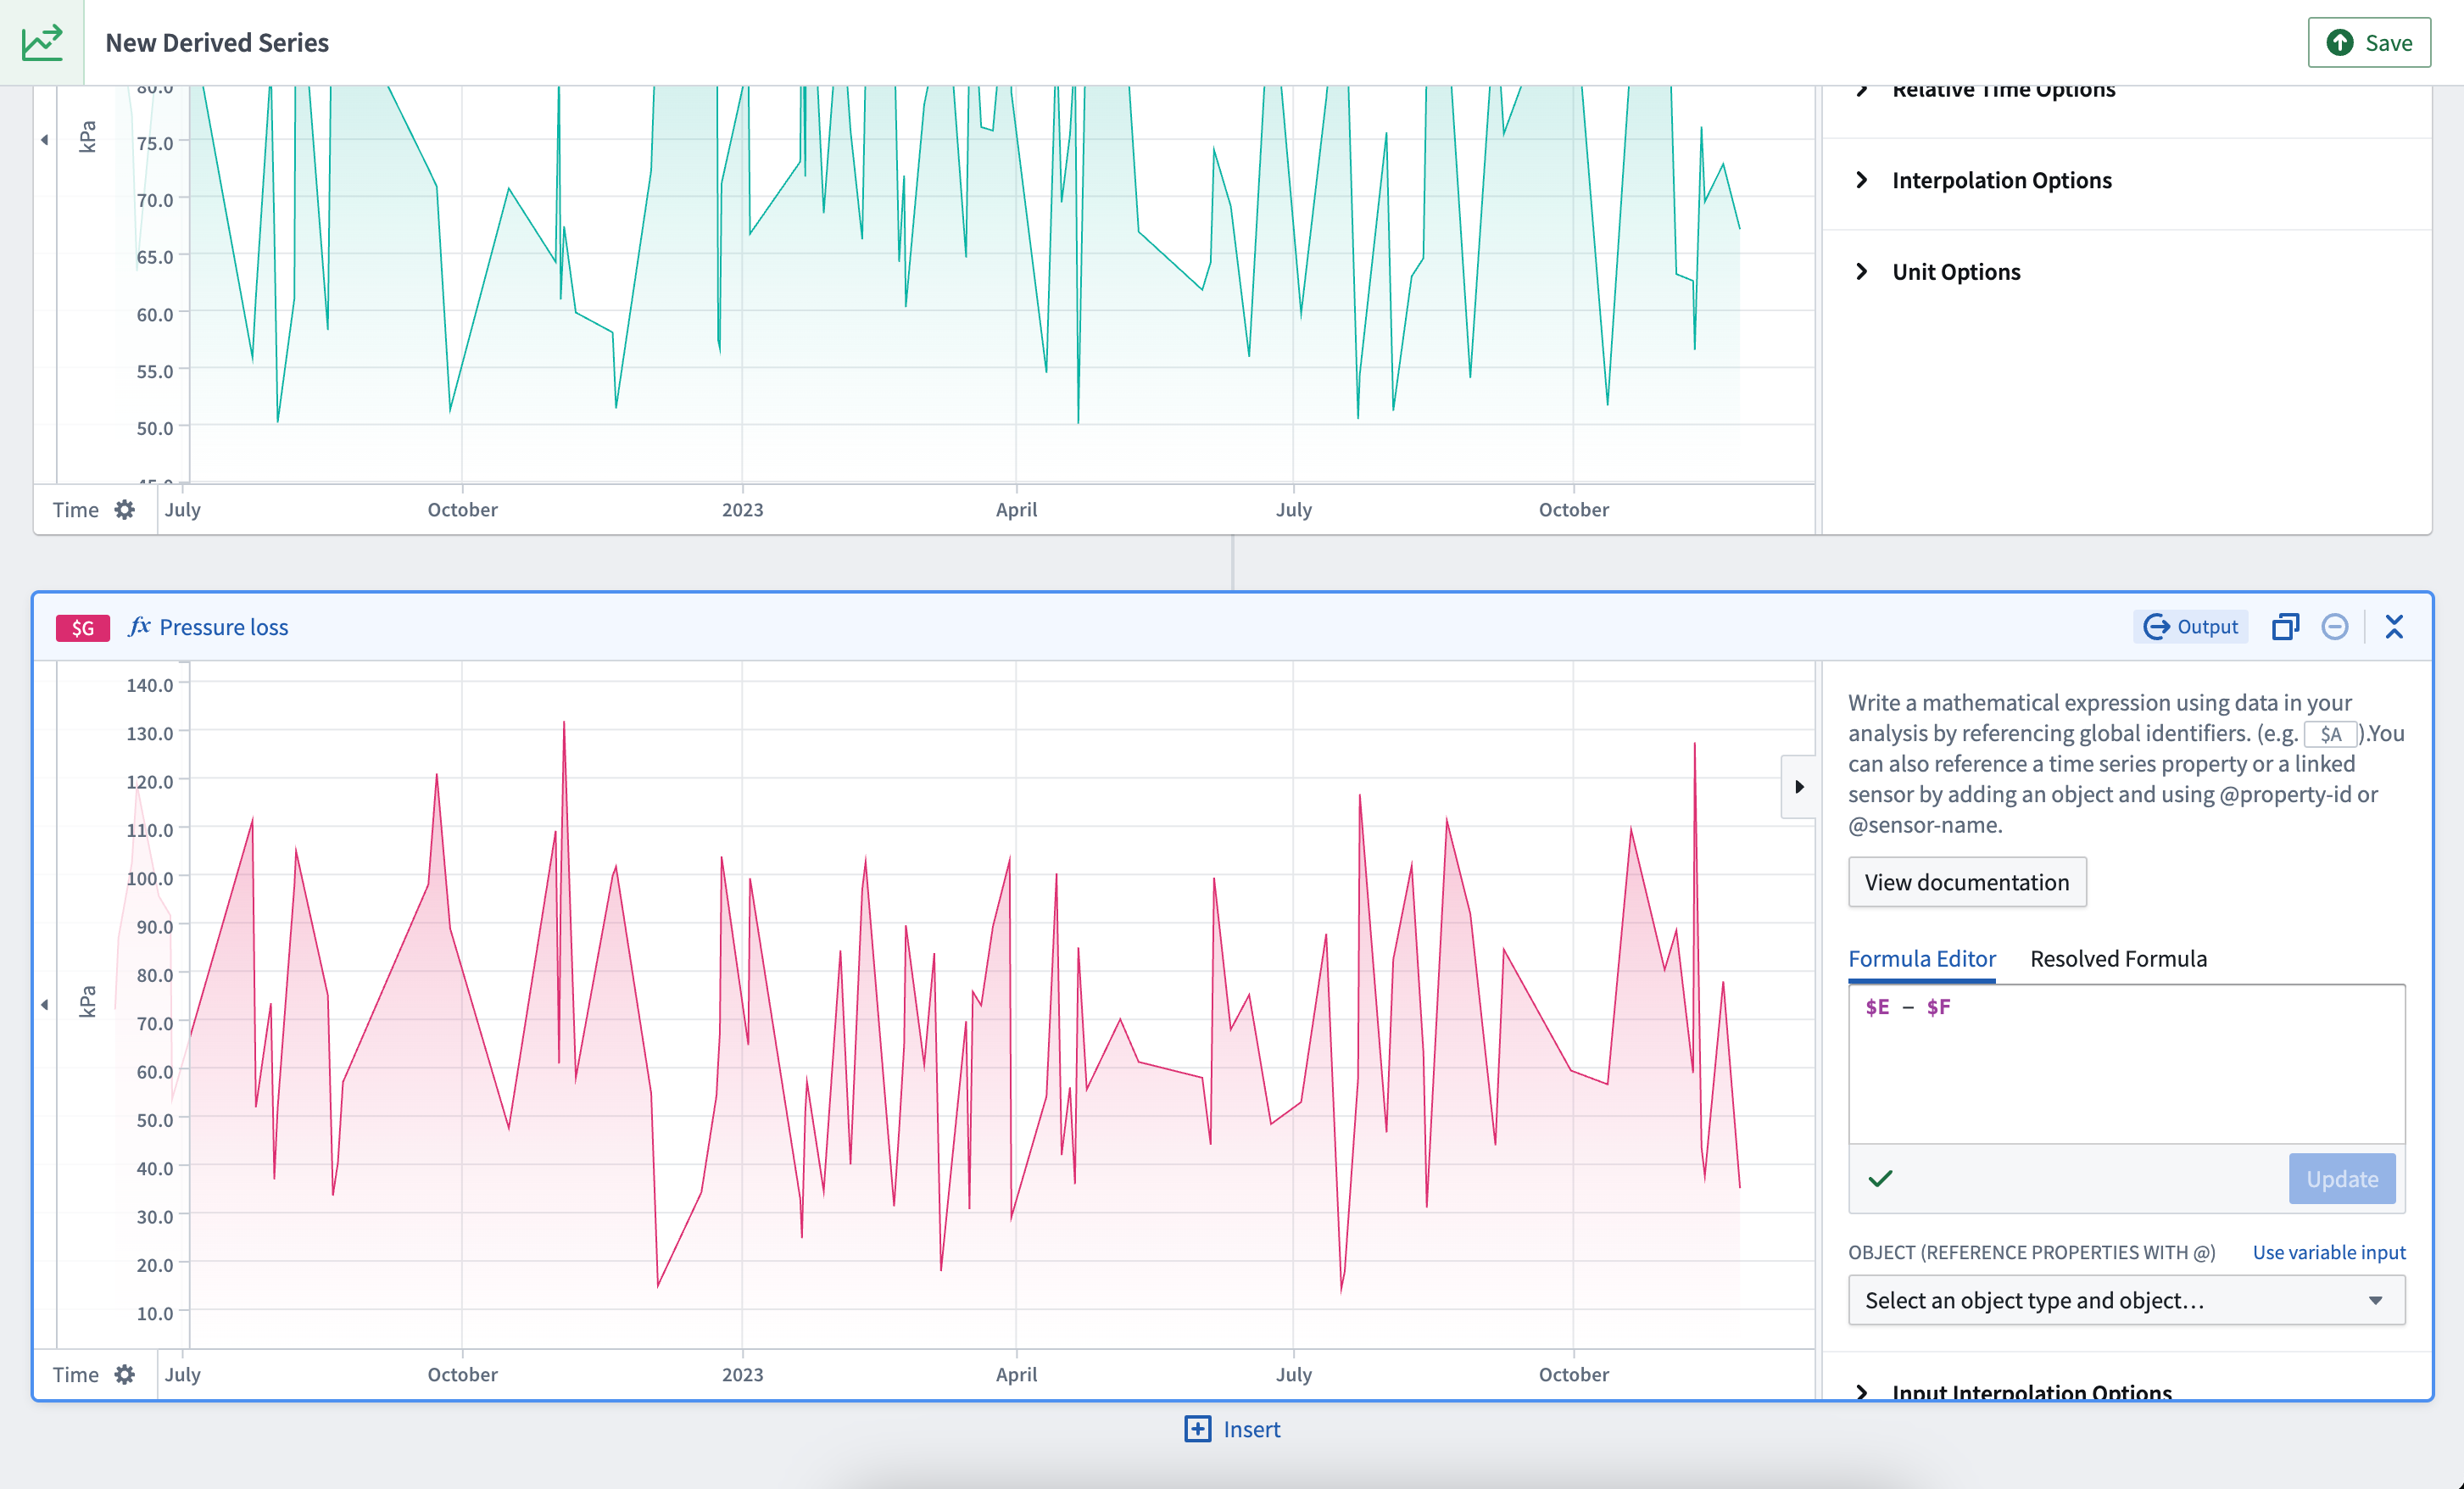
Outlet pressureselected - A Time series formula card calculating
$E - $G, assuming identifier$EisInlet pressureand$GisOutlet pressure. Identifiers are located in the top left of every card.
4. Select output
Once your derivation is complete, select the final transform as the logic output by choosing Set as output from the top right of the card header.
5. Save
Once you are satisfied with your logic, select Save from the top right of the page.
6. Configure Ontology saving options
Select Automatic Ontology saving to save the derived series directly to the Ontology.
:::callout{theme="neutral"} Automatic Ontology saving is only supported for sensor object types. You can choose to configure automatic Ontology saving after creation; however, you will not be able to change your selected object type. After creating a derived series that requires manual saving, follow the documentation to successfully save references to the Ontology. :::
Select an object type that will bind to the derived series. For templated derived series, this can be either the root object type from which you created the derived series logic, or any of its linked sensor object types. For single derived series, any root object type or sensor object type may be selected.
This bound object type is the only object type from which the derived series can be resolved. You will not be able to change the bound object type after saving.

Continue setting up automatic Ontology saving by configuring the sensor name, scope, property mapping, and Action types.
Sensor name: Provide a sensor name to identify the derived series once it is saved to the Ontology. This value will be included in the property mapping.
Scope selection: Templated derived series must provide a root object scope. This scope allows you to select which root objects you want to save this derived series for. One sensor object will be created for each selected root object. Currently, scope selection has a limit of 5000 objects.
Property mapping: The property mapping provides values for sensor object properties. These values will be used across all created sensor objects. Currently, only string or Boolean values are supported. Most sensor object properties are automatically mapped.
Action types: Automatic Ontology saving leverages Actions to save the derived series to the Ontology. As a prerequisite for this, you must have the Create object, Modify object, and Delete object Action types configured for the object type. Learn more about setting Action types for automatic Ontology saving in the derived series requirements documentation.

For guidance on where to store the derived series, review the time series Ontology setup documentation.
7. Select a resource location
Choose a name and folder location to save the resulting derived series resource.

8. Review
Finally, review the Ontology output and resource location information and optionally provide a version description before saving.

After saving the derived series, any future changes must be made from the derived series management page.
:::callout{theme="warning"} Deleting a derived series resource does not delete the associated objects added to the Ontology. Before deleting the derived series resource, first delete the derived series from the Ontology. :::
Advanced: Create derived series in Quiver
Derived series can also be created directly from a Quiver analysis.
Select any time series card and view the Derived series options configuration, then select Create derived series.
The save dialog is similar to the Time Series Catalog creation dialog, but you must select the type of derived series you are attempting to configure. You will not be able to select the templated option if the derived series operates on multiple objects.

Derived series created from Quiver analyses will not be associated with its source analysis after creation; all future management of the derived series must happen in the derived series management page.
We recommend using the Time Series Catalog to create derived series since not all Quiver operations are supported in derived series.
中文翻译
创建派生时序
从时序目录应用创建派生时序。在时序目录的起始页面,从左上角选择派生时序(Derived series)。在下一页中,从右上角选择+ 新建派生时序。按照以下步骤继续创建您的派生时序。
1. 选择派生时序类型
选择您要配置的是模板化(templated)还是单一(single)派生时序。当您要派生一个能惠及给定类型所有对象的新时序时,应使用模板化派生时序。当您要构建一个依赖多个对象的派生时,应使用单一派生时序。
对于模板化派生时序,在选择根对象类型后,您将进入逻辑视图,其中已选中指定类型的一个预览对象。您可以更新页面顶部的预览根对象。
对于单一派生时序,系统会提示您为逻辑选择起始对象。请注意,单一派生时序不包含预览对象,因为逻辑中可能涉及多个对象。
确认后,您将被引导至逻辑视图,其中每个选定对象都对应一个时序属性(Time series property)卡片。
2. 添加时序数据
使用时序属性卡片为模板化和单一派生时序从对象中选择时序。
此卡片允许您选择对象上的时序属性以及任何存在的关联传感器。
请记住,模板化派生时序必须基于单个根对象操作;时序目录界面会阻止您在创建模板化派生时序时向逻辑中添加多个对象。
在创建或编辑单一派生时序时,您可以随时从逻辑视图中使用右上角的添加时序数据选项来添加更多数据。或者,在卡片上方或下方选择插入(Insert),然后选择+ 添加时序数据。
在弹出窗口中确认时序对象后,将为每个选定对象创建一个时序属性卡片。
3. 应用变换
通过插入新卡片,对您的时序应用相关变换。
例如,要计算假设的Machine对象类型上带有Inlet pressure和Outlet pressure传感器的压力损失,请添加以下卡片:
- 一个时序属性卡片,选择
Inlet pressure - 一个时序属性卡片,选择
Outlet pressure - 一个时序公式(Time series formula)卡片,计算
$E - $G,假设标识符$E是Inlet pressure,$G是Outlet pressure。标识符位于每个卡片的左上角。
4. 选择输出
完成派生后,通过从卡片标题右上角选择设为输出(Set as output),将最终变换选为逻辑输出。
5. 保存
当您对逻辑满意后,从页面右上角选择保存(Save)。
6. 配置本体论保存选项
选择自动(Automatic)本体论(Ontology)保存,将派生时序直接保存到本体论。
:::callout{theme="neutral"} 自动本体论保存仅支持传感器对象类型。您可以选择在创建后配置自动本体论保存;但您将无法更改选定的对象类型。创建需要手动保存的派生时序后,请按照文档操作,以成功将引用保存到本体论。 :::
选择一个将绑定到派生时序的对象类型。对于模板化派生时序,这可以是您创建派生时序逻辑的根对象类型,或其任何关联传感器对象类型。对于单一派生时序,可以选择任何根对象类型或传感器对象类型。
此绑定对象类型是唯一可以解析派生时序的对象类型。保存后将无法更改绑定对象类型。
通过配置传感器名称、范围、属性映射和操作类型(Action types),继续设置自动本体论保存。
传感器名称(Sensor name): 提供传感器名称以标识派生时序保存到本体论后的身份。此值将包含在属性映射中。
范围选择(Scope selection): 模板化派生时序必须提供根对象范围。此范围允许您选择要为哪些根对象保存此派生时序。每个选定的根对象将创建一个传感器对象。目前,范围选择限制为5000个对象。
属性映射(Property mapping): 属性映射为传感器对象属性提供值。这些值将应用于所有创建的传感器对象。目前,仅支持字符串或布尔值。大多数传感器对象属性会自动映射。
操作类型(Action types): 自动本体论保存利用操作(Actions)将派生时序保存到本体论。作为前提条件,您必须为对象类型配置了创建对象、修改对象和删除对象操作类型。有关为自动本体论保存设置操作类型的更多信息,请参阅派生时序要求文档。
关于派生时序存储位置的指导,请查阅时序本体论设置文档。
7. 选择资源位置
选择名称和文件夹位置以保存生成的派生时序资源。
8. 审查
最后,审查本体论输出和资源位置信息,并可选地在保存前提供版本描述。
保存派生时序后,任何未来的更改都必须从派生时序管理页面进行。
:::callout{theme="warning"} 删除派生时序资源不会删除添加到本体论的关联对象。在删除派生时序资源之前,请先从本体论中删除派生时序。 :::
高级:在 Quiver 中创建派生时序
也可以直接从Quiver分析中创建派生时序。
选择任意时序卡片并查看派生时序选项配置,然后选择创建派生时序。
保存对话框与时序目录创建对话框类似,但您必须选择要配置的派生时序类型。如果派生时序操作涉及多个对象,您将无法选择模板化选项。
从Quiver分析创建的派生时序在创建后将不会与其源分析关联;所有未来的派生时序管理都必须在派生时序管理页面中进行。
我们建议使用时序目录创建派生时序,因为并非所有Quiver操作都支持在派生时序中使用。