Create sensor object types with Ontology Manager(使用 Ontology Manager 创建传感器对象类型)
This guidance explains how to use Ontology Manager to create a sensor object type and link it to a root object type. Once you complete the steps below, you will be able to interact with a sensor object type in the platform. In this example, you will create a Flight Sensor object type and link it to a Flight root object type.
Part I: Create the sensor object type
- Navigate to Ontology Manager, and select Object types from the left side panel.
- From the upper right corner of the screen, select New object type.
- In the configuration dialog that appears, configure your object type metadata.
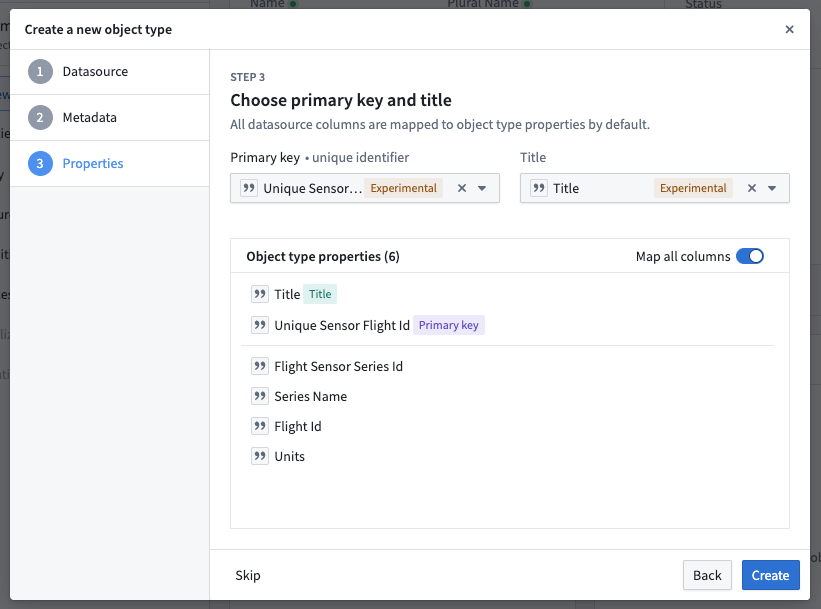
- In the Properties step, choose to back the object type with the
[Example] Sensorsdataset that you created with the sensor data pipeline. - Then, in the Property field, select the string type
unique_sensor_flight_idproperty to use as the primary key. You can also select Sync all columns from datasource or Map all columns if either of those options is available. - Choose the
Titlecolumn as the title property, which allows theFlight Sensorobject types to appear across the application with human-readable names.
-
Depending on your version of the platform you may see options to configure permissions and actions for the
Flight Sensorobject type. Our example does not require additional permissions or action configuration. -
Once you have progressed through all the steps in the dialog, select Create.
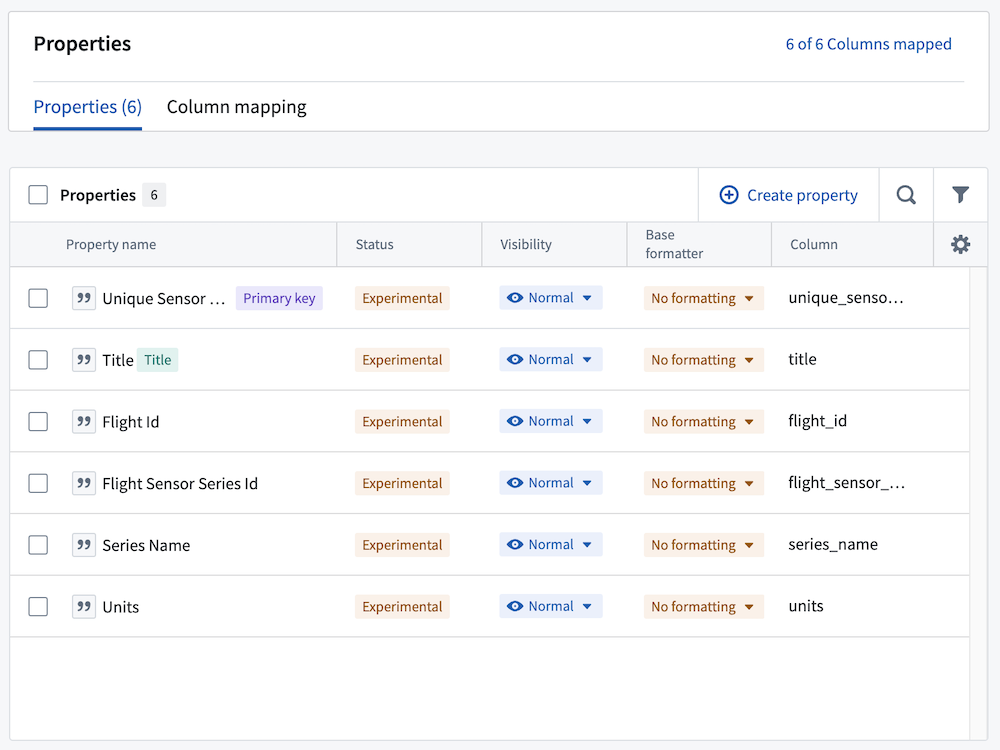
From the Properties tab of the new [Example] Sensors object type, the properties should appear as in the screenshot below:
Part II: Configure the time series property for the sensor object type
- Navigate to the
[Example] Flight Sensorobject type in Ontology Manager and select the Capabilities tab from the left side panel. - From the Time series property section select + Add.
- Select the existing
Flight Sensor Series Idproperty as the time series property, then select Set as default time series property so that it automatically appears in Quiver.

- Select the time series sync that you created in Pipeline Builder. In our example, it is called
[Example] Time Series Sync | Sensor Readings.
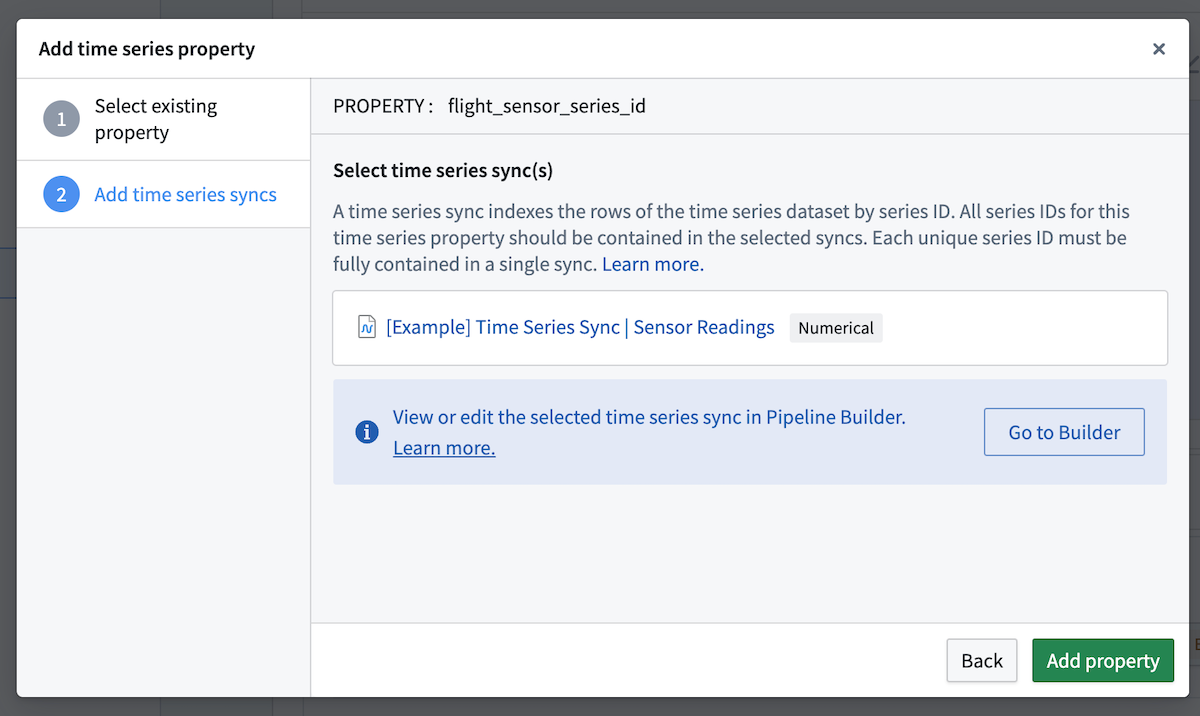
- Select Add property to save the time series property configuration.
Part III: Link the sensor object type to a root object type
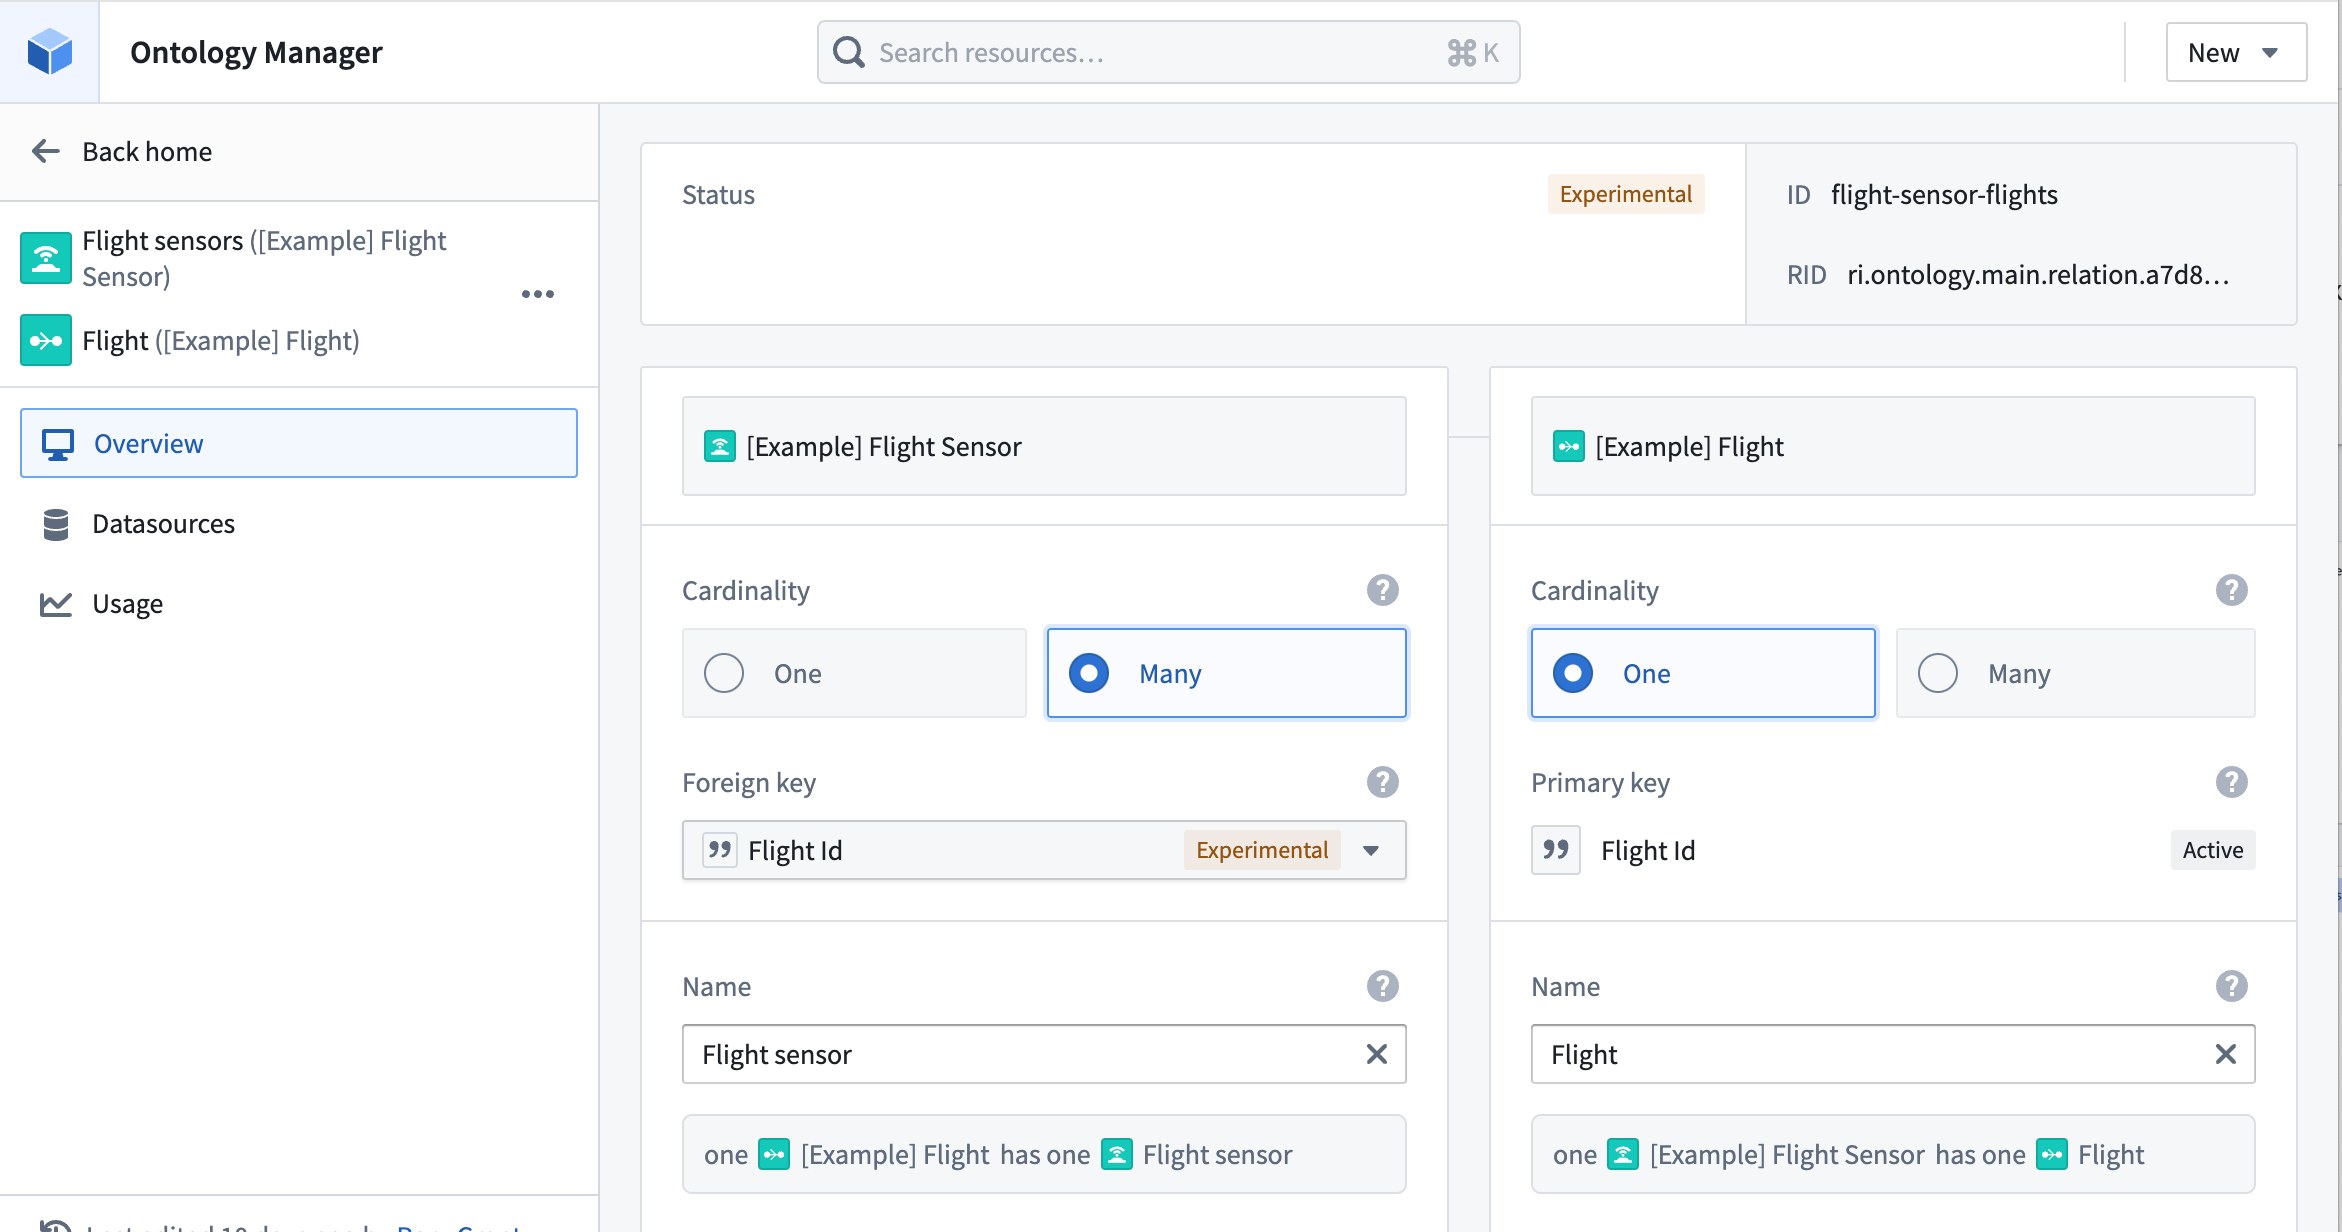
Add a link between the [Example] Flight Sensor and [Example] Flight object types using the steps below.
- From the
[Example] Flight Sensorview in Ontology Manager, select the New dropdown menu and choose Link type - On the left side of the link, choose the
[Example] Flight Sensorobject type. On the right, choose the[Example] Flightobject type. - Set the cardinality for the left
Flight Sensorobject type as Many, and the rightFlightobject type as One, meaning theFlightobject type has a one to many relationship to theFlight Sensorobject type. - Set the
flight_idcolumn as a foreign key to theFlight Sensorobject type, which will setflight_idas the primary key for theFlightobject type.
Learn more about link types.
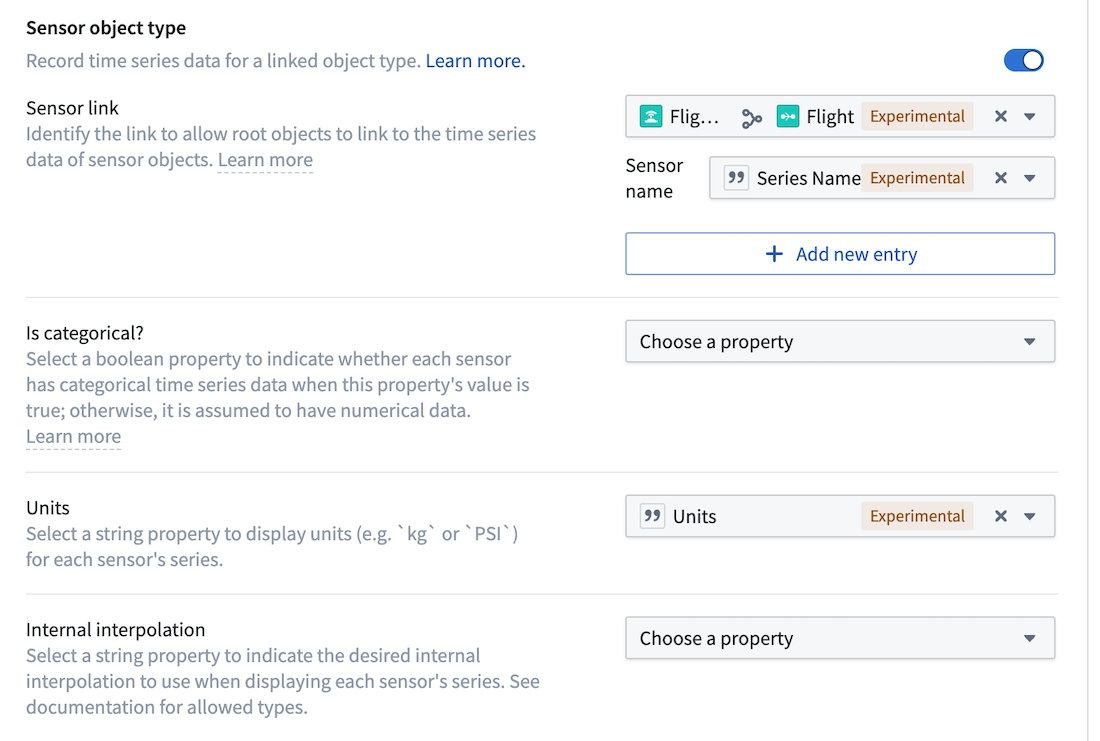
Part IV: Configure the sensor object type
In the time series section, ensure that the sensor object type toggle is on. Set up the Sensor link to use the recently created Flight to Flight Sensor link.
-
Set the link name as the
Series Namecolumn. Applications will surface the sensor object data under this series name. -
Configure units by selecting the Units dropdown menu in the sensor object type setup.
Is categorical and Internal interpolation can be inferred from properties on the sensor object type, but they are not required for this use case. Is categorical is only needed when it is important to delineate categorical time series values from numeric time series values.
Internal interpolation is used to enable applications like Quiver to infer series values between adjacent data points. Review our Quiver documentation on interpolation for more information.
- Choose to Save the edits to the object type from upper right corner of the screen to view the changes in the Ontology and throughout the platform.
Now, you are ready to use the Flight Sensor and Flight object types in an operational context. Proceed in the documentation to learn how to use sensor object type time series data in Workshop and Quiver.
:::callout{theme="neutral"}
Configuration for Is enum? is not required for our example use case. Is deprecated and Sparkline preview properties should be ignored.
:::
中文翻译
使用 Ontology Manager 创建传感器对象类型
本指南将说明如何使用 Ontology Manager 创建传感器对象类型(sensor object type),并将其链接到根对象类型(root object type)。完成以下步骤后,您将能够在平台中与传感器对象类型进行交互。在本示例中,您将创建一个飞行传感器对象类型,并将其链接到飞行根对象类型。
第一部分:创建传感器对象类型
- 导航至 Ontology Manager,从左侧面板选择对象类型。
- 在屏幕右上角,选择新建对象类型。
- 在出现的配置对话框中,配置您的对象类型元数据。
- 在属性步骤中,选择使用您通过传感器数据管道创建的
[示例] 传感器数据集来支持该对象类型。 - 然后在属性字段中,选择字符串类型的
unique_sensor_flight_id属性作为主键。如果可用,您也可以选择从数据源同步所有列或映射所有列。 - 选择
标题列作为标题属性,这将使飞行传感器对象类型在应用程序中以人类可读的名称显示。
-
根据您使用的平台版本,您可能会看到为
飞行传感器对象类型配置权限和操作的选项。本示例不需要额外的权限或操作配置。 -
完成对话框中的所有步骤后,选择创建。
在新建的[示例] 传感器对象类型的属性选项卡中,属性应如下截图所示:
第二部分:为传感器对象类型配置时间序列属性
- 在 Ontology Manager 中导航至
[示例] 飞行传感器对象类型,从左侧面板选择功能选项卡。 - 在时间序列属性部分,选择+ 添加。
- 选择现有的
飞行传感器系列 ID属性作为时间序列属性,然后选择设为默认时间序列属性,使其自动显示在 Quiver 中。
- 选择您在Pipeline Builder中创建的时间序列同步。在本示例中,它名为
[示例] 时间序列同步 | 传感器读数。
- 选择添加属性以保存时间序列属性配置。
第三部分:将传感器对象类型链接到根对象类型
按照以下步骤在[示例] 飞行传感器和[示例] 飞行对象类型之间添加链接。
- 在 Ontology Manager 的
[示例] 飞行传感器视图中,选择新建下拉菜单,然后选择链接类型。 - 在链接左侧,选择
[示例] 飞行传感器对象类型。在右侧,选择[示例] 飞行对象类型。 - 将左侧
飞行传感器对象类型的基数设置为多,右侧飞行对象类型的基数设置为一,这意味着飞行对象类型与飞行传感器对象类型之间存在一对多关系。 - 将
flight_id列设置为飞行传感器对象类型的外键,这将使flight_id成为飞行对象类型的主键。
了解更多关于链接类型的信息。
第四部分:配置传感器对象类型
在时间序列部分,确保传感器对象类型开关已开启。设置传感器链接以使用刚创建的飞行到飞行传感器链接。
-
将链接名称设置为
系列名称列。应用程序将在此系列名称下显示传感器对象数据。 -
通过选择传感器对象类型设置中的单位下拉菜单来配置单位。
是否为分类和内部插值可以从传感器对象类型的属性中推断,但本用例不需要这些设置。是否为分类仅在需要区分分类时间序列值和数值时间序列值时使用。
内部插值用于启用 Quiver 等应用程序推断相邻数据点之间的系列值。请查阅我们的Quiver 插值文档了解更多信息。
- 从屏幕右上角选择保存对对象类型的编辑,以查看本体和整个平台中的更改。
现在,您已准备好在实际操作环境中使用飞行传感器和飞行对象类型。继续阅读文档,了解如何在 Workshop 和 Quiver 中使用传感器对象类型时间序列数据。
:::callout{theme="neutral"}
本示例用例不需要配置是否为枚举?。应忽略是否已弃用和迷你图预览属性。
:::