Use commands as tools in AIP Chatbot Studio(在 AIP Chatbot Studio 中将命令作为工具使用)
You can add commands as tools to AIP chatbots, enabling the chatbot to interact with and act on behalf of a user in Palantir applications. Commands run directly in the user's application, giving them access to the current application state and screen. This enables integrations that traditional backend tools struggle to support. For example, the chatbot can use commands to navigate the user interface, like setting the view to a specific location on a map.
:::callout{theme="success"} You can also configure Workshop's Button Group, Metric Card, and App Pairing widgets to trigger operations in any application that produces commands. :::
Add command tools to an AIP Chatbot
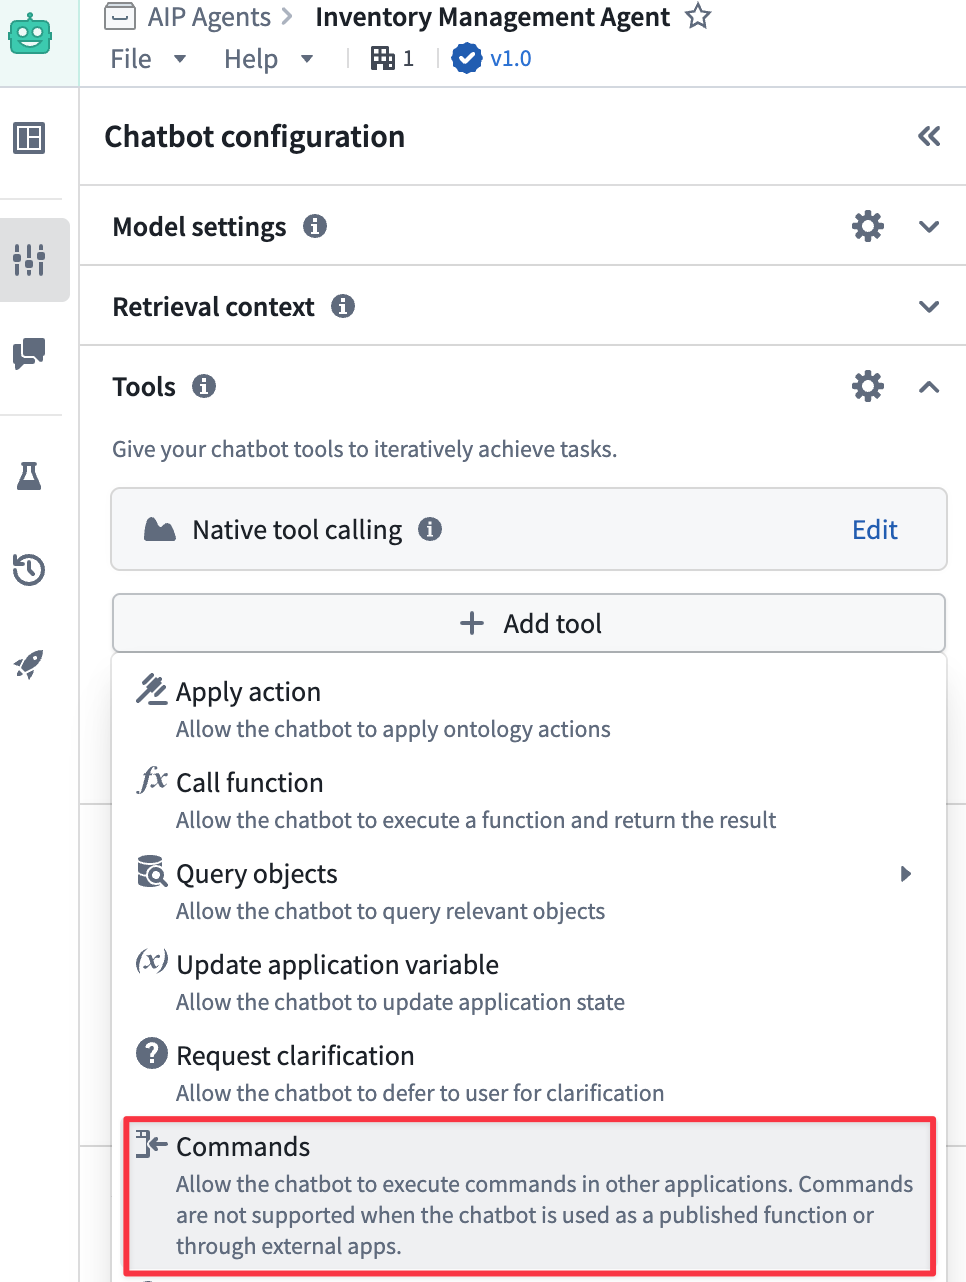
Chatbots can use commands as tools once an application declares and produces the command. To add commands as tools to a chatbot, select Add tool > Commands from the Chatbot configuration panel.
Search for and select one or multiple commands from the Search commands... modal. You can select a command multiple times if you need to configure distinct prompts for each instance of that command. Add the selected commands to your chatbot and apply configurations as needed.
:::callout{theme="neutral"} AIP Chatbots that use commands as tools have a retention window that is automatically set to expire after 24 hours of inactivity. :::
Configure command tools [Beta]
:::callout{theme="neutral"} The ability to configure a command used as a chatbot tool is in the beta phase of development. Its supporting interface may change during active development. Contact Palantir Support with questions about configuring commands as tools in AIP Chatbot Studio. :::
After you add one or multiple commands as tools to your chatbot, you can select a command to open a modal with additional configurations the chatbot uses to inform its actions. Select Show more to render additional documentation to help you learn more about each tool's optional configuration settings, such as its input parameters and expected behavior when invoked.

Review the sections below to learn more about additional configuration options.
Additional descriptions
Provide command-specific context in addition to the default documentation made available to help the chatbot's backing model understand the action it will execute. While each command contains default documentation that helps the chatbot use it as a tool, you can provide more detail in Additional documentation to help the chatbot decide precisely when and how it should call the tool. As an example, you can instruct the Remove all features command to remove ephemeral features before drawing a new one if the existing features are not related to the new in a certain manner.
Input parameters
Some commands accept input parameters when you configure them as a tool. Use Input parameters to set input values for command parameters, such as Fill pattern or Stroke width for the Draw polygon command.
By default, the chatbot determines the value of all required parameters based on your Instructions and the user's prompt. For optional parameters, the chatbot may optionally determine the value based on your Instructions and the user's prompt.
To override the default behavior, select Add parameter override, choose the parameter you want to override, and configure it using one of the following override options:
- Chatbot decides (default): The chatbot determines the value. This is the default behavior.
- Preset values: Hard-code a static value to consistently use the same value as an input parameter.
- Application variable: Use a preconfigured string or object set variable.
- Don't pass the parameter to chatbot: Instruct the chatbot not to provide a value for an optional parameter. This option is available for optional parameters only.
Asks for user approval before execution
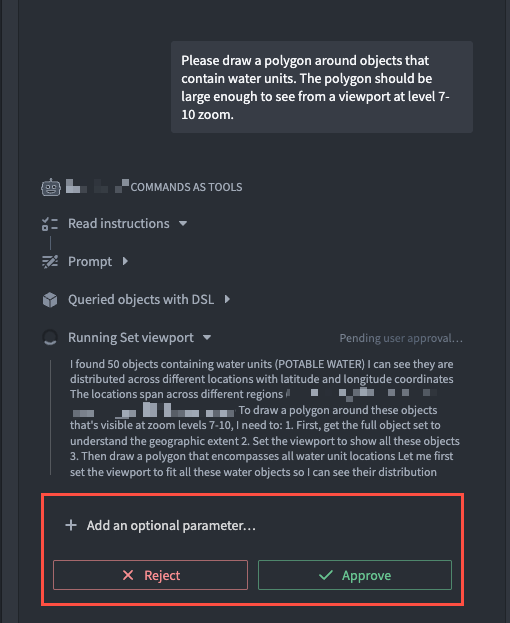
Enabled by default, your chatbot will ask a user to review the command payload data and either Reject or Approve the command's action or output from their prompt before the command is executed. When disabled, your chatbot will execute commands based on a user's prompt without manual approval intervention.
Test an AIP Chatbot's ability to use commands as tools
After you configure your commands in AIP Chatbot Studio, you can follow the instructions below to test your chatbot and validate its configurations before you save and publish to make it available in production applications:
- In a separate browser window, open the application that produces your chatbot's command tool(s) and arrange it next to a window containing your chatbot in AIP Chatbot Studio.
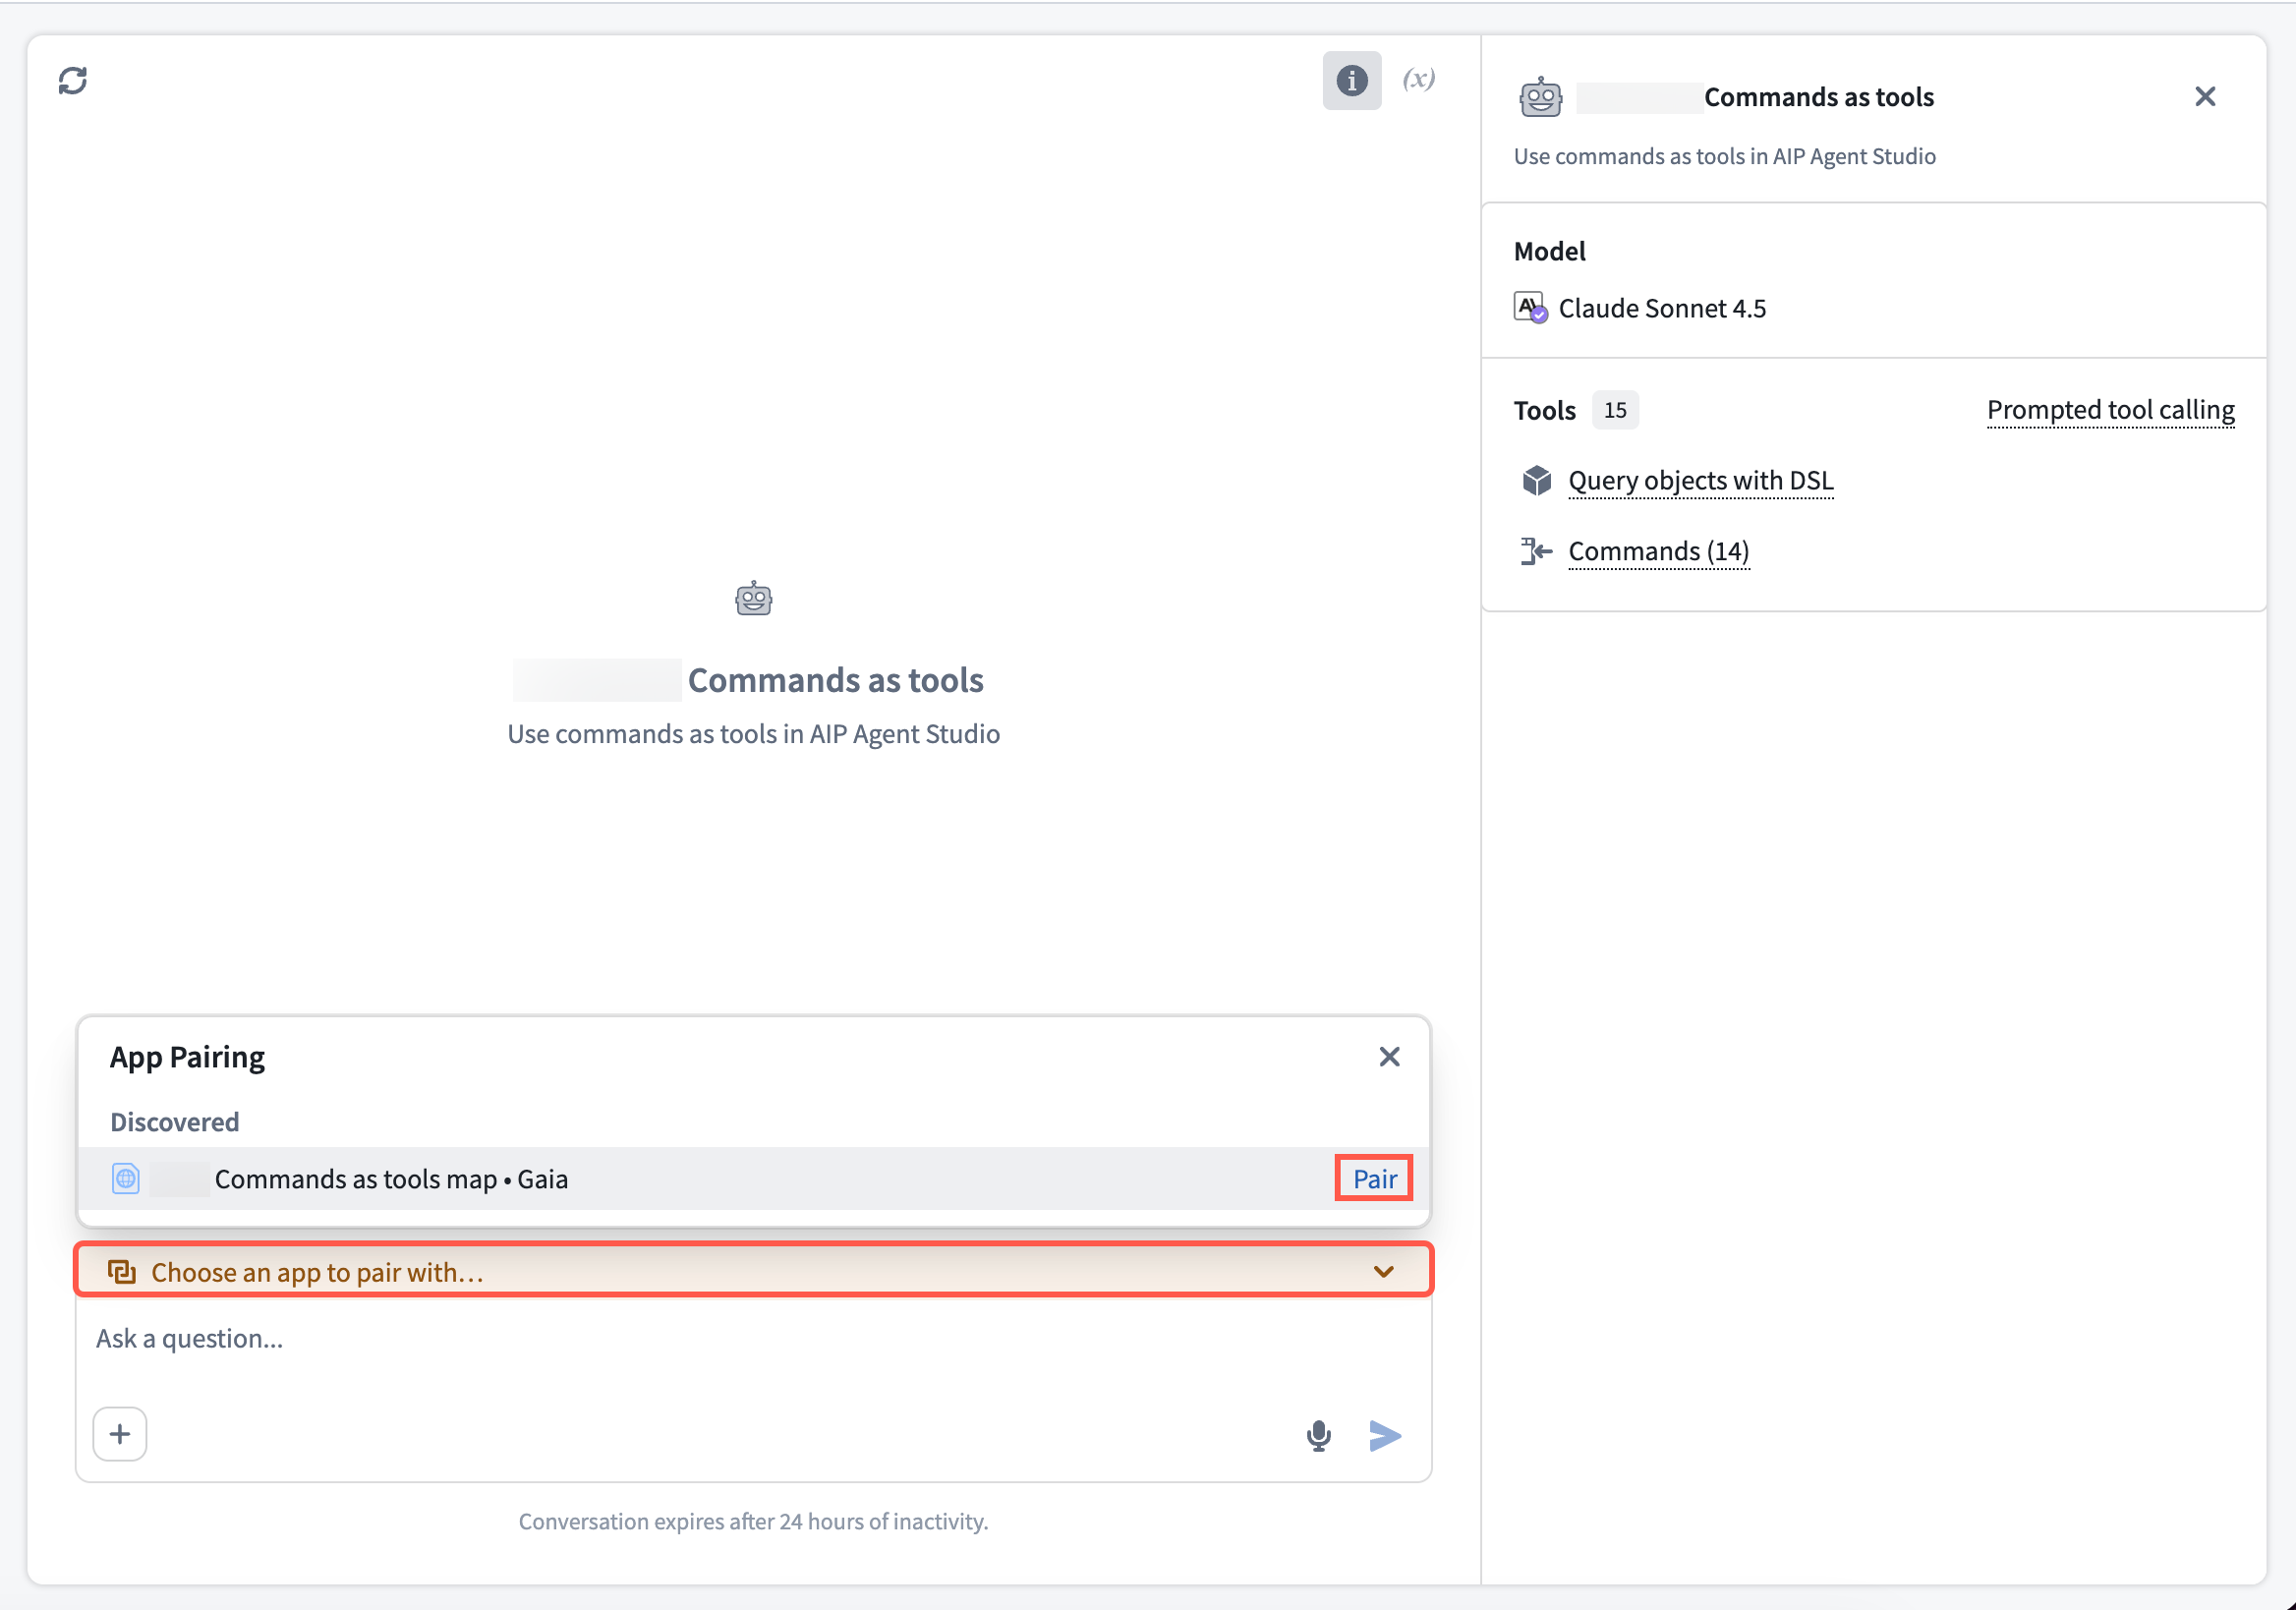
- Select Choose an app to pair with... > Pair for the application launched in the separate browser window, such as a Gaia map.
- Enter prompts in your chatbot's chat input window to test its ability to use the commands you added as tools.
Once you are satisfied with your chatbot's configurations, publish the chatbot for use as an assistant embedded in AIP Assist or through Workshop within the AIP Chatbot widget.
:::callout{theme="neutral"} A chatbot will ignore commands as tools if you publish it as a function and execute it from an environment that does not support commands, such as configuring it to run within an automation built in Automate. Contact Palantir Support with questions about your environment. :::
Pair your chatbot with multiple applications
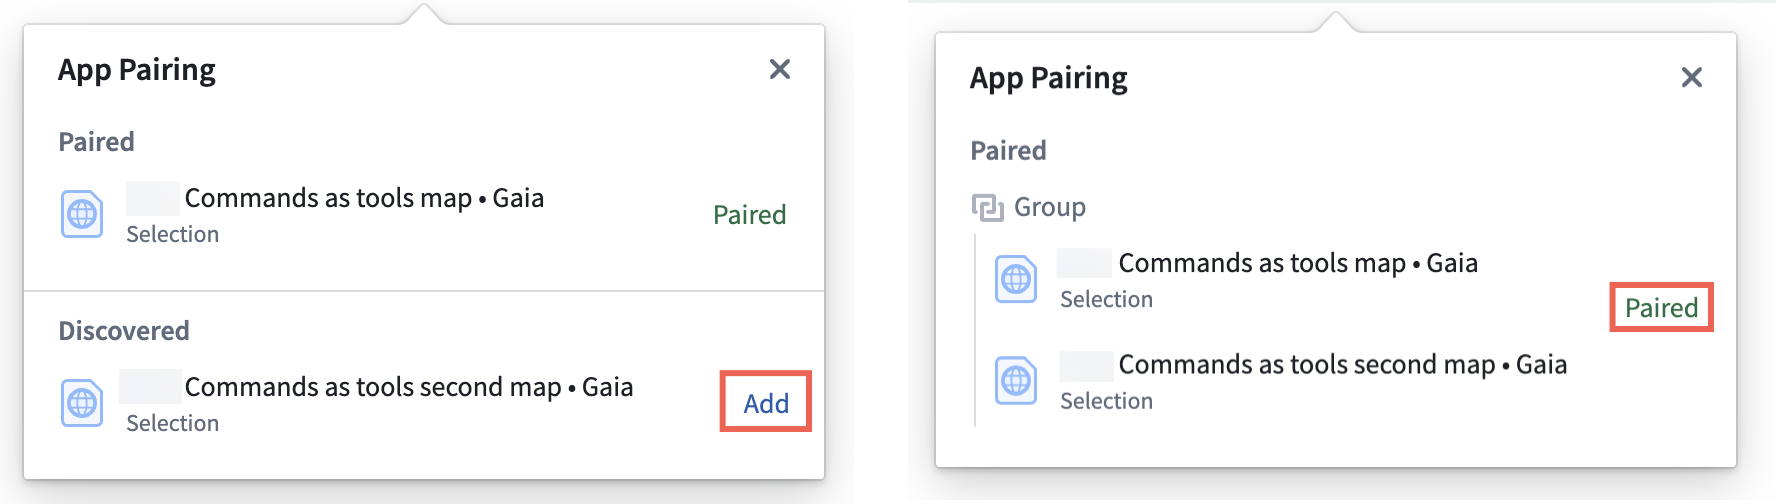
Through App Pairing, your chatbot will automatically discover other applications you have open in your browser. To pair your chatbot with multiple application instances, select Add next to the Discovered application to create a pairing Group.
If your chatbot is not paired with an application to execute a command, then it will prompt the user to select an application to pair.
Embed your chatbot in AIP Assist or Workshop
While you can use AIP Chatbot Studio with your paired application to test your chatbot's performance, you should embed the chatbot in a Workshop module or AIP Assist panel for a streamlined user experience. In both cases, the chatbot will automatically pair to the application with which it interacts.
Publish your chatbot to AIP Assist
To make your chatbot accessible to AIP Assist, choose the rocket icon on the left side of your screen in AIP Chatbot Studio to launch the Usage panel before selecting the AIP Assist toggle. Next, select Publish on the top right of your screen. This will deploy the latest published chatbot version to AIP Assist, after which you will be able to select it from the Chat with an AIP Chatbot menu in an AIP Assist chat panel.

Once you select the chatbot, AIP Assist will automatically pair with the target application, and all relevant commands configured as tools will target the application. If your chatbot contains tools for multiple applications but is not paired with those applications, then AIP Assist will prompt you to choose an application to pair in one of your open browser tabs.
Add your chatbot to Workshop
Use Workshop's AIP Chatbot widget to embed your chatbot in a module, where you can also use the Iframe widget to embed one or more applications within sections adjacent to the AIP Chatbot widget. An AIP Chatbot widget and an iframe-embedded application in a Workshop module will automatically pair, and all relevant commands you configure as tools will target the iframe-embedded application.
中文翻译
在 AIP Chatbot Studio 中将命令作为工具使用
您可以将命令添加为AIP 聊天机器人的工具,使聊天机器人能够在 Palantir 应用中代表用户进行交互和操作。命令直接在用户的应用中运行,使其能够访问当前的应用程序状态和界面。这实现了传统后端工具难以支持的集成。例如,聊天机器人可以使用命令来导航用户界面,比如将视图设置到地图上的特定位置。
:::callout{theme="success"} 您还可以配置 Workshop 的按钮组、指标卡片和应用配对小部件,以触发任何能产生命令的应用中的操作。 :::
向 AIP 聊天机器人添加命令工具
一旦应用声明并产生命令,聊天机器人就可以将命令作为工具使用。要将命令作为工具添加到聊天机器人,请从聊天机器人配置面板中选择添加工具 > 命令。
在搜索命令... 模态框中搜索并选择一个或多个命令。如果您需要为每个命令实例配置不同的提示,可以多次选择同一个命令。将选定的命令添加到聊天机器人,并根据需要应用配置。
:::callout{theme="neutral"} 使用命令作为工具的 AIP 聊天机器人具有自动设置的保留窗口,该窗口在 24 小时不活动后过期。 :::
配置命令工具 [测试版]
:::callout{theme="neutral"} 配置用作聊天机器人工具的命令的能力正处于测试版开发阶段。其支持界面在活跃开发期间可能会发生变化。如有关于在 AIP Chatbot Studio 中将命令配置为工具的问题,请联系 Palantir 支持。 :::
在将一个或多个命令作为工具添加到聊天机器人后,您可以选择一个命令以打开一个模态框,其中包含聊天机器人用于指导其操作的额外配置。选择显示更多以呈现更多文档,帮助您了解每个工具的可选配置设置,例如其输入参数和调用时的预期行为。
请查看以下部分以了解有关其他配置选项的更多信息。
额外描述
提供命令特定的上下文,补充帮助聊天机器人的底层模型理解其将要执行的操作的默认文档。虽然每个命令都包含帮助聊天机器人将其用作工具的默认文档,但您可以在额外文档中提供更多细节,以帮助聊天机器人精确决定何时以及如何调用该工具。例如,您可以指示移除所有要素命令在绘制新要素之前移除临时要素,前提是现有要素与新要素在某种方式上不相关。
输入参数
某些命令在配置为工具时接受输入参数。使用输入参数为命令参数设置输入值,例如绘制多边形命令的填充图案或描边宽度。
默认情况下,聊天机器人根据您的指令和用户的提示确定所有必需参数的值。对于可选参数,聊天机器人可能会根据您的指令和用户的提示选择性地确定值。
要覆盖默认行为,请选择添加参数覆盖,选择要覆盖的参数,并使用以下覆盖选项之一进行配置:
- 聊天机器人决定(默认): 聊天机器人确定值。这是默认行为。
- 预设值: 硬编码一个静态值,以一致地使用相同的值作为输入参数。
- 应用变量: 使用预配置的字符串或对象变量。
- 不向聊天机器人传递参数: 指示聊天机器人不为可选参数提供值。此选项仅适用于可选参数。
执行前请求用户批准
默认启用,您的聊天机器人会在执行命令前要求用户查看命令负载数据,并从其提示中选择拒绝或批准命令的操作或输出。禁用时,您的聊天机器人将根据用户的提示执行命令,无需手动批准干预。
测试 AIP 聊天机器人使用命令作为工具的能力
在 AIP Chatbot Studio 中配置命令后,您可以按照以下说明测试聊天机器人并验证其配置,然后再保存并发布以使其在生产应用中可用:
- 在单独的浏览器窗口中,打开生成聊天机器人命令工具的应用,并将其与包含 AIP Chatbot Studio 中聊天机器人的窗口并排排列。
- 选择选择要配对的应用... > 配对,用于在单独浏览器窗口中启动的应用,例如 Gaia 地图。
- 在聊天机器人的聊天输入窗口中输入提示,以测试其使用您添加为工具的命令的能力。
一旦对聊天机器人的配置满意,即可发布聊天机器人,作为嵌入在 AIP Assist 或通过 Workshop 中的AIP 聊天机器人小部件中的助手使用。
:::callout{theme="neutral"} 如果您将聊天机器人作为函数发布并从不支持命令的环境中执行它,例如将其配置为在Automate中构建的自动化中运行,则聊天机器人将忽略作为工具的命令。如有关于您环境的问题,请联系 Palantir 支持。 :::
将聊天机器人与多个应用配对
通过应用配对,您的聊天机器人将自动发现您在浏览器中打开的其他应用。要将聊天机器人与多个应用实例配对,请选择已发现应用旁边的添加以创建配对组。
如果您的聊天机器人未与执行命令的应用配对,则会提示用户选择要配对的应用。
将聊天机器人嵌入 AIP Assist 或 Workshop
虽然您可以使用 AIP Chatbot Studio 与配对的应用来测试聊天机器人的性能,但为了获得流畅的用户体验,您应将聊天机器人嵌入 Workshop 模块或 AIP Assist 面板中。在这两种情况下,聊天机器人将自动与与之交互的应用配对。
将聊天机器人发布到 AIP Assist
要使聊天机器人可在 AIP Assist 中访问,请在 AIP Chatbot Studio 中选择屏幕左侧的火箭图标以启动使用情况面板,然后选择AIP Assist切换开关。接下来,选择屏幕右上角的发布。这将把最新发布的聊天机器人版本部署到 AIP Assist,之后您将能够在 AIP Assist 聊天面板的与 AIP 聊天机器人聊天菜单中选择它。
选择聊天机器人后,AIP Assist 将自动与目标应用配对,所有配置为工具的相关命令将针对该应用。如果您的聊天机器人包含多个应用的工具但未与这些应用配对,则 AIP Assist 将提示您选择要在打开的浏览器标签页中配对的应用。
将聊天机器人添加到 Workshop
使用 Workshop 的AIP 聊天机器人小部件将聊天机器人嵌入模块中,您还可以使用Iframe小部件将一个或多个应用嵌入到与 AIP 聊天机器人小部件相邻的部分中。Workshop 模块中的 AIP 聊天机器人小部件和 iframe 嵌入的应用将自动配对,您配置为工具的所有相关命令将针对 iframe 嵌入的应用。