Train models with GPUs(使用 GPU 训练模型)
This page outlines the process of leveraging GPU resources when training machine learning models in Foundry. GPU acceleration can significantly reduce training time for deep learning models and other compute-intensive algorithms. The recommended method for training models with GPUs in Foundry is to use a Jupyter® code workspace with one or more GPUs configured.
Prerequisites
Only jobs originating in projects with an assigned GPU resource queue can use GPUs. You can check whether your project has a configured resource queue by selecting the flag icon in the right sidebar of the project file tree view, as shown below.
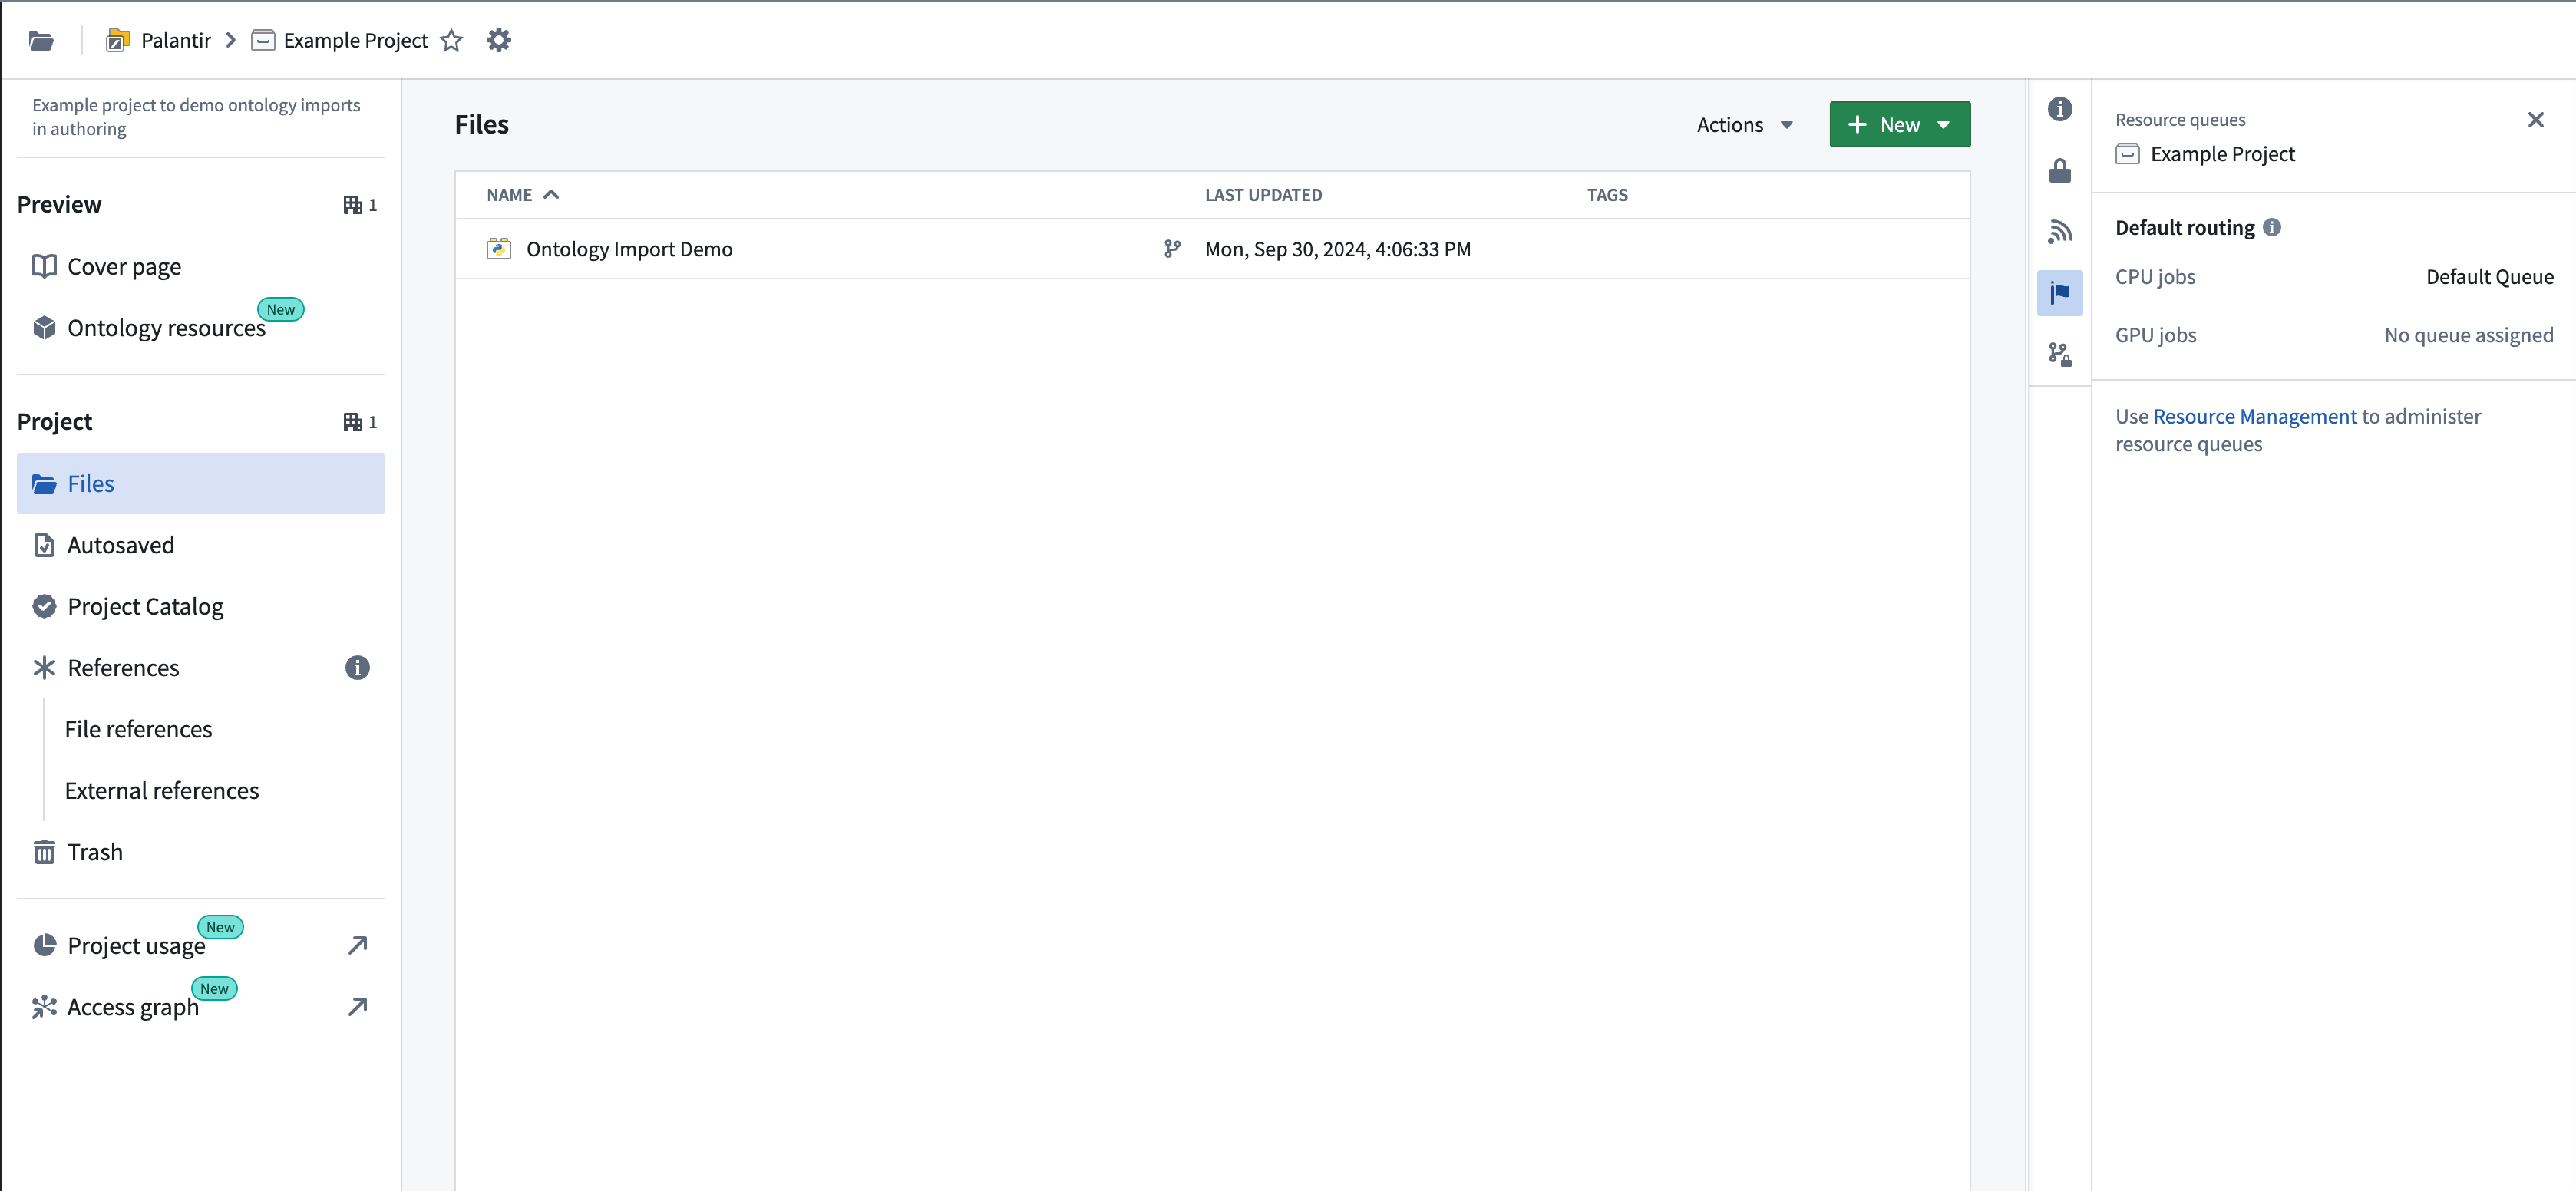
Resource management administrators have the required permissions to assign resource queues to projects. This group of users can be configured in Control Panel. Resource queues can be assigned in the Resource Management application, accessible from the Applications section in the left sidebar, or by selecting the link shown in the example above. If you are not part of this group, contact your Palantir administrator or Palantir representative to enable GPUs for your project by submitting a Foundry Issue.
For details on supported GPU types and how GPUs affect compute usage, refer to the Code Workspaces or Code Repositories compute usage documentation. Note that not all GPU types listed in the documentation may be available for your enrollment depending on your hosting configuration. Your enrollment may not have any available GPU types. Contact Palantir Support to enable any GPU types not currently available on your enrollment.
Use a GPU in Jupyter® and VS Code Workspaces
GPUs can be requested from the Settings menu in the Code Workspaces sidebar in either VS Code or Jupyter® workspaces:
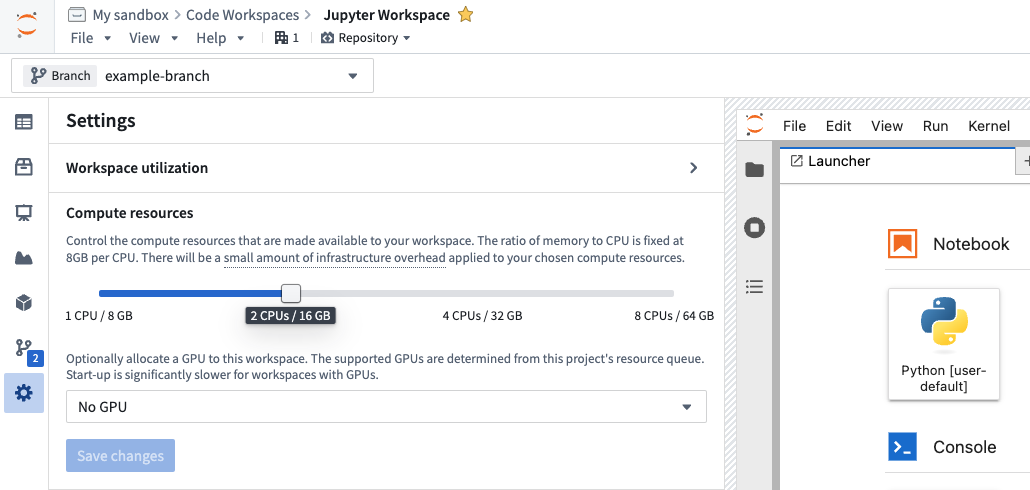
To obtain an environment with a GPU-enabled version of TensorFlow, PyTorch, or similar packages, you can install the package in a code workspace containing a GPU.
The following steps outline how to successfully set up GPUs in Code Workspaces:
- Start a code workspace and enable a GPU in the Settings menu.
- Install your desired machine learning library, for example, TensorFlow or PyTorch, using Maestro or the Libraries sidebar after a GPU has been added to the workspace.
- Verify that the GPU-enabled version of the package is installed. Review the verification steps below for more details on how to verify.
- If necessary, reset or update your environment to ensure that a GPU-enabled build is installed. Review the troubleshooting section below for more information.
Troubleshooting
This section provides a quick reference for issues that are commonly encountered with GPU-enabled packages in Python. Review the Python library considerations below for more information.
CPU-only packages are installed instead of GPU packages
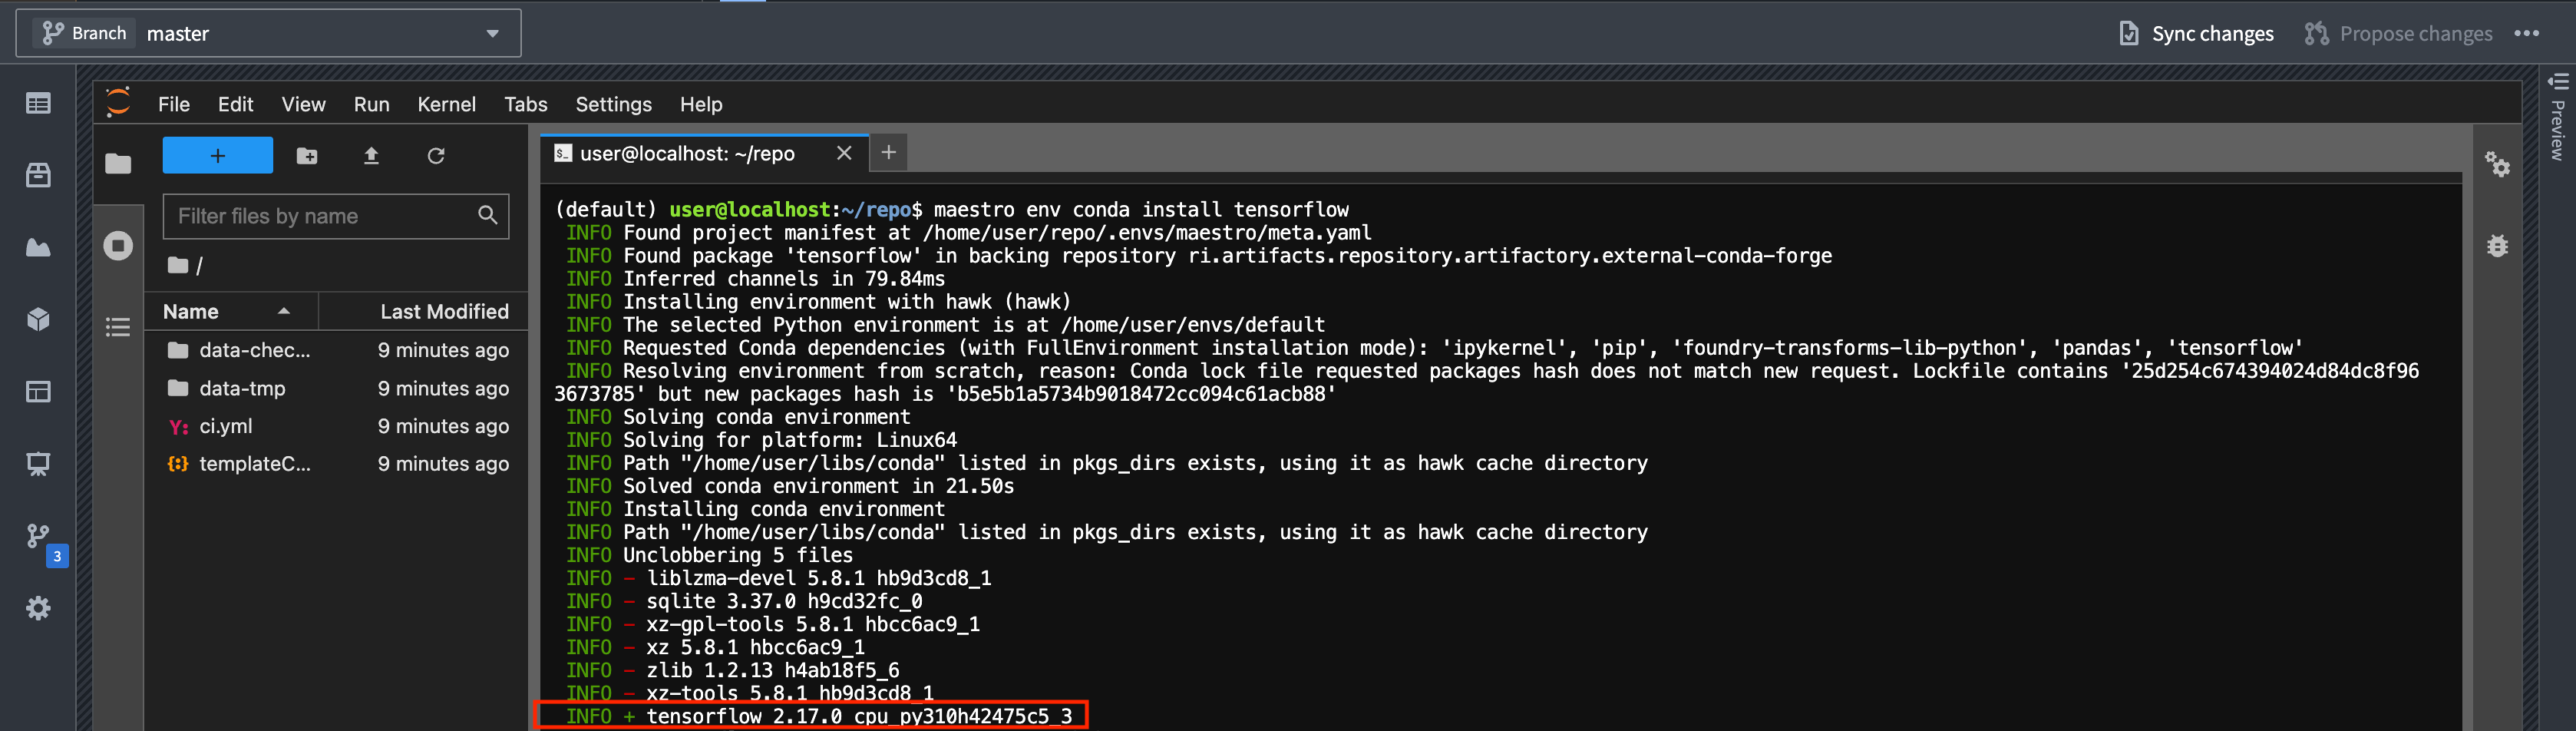
Installing packages like TensorFlow before a GPU is configured is a common mistake. If this happens, the CPU-only version of the library will be installed. You can check the build string in your lockfile or installation logs to see if this is the case for your workspace. GPU-enabled builds contain cuda in the name, while CPU-only builds contain cpu.
Solution: Install the package after the GPU has been added to the workspace, or reset the environment once a GPU has been added.
Details: When installing TensorFlow or similar libraries in a workspace without a GPU, Conda resolves to a CPU-only build variant. The build string will contain cpu like so: cpu_py310heba74a3_3. In contrast, a GPU-enabled version will have cuda in the build string, for example: tensorflow-2.17.0-cuda120py310heb3ae67_203. Below is an example of logs as the packages are installed:
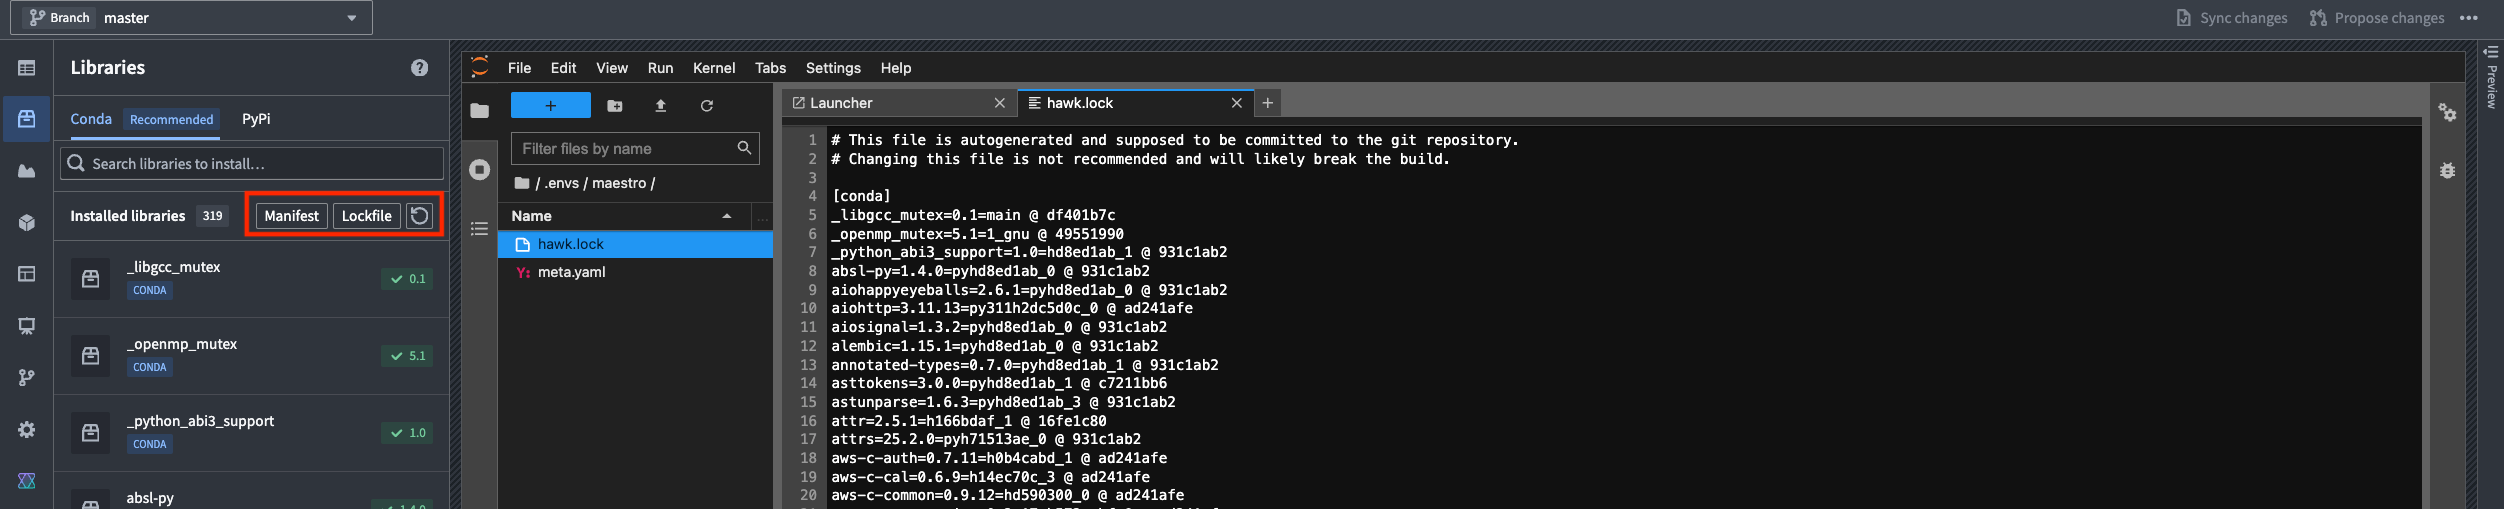
You can also check which build was installed by viewing the Lockfile from the Libraries sidebar in Jupyter. In VS Code, the lockfile is located under .maestro/hawk.lock. Editing meta.yaml or hawk.lock files directly is not supported and can cause issues; always use the Libraries sidebar or Maestro commands.
Unsolvable environment error: CUDA cannot be installed because there are no viable options
Attempting to force the installation of a GPU-enabled package, for example, tensorflow=2.17.0=*cuda* without a GPU present will fail with an unsolvable environment error referencing __cuda.
Solution: Add a GPU to the workspace and then install the package.
Details: If you try to force-install a GPU-enabled version of a package by specifying the build string in a workspace without a GPU, conda will fail to resolve dependencies due to the absence of the __cuda virtual package. Below is an example of a command attempting to force-install a a GPU-enabled version of a package:
maestro env conda install tensorflow=2.17.0=*cuda*
You will see the following error message:
ERROR ❌  Unsolvable environment error: ["tensorflow ==2.17.0 *cuda* cannot be installed because there are no viable options:
└─ tensorflow 2.17.0 | (...) | 2.17.0 would require
└─ __cuda *, for which no candidates were found."]
Adding a GPU to the workspace does not trigger a new environment solve
If you add a GPU after installing a CPU-only package, the environment will not automatically update to the GPU-enabled version of installed packages.
Solution: Reinstall the package after a GPU has been added, or reset the environment using the following command:
maestro env reset --hard
Alternatively, add or remove a dependency to trigger a new environment solve.
Details: When a GPU is added to a workspace where a CPU-only version of a package is already installed, the environment restore process uses the existing lock file, which still satisfies the original cpu-only constraints. As a result, the GPU-enabled version of installed packages will not be installed automatically. To get the GPU-enabled version, you must reinstall the package after a GPU is added, reset the environment to force a new solve, or change the dependencies to invalidate the lock file. Deleting the lock file manually is not recommended; always use supported commands to manage the environment.
Use a GPU in Code Repositories
The recommended method for using GPUs in Python transforms is to use the lightweight decorator. You can specify the type of GPU as described in the lightweight API documentation:
import torch  # Remember to add pytorch and pytorch-gpu to your meta.yaml file
import logging
from transforms.api import transform, Output, lightweight, LightweightOutput

@lightweight(gpu_type='NVIDIA_T4')
@transform(out=Output('/Project/folder/output'))
def compute(out: LightweightOutput):
    logging.info(torch.cuda.get_device_name(0))
To use a GPU in a Python transform that uses Spark, import the DRIVER_GPU_ENABLED and/or EXECUTOR_GPU_ENABLED profiles into your project and use them in your code repository. This does not require specifying a GPU type and will simply use the GPU type available in the project's resource queue. Learn more about importing Spark profiles.
Unless your code or the library you are using supports distributing inference or training over Spark, you need to make sure that your code can handle tasks such as distributing model training and inference work to the executors.
:::callout{theme="neutral" title="Prefer lightweight to driver-only Spark jobs"} Using lightweight transforms is the more performant option compared to using Spark with a driver-only profile. Spark introduces overhead for distributing work and converting Spark DataFrames into Python objects, such as the Pandas DataFrames that your model likely expects. We recommend avoiding Spark transforms by using the lightweight decorator, unless you want to distribute work to executors, or your model can natively use Spark DataFrames. An exception to this is running a model as a container, as described in the section below. Note that running a model as a container is only supported in Spark transforms, and not in lightweight transforms. :::
Install GPU-enabled packages in Code Repositories
:::callout{theme="warning"} The instructions below only apply to repositories managed within the Palantir platform's Code Repositories user interface. To use GPU-enabled packages within browser-based VS Code, refer to the code workspaces instructions above. :::
In Code Repositories, the conda environment solve process that produces the environment specifications and the actual build run on different servers. The servers that perform the conda solve do not have a GPU and cannot be configured to use one. Instead, Foundry allows users to specify which CUDA version they would like to run by using the CONDA_OVERRIDE_CUDA environment variable as recommended in the conda documentation on virtual packages ↗. To set this up, select the cog icon in your repository, toggle Show hidden files and folders, locate the most nested build.gradle file, and add the lines below. You will also need to specify that you want a GPU-enabled package by installing pytorch-gpu, tensorflow-gpu or using a build string constraint as mentioned above.
:::callout{theme="neutral" title="Check your maximum supported CUDA version"}
To determine the maximum CUDA version supported by your GPU, run the nvidia-smi command in a code workspace terminal with a GPU enabled. The CUDA version will be displayed in the top-right corner of the output, indicating the maximum supported CUDA version; you can use any CUDA version up to and including this version. Choose a CUDA version that is compatible with both your GPU and your machine learning framework. For more information, review the framework documentation links in the Gradle code snippet below.
:::
// CUDA setup
tasks.runVersions {
// 11.8 is just an example, use the latest supported
// CUDA version for your model training framework version
// and GPU/driver.
// See https://www.tensorflow.org/install/source#gpu for tensorflow
// and https://pytorch.org/get-started/locally/ under linux for pytorch.
    environment("CONDA_OVERRIDE_CUDA", "11.8")
}
tasks.condaPackRun {
    environment("CONDA_OVERRIDE_CUDA", "11.8")
}
:::callout{theme="warning"}
Do not add this snippet in the top-level build.gradle file. Add it in one of the folders outlined below based on the template used to create the repository:
- The
transforms-pythonfolder: When using a repository created from the transforms template. - The
transformers-model-trainingfolder: When using a repository created from the model template. :::
To see the installed packages in a code repository, review the conda-versions.run.linux-64.lock hidden file or navigate to the checks logs, which list the package versions used.
:::callout{theme="neutral"} Note that GPUs are not available when previewing your transform, which could result in different behavior than what you would expect when running a build. :::
Python library considerations
GPU-enabled packages in conda
:::callout{theme="neutral" title="Conda in Foundry"}
We recommend managing Python environments using conda rather than PyPI and Pip, since conda does not allow packages with incompatible dependencies to be installed. In the case of a conflict, conda will throw an error and refuse to install conflicting packages. This ensures that the Python libraries leveraged by Foundry for core functionalities such as transforms-python or palantir_models keep working no matter what packages the user tries to install.
:::
Machine learning libraries such as tensorflow or pytorch typically publish CPU-only versions of their packages to avoid unnecessary downloads of the heavy binaries required for GPU training, such as CUDA. It is important to make sure that you have installed the CUDA-enabled version of a library. Otherwise, the library will fail to detect and use the GPU, and model training will run exclusively on the CPU.
Conda checks the GPU(s) installed on the source system to determine what version of the package to install. If there are no GPUs on the system, conda will select a CPU-only build of the package for installation. Trying to force the installation of a GPU-enabled package by specifying a particular build version will make conda's dependency resolution fail due to the lack of GPU on the system through the __cuda virtual package, as explained in the conda-forge documentation ↗. The sections above go over Code Workspaces and Code Repositories examples to better understand the implications of this, and how to work with GPUs in Foundry.
Pip
If needed, you can also install packages using pip in Code Repositories and Code Workspaces. Note that this will install pip packages and their dependencies on top of the existing conda environment, ignoring any dependency requirements from your conda packages.
Verify GPU usage
GPU usage in PyTorch
To verify that PyTorch is using the GPU and confirm that it speeds up operations, run the following code in a Jupyter® code workspace or code repository. Note that the speedup displayed may not be representative of the results you might get for model training in practice.
import torch
import time
import logging

logger = logging.getLogger(__name__)

A_cpu = torch.randn(5000, 5000)
B_cpu = torch.randn(5000, 5000)
start_time = time.time()
C_cpu = torch.matmul(A_cpu, B_cpu)
cpu_time = time.time() - start_time
logger.warning(f"CPU execution time: {cpu_time:.4f} seconds")

if torch.cuda.is_available():
    A_gpu = torch.randn(5000, 5000, device='cuda')
    B_gpu = torch.randn(5000, 5000, device='cuda')

    # Warm-up run to initialize the GPU
    _ = torch.matmul(A_gpu, B_gpu)
    torch.cuda.synchronize()

    # Actual benchmark
    start_time = time.time()
    C_gpu = torch.matmul(A_gpu, B_gpu)
    torch.cuda.synchronize()  # Waiting for GPU computation to finish
    gpu_time = time.time() - start_time

    logger.warning(f"GPU execution time: {gpu_time:.4f} seconds")
    logger.warning(f"GPU speedup: {cpu_time/gpu_time:.2f}x faster")
Inspect GPU usage
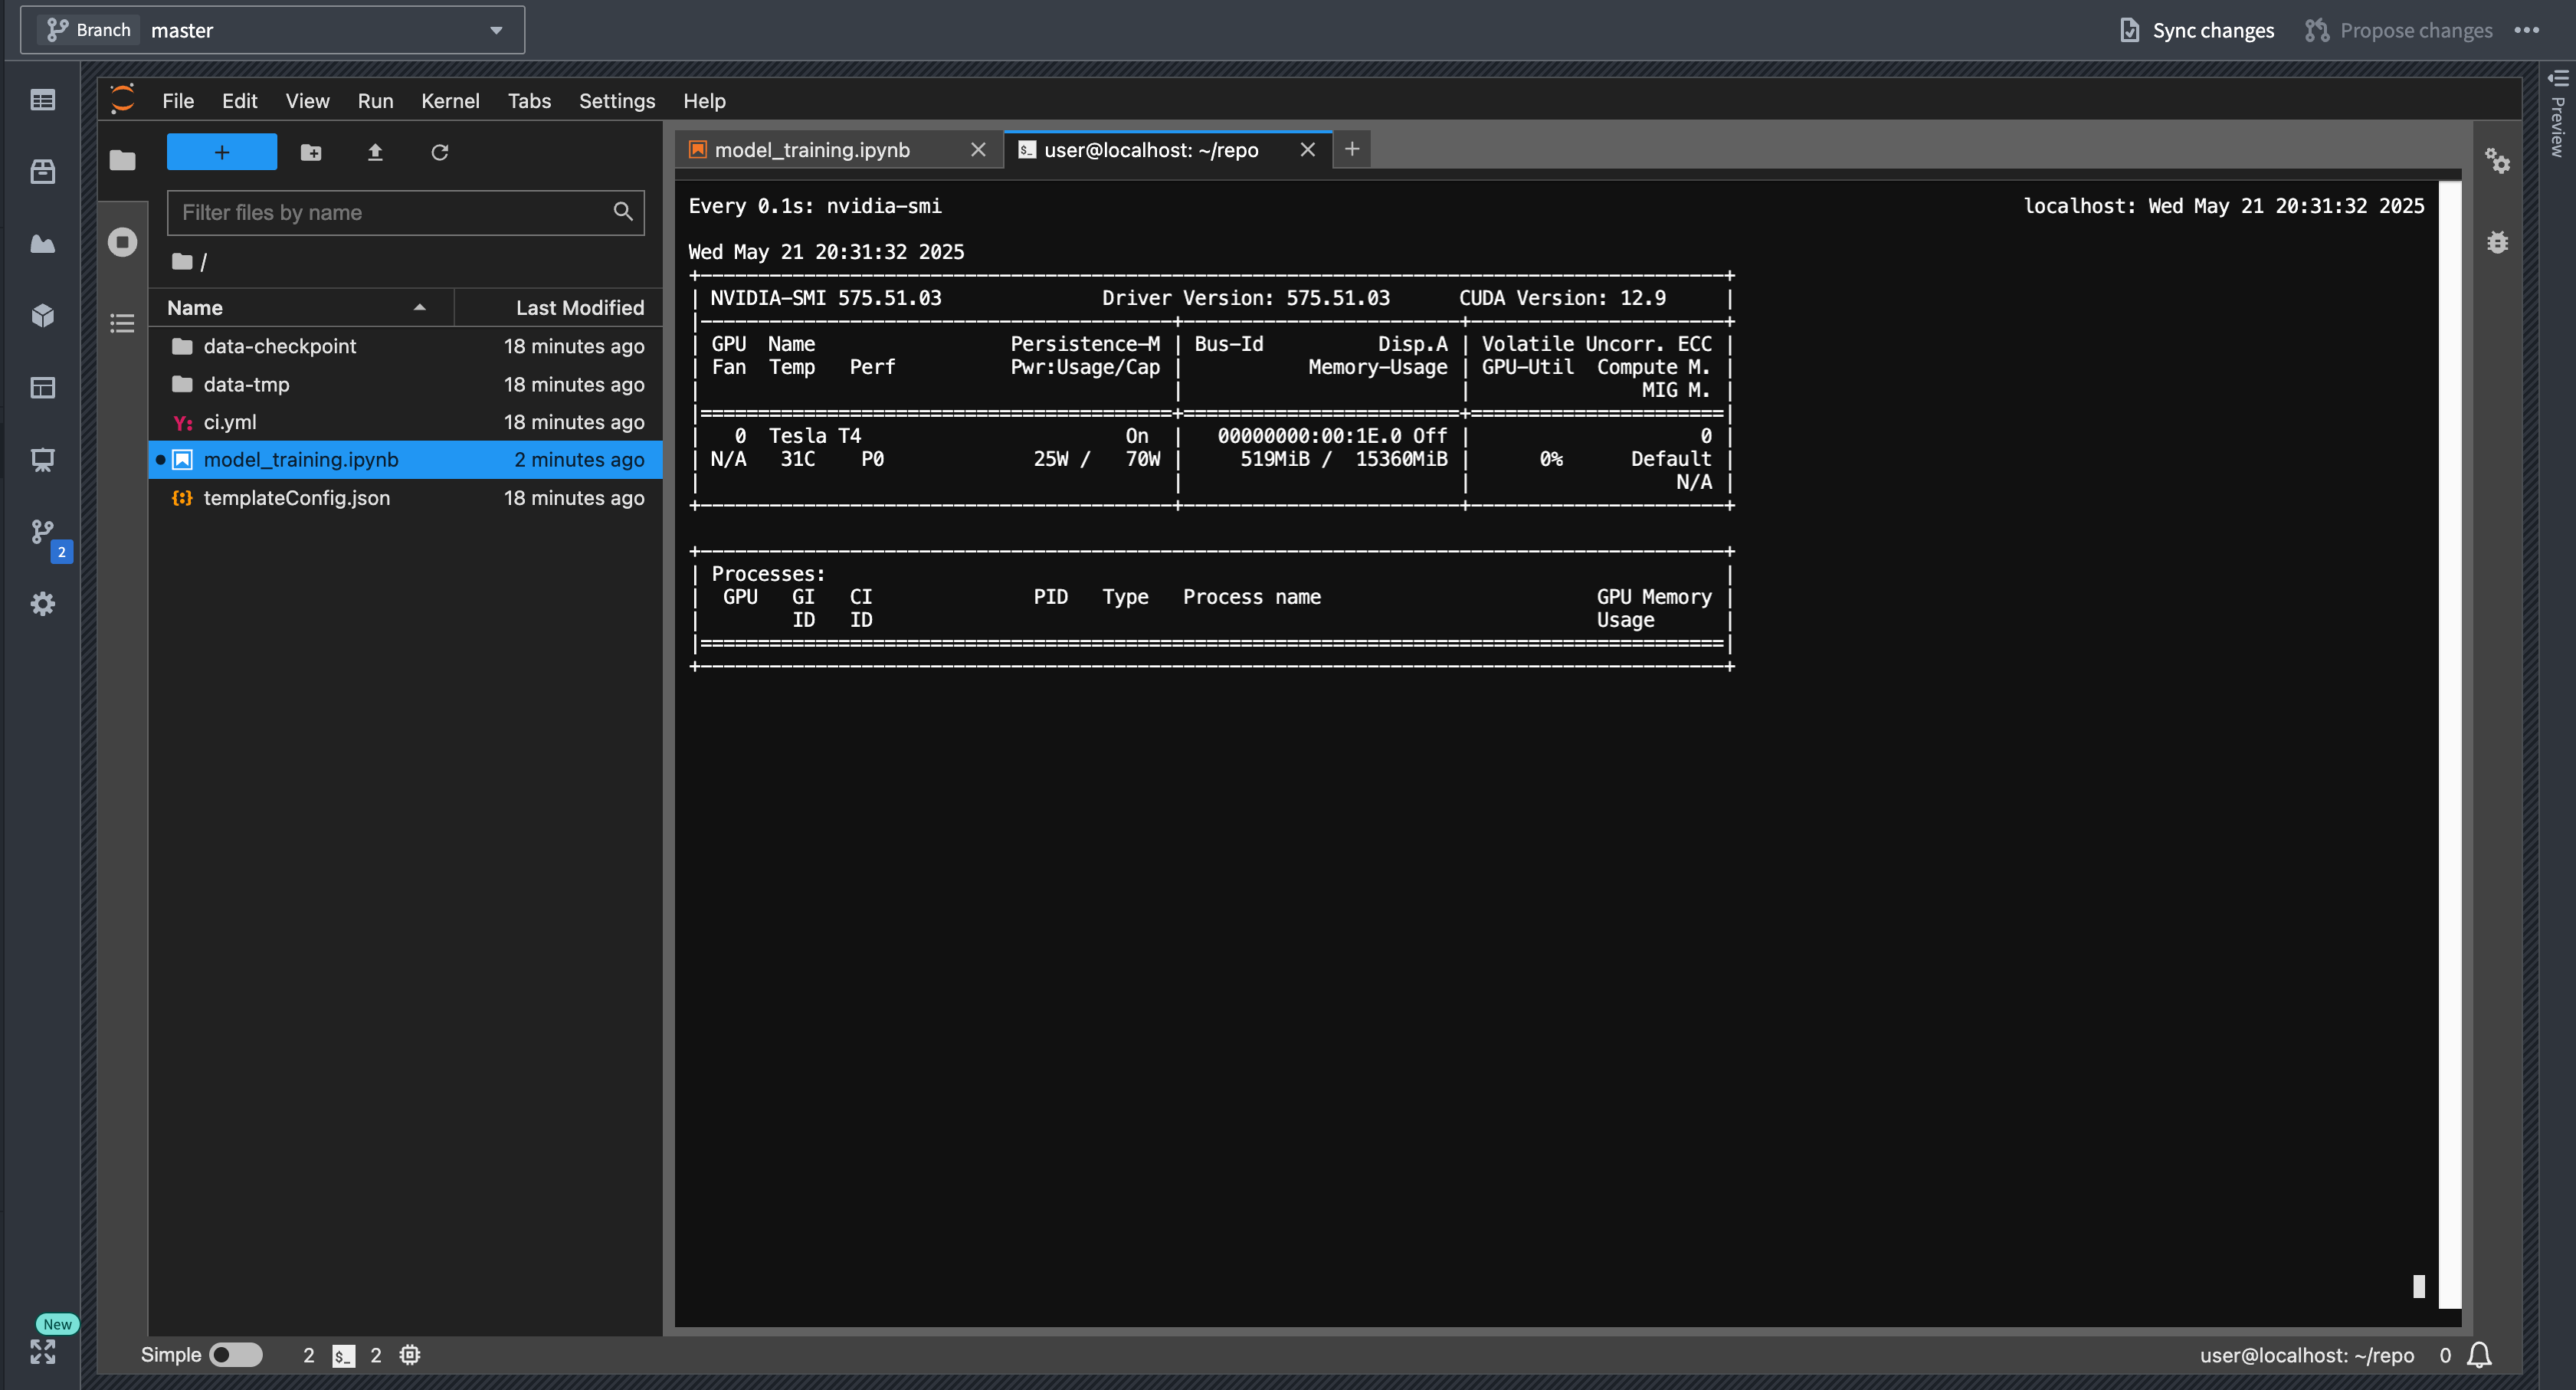
You can monitor GPU usage in real-time using the nvidia-smi command in the console. This command provides detailed information about GPU utilization, memory usage, and running processes.
- Open a terminal in JupyterLab® by selecting the + icon in the file browser and selecting Terminal.
- Run the
watch -n0.2 nvidia-smicommand to get a continuously updating picture of current GPU utilization:
Run inference with sidecar when using GPUs
When a model is not produced by the repository that it is imported to, and this repository is running inference, the model's Python dependencies need to be imported and resolved against the repositories' dependencies. This can cause issues such as the model's libraries being resolved to different versions, or errors arising due to dependency conflicts. This is particularly tricky when complex GPU-enabled dependencies are involved.
In this case, we recommend setting use_sidecar=True in the ModelInput class. This runs a container along with each executor and driver that loads the model with the required Python environment. A GPU can be requested on the sidecar container(s) using the sidecar_resources argument as shown in the example below:
from transforms.api import transform, Input, Output, configure, LightweightInput, LightweightOutput
from palantir_models.transforms import ModelInput
from palantir_models import ModelAdapter

# Using use_sidecar=True with @transform.using requires palantir_models version 0.2010.0 or higher.
@transform.using(
    inference_output=Output("path_to_output"),
    inference_input=Input("path_to_input"),
    model=ModelInput(
        "path_to_model",
        use_sidecar=True,
        sidecar_resources={"gpus": 1, "cpus": 3.4, "memory_gb": 16}
    ),
)
def compute(
        inference_output: LightweightOutput,
        inference_input: LightweightInput,
        model: ModelAdapter
    ):
    inference_results = model.transform(inference_input)
    inference = inference_results.df_out
    inference_output.write_pandas(inference)
中文翻译
使用 GPU 训练模型
本页概述了在 Foundry 中训练机器学习模型时利用 GPU 资源的流程。GPU 加速可以显著减少深度学习模型及其他计算密集型算法的训练时间。在 Foundry 中使用 GPU 训练模型的推荐方法是使用配置了一个或多个 GPU 的 Jupyter® 代码工作台。
前提条件
只有源自已分配 GPU 资源队列 的项目中的作业才能使用 GPU。您可以通过选择项目文件树视图右侧边栏中的旗帜图标来检查您的项目是否已配置资源队列,如下所示。
资源管理管理员 拥有为项目分配资源队列所需的权限。可以在控制面板中配置此用户组。资源队列可以在资源管理应用程序中分配,该应用程序可通过左侧边栏的 应用程序 部分访问,或通过选择上例中显示的链接进行访问。如果您不属于此用户组,请联系您的 Palantir 管理员或 Palantir 代表,通过提交 Foundry 问题 为您的项目启用 GPU。
有关支持的 GPU 类型以及 GPU 如何影响计算使用量的详细信息,请参阅 代码工作台 或 代码仓库 的计算使用量文档。请注意,根据您的托管配置,文档中列出的 GPU 类型可能并非全部可用于您的注册环境。您的注册环境可能没有任何可用的 GPU 类型。请联系 Palantir 支持以启用当前在您的注册环境中不可用的任何 GPU 类型。
在 Jupyter® 和 VS Code 工作台中使用 GPU
可以从代码工作台侧边栏的 设置 菜单中请求 GPU,无论是在 VS Code 还是 Jupyter® 工作台中:
要获得包含支持 GPU 的 TensorFlow、PyTorch 或类似包的环境,您可以在包含 GPU 的代码工作台中安装该包。
以下步骤概述了如何在代码工作台中成功设置 GPU:
- 启动一个代码工作台,并在 设置 菜单中启用 GPU。
- 使用 Maestro 或 库 侧边栏,在 GPU 添加到工作台之后,安装您所需的机器学习库,例如 TensorFlow 或 PyTorch。
- 验证是否安装了支持 GPU 版本的包。有关如何验证的更多详细信息,请查看下面的验证步骤。
- 如有必要,重置或更新您的环境,以确保安装了支持 GPU 的构建版本。有关更多信息,请查看下面的故障排除部分。
故障排除
本节提供 Python 中支持 GPU 的包常见问题的快速参考。有关更多信息,请查看下面的 Python 库注意事项。
安装了仅 CPU 的包而非 GPU 包
在配置 GPU 之前安装 TensorFlow 等包是一个常见错误。如果发生这种情况,将安装该库的仅 CPU 版本。您可以检查锁定文件或安装日志中的构建字符串,以确定您的工作台是否属于这种情况。支持 GPU 的构建版本名称中包含 cuda,而仅 CPU 的构建版本名称中包含 cpu。
解决方案: 在 GPU 添加到工作台之后安装该包,或者在添加 GPU 后重置环境。
详细信息: 在没有 GPU 的工作台中安装 TensorFlow 或类似库时,Conda 会解析为仅 CPU 的构建变体。构建字符串将包含 cpu,例如:cpu_py310heba74a3_3。相比之下,支持 GPU 的版本构建字符串中将包含 cuda,例如:tensorflow-2.17.0-cuda120py310heb3ae67_203。以下是安装包时的日志示例:
您还可以通过从 Jupyter 的 库 侧边栏查看 锁定文件 来检查安装了哪个构建版本。在 VS Code 中,锁定文件位于 .maestro/hawk.lock。不支持直接编辑 meta.yaml 或 hawk.lock 文件,这可能会导致问题;请始终使用 库 侧边栏或 Maestro 命令。
无法解决的环境错误:无法安装 CUDA,因为没有可行的选项
在没有 GPU 的情况下尝试强制安装支持 GPU 的包,例如 tensorflow=2.17.0=*cuda*,将失败并出现引用 __cuda 的无法解决的环境错误。
解决方案: 向工作台添加 GPU,然后安装该包。
详细信息: 如果您尝试通过在没有 GPU 的工作台中指定构建字符串来强制安装支持 GPU 版本的包,由于缺少 __cuda 虚拟包,conda 将无法解析依赖关系。以下是尝试强制安装支持 GPU 版本的包的命令示例:
maestro env conda install tensorflow=2.17.0=*cuda*
您将看到以下错误消息:
ERROR ❌  Unsolvable environment error: ["tensorflow ==2.17.0 *cuda* cannot be installed because there are no viable options:
└─ tensorflow 2.17.0 | (...) | 2.17.0 would require
└─ __cuda *, for which no candidates were found."]
向工作台添加 GPU 不会触发新的环境解析
如果您在安装仅 CPU 的包之后添加 GPU,环境不会自动更新为已安装包的支持 GPU 版本。
解决方案: 在 GPU 添加之后重新安装该包,或使用以下命令重置环境:
maestro env reset --hard
或者,添加或删除一个依赖项以触发新的环境解析。
详细信息: 当向已安装仅 CPU 版本包的工作台添加 GPU 时,环境恢复过程会使用现有的锁定文件,该文件仍然满足原始的仅 CPU 约束。因此,已安装包的支持 GPU 版本不会自动安装。要获得支持 GPU 的版本,您必须在添加 GPU 之后重新安装该包,重置环境以强制进行新的解析,或更改依赖项以使锁定文件失效。不建议手动删除锁定文件;请始终使用受支持的命令来管理环境。
在代码仓库中使用 GPU
在 Python 转换(transform)中使用 GPU 的推荐方法是使用轻量级装饰器。您可以按照轻量级 API 文档中的描述指定 GPU 类型:
import torch  # 记得将 pytorch 和 pytorch-gpu 添加到您的 meta.yaml 文件中
import logging
from transforms.api import transform, Output, lightweight, LightweightOutput

@lightweight(gpu_type='NVIDIA_T4')
@transform(out=Output('/Project/folder/output'))
def compute(out: LightweightOutput):
    logging.info(torch.cuda.get_device_name(0))
要在使用 Spark 的 Python 转换 中使用 GPU,请将 DRIVER_GPU_ENABLED 和/或 EXECUTOR_GPU_ENABLED 配置文件导入到您的项目中,并在您的代码仓库中使用它们。这不需要指定 GPU 类型,将直接使用项目资源队列中可用的 GPU 类型。了解更多关于导入 Spark 配置文件的信息。
除非您的代码或您使用的库支持在 Spark 上分布式推理或训练,否则您需要确保您的代码能够处理诸如将模型训练和推理工作分发给执行器(executor)等任务。
:::callout{theme="neutral" title="优先使用轻量级转换而非仅驱动器的 Spark 作业"} 与使用仅驱动器配置文件的 Spark 相比,使用轻量级转换是性能更优的选择。Spark 在分发工作以及将 Spark DataFrame 转换为 Python 对象(例如您的模型可能期望的 Pandas DataFrame)时会引入开销。我们建议通过使用轻量级装饰器来避免使用 Spark 转换,除非您想将工作分发给执行器,或者您的模型可以原生使用 Spark DataFrame。一个例外情况是作为容器运行模型,如下面部分所述。请注意,作为容器运行模型仅在 Spark 转换中受支持,在轻量级转换中不受支持。 :::
在代码仓库中安装支持 GPU 的包
:::callout{theme="warning"} 以下说明仅适用于在 Palantir 平台的代码仓库用户界面中管理的仓库。要在基于浏览器的 VS Code 中使用支持 GPU 的包,请参考上面的代码工作台说明。 :::
在代码仓库中,生成环境规范的 conda 环境解析过程和实际的构建运行在不同的服务器上。执行 conda 解析的服务器没有 GPU,也无法配置使用 GPU。相反,Foundry 允许用户通过使用 CONDA_OVERRIDE_CUDA 环境变量来指定他们想要运行的 CUDA 版本,正如 conda 关于虚拟包的文档 ↗ 中所推荐的那样。要进行设置,请选择仓库中的齿轮图标,切换 显示隐藏文件和文件夹,找到最内层的 build.gradle 文件,并添加以下行。您还需要通过安装 pytorch-gpu、tensorflow-gpu 或使用上述构建字符串约束来指定您需要支持 GPU 的包。
:::callout{theme="neutral" title="检查您的最大支持 CUDA 版本"}
要确定您的 GPU 支持的最大 CUDA 版本,请在启用了 GPU 的代码工作台终端中运行 nvidia-smi 命令。CUDA 版本将显示在输出的右上角,指示支持的最大 CUDA 版本;您可以使用任何等于或低于此版本的 CUDA 版本。选择一个与您的 GPU 和机器学习框架都兼容的 CUDA 版本。有关更多信息,请查看下面 Gradle 代码片段中的框架文档链接。
:::
// CUDA 设置
tasks.runVersions {
// 11.8 只是一个示例,请为您的模型训练框架版本
// 和 GPU/驱动程序使用最新的受支持
// CUDA 版本。
// 有关 tensorflow,请参阅 https://www.tensorflow.org/install/source#gpu
// 有关 pytorch,请参阅 https://pytorch.org/get-started/locally/ 下的 linux 部分。
    environment("CONDA_OVERRIDE_CUDA", "11.8")
}
tasks.condaPackRun {
    environment("CONDA_OVERRIDE_CUDA", "11.8")
}
:::callout{theme="warning"}
不要将此代码片段添加到顶层的 build.gradle 文件中。根据用于创建仓库的模板,将其添加到下面概述的文件夹之一中:
transforms-python文件夹: 当使用从转换模板创建的仓库时。transformers-model-training文件夹: 当使用从模型模板创建的仓库时。 :::
要查看代码仓库中已安装的包,请查看 conda-versions.run.linux-64.lock 隐藏文件,或导航到检查日志,其中列出了使用的包版本。
:::callout{theme="neutral"} 请注意,在预览您的转换时 GPU 不可用,这可能导致与运行构建时预期的行为不同。 :::
Python 库注意事项
conda 中支持 GPU 的包
:::callout{theme="neutral" title="Foundry 中的 Conda"}
我们建议使用 conda 而非 PyPI 和 Pip 来管理 Python 环境,因为 conda 不允许安装具有不兼容依赖项的包。如果发生冲突,conda 将抛出错误并拒绝安装冲突的包。这确保了 Foundry 用于核心功能(如 transforms-python 或 palantir_models)的 Python 库无论用户尝试安装什么包都能正常工作。
:::
诸如 tensorflow 或 pytorch 之类的机器学习库通常会发布其包的仅 CPU 版本,以避免不必要地下载 GPU 训练所需的重型二进制文件(如 CUDA)。确保您已安装支持 CUDA 版本的库非常重要。否则,该库将无法检测和使用 GPU,模型训练将仅在 CPU 上运行。
Conda 会检查源系统上安装的 GPU,以确定要安装的包版本。如果系统上没有 GPU,conda 将选择包的仅 CPU 构建版本进行安装。尝试通过指定特定构建版本来强制安装支持 GPU 的包,将由于系统上缺少 GPU(通过 __cuda 虚拟包)而导致 conda 的依赖关系解析失败,如 conda-forge 文档 ↗ 中所述。上面的部分详细介绍了代码工作台和代码仓库的示例,以帮助更好地理解这一点的影响,以及如何在 Foundry 中使用 GPU。
Pip
如果需要,您也可以在代码仓库和代码工作台中使用 pip 安装包。请注意,这将在现有 conda 环境之上安装 pip 包及其依赖项,忽略 conda 包中的任何依赖项要求。
验证 GPU 使用情况
PyTorch 中的 GPU 使用情况
要验证 PyTorch 是否正在使用 GPU 并确认其加速了操作,请在 Jupyter® 代码工作台或代码仓库中运行以下代码。请注意,显示的速度提升可能不代表您在模型训练实践中可能获得的结果。
import torch
import time
import logging

logger = logging.getLogger(__name__)

A_cpu = torch.randn(5000, 5000)
B_cpu = torch.randn(5000, 5000)
start_time = time.time()
C_cpu = torch.matmul(A_cpu, B_cpu)
cpu_time = time.time() - start_time
logger.warning(f"CPU execution time: {cpu_time:.4f} seconds")

if torch.cuda.is_available():
    A_gpu = torch.randn(5000, 5000, device='cuda')
    B_gpu = torch.randn(5000, 5000, device='cuda')

    # 预热运行以初始化 GPU
    _ = torch.matmul(A_gpu, B_gpu)
    torch.cuda.synchronize()

    # 实际基准测试
    start_time = time.time()
    C_gpu = torch.matmul(A_gpu, B_gpu)
    torch.cuda.synchronize()  # 等待 GPU 计算完成
    gpu_time = time.time() - start_time

    logger.warning(f"GPU execution time: {gpu_time:.4f} seconds")
    logger.warning(f"GPU speedup: {cpu_time/gpu_time:.2f}x faster")
检查 GPU 使用情况
您可以使用控制台中的 nvidia-smi 命令实时监控 GPU 使用情况。此命令提供有关 GPU 利用率、内存使用情况和正在运行的进程的详细信息。
- 在 JupyterLab® 中打开一个终端,方法是选择文件浏览器中的 + 图标,然后选择 终端。
- 运行
watch -n0.2 nvidia-smi命令以获取持续更新的当前 GPU 利用率图像:
使用 GPU 时通过 sidecar 运行推理
当模型不是由导入它的仓库生成,并且该仓库正在运行推理时,模型的 Python 依赖项需要被导入并与仓库的依赖项进行解析。这可能会导致问题,例如模型的库被解析为不同的版本,或者由于依赖项冲突而产生错误。当涉及复杂的支持 GPU 的依赖项时,这尤其棘手。
在这种情况下,我们建议在 ModelInput 类中设置 use_sidecar=True。这会为每个执行器和驱动器运行一个容器,该容器使用所需的 Python 环境加载模型。可以使用 sidecar_resources 参数在 sidecar 容器上请求 GPU,如下例所示:
from transforms.api import transform, Input, Output, configure, LightweightInput, LightweightOutput
from palantir_models.transforms import ModelInput
from palantir_models import ModelAdapter

# 将 use_sidecar=True 与 @transform.using 一起使用需要 palantir_models 版本 0.2010.0 或更高版本。
@transform.using(
    inference_output=Output("path_to_output"),
    inference_input=Input("path_to_input"),
    model=ModelInput(
        "path_to_model",
        use_sidecar=True,
        sidecar_resources={"gpus": 1, "cpus": 3.4, "memory_gb": 16}
    ),
)
def compute(
        inference_output: LightweightOutput,
        inference_input: LightweightInput,
        model: ModelAdapter
    ):
    inference_results = model.transform(inference_input)
    inference = inference_results.df_out
    inference_output.write_pandas(inference)