4. Tutorial - Productionize a model(4. 教程 - 将模型投入生产(Productionize a model))
Before moving on with this tutorial, you should have completed the modeling project setup and model training and, optionally, the model evaluation tutorials. At this point, you should have at least one model in your modeling objective.
In this step of the tutorial, you take your machine learning model and set up a production usage of that model.
- Release a model in a modeling objective.
- Create a batch deployment for batch processing.
- Create an interactive live endpoint for your model.
4.1 Release a model in modeling objective
Now that we have a model, it can be deployed to production. Depending on the intended use of this model we might want to productionize it in one of a few ways. Models can be deployed from Modeling Objectives, which offer full-featured release and model management including documentation, evaluation and support for comparing submissions from multiple backing models.
Deployment from Modeling Objectives can be done in the following ways:
- In a batch deployment: Generate predictions for a dataset, recommended for calculating predictions for a group of records at once.
- In a live deployment: Host the model behind a REST endpoint, recommended for using the model from an external system or if you require real-time interactivity with your model.
- In a Python transform: Useful for quick iteration in a transform.
Alternatively, users who favor a more lightweight setup can import their model in a transform for batch inference as described in the tutorial on running batch inference in Code Repositories, or deploy it behind a REST endpoint using direct deployments without creating a modeling objective.
Learn more about the differences between live deployments in Modeling Objectives and direct deployments.
What is a release in a modeling objective?
Batch and live deployments are backed by model releases. If you release a new model in a modeling objective, the deployments in that modeling objective will be automatically upgraded to use the newly released model.
This allows model consumers to use the model without worrying about its specific implementation. Data scientists can focus on making the model better while application developers focus on building useful applications.
Release management
Releases and deployments are categorized into staging and production. Model developers can release a model to the staging environment before production release. This upgrades staging deployments while leaving production deployments unchanged. A data scientist or application builder can then test the new model in the staging environment before the model is productionized.
All releases, as well as the individual who released the model, are recorded to ensure teams can keep a track of which model was used at what time. This can help answer regulatory questions such as those required by GDPR or the EU AI Act.
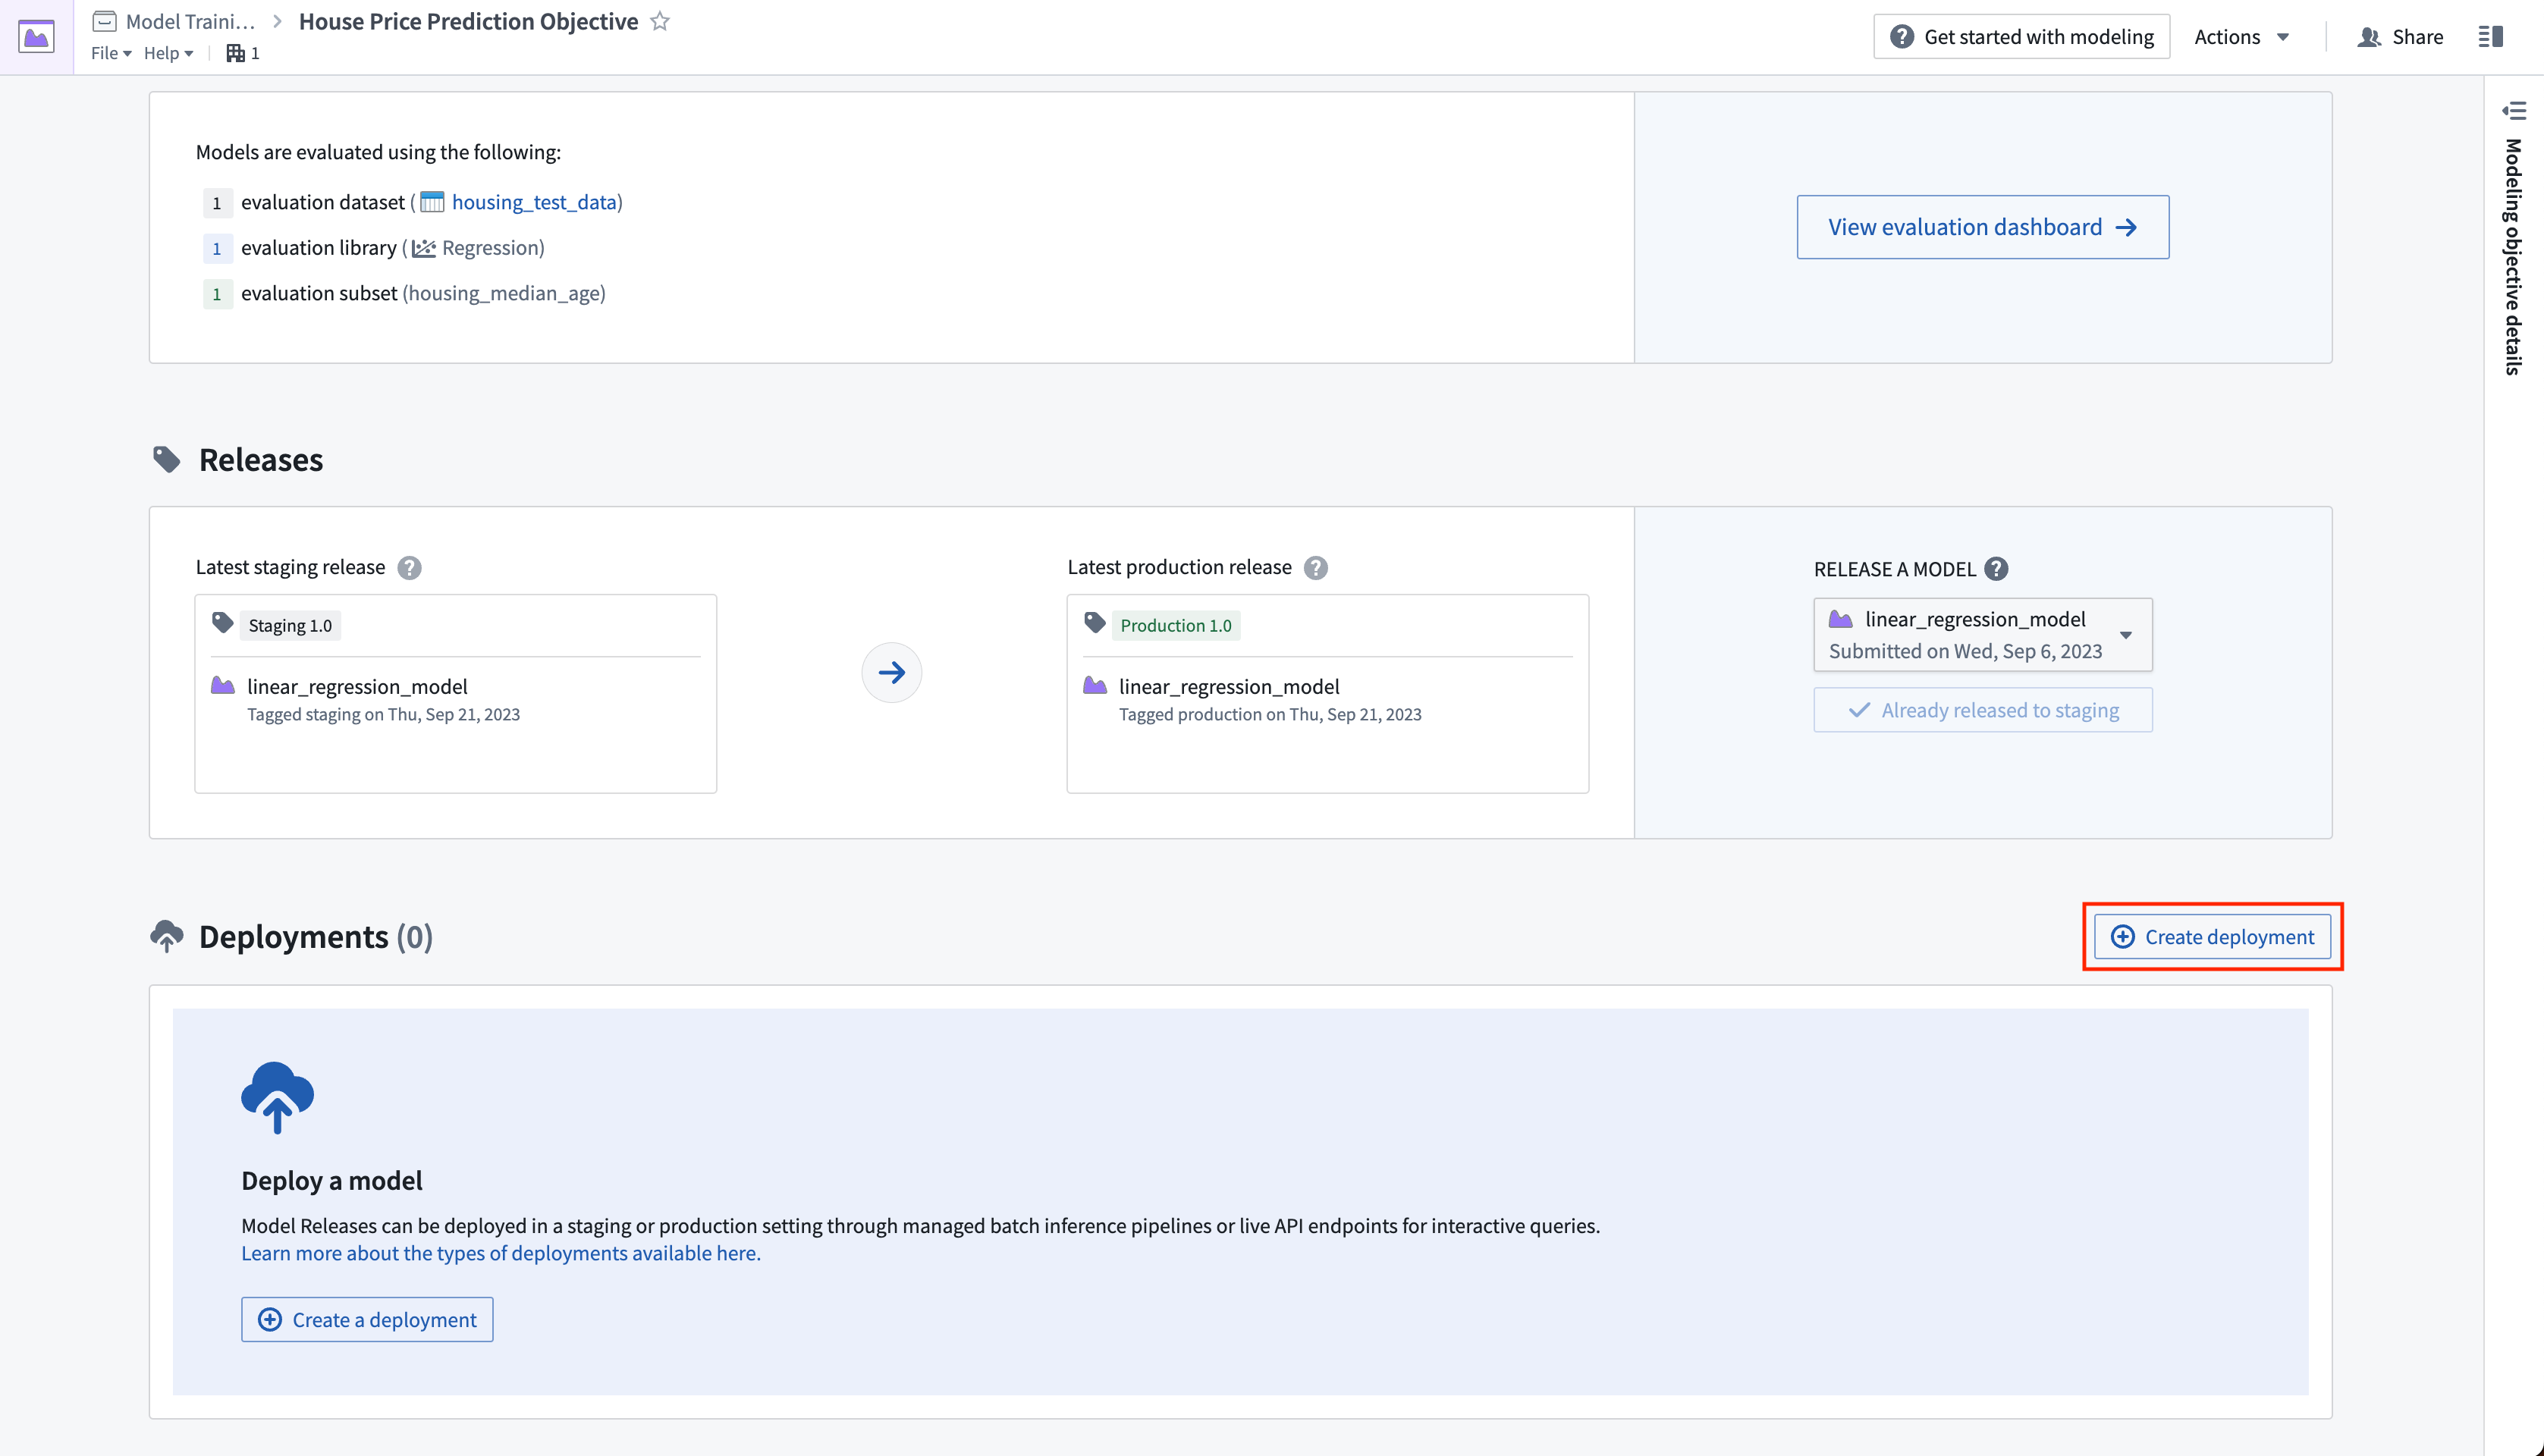
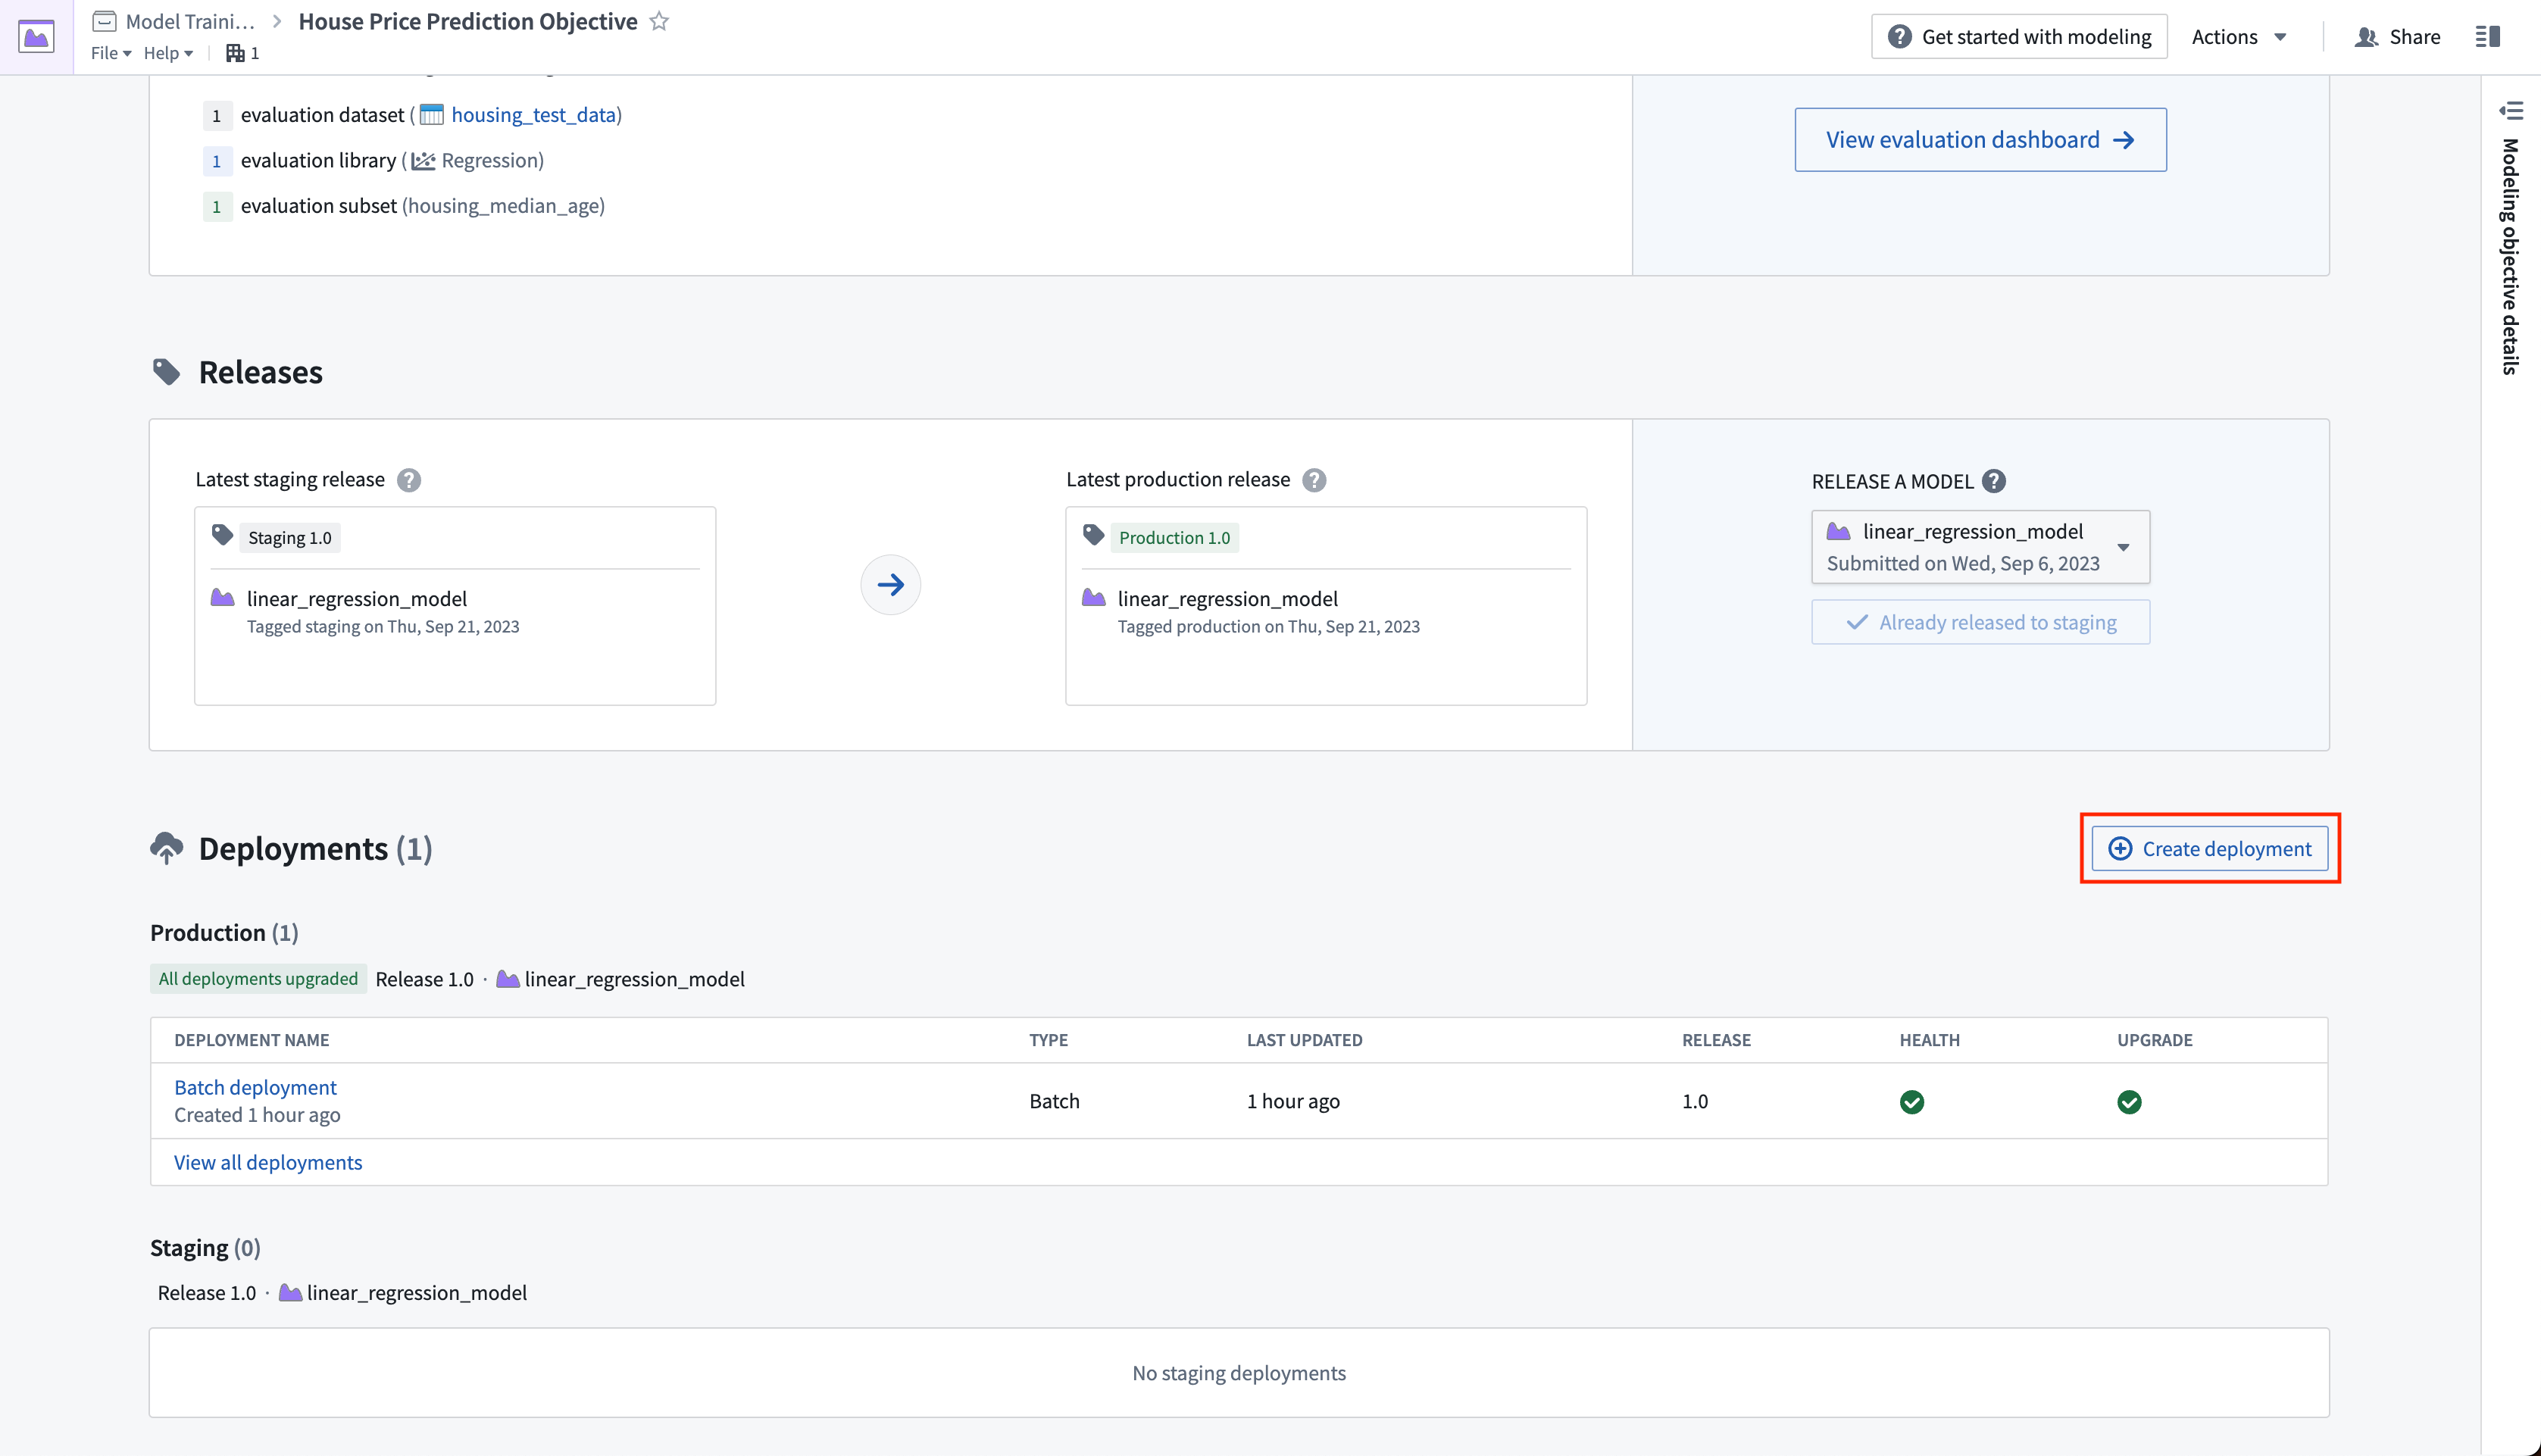
Action: Navigate to the home page in your modeling objective and scroll to the releases section. Select Release to staging, then select the arrow icon to release the model to production. You will need to give the release a release number, such as "1.0".
4.2 How to create a batch deployment for batch processing
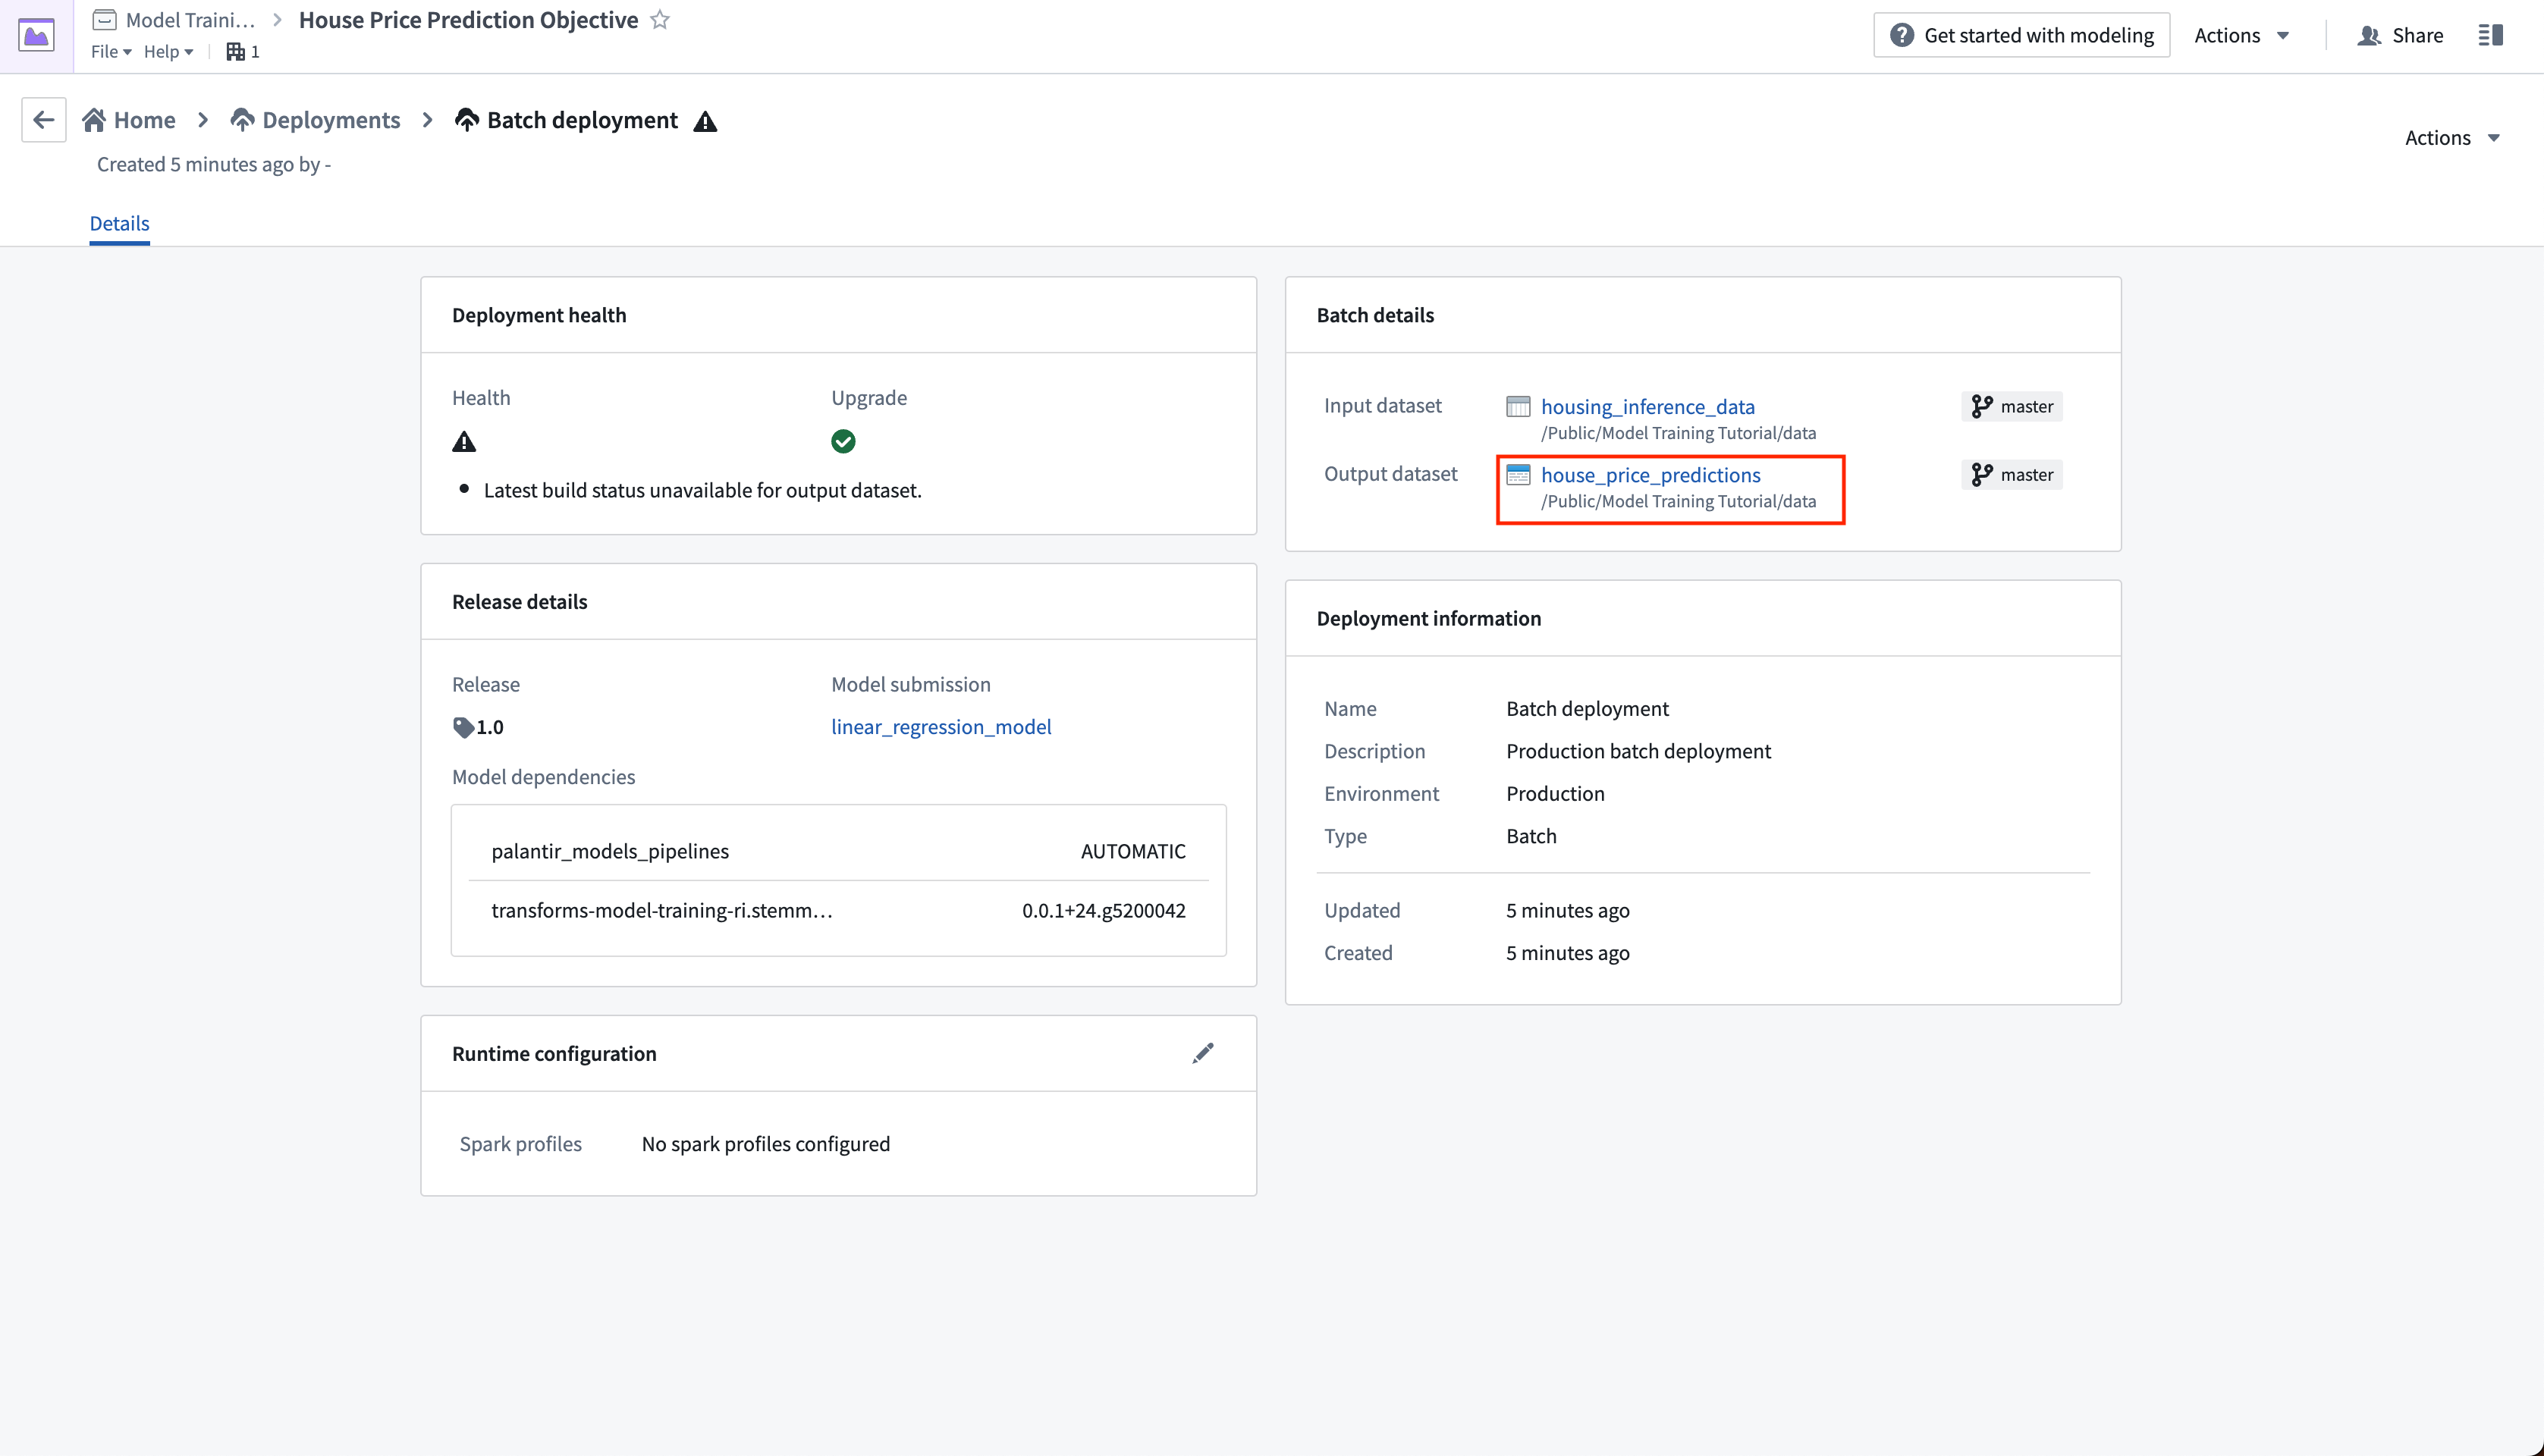
A batch deployment will create a Foundry transform from an input dataset. The output of a batch deployment is dataset that is the result of running inference (generating predictions) on the input dataset with the model.
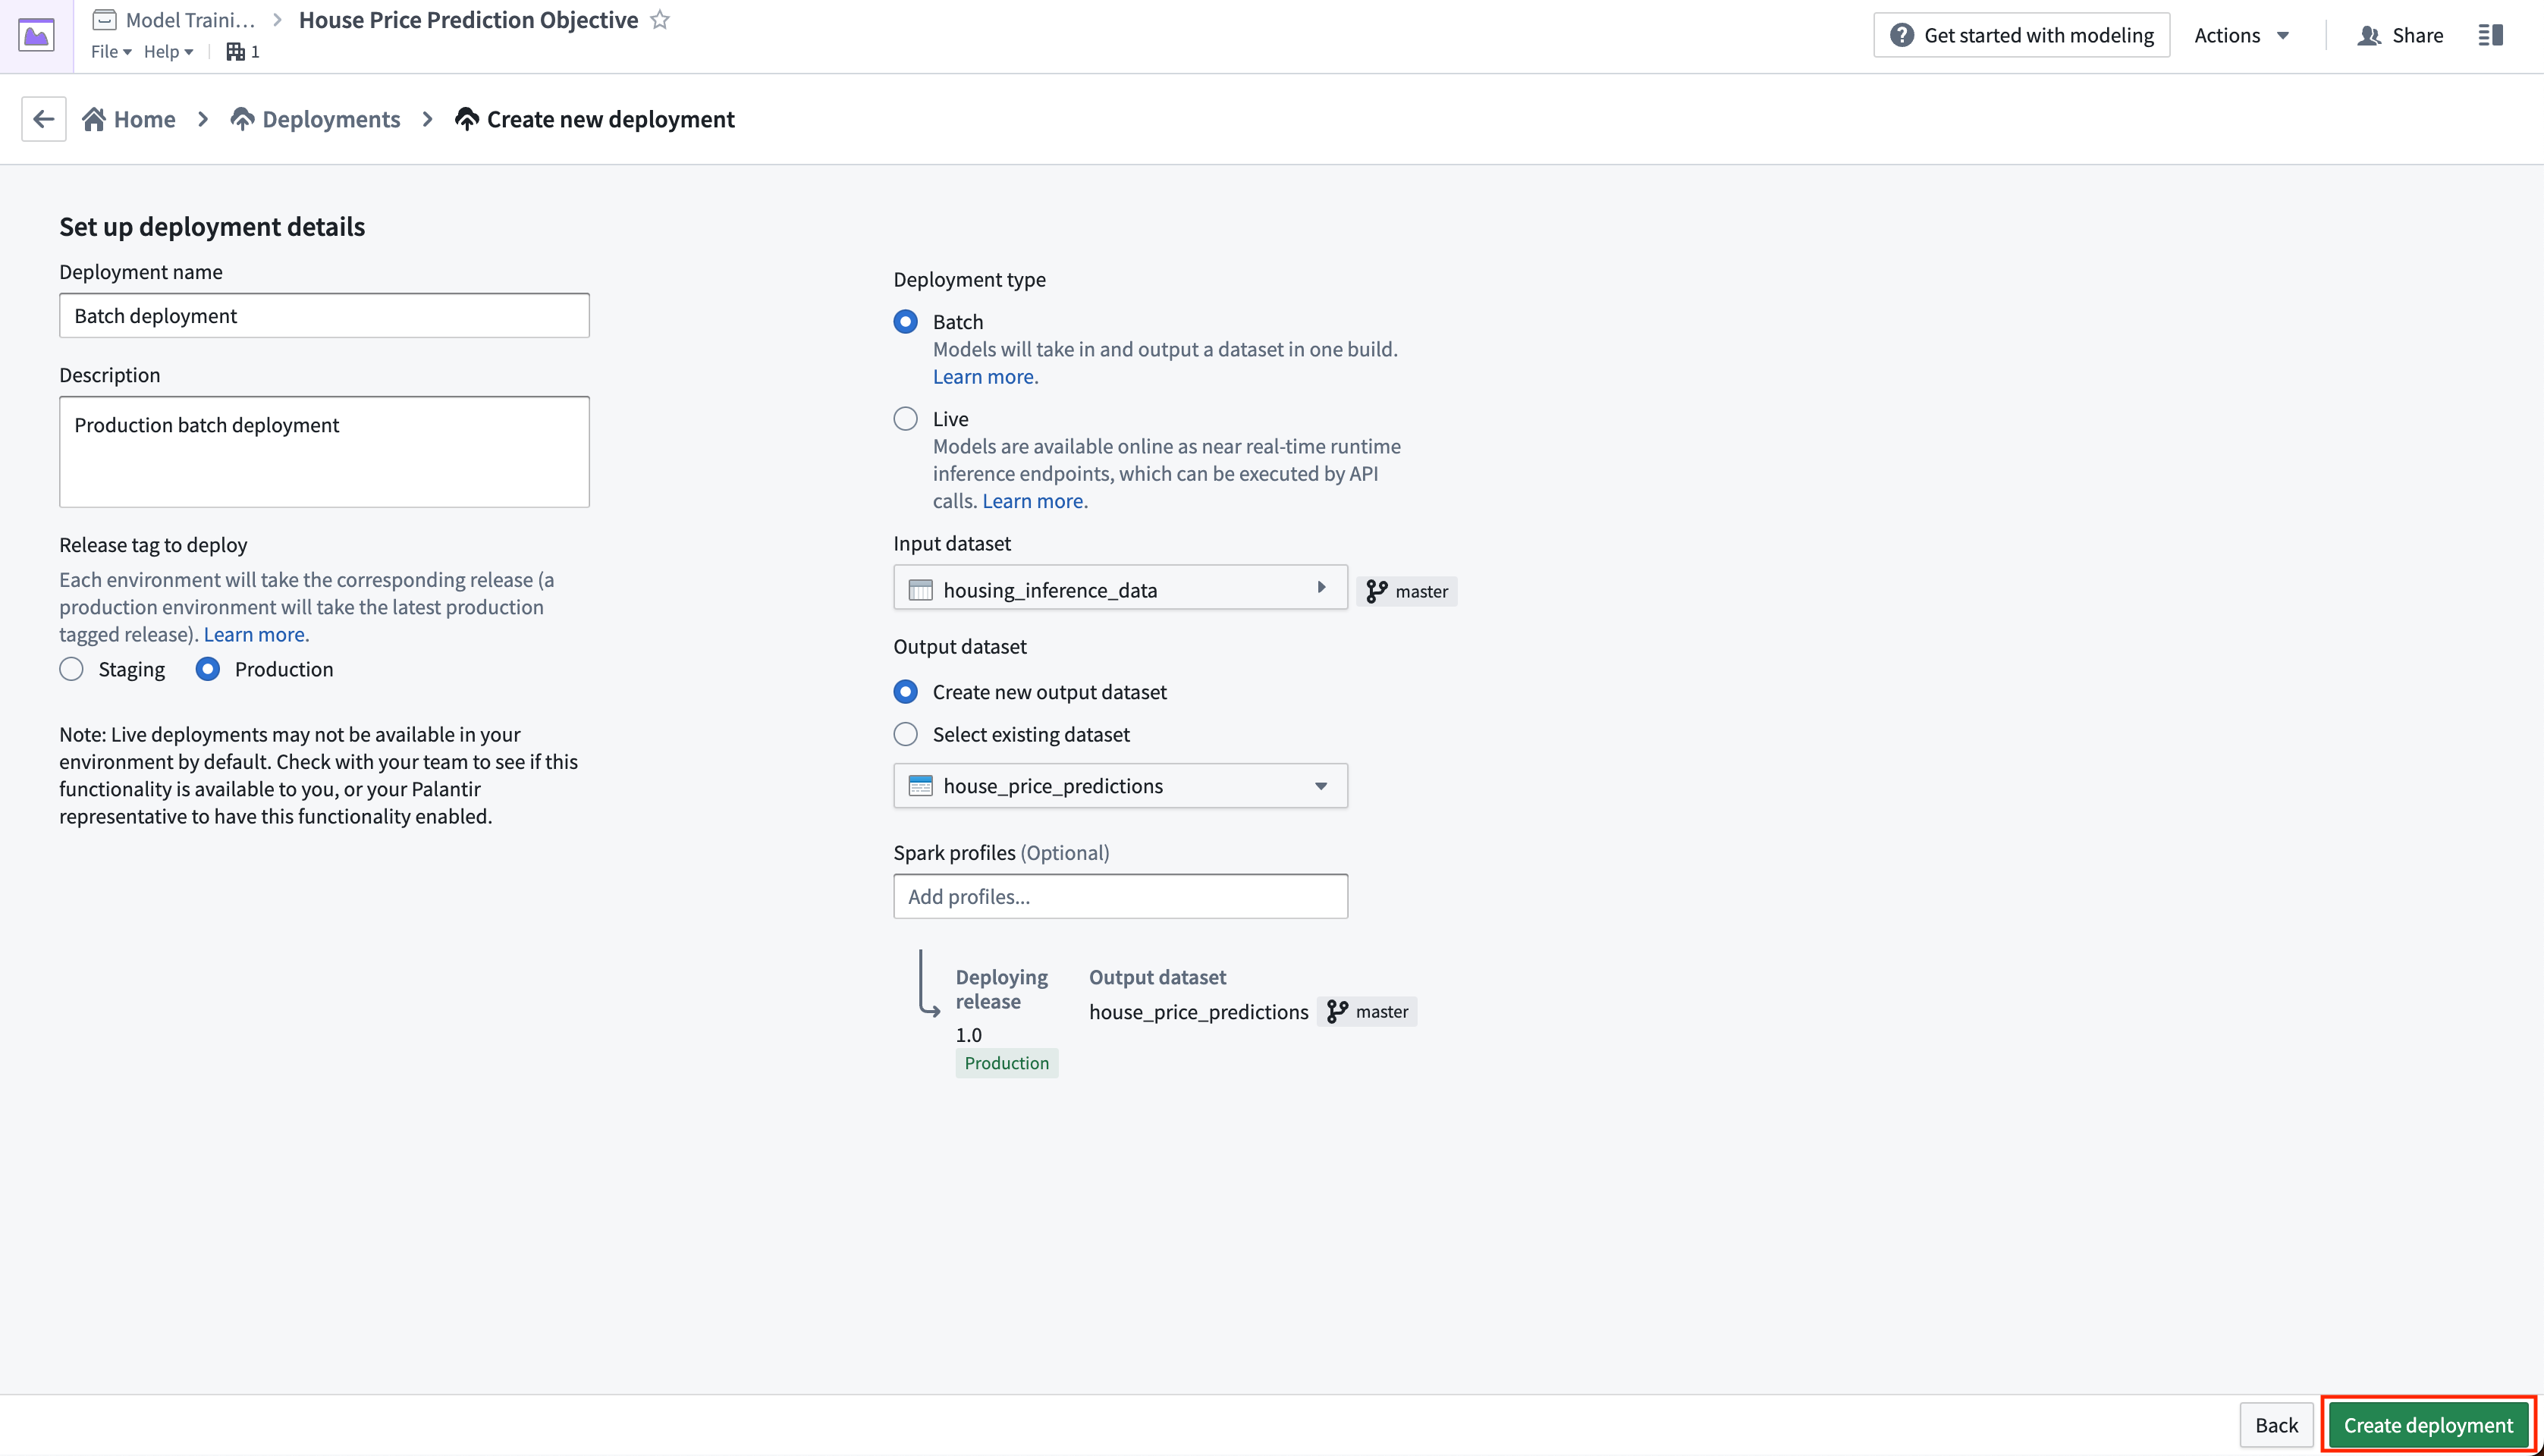
Action: Click create deployment and configure a production batch deployment. Give the deployment a name Batch deployment and a description Production batch deployment. Select the housing_inference_data dataset that you created earlier as your input dataset, and create a new output dataset in your data folder named house_price_predictions. Select Create deployment to save the configuration.
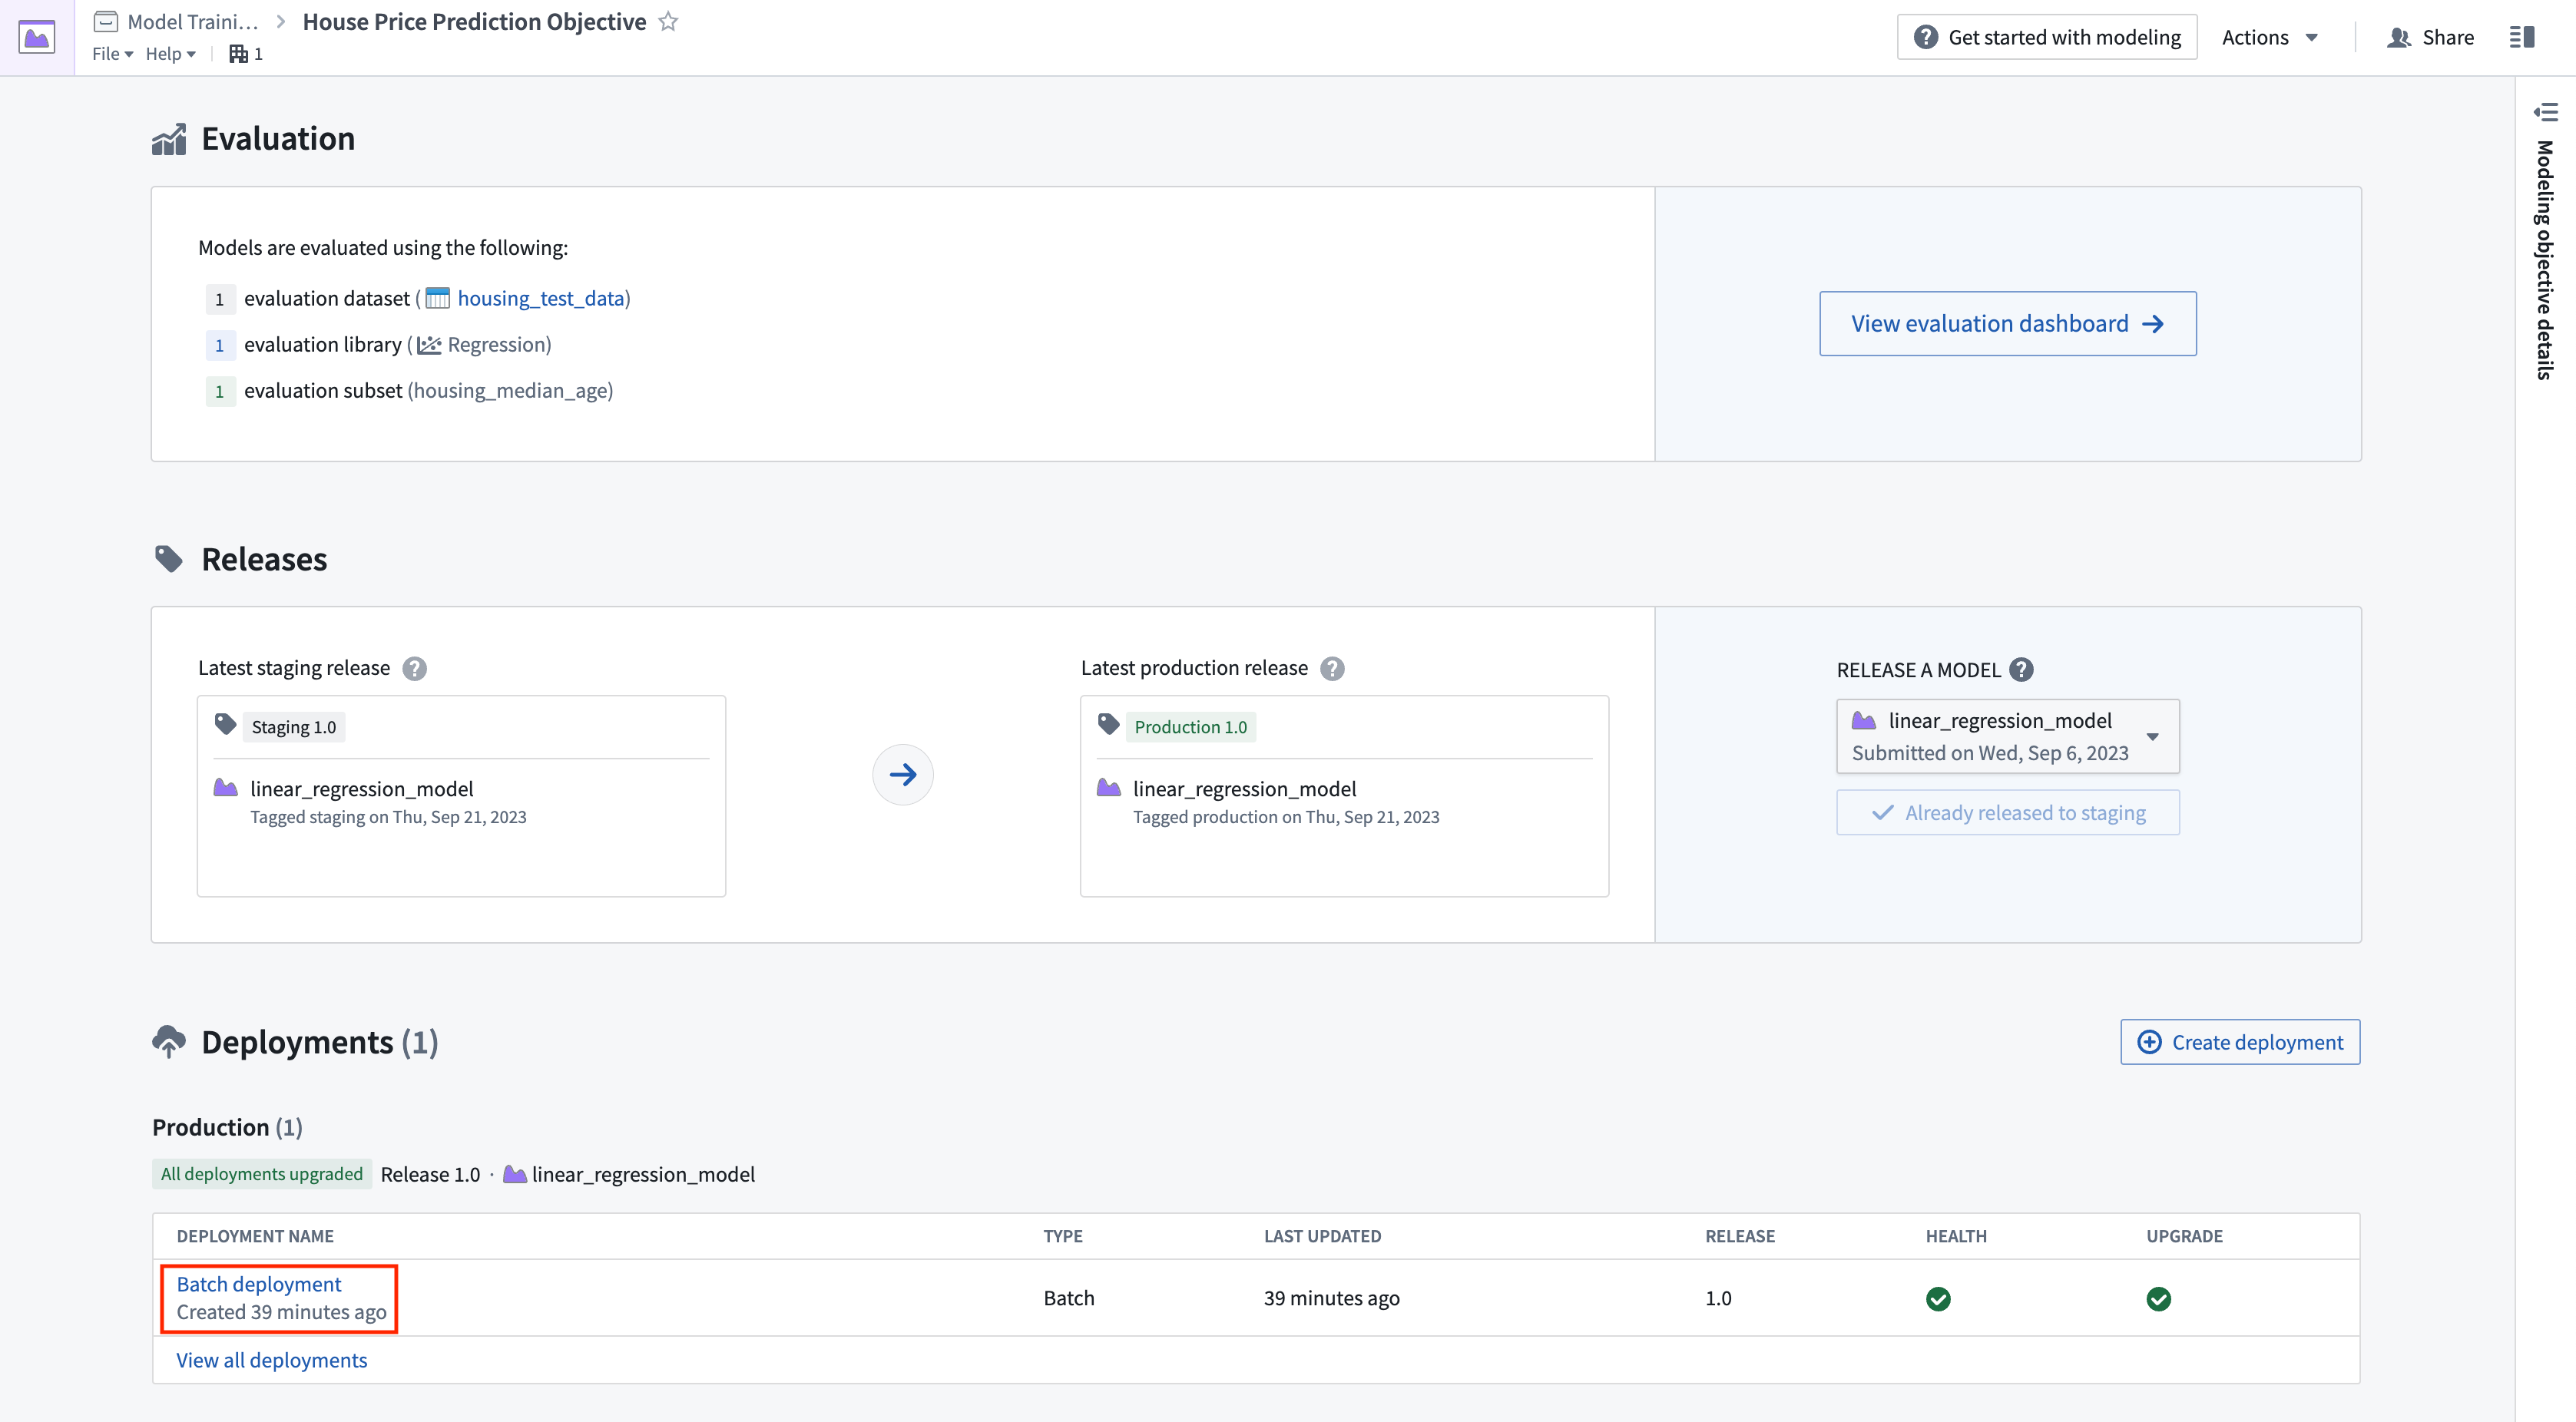
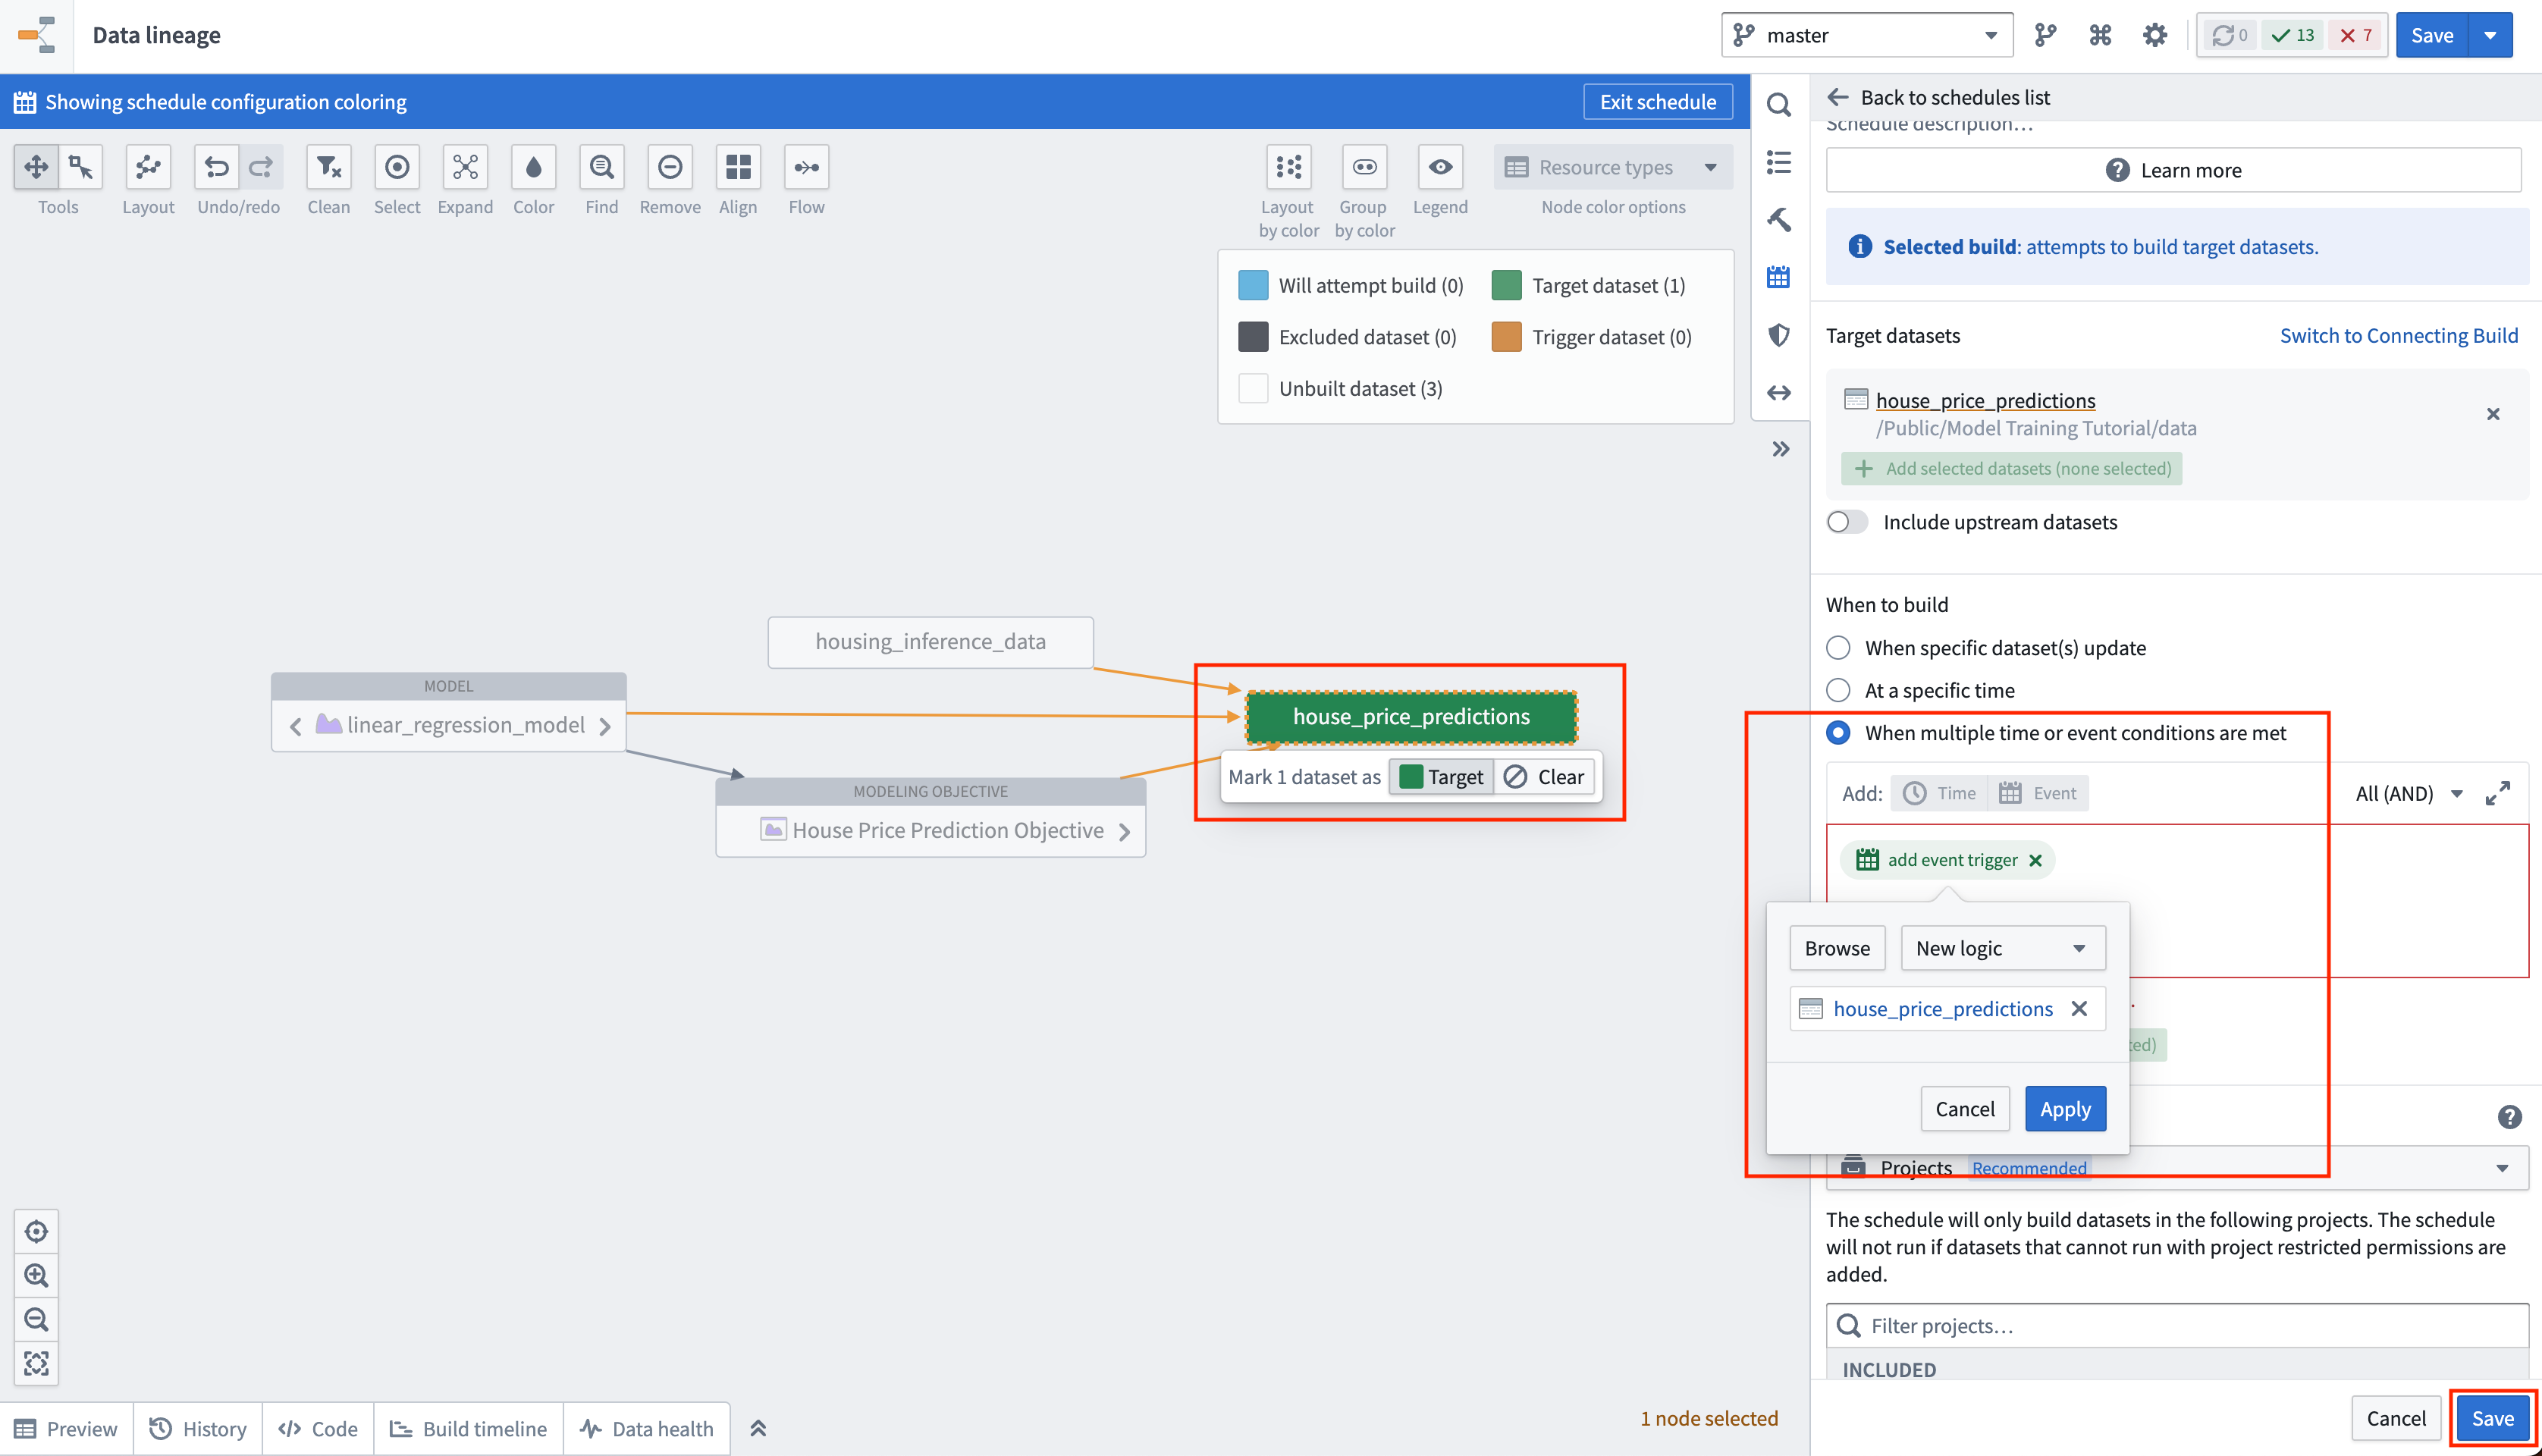
Now, we can schedule the batch deployment so that our output dataset will update automatically whenever a new model is released - ensuring that we are always using the best predictions. Let's add a schedule on the output dataset so that the output dataset will rebuild whenever it receives new logic.
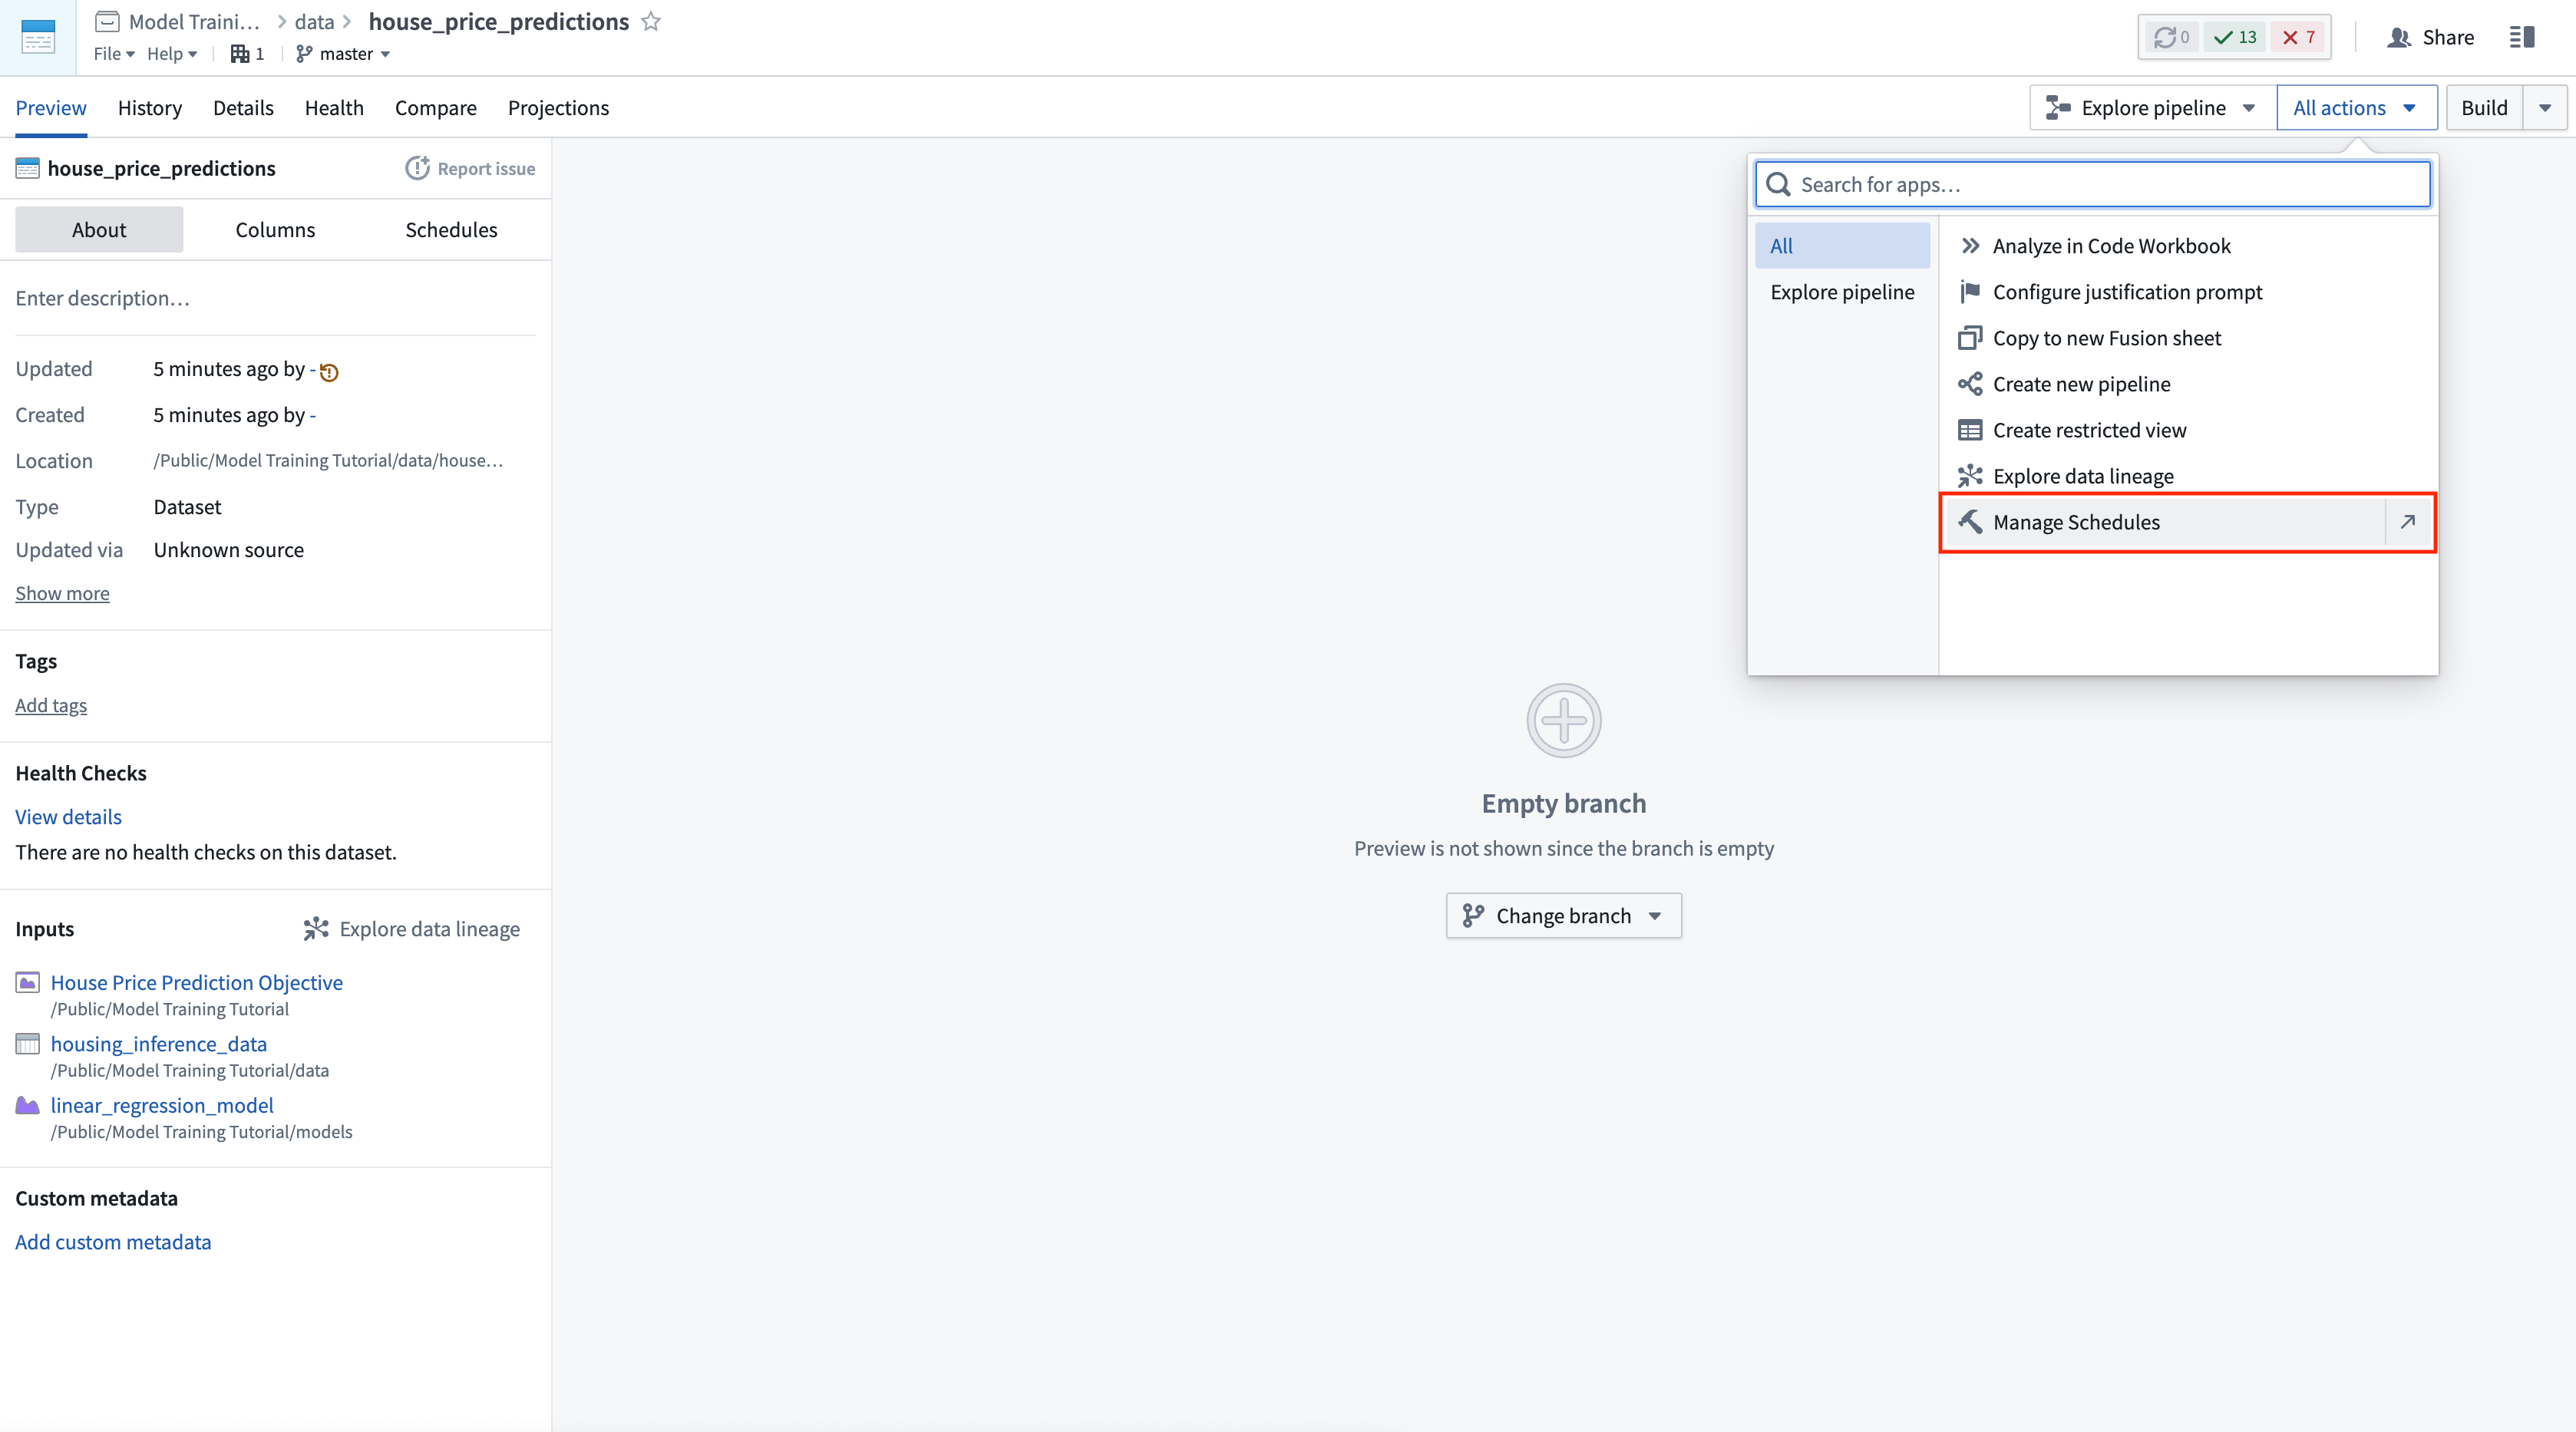
Action: Select your batch deployment in the deployments table. Select the output dataset named house_price_predictions. Under All actions, select Manage schedules. On the house_price_predictions dataset, select Create new schedule -> When multiple time or event conditions are met, when the house_price_predictions dataset receives New logic. Finally, select Save to save the schedule.
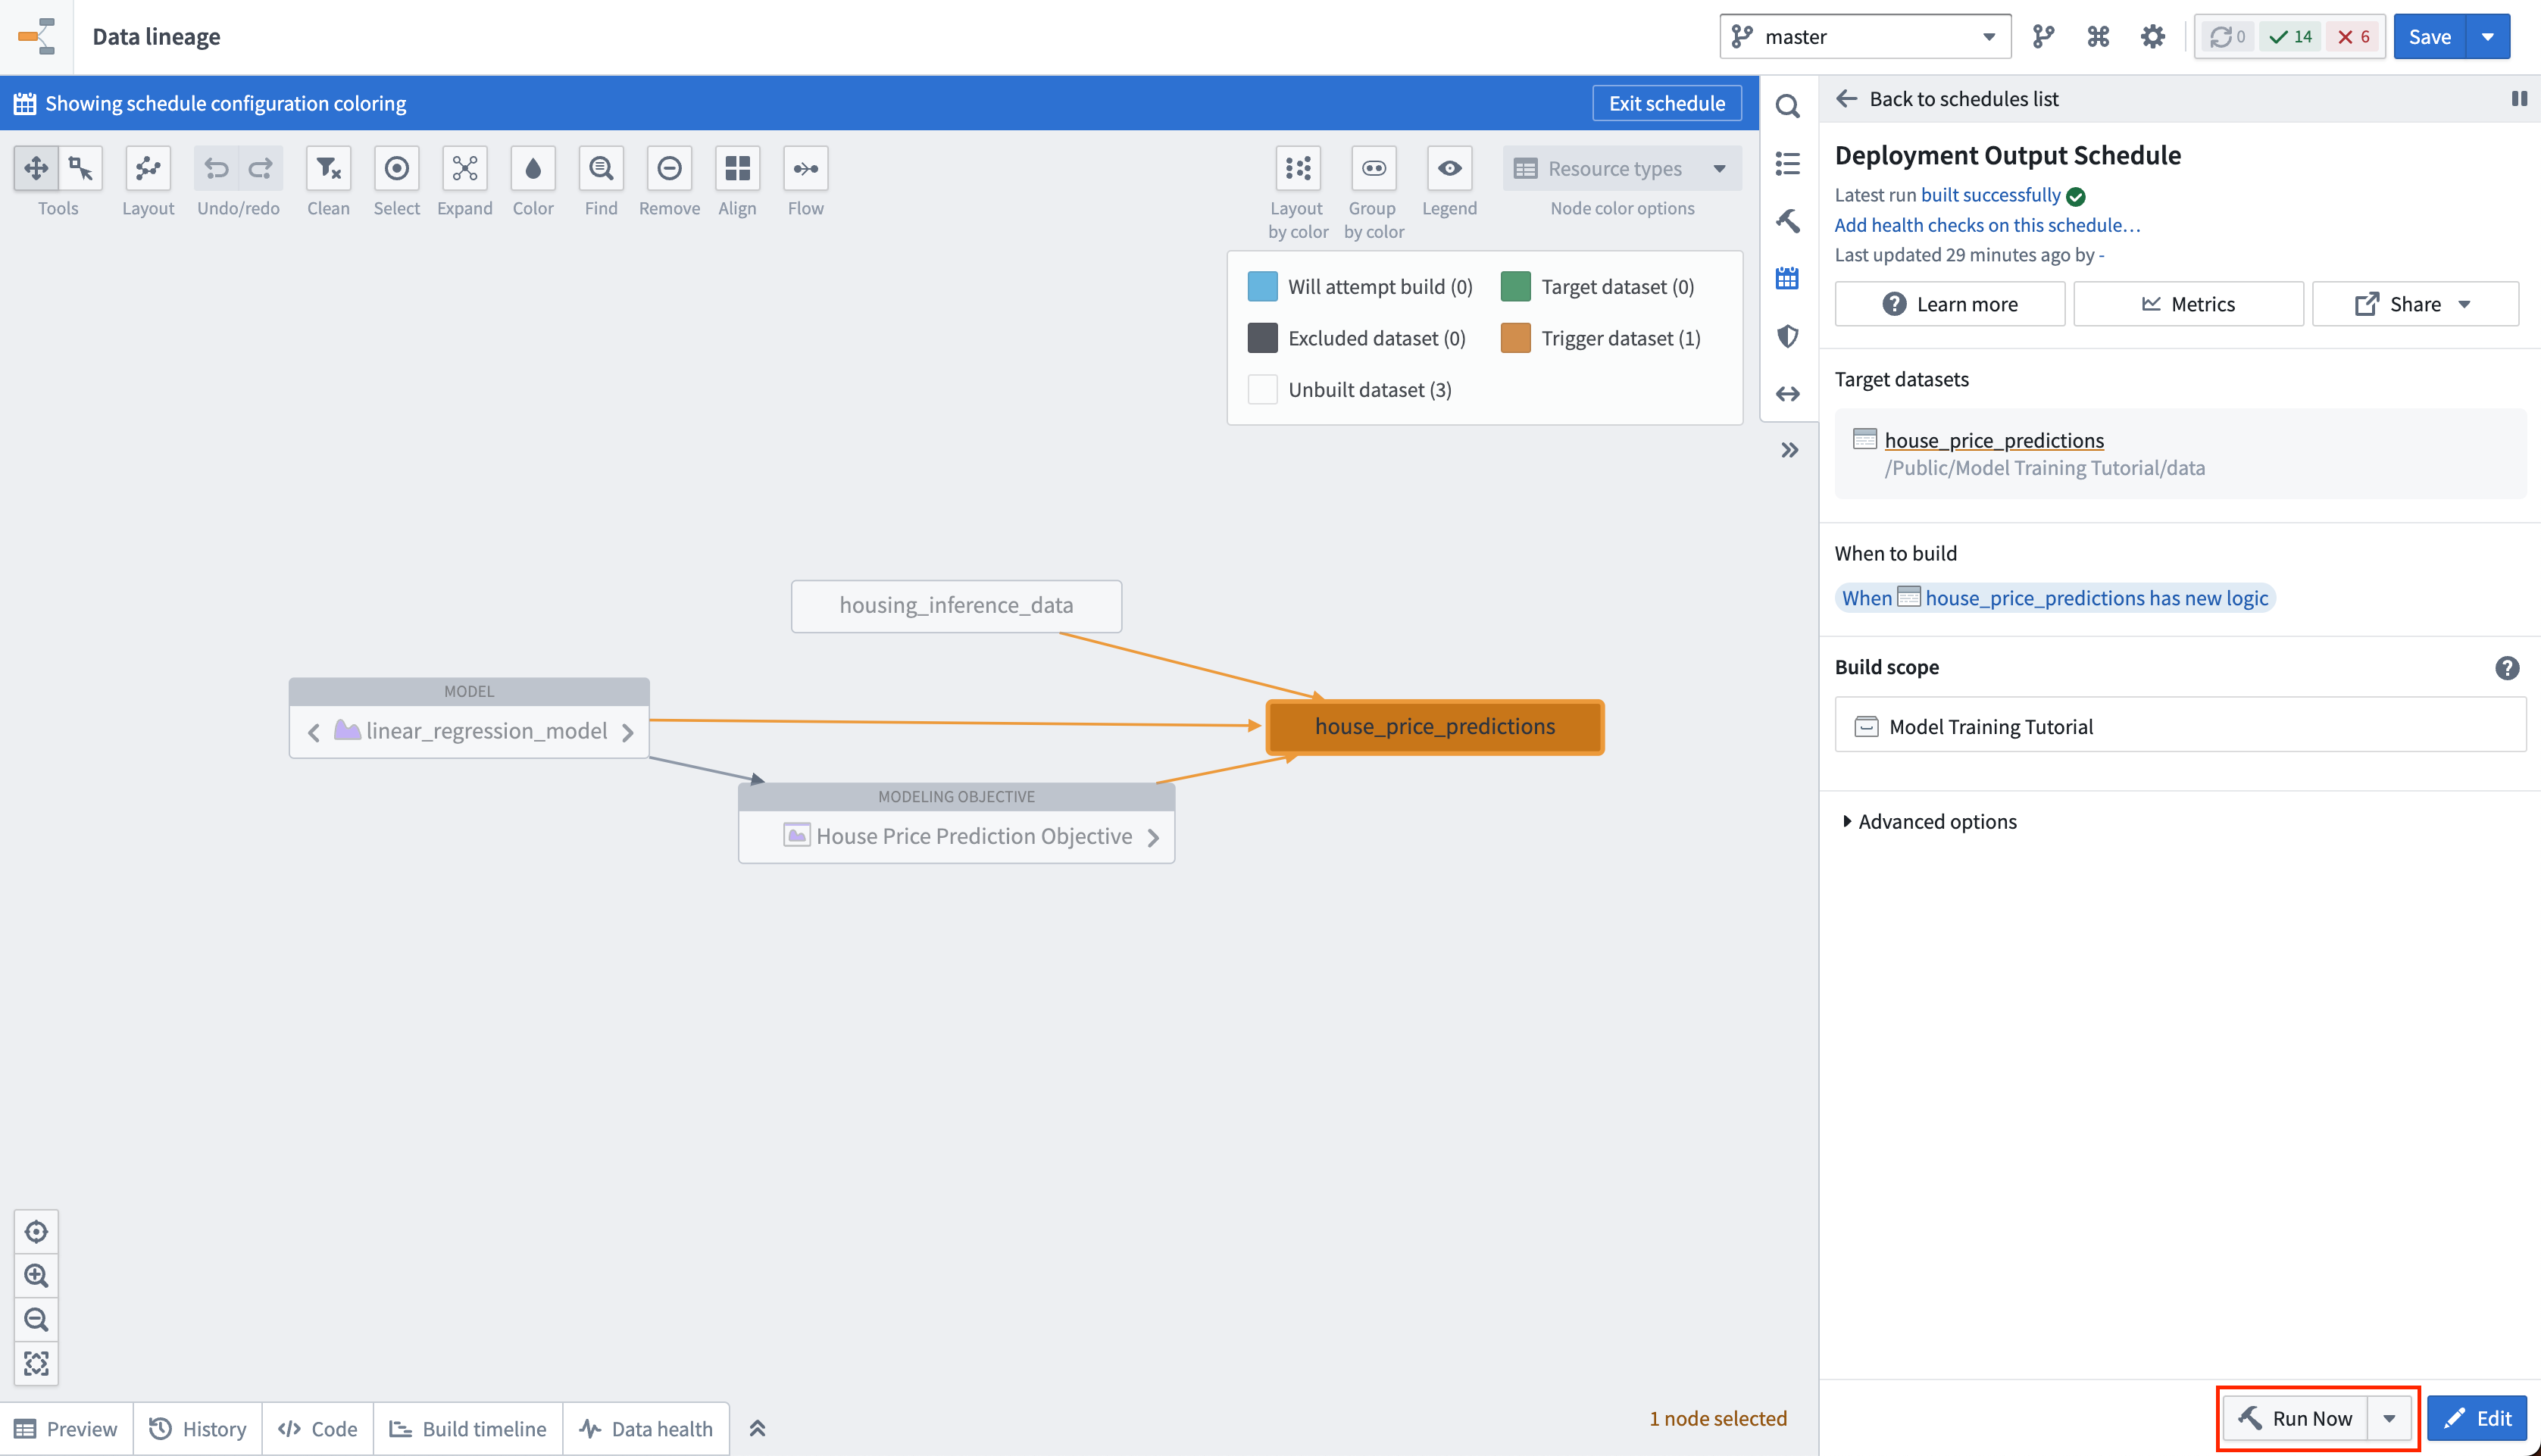
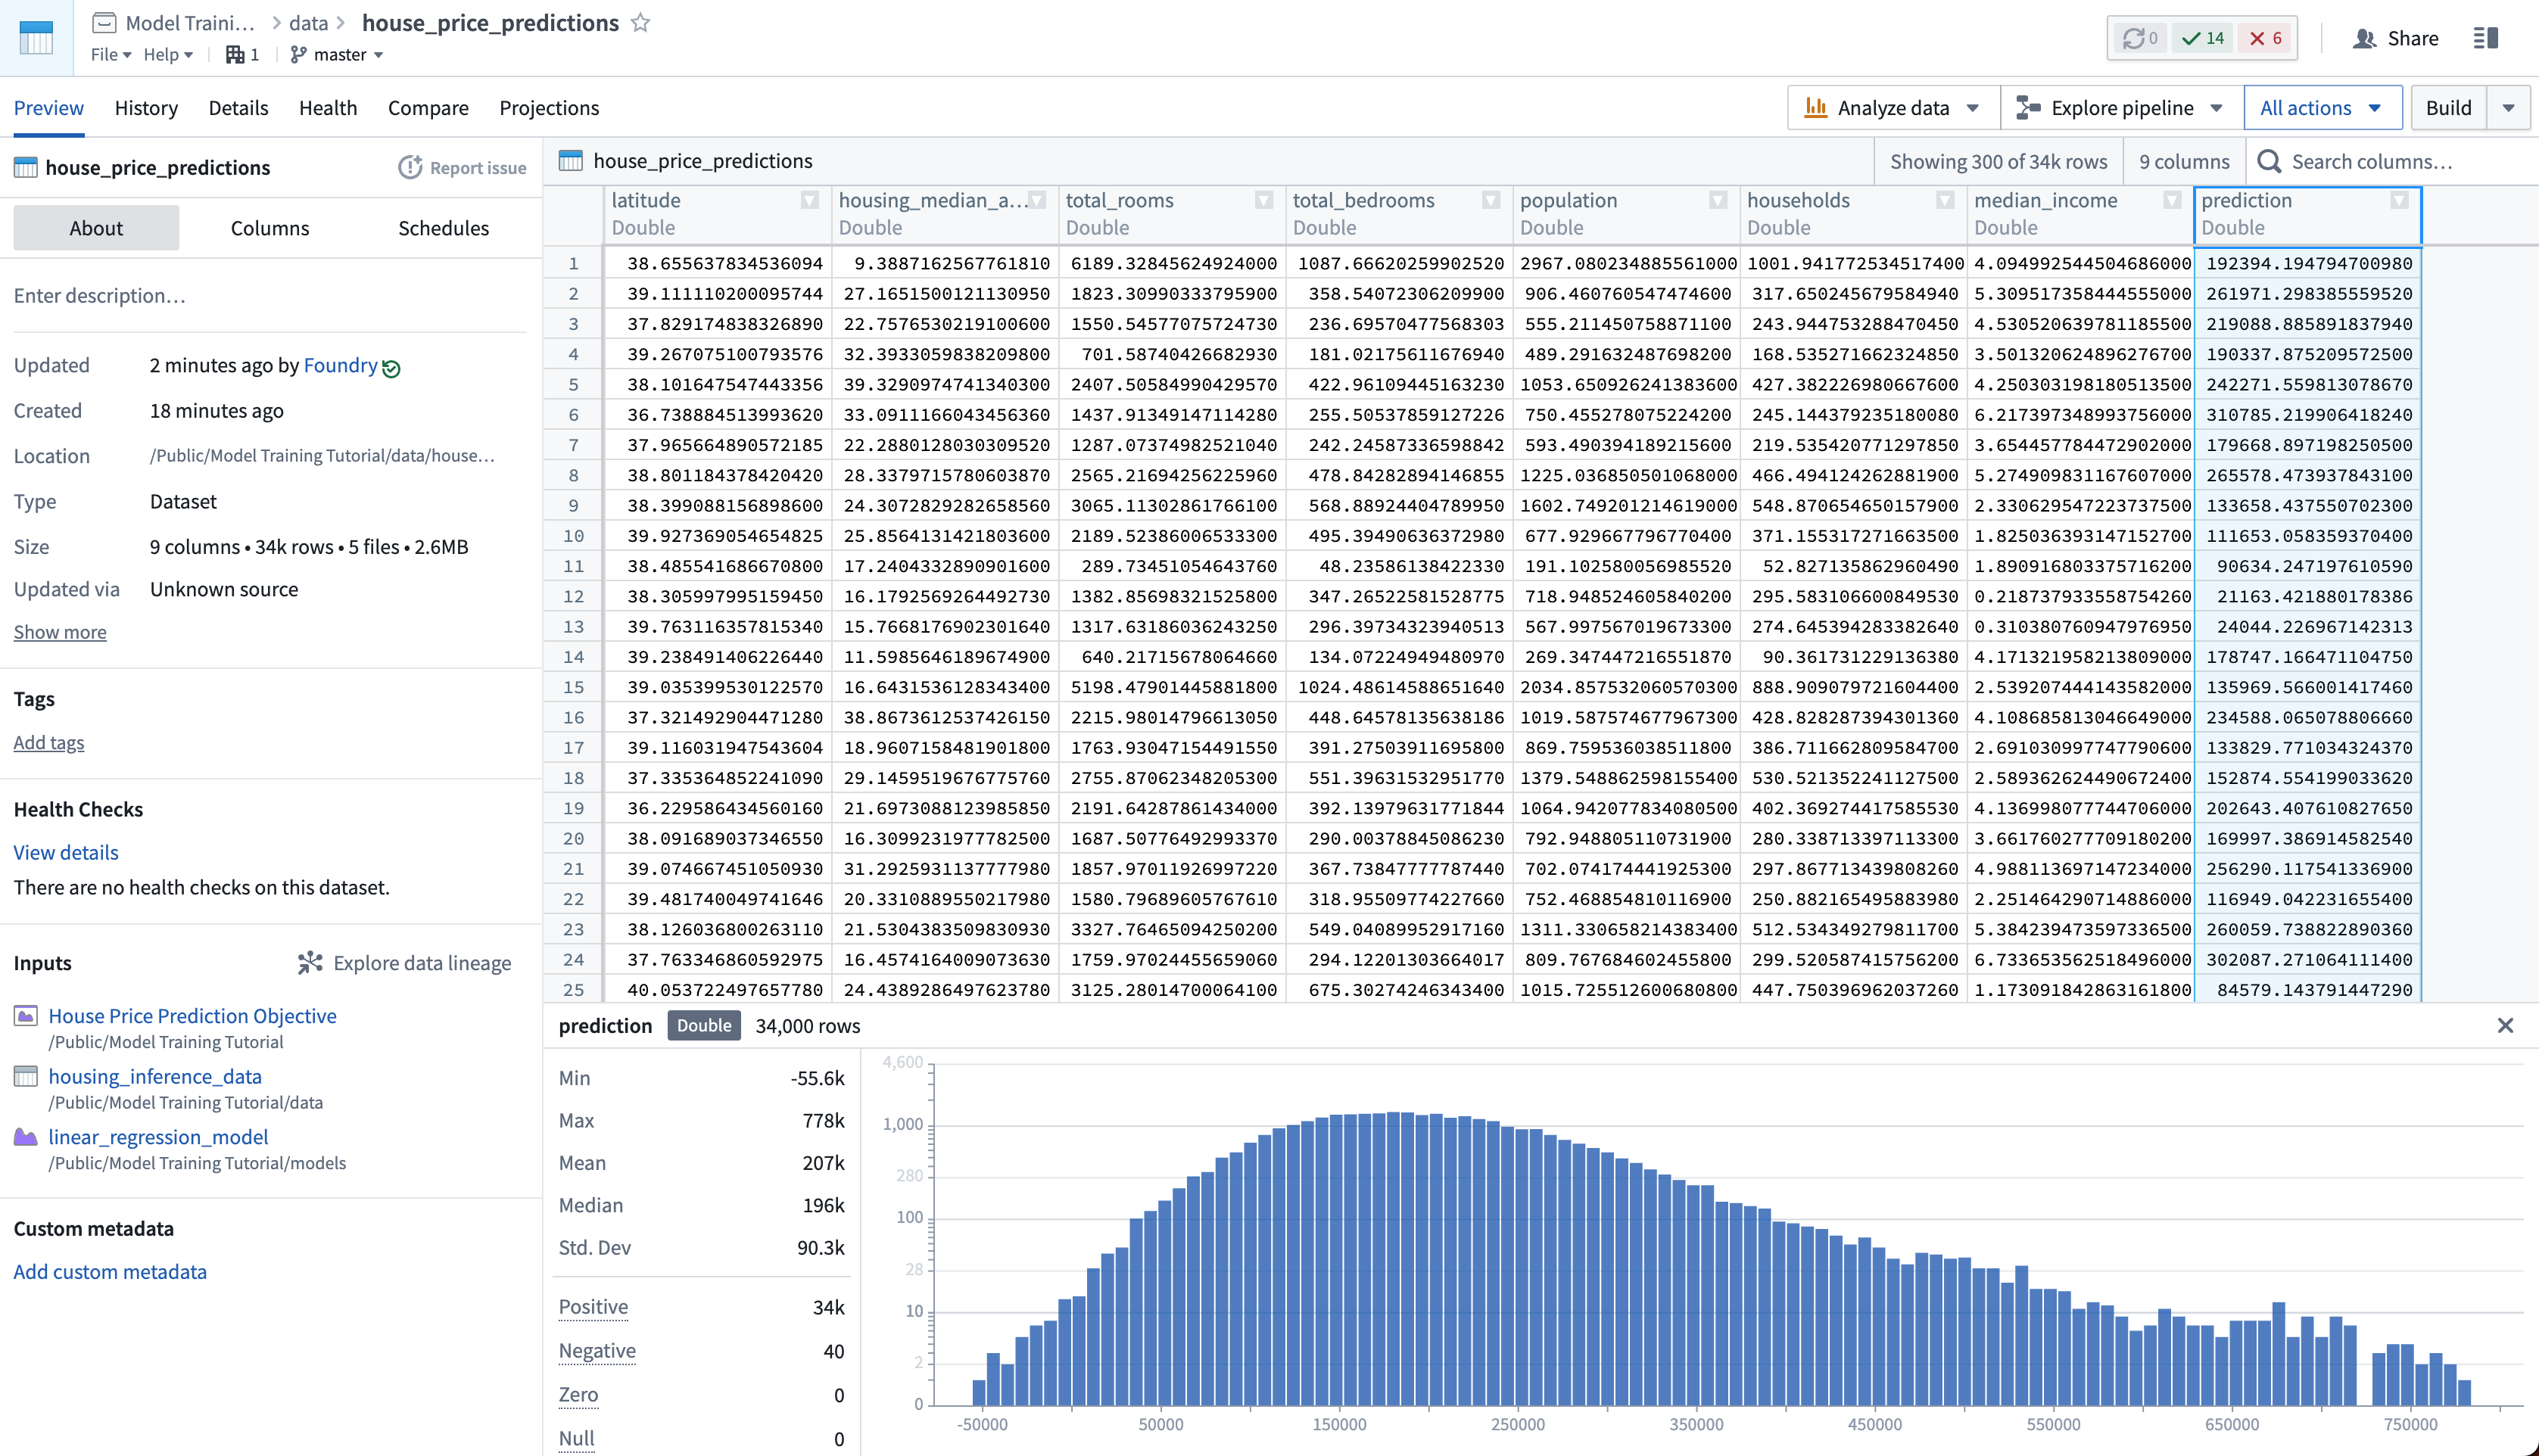
Lastly, as we have not updated the house_price_predictions dataset, we can run this to generate predictions. After the build has completed, you can open the house_price_predictions dataset to see the newly-derived predictions in the prediction column.
Action: Select Run now in the schedule view to build the house_price_predictions dataset. After the build is completed, you can open the output dataset to see the generated predictions by right-clicking the house_price_predictions dataset and then choosing Open.
4.3 How to create an interactive live endpoint for your model
A live deployment is a queryable endpoint that hosts the production model behind a REST endpoint. A live deployment is useful when you want to interact with a model interactively and can be queried from:
- Functions on Models: Functions on Models enables querying models directly from Slate or Workshop applications in Foundry.
- A real-time external system: Such as a website that needs to generate a live prediction from user behavior.
- CURL: For local testing of your model.
In this example, you might want to build an interactive dashboard that allows a user to enter details about a census district and see how this impacts the median house price.
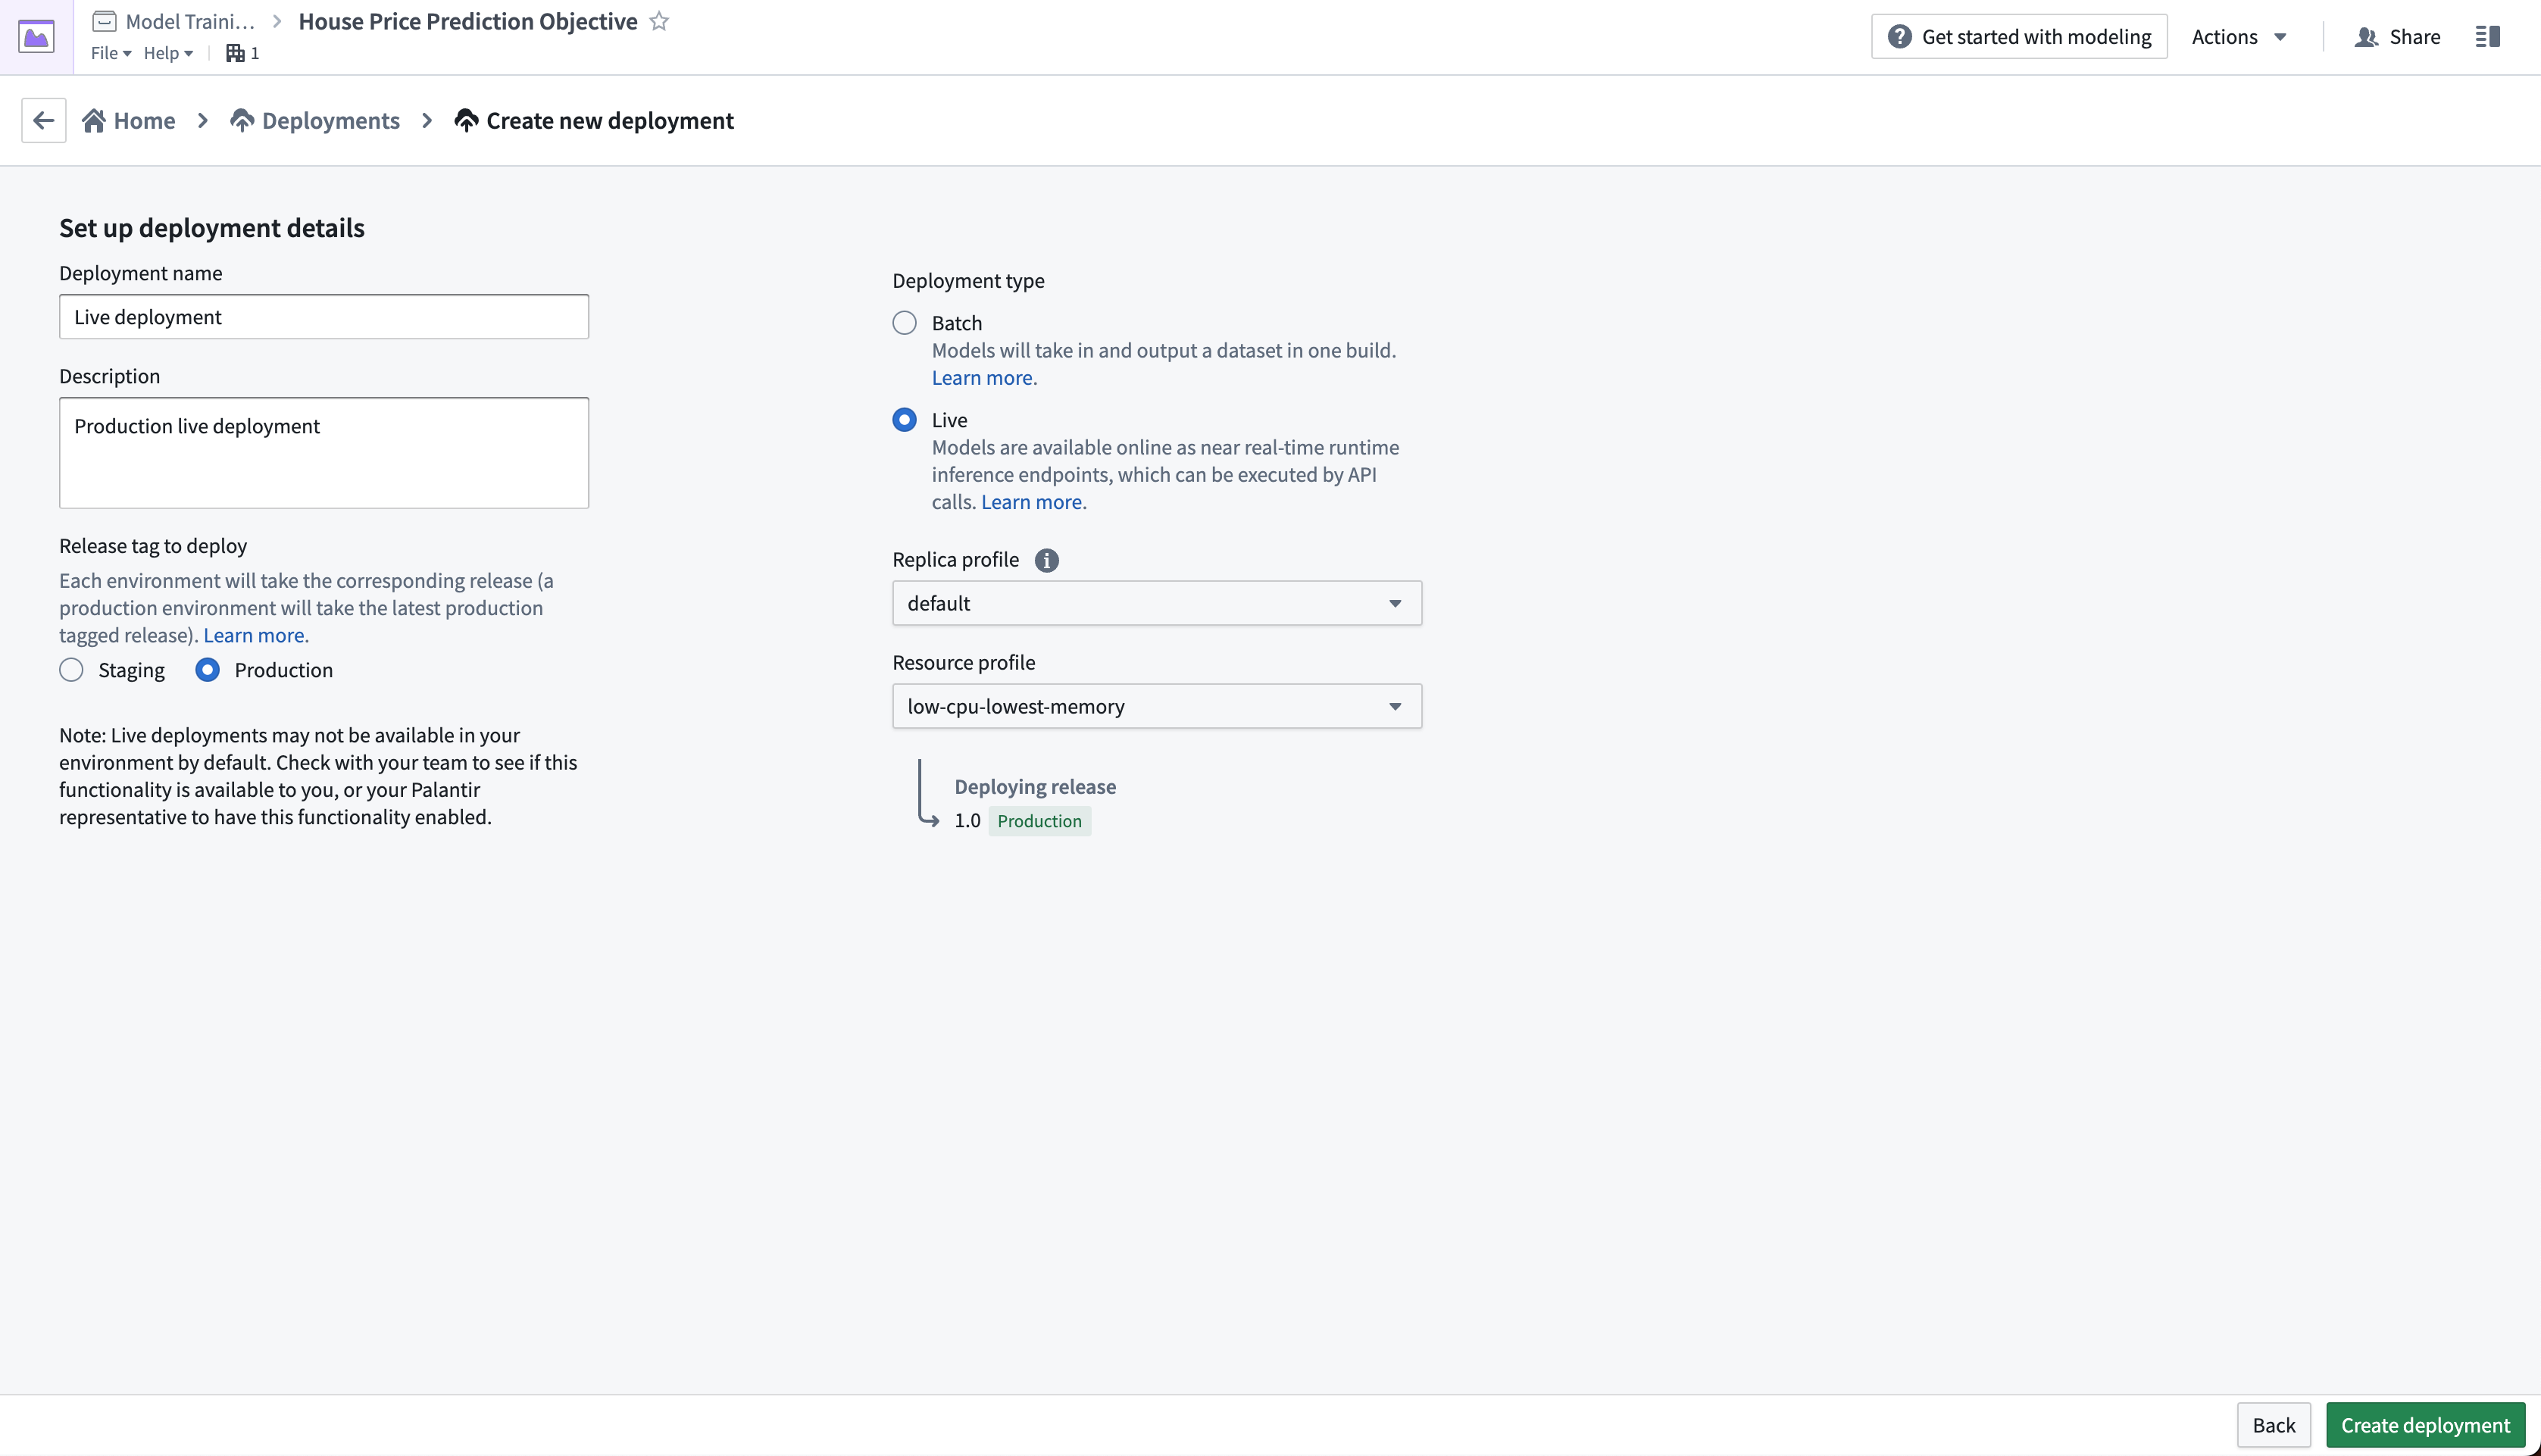
Action: From the objective home page, Click Create Deployment and configure a production live deployment. Give the deployment a name Live deployment and a description Production live deployment. Click Create deployment to save the configuration.
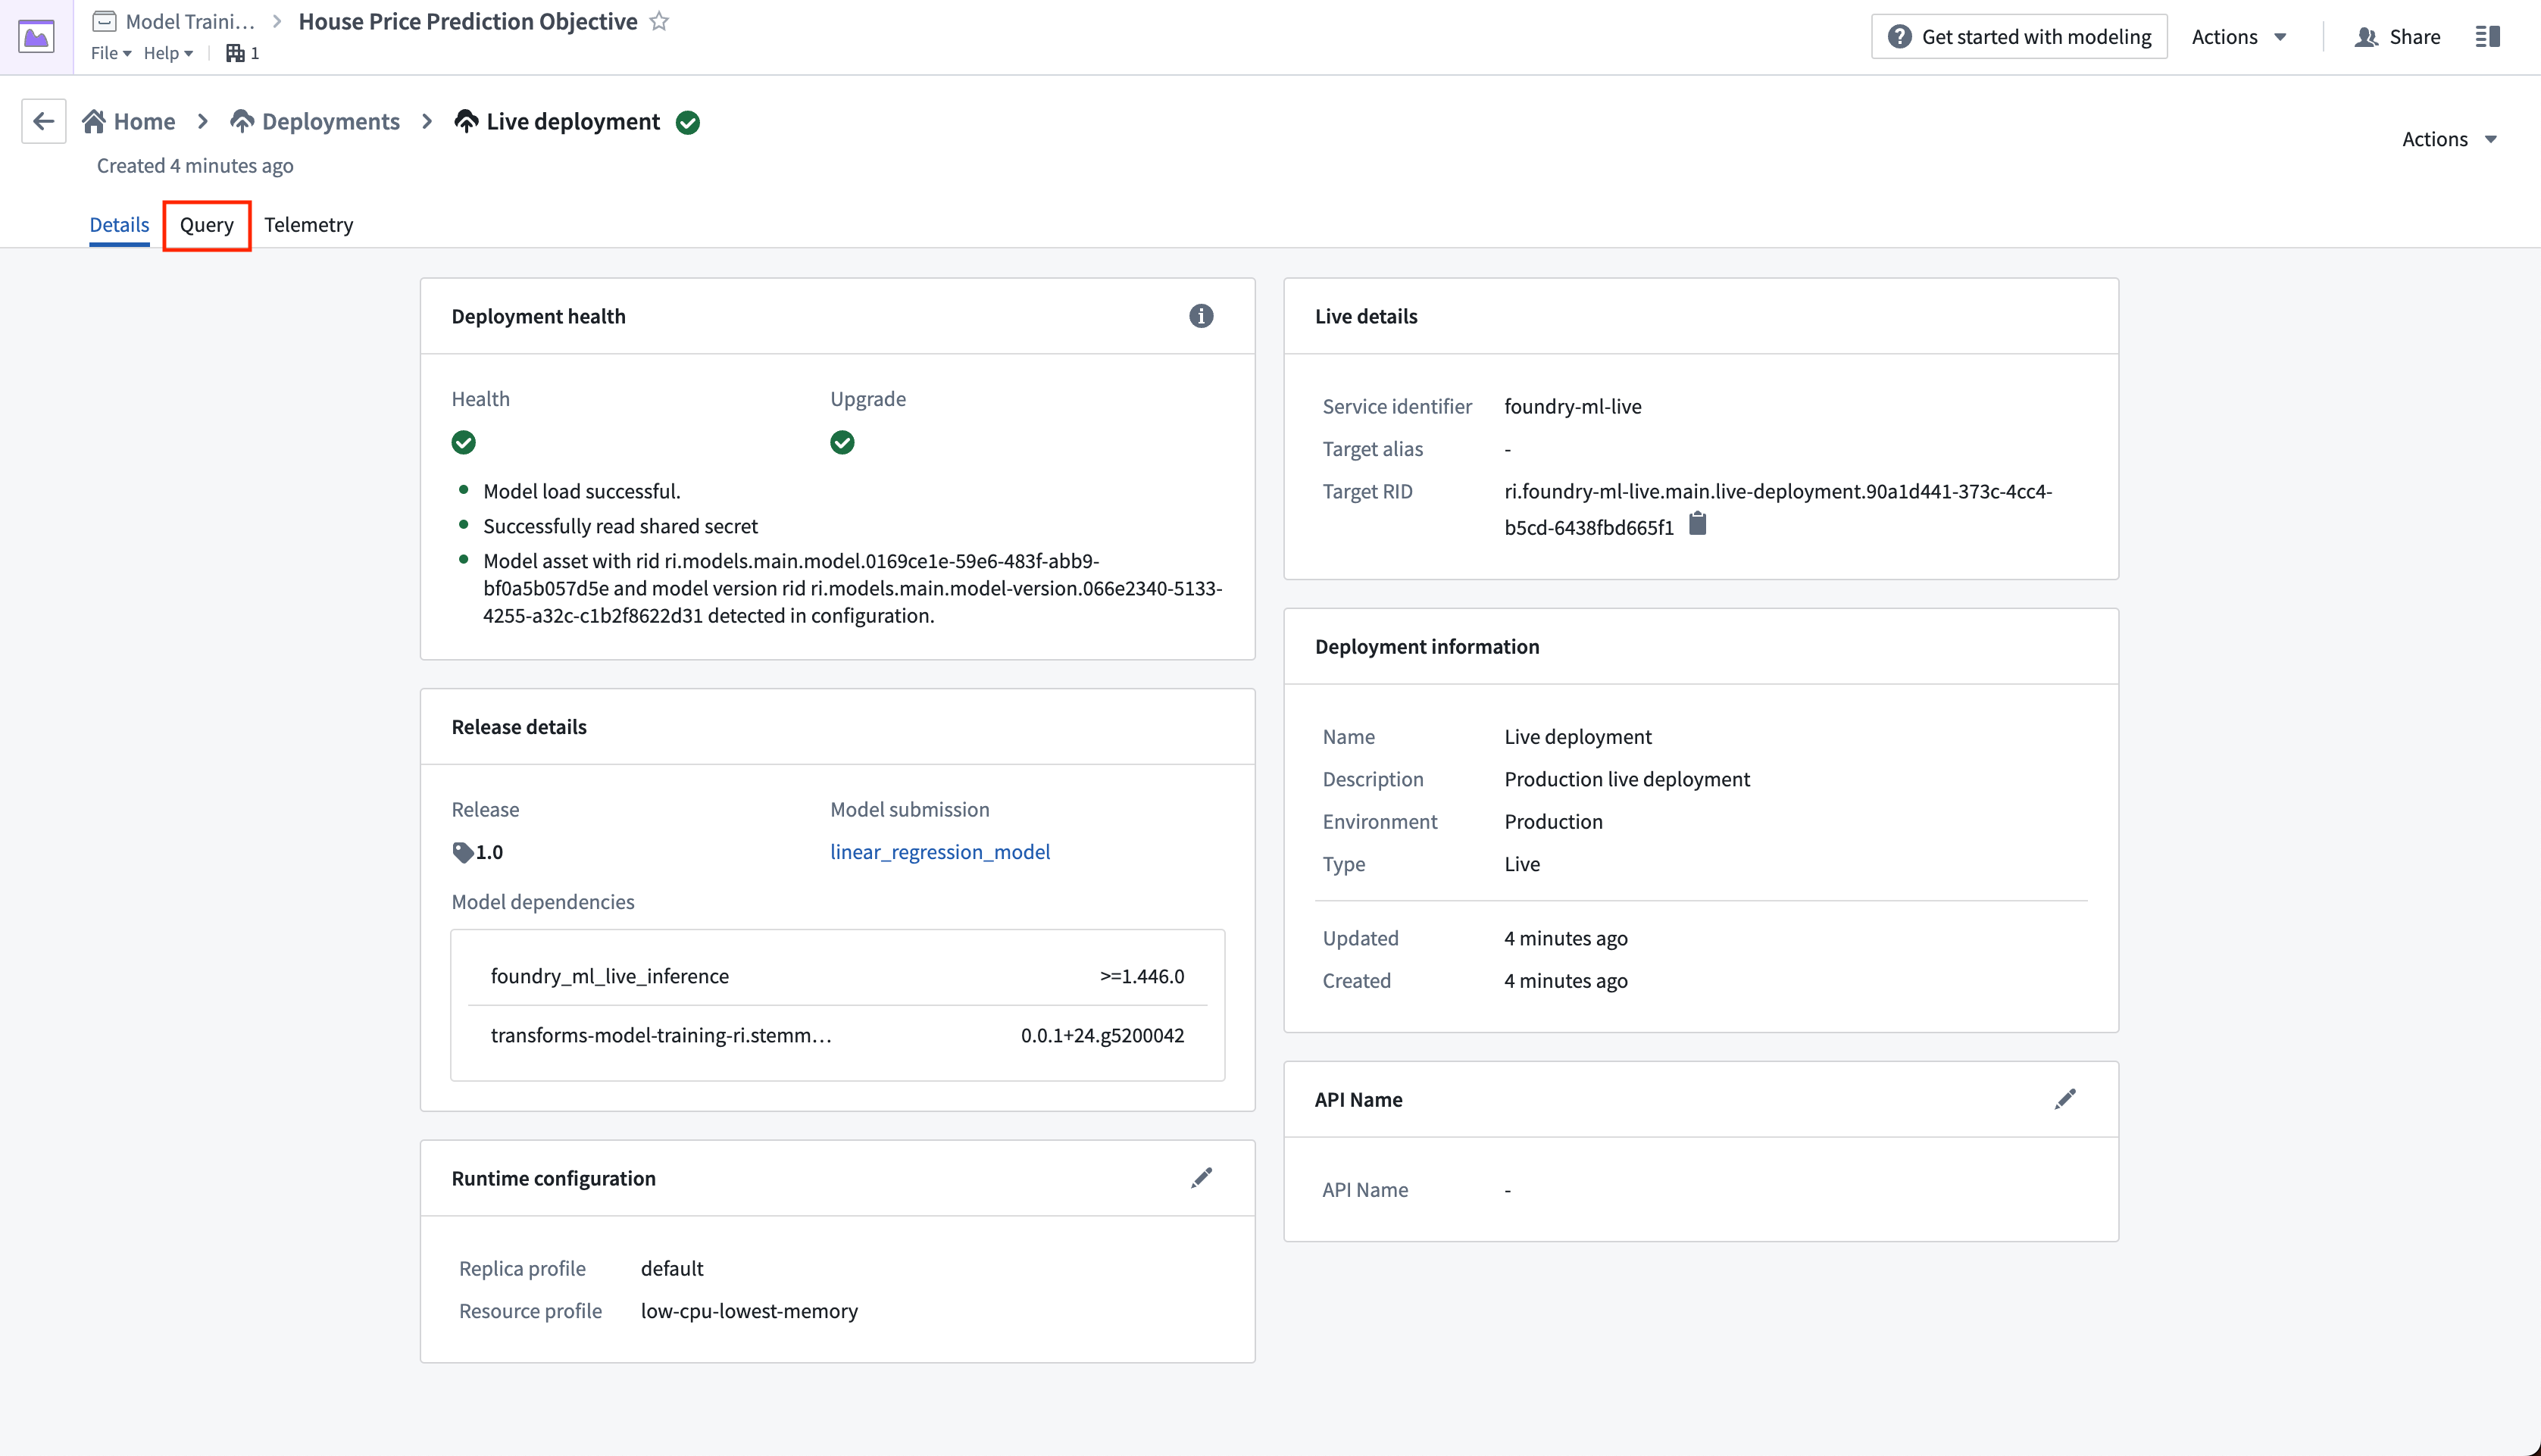
The live deployment may take a few minutes to start. Once it is initialized, you can set up real-time operational applications to connect to the model.
Action: Select your live deployment. When the deployment has upgraded, open the Query tab. Paste in the below example and select Run to test the model.
{
  "df_in": [
    {
    "housing_median_age": 33.4,
    "total_rooms": 1107.0,
    "total_bedrooms": 206,
    "population": 515.3,
    "households": 200.9,
    "median_income": 4.75
    }
  ]
}

Optional: With the example query in the query text box, select the copy icon to copy an example CURL request that you can use to test the model locally. You will need to update \
curl --http2 -H "Content-Type: application/json" -H "Authorization: <BEARER_TOKEN>" -d '{"requestData":[ { "housing_median_age": 33.4, "total_rooms": 1107.0, "total_bedrooms": 206, "population": 515.3, "households": 200.9, "median_income": 4.75 } ], "requestParams":{}}' --request POST <STACK>/foundry-ml-live/api/inference/transform/<DEPLOYMENT_RID>
:::callout{title="Warning"} Live deployments are backed by a continually running server. Once started, Foundry will not terminate a staging or production deployment automatically. Live deployments may be expensive, so make sure to disable or delete this live deployment after you have completed the tutorial. Note that direct deployments can be configured to scale down to zero and start servers as needed, although the first calls will take longer to respond while the server(s) spins up.
You can disable or delete a live deployment through the actions dropdown in the live deployment view. :::
Next step
At this point, we have successfully set up a machine learning project, built a new model, evaluated its performance, and deployed it so the model is now ready for operational use.
Before reading the tutorial conclusion, consider training a new version of your model, evaluating it, and then updating your deployments by creating a new production release. You can use the following logic to train a random forest regressor with scikit-learn and a new, derived property housing_age_per_income instead. You will not need to update your model adapter logic for the below code.
from transforms.api import transform, Input
from palantir_models.transforms import ModelOutput
from main.model_adapters.adapter import SklearnRegressionAdapter


def derive_housing_age_per_income(X):
    X['housing_age_per_income'] = X['housing_median_age'] / X['median_income']
    return X


def train_model(training_df):
    from sklearn.ensemble import RandomForestRegressor
    from sklearn.impute import SimpleImputer
    from sklearn.pipeline import Pipeline
    from sklearn.preprocessing import StandardScaler, FunctionTransformer

    numeric_features = ['median_income', 'housing_median_age', 'total_rooms']

    numeric_transformer = Pipeline(
        steps=[
            ("rooms_per_person_transformer", FunctionTransformer(derive_housing_age_per_income, validate=False)),
            ("imputer", SimpleImputer(strategy="median")),
            ("scaler", StandardScaler())
        ]
    )

    model = Pipeline(
        steps=[
            ("preprocessor", numeric_transformer),
            ("regressor", RandomForestRegressor())
        ]
    )
    X_train = training_df[numeric_features]
    y_train = training_df['median_house_value']
    model.fit(X_train, y_train)

    return model

@transform.using(
    training_data_input=Input("<YOUR_PROJECT_PATH>/data/housing_training_data"),
    model_output=ModelOutput("<YOUR_PROJECT_PATH>/models/random_forest_regressor_model"),
)
def compute(training_data_input, model_output):
    training_df = training_data_input.pandas()
    model = train_model(training_df)

    # Wrap the trained model in a ModelAdapter
    foundry_model = SklearnRegressionAdapter(model)

    # Publish and write the trained model to Foundry
    model_output.publish(
        model_adapter=foundry_model
    )
中文翻译
4. 教程 - 将模型投入生产(Productionize a model)
在继续本教程之前,您应已完成建模项目设置、模型训练以及(可选)模型评估教程。此时,您的建模目标(Modeling Objective)中应至少有一个模型。
在本教程的此步骤中,您将获取机器学习模型并为其设置生产使用环境。
4.1 在建模目标中发布模型(Release a model in modeling objective)
现在我们有了模型,可以将其部署到生产环境。根据模型的预期用途,我们可能希望以几种方式之一将其投入生产。模型可以从建模目标(Modeling Objectives)部署,它提供功能完整的发布和模型管理,包括文档、评估以及支持比较来自多个支持模型的提交。
从建模目标部署可以通过以下方式进行:
- 在批量部署中: 为数据集生成预测,推荐用于一次性计算一组记录的预测。
- 在实时部署中: 将模型托管在 REST 端点之后,推荐用于从外部系统使用模型或需要与模型进行实时交互时。
- 在 Python 转换中: 适用于在转换中进行快速迭代。
或者,偏好更轻量级设置的用户可以在转换中导入模型以进行批量推理,如关于在代码仓库中运行批量推理的教程所述,或者使用直接部署将其部署在 REST 端点之后,而无需创建建模目标。
了解更多关于建模目标中的实时部署与直接部署之间的区别。
什么是建模目标中的发布(release)?
批量部署和实时部署都由模型发布(model releases)支持。如果您在建模目标中发布一个新模型,该建模目标中的部署将自动升级以使用新发布的模型。
这使得模型使用者无需担心其具体实现即可使用模型。数据科学家可以专注于改进模型,而应用程序开发者则专注于构建有用的应用程序。
发布管理
发布和部署分为暂存(staging)和生产(production)。模型开发者可以在生产发布之前将模型发布到暂存环境。这会升级暂存部署,同时保持生产部署不变。然后,数据科学家或应用程序构建者可以在模型投入生产之前在暂存环境中测试新模型。
所有发布以及发布模型的人员都会被记录,以确保团队能够追踪在什么时间使用了哪个模型。这有助于回答监管问题,例如 GDPR 或欧盟 AI 法案所要求的问题。
操作: 导航到建模目标中的主页,滚动到发布部分。选择 发布到暂存(Release to staging),然后选择箭头图标将模型发布到生产环境。您需要为发布指定一个发布编号,例如 "1.0"。
4.2 如何创建用于批量处理的批量部署(How to create a batch deployment for batch processing)
批量部署将根据输入数据集创建一个 Foundry 转换。批量部署的输出是一个数据集,该数据集是使用模型对输入数据集运行推理(生成预测)的结果。
操作: 点击创建部署(Create deployment) 并配置一个生产批量部署。为部署命名 Batch deployment 并添加描述 Production batch deployment。选择您之前创建的 housing_inference_data 数据集作为输入数据集,并在您的 data 文件夹中创建一个名为 house_price_predictions 的新输出数据集。选择 创建部署(Create deployment) 以保存配置。
现在,我们可以安排批量部署,以便每当发布新模型时,我们的输出数据集会自动更新——确保我们始终使用最佳的预测。让我们在输出数据集上添加一个计划,以便输出数据集在接收到新逻辑时重新构建。
操作: 在部署表中选择您的批量部署。选择名为 house_price_predictions 的输出数据集。在 所有操作(All actions) 下,选择 管理计划(Manage schedules)。在 house_price_predictions 数据集上,选择 创建新计划(Create new schedule) -> 当满足多个时间或事件条件时(When multiple time or event conditions are met),当 house_price_predictions 数据集接收到 新逻辑(New logic) 时。最后,选择 保存(Save) 以保存计划。
最后,由于我们尚未更新 house_price_predictions 数据集,我们可以运行它以生成预测。构建完成后,您可以打开 house_price_predictions 数据集,在 prediction 列中查看新生成的预测。
操作: 在计划视图中选择 立即运行(Run now) 以构建 house_price_predictions 数据集。构建完成后,您可以右键单击 house_price_predictions 数据集并选择 打开(Open) 来查看生成的预测。
4.3 如何为模型创建交互式实时端点(How to create an interactive live endpoint for your model)
实时部署(Live deployment)是一个可查询的端点,它将生产模型托管在 REST 端点之后。当您希望与模型进行交互式交互时,实时部署非常有用,并且可以从以下位置查询:
- 模型上的函数(Functions on Models): 模型上的函数 允许直接从 Foundry 中的 Slate 或 Workshop 应用程序查询模型。
- 实时外部系统: 例如需要根据用户行为生成实时预测的网站。
- CURL: 用于本地测试您的模型。
在此示例中,您可能希望构建一个交互式仪表板,允许用户输入人口普查区的详细信息,并查看这如何影响房价中位数。
操作: 从目标主页,点击创建部署(Create Deployment) 并配置一个生产实时部署。为部署命名 Live deployment 并添加描述 Production live deployment。点击创建部署(Create deployment) 以保存配置。
实时部署可能需要几分钟才能启动。一旦初始化完成,您可以设置实时操作应用程序以连接到模型。
操作: 选择您的实时部署。当部署升级后,打开 查询(Query) 选项卡。粘贴下面的示例并选择 运行(Run) 以测试模型。
{
  "df_in": [
    {
    "housing_median_age": 33.4,
    "total_rooms": 1107.0,
    "total_bedrooms": 206,
    "population": 515.3,
    "households": 200.9,
    "median_income": 4.75
    }
  ]
}
可选: 在查询文本框中输入示例查询后,选择复制图标以复制一个示例 CURL 请求,您可以使用它在本地测试模型。您需要更新 \
curl --http2 -H "Content-Type: application/json" -H "Authorization: <BEARER_TOKEN>" -d '{"requestData":[ { "housing_median_age": 33.4, "total_rooms": 1107.0, "total_bedrooms": 206, "population": 515.3, "households": 200.9, "median_income": 4.75 } ], "requestParams":{}}' --request POST <STACK>/foundry-ml-live/api/inference/transform/<DEPLOYMENT_RID>
:::callout{title="警告"} 实时部署由持续运行的服务器支持。一旦启动,Foundry 不会自动终止暂存或生产部署。实时部署可能成本较高,因此请确保在完成教程后禁用或删除此实时部署。请注意,直接部署可以配置为缩减到零并根据需要启动服务器,尽管在服务器启动期间,首次调用响应时间会较长。
您可以通过实时部署视图中的操作下拉菜单禁用或删除实时部署。 :::
下一步
至此,我们已经成功设置了一个机器学习项目,构建了一个新模型,评估了其性能,并将其部署,使模型现在可以投入运营使用。
在阅读教程总结之前,考虑训练一个新版本的模型,对其进行评估,然后通过创建新的生产发布来更新您的部署。您可以使用以下逻辑来训练一个使用 scikit-learn 的随机森林回归器(Random Forest Regressor),并使用一个新的派生属性 housing_age_per_income。您无需为以下代码更新模型适配器逻辑。
from transforms.api import transform, Input
from palantir_models.transforms import ModelOutput
from main.model_adapters.adapter import SklearnRegressionAdapter


def derive_housing_age_per_income(X):
    X['housing_age_per_income'] = X['housing_median_age'] / X['median_income']
    return X


def train_model(training_df):
    from sklearn.ensemble import RandomForestRegressor
    from sklearn.impute import SimpleImputer
    from sklearn.pipeline import Pipeline
    from sklearn.preprocessing import StandardScaler, FunctionTransformer

    numeric_features = ['median_income', 'housing_median_age', 'total_rooms']

    numeric_transformer = Pipeline(
        steps=[
            ("rooms_per_person_transformer", FunctionTransformer(derive_housing_age_per_income, validate=False)),
            ("imputer", SimpleImputer(strategy="median")),
            ("scaler", StandardScaler())
        ]
    )

    model = Pipeline(
        steps=[
            ("preprocessor", numeric_transformer),
            ("regressor", RandomForestRegressor())
        ]
    )
    X_train = training_df[numeric_features]
    y_train = training_df['median_house_value']
    model.fit(X_train, y_train)

    return model

@transform.using(
    training_data_input=Input("<YOUR_PROJECT_PATH>/data/housing_training_data"),
    model_output=ModelOutput("<YOUR_PROJECT_PATH>/models/random_forest_regressor_model"),
)
def compute(training_data_input, model_output):
    training_df = training_data_input.pandas()
    model = train_model(training_df)

    # 将训练好的模型包装在 ModelAdapter 中
    foundry_model = SklearnRegressionAdapter(model)

    # 发布并将训练好的模型写入 Foundry
    model_output.publish(
        model_adapter=foundry_model
    )