Train a model in a Jupyter® notebook(在 Jupyter® Notebook 中训练模型)
:::callout{theme="warning"} Model assets do not currently support the SparkML library. We recommend switching to a single-node machine learning framework like PyTorch, TensorFlow, XGBoost, LightGBM, or scikit-learn. :::
Models can be trained in a Jupyter® notebook in Code Workspaces. To train a model, complete the following steps:
- Create a Jupyter® code workspace
- Import data and write model training code
- Add a model output and implement the model adapter
- Publish the model to Foundry
- Consume the model
The supervised model training tutorial provides additional instruction on model training in Jupyter® code workspaces.
Create a Jupyter® code workspace
- To create a new Jupyter® code workspace for model training, navigate to your project folder and select + New > Jupyter® Code Workspace, or select + New code workspace in the Code Workspaces application.
- In Code Workspaces, select JupyterLab® as the workspace type, then select Continue on the bottom right.
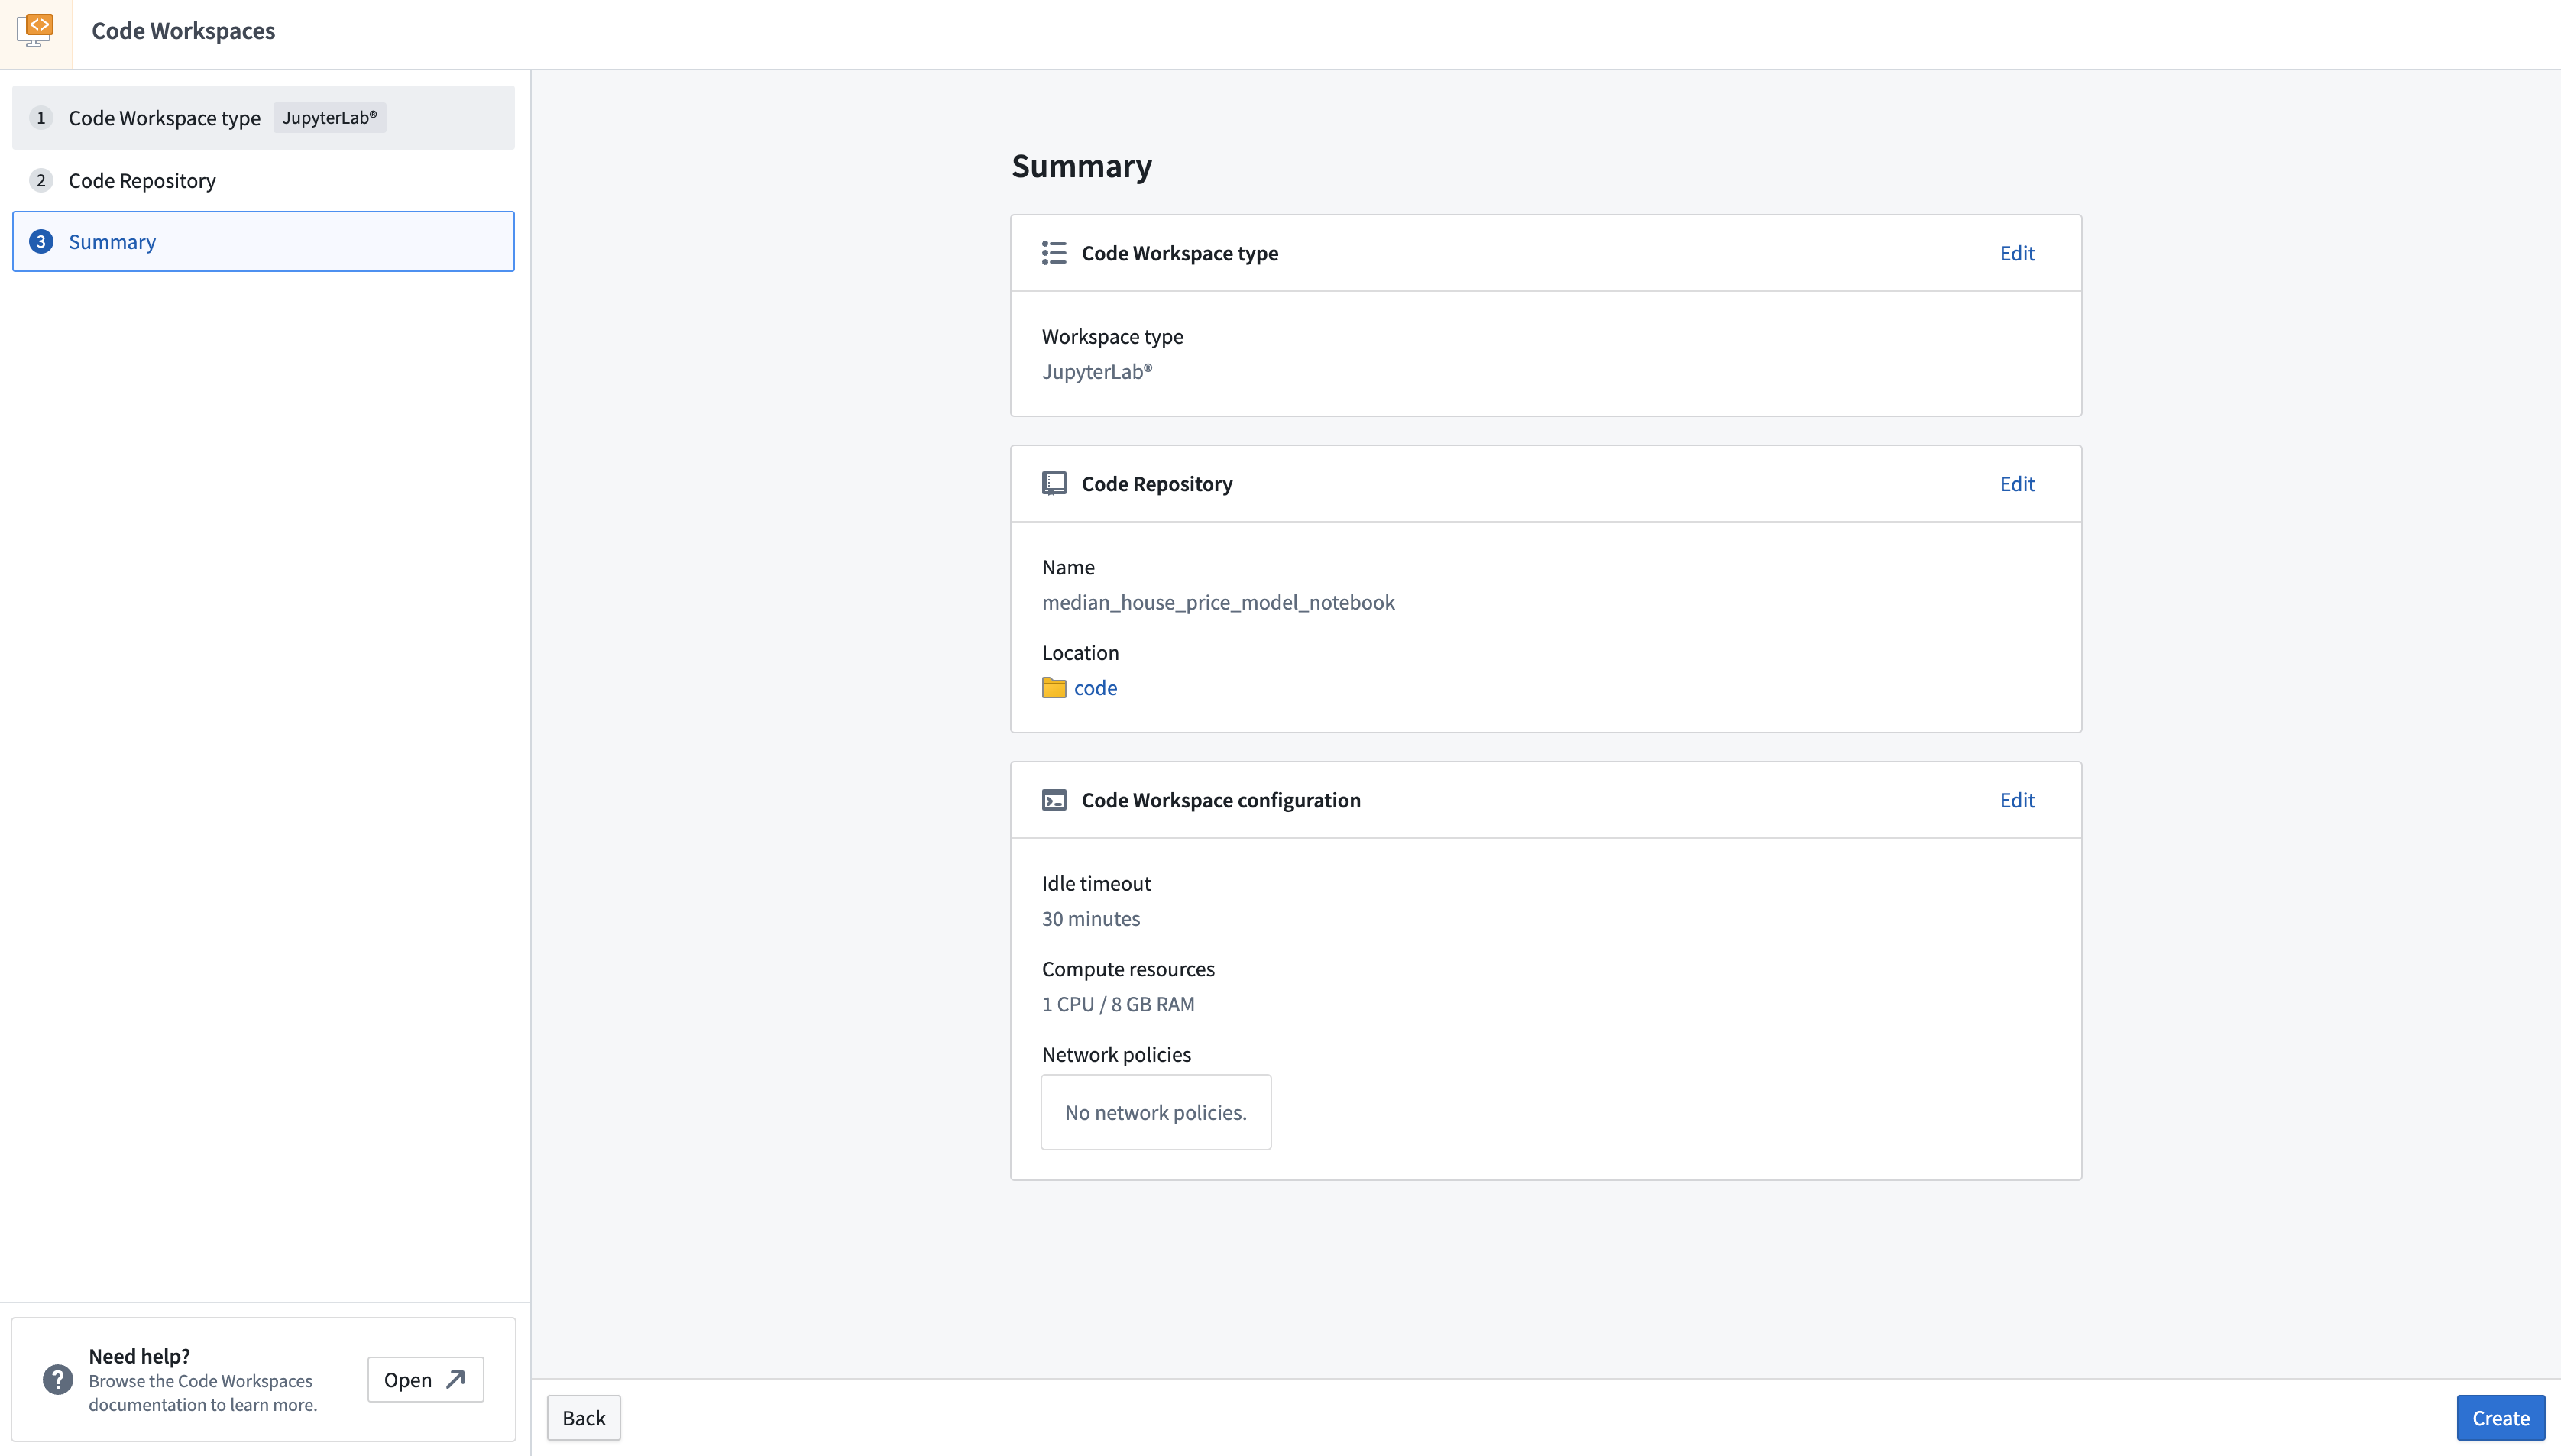
- Name your workspace in relation to the model you are training. You can optionally configure additional settings such as the workspace's compute resources or network policies by selecting Advanced in the Code Repository step. Once you have named your notebook, Select Continue.
- Lastly, select Create to create and launch the workspace.
Import data and write model training code
After establishing a workspace, you can create a new notebook to import data and begin writing model training code.
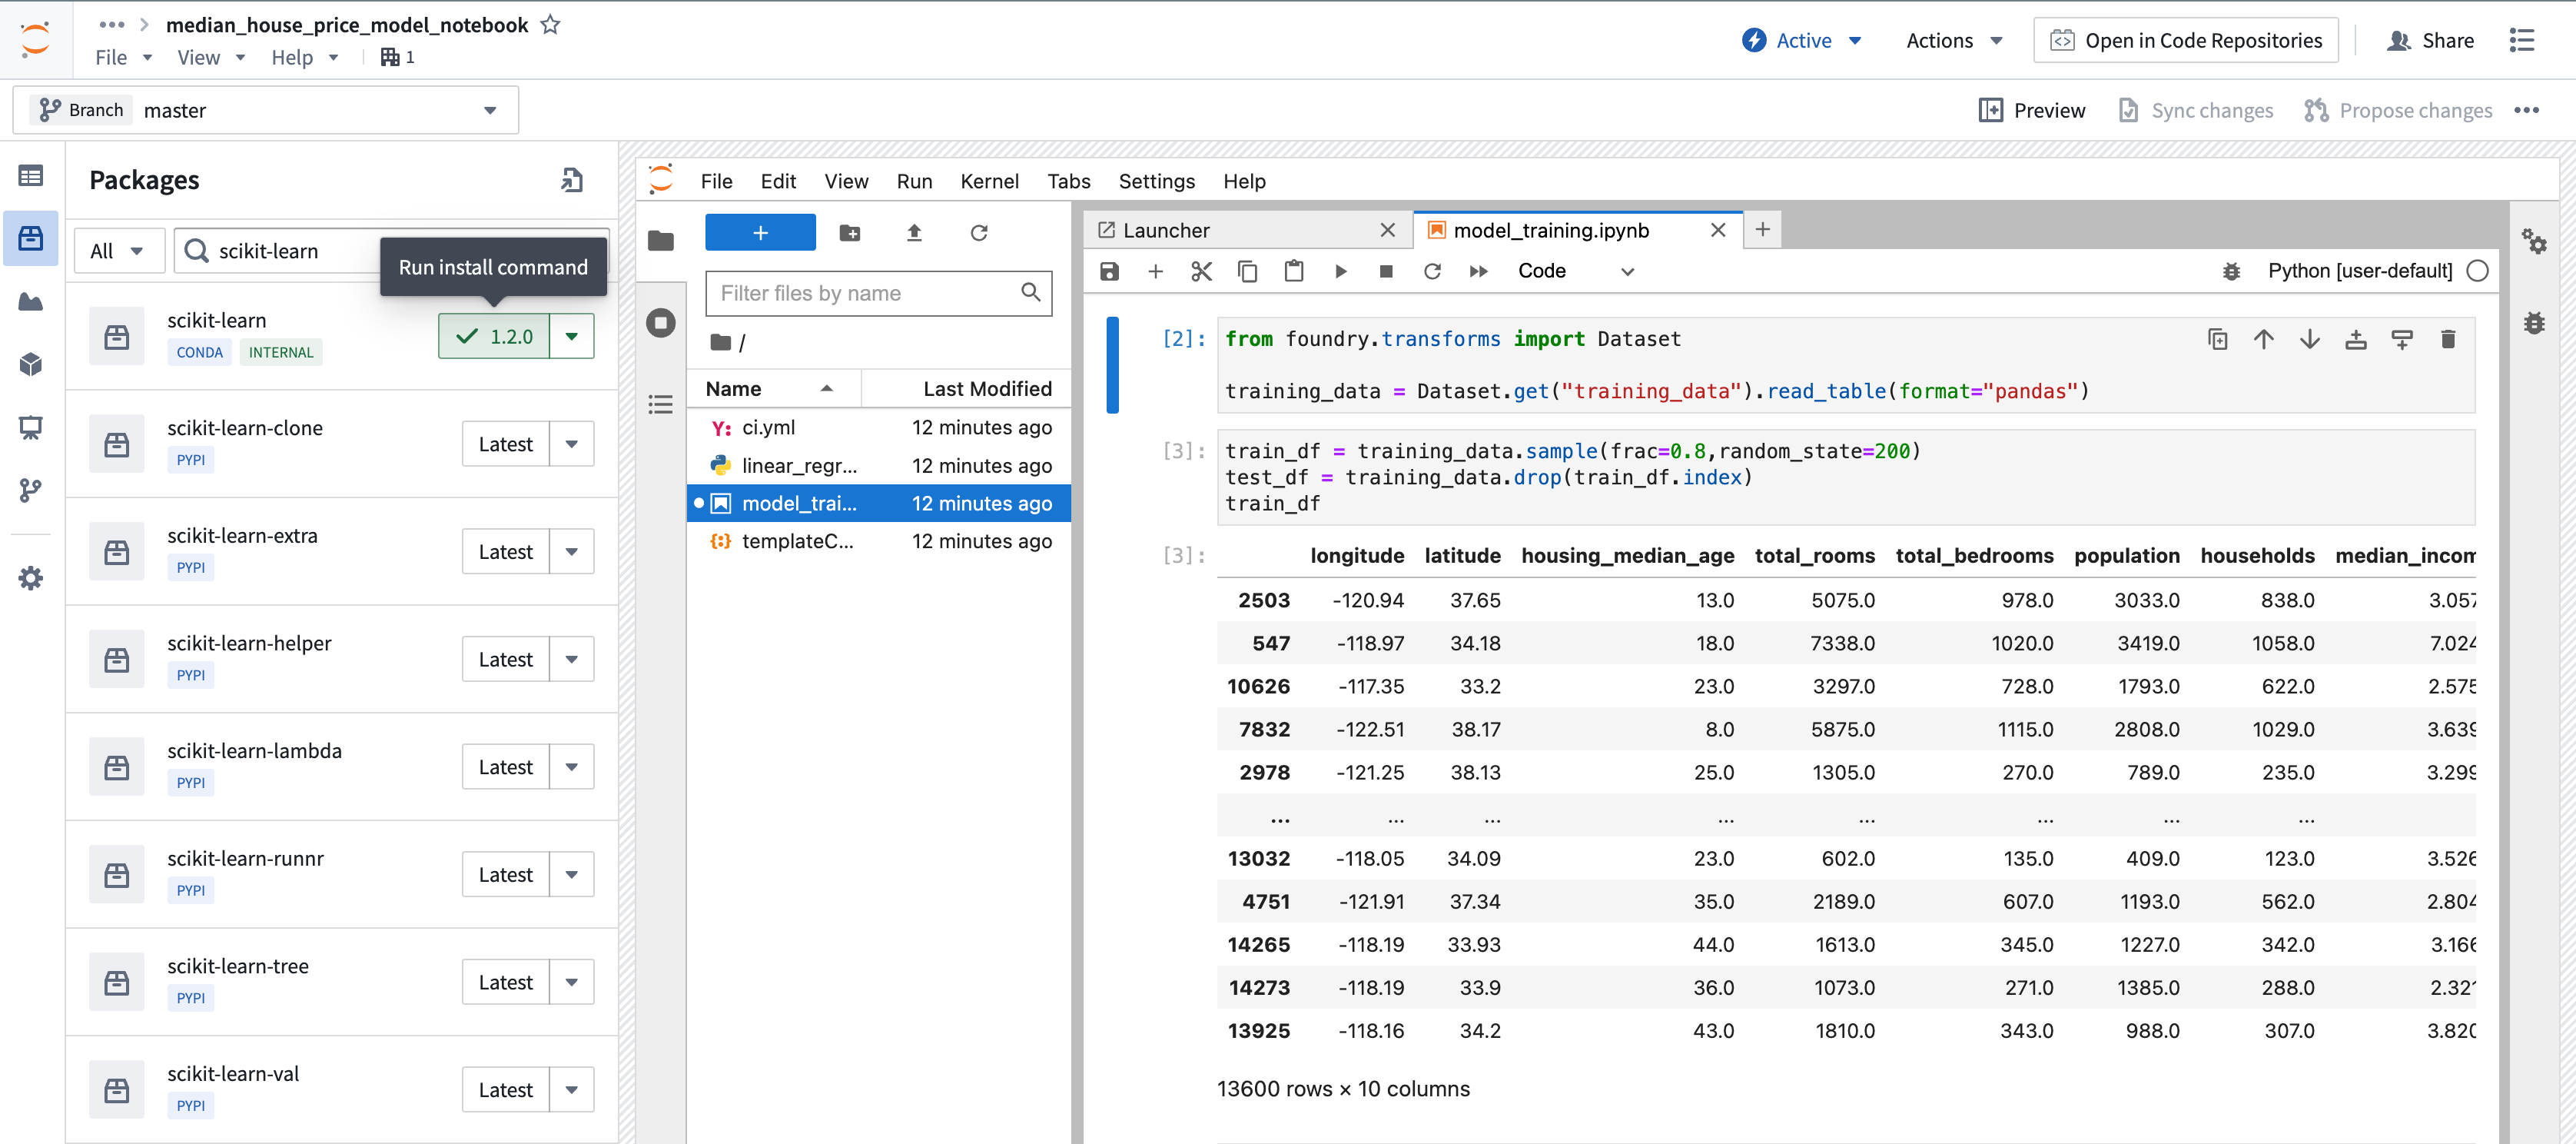
:::callout{theme="neutral" title="Installing dependencies"} Code Workspaces grants access to packages available in other Foundry code authoring environments, such as Code Repositories. To add a new package, open the Packages tab available on the left sidebar of your workspace, search for the package you need, and select, then click on Latest or another available version to open a Terminal and run the corresponding install command. :::
Import data into the workspace
The Code Workspaces application enables users to import existing Foundry datasets for use as training data. Training data used in Code Workspaces will need a human-readable alias as its resource identifier.
- To import a dataset, open the Data tab at the top of the left sidebar, then select Add dataset > Read existing datasets.
- Select the dataset you want to import to your workspace, enter a dataset alias, and then select + Add dataset to complete Step 1.
- Code Workspaces will then generate a code snippet in Step 2 where you can select the dataset format, such as a
pandas DataFrame. To copy the generated code snippet into your notebook, select the clipboard icon in the upper right corner of the code snippet, then select Done. Below is an example of a code snippet generated by Code Workspaces:
from foundry.transforms import Dataset

training_data = Dataset.get("my-alias").read_table(format="pandas")
- With the code snippet copied to your clipboard, launch a Notebook from the
Launcherpanel by selecting Python [user-default], and pasting the code snippet into the first cell. - Run the code to import the dataset by selecting the "play" icon in the action toolbar or by selecting Run > Run Selected Cells in the menu bar.
Write model training code
The open source tools available for model development in Code Workspaces allow you to train your model for a wide array of analytical use cases, such as regression or classification. Below is a sample linear regression model that predicts median household income using scikit-learn.
- Install
scikit-learnin your workspace by selecting the Packages icon under Data in the left sidebar. - Choose between
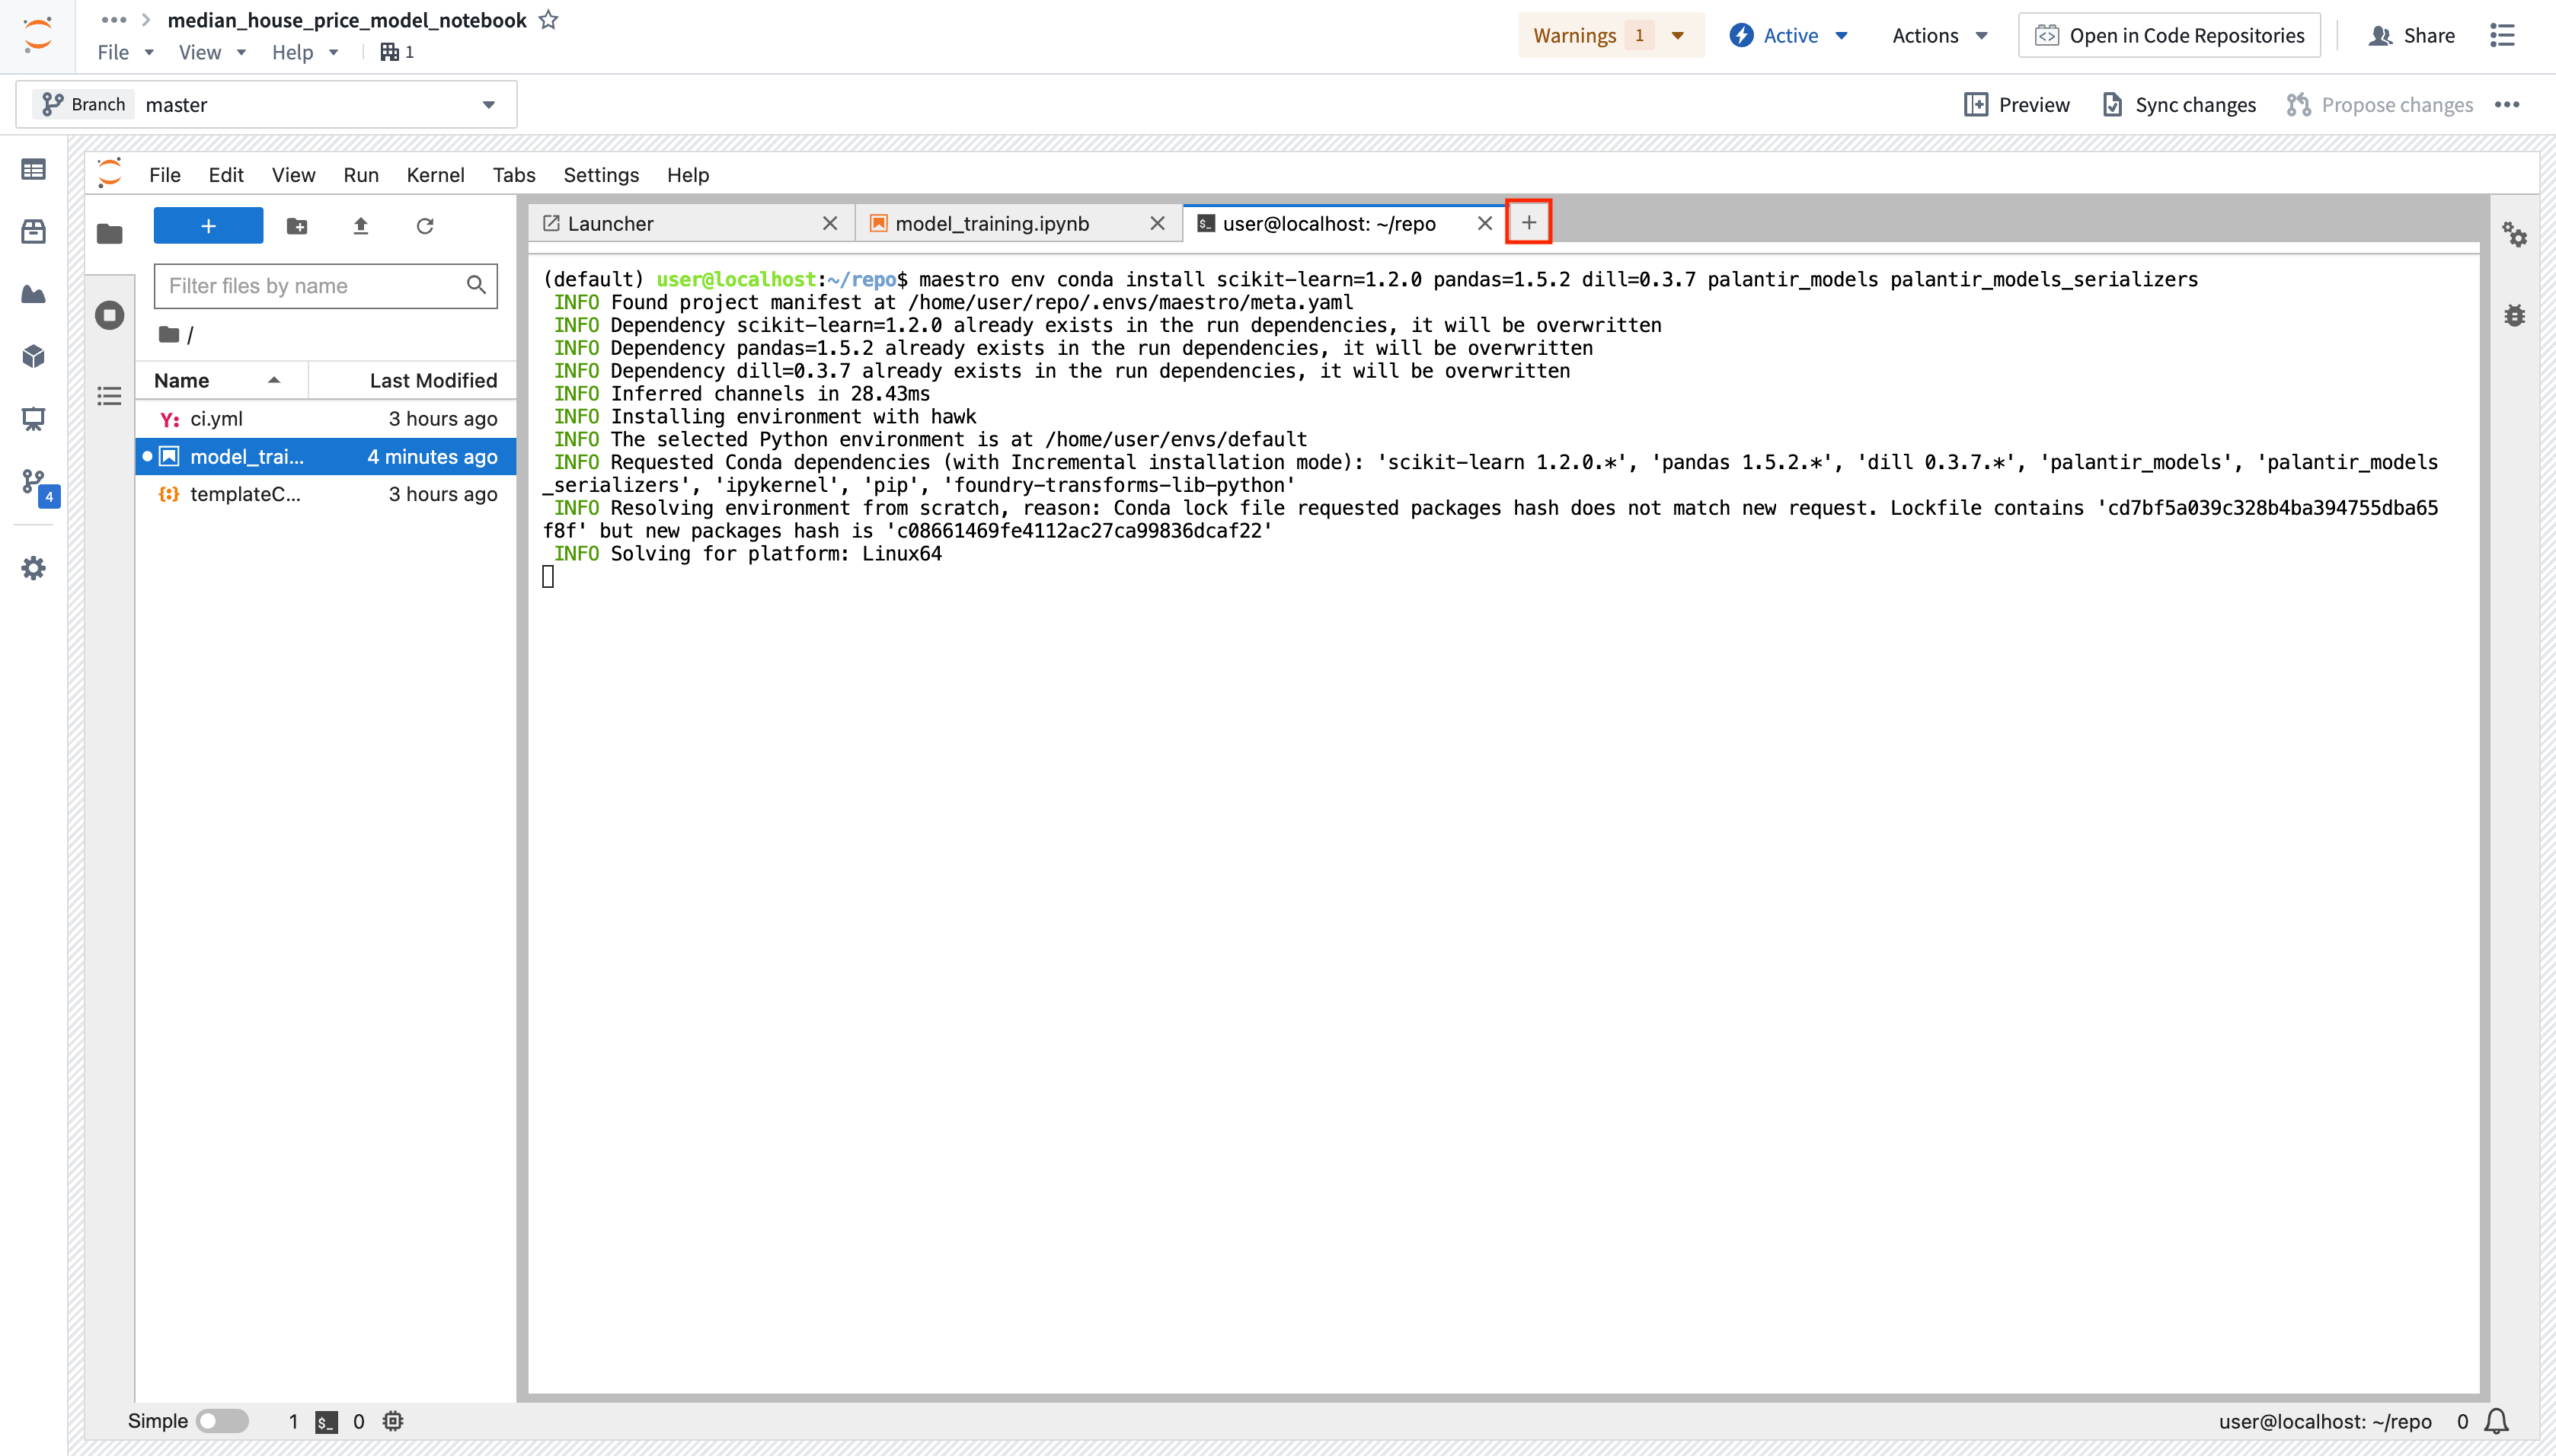
CondaorPyPimanagers in the dropdown to the left of the search bar, then search forscikit-learn. - To run the install command in the terminal, choose a package version in the drop down, then select the version button. Alternatively, you can install several packages into your managed environment at once from a terminal using the
maestro env conda installormaestro env pip installcommands.
Package installation using the sidebar:
Package installation from the terminal:
After writing and running your model in Code Workspaces, you can publish it to Foundry for integration across other applications. Below is an example of model training code:
from sklearn.impute import SimpleImputer
from sklearn.linear_model import LinearRegression
from sklearn.pipeline import Pipeline
from sklearn.preprocessing import StandardScaler

numeric_features = ['median_income', 'housing_median_age', 'total_rooms']
numeric_transformer = Pipeline(
    steps=[
        ("imputer", SimpleImputer(strategy="median")),
        ("scaler", StandardScaler())
    ]
)

model = Pipeline(
    steps=[
        ("preprocessor", numeric_transformer),
        ("classifier", LinearRegression())
    ]
)
X_train = training_dataframe[numeric_features]
y_train = training_dataframe['median_house_value']
model.fit(X_train, y_train)
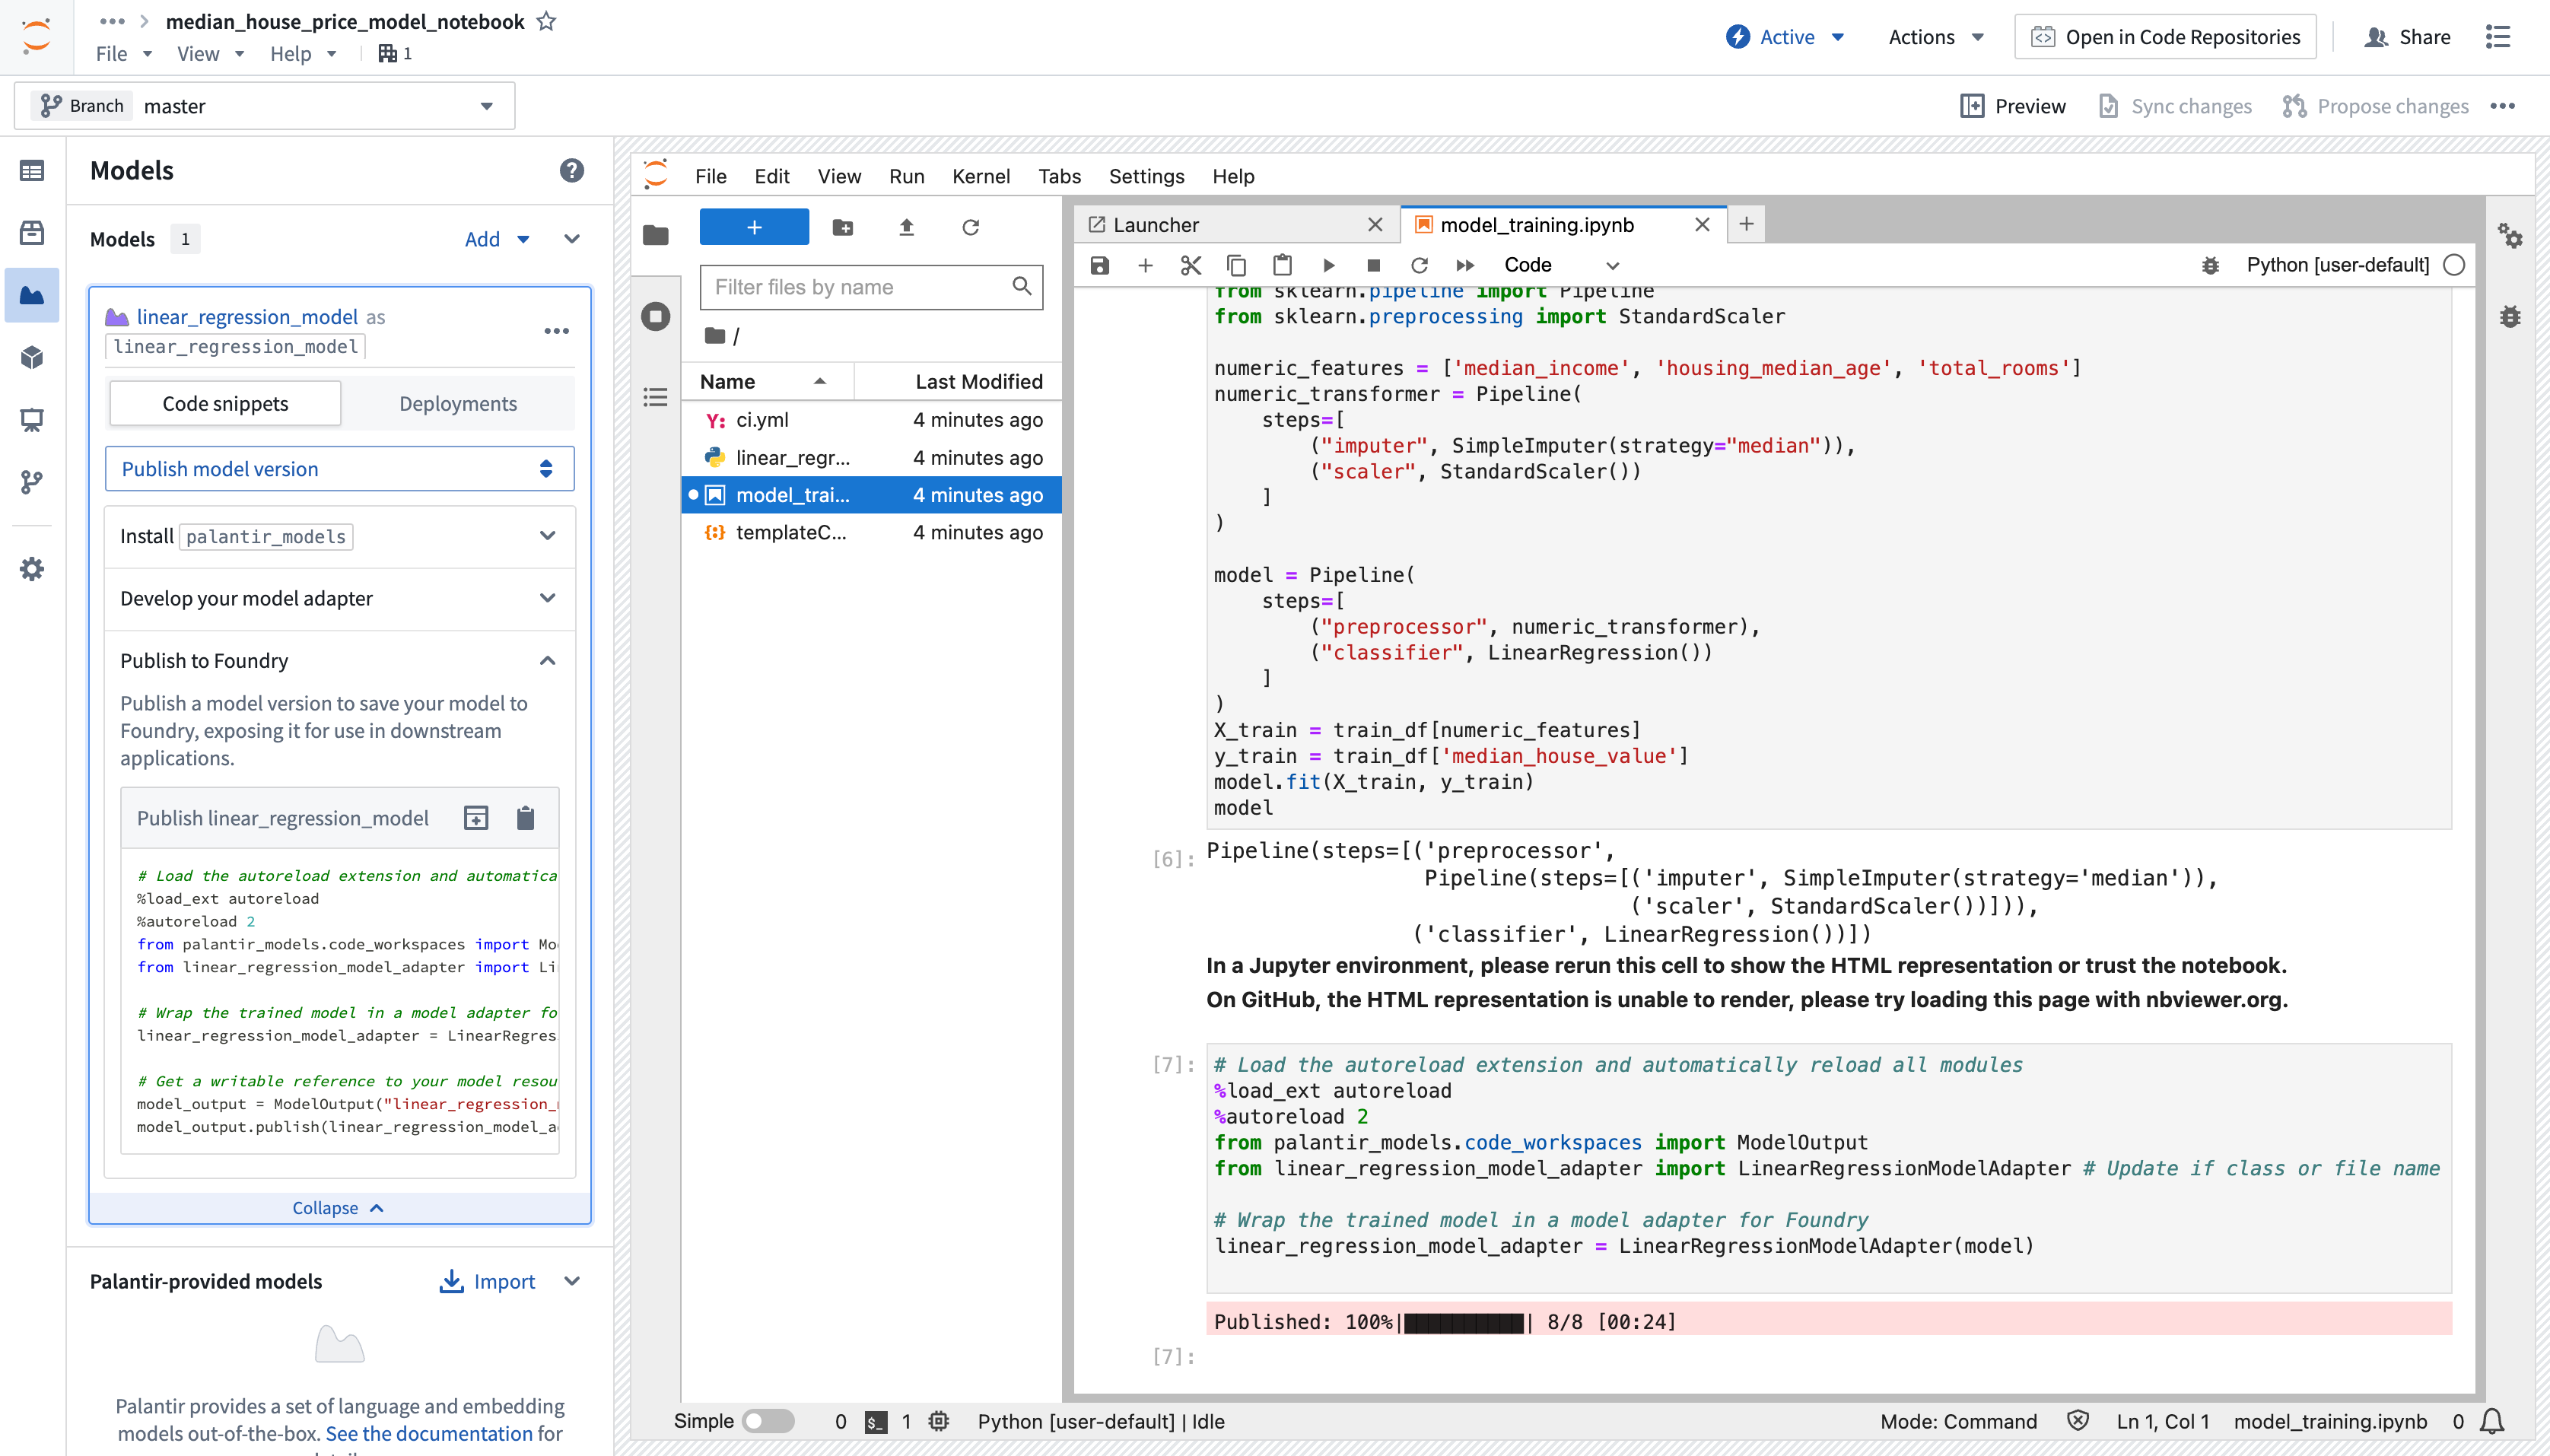
Add a model output and implement the model adapter
To make a model available outside of Code Workspaces, you must add a new model output to the workspace. Code Workspaces will automatically create and store a new .py file in your existing workspace after you create a new model output, which you can use to implement a model adapter. Model adapters provide a standard interface for all models in Foundry, ensuring the platform's production applications can consume models immediately after they are created. Foundry infrastructure will load the model, configure its Python dependencies, expose its API(s), and enable model interfacing.
- To add an output, open the Models tab in the left sidebar below Packages and select Add model > Create new model. Name the model and save it to a location of your choice.
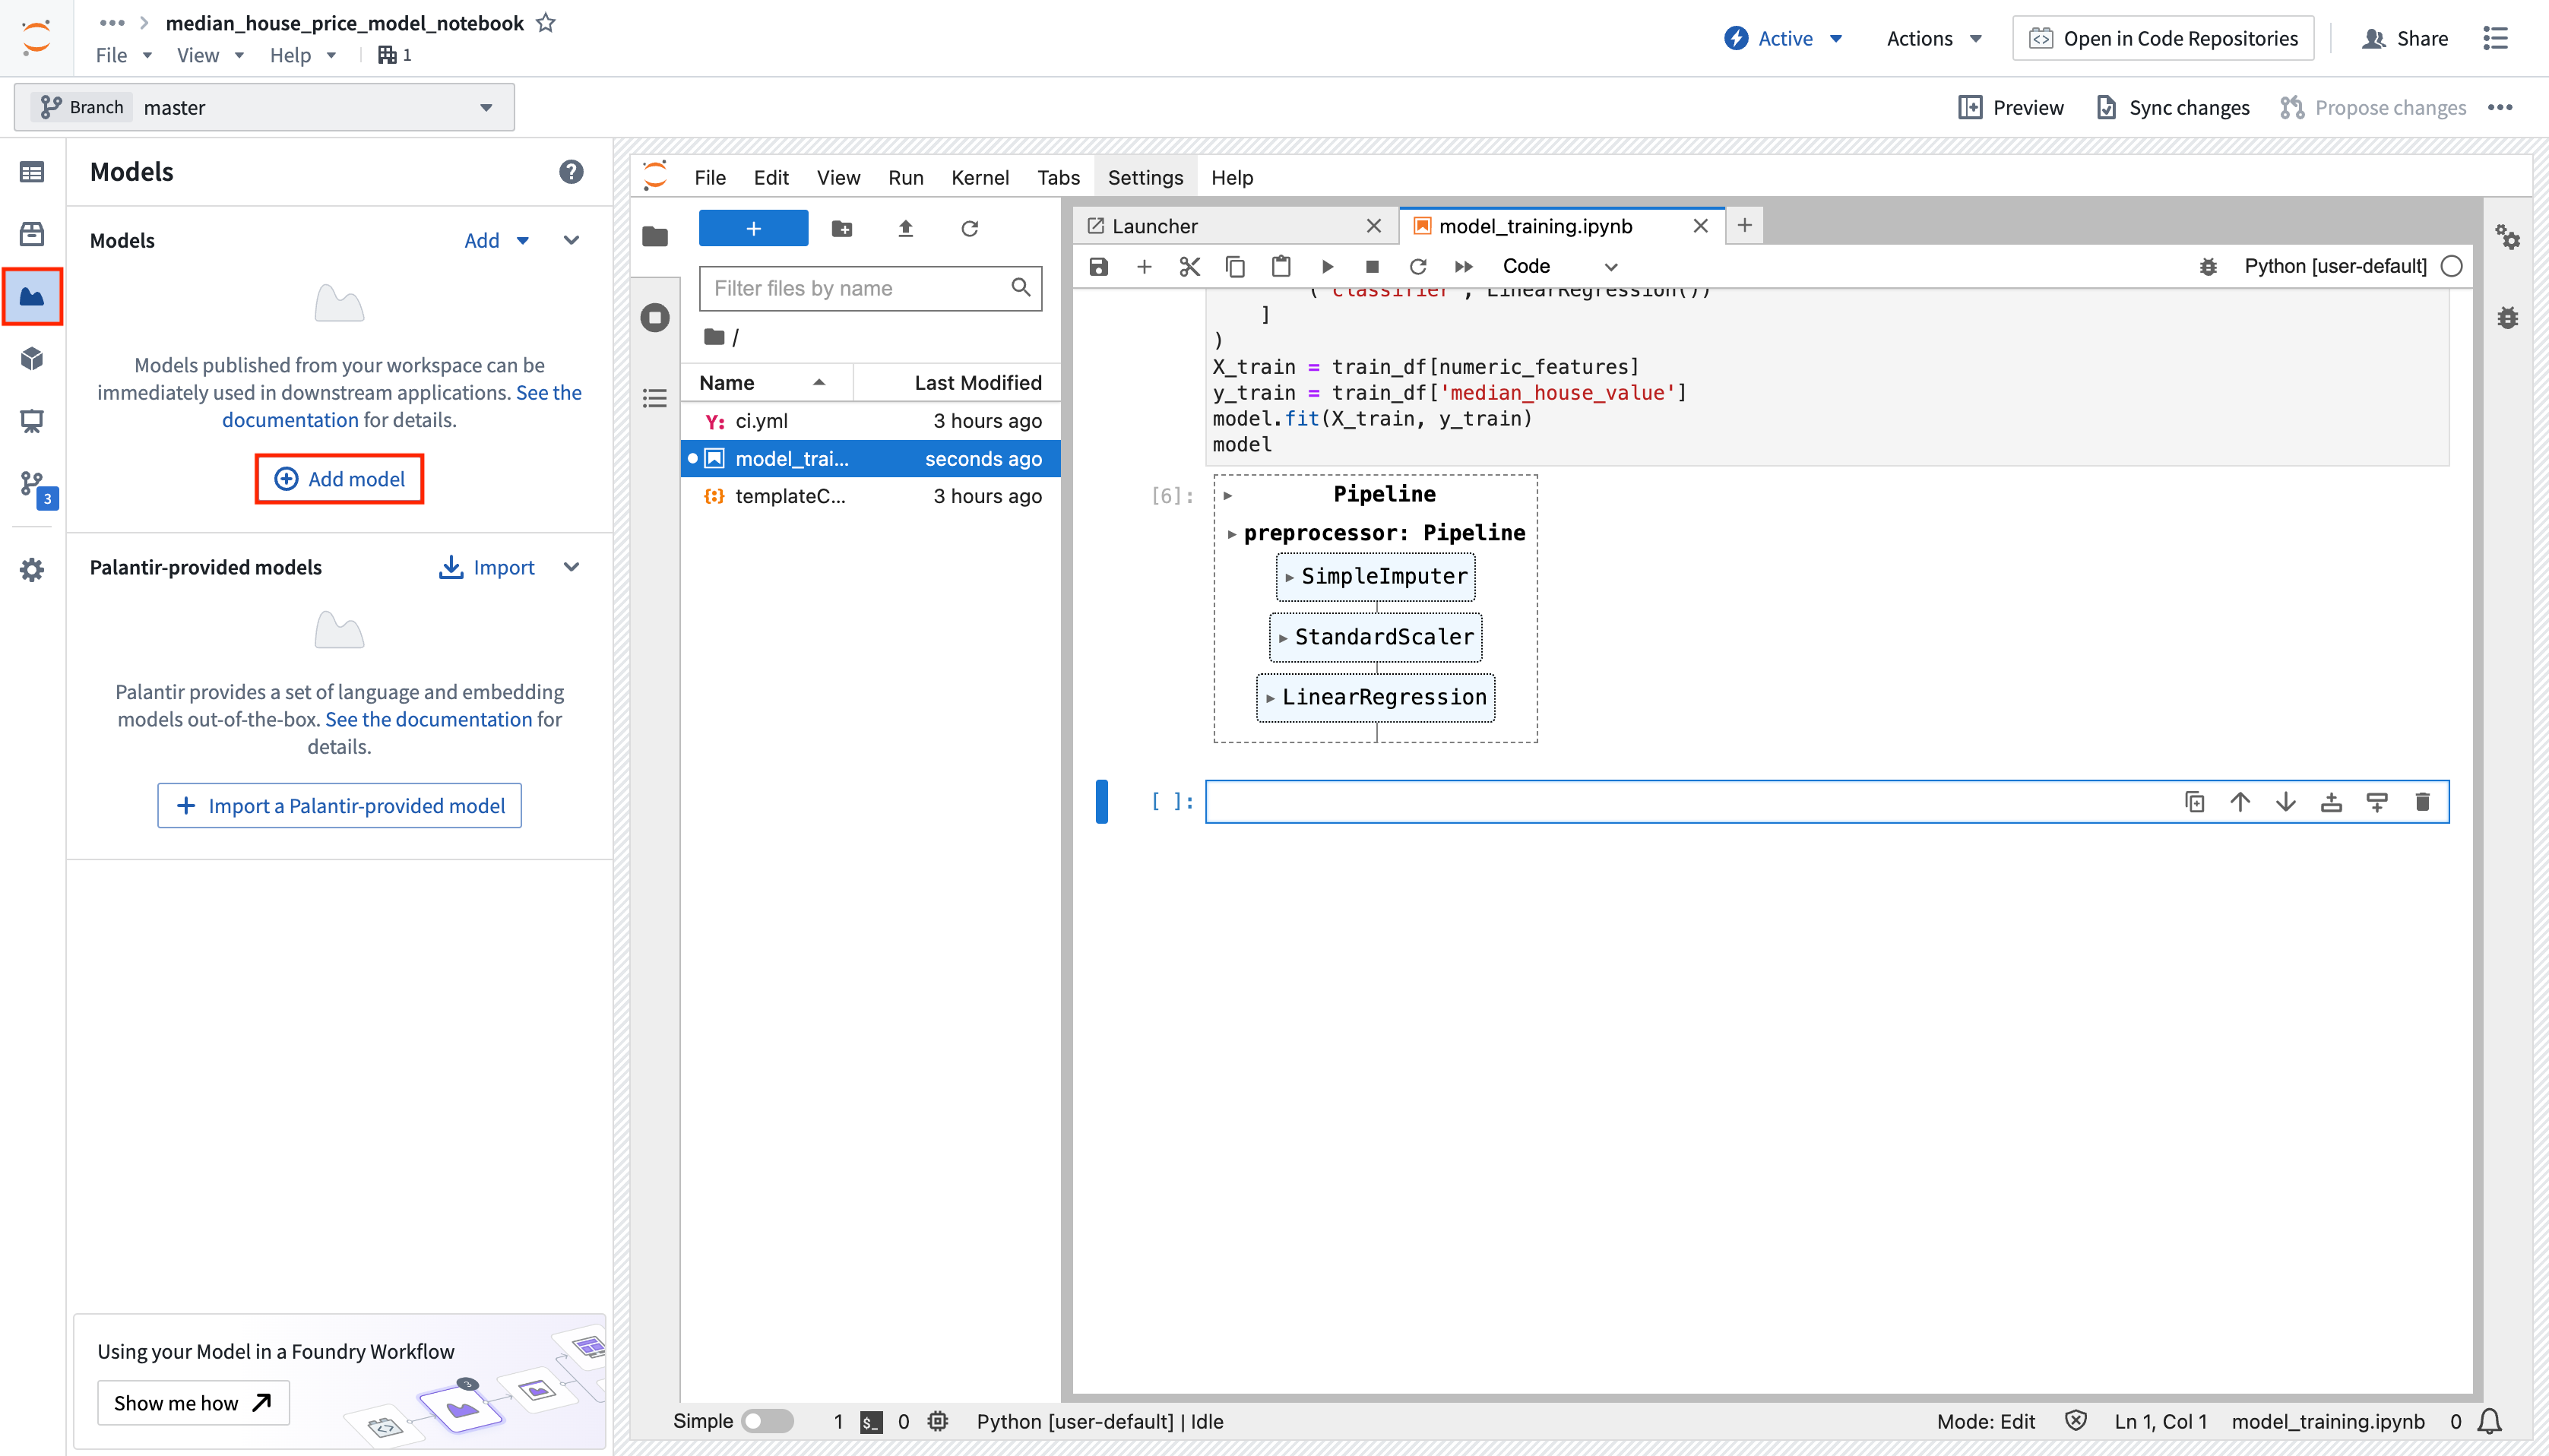
-
After you name and save your model, you will be prompted to Publish a new model in the left panel of your workspace. Complete Step 1: Install
palantir_modelsby copying the code snippet to your clipboard and running it in your original.ipynbnotebook file. -
After you successfully install
palantir_models, create and develop your model adapter in Step 2: Develop your model adapter. A model adapter must implement the following methods: -
saveandload: In order to reuse your model, you need to define how your model should be saved and loaded. Palantir provides default methods of serialization (saving), and in more complex cases, you can implement custom serialization logic. api: Defines the API of your model and tells Foundry what type of input data your model requires.predict: Called by Foundry to provide data to your model. This is where you can pass input data to the model and generate inferences (predictions).
Refer to the model adapter API reference for more details.
The code sample below implements the functions described above to develop an adapter for a linear regression model using scikit-learn:
import palantir_models as pm
from palantir_models.serializers import DillSerializer

class LinearRegressionModelAdapter(pm.ModelAdapter):

    @pm.auto_serialize(
        model=DillSerializer()
    )
    def __init__(self, model):
        self.model = model

    @classmethod
    def api(cls):
        columns = [
            ('median_income', float),
            ('housing_median_age', float),
            ('total_rooms', float),
        ]
        return {"df_in": pm.Pandas(columns)}, \
               {"df_out": pm.Pandas(columns + [('prediction', float)])}

    def predict(self, df_in):
        df_in['prediction'] = self.model.predict(
            df_in[['median_income', 'housing_median_age', 'total_rooms']]
        )
        return df_in
Refer to the model adapter documentation for more guidance.
(Optional) Log metrics and hyperparameters to a model experiment
Model experiments is a lightweight framework for logging metrics and hyperparameters produced during a model training run, which can then be published alongside a model and persisted in the model page.
Learn more about creating and writing to experiments.
Publish the model to Foundry
To publish the model to Foundry, copy the available snippet for the model you wish to publish in the left sidebar under Step 3: Publish your model, paste it in your notebook and run the cell. Here is an example snippet to publish a linear regression model using the LinearRegressionModelAdapter written above:
from palantir_models.code_workspaces import ModelOutput

# Model adapter has been defined in linear_regression_model_adapter.py
from linear_regression_model_adapter import LinearRegressionModelAdapter

# sklearn_model is a model trained in another cell
linear_regression_model_adapter = LinearRegressionModelAdapter(sklearn_model)

# "linear_regression_model" is the alias for this example model
model_output = ModelOutput("linear_regression_model")
model_output.publish(linear_regression_model_adapter)
The snippet should work as is, with the exception of having to properly pass the model you trained to the adapter initialization. Once the code is ready, you can run the cell to publish the model to Foundry.
Consume the model
Models can be consumed through submission to a modeling objective. A model can be submitted to a modeling objective for:
Models can also be consumed using model deployments, which represent an alternative model hosting system beyond modeling objectives.
Jupyter®, and JupyterLab®, are trademarks or registered trademarks of NumFOCUS.
All third-party trademarks referenced remain the property of their respective owners. No affiliation or endorsement is implied.
中文翻译
在 Jupyter® Notebook 中训练模型
:::callout{theme="warning"} 模型资产(Model assets)目前不支持 SparkML 库。建议切换至单节点机器学习框架,例如 PyTorch、TensorFlow、XGBoost、LightGBM 或 scikit-learn。 :::
模型(Models) 可以在 代码工作区(Code Workspaces) 的 Jupyter® notebook 中进行训练。要训练模型,请完成以下步骤:
监督模型训练教程 提供了关于在 Jupyter® 代码工作区中进行模型训练的更多指导。
创建 Jupyter® 代码工作区
- 要创建一个新的 Jupyter® 代码工作区用于模型训练,请导航至您的项目文件夹,选择 + New > Jupyter® Code Workspace,或者在代码工作区(Code Workspaces)应用中选择 + New code workspace。
- 在代码工作区中,选择 JupyterLab® 作为工作区类型,然后选择右下角的 Continue。
- 根据您要训练的模型为工作区命名。您可以通过在 Code Repository 步骤中选择 Advanced 来可选地配置其他设置,例如工作区的计算资源或网络策略。为 notebook 命名后,选择 Continue。
- 最后,选择 Create 来创建并启动工作区。
导入数据并编写模型训练代码
建立工作区后,您可以创建一个新的 notebook 来导入数据并开始编写模型训练代码。
:::callout{theme="neutral" title="安装依赖项"} 代码工作区允许访问其他 Foundry 代码编写环境(如代码仓库(Code Repositories))中可用的包。要添加新包,请打开工作区左侧边栏中的 Packages 选项卡,搜索您需要的包并选中,然后点击 Latest 或其他可用版本以打开终端并运行相应的安装命令。 :::
将数据导入工作区
代码工作区应用允许用户导入现有的 Foundry 数据集作为训练数据。在代码工作区中使用的训练数据需要有一个人类可读的别名(alias)作为其资源标识符。
- 要导入数据集,请打开左侧边栏顶部的 Data 选项卡,然后选择 Add dataset > Read existing datasets。
- 选择要导入到工作区的数据集,输入数据集别名,然后选择 + Add dataset 完成 步骤 1。
- 代码工作区随后会在 步骤 2 中生成一个代码片段,您可以在其中选择数据集格式,例如
pandas DataFrame。要将生成的代码片段复制到您的 notebook 中,请选择代码片段右上角的剪贴板图标,然后选择 Done。以下是代码工作区生成的代码片段示例:
from foundry.transforms import Dataset

training_data = Dataset.get("my-alias").read_table(format="pandas")
- 将代码片段复制到剪贴板后,从
Launcher面板中选择 Python [user-default] 启动一个 Notebook,并将代码片段粘贴到第一个单元格中。 - 通过选择操作工具栏中的“播放”图标或菜单栏中的 Run > Run Selected Cells 来运行代码以导入数据集。
编写模型训练代码
代码工作区中可用于模型开发的开源工具允许您为各种分析用例(如回归或分类)训练模型。以下是使用 scikit-learn 预测家庭收入中位数的线性回归模型示例。
- 通过选择左侧边栏中 Data 下的 Packages 图标,在工作区中安装
scikit-learn。 - 在搜索栏左侧的下拉菜单中选择
Conda或PyPi管理器,然后搜索scikit-learn。 - 要在终端中运行安装命令,请在下拉菜单中选择一个包版本,然后选择版本按钮。或者,您可以使用
maestro env conda install或maestro env pip install命令,从终端一次性将多个包安装到您的托管环境(managed environment)中。
使用侧边栏安装包:
从终端安装包:
在代码工作区中编写并运行模型后,您可以将其发布到 Foundry,以便在其他应用中集成。以下是模型训练代码的示例:
from sklearn.impute import SimpleImputer
from sklearn.linear_model import LinearRegression
from sklearn.pipeline import Pipeline
from sklearn.preprocessing import StandardScaler

numeric_features = ['median_income', 'housing_median_age', 'total_rooms']
numeric_transformer = Pipeline(
    steps=[
        ("imputer", SimpleImputer(strategy="median")),
        ("scaler", StandardScaler())
    ]
)

model = Pipeline(
    steps=[
        ("preprocessor", numeric_transformer),
        ("classifier", LinearRegression())
    ]
)
X_train = training_dataframe[numeric_features]
y_train = training_dataframe['median_house_value']
model.fit(X_train, y_train)
添加模型输出并实现模型适配器
要使模型在代码工作区之外可用,您必须向工作区添加一个新的模型输出(model output)。创建新的模型输出后,代码工作区会自动在您现有的工作区中创建并存储一个新的 .py 文件,您可以使用该文件来实现模型适配器(model adapter)。模型适配器为 Foundry 中的所有模型提供了标准接口,确保平台的应用程序在模型创建后即可立即使用。Foundry 基础设施将加载模型、配置其 Python 依赖项、公开其 API,并启用模型接口。
- 要添加输出,请打开左侧边栏中 Packages 下方的 Models 选项卡,然后选择 Add model > Create new model。为模型命名并将其保存到您选择的位置。
-
命名并保存模型后,系统会提示您在工作区左侧面板中 Publish a new model。通过将代码片段复制到剪贴板并在原始的
.ipynbnotebook 文件中运行,完成 步骤 1:安装palantir_models。 -
成功安装
palantir_models后,在 步骤 2:开发您的模型适配器 中创建并开发您的模型适配器。模型适配器必须实现以下方法: -
save和load: 为了重用您的模型,您需要定义模型的保存和加载方式。Palantir 提供了默认的序列化(保存)方法,在更复杂的情况下,您可以实现自定义序列化逻辑。 api: 定义模型的 API,并告知 Foundry 您的模型需要何种类型的输入数据。predict: 由 Foundry 调用以向您的模型提供数据。您可以在此处将输入数据传递给模型并生成推理(预测)。
更多详情请参考模型适配器 API 参考。
下面的代码示例实现了上述函数,用于开发一个使用 scikit-learn 的线性回归模型适配器:
import palantir_models as pm
from palantir_models.serializers import DillSerializer

class LinearRegressionModelAdapter(pm.ModelAdapter):

    @pm.auto_serialize(
        model=DillSerializer()
    )
    def __init__(self, model):
        self.model = model

    @classmethod
    def api(cls):
        columns = [
            ('median_income', float),
            ('housing_median_age', float),
            ('total_rooms', float),
        ]
        return {"df_in": pm.Pandas(columns)}, \
               {"df_out": pm.Pandas(columns + [('prediction', float)])}

    def predict(self, df_in):
        df_in['prediction'] = self.model.predict(
            df_in[['median_income', 'housing_median_age', 'total_rooms']]
        )
        return df_in
更多指导请参考模型适配器文档。
(可选)将指标和超参数记录到模型实验
模型实验(Model experiments) 是一个轻量级框架,用于记录模型训练运行期间产生的指标和超参数,这些信息随后可以与模型一起发布并持久保存在模型页面中。
将模型发布到 Foundry
要将模型发布到 Foundry,请在左侧边栏的 步骤 3:发布您的模型 下复制您要发布的模型的可用代码片段,将其粘贴到您的 notebook 中并运行该单元格。以下是使用上面编写的 LinearRegressionModelAdapter 发布线性回归模型的示例代码片段:
from palantir_models.code_workspaces import ModelOutput

# 模型适配器已在 linear_regression_model_adapter.py 中定义
from linear_regression_model_adapter import LinearRegressionModelAdapter

# sklearn_model 是在另一个单元格中训练的模型
linear_regression_model_adapter = LinearRegressionModelAdapter(sklearn_model)

# "linear_regression_model" 是该示例模型的别名
model_output = ModelOutput("linear_regression_model")
model_output.publish(linear_regression_model_adapter)
该代码片段应可直接使用,但需要将您训练的模型正确传递给适配器的初始化。代码准备就绪后,您可以运行该单元格将模型发布到 Foundry。
使用模型
模型可以通过提交到建模目标(modeling objective) 来使用。模型可以提交到建模目标以用于:
模型也可以使用模型部署(model deployments) 来使用,这代表了建模目标之外的另一种模型托管系统。
Jupyter® 和 JupyterLab® 是 NumFOCUS 的商标或注册商标。
所有提及的第三方商标均为其各自所有者的财产。不暗示任何隶属关系或认可。