Installation(安装)
:::callout{theme="neutral"} The Palantir model context protocol (MCP) enables external AI systems to read data and metadata from Foundry and interact via AI-friendly API endpoints using the configured user token permissions. Once data is accessed by an external system through Palantir MCP, the governance of its use shifts from Palantir to the external system. Data security will then depend on your relationship with that external system. Using the Palantir MCP does not imply that a Palantir AI model will be used; the AI model provider is determined by the external system you connect to, such as Microsoft for GitHub Copilot, or Cursor. :::
The instructions below explain how to set up Palantir MCP with a supported IDE. Alternatively, use the AI development tools available in a VS Code workspace to access Palantir MCP.
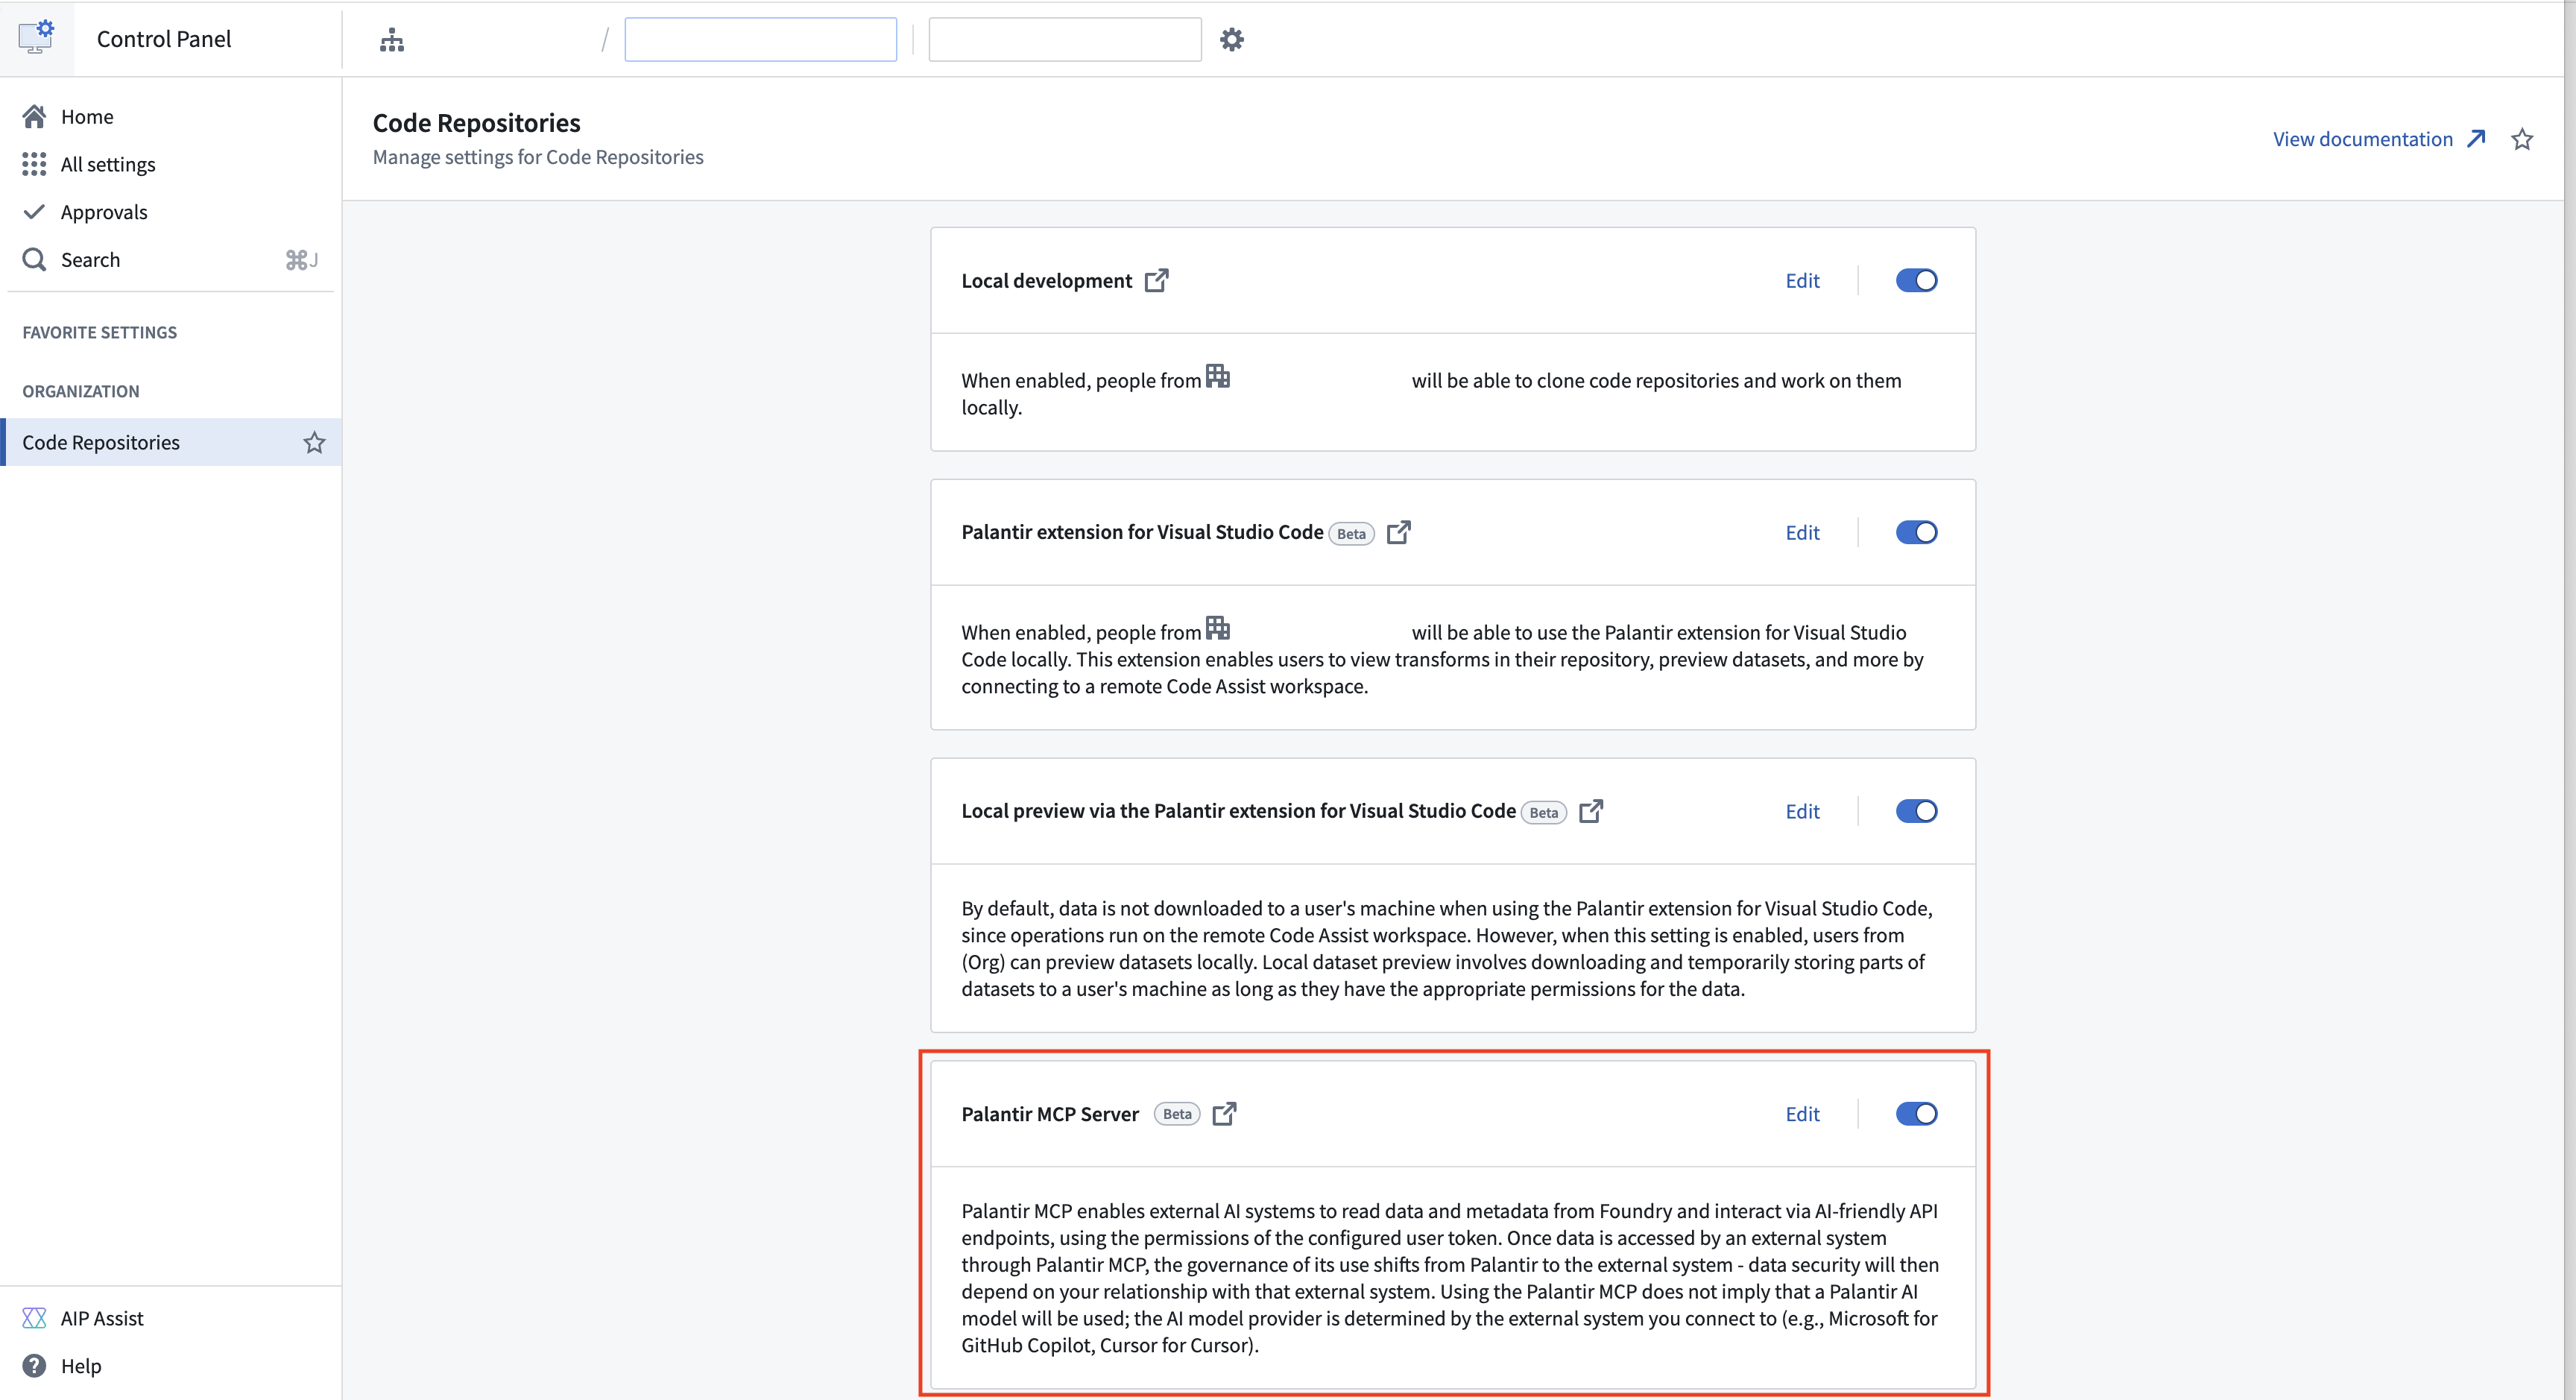
1. Enable Palantir MCP in Control Panel
Platform administrators must first enable Palantir MCP for use through Control Panel. Access can be configured for a specific subset of users or groups. Palantir MCP is in Control Panel under Code Repositories.
2. Configure your IDE to use Palantir MCP
See instructions for:
Claude Code
- Generate a user token from Palantir, then add this in place of
<token>in the code below. - Replace
<your-foundry-hostname>with your Foundry hostname (for example,mycompany.palantirfoundry.com). Do not prefix with "https://". - Review the Claude Code documentation ↗ to install Palantir MCP in your Claude Code CLI, particularly the documentation around scoping where MCP should be installed. We recommend installing the MCP at the project scope ↗ level so that the MCP server configuration is scoped to the current project.
- Run the following commands in your terminal:
export FOUNDRY_HOST="<your-foundry-hostname>"
export FOUNDRY_TOKEN=<token>
claude mcp add palantir-mcp \
    --scope project \
    -e FOUNDRY_TOKEN='${FOUNDRY_TOKEN}' \
    -- npx "-y" "palantir-mcp" "--foundry-api-url" "https://$FOUNDRY_HOST"
Cline
- Generate a user token from Palantir, then add this in place of
<token>in the code below. - Replace
<your-foundry-hostname>with your Foundry hostname (for example,mycompany.palantirfoundry.com). - Review the Cline documentation ↗ to install Palantir MCP into your Cline extension with the configuration below.
```json tab="json"
{
"mcpServers": {
"palantir-mcp": {
"command": "npx",
"args": [
"-y",
"palantir-mcp",
"--foundry-api-url",
"https://### Continue
1. [Generate a user token](https://palantir.com/docs/foundry/platform-security-third-party/user-generated-tokens/) from Palantir, then add this in place of `<token>` in the code below.
2. Replace `<your-foundry-hostname>` with your Foundry hostname (for example, `mycompany.palantirfoundry.com`).
3. Review the [Continue documentation ↗](https://docs.continue.dev/customize/deep-dives/mcp) to install Palantir MCP into your Continue extension with the configuration below.
```yaml tab="yaml"
mcpServers:
- name: palantir-mcp
command: npx
args:
- "-y"
- "palantir-mcp"
- "--foundry-api-url"
- "https://<your-foundry-hostname>"
env:
FOUNDRY_TOKEN: "<token>"
Cursor
- Generate a user token from Palantir, then add this in place of
<token>in the code below. - Replace
<your-foundry-hostname>with your Foundry hostname (for example,mycompany.palantirfoundry.com). - Review the Cursor documentation ↗ to install Palantir MCP into your Cursor IDE with the configuration below.
For macOS:
```json tab="json"
{
"mcpServers": {
"palantir-mcp": {
"type": "stdio",
"command": "npx",
"args": [
"-y",
"palantir-mcp",
"--foundry-api-url",
"https://For Windows:
```json tab="json"
{
"mcpServers": {
"palantir-mcp": {
"type": "stdio",
"command": "cmd /k npx",
"args": [
"-y",
"palantir-mcp",
"--foundry-api-url",
"https://<your-foundry-hostname>"
],
"env": {
"FOUNDRY_TOKEN": "<token>"
}
}
}
}
Github Copilot in VS Code
- Generate a user token from Palantir, then add this in place of
<token>in the code below. - Replace
<your-foundry-hostname>with your Foundry hostname (for example,mycompany.palantirfoundry.com). - Review the VS Code documentation ↗ to install Palantir MCP into your VS Code IDE with the configuration below.
```json tab="json"
"mcp": {
"inputs": [
{
"type": "promptString",
"id": "foundry-token",
"description": "Foundry user token",
"password": true
}
],
"servers": {
"palantir-mcp": {
"type": "stdio",
"command": "npx",
"args": [
"-y",
"palantir-mcp",
"--foundry-api-url",
"https://### Windsurf
1. [Generate a user token](https://palantir.com/docs/foundry/platform-security-third-party/user-generated-tokens/) from Palantir, then add this in place of `<token>` in the code below.
2. Replace `<your-foundry-hostname>` with your Foundry hostname (for example, `mycompany.palantirfoundry.com`).
3. Review the [Windsurf documentation ↗](https://docs.windsurf.com/windsurf/cascade/mcp) to install Palantir MCP into your Windsurf IDE with the configuration below.
```json tab="json"
{
"mcpServers": {
"palantir-mcp": {
"command": "npx",
"args": [
"-y",
"palantir-mcp",
"--foundry-api-url",
"https://<your-foundry-hostname>"
],
"env": {
"FOUNDRY_TOKEN": "<token>"
}
}
}
}
中文翻译
安装
:::callout{theme="neutral"} Palantir 模型上下文协议(MCP,model context protocol)使外部 AI 系统能够从 Foundry 读取数据和元数据,并通过配置的用户令牌权限,使用 AI 友好的 API 端点进行交互。一旦外部系统通过 Palantir MCP 访问数据,其使用治理权将从 Palantir 转移至该外部系统。数据安全将取决于您与该外部系统的关系。使用 Palantir MCP 并不意味着将使用 Palantir AI 模型;AI 模型提供商由您连接的外部系统决定,例如 GitHub Copilot 对应 Microsoft,或 Cursor。 :::
以下说明介绍了如何在支持的 IDE 中设置 Palantir MCP。或者,使用 VS Code 工作区中提供的 AI 开发工具 来访问 Palantir MCP。
1. 在控制面板中启用 Palantir MCP
平台管理员必须首先在控制面板中启用 Palantir MCP 以供使用。可以为特定用户或用户组配置访问权限。Palantir MCP 位于控制面板的 代码仓库(Code Repositories) 下。
2. 配置 IDE 以使用 Palantir MCP
请参阅以下说明:
Claude Code
- 从 Palantir 生成用户令牌,然后将其添加到下方代码中的
<token>位置。 - 将
<your-foundry-hostname>替换为您的 Foundry 主机名(例如mycompany.palantirfoundry.com)。请勿添加 "https://" 前缀。 - 查阅 Claude Code 文档 ↗,了解如何在 Claude Code CLI 中安装 Palantir MCP,特别是关于 MCP 安装范围的文档。我们建议在项目范围(project scope)↗级别安装 MCP,以便 MCP 服务器配置限定于当前项目。
- 在终端中运行以下命令:
export FOUNDRY_HOST="<your-foundry-hostname>"
export FOUNDRY_TOKEN=<token>
claude mcp add palantir-mcp \
    --scope project \
    -e FOUNDRY_TOKEN='${FOUNDRY_TOKEN}' \
    -- npx "-y" "palantir-mcp" "--foundry-api-url" "https://$FOUNDRY_HOST"
Cline
- 从 Palantir 生成用户令牌,然后将其添加到下方代码中的
<token>位置。 - 将
<your-foundry-hostname>替换为您的 Foundry 主机名(例如mycompany.palantirfoundry.com)。 - 查阅 Cline 文档 ↗,使用以下配置将 Palantir MCP 安装到您的 Cline 扩展中。
```json tab="json"
{
"mcpServers": {
"palantir-mcp": {
"command": "npx",
"args": [
"-y",
"palantir-mcp",
"--foundry-api-url",
"https://### Continue
1. 从 Palantir [生成用户令牌](https://palantir.com/docs/foundry/platform-security-third-party/user-generated-tokens/),然后将其添加到下方代码中的 `<token>` 位置。
2. 将 `<your-foundry-hostname>` 替换为您的 Foundry 主机名(例如 `mycompany.palantirfoundry.com`)。
3. 查阅 [Continue 文档 ↗](https://docs.continue.dev/customize/deep-dives/mcp),使用以下配置将 Palantir MCP 安装到您的 Continue 扩展中。
```yaml tab="yaml"
mcpServers:
- name: palantir-mcp
command: npx
args:
- "-y"
- "palantir-mcp"
- "--foundry-api-url"
- "https://<your-foundry-hostname>"
env:
FOUNDRY_TOKEN: "<token>"
Cursor
- 从 Palantir 生成用户令牌,然后将其添加到下方代码中的
<token>位置。 - 将
<your-foundry-hostname>替换为您的 Foundry 主机名(例如mycompany.palantirfoundry.com)。 - 查阅 Cursor 文档 ↗,使用以下配置将 Palantir MCP 安装到您的 Cursor IDE 中。
对于 macOS:
```json tab="json"
{
"mcpServers": {
"palantir-mcp": {
"type": "stdio",
"command": "npx",
"args": [
"-y",
"palantir-mcp",
"--foundry-api-url",
"https://对于 Windows:
```json tab="json"
{
"mcpServers": {
"palantir-mcp": {
"type": "stdio",
"command": "cmd /k npx",
"args": [
"-y",
"palantir-mcp",
"--foundry-api-url",
"https://<your-foundry-hostname>"
],
"env": {
"FOUNDRY_TOKEN": "<token>"
}
}
}
}
Github Copilot in VS Code
- 从 Palantir 生成用户令牌,然后将其添加到下方代码中的
<token>位置。 - 将
<your-foundry-hostname>替换为您的 Foundry 主机名(例如mycompany.palantirfoundry.com)。 - 查阅 VS Code 文档 ↗,使用以下配置将 Palantir MCP 安装到您的 VS Code IDE 中。
```json tab="json"
"mcp": {
"inputs": [
{
"type": "promptString",
"id": "foundry-token",
"description": "Foundry 用户令牌",
"password": true
}
],
"servers": {
"palantir-mcp": {
"type": "stdio",
"command": "npx",
"args": [
"-y",
"palantir-mcp",
"--foundry-api-url",
"https://### Windsurf
1. 从 Palantir [生成用户令牌](https://palantir.com/docs/foundry/platform-security-third-party/user-generated-tokens/),然后将其添加到下方代码中的 `<token>` 位置。
2. 将 `<your-foundry-hostname>` 替换为您的 Foundry 主机名(例如 `mycompany.palantirfoundry.com`)。
3. 查阅 [Windsurf 文档 ↗](https://docs.windsurf.com/windsurf/cascade/mcp),使用以下配置将 Palantir MCP 安装到您的 Windsurf IDE 中。
```json tab="json"
{
"mcpServers": {
"palantir-mcp": {
"command": "npx",
"args": [
"-y",
"palantir-mcp",
"--foundry-api-url",
"https://<your-foundry-hostname>"
],
"env": {
"FOUNDRY_TOKEN": "<token>"
}
}
}
}