Perform refactors and understand your workflows(执行重构并理解工作流)
:::callout{theme="neutral"} The application previously known as Workflow Builder is now called Workflow Lineage. :::
To start using Workflow Lineage, open a Workshop application or functions repository and use the keyboard shortcut Command + I (macOS) or Ctrl + I (Windows) to view the relevant Workflow Lineage graph depicting the objects, actions, and functions that back the application.
You can also navigate directly to the Workflow Lineage application and manually add resources to the graph.

To help you understand and easily perform refactors in your workflow, Workflow Lineage provides a simple way for you to understand attached properties, update outdated variables and action-backed functions, or bulk edit submission criteria on actions.
Property provenance
You can track the usage of each property within any object throughout your entire workflow. Select the object on the graph, and view the Selection details panel on the left to see where each property is being used.
The number shown next to each property refers to the amount of functions, actions, linkages, Workshop applications, and more depending on the context.

Function-backed action upgrades
To identify and upgrade outdated function-backed actions, begin by navigating to the color legend. From there, select the Out-of-date functions option. This action will highlight all the outdated functions in red, giving you a clear visual indication. Next, choose the specific actions for which you wish to upgrade the backing function. Upon selection, any outdated actions related to your choice will appear in the panel located at the bottom of the screen for further action.
:::callout{theme="warning"} If an action is configured with an action log and the new function version edits a new object type, that action cannot be updated in Workflow Lineage and must be upgraded in Ontology Manager. :::
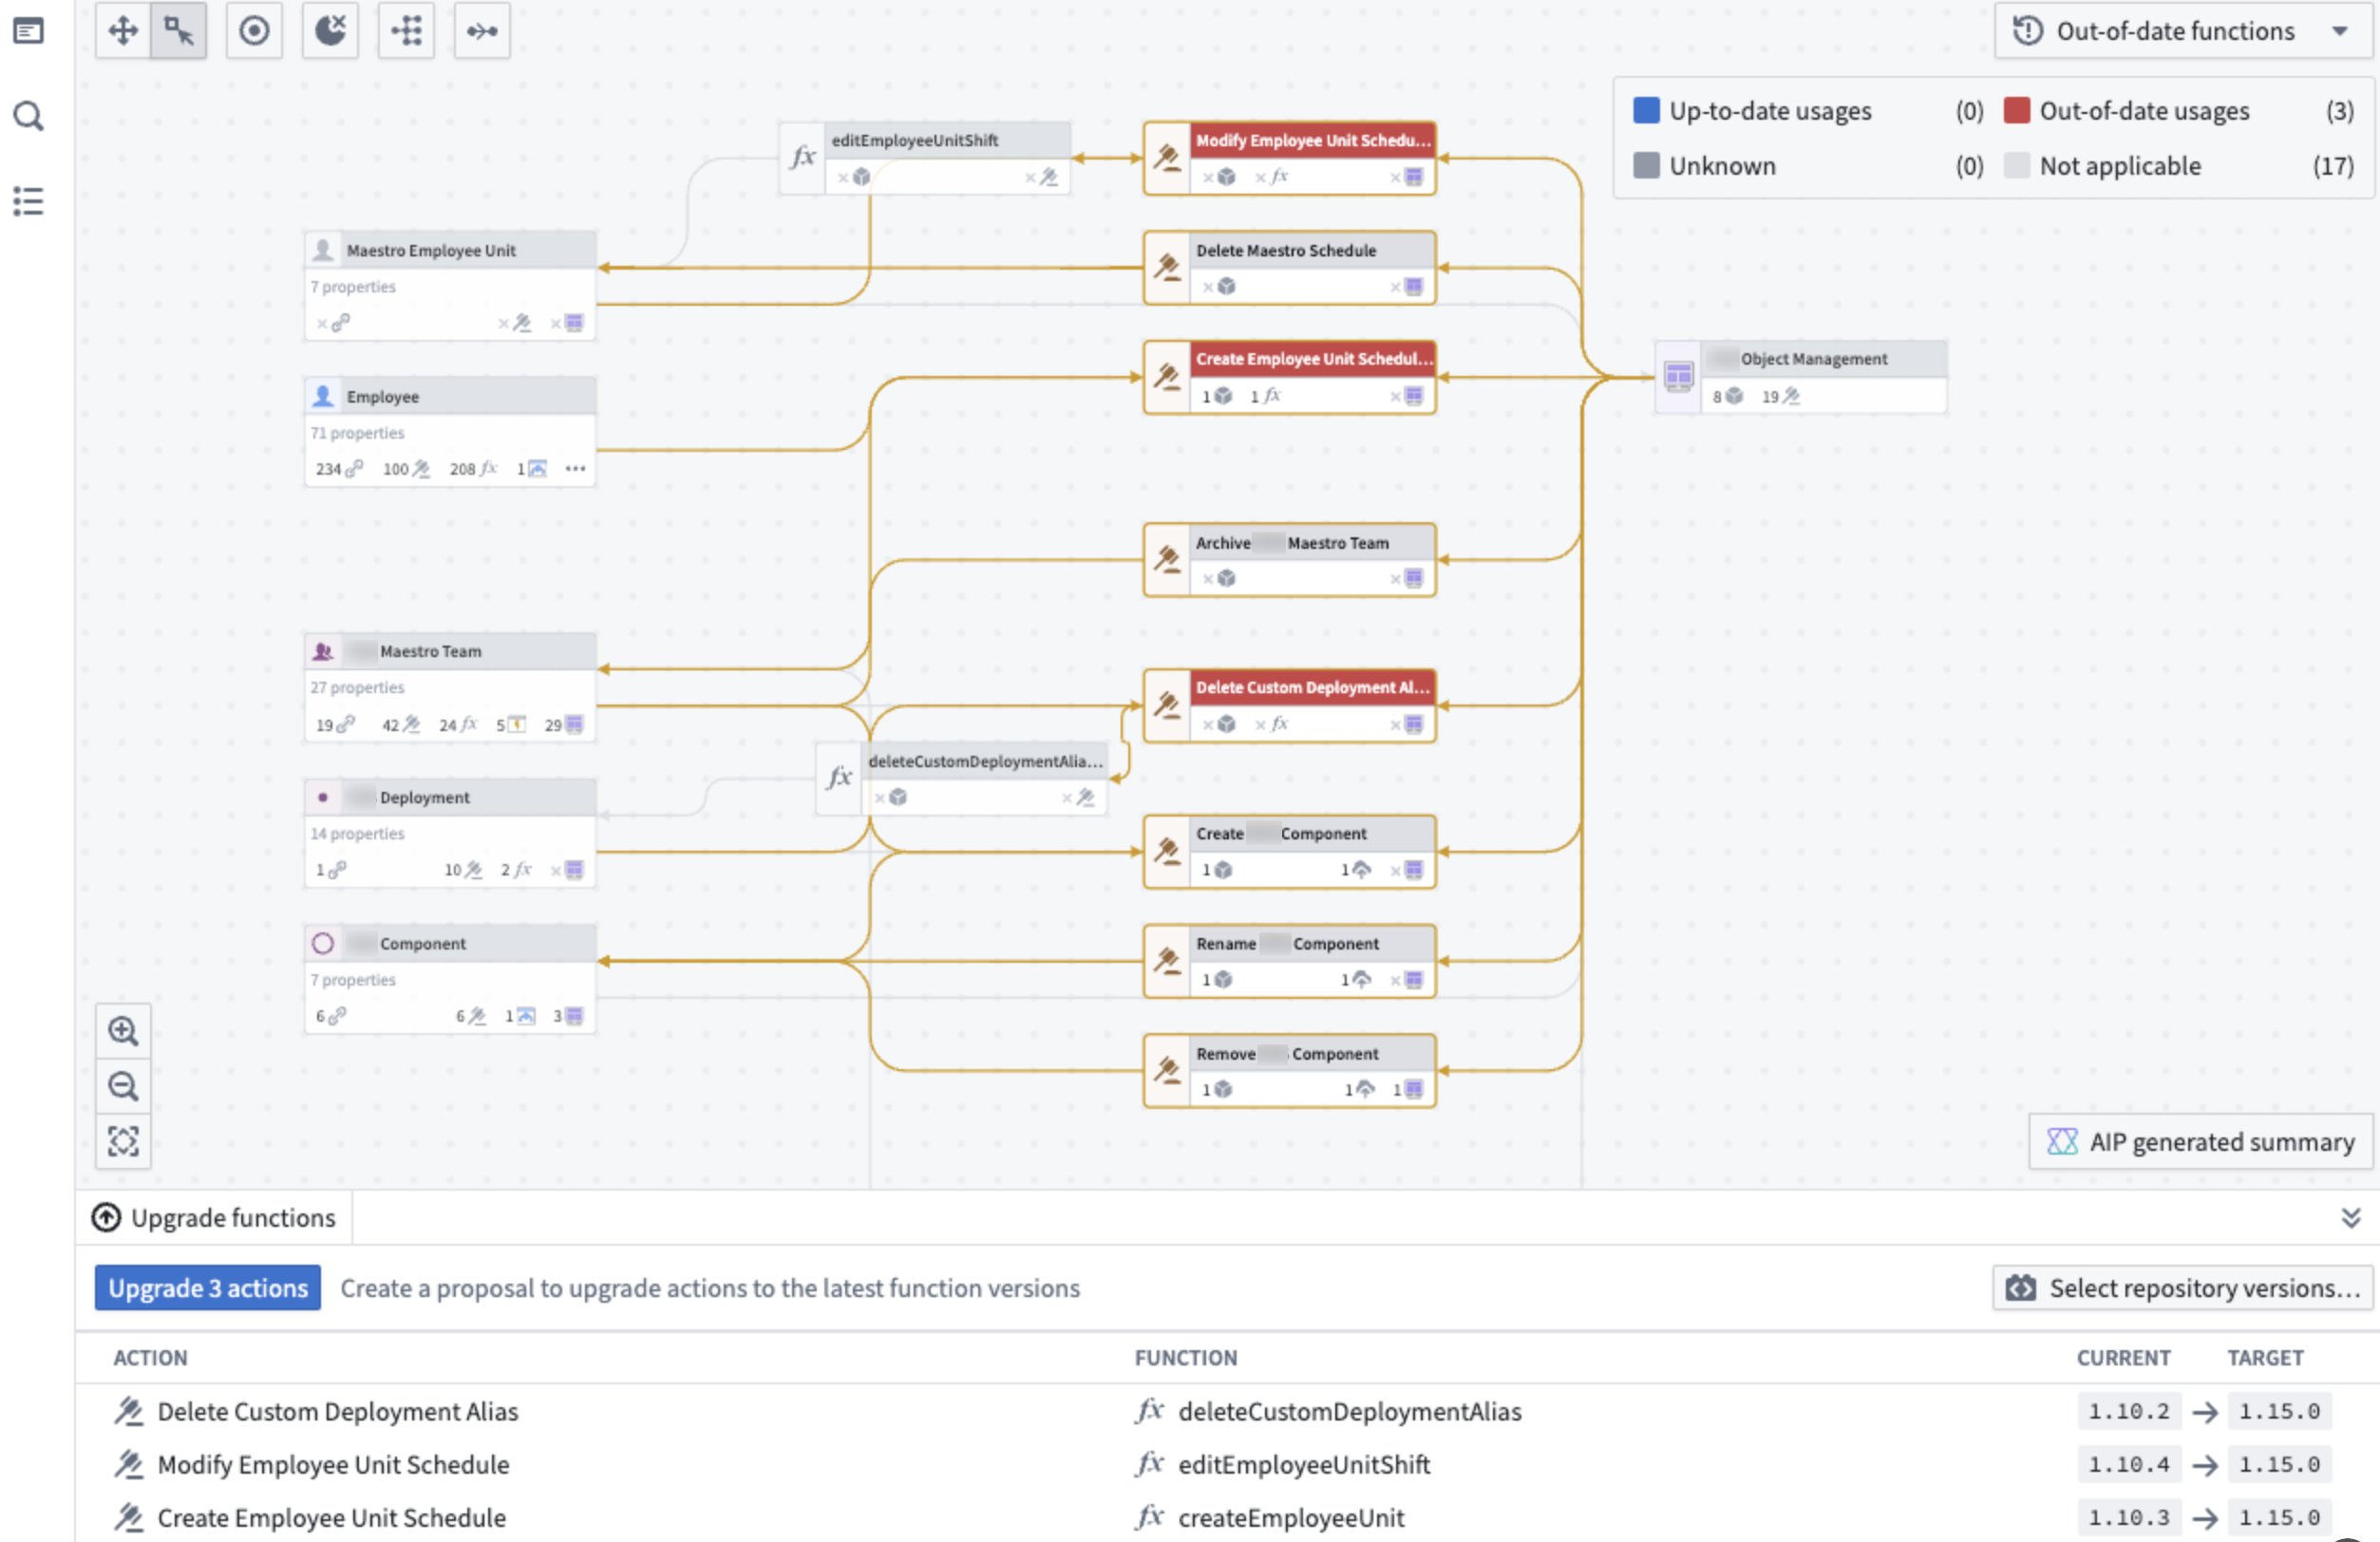
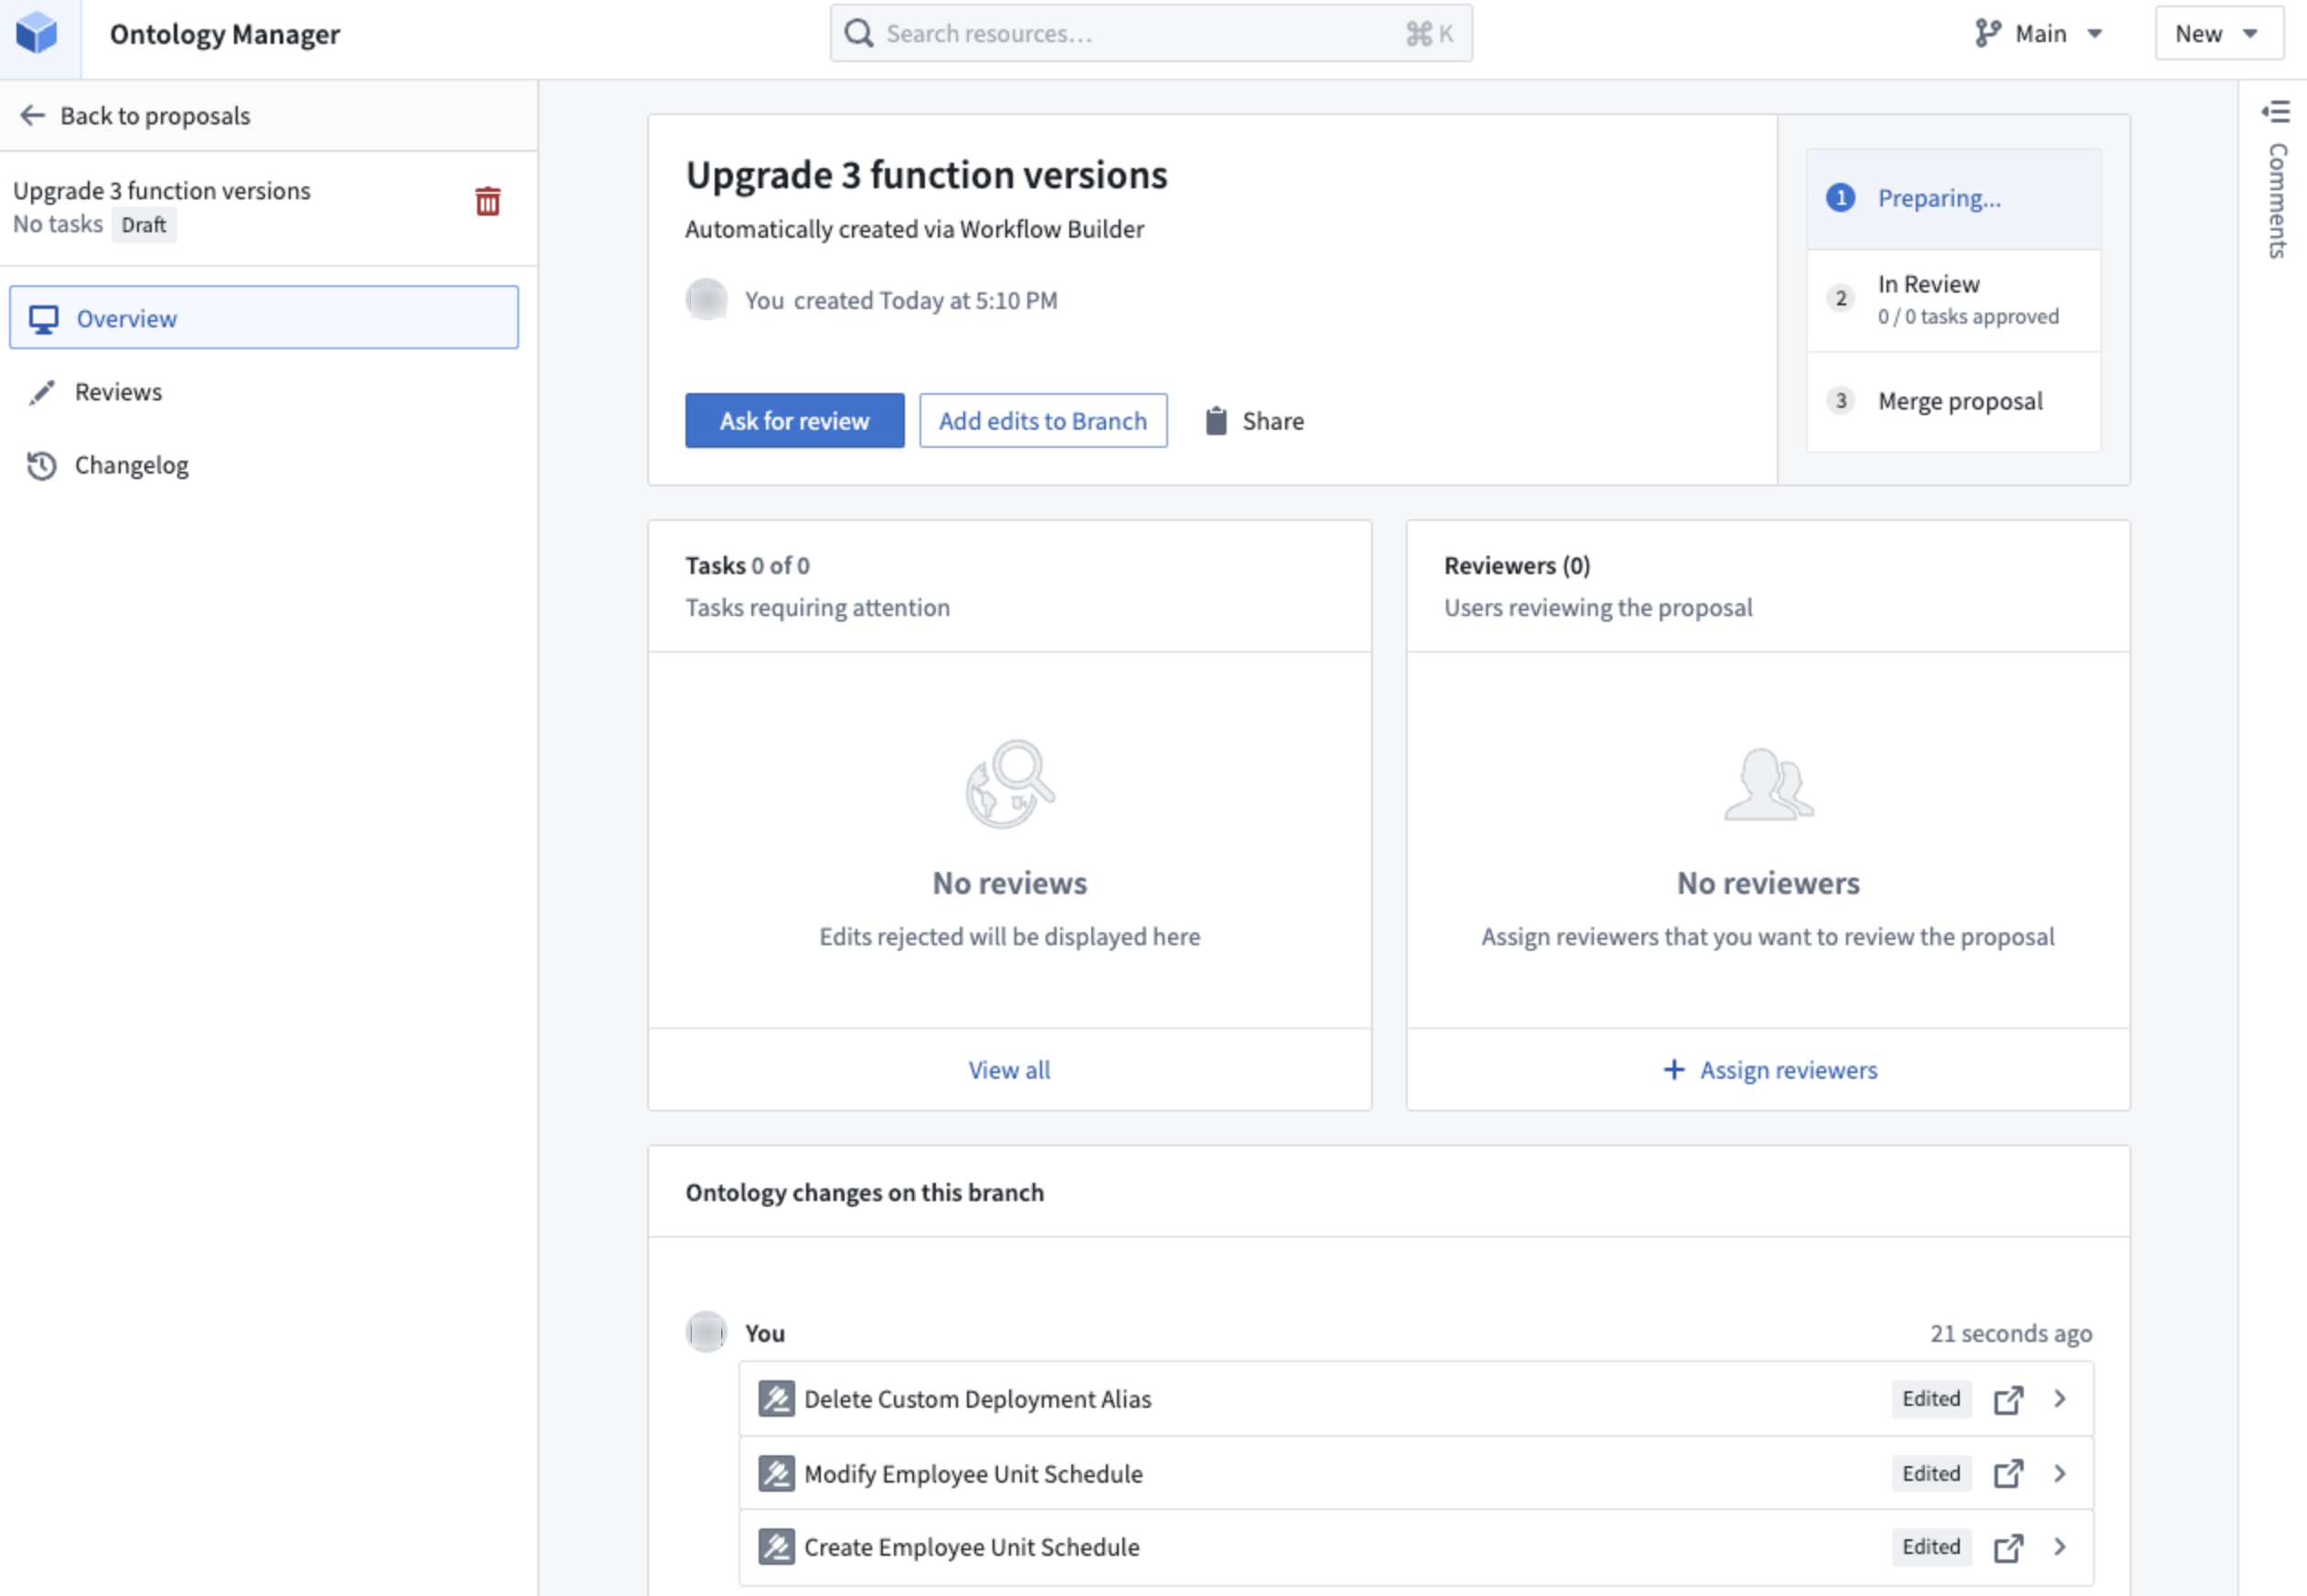
After you upgrade your actions, a proposal will be created in Ontology Manager. Here, you can ask for a review of the changes (for example, the function upgrades) and once approved, you will be able to merge the proposal.
Function-backed Workshop application upgrades
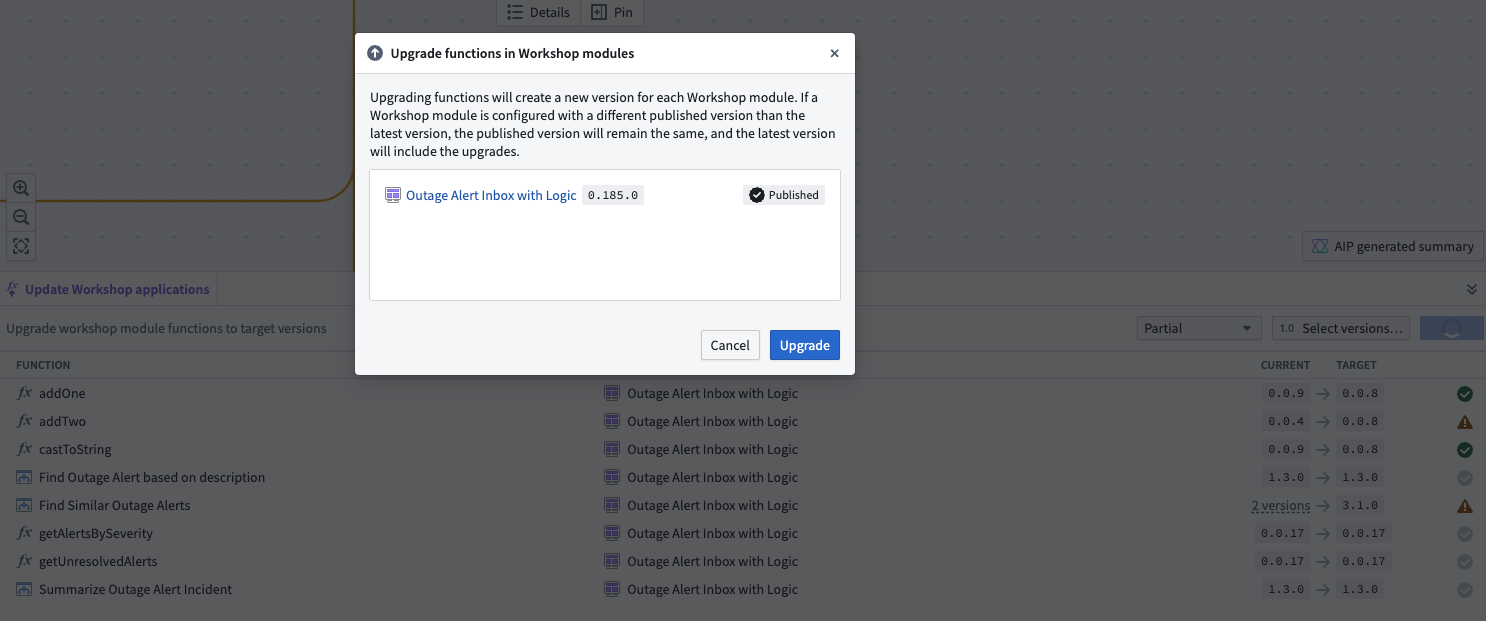
To upgrade functions used in Workshop applications, select the Workshop node and open Update Workshop applications on the bottom panel.
There are two upgrade options:
- All or nothing: Upgrade the functions in the workshop only if all can upgrade without breaking changes. If there are any breaking changes, nothing will be upgraded.
- Partial: Upgrade only the functions without breaking changes. Functions that would cause breaking changes will not be upgraded.
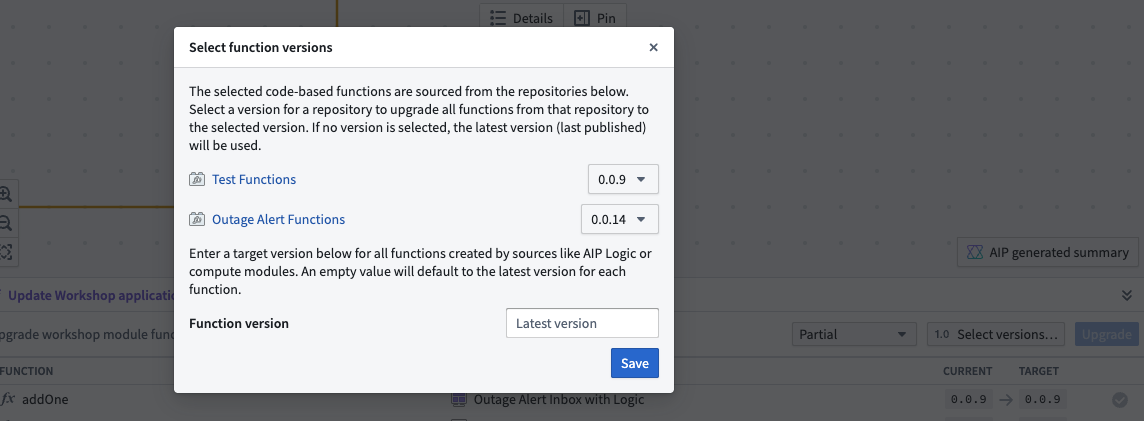
To select the desired version of the functions to be upgraded, choose Select versions.... This will open up a pop-up window where you can select the desired version for each function repository as well as the version for all functions created by AIP Logic or compute modules. If nothing is specified, it will automatically take the repository's latest version.
When a function cannot be upgraded, a yellow warning icon will appear next to that function.
When a function is already up-to-date, a gray check mark icon will appear next to that function.
If a function can be successfully updated, a green check mark icon will appear.
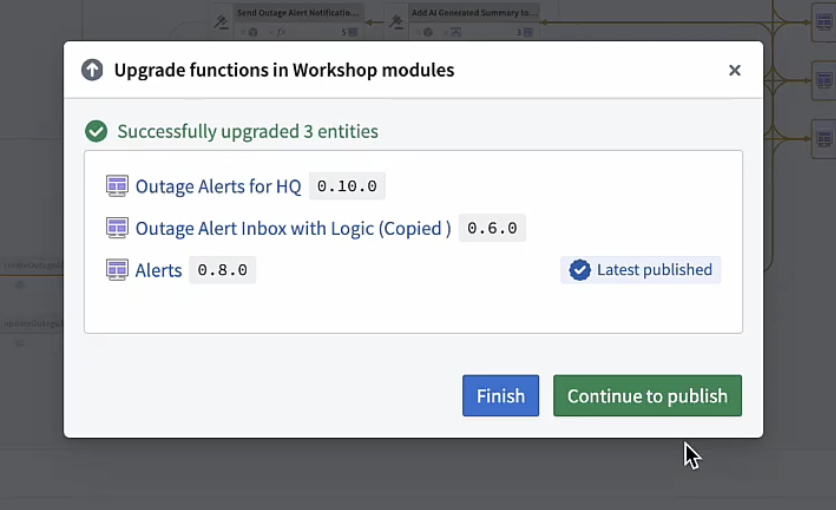
Select the blue Upgrade option to upgrade your Workshop module function to the target versions. This will open a pop up listing which Workshop modules will be upgraded.
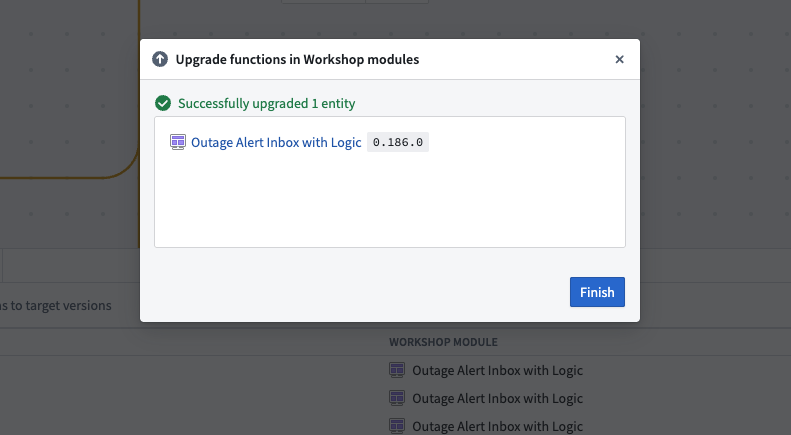
Select Upgrade for the changes to go into effect. The successfully upgraded Workshop application will appear on the pop up.
You also have the choice of bulk publishing the Workshop after the functions are updated. Learn how in the documentation on bulk-publishing Workshop applications.
Bulk publish Workshop applications
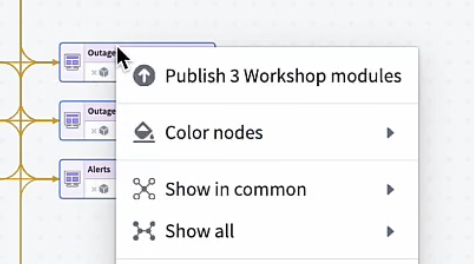
Workshop applications can be configured to always publish the latest version; Workshop applications that do not automatically publish the latest version can be "bulk published", which will update all selected applications at once. To bulk publish Workshop applications, select the Workshop nodes, then right-click and select Publish [number of] Workshop modules.
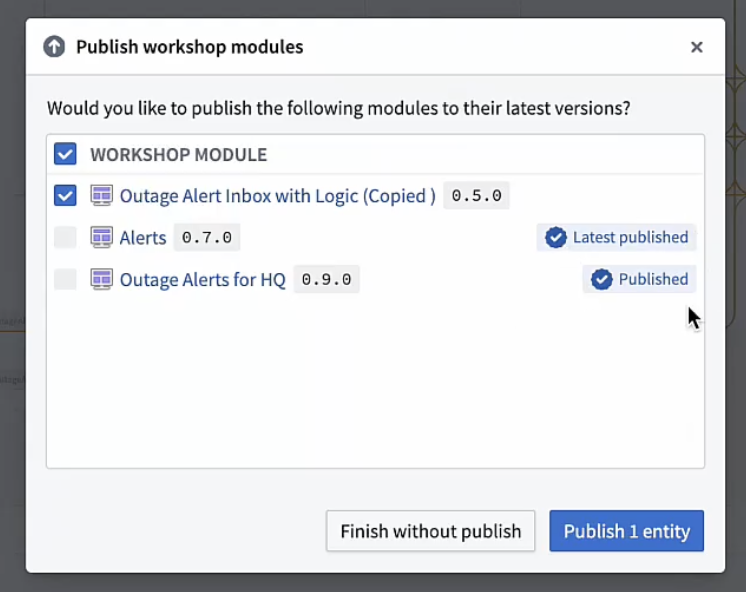
Publishing multiple Workshop modules at once will open a window displaying which of your Workshop applications are already on the latest version. If a Workshop application has a blue checkmark with either Latest published or Published next to it, the workshop is already on the latest version.
Specifically:
- Latest published means that Workshop always automatically publishes the latest version. This is a setting that can be toggled in the Workshop application.
- Published means that Workshop does not automatically publish the latest version, but the application currently has the latest version published.
For Workshop applications that are not Published or Latest published, you can select which applications you want to publish to the latest version and then select Publish [number of] entities.
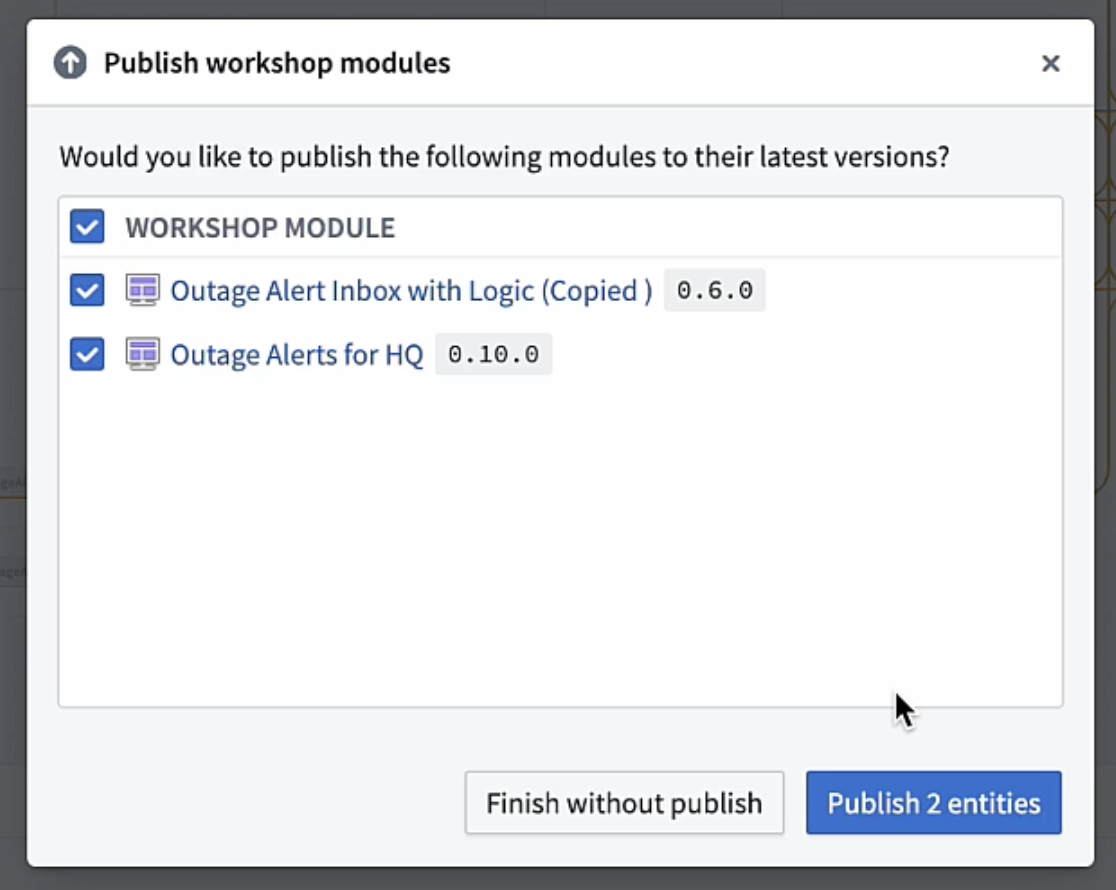
You can also bulk publish Workshop modules after updating functions in Workflow Lineage. To do so, after updating the functions, select Continue to publish.
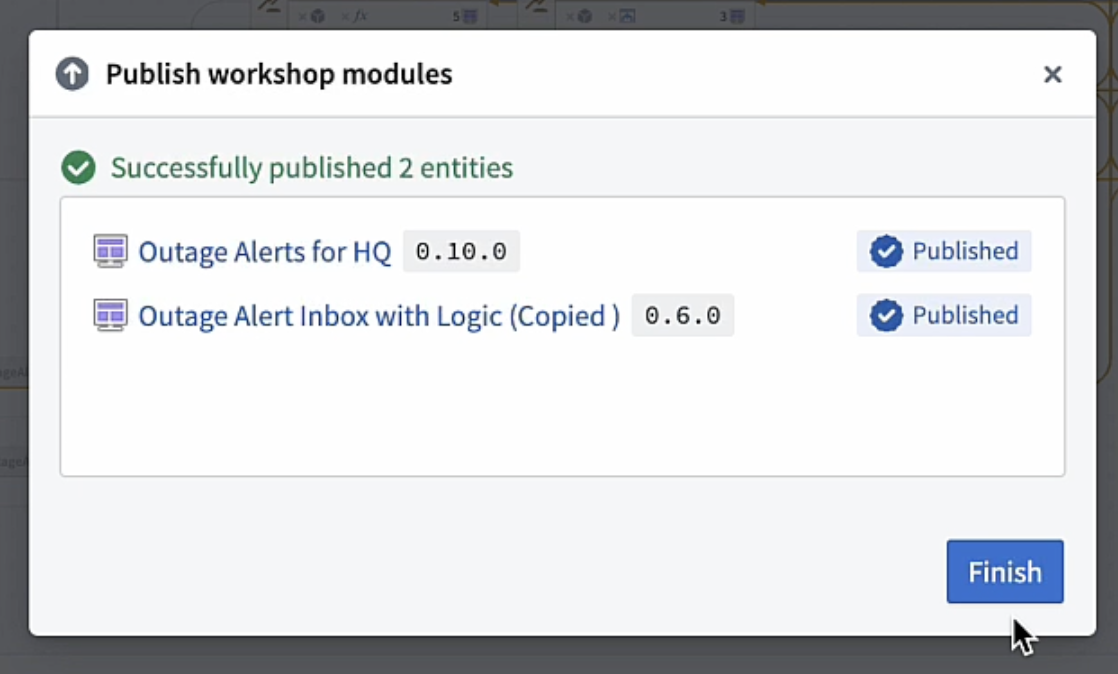
This will bring you to a page with all the Workshop modules that are not yet published to their latest version. Confirm that you want to publish the latest version for these modules and select Publish [number of] entities.
Once this has been done successfully, select Finish.
Bulk replace models
You can replace a model used by multiple AIP Logic functions in a single action from Workflow Lineage instead of opening each function and updating the model individually. This is useful when migrating off a deprecated model or evaluating a new model across a workflow.
:::callout{theme="neutral"} Bulk model replacement in Workflow Lineage currently supports AIP Logic nodes only. Support for additional resource types is in development. :::
To replace a model across multiple AIP Logic functions:
- Open your workflow in Workflow Lineage.
- Select the language model node you want to replace on the graph.
- Add the AIP Logic nodes you want to update to the graph if they are not already present. Select the AIP Logic icon on the model node to filter nodes that consume the selected model directly on the graph. AIP Logic nodes that are not on the graph will not appear in the Replace model tab.
- Open the Replace model tab in the bottom panel. The source model appears on the left, and the AIP Logic functions that use it appear under Used in on the right.
- Select the replacement model under Replace with.
- Use the checkboxes in the Used in list to deselect any AIP Logic functions you want to exclude from the model replacement.

- Select Replace model.
Considerations when replacing models in bulk
- Workflow Lineage skips AIP Logic functions you are not able to edit.
- Workflow Lineage applies the changes directly to the affected AIP Logic functions. There is no proposal or review step.
- Graph connections may take a moment to refresh after a successful replacement.
- Replacement models must be Palantir-provided.
Bulk delete objects and actions
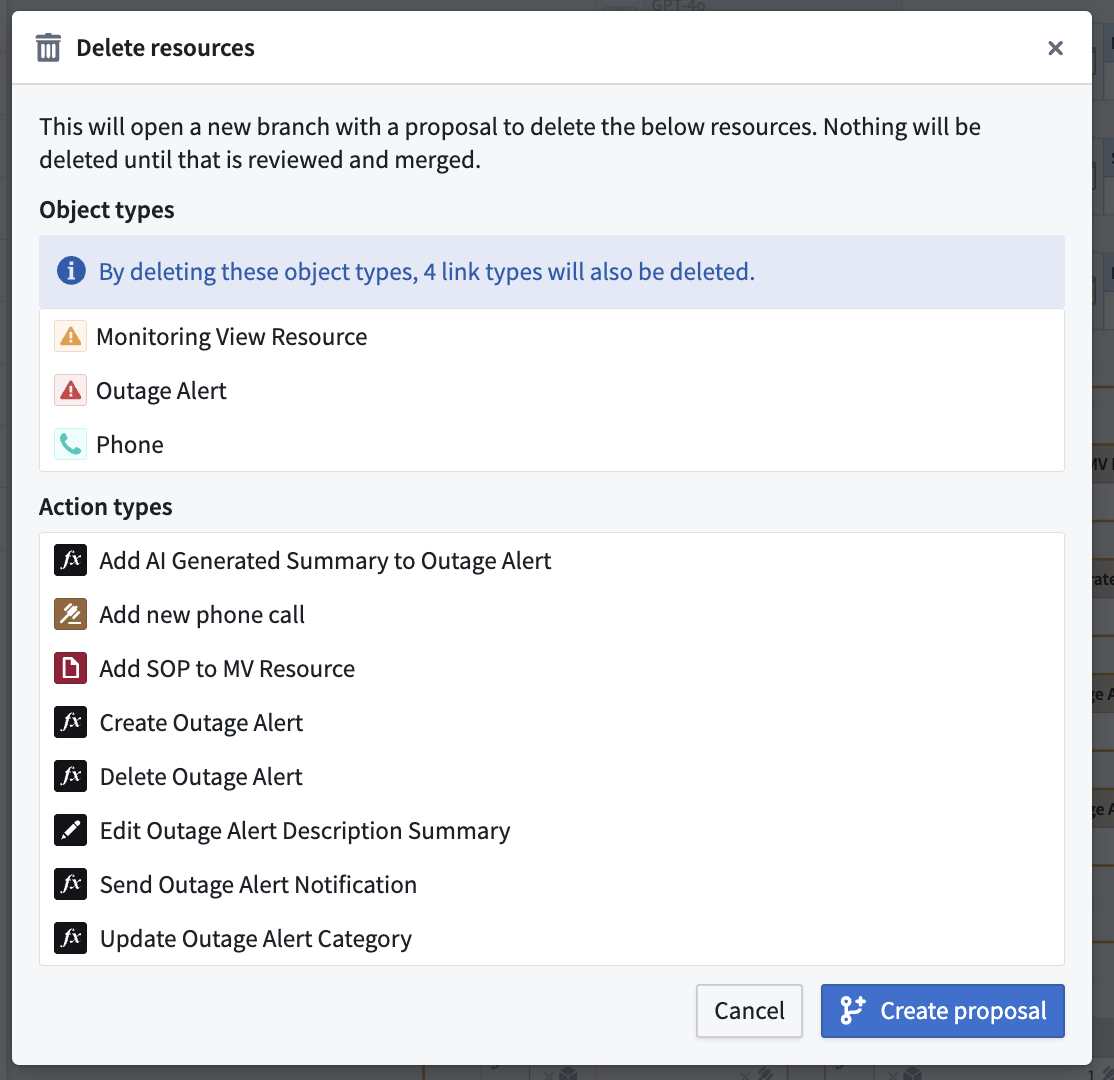
To bulk delete objects and actions, select the nodes on the graph, right click, and select Delete resources.
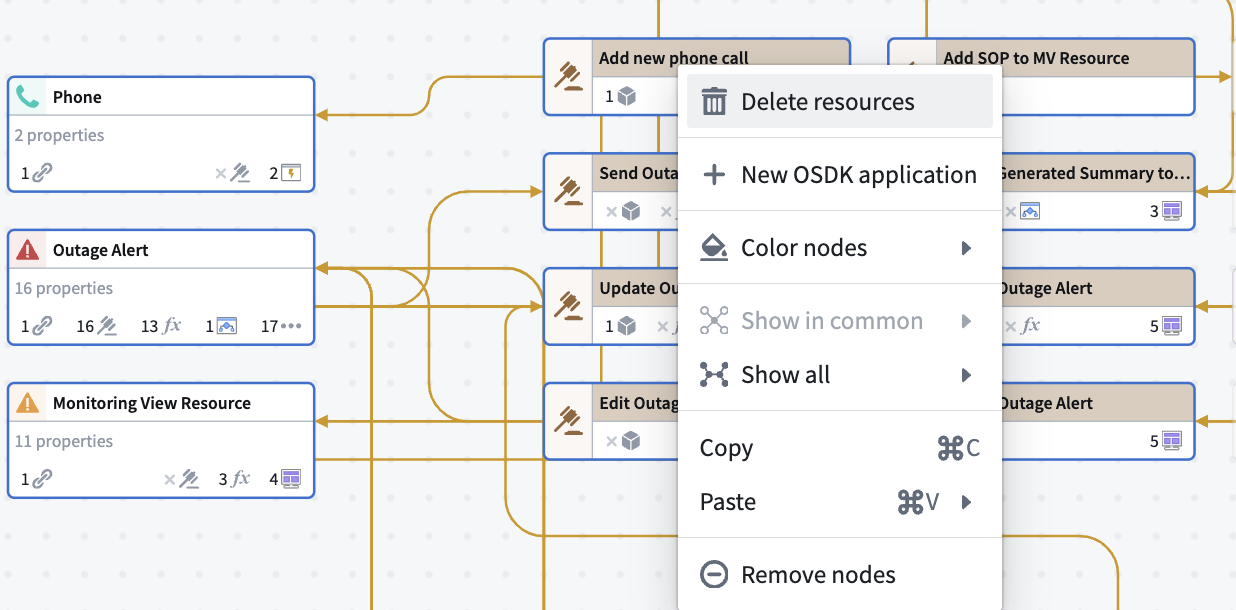
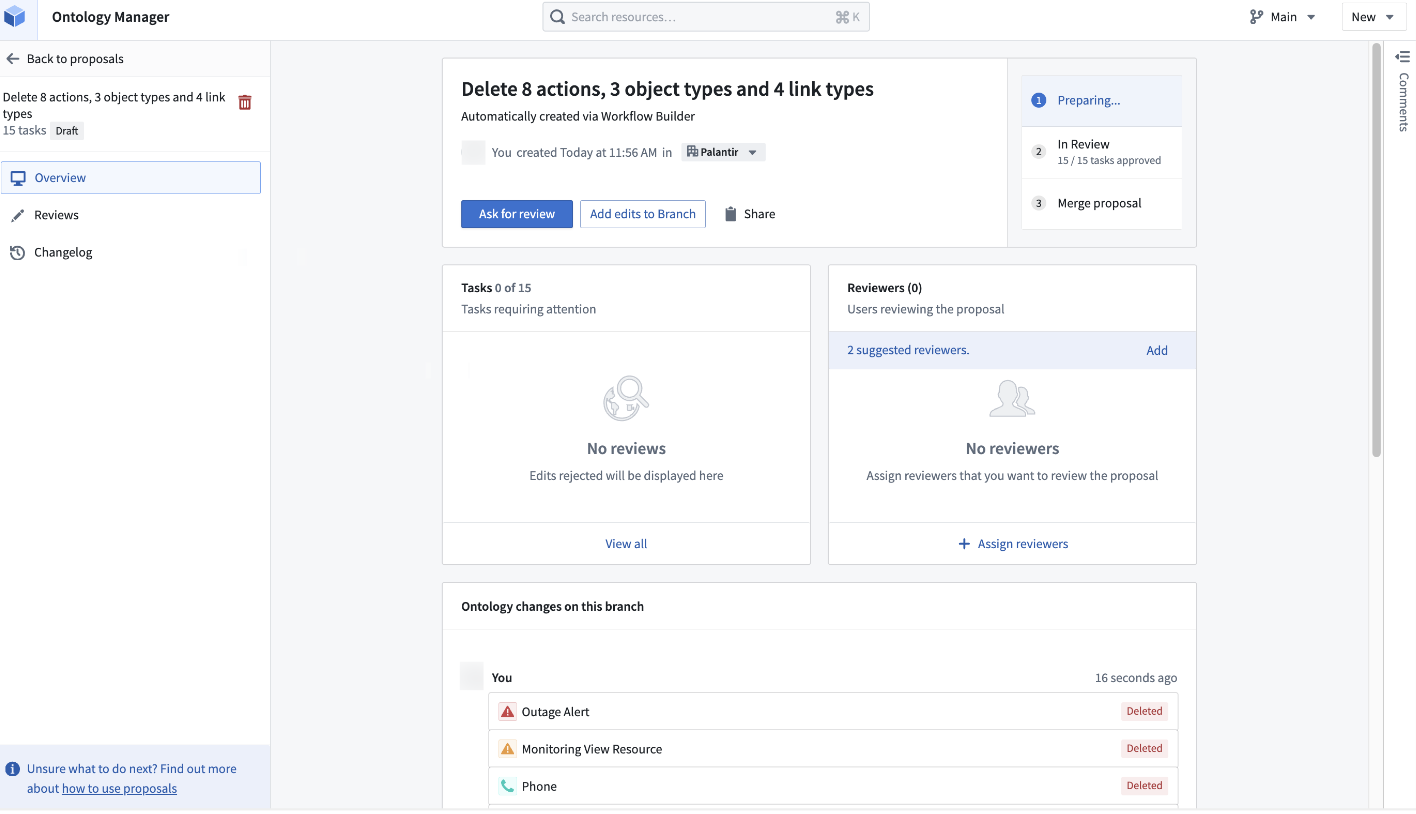
This will prompt you to create a proposal. You will also see the number of link types associated with the objects being deleted. These links will also be included in the deletion proposal.
Follow the prompt in Ontology Manager to merge the proposal.
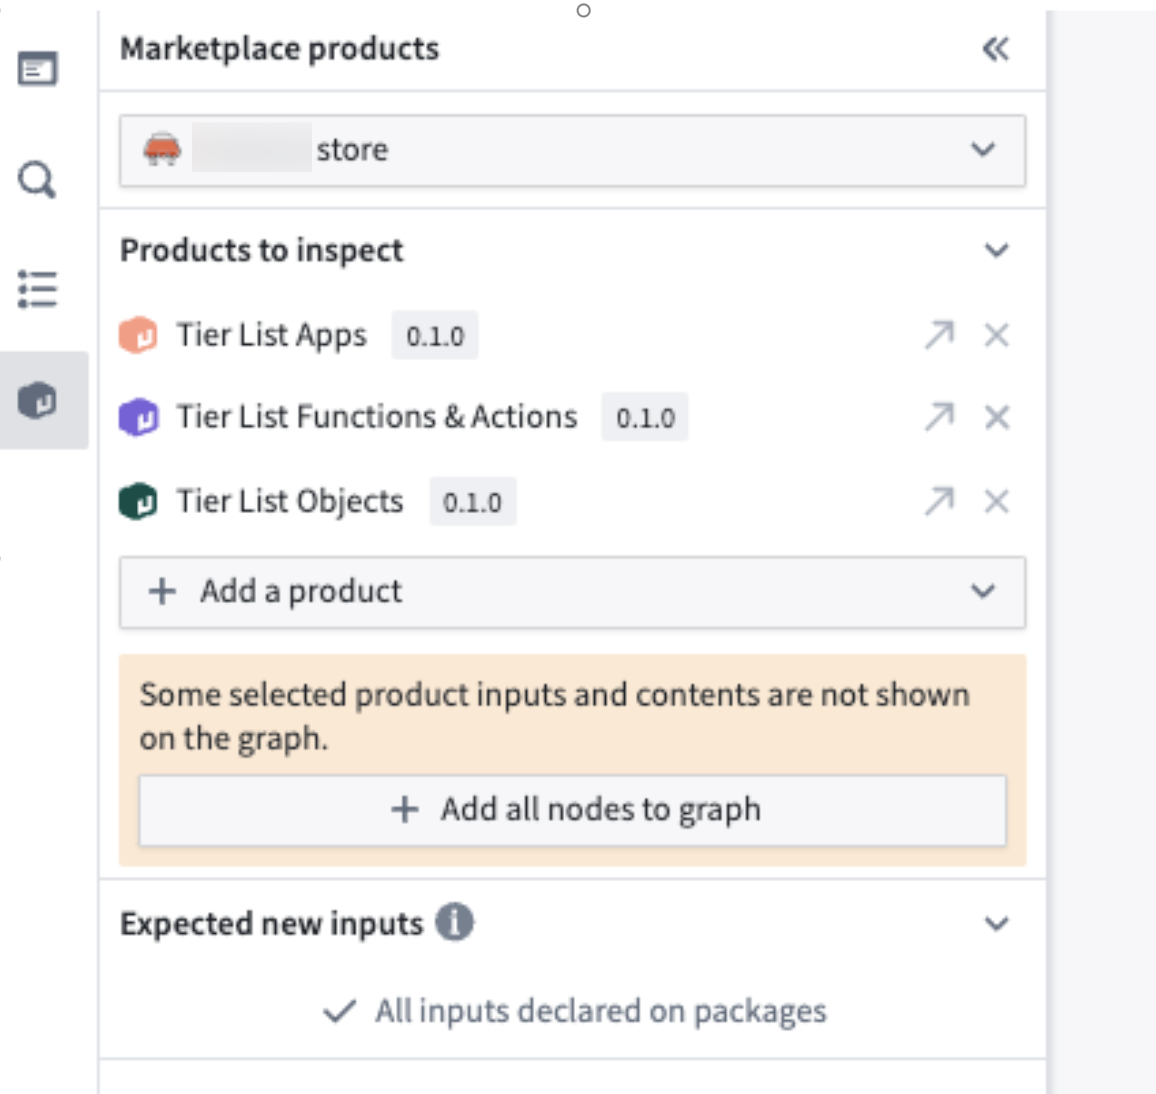
Marketplace products
The Marketplace products sidebar helps you inspect and confirm that Marketplace products have the right inputs, no resources are missing, and all resources are in the expected packages. This feature is especially helpful for packages you created that are publishing elsewhere.
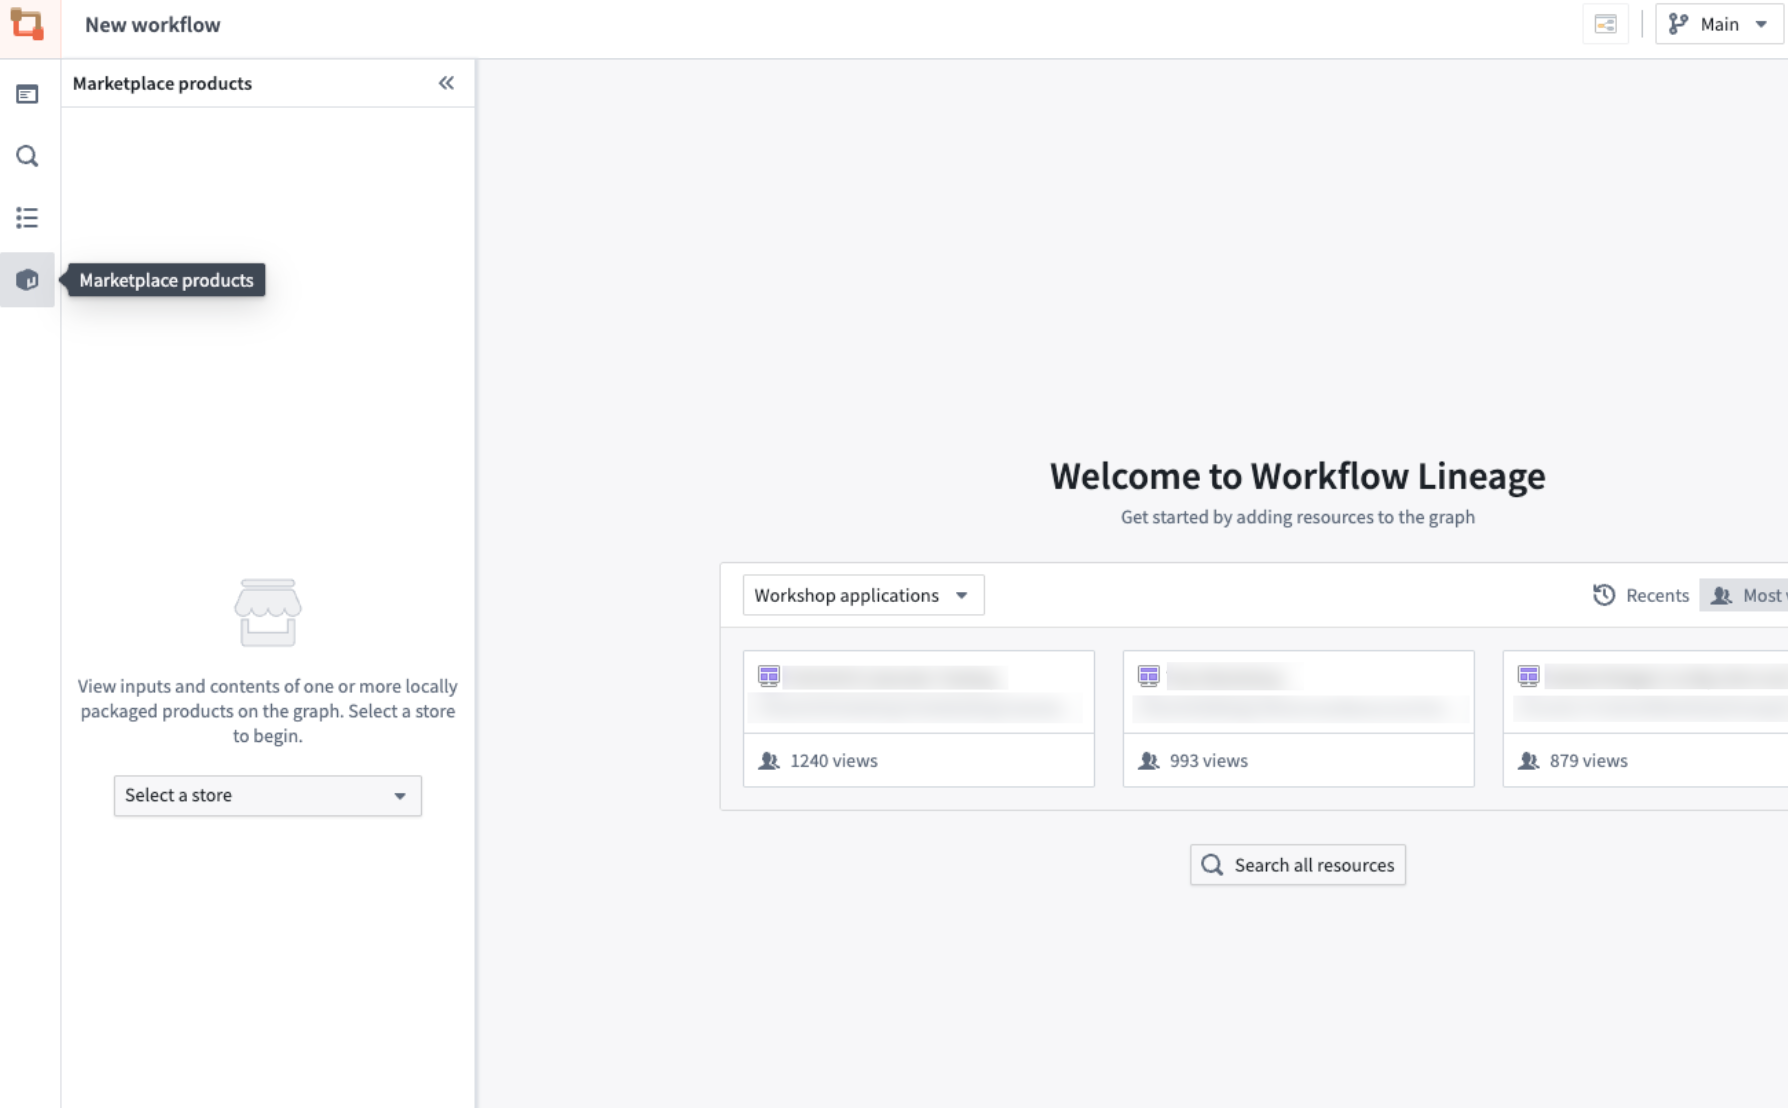
Navigate to the Marketplace products sidebar and choose your store in the dropdown menu. Note that the sidebar will only search local stores and not remote stores.
Select Add a product to add the products you wish to inspect, and add all corresponding nodes on the graph by selecting Add all nodes to graph.
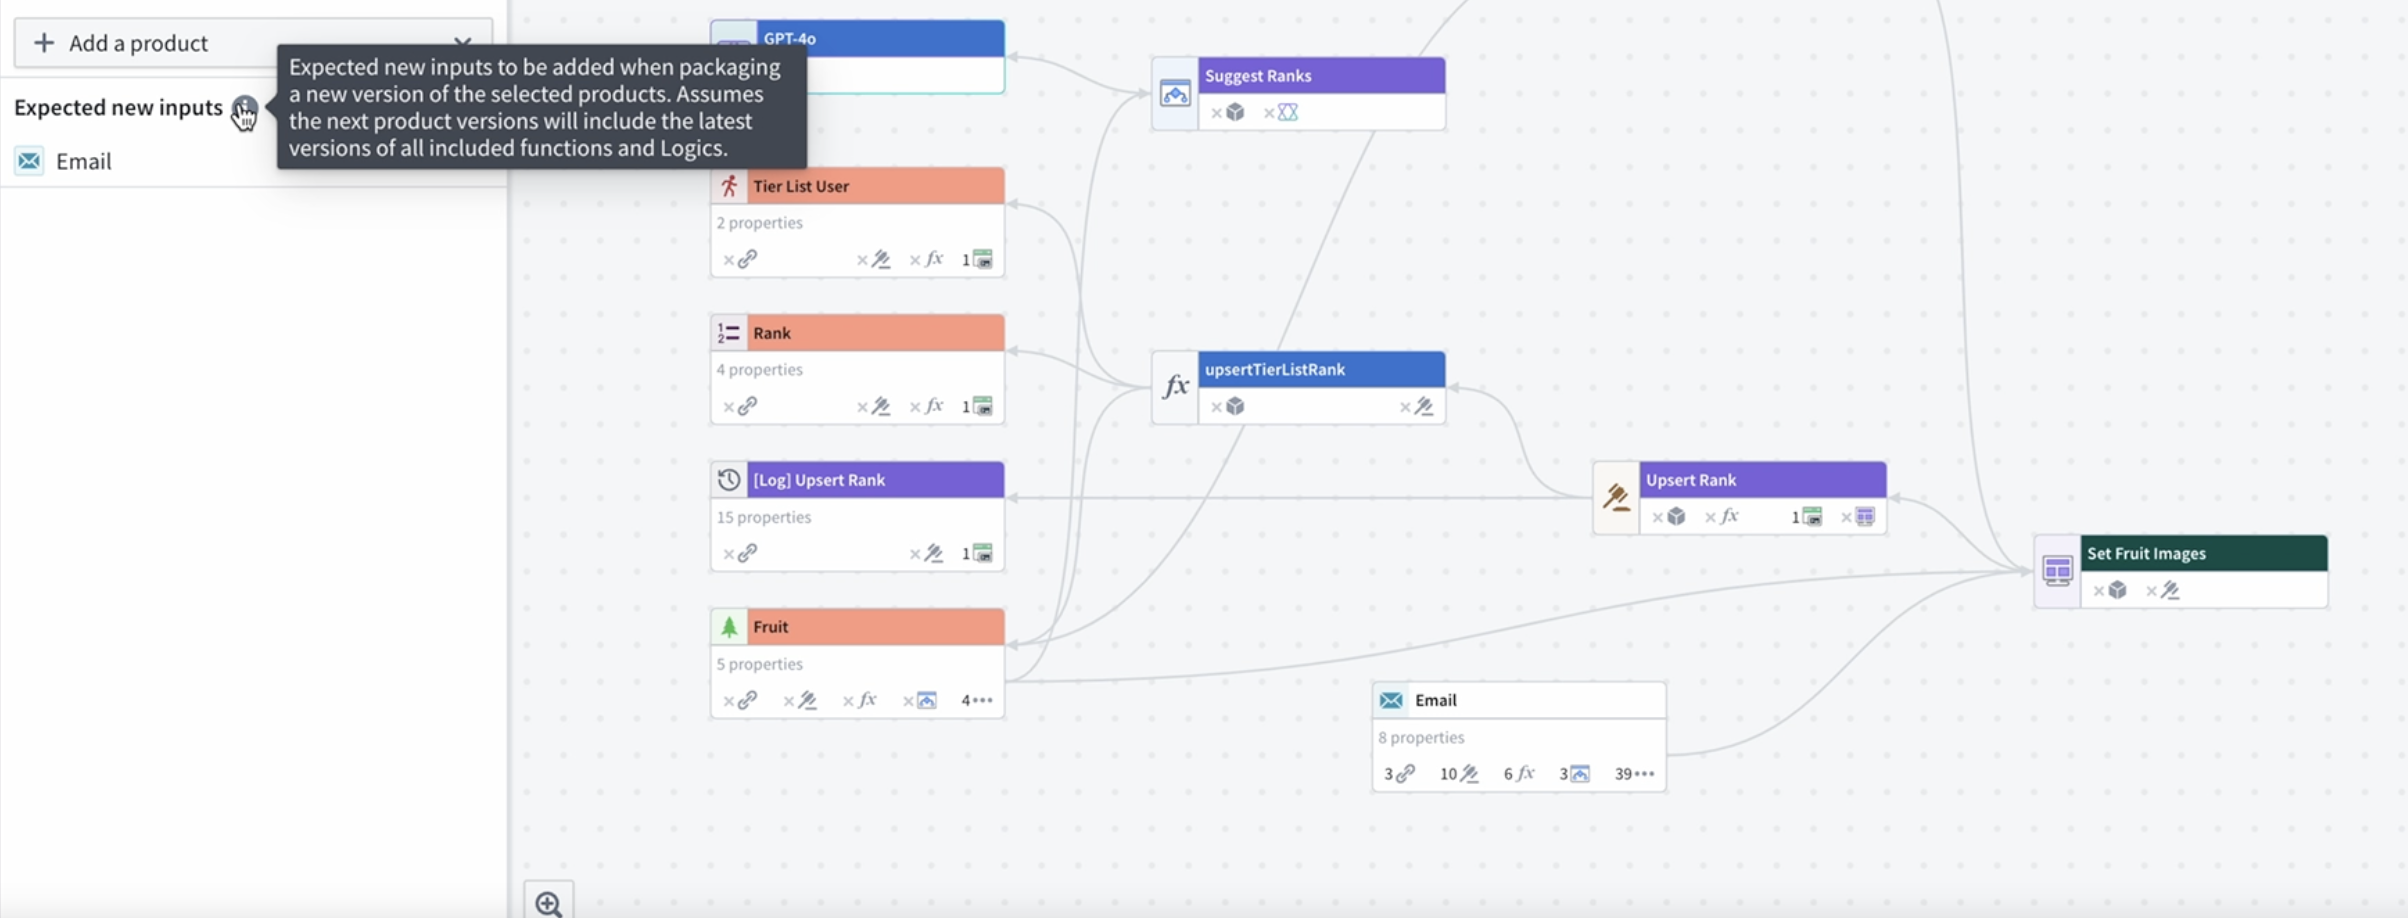
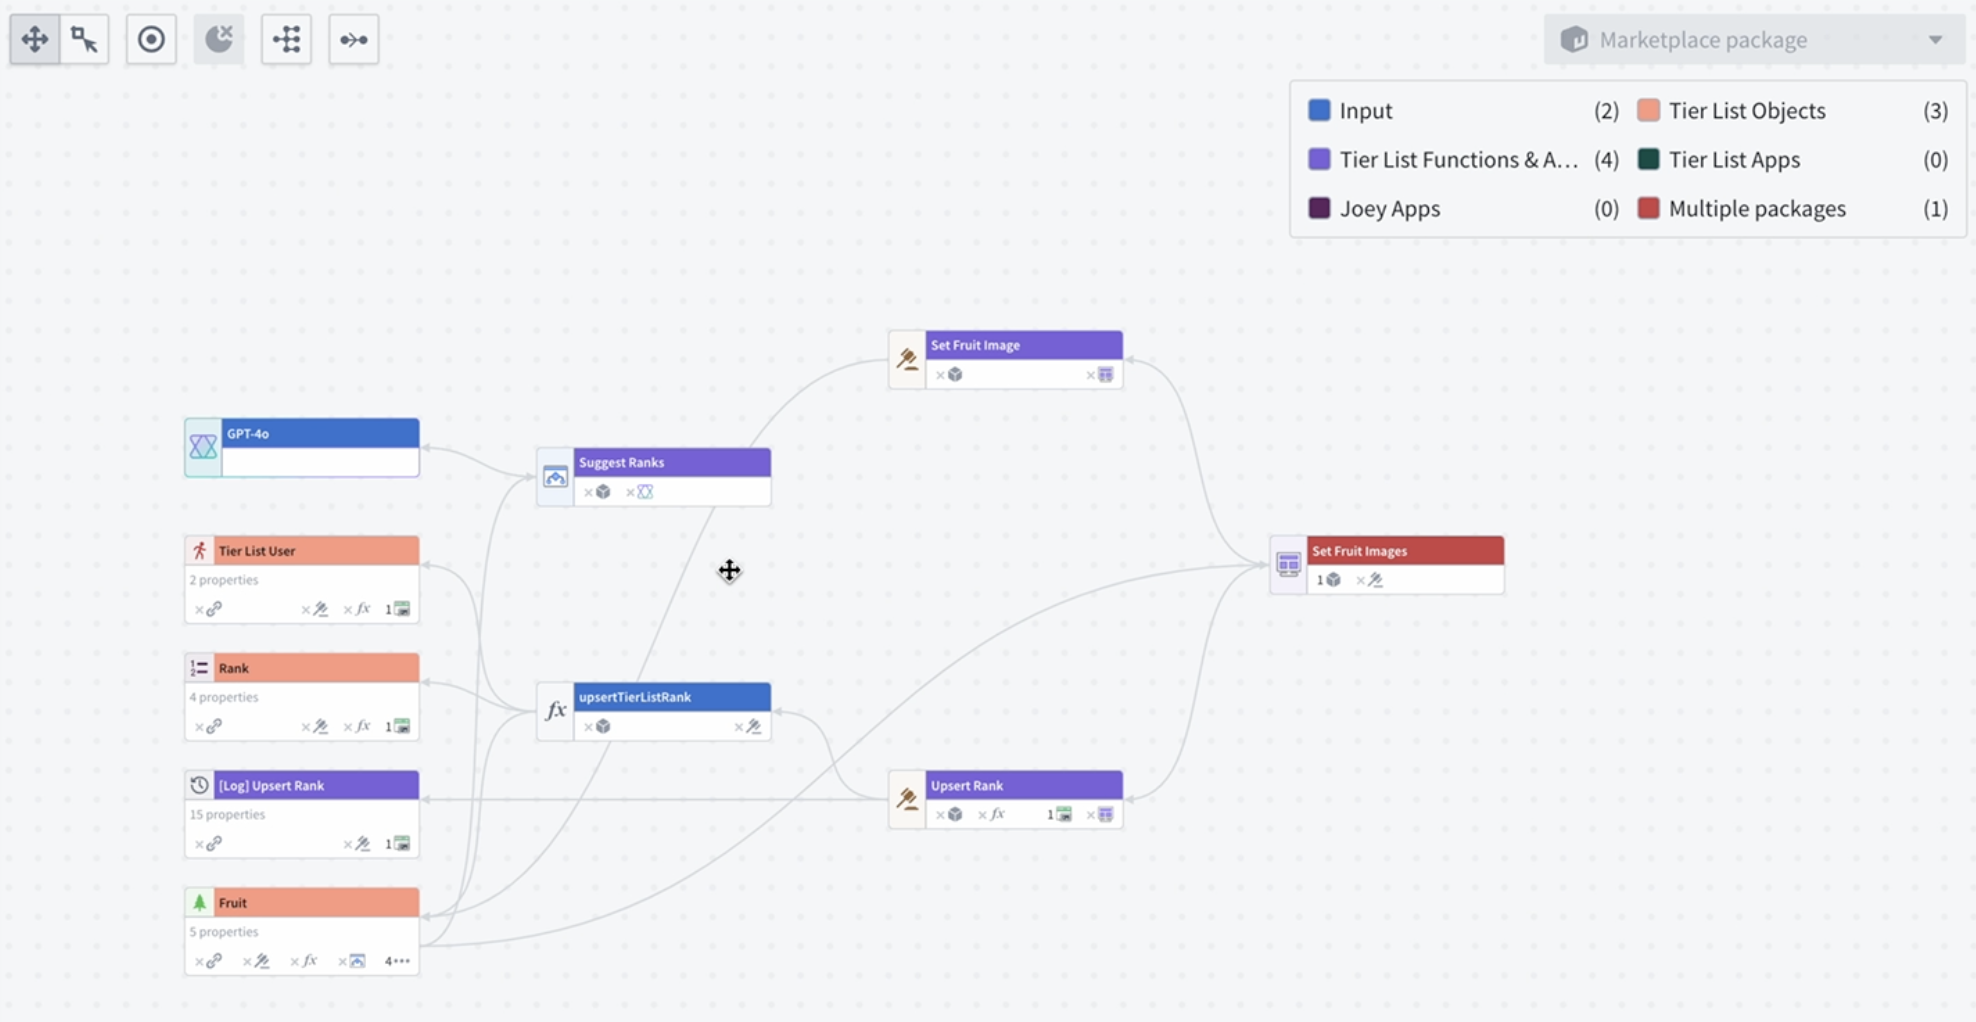
A Workflow Lineage graph will populate, colored by which package the resources are in and whether the resources are inputs to a specific package.
In the example below, the function upsertTierListRank is listed as an input; however, the function should be packaged because it is used in an action that is packaged. Additionally, the [Log] Upsert Rank object ended up in Tier List Functions & Actions instead of the Tier List Objects. A flag also shows that the model GPT-4o is required to use the logic function.

On the left panel, a list of expected new inputs to your package is displayed. In the example below, the Email object feeds into the Set Fruit Images Workshop module, so it should be included in future packages.
The color legend will also show package overlaps with the Multiple packages key.
Additional workflow updates
Aside from the various refactoring explained above, you can also perform security updates for your workflows directly from Workflow Lineage. Review our Workflow Lineage security documentation to learn how to bulk update ontology roles on workflow resources and action submission criteria.
中文翻译
执行重构并理解工作流
:::callout{theme="neutral"} 先前称为工作流构建器(Workflow Builder)的应用程序现在更名为工作流血缘(Workflow Lineage)。 :::
要开始使用工作流血缘(Workflow Lineage),请打开一个 Workshop 应用程序或函数仓库,并使用键盘快捷键 Command + I(macOS)或 Ctrl + I(Windows)查看相关的工作流血缘图,该图展示了支撑该应用程序的对象、操作和函数。
您也可以直接导航到工作流血缘应用程序,并手动向图中添加资源。
为了帮助您理解并轻松执行工作流中的重构,工作流血缘提供了一种简单的方式来理解附加属性、更新过时的变量和基于操作(action-backed)的函数,或批量编辑操作的提交条件。
属性溯源(Property provenance)
您可以追踪整个工作流中任何对象内每个属性的使用情况。在图上选择该对象,然后查看左侧的选择详情面板,即可了解每个属性的使用位置。
每个属性旁边显示的数字表示该属性在函数、操作、链接、Workshop 应用程序等中的使用次数,具体取决于上下文。
基于函数的操作升级(Function-backed action upgrades)
要识别并升级过时的基于函数的操作,首先导航到颜色图例。然后,选择过时的函数选项。此操作会将所有过时的函数以红色高亮显示,为您提供清晰的视觉指示。接下来,选择您希望升级其支持函数的具体操作。选择后,与您的选择相关的任何过时操作将显示在屏幕底部的面板中,以便进一步操作。
:::callout{theme="warning"} 如果某个操作配置了操作日志(action log),并且新函数版本编辑了新的对象类型,则该操作无法在工作流血缘中更新,必须在本体管理器(Ontology Manager)中进行升级。 :::
升级操作后,将在本体管理器中创建一个提案。在此处,您可以请求对更改(例如函数升级)进行审查,一旦获得批准,您就可以合并该提案。
基于函数的 Workshop 应用程序升级(Function-backed Workshop application upgrades)
要升级 Workshop 应用程序中使用的函数,请选择 Workshop 节点,然后打开底部面板上的更新 Workshop 应用程序。
有两种升级选项:
- 全部或无(All or nothing): 仅当所有函数都能在不产生破坏性变更的情况下升级时,才升级 Workshop 中的函数。如果存在任何破坏性变更,则不会升级任何内容。
- 部分(Partial): 仅升级没有破坏性变更的函数。会导致破坏性变更的函数将不会被升级。
要选择要升级的函数的所需版本,请选择选择版本...。这将打开一个弹出窗口,您可以在其中为每个函数仓库选择所需版本,以及为 AIP Logic 或计算模块创建的所有函数选择版本。如果未指定任何内容,它将自动采用仓库的最新版本。
当某个函数无法升级时,该函数旁边会出现一个黄色警告图标。
当某个函数已经是最新时,该函数旁边会出现一个灰色勾选图标。
如果某个函数可以成功更新,则会显示一个绿色勾选图标。
选择蓝色的升级选项,将您的 Workshop 模块函数升级到目标版本。这将打开一个弹出窗口,列出将要升级的 Workshop 模块。
选择升级以使更改生效。成功升级的 Workshop 应用程序将显示在弹出窗口中。
您还可以选择在函数更新后批量发布 Workshop。请参阅关于批量发布 Workshop 应用程序的文档了解操作方法。
批量发布 Workshop 应用程序(Bulk publish Workshop applications)
Workshop 应用程序可以配置为始终发布最新版本;未配置为自动发布最新版本的 Workshop 应用程序可以进行"批量发布",这将一次性更新所有选定的应用程序。要批量发布 Workshop 应用程序,请选择 Workshop 节点,然后右键单击并选择发布 [数量] 个 Workshop 模块。
一次发布多个 Workshop 模块将打开一个窗口,显示哪些 Workshop 应用程序已经处于最新版本。如果某个 Workshop 应用程序旁边有一个蓝色勾选标记,并带有已发布最新版本或已发布字样,则表示该 Workshop 已处于最新版本。
具体来说:
- 已发布最新版本 表示 Workshop 始终自动发布最新版本。这是一个可以在 Workshop 应用程序中切换的设置。
- 已发布 表示 Workshop 不会自动发布最新版本,但该应用程序当前已发布最新版本。
对于未标记为已发布或已发布最新版本的 Workshop 应用程序,您可以选择要发布到最新版本的应用程序,然后选择发布 [数量] 个实体。
您还可以在工作流血缘中更新函数后批量发布 Workshop 模块。为此,请在更新函数后选择继续发布。
这将带您进入一个页面,其中包含所有尚未发布到最新版本的 Workshop 模块。确认您希望为这些模块发布最新版本,然后选择发布 [数量] 个实体。
成功完成后,选择完成。
批量替换模型(Bulk replace models)
您可以通过工作流血缘中的单个操作来替换多个 AIP Logic 函数使用的模型,而无需分别打开每个函数并逐个更新模型。这在迁移出已弃用的模型或评估工作流中的新模型时非常有用。
:::callout{theme="neutral"} 工作流血缘中的批量模型替换目前仅支持 AIP Logic 节点。对其他资源类型的支持正在开发中。 :::
要跨多个 AIP Logic 函数替换模型:
- 在工作流血缘中打开您的工作流。
- 在图上选择您要替换的语言模型节点。
- 将要更新的 AIP Logic 节点添加到图中(如果尚未存在)。选择模型节点上的 AIP Logic 图标,以在图上直接过滤使用所选模型的节点。不在图上的 AIP Logic 节点将不会出现在替换模型选项卡中。
- 打开底部面板中的替换模型选项卡。源模型显示在左侧,使用该模型的 AIP Logic 函数显示在右侧的用于列表中。
- 在替换为下选择替换模型。
- 使用用于列表中的复选框,取消选择您希望从模型替换中排除的任何 AIP Logic 函数。
- 选择替换模型。
批量替换模型时的注意事项
- 工作流血缘会跳过您无法编辑的 AIP Logic 函数。
- 工作流血缘直接将更改应用于受影响的 AIP Logic 函数。没有提案或审查步骤。
- 成功替换后,图连接可能需要片刻时间才能刷新。
- 替换模型必须是 Palantir 提供的。
批量删除对象和操作(Bulk delete objects and actions)
要批量删除对象和操作,请选择图上的节点,右键单击,然后选择删除资源。
这将提示您创建一个提案。您还将看到与正在删除的对象关联的链接类型数量。这些链接也将包含在删除提案中。
按照本体管理器中的提示合并提案。
Marketplace 产品(Marketplace products)
Marketplace 产品侧边栏可帮助您检查并确认 Marketplace 产品具有正确的输入、没有缺失资源,并且所有资源都在预期的包中。此功能对于您创建并发布到其他位置的包尤其有用。
导航到Marketplace 产品侧边栏,然后在下拉菜单中选择您的商店。请注意,侧边栏只会搜索本地商店,而不会搜索远程商店。
选择添加产品以添加您希望检查的产品,然后通过选择将所有节点添加到图来将图中所有对应的节点添加进来。
工作流血缘图将填充,并根据资源所在的包以及资源是否为特定包的输入进行着色。
在下面的示例中,函数 upsertTierListRank 被列为输入;然而,该函数应该被打包,因为它被用于一个已打包的操作中。此外,[Log] Upsert Rank 对象最终出现在层级列表函数与操作包中,而不是层级列表对象包中。还有一个标志显示,使用该逻辑函数需要模型 GPT-4o。
在左侧面板中,显示了您的包预期的新输入列表。在下面的示例中,Email 对象为设置水果图像 Workshop 模块提供数据,因此它应包含在未来的包中。
颜色图例还将显示带有多个包键的包重叠情况。
其他工作流更新
除了上述各种重构之外,您还可以直接从工作流血缘为工作流执行安全更新。请查阅我们的工作流血缘安全文档,了解如何批量更新工作流资源上的本体角色和操作提交条件。