Protecting sensitive data(保护敏感数据)
As you saw in Securing a data foundation, access to data in various projects can be managed by project owners. This is what’s known as discretionary access controls ↗. However, when it comes to sensitive data, a stronger, more centralized access control model is needed.
In our example, we have a notional dataset containing passenger birth dates (DOBs), which constitute Personally Identifiable Information (PII). We may want to tightly control this PII, and ensure that this data is only accessible to those who have gone through a PII training. We can solve this using Markings.
Markings are Foundry’s implementation of mandatory access controls ↗. A marking represents a type of data (like PII), to which a specified list of users or groups have access. When a marking is applied to a dataset, users without access to that marking are guaranteed to never be able to access that data, even if the project owner tries sharing it with them. Importantly, this restriction propagates to any data derived from this dataset anywhere in the platform.
This feature is very powerful for data governance, enabling data protection officers to centrally manage and audit exactly who can access a category of data.
Before we introduce our application to our end users, we want to make sure we protect sensitive data. Again, in our example, we have passenger birth dates (DOBs) which we want to lock down in the data pipeline.
Create a marking
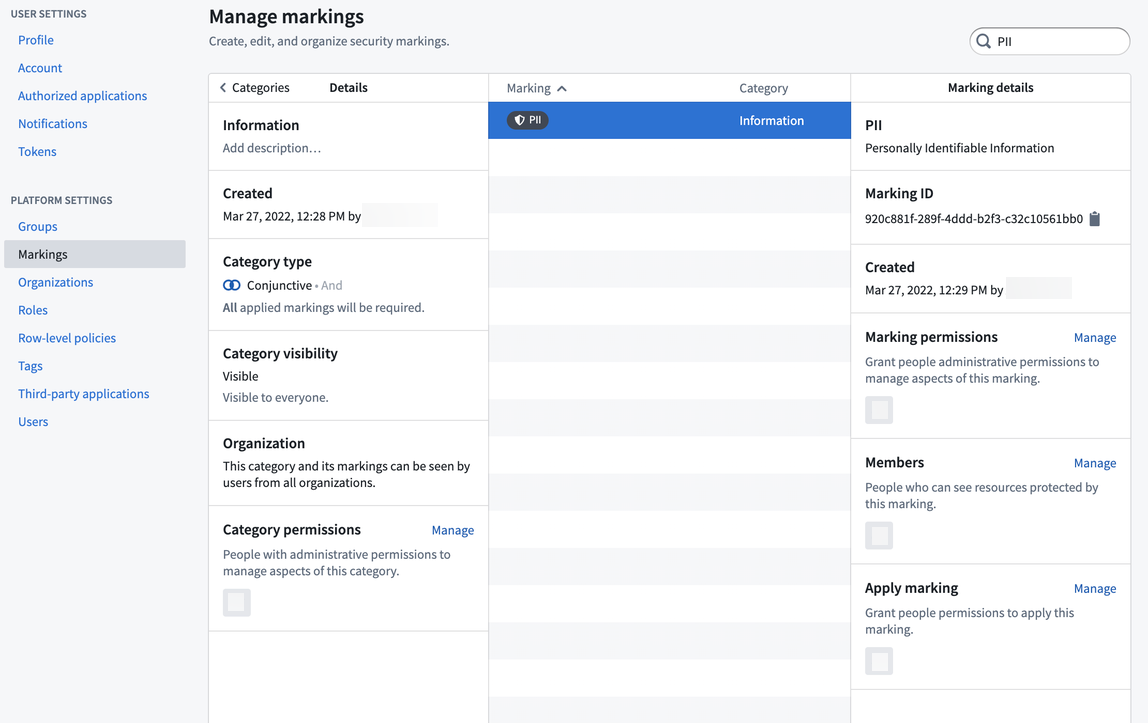
We need to create a marking category, which is a name for a set of markings. In this case, create a marking category of “Information”, since there will likely be other information related markings needed in the future (e.g. Personal Health Information, or PHI). After you create the category, you can create the PII marking. You can then add the people who have permission to see PII data as members of the marking and add the admin team as the managers of the marking.
Simulate our marking change
Markings have the powerful behavior of propagating along data lineage. Accordingly, applying a new marking to an existing pipeline can risk locking out downstream users unexpectedly, so it’s best practice to always simulate applying a marking to our pipeline to see where it propagates. To do this, open the data lineage of your pipeline and turn on simulation mode. You can edit the Markings on the raw/passengers dataset and apply the PII Marking you created. You will then see all the datasets downstream that will be affected when the PII marking is applied.
We don’t want all consumers of our data to have to have PII access, so we want to remove the sensitive DOB column at some point in our pipeline. To do this, we should click through the pipeline, reviewing where we think it’s best to remove the PII marking. Typically this is done by opening the preview view in the bottom when selecting a dataset, so we can see the data and columns.
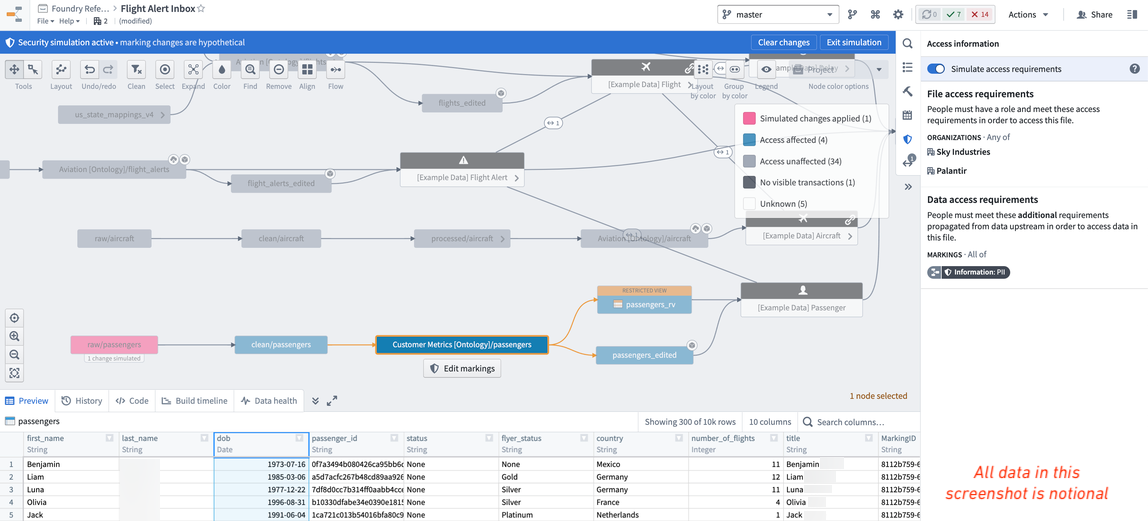
In our notional example, we can see that the PII marking propagates all the way to the ontology dataset, which would lock out all our end-users who don’t have access to PII. Therefore, we decide it was best to keep the sensitive data in the pipeline as long as possible, but remove the “dob” column on the ontology version of the passengers data (i.e. /Sky Industries/Customer Metrics [Ontology]/passengers).
Remove soon-to-be inherited marking
In the data lineage view, click on the Customer Metrics [Ontology]/passengers dataset, click on Code, and click View in repository. This will open up the code repository that was used to create this notional dataset. In the code repository, you will want to 1) create a branch, 2) remove the sensitive column (that is, drop the dob column), 3) remove the soon-to-be inherited PII marking from the input dataset, and then 4) create the pull request. We recommend reviewing the documentation on how to remove inherited markings and organizations.
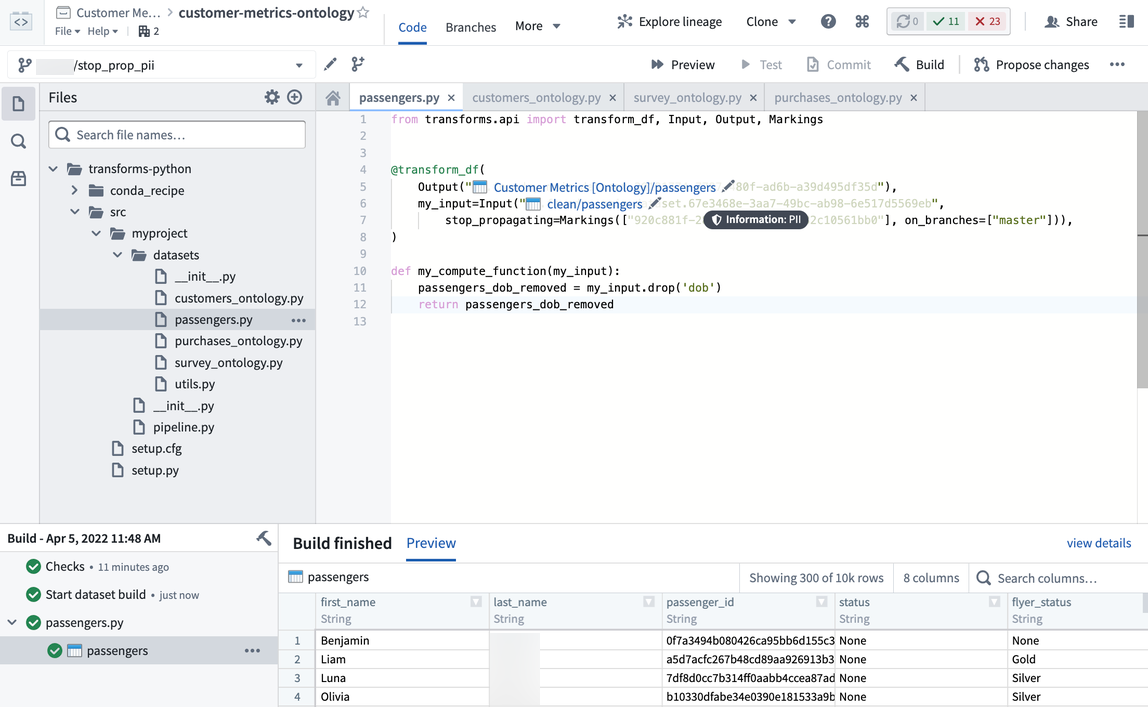
After our colleague approves the pull request to stop propagating the PII marking, we will need to build this dataset and everything downstream of it so that the latest dataset transactions all “stop propagating” the soon-to-be added marking. Also, there are considerations with APPEND or UPDATE transaction types that require special attention. But in our example, everything is being build as a SNAPSHOT, which is the default transaction type in Foundry.
Apply the marking
Before we apply the marking, we want to double check that it will propagate to the datasets we expect and no others. To do this, open up the data lineage view of the pipeline again, turn on simulation mode, apply the marking on the raw/passenger dataset, and confirm that the ontology/passenger dataset is not affected. This means the stop_propagating logic in the previous section was applied correctly.
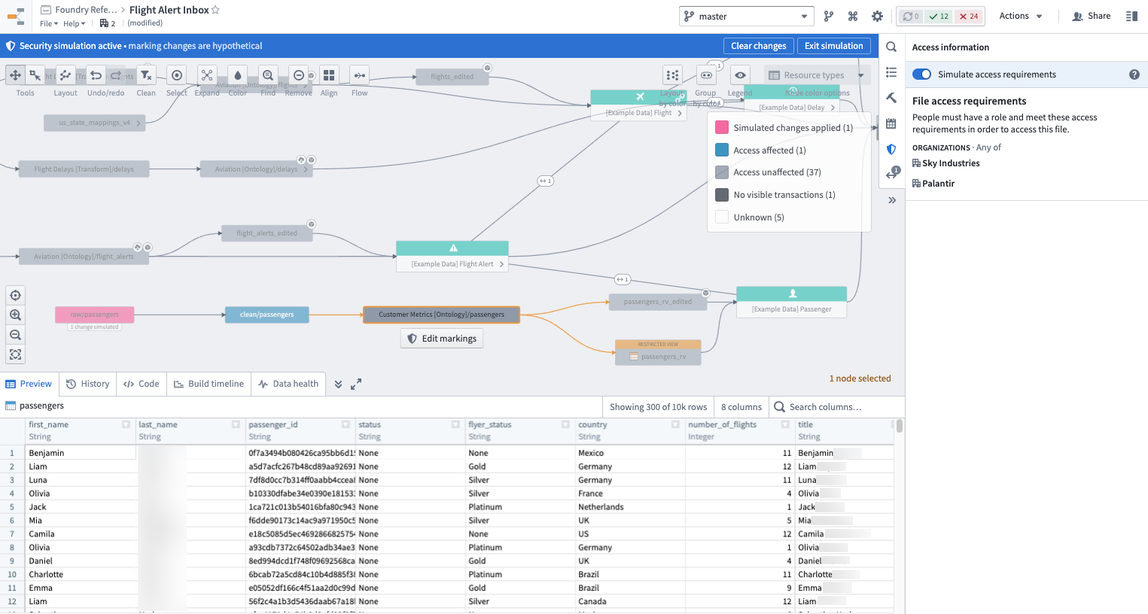
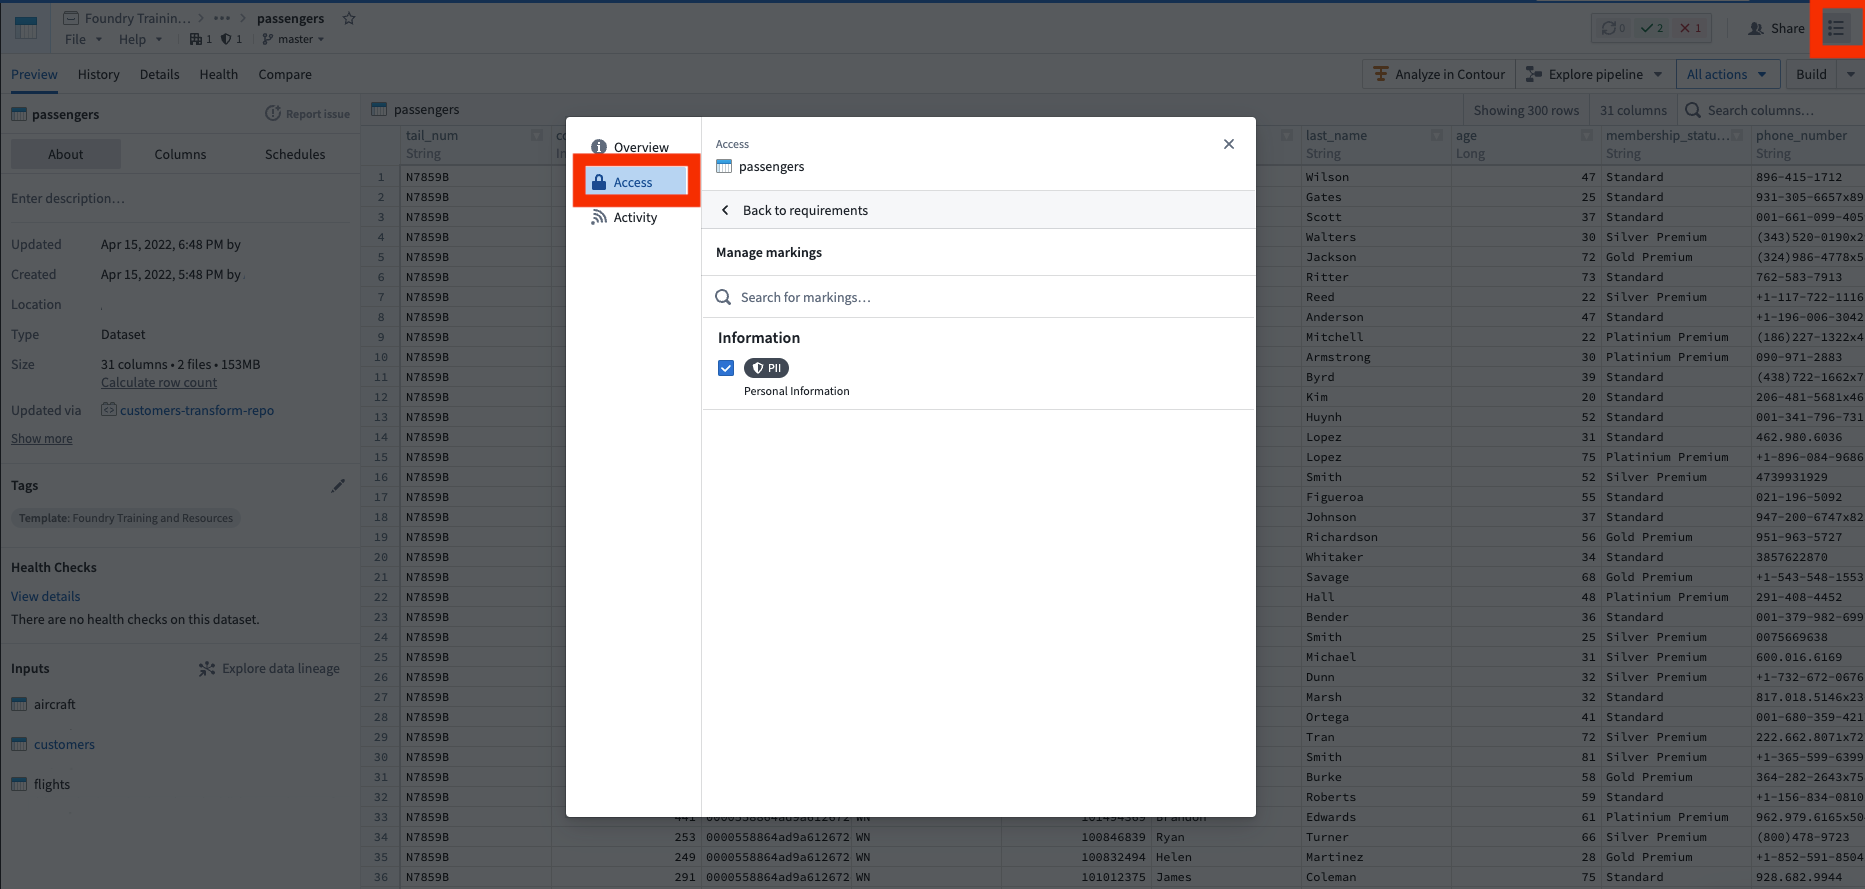
Now you are ready to apply the marking, as shown in the screenshot below of notional data. To do this, go to the raw/passenger dataset, open the security helper, and apply the marking. Once you click save, the PII marking is applied immediately and propagates downstream immediately. You can see this by looking at the data lineage and seeing a marking badge on the datasets that now have markings. You have successfully protected your sensitive PII data.
中文翻译
保护敏感数据
正如你在保护数据基础中所见,不同项目中的数据访问权限可由项目所有者管理。这就是所谓的自主访问控制 ↗。然而,对于敏感数据,我们需要一种更强大、更集中的访问控制模型。
在我们的示例中,有一个包含乘客出生日期(DOB)的概念数据集,这些数据属于个人身份信息(PII)。我们可能希望严格控制这些PII数据,确保只有经过PII培训的人员才能访问。我们可以通过标记(Markings)来解决这个问题。
标记(Markings)是Foundry对强制访问控制 ↗的实现。一个标记代表一种数据类型(如PII),只有指定的用户或用户组列表才能访问该数据。当标记应用于数据集时,没有该标记访问权限的用户将永远无法访问该数据,即使项目所有者试图与他们共享也无济于事。重要的是,这种限制会传播到平台上从该数据集衍生的任何数据。
此功能对于数据治理非常强大,使数据保护官能够集中管理和审计谁可以访问某一类数据。
在向最终用户介绍我们的应用程序之前,我们希望确保保护敏感数据。同样,在我们的示例中,我们有乘客出生日期(DOB),需要在数据管道中锁定这些数据。
创建标记
我们需要创建一个标记类别(Marking Category),这是一组标记的名称。在这种情况下,创建一个"信息(Information)"标记类别,因为未来可能还需要其他与信息相关的标记(例如个人健康信息PHI)。创建类别后,您可以创建PII标记。然后,将有权查看PII数据的人员添加为标记的成员,并将管理团队添加为标记的管理员。
模拟标记变更
标记具有沿数据谱系传播的强大特性。因此,对现有管道应用新标记可能会意外锁定下游用户,因此最佳实践是始终模拟将标记应用于管道,以查看其传播范围。为此,请打开管道的数据谱系视图并开启模拟模式。您可以在raw/passengers数据集上编辑标记,并应用您创建的PII标记。然后,您将看到应用PII标记时所有受影响的下游数据集。
我们不希望所有数据消费者都必须拥有PII访问权限,因此我们希望在管道的某个节点移除敏感的DOB列。为此,我们应该点击浏览管道,评估在何处移除PII标记最为合适。通常,这可以通过在选择数据集时打开底部的预览视图来完成,这样我们就可以看到数据和列。
在我们的概念示例中,我们可以看到PII标记一直传播到本体论(Ontology)数据集,这将锁定所有没有PII访问权限的最终用户。因此,我们决定最好在管道中尽可能长时间地保留敏感数据,但在乘客数据的本体论(Ontology)版本(即/Sky Industries/Customer Metrics [Ontology]/passengers)中移除"dob"列。
移除即将继承的标记
在数据谱系视图中,点击Customer Metrics [Ontology]/passengers数据集,点击代码(Code),然后点击在仓库中查看(View in repository)。这将打开用于创建此概念数据集的代码仓库。在代码仓库中,您需要:1) 创建一个分支,2) 移除敏感列(即删除dob列),3) 移除输入数据集中即将继承的PII标记,然后4) 创建拉取请求(Pull Request)。我们建议查阅关于如何移除继承的标记和组织的文档。
在我们的同事批准了停止传播PII标记的拉取请求后,我们需要构建此数据集及其所有下游数据集,以便最新的数据集事务全部"停止传播"即将添加的标记。此外,APPEND或UPDATE事务类型需要特别注意。但在我们的示例中,所有内容都以SNAPSHOT方式构建,这是Foundry中的默认事务类型。
应用标记
在应用标记之前,我们希望再次确认它将传播到我们预期的数据集,而不会影响其他数据集。为此,请再次打开管道的数据谱系视图,开启模拟模式,在raw/passenger数据集上应用标记,并确认ontology/passenger数据集未受影响。这意味着上一节中的stop_propagating逻辑已正确应用。
现在您可以应用标记了,如下方概念数据的截图所示。为此,请前往raw/passenger数据集,打开安全助手(Security Helper),然后应用标记。点击保存后,PII标记将立即应用并立即向下游传播。您可以通过查看数据谱系并观察现在带有标记的数据集上的标记徽章来确认这一点。您已成功保护了敏感的PII数据。