Configure cloud identities(配置云身份(Cloud identities))
Cloud identities allow you to authenticate to cloud provider resources without the use of static credentials.
:::callout{theme="neutral"} The Cloud identities page in Control Panel will only be displayed if the following is true:
- Your Foundry enrollment is hosted in AWS.
- Your Foundry enrollment is running on Rubix, Palantir's Kubernetes-based infrastructure. :::
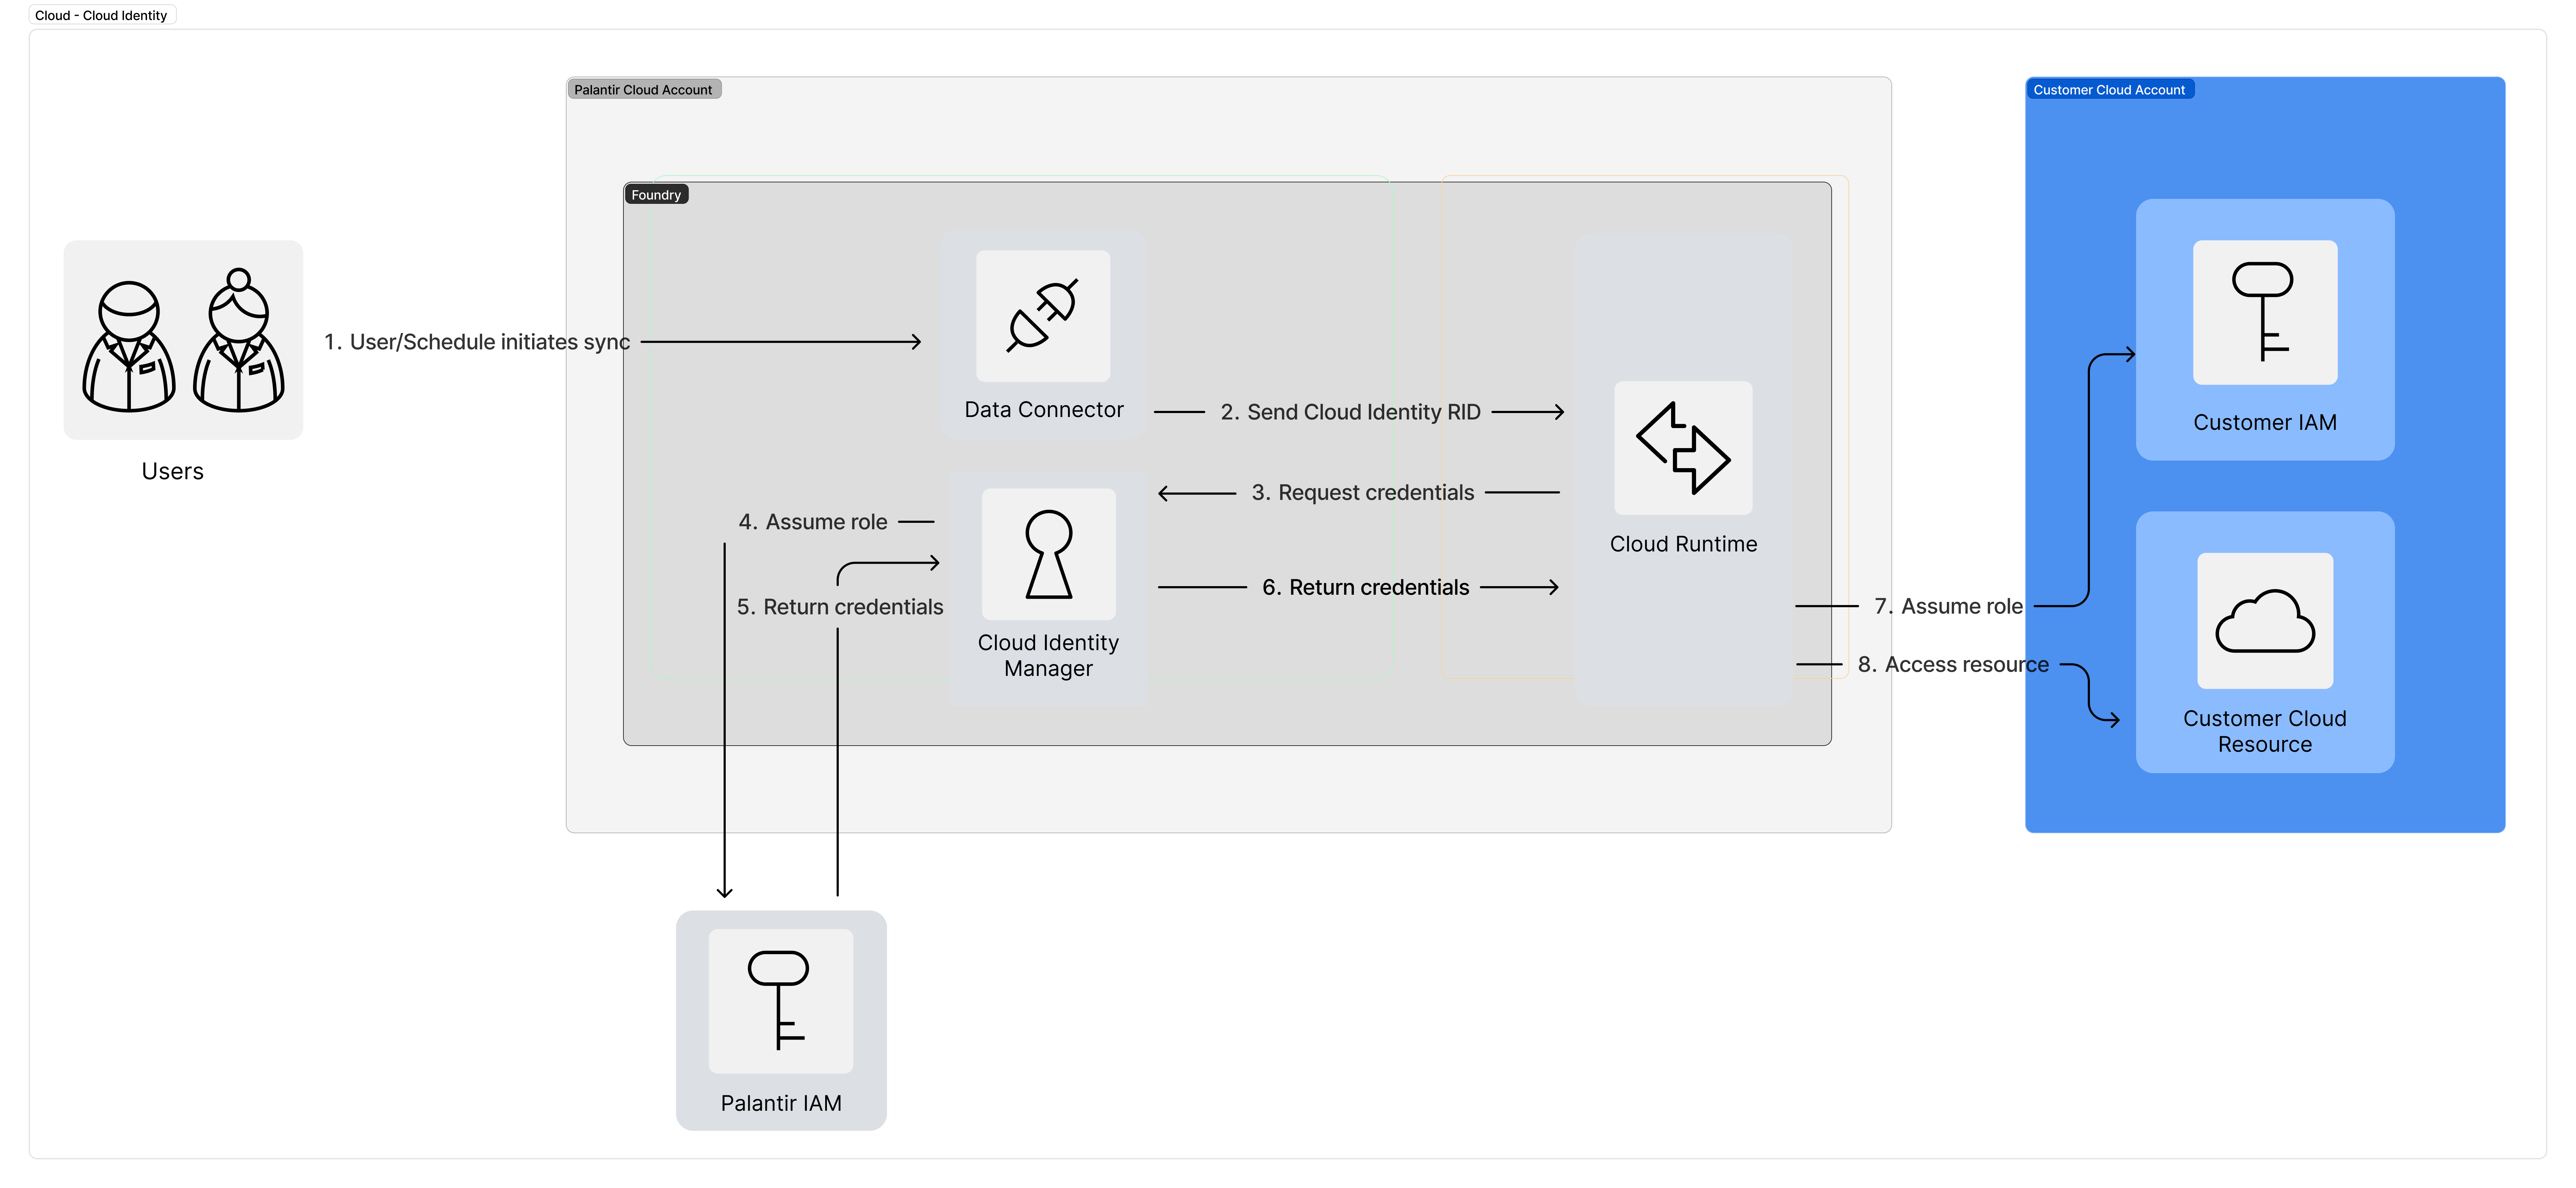
Cloud identity authentication allows Foundry to access resources in your cloud provider, including Amazon AWS, Microsoft Azure, or Google Cloud Platform. Cloud identities are configured and managed at the enrollment level in Control Panel and should be imported when setting up individual source connections in Data Connection.
The Foundry-generated cloud identity must be granted access to resources in the target cloud platform. Where available, cloud identity is recommended over static credential-based authentication.
Cloud identity for AWS
For access to AWS resources, a cloud identity represents an AWS Identity and Access Management (IAM) role generated in the AWS account where your Foundry enrollment is hosted.
:::callout{theme="neutral"} As of April 2024, you may create up to 15 cloud identities per enrollment in Control Panel. If you need additional cloud identities, please file a support ticket to discuss options that may be available for your enrollment. :::
Enable AWS cloud identity for your enrollment
To generate a cloud identity for your enrollment, navigate to Enrollment Settings > Cloud Identities in the Control Panel sidebar. Accessing this page requires the Manage cloud identity configuration workflow which is granted to the Enrollment administrator and Information security officer roles.
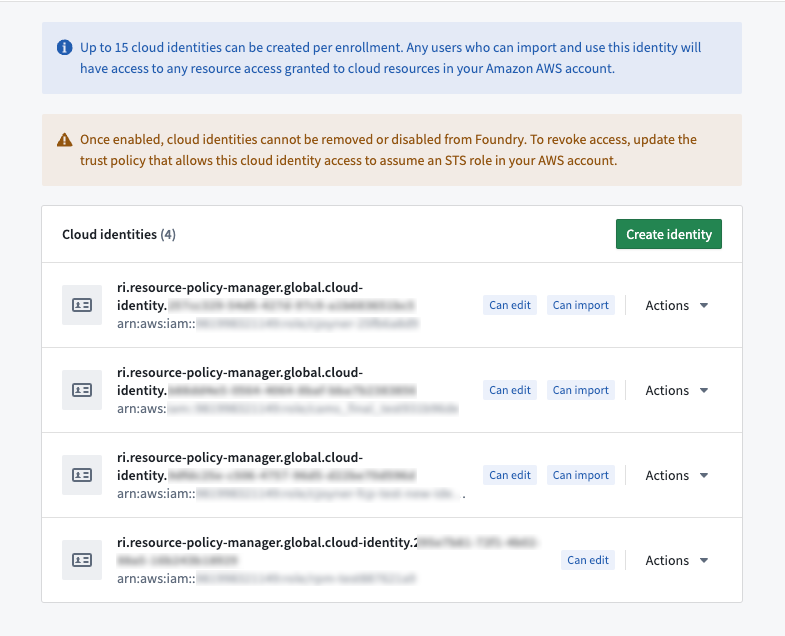
Select Create Identity to generate a cloud identity and associated IAM role. The role's Amazon Resource Number (ARN) ↗ will be displayed.
:::callout{theme="warning"} Once created, a cloud identity cannot be deleted and its name cannot be edited. Users of multiple cloud identities should be mindful of the reasons why a new cloud identity is needed. :::
To enable the cloud identity's IAM role to authenticate and access resources, you must create a separate IAM role in your AWS account and create two policies.
Policy 1: You must create a trust policy that allows the cloud identity's IAM role to assume the IAM role created in your AWS account.
Example trust policy, attached to the IAM role in your AWS account, for a generated cloud identity role ARN:
{
   "Statement":
   [
      {
         "Action": "sts:AssumeRole",
         "Effect": "Allow",
         "Principal": {
            "AWS": "$GENERATED_CLOUD_IDENTITY_ARN",
         },
      }
   ],
   "Version": "2012-10-17"
}
Substitute $GENERATED_CLOUD_IDENTITY_ARN with the full ARN string. You can copy the ARN string from Control Panel by selecting Copy to clipboard.

Policy 2: You must create a permissions policy attached to the IAM role created in your AWS account that allows the role to carry out the intended tasks on the resources.
Below is an example S3 permissions policy. You should replace $BUCKET with the name of the desired source S3 bucket.
{
   "Statement":
   [
      {
         "Action":
         [
            "s3:GetObject",
            "s3:ListBucket",
            "s3:DeleteObject",
            "s3:PutObject"
         ],
         "Effect": "Allow",
         "Resource":
         [
            "arn:aws:s3:::$BUCKET",
            "arn:aws:s3:::$BUCKET/*"
         ]
      }
   ],
   "Version": "2012-10-17"
}
Learn more about these policies in the AWS documentation ↗.
:::callout{theme="neutral"} Ensure that the necessary Foundry Rubix IPs have been allowlisted on your AWS network. Additionally, verify that the relevant egress policies have been added to your Foundry enrollment to allow a direct connection between Foundry and your AWS account. You can find the Foundry Rubix IPs for your enrollment and set up the necessary egress policies under the Network Egress option in Control Panel. :::
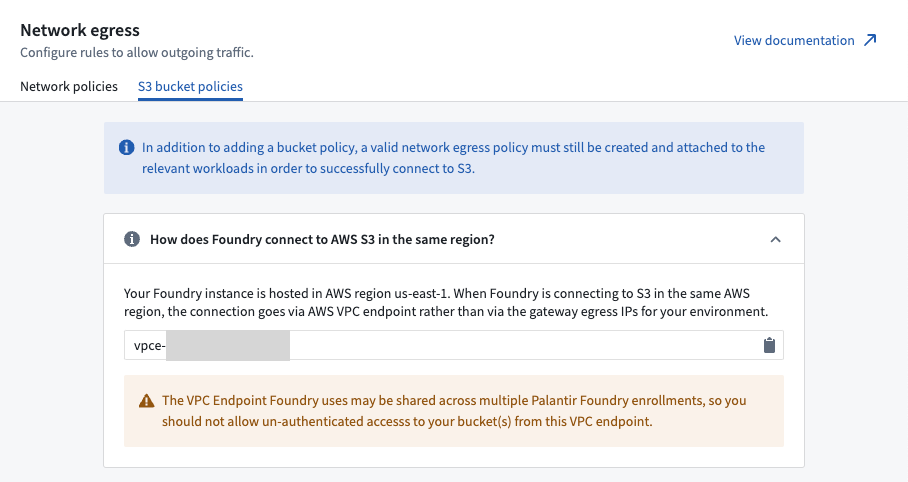
:::callout{theme="warning"} If your S3 bucket is in the same region where your Foundry instance is hosted, you must use a separate process to allow egress to those buckets; the network traffic from Foundry’s Rubix will instead come from the Amazon VPCE used to connect to S3. VPCE identifiers can be accessed in the Network Egress section of the Control Panel, under the S3 bucket policies tab. Depending on how an S3 source is configured, VPCE identifiers can also be exposed via the Data Connection app. :::
Use cloud identity when configuring an S3 source
Once enabled, the Cloud identity credentials option will be available to use with your S3 source in Foundry on the Connection details page in Data Connection.

When using cloud identity authentication, the role ARN will be displayed in the credentials section. After selecting the Cloud identity option, a default cloud identity will be preselected. In the case that multiple cloud identities exist on your enrollment, a dropdown menu will allow you to select from one from a list. After a cloud identity is selected, you must also configure the following:
- Configure an Identity and Access Management (IAM) role in the target Amazon AWS account.
- Grant the IAM role access to the S3 bucket to which you wish to connect. You can generally do this with a bucket policy ↗.
- In the S3 source configuration details, add the IAM role under the Security Token Service (STS) role ↗ configuration. The cloud identity IAM role in Foundry will attempt to assume the AWS Account IAM role when accessing S3 ↗.
- Configure a corresponding trust policy ↗ to allow the cloud identity IAM role to assume the target AWS account IAM role.
中文翻译
配置云身份(Cloud identities)
云身份允许您在不使用静态凭据的情况下对云提供商资源进行身份验证。
:::callout{theme="neutral"} 仅当满足以下条件时,Control Panel 中才会显示云身份页面:
- 您的 Foundry enrollment 托管在 AWS 中。
- 您的 Foundry enrollment 运行在 Rubix(Palantir 基于 Kubernetes 的基础设施)上。 :::
云身份身份验证允许 Foundry 访问您的云提供商中的资源,包括 Amazon AWS、Microsoft Azure 或 Google Cloud Platform。云身份在 Control Panel 的 enrollment 级别进行配置和管理,并在 Data Connection 中设置各个源连接时导入。
必须为 Foundry 生成的云身份授予对目标云平台资源的访问权限。在可用的情况下,建议优先使用云身份,而不是基于静态凭据的身份验证。
适用于 AWS 的云身份
为了访问 AWS 资源,云身份代表在托管您的 Foundry enrollment 的 AWS 账户中生成的 AWS Identity and Access Management (IAM) 角色。
:::callout{theme="neutral"} 截至 2024 年 4 月,您最多可以在 Control Panel 中为每个 enrollment 创建 15 个云身份。如果您需要更多云身份,请提交支持工单,讨论适用于您的 enrollment 的可用选项。 :::
为您的 enrollment 启用 AWS 云身份
要为您的 enrollment 生成云身份,请在 Control Panel 侧边栏中导航至 Enrollment Settings > Cloud Identities。访问此页面需要 Manage cloud identity configuration 工作流,该工作流已授予 Enrollment administrator 和 Information security officer 角色。
选择 Create Identity 以生成云身份及关联的 IAM 角色。系统将显示该角色的 Amazon Resource Number (ARN) ↗。
:::callout{theme="warning"} 云身份一旦创建,便无法删除,其名称也无法编辑。使用多个云身份的用户应谨慎考虑为何需要新建云身份。 :::
要使云身份的 IAM 角色能够进行身份验证并访问资源,您必须在您的 AWS 账户中创建一个单独的 IAM 角色,并创建两个策略。
策略 1:您必须创建一个信任策略(trust policy),允许云身份的 IAM 角色代入在您的 AWS 账户中创建的 IAM 角色。
附加到您的 AWS 账户中 IAM 角色的示例信任策略,用于生成的云身份角色 ARN:
{
   "Statement":
   [
      {
         "Action": "sts:AssumeRole",
         "Effect": "Allow",
         "Principal": {
            "AWS": "$GENERATED_CLOUD_IDENTITY_ARN",
         },
      }
   ],
   "Version": "2012-10-17"
}
将 $GENERATED_CLOUD_IDENTITY_ARN 替换为完整的 ARN 字符串。您可以通过选择 Copy to clipboard 从 Control Panel 复制 ARN 字符串。
策略 2:您必须创建一个权限策略(permissions policy)并将其附加在您的 AWS 账户中创建的 IAM 角色上,以允许该角色对资源执行预期任务。
下面是一个 S3 权限策略示例。您应将 $BUCKET 替换为目标源 S3 存储桶的名称。
{
   "Statement":
   [
      {
         "Action":
         [
            "s3:GetObject",
            "s3:ListBucket",
            "s3:DeleteObject",
            "s3:PutObject"
         ],
         "Effect": "Allow",
         "Resource":
         [
            "arn:aws:s3:::$BUCKET",
            "arn:aws:s3:::$BUCKET/*"
         ]
      }
   ],
   "Version": "2012-10-17"
}
有关这些策略的更多信息,请参阅 AWS 文档 ↗。
:::callout{theme="neutral"} 请确保已在您的 AWS 网络上将必要的 Foundry Rubix IP 加入白名单。此外,请验证是否已为您的 Foundry enrollment 添加相关的出站(egress)策略,以允许 Foundry 与您的 AWS 账户之间建立直接连接。您可以在 Control Panel 的 Network Egress 选项下找到您的 enrollment 对应的 Foundry Rubix IP,并设置必要的出站策略。 :::
:::callout{theme="warning"} 如果您的 S3 存储桶与托管 Foundry 实例的区域相同,则必须使用单独的流程来允许出站至这些存储桶;来自 Foundry Rubix 的网络流量将改为来自用于连接 S3 的 Amazon VPCE。您可以在 Control Panel 的 Network Egress 部分中的 S3 bucket policies 选项卡下访问 VPCE 标识符。根据 S3 源的配置方式,VPCE 标识符也可以通过 Data Connection 应用公开。 :::
配置 S3 源时使用云身份
启用后,您可以在 Data Connection 的 Connection details 页面中,将 Cloud identity 凭据选项用于 Foundry 中的 S3 源。
使用云身份身份验证时,凭据部分将显示角色 ARN。选择 Cloud identity 选项后,系统将预选一个默认云身份。如果您的 enrollment 上存在多个云身份,下拉菜单将允许您从列表中选择一个。选择云身份后,您还必须配置以下内容:
- 在目标 Amazon AWS 账户中配置 Identity and Access Management (IAM) 角色。
- 授予该 IAM 角色对您希望连接的 S3 存储桶的访问权限。通常,您可以通过存储桶策略 ↗来实现此操作。
- 在 S3 源配置详细信息中,在 Security Token Service (STS) role ↗ 配置下添加该 IAM 角色。Foundry 中的云身份 IAM 角色将尝试在访问 S3 时代入 AWS 账户 IAM 角色 ↗。
- 配置相应的信任策略 ↗,以允许云身份 IAM 角色代入目标 AWS 账户 IAM 角色。