Configure domains and certificates(配置域名与证书)
:::callout{theme="warning"} As of February 2026, this feature is only available for new customer managed domains. Any existing domains previously configured with support from Palantir may continue to require Palantir support. :::
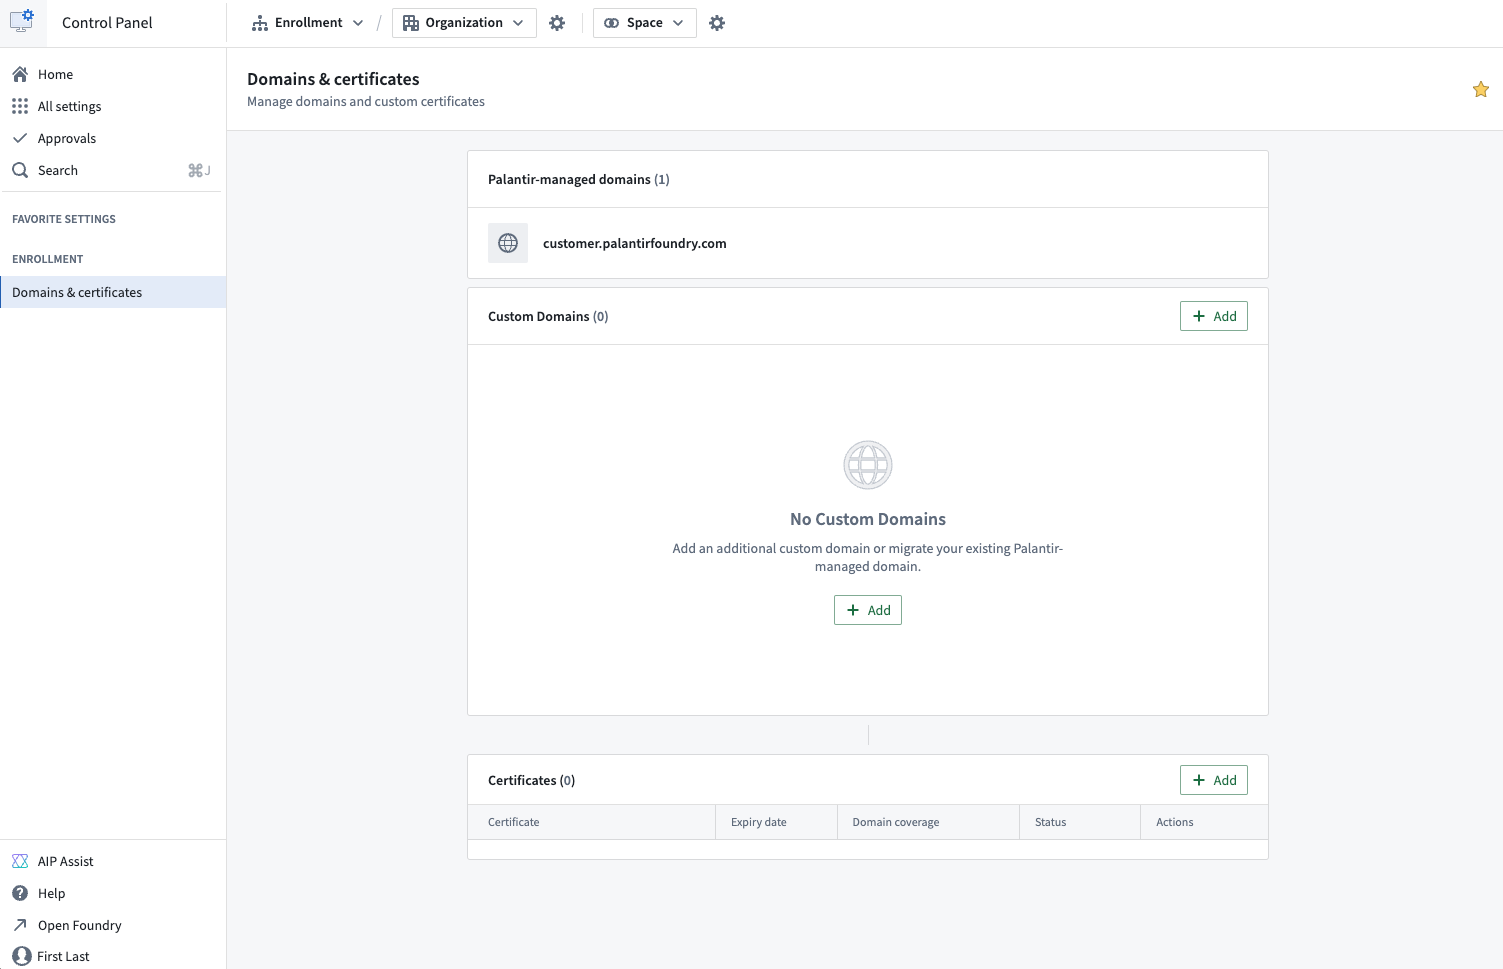
Users with permissions to edit custom domains and certificates can access the Domains & certificates tab under Enrollment settings in Control Panel to create, edit, and delete custom domains and renew certificates. Enrollment administrators and Information Security Officers are given these permissions by default.
:::callout{theme="neutral"} Custom domain and certificate configuration in Control Panel is a new feature and, due to compliance reasons and ongoing migrations, may not be available on some enrollments. If the feature is not yet available in your enrollment, contact your Palantir representative for assistance. :::
Create a new custom domain
Follow the steps below to create a custom domain. The first step is creating a new certificate.
1. Generate a certificate signing request (CSR)
- Select the + Add button in the certificates table.
- Optional: select the Populate fields from existing certificate checkbox to copy details from an existing certificate.
- Provide the common name (CN). Additionally, you may include subject alternative names (SANs), which can be regular domains or wildcard domains. You can also specify other details such as country (C), state (ST), locality (L), organization (O), and organizational unit (OU).
- Once the CSR is generated, download the
.pemCSR file. This CSR is used in the next step to obtain a signed certificate from a certificate authority (CA).
2. Sign the certificate
Signing the certificate should be completed outside of the platform. This can be done by many domain providers or through a registered CA. To ensure compatibility and security, the signed certificate must meet the following criteria:
- The certificate must not expire within 30 days. If it does, renew the certificate before proceeding.
- The certificate must be encoded in PEM format. PEM is a Base64 encoded format that is widely used and compatible with most systems.
- The
CNandSANfields must exactly match those in the generated CSR. - The certificate must use the SHA256withRSA signing algorithm.
- The certificate must be publicly trusted by major browsers. If you wish to use a certificate signed by a custom CA, contact Palantir Support for guidance.
:::callout{theme="neutral"}
If you received multiple signed certificates (including both leaf certificates signed by intermediate CAs and intermediate certificates signed by the root CA), concatenate these certificates into a single .pem file with the leaf certificate first, followed by intermediate certificates. Certificates uploaded to Control Panel must be signed by a root CA approved by the Palantir security team in order to be accepted.
:::
This process may vary based on the domain and method you choose to sign the certificate.
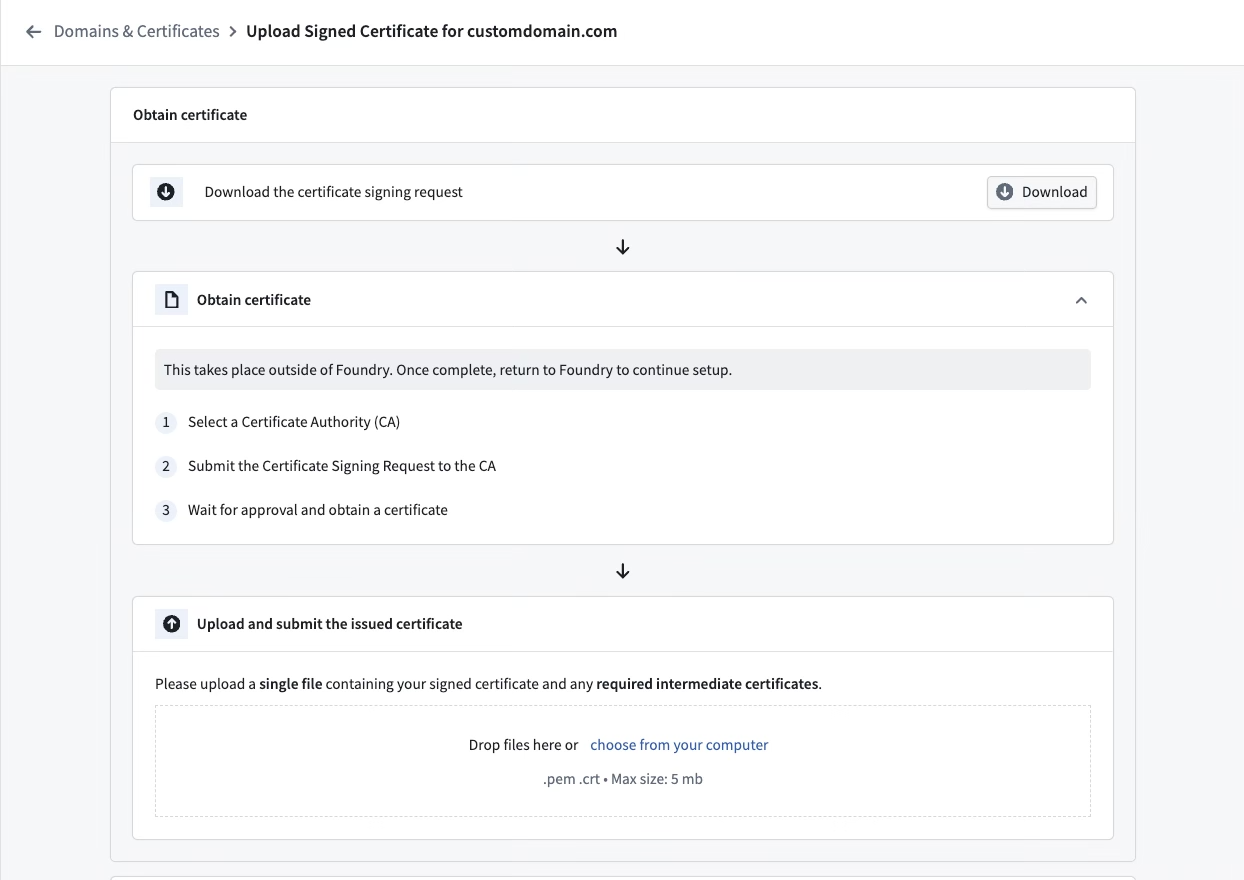
3. Upload the signed certificate
- If the criteria in step 2 are met, upload the signed certificate to the form.
- The form will run validation checks on the signed certificate. If there are any issues, an error message will appear. Refer to common errors for guidance.
- Upon successful validation, the CA and the expiry date of the signed certificate will be displayed as confirmation.
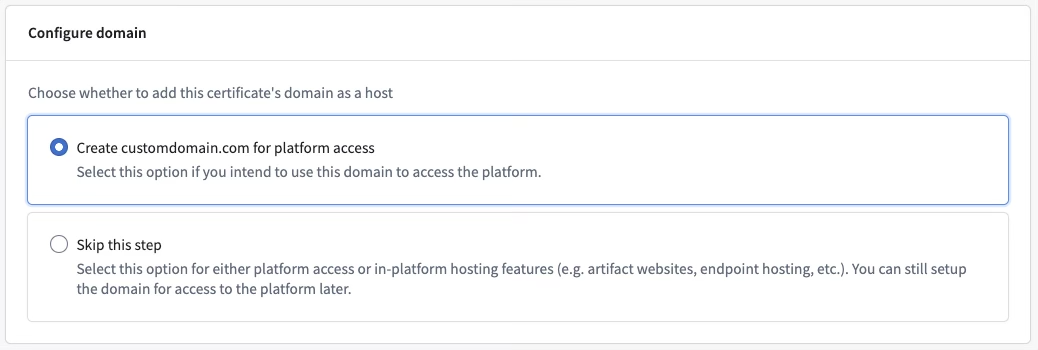
4. Configure a domain
- After uploading the signed certificate, select whether you would like to create the domain for platform access. Choosing this option will configure this domain to enable platform access immediately.
- Choose Skip this step if you want to enable platform access through this domain later (See step 6), or if you do not intend to configure this domain for platform access, for example if you want to host an artifact website on this domain.
5. Update the domain name server (DNS)
- To enable network connectivity to the custom domain, the DNS settings need to be updated in the domain registrar’s platform.
- This takes place outside of the Palantir platform and the process will depend on the domain provider.
- Control Panel will display the domain that is required to create a CNAME record using a canonical domain.

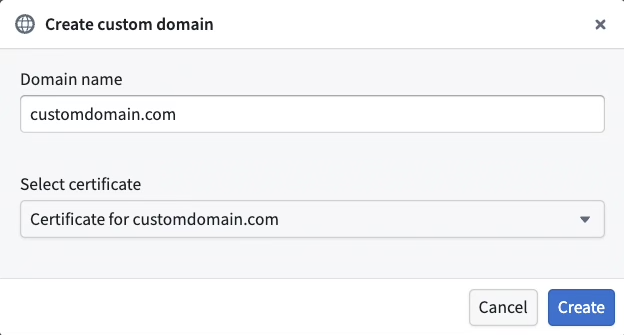
6. Create the domain using the new certificate
- Select + Add in the custom domains table.
- Enter the custom domain you wish to provision.
- Choose the certificate that you just created from the Select certificate dropdown menu.
- Select Create.
Common errors
NotAllowedByPalantirSecurity: The certificate authority is not allowed by Palantir security. Common root causes for this error include:- Uploading a self-signed certificate or a certificate signed by a CA that is not recognized by major browsers. Contact Palantir Support for assistance if you need to use a custom CA.
- Uploading a certificate signed by an intermediate CA. Ensure that the full certificate chain is uploaded, including any intermediate certificates.
UntrustedAlgorithm: The certificate was signed using an untrusted algorithm.InvalidSignedCertificate: The signed certificate is invalid, or it does not match the CSR.ShortExpiryForCertificate: The duration until certificate expiration is too short.
Copy an existing domain configuration
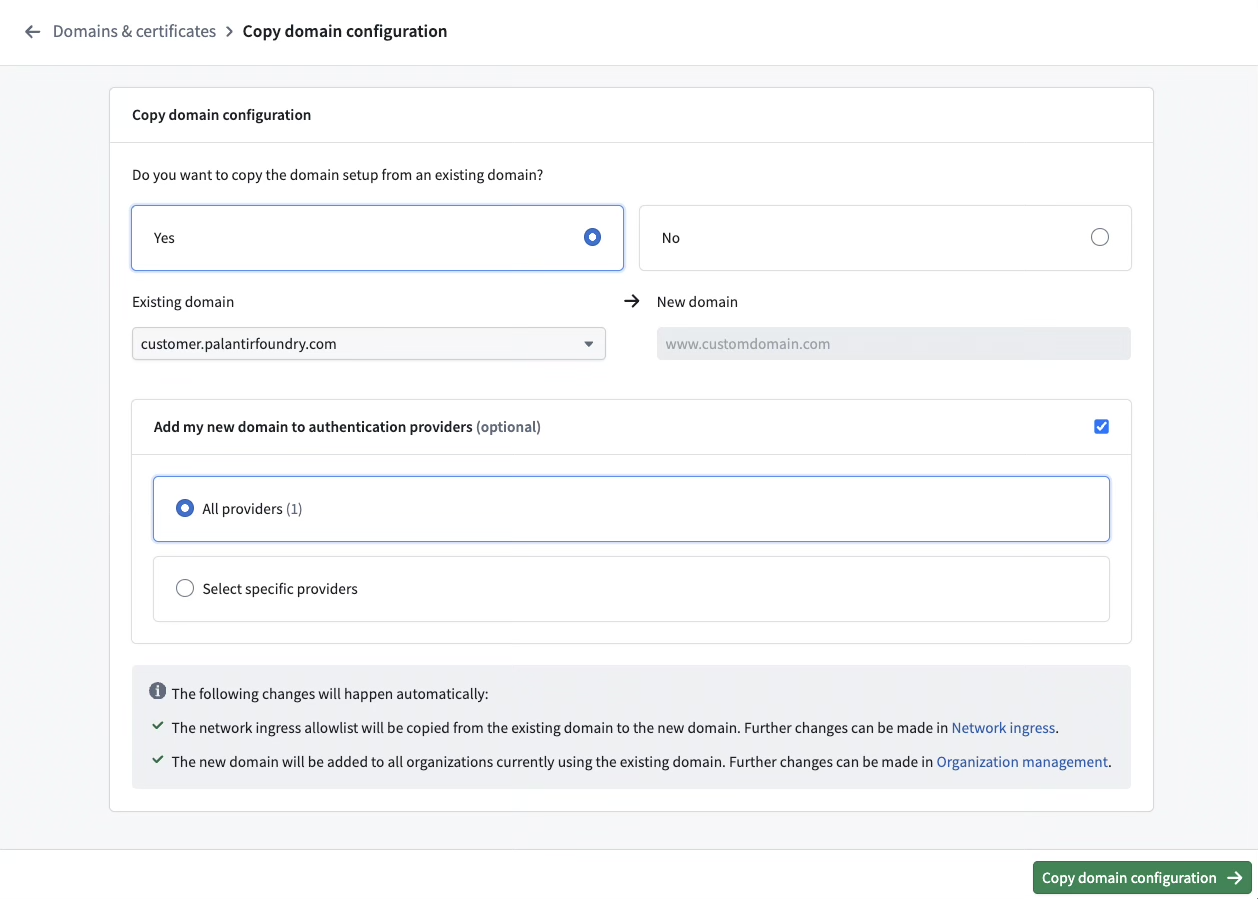
When setting up a new domain, you can choose to copy settings from an existing domain to the new domain for convenience. The following automatic changes occur if you go forward with this option:
- The network ingress allowlist will be copied from the existing domain to the new one. You can make further modifications in the Network Ingress extension.
- The new domain will be added to all organizations currently using the existing domain. Further adjustments can be made in the Organization management section.
- [Optional] Your new domain can be added to authentication providers. You can either add it to all auth providers or select specific ones.
- The previous domain will continue to function after the new domain is set up until it is manually removed.
Follow the steps below to migrate from an existing domain:
- Follow the steps to Create a new domain.
- Select Yes on the migration screen.
- Select the existing domain from which you would like to copy settings.
- Decide if authentication providers using the old domain should be updated, and if yes, select the authentication providers you would like to update.
- Select Migrate.
- Follow the instructions to update your authentication providers. Your identity provider will have to be updated at the source and the process will depend on the type of identity provider (SAML or OIDC),
- SAML: Download the metadata (in XML) for each provider.
- OIDC: Copy the redirect URLs for each provider.
- Once the identity providers have been updated, select Finish setup to mark the domain’s migration status as complete. You will be redirected to the domains list where you can see your new domain.
Renew expiring certificates
If a certificate is set to expire within 30 days, a banner will appear at the top of Control Panel to notify you. In addition, an email will be sent to users with the Enrollment administrator role.
To renew expiring certificates, follow these steps:
- Navigate to the certificate list.
- Select Actions > Renew to initiate the certificate creation workflow, with the CSR form pre-populated with existing certificate details for convenience.
- Complete the steps from create a new custom domain to generate a certificate signing request and upload the signed certificate.
- After the upload is complete, you will be directed to a renewal page where you can replace an existing certificate. Select the desired certificate and Renew.
- You will be redirected back to the domains and certificates list where your renewed certificate will be visible.
Create a new custom certificate
The process for creating a new custom certificate mirrors that of creating a new custom domain. If no custom domain corresponding to the new certificate’s common name exists, a new one will be created, and the flow will automatically switch to the creation of a new custom domain.
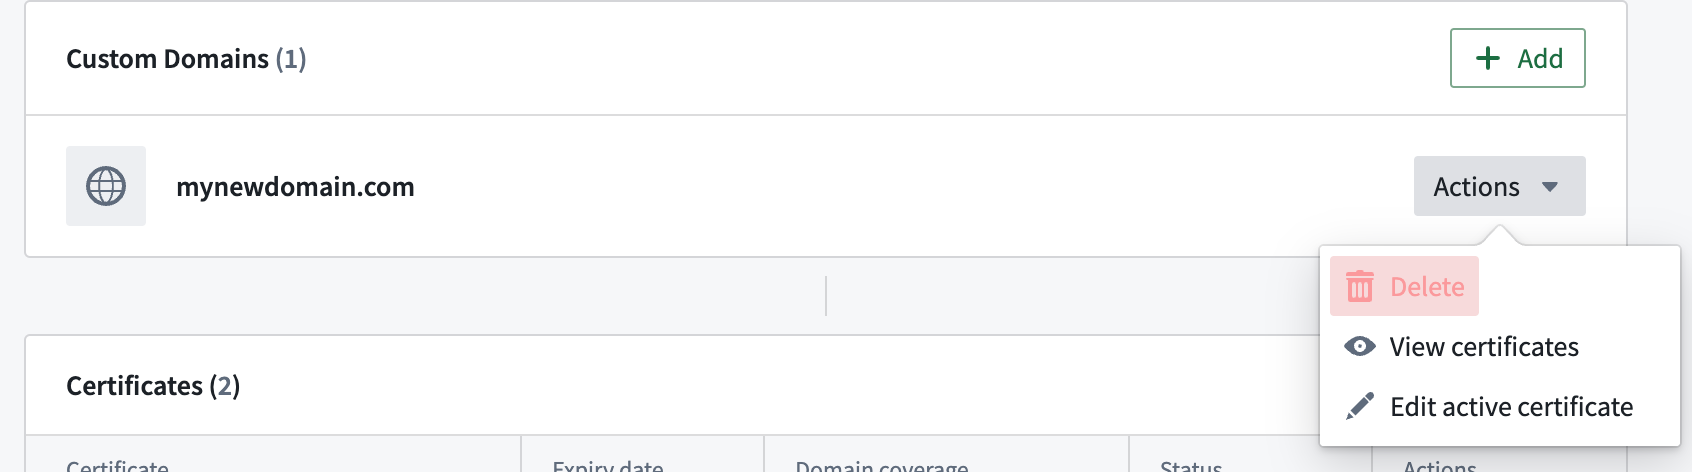
Edit the active certificate
To edit the active certificate of a domain:
- Navigate to the domains list.
- Go to Actions > Edit active certificate to switch certificates.
- Select an eligible certificate to set as the active certificate for the custom domain.

Delete a domain
To delete a domain, navigate to Actions > Delete.
A domain cannot be deleted if any of the following are true:
- It is being used by one or more organizations
- It is being used as a supported host by one or more authentication providers
- It has active subdomains or open subdomain registration requests
Glossary
CSR= Certificate Signing RequestCA= Certificate AuthoritySAML= Security Assertion Markup LanguageOIDC= OpenID ConnectDNS= Domain Name Server
Frequently asked questions
The following section serves to answer frequently asked questions.
Can I change my Palantir-owned domain?
No. The Palantir-owned domain provided with your enrollment is not modifiable in self-service. If you have an enterprise account and need to change your domain to another Palantir-owned domain, contact your Palantir representative.
Can I have my certificate signed by an intermediate CA rather than the root CA?
No. Certificates uploaded to Control Panel must be signed by a root CA approved by the Palantir security team to be accepted. Leaf certificates are not permitted on their own. As mentioned in step 2, you must concatenate leaf and intermediate certificates into a single .pem file with the leaf certificate first, followed by intermediate(s):
-----BEGIN CERTIFICATE-----
[leaf certificate content]
-----END CERTIFICATE-----
-----BEGIN CERTIFICATE-----
[intermediate certificate content]
-----END CERTIFICATE-----
中文翻译
配置域名与证书
:::callout{theme="warning"} 自2026年2月起,此功能仅适用于新的客户管理域名。此前在Palantir支持下配置的任何现有域名可能仍需Palantir提供支持。 :::
拥有编辑自定义域名和证书权限的用户,可通过控制面板(Control Panel)中的注册设置(Enrollment settings)下的域名与证书(Domains & certificates)选项卡,创建、编辑和删除自定义域名以及续订证书。注册管理员(Enrollment administrators)和信息安全官(Information Security Officers)默认拥有这些权限。
:::callout{theme="neutral"} 控制面板中的自定义域名和证书配置是一项新功能,由于合规性原因和持续迁移工作,某些注册可能无法使用此功能。如果您的注册中尚未提供此功能,请联系您的Palantir代表寻求帮助。 :::
创建新的自定义域名
请按照以下步骤创建自定义域名。第一步是创建新证书。
1. 生成证书签名请求(CSR)
- 在证书表中点击+ 添加(+ Add)按钮。
- 可选: 勾选从现有证书填充字段(Populate fields from existing certificate)复选框,以复制现有证书的详细信息。
- 提供通用名称(CN)。此外,您还可以包含主题备用名称(SAN),可以是常规域名或通配符域名。您还可以指定其他详细信息,如国家(C)、州/省(ST)、地区(L)、组织(O)和组织单位(OU)。
- 生成CSR后,下载
.pem格式的CSR文件。此CSR将在下一步中用于从证书颁发机构(CA)获取签名证书。
2. 签署证书
签署证书应在平台外部完成。许多域名提供商或注册CA均可完成此操作。为确保兼容性和安全性,签名证书必须满足以下条件:
- 证书有效期不得少于30天。如果少于30天,请先续订证书再继续操作。
- 证书必须采用PEM格式编码。PEM是一种广泛使用且与大多数系统兼容的Base64编码格式。
CN和SAN字段必须与生成的CSR完全一致。- 证书必须使用SHA256withRSA签名算法。
- 证书必须受到主流浏览器的公开信任。如果您希望使用由自定义CA签名的证书,请联系Palantir支持获取指导。
:::callout{theme="neutral"}
如果您收到多个签名证书(包括由中间CA签名的叶证书和由根CA签名的中间证书),请将这些证书连接成一个单独的.pem文件,叶证书在前,中间证书在后。上传到控制面板的证书必须由Palantir安全团队批准的根CA签名才能被接受。
:::
此过程可能因您选择的域名和签名方法而异。
3. 上传签名证书
- 如果满足步骤2中的条件,请将签名证书上传到表单中。
- 表单将对签名证书进行验证检查。如果存在任何问题,将显示错误消息。请参考常见错误获取指导。
- 验证成功后,将显示CA和签名证书的到期日期作为确认。
4. 配置域名
- 上传签名证书后,选择是否要为平台访问创建域名。选择此选项将配置该域名以立即启用平台访问。
- 如果您希望稍后通过此域名启用平台访问(请参见步骤6),或者不打算为此域名配置平台访问(例如,您希望在此域名上托管工件网站),请选择跳过此步骤(Skip this step)。
5. 更新域名服务器(DNS)
- 要启用对自定义域名的网络连接,需要在域名注册商的平台中更新DNS设置。
- 此操作在Palantir平台外部完成,具体过程取决于域名提供商。
- 控制面板将显示使用规范域名创建CNAME记录所需的域名。
6. 使用新证书创建域名
- 在自定义域名表中点击+ 添加(+ Add)。
- 输入您要配置的自定义域名。
- 从选择证书(Select certificate)下拉菜单中选择您刚刚创建的证书。
- 点击创建(Create)。
常见错误
NotAllowedByPalantirSecurity:Palantir安全策略不允许该证书颁发机构。此错误的常见根本原因包括:- 上传自签名证书或由主流浏览器不认可的CA签名的证书。如果您需要使用自定义CA,请联系Palantir支持寻求帮助。
- 上传由中间CA签名的证书。请确保上传完整的证书链,包括所有中间证书。
UntrustedAlgorithm:证书使用了不受信任的算法进行签名。InvalidSignedCertificate:签名证书无效,或与CSR不匹配。ShortExpiryForCertificate:证书到期前的剩余时间过短。
复制现有域名配置
在设置新域名时,您可以选择将现有域名的设置复制到新域名以方便操作。如果选择此选项,将自动进行以下更改:
- 网络入口允许列表将从现有域名复制到新域名。您可以在网络入口(Network Ingress)扩展中进行进一步修改。
- 新域名将添加到当前使用现有域名的所有组织中。可在组织管理(Organization management)部分进行进一步调整。
- [可选] 您的新域名可以添加到身份验证提供者中。您可以将其添加到所有身份验证提供者,或选择特定的提供者。
- 在手动移除之前,原有域名将在新域名设置完成后继续运行。
请按照以下步骤从现有域名迁移:
- 按照创建新域名的步骤操作。
- 在迁移屏幕上选择是(Yes)。
- 选择您要从中复制设置的现有域名。
- 决定是否更新使用旧域名的身份验证提供者,如果是,请选择要更新的身份验证提供者。
- 点击迁移(Migrate)。
- 按照说明更新您的身份验证提供者。您需要在源端更新身份提供者,具体过程取决于身份提供者的类型(SAML或OIDC):
- SAML: 为每个提供者下载元数据(XML格式)。
- OIDC: 为每个提供者复制重定向URL。
- 身份提供者更新完成后,选择完成设置(Finish setup)以将域名的迁移状态标记为完成。您将被重定向到域名列表,其中可以看到您的新域名。
续订即将过期的证书
如果证书将在30天内过期,控制面板顶部将显示横幅通知。此外,还将向具有注册管理员(Enrollment administrator)角色的用户发送电子邮件。
要续订即将过期的证书,请按照以下步骤操作:
- 导航到证书列表。
- 选择操作(Actions) > 续订(Renew)以启动证书创建工作流程,CSR表单将预先填充现有证书的详细信息以方便操作。
- 完成创建新的自定义域名中的步骤,生成证书签名请求并上传签名证书。
- 上传完成后,您将被引导至续订页面,您可以在其中替换现有证书。选择所需的证书并点击续订(Renew)。
- 您将被重定向回域名和证书列表,其中将显示您续订后的证书。
创建新的自定义证书
创建新自定义证书的过程与创建新的自定义域名相同。如果不存在与新证书通用名称对应的自定义域名,则会创建一个新域名,流程将自动切换到创建新的自定义域名。
编辑活动证书
要编辑域名的活动证书:
- 导航到域名列表。
- 进入操作(Actions) > 编辑活动证书(Edit active certificate)以切换证书。
- 选择一个符合条件的证书,将其设置为自定义域名的活动证书。
删除域名
要删除域名,请导航到操作(Actions) > 删除(Delete)。
如果存在以下任一情况,则无法删除域名:
- 该域名正被一个或多个组织使用
- 该域名正被一个或多个身份验证提供者用作受支持的主机
- 该域名存在活动子域名或待处理的子域名注册请求
术语表
CSR= 证书签名请求(Certificate Signing Request)CA= 证书颁发机构(Certificate Authority)SAML= 安全断言标记语言(Security Assertion Markup Language)OIDC= OpenID ConnectDNS= 域名服务器(Domain Name Server)
常见问题解答
以下部分用于解答常见问题。
我可以更改我的Palantir自有域名吗?
不可以。注册时提供的Palantir自有域名无法通过自助服务修改。如果您拥有企业账户并需要将域名更改为其他Palantir自有域名,请联系您的Palantir代表。
我可以让中间CA而不是根CA签署我的证书吗?
不可以。上传到控制面板的证书必须由Palantir安全团队批准的根CA签名才能被接受。叶证书不能单独使用。如步骤2所述,您必须将叶证书和中间证书连接成一个单独的.pem文件,叶证书在前,中间证书在后:
-----BEGIN CERTIFICATE-----
[叶证书内容]
-----END CERTIFICATE-----
-----BEGIN CERTIFICATE-----
[中间证书内容]
-----END CERTIFICATE-----