Configure network egress(配置网络出站)
Network egress refers to any network traffic originating from within Foundry that attempts to connect to an external system. This page outlines how network egress is configured and managed in Control Panel and how those configurations are consumed by user workloads in Foundry.
:::callout{theme="neutral"} Network ingress refers to network traffic originating outside of Foundry that attempts to establish a connection to Foundry. Network ingress is also managed in Control Panel. :::
Network egress overview
Foundry provides strict network firewalls to protect customer data. Customer-managed network egress policies are used to apply network firewall rules to individual workloads using container networking technology (Cilium ↗, eBPF ↗). In addition to these customer-specific rules, Palantir's Information Security team maintains network firewall rules at the infrastructure proxy level to provide another layer of security. Together, these rules govern the network egress execution of user workloads in Foundry, including the following:
- Data connection sources using a Foundry worker
- External transforms
- External functions
- External streaming user-defined functions (UDFs)
- External model adapters (for modeling live deployments)
- Code workbooks
:::callout{theme="neutral"} Network traffic that egresses from Foundry may still cause data to flow in either direction. This means that workloads within Foundry that are allowed to connect externally may be used to both sync and export data. :::
Opening a network egress route is always a security risk. Information security officers for a Foundry enrollment should ensure that they only open network routes to trusted destinations, and limit access to those routes to a trusted group of developers. Even a trusted external system can be abused by malicious actors to bypass security controls. Information security officers should leverage Foundry change management tools to ensure changes to egress logic are reviewed by a trusted group, and establish audit processes to ensure egress logic remains secure.
:::callout{theme="neutral"} The destination of a network egress policy cannot be modified once the policy has been created. Network egress policies cannot be deleted after creation, they may only be revoked. :::
Multiple egress policy types exist to represent different network paths from Foundry to external systems:
To create an egress policy, navigate to the Network egress page in Control Panel and select Request network egress policy.
Direct connection egress policies
Direct connection policies enable connections where egress can be made directly from Foundry's network to the external destination. In the case of Foundry instances hosted in the cloud, this will mean connections made over the Internet, such as REST APIs or systems hosted in the cloud. In the case of on-premise Foundry instances however, this will mean connections to systems connected to the on-premise network itself.
:::callout{theme="neutral"} The external system must allow inbound connections from Foundry. :::
The following list summarizes the options that may be used when configuring direct connection egress policies.
| Option | Description |
|---|---|
| Address | Option 1: DNS A domain name in the format subdomain.domain.com. Wildcard domains are also supported, allowing traffic to multiple subdomains under a given domain (for example, *.domain.com). See Wildcard egress policies for more details. Option 2: IP A single IPv4 address in the format x.x.x.x Option 3: CIDR An IPv4 CIDR address block in the format x.x.x.x/x |
| Port(s) | The port or port range that should be allowed for the specified domain. Port values must be in the range of 1 - 65535 inclusive. Option 1: Single port When using a DNS address, you must specify a single port. Option 2: Port range When using this option, you must provide a starting and ending port, where the starting port is less than or equal to the ending port. |
Server Name Indication (SNI) verification
Palantir's network infrastructure attempts to perform SNI verification by default for all network connections using port 443 (default HTTPS port). If the traffic over that port does not have SNI, which is the case for some protocols like FTP(S), SFTP, and most TCP-based database connections, you may encounter hanging connections and/or timeout errors.
If you expect non-HTTPS traffic on port 443 for a given policy, administrators have the ability to disable SNI verification on that policy.
Wildcard egress policies
Wildcard addresses allow you to allowlist an entire subdomain level of a domain
(for example, *.domain.com) rather than managing individual subdomains. This is useful when
subdomains are dynamic or unknown ahead of time — for example, Azure SQL redirect mode,
Kafka nodes, or MongoDB SRV connections.
:::callout{theme="neutral"} Wildcard addresses are supported for direct connection and agent proxy policies. They are not supported for private link or bucket endpoint policies. :::
Wildcards must appear as a single element at the leftmost label of the domain, and must
not target a public suffix (for example, *.com, *.co.uk, *.github.io) — if they do, the policy
will be unusable. A wildcard address matches exactly one subdomain level. For example,
*.domain.com matches bar.domain.com but not domain.com or bar.baz.domain.com.
| Pattern | Supported |
|---|---|
*.domain.com |
✅ |
*.com |
❌ Public suffix |
*.s3.amazonaws.com |
❌ Public suffix |
subdomain.*.com |
❌ Intermediary wildcard |
*.*.domain.com |
❌ Multiple wildcards |
Agent proxy egress policies
Agent proxy egress policies enable connections to on-premise or privately hosted systems over a Data Connection agent. Agent proxy egress policies allow Foundry workflows to function as if they were directly connecting to the external system directly, without requiring any additional configuration; all the traffic is transparently proxied via the agent.
:::callout{theme="neutral"} With this scenario, no inbound connections are initiated from Foundry to the external system, and the external system does not need to allow inbound connections from Foundry.
However, the agent host machine must have outbound network connectivity to the target external system, and the target external system must allow inbound connections from the agent host. :::
Sources using agent egress policies are supported in the following workflows:
- All first-class data connection capabilities
- Unsupported workflows:
- External transforms (preview supported only for VS code)
- External deployed functions. Learn more about external functions.
- External streaming user-defined functions (UDFs)
- Code workspaces
- Compute modules
The following list summarizes the options that may be used when configuring agent proxy egress policies.
| Option | Description |
|---|---|
| Address | Option 1: DNS The external system domain name in the format subdomain.domain.com. Wildcard domains are also supported, allowing traffic to any subdomain at one level (for example, *.domain.com). See Wildcard egress policies for more details. Option 2: IP The external system single IPv4 address in the format x.x.x.x. Note: Private IP address ranges, such as 10.x.x.x, may conflict with Foundry's internal infrastructure and are not routable. For source systems accessible only using private IP addresses, use host overrides to map a placeholder domain name to the private IP address within your network. Option 3: CIDR The external system IPv4 CIDR address block in the format x.x.x.x/x |
| Port(s) | The port or port range that should be allowed for the specified domain. Port values must be in the range of 1 - 65535 inclusive. Option 1: Single port When using a DNS address, you must specify a single port. Option 2: Port range When using this option, you must provide a starting and ending port, where the starting port is less than or equal to the ending port. |
| Agent(s) | The agent(s) to be used to connect to the external system. If more than one agent is specified, traffic will be assigned randomly to one of the agent in the list. |
Private link egress policies
Private link egress policies enable connections over private links by routing all traffic to an address to go over the private link.
:::callout{theme="neutral"} Before private link egress policies existed, direct connection egress policies were used to route traffic over private links.
Existing direct connection egress policies configured for domains of a private link will continue to function and will be migrated to private link egress policies automatically. :::
The following list summarizes the options that may be used when configuring private link egress policies.
| Option | Description |
|---|---|
| Address | The external system domain name in the format subdomain.domain.com. Only the specific domain name will be allowed, and wildcards are not supported. For example, to allow traffic to both foo.mycompany.com and bar.mycompany.com, two separate domain name policies must be created. |
| Port(s) | The port or port range that should be allowed for the specified domain. Port values must be in the range of 1 - 65535 inclusive. Option 1: Single port When using a DNS address, you must specify a single port. Option 2: Port range When using this option, you must provide a starting and ending port, where the starting port is less than or equal to the ending port. |
| Private link | The private link to be used to connect to the external system. |
Sources using private link egress policies are not supported in the following workflows:
Bucket endpoint egress policies
:::callout{theme="neutral"} Only Amazon AWS bucket policies are supported at the moment. :::
When the Palantir platform is hosted on the same cloud provider as the external system you must egress to (Amazon AWS, Azure or Google Cloud Platform), specific allowlisting may be required to let traffic flow within the cloud provider's specific endpoints. Allowlisting is controlled through bucket endpoint egress policies.
:::callout{theme="neutral"} Only AWS S3 buckets are currently supported by bucket endpoint egress policies. Read below for Azure and Google Cloud Platform specific egress. :::
AWS S3 bucket endpoint policies
:::callout{theme="neutral"}
S3 bucket endpoint policies replace existing S3 bucket policies. These previous policy types will continue to function but will require migration to bucket endpoint egress policies in the future.
Up to 300 S3 bucket endpoint policies can be set per enrollment, compared to only 10 with S3 bucket policies.
:::
For Palantir platform instances hosted in AWS, bucket endpoint policies are required when connecting to external S3 buckets hosted in the same AWS region ↗. This requirement is due to how AWS handles networking for requests to S3 from a VPC gateway endpoint in the same region (the Palantir platform in this case).
To establish a connection to AWS, follow the steps below:
- Create a network egress policy of type Bucket endpoint from Control Panel.
The table below summarizes configuration options for S3 bucket endpoint egress policies:
| Option | Description |
|---|---|
| Address | The external system domain name in the format subdomain.domain.com. Only the specific domain name will be allowed, and wildcards are not supported. For example, to allow traffic to both foo.mycompany.com and bar.mycompany.com, two separate domain name policies must be created. |
| Port(s) | Port 443 |
| S3 bucket name | The name of the S3 bucket to which this policy egresses. |
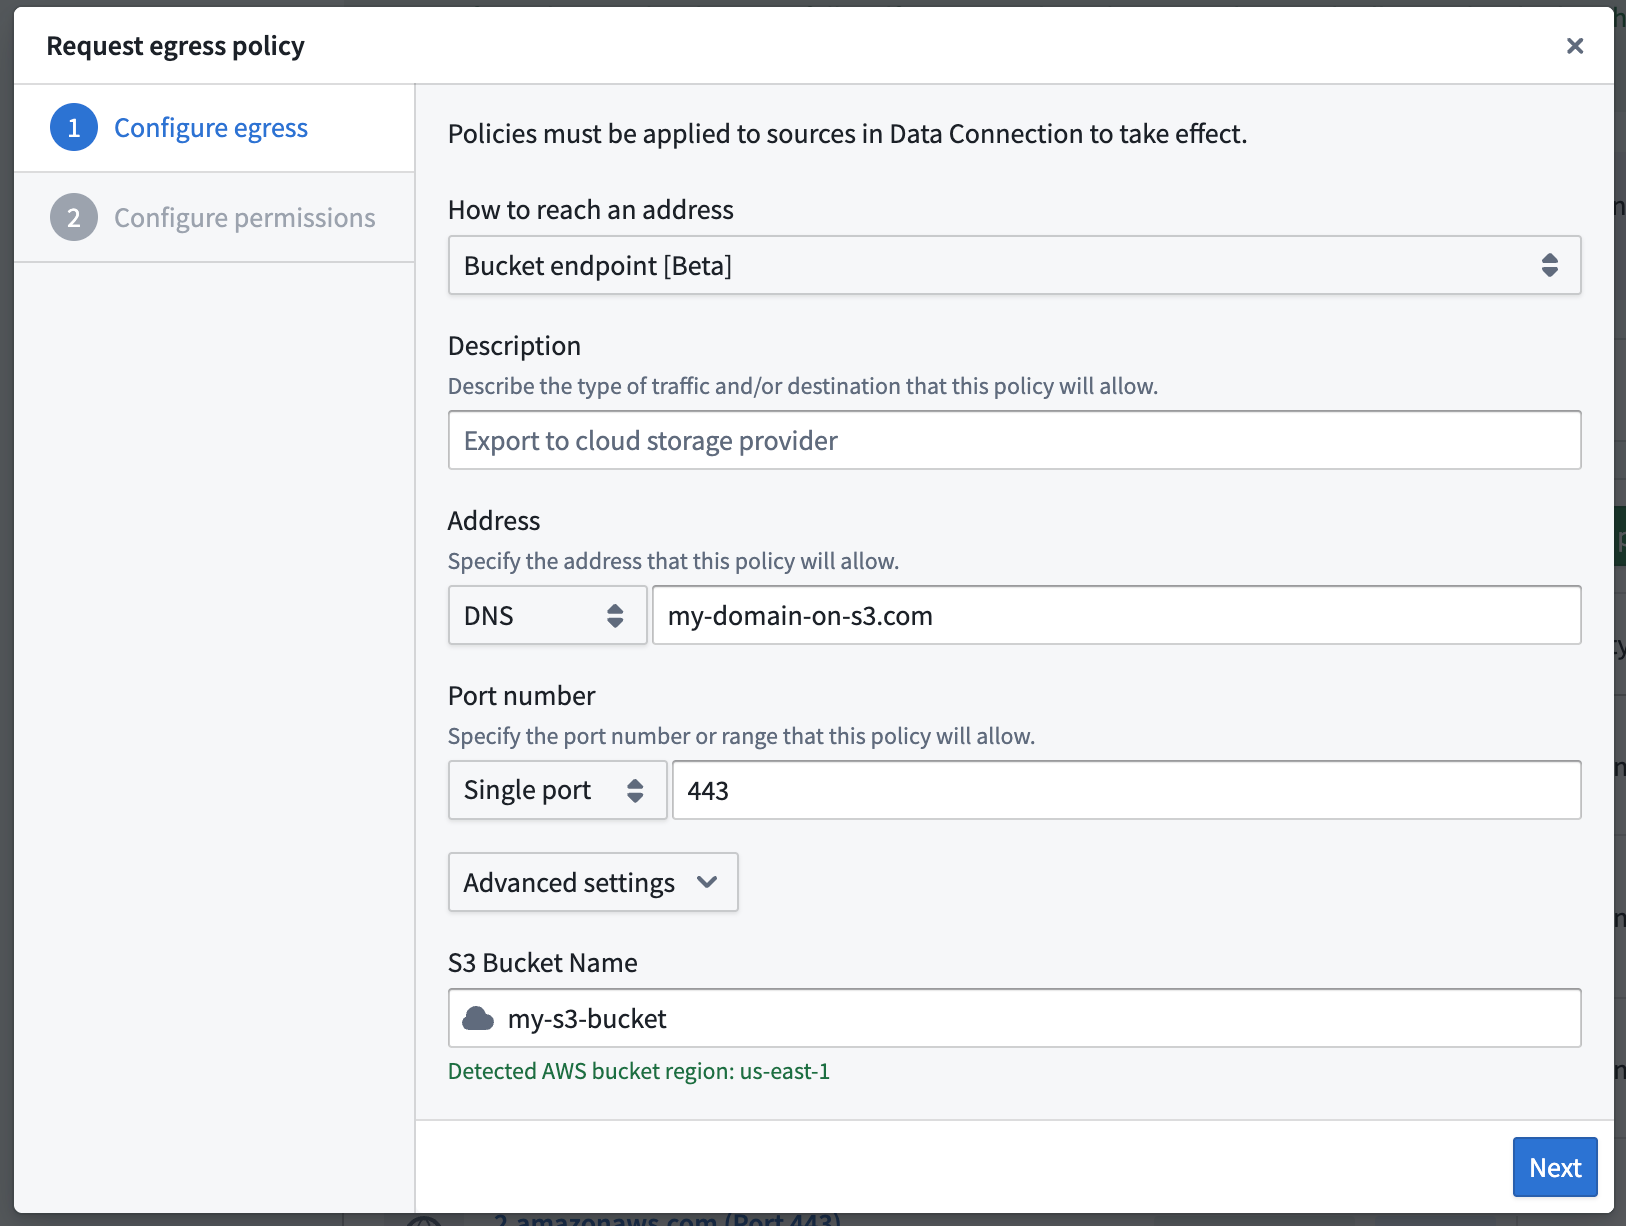
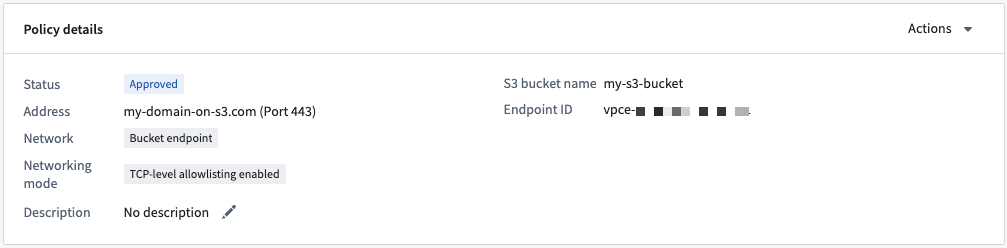
- Ensure that the bucket policy ↗ for your S3 bucket allows inbound traffic from the VPC endpoint of your Palantir platform instance.
Once the network policy is created, the VPC endpoint the connection comes from will be shown on the policy overview page.
The Amazon S3 documentation contains an example ↗ of how a bucket policy may be used to restrict traffic to an S3 bucket to a specific VPC endpoint. To learn more about managing inbound traffic to S3 from VPC endpoints, review the official AWS documentation ↗.
:::callout{theme="warning"} You can configure AWS bucket policies to gate traffic based on the VPC endpoint where the traffic originates. However, you should always use some form of access authentication to provide security for your bucket, as your VPC endpoint may be shared across multiple policies on your enrollment. A bucket policy that allows access purely based on the VPC endpoint may allow unauthorized access. :::
Sources using bucket endpoint egress policies are not supported in the following workflows:
Using a policy
This section summarizes the relevant permissions for network egress policies, the potential lifecycle states that a network egress policy can be in, and describes how to apply a network egress policy.
Permissions
The below table shows a summary of the operations that are relevant for network egress policies and the default configuration of these permissions.
| Operation | Description |
|---|---|
| Propose | Any Foundry user may propose a network egress policy. Proposed policies only become active and usable once they are approved. Policies pending approval are visible in the Approvals inbox in Control Panel. |
| Approve/Create | Granted via the Manage network egress configuration workflow. By default, this workflow is then granted to both Enrollment Administrator and Information Security Officer roles. |
| Update metadata | Granted via the Manage network egress configuration workflow. By default, this workflow is then granted to both Enrollment Administrator and Information Security Officer roles. |
| Revoke | Granted via the Manage network egress configuration workflow. By default, this workflow is then granted to both Enrollment Administrator and Information Security Officer roles. |
| Pause | Palantir's Information Security team has the ability to block network egress that are deemed a security risk or threat. Any network egress policies blocked by this will appear as Paused in Control Panel. If you believe a legitimate network egress policy for your enrollment has been incorrectly paused, file a support ticket with the relevant details. |
| View | Allows assigned users and groups to see the existence of the policy, but does not allow them to import and use it in any workloads. In general, we recommend making anyone who might ever need to use the policy a viewer, even if they are not currently an importer. |
| Import | Allows assigned users and groups to see the existence of the policy and to import and use within workloads. |
The primary management interface for network egress lives at the enrollment level in Control Panel. Users with access to the Manage network egress configuration workflow, associated with the Enrollment administrator role, will be able to access the Network Egress page to perform any administrative actions on egress policies.
Enrollment Administrators and Information Security Officers are additionally always able to see which projects an egress policy has been imported into. This is possible regardless of the individual access of the administrative user's access to the project(s). This metadata is available to ensure that Information Security Officers have sufficient visibility into policy usage to take governance decisions on possibly revoking or otherwise restricting the ability for a policy to be used.
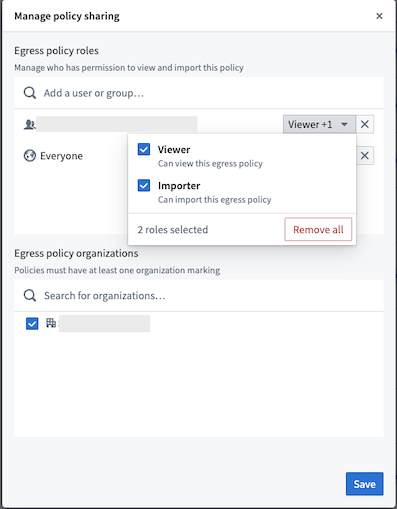
When approving a policy, the Information Security Officer must decide which users or groups should be granted the ability to either View or Import the network egress policy. This may also be managed later in Control Panel using the Manage Sharing button on the policy details page.
By default, policies are "opt-in" and must be attached to a workload in Foundry. For example, when creating a data connection source, policies for that source should be explicitly attached to the source by a user with Importer permission on the policy. This follows the principle of least privilege ↗, ensuring that workloads are only granted egress rules that are strictly required for that workload to run successfully.
:::callout{theme="warning"}
Users with Import access to a network egress policy can run arbitrary code in Foundry that talks to the destination address. Ensure that any users granted Import permissions are trusted and trained on your organization's information security policies to avoid misuse of this access.
:::
Policy states
Throughout the lifecycle of a network egress policy, it may be in one of the various states described below:
| Policy state | Description |
|---|---|
Pending approval |
Pending approval is the default state for new network egress policies. Policies in this state can be attached to workloads, but workloads attempting to use a pending approval policy will fail to run. |
Active |
Once a policy is approved, it becomes active. Importers of an active policy are able to attach it to Foundry workloads to allow that workload to egress to the specified external address. |
Paused |
Palantir's Information Security team has blocked egress to the specified address. Workloads attempting to use a paused policy will fail to run. |
Revoked |
Information Security Officers for a Foundry enrollment may revoke a policy from Control Panel. Workloads attempting to use a revoked policy will fail to run. |
Apply a policy
Follow the steps below to successfully apply a network policy:
-
Create the policy in Control Panel. If your Foundry policies are managed by Palantir, provide the details of your egress policy to your Palantir representative. Doing so will allow Palantir to assess security risks before expanding network access. If your Foundry policy management is fully self-service, the policy will automatically be applied to the firewalls.
-
Assign the policy to a user workload:
-
Data Connection sources using a Foundry worker: Specify the network policy when creating a new source.
- Code Workbook: Granular network management is not yet available, and administrators must instead create a global policy. A global policy is applied indiscriminately to all workloads and should only be configured for highly trusted network routes.
To assign a policy to a user workload, the Importer permission is required for the specific egress policy. This permission is granted on a per-policy basis through the Manage Sharing setting on the respective egress policy.
Limits
You can import a maximum of 10 sources into a code resource or a transform, with up to 50 egress policies that use TCP-level allowlisting combined.
Observability
To monitor and troubleshoot network egress policies using logs and metrics, review our network egress observability documentation.
Advanced settings
TCP-level allowlisting
Egress controls can be enforced at either the HTTP or TCP level. TCP-level allowlisting is required for all egress policies except direct connection policies on port 80 and 443, which are the standard port of HTTP and HTTPS traffic. The security of the connection does not change if TCP-level allowlisting is used or not.
If non-HTTP(S) traffic is transmitted over policies using port 80 or 443, you must enable TCP-level allowlisting for egress to be successful.
Common edge cases
What happens when there are two identical policies, and one is paused/revoked while the other is active?
Any workloads using the active policy will run successfully, while workloads attempting to use the paused/revoked policy will fail to run.
What happens if policies are overlapping, and one is paused/revoked and the other is active?
This may happen if a policy using a single IP address and a policy specifying a CIDR block of IP addresses overlap.
In this case, as with identical policies, any workloads using the active policy will run successfully, while workloads attempting to use the paused/revoked policy will fail to run.
What happens if I propose a policy that already exists?
Duplicate policies are allowed, and the information security officer reviewing the proposal may choose to do one of the following:
- Deny the proposal entirely.
- Deny the proposal and grant the proposer "Importer access" to an existing identical or overlapping policy.
- Approve the proposal and allow duplicate or overlapping policies (not recommended).
Which IPs do connections from Foundry come from?
When connections are initiated from Foundry to external destinations, they come from certain IP ranges. Sometimes those IPs need to be added to an allowlist before connections from Foundry will be accepted.
When Foundry is hosted in Palantir's cloud infrastructure, the egress IPs where Foundry traffic originates will be displayed on the network egress management page in Control Panel. You should copy the CIDR ranges displayed there when adding to an allowlist in the destination system.
:::callout{theme="neutral"} Note that connections through agents are handled differently. When using an agent, network traffic to the source system will always come from the agent host on your infrastructure; it is your responsibility to ensure network connectivity between the agent and target systems. :::
Cloud provider egress
Amazon S3 bucket policies
:::callout{theme="warning"} S3 bucket policies have been replaced by bucket endpoint policies and will require migration in the future. The differences between both concepts are the following:
- Scope: Bucket endpoint policies create a single VPC endpoint per enrollment, whereas S3 bucket policies create one per Palantir platform Foundry instance. This means that an S3 bucket policy that allows access purely based on the VPC endpoint may allow unauthorized access by users outside your organization.
- Limits: You can create up to 300 bucket endpoint policies, but only 10 S3 bucket policies.
- Controls: Bucket endpoint policies must be attached to data sources to take effect; only workloads using these sources will be able to route traffic through them. S3 bucket policies, however, take effect immediately and apply to all workloads attempting to egress directly from Foundry to that bucket. :::
For Foundry instances hosted in AWS, additional configuration is required when connecting to S3 buckets in the same region. This is due to how AWS handles networking for requests to S3 from a VPC gateway endpoint in the same region.
To check if your connection requires extra configuration, navigate to the Network egress page in Control Panel. If you find an additional tab called S3 bucket policies, then your instance is hosted in AWS and you must explicitly allow traffic from Palantir's VPC endpoint to any S3 buckets in the same region.
If present, the S3 bucket policies tab will also display the region where your instance is hosted, along with the Amazon Reference Number (ARN) of the VPC endpoint used to route traffic from Foundry to any same-region S3 buckets.
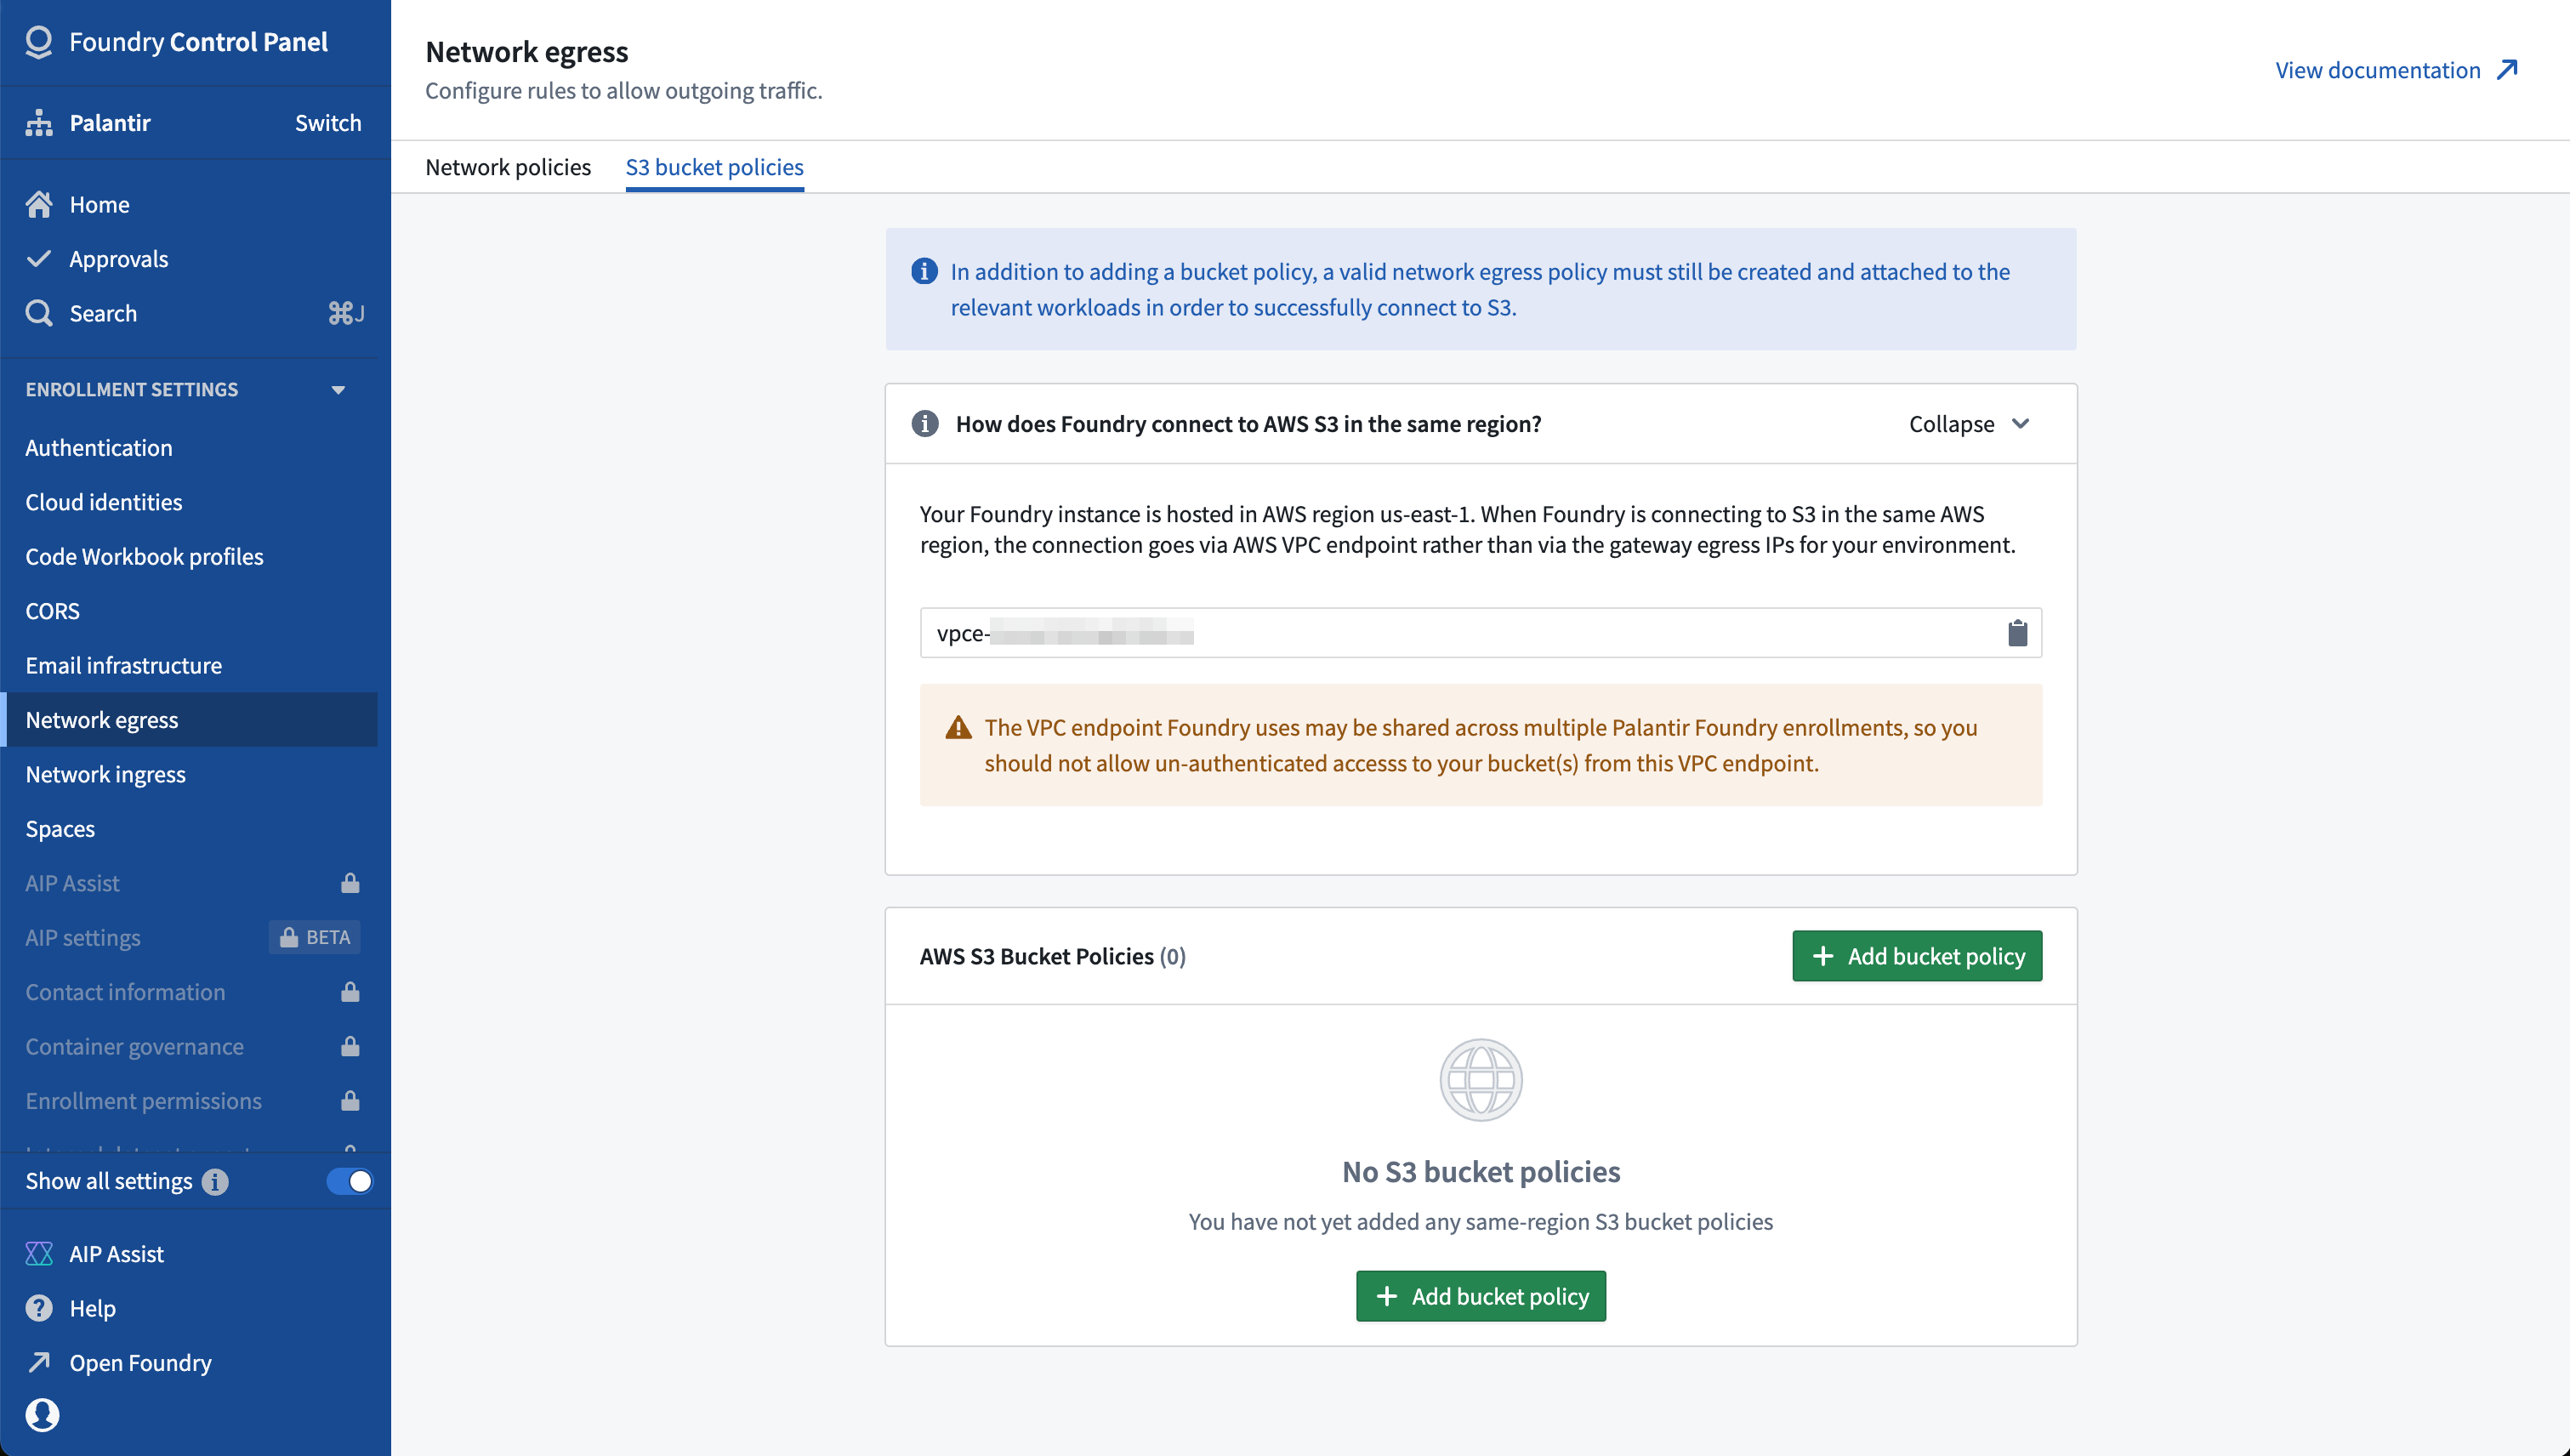
To successfully connect to a bucket in the same region as Foundry, you must complete the following:
- Configure your bucket policy in the AWS console to allow traffic from the VPC endpoint for your Foundry instance. Learn more about AWS bucket policies ↗.
- Ensure that your desired bucket is listed under Network egress > S3 bucket policies > AWS S3 Bucket Policies in Control Panel.
- Create an appropriate network egress policy as described above, and add it to the configuration details of the Data Connection source you are using to connect.
Allow traffic to S3 from the VPC endpoint for your Foundry instance
In the AWS console, you must ensure that the bucket policy ↗ for your S3 bucket allows inbound traffic from the VPC endpoint displayed in the Network egress > S3 bucket policies tab, as shown below:
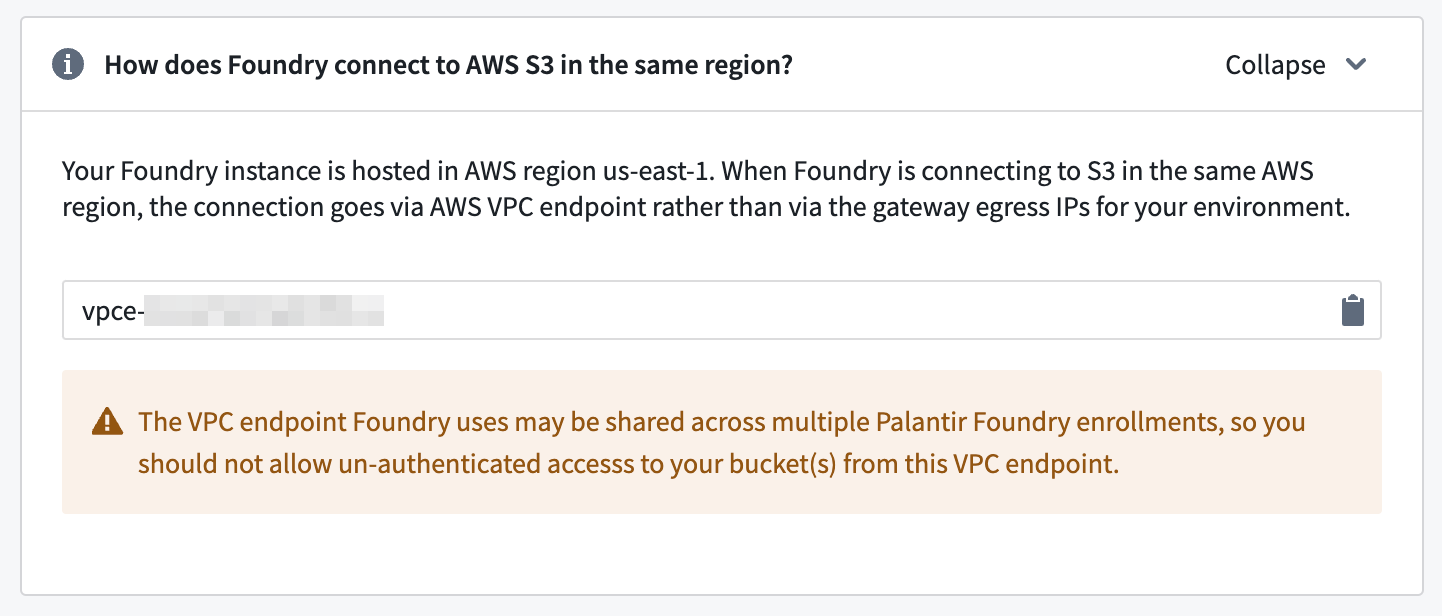
The Amazon S3 documentation contains an example ↗ of how a bucket policy may be used to restrict traffic to an S3 bucket to a specific VPC endpoint. To learn more about managing inbound traffic to S3 from VPC endpoints, review the official AWS documentation ↗.
:::callout{theme="warning"} You can configure AWS bucket policies to gate traffic based on the VPC endpoint where the traffic originates. However, you should always use some form of access authentication to provide security for your bucket, as multiple Foundry instances may share a single VPC endpoint. A bucket policy that allows access purely based on the VPC endpoint may allow unauthorized access by users outside your organization. :::
Add an S3 bucket policy
To add a same-region bucket, select Add bucket policy and follow the prompts to enter your desired bucket name, as shown below:
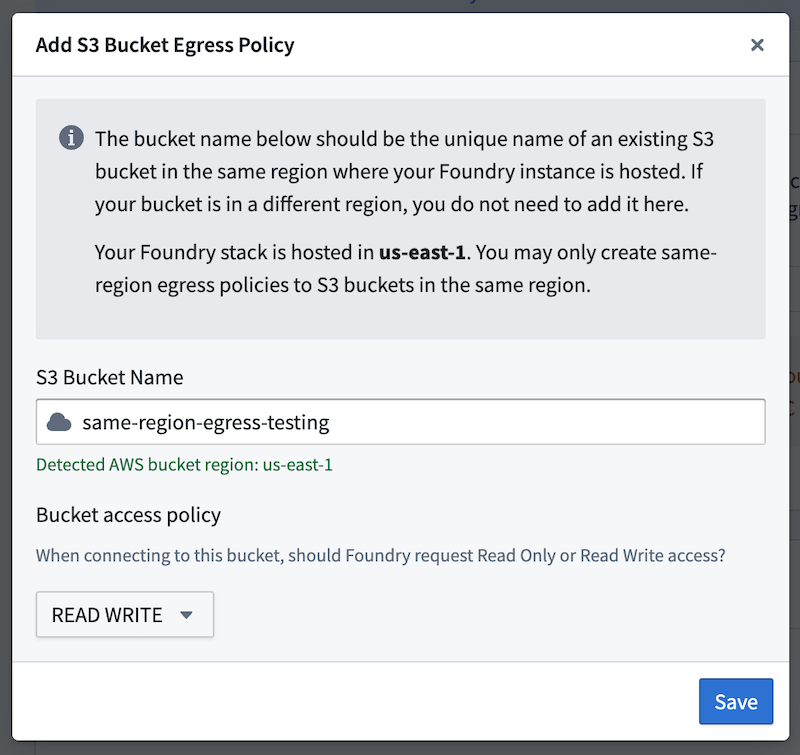
The form will automatically check for a valid bucket name, as well as the region. If a valid bucket name matches the region where your Foundry instance is hosted, you will be able to save. In addition to the bucket name, you must provide a policy of READ ONLY or READ WRITE. This dictates what level of access you would like Palantir to request when establishing a connection to S3.
:::callout{theme="warning"} The addition of same-region S3 buckets to the allowlist, as well as the desired bucket access policy, should be treated as a minimum level of access guaranteed to be available over the VPC endpoint for your Foundry instance.
Data in S3 should be secured with appropriate authentication and authorization in AWS, as well as network egress policy governance within Foundry.
Palantir may expand the provided list to allow access to additional same-region buckets and may also bump up the access policy for a given bucket from READ ONLY to READ WRITE. Proper authentication and authorization when using the S3 source type will ensure that you do not accidentally allow unauthorized Foundry users to access your S3 bucket(s).
:::
Use an S3 bucket policy
Once added, same-region bucket policies take effect immediately and apply to all workloads attempting to egress directly from Foundry to that bucket. Unlike network egress policies, they do not need to be attached to specific sources or other workloads in Foundry.
When creating an S3 source, the configuration interface automatically checks if the bucket is in the same region as Foundry and if the bucket has already been added in Control Panel. Users configuring the source will see either a green check indicating that the bucket is added correctly, or a red check indicating that action is required by an administrator with access to add an S3 bucket policy in Control Panel.
S3 bucket policy limits
You can add up to a maximum of 10 same-region buckets per enrollment. Contact Palantir Support If you require access to more than 10 same-region S3 buckets from your Foundry instance.
Microsoft Azure Storage policies
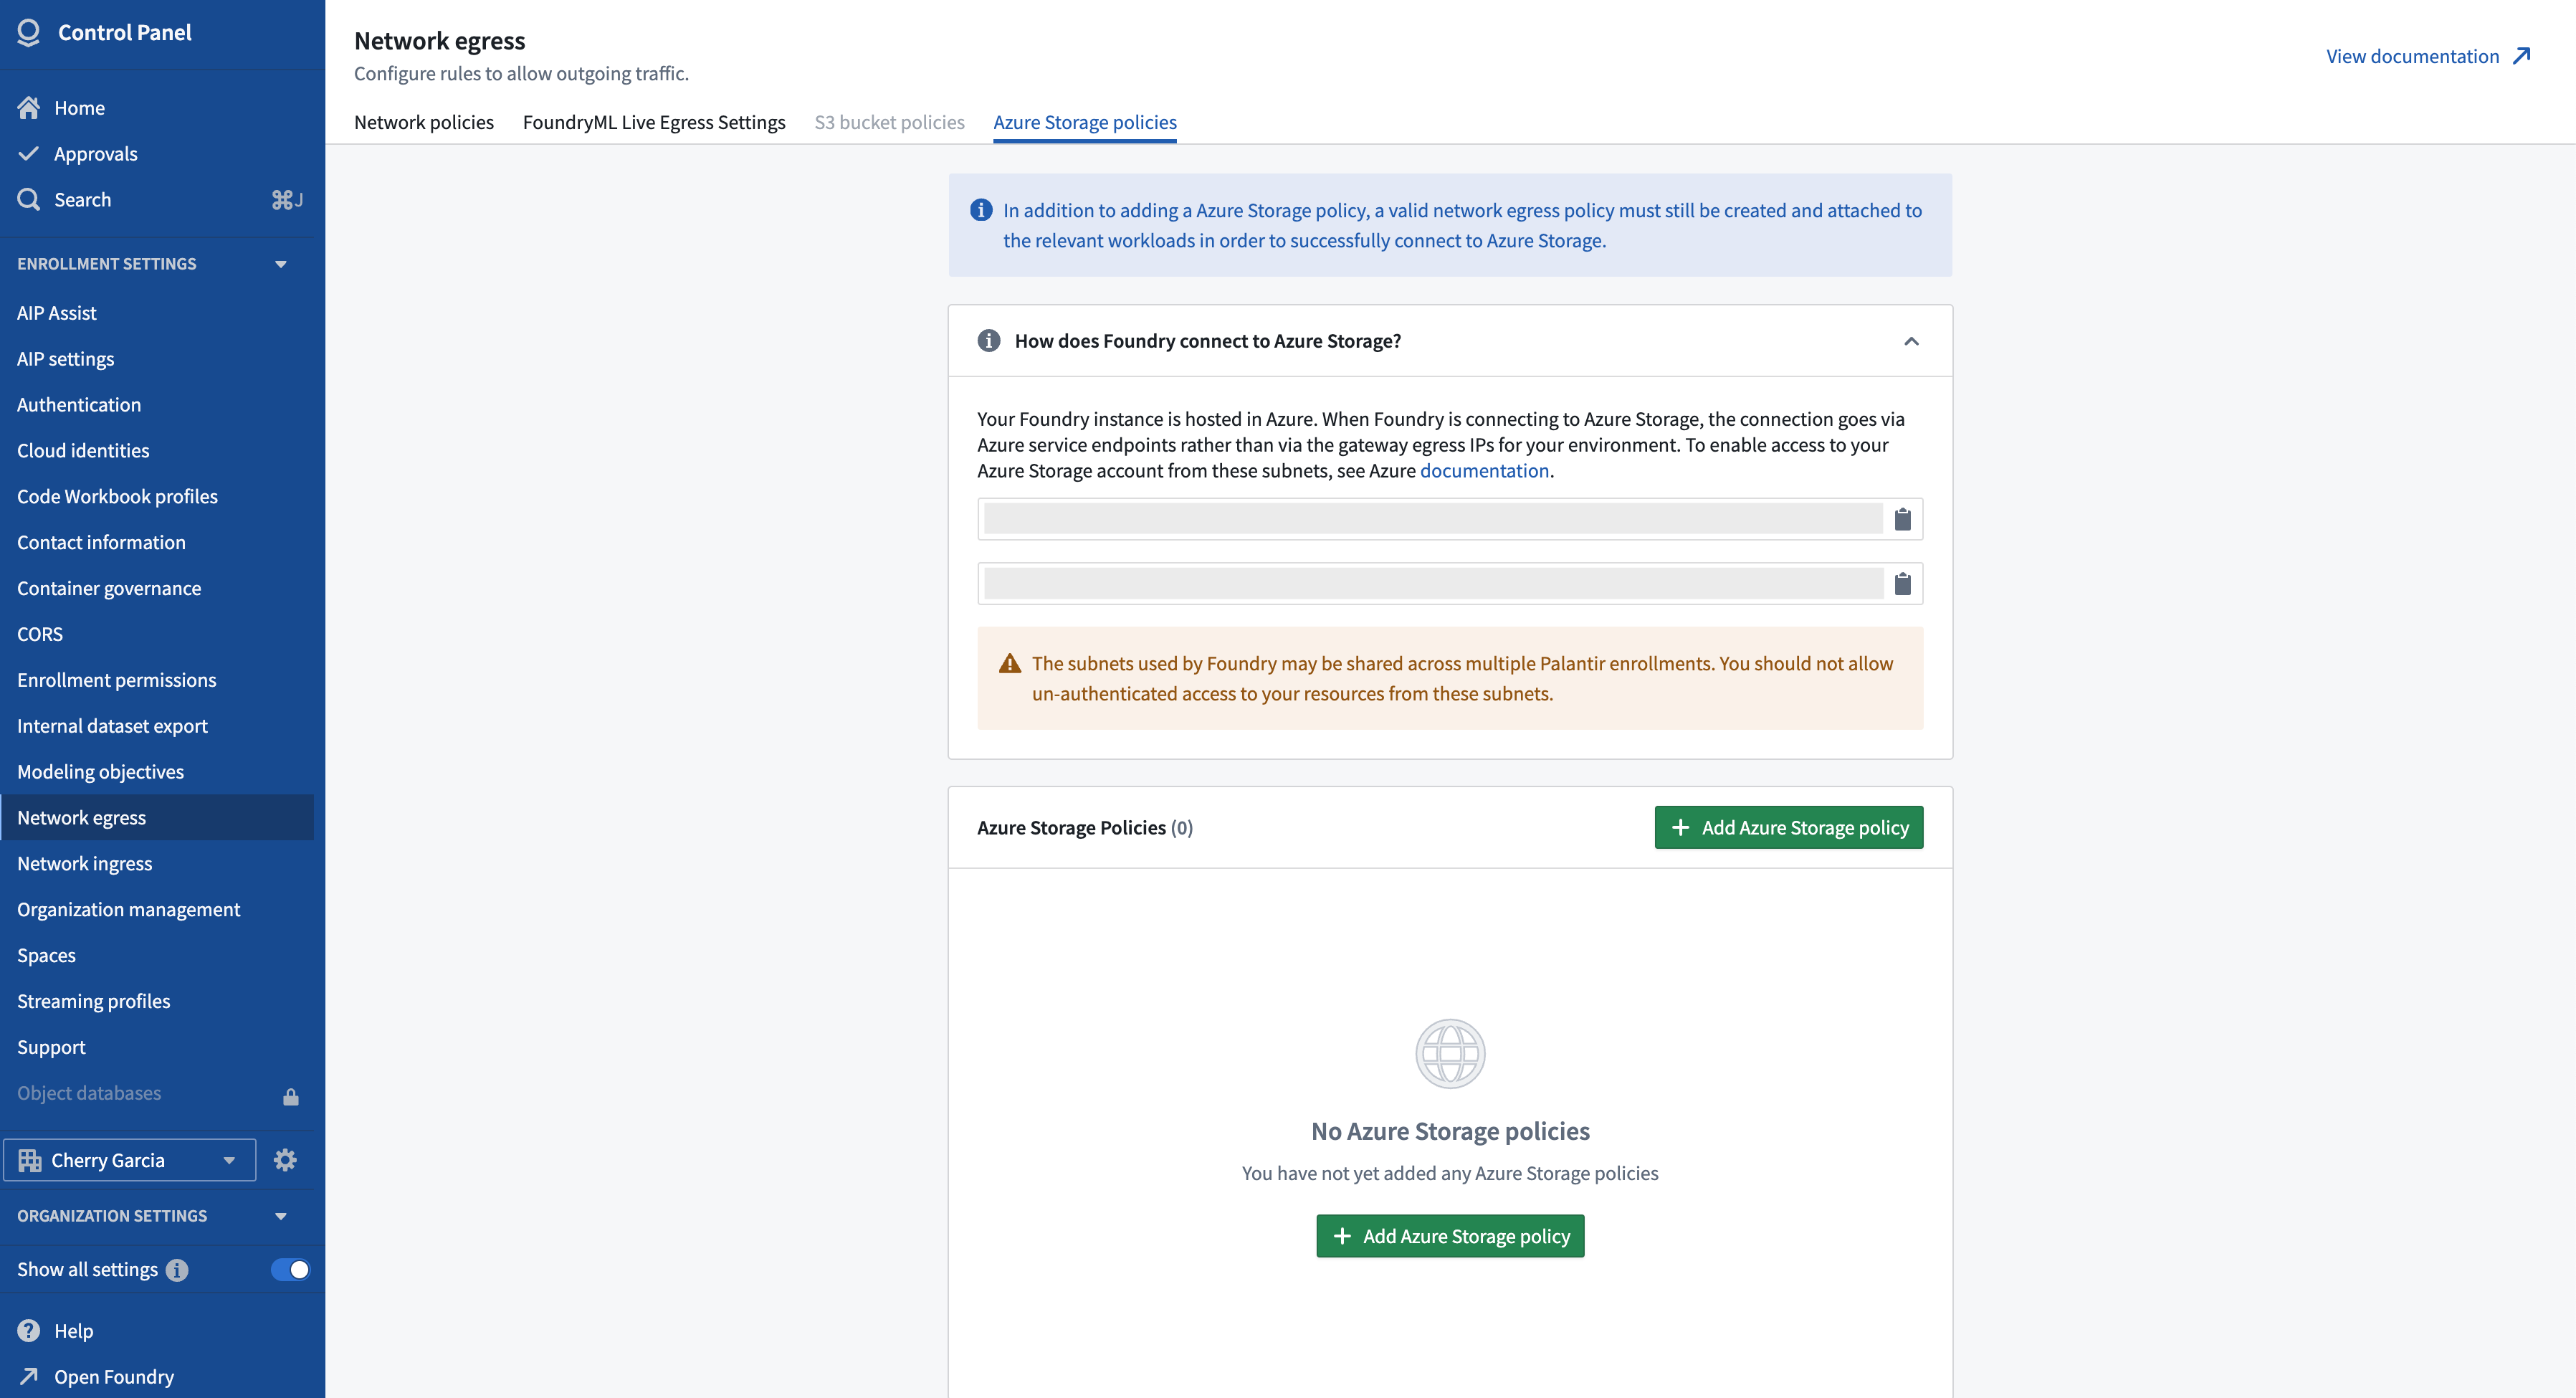
For Foundry instances hosted in Azure, additional configuration is required when connecting to Azure Storage resources as traffic is routed over Azure service endpoints.
To check if your connection requires extra configuration, navigate to the Network egress page in Control Panel. If you find an additional selectable tab called Azure Storage policies, then your instance is hosted in Azure and you must explicitly allow traffic from Palantir's Azure subnets to any Azure Storage account with connected resources.
If present, the Azure Storage policies tab will display the subnet IDs that are used to route traffic from Foundry to any Azure Storage resource.
To successfully connect to an Azure Storage resource, you must complete the following:
- Configure your Azure Storage account's virtual network rules in Azure to allow traffic from the subnets for your Foundry instance. Learn more about managing Azure virtual network rules ↗.
- Ensure that your desired Azure Storage account is listed under Network egress > Azure Storage policies in Control Panel.
- Create an appropriate network egress policy as described above, and add it to the configuration details of the Data Connection source you are using to connect.
Allow traffic to Azure Storage account from the subnets of your Foundry instance
In your Azure account, you must ensure that the virtual network rules ↗ for your Storage account allow inbound traffic from the subnet IDs displayed in the Network egress > Azure Storage policies tab, as shown below:
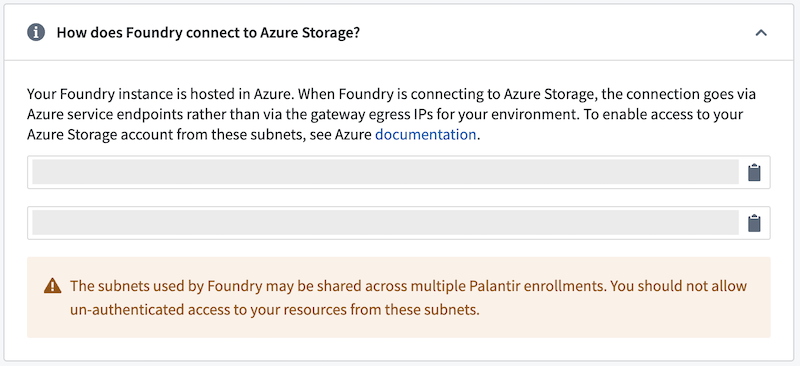
:::callout{theme="warning"} You can configure Azure Storage policies to gate traffic based on subnet IDs. However, you should always use some form of access authentication to provide security for your Azure Storage account, as multiple Foundry instances may share the same subnets. An Azure Storage policy that allows access purely based on the subnet IDs may allow unauthorized access by users outside your Organization. :::
Add an Azure Storage policy
To add a Azure Storage egress policy, select Add Azure Storage policy, and follow the prompts to enter your desired Storage account resource ID, as shown below:
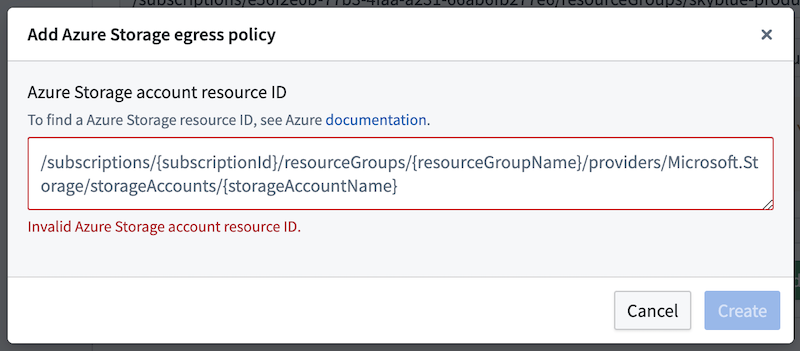
The form will automatically check if the provided Azure Storage account resource ID is valid. You can find more information on how to find an Azure Storage account resource ID in the Azure documentation ↗.
Use an Azure Storage policy
Once added, Azure Storage policies take effect immediately and apply to all workloads attempting to egress directly from Foundry to that Storage account. Unlike network egress policies, they do not need to be attached to specific sources or other workloads in Foundry.
When creating an ABFS source, the configuration interface automatically checks if the Foundry is deployed on Azure and if there is a valid Storage account that has already been added in Control Panel. Users configuring the source will see a warning indicating that action is required by an administrator with access to add an Azure Storage policy in Control Panel, as shown below.

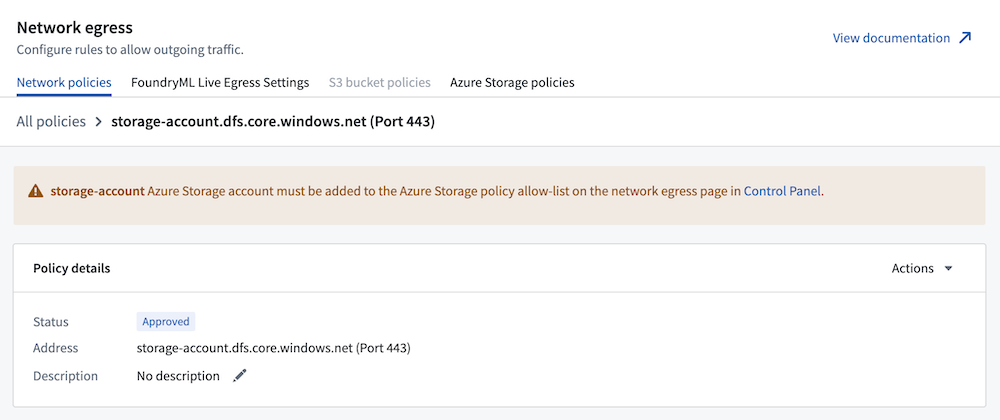
Following the creation of a network egress policy, if an Azure Storage policy is also required to egress, a warning is also displayed as shown below:
Google Cloud Platform (GCP) egress
For Foundry instances hosted in GCP, additional configuration is required when connecting to resources also hosted on GCP projects, such as BigQuery, Google Cloud Storage, and Google Pub/Sub.
To set up the additional configuration needed for GCP projects, contact Palantir Support for assistance.
中文翻译
配置网络出站
网络出站(Network egress)指从 Foundry 内部发起、尝试连接外部系统的所有网络流量。本文概述了如何在控制面板(Control Panel)中配置和管理网络出站,以及这些配置如何被 Foundry 中的用户工作负载使用。
:::callout{theme="neutral"} 网络入站(Network ingress)指从 Foundry 外部发起、尝试建立与 Foundry 连接的网络流量。网络入站也在控制面板中进行管理。 :::
网络出站概述
Foundry 提供严格的网络防火墙以保护客户数据。客户管理的网络出站策略(Network egress policies)用于通过容器网络技术(Cilium ↗、eBPF ↗)将网络防火墙规则应用于单个工作负载。除了这些客户特定的规则外,Palantir 的信息安全团队还在基础设施代理层维护网络防火墙规则,以提供另一层安全保障。这些规则共同管理 Foundry 中用户工作负载的网络出站执行,包括以下内容:
- 使用 Foundry 工作节点(Foundry worker) 的数据连接源(Data connection sources)
- 外部转换(External transforms)
- 外部函数(External functions)
- 外部流式用户自定义函数(UDFs)
- 外部模型适配器(External model adapters)(用于建模实时部署)
- 代码工作簿(Code workbooks)
:::callout{theme="neutral"} 从 Foundry 出站的网络流量仍可能导致数据双向流动。这意味着允许外部连接的 Foundry 内部工作负载可能被用于同步和导出数据。 :::
开放网络出站路由始终存在安全风险。Foundry 注册(Enrollment)的信息安全官应确保仅向受信任的目标开放网络路由,并将这些路由的访问权限限制在受信任的开发人员群体内。即使是受信任的外部系统也可能被恶意行为者利用以绕过安全控制。信息安全官应利用 Foundry 变更管理工具,确保对出站逻辑的变更由受信任的群体审查,并建立审计流程以确保出站逻辑保持安全。
:::callout{theme="neutral"} 网络出站策略的目标地址一旦创建便无法修改。网络出站策略创建后无法删除,只能被撤销。 :::
存在多种出站策略类型,用于表示从 Foundry 到外部系统的不同网络路径:
- 直接连接策略(Direct connection policies)
- 代理代理策略(Agent proxy policies)
- 私有链接策略(Private link policies)
- 存储桶端点策略(Bucket endpoint policies)
要创建出站策略,请导航至控制面板中的网络出站(Network egress)页面,然后选择请求网络出站策略(Request network egress policy)。
直接连接出站策略
直接连接策略支持从 Foundry 网络直接出站到外部目标的连接。对于托管在云端的 Foundry 实例,这意味着通过互联网建立的连接,例如 REST API 或托管在云端的系统。而对于本地部署的 Foundry 实例,则意味着连接到本地网络本身的系统。
:::callout{theme="neutral"} 外部系统必须允许来自 Foundry 的入站连接。 :::
下表总结了配置直接连接出站策略时可用的选项。
| 选项 | 描述 |
|---|---|
| 地址 | 选项 1:DNS 格式为 subdomain.domain.com 的域名。也支持通配符域名,允许流量访问给定域名下的多个子域名(例如 *.domain.com)。更多详情请参见通配符出站策略。 选项 2:IP 格式为 x.x.x.x 的单个 IPv4 地址 选项 3:CIDR 格式为 x.x.x.x/x 的 IPv4 CIDR 地址块 |
| 端口 | 应为指定域名允许的端口或端口范围。端口值必须在 1 - 65535 范围内(含)。 选项 1:单个端口 使用 DNS 地址时,必须指定单个端口。 选项 2:端口范围 使用此选项时,必须提供起始端口和结束端口,起始端口必须小于或等于结束端口。 |
服务器名称指示(SNI)验证
Palantir 的网络基础设施默认对所有使用端口 443(默认 HTTPS 端口)的网络连接尝试执行 SNI 验证。如果该端口上的流量没有 SNI(某些协议如 FTP(S)、SFTP 以及大多数基于 TCP 的数据库连接属于这种情况),您可能会遇到连接挂起和/或超时错误。
如果您预期某个策略的端口 443 上存在非 HTTPS 流量,管理员可以禁用该策略的 SNI 验证。
通配符出站策略
通配符地址允许您将域名的整个子域名级别加入白名单(例如 *.domain.com),而无需管理单个子域名。这在子域名是动态的或事先未知时非常有用——例如 Azure SQL 重定向模式、Kafka 节点或 MongoDB SRV 连接。
:::callout{theme="neutral"} 通配符地址支持用于直接连接和代理代理策略。它们不支持用于私有链接或存储桶端点策略。 :::
通配符必须作为域名的最左侧标签出现,并且不能针对公共后缀(public suffix)(例如 *.com、*.co.uk、*.github.io)——如果针对公共后缀,该策略将无法使用。通配符地址仅匹配一个子域名级别。例如,*.domain.com 匹配 bar.domain.com,但不匹配 domain.com 或 bar.baz.domain.com。
| 模式 | 是否支持 |
|---|---|
*.domain.com |
✅ |
*.com |
❌ 公共后缀 |
*.s3.amazonaws.com |
❌ 公共后缀 |
subdomain.*.com |
❌ 中间通配符 |
*.*.domain.com |
❌ 多个通配符 |
代理代理出站策略
代理代理出站策略支持通过数据连接代理(Data Connection agent)连接到本地或私有托管的系统。代理代理出站策略允许 Foundry 工作流如同直接连接到外部系统一样运行,无需任何额外配置;所有流量都通过代理透明地转发。
:::callout{theme="neutral"} 在此场景下,Foundry 不会向外部系统发起任何入站连接,外部系统也无需允许来自 Foundry 的入站连接。
但是,代理主机机器必须具有到目标外部系统的出站网络连接,并且目标外部系统必须允许来自代理主机的入站连接。 :::
使用代理出站策略的源在以下工作流中得到支持:
- 所有一流的数据连接能力(Data connection capabilities)
- 不支持的工作流:
- 外部转换(External transforms)(预览版仅支持 VS Code)
- 外部部署函数(Deployed functions)。了解更多关于外部函数(External functions)的信息。
- 外部流式用户自定义函数(UDFs)
- 代码工作区(Code workspaces)
- 计算模块(Compute modules)
下表总结了配置代理代理出站策略时可用的选项。
| 选项 | 描述 |
|---|---|
| 地址 | 选项 1:DNS 外部系统域名,格式为 subdomain.domain.com。也支持通配符域名,允许流量访问一个级别下的任何子域名(例如 *.domain.com)。更多详情请参见通配符出站策略。 选项 2:IP 外部系统的单个 IPv4 地址,格式为 x.x.x.x。注意: 私有 IP 地址范围(例如 10.x.x.x)可能与 Foundry 的内部基础设施冲突且不可路由。对于仅能通过私有 IP 地址访问的源系统,请使用主机覆盖(Host overrides)将占位符域名映射到您网络内的私有 IP 地址。 选项 3:CIDR 外部系统的 IPv4 CIDR 地址块,格式为 x.x.x.x/x |
| 端口 | 应为指定域名允许的端口或端口范围。端口值必须在 1 - 65535 范围内(含)。 选项 1:单个端口 使用 DNS 地址时,必须指定单个端口。 选项 2:端口范围 使用此选项时,必须提供起始端口和结束端口,起始端口必须小于或等于结束端口。 |
| 代理 | 用于连接到外部系统的代理。如果指定了多个代理,流量将被随机分配给列表中的一个代理。 |
私有链接出站策略
私有链接出站策略通过将所有发往某个地址的流量路由到私有链接上,从而支持通过私有链接(Private links)进行连接。
:::callout{theme="neutral"} 在私有链接出站策略出现之前,直接连接出站策略被用于通过私有链接路由流量。
为私有链接的域名配置的现有直接连接出站策略将继续运行,并将自动迁移到私有链接出站策略。 :::
下表总结了配置私有链接出站策略时可用的选项。
| 选项 | 描述 |
|---|---|
| 地址 | 外部系统域名,格式为 subdomain.domain.com。仅允许特定的域名,不支持通配符。例如,要允许流量同时访问 foo.mycompany.com 和 bar.mycompany.com,必须创建两个独立的域名策略。 |
| 端口 | 应为指定域名允许的端口或端口范围。端口值必须在 1 - 65535 范围内(含)。 选项 1:单个端口 使用 DNS 地址时,必须指定单个端口。 选项 2:端口范围 使用此选项时,必须提供起始端口和结束端口,起始端口必须小于或等于结束端口。 |
| 私有链接 | 用于连接到外部系统的私有链接(Private link)。 |
使用私有链接出站策略的源在以下工作流中不受支持:
- 虚拟表(Virtual tables)
- Iceberg 表自带存储(Bring-your-own-bucket storage for Iceberg tables)
- OIDC 认证(OIDC authentication)
存储桶端点出站策略
:::callout{theme="neutral"} 目前仅支持 Amazon AWS 存储桶策略。 :::
当 Palantir 平台与外部系统托管在同一云提供商(Amazon AWS、Azure 或 Google Cloud Platform)上时,可能需要特定的白名单设置以允许流量在云提供商的特定端点内流动。白名单控制通过存储桶端点(Bucket endpoint)出站策略进行管理。
:::callout{theme="neutral"} 目前存储桶端点出站策略仅支持 AWS S3 存储桶。请阅读下文了解 Azure 和 Google Cloud Platform 特定的出站配置。 :::
AWS S3 存储桶端点策略
:::callout{theme="neutral"}
S3 存储桶端点策略取代了现有的 S3 存储桶策略。这些先前的策略类型将继续运行,但将来需要迁移到存储桶端点出站策略。
每个注册最多可设置 300 个 S3 存储桶端点策略,而 S3 存储桶策略仅允许 10 个。
:::
对于托管在 AWS 中的 Palantir 平台实例,当连接到托管在同一 AWS 区域(AWS region) ↗ 的外部 S3 存储桶时,需要存储桶端点策略。这是因为 AWS 处理来自同一区域 VPC 网关端点(此处为 Palantir 平台)到 S3 的请求的网络方式所致。
要建立与 AWS 的连接,请遵循以下步骤:
- 从控制面板创建一个类型为存储桶端点(Bucket endpoint)的网络出站策略。
下表总结了 S3 存储桶端点出站策略的配置选项:
| 选项 | 描述 |
|---|---|
| 地址 | 外部系统域名,格式为 subdomain.domain.com。仅允许特定的域名,不支持通配符。例如,要允许流量同时访问 foo.mycompany.com 和 bar.mycompany.com,必须创建两个独立的域名策略。 |
| 端口 | 端口 443 |
| S3 存储桶名称 | 此策略出站所指向的 S3 存储桶的名称。 |
- 确保您的 S3 存储桶的存储桶策略(Bucket policy) ↗允许来自您的 Palantir 平台实例 VPC 端点的入站流量。
网络策略创建后,连接来源的 VPC 端点将显示在策略概览页面上。
Amazon S3 文档包含一个示例 ↗,说明如何使用存储桶策略将流量限制到特定 VPC 端点的 S3 存储桶。要了解更多关于管理从 VPC 端点进入 S3 的入站流量,请查阅官方 AWS 文档 ↗。
:::callout{theme="warning"} 您可以配置 AWS 存储桶策略,根据流量来源的 VPC 端点来限制流量。但是,您应始终使用某种形式的访问认证来保护您的存储桶安全,因为您的 VPC 端点可能在您的注册中的多个策略之间共享。仅基于 VPC 端点允许访问的存储桶策略可能会允许未经授权的访问。 :::
使用存储桶端点出站策略的源在以下工作流中不受支持:
使用策略
本节总结了网络出站策略的相关权限、网络出站策略可能处于的生命周期状态,并描述了如何应用网络出站策略。
权限
下表总结了与网络出站策略相关的操作以及这些权限的默认配置。
| 操作 | 描述 |
|---|---|
| 提议(Propose) | 任何 Foundry 用户都可以提议网络出站策略。提议的策略只有在获得批准后才变为活动状态并可用。待批准的策略在控制面板的审批收件箱中可见。 |
| 批准/创建(Approve/Create) | 通过 Manage network egress configuration 工作流授予。默认情况下,此工作流授予 注册管理员(Enrollment Administrator) 和 信息安全官(Information Security Officer) 角色。 |
| 更新元数据(Update metadata) | 通过 Manage network egress configuration 工作流授予。默认情况下,此工作流授予 注册管理员(Enrollment Administrator) 和 信息安全官(Information Security Officer) 角色。 |
| 撤销(Revoke) | 通过 Manage network egress configuration 工作流授予。默认情况下,此工作流授予 注册管理员(Enrollment Administrator) 和 信息安全官(Information Security Officer) 角色。 |
| 暂停(Pause) | Palantir 的信息安全团队有能力阻止被视为安全风险或威胁的网络出站。任何因此被阻止的网络出站策略将在控制面板中显示为 已暂停(Paused)。如果您认为您的注册的某个合法网络出站策略被错误地暂停,请提交包含相关详细信息的支持工单。 |
| 查看(View) | 允许被分配的用户和组查看策略的存在,但不允许他们在任何工作负载中导入和使用该策略。通常,我们建议将任何可能需要使用该策略的人员设为查看者,即使他们当前不是导入者。 |
| 导入(Import) | 允许被分配的用户和组查看策略的存在,并在工作负载中导入和使用该策略。 |
网络出站的主要管理界面位于控制面板的注册级别。拥有 Manage network egress configuration 工作流(与注册管理员角色关联)访问权限的用户将能够访问网络出站(Network Egress)页面,以对出站策略执行任何管理操作。
注册管理员和信息安全官始终能够查看出站策略已被导入到哪些项目中。无论管理用户对项目本身的个人访问权限如何,此功能均可用。此元数据可用是为了确保信息安全官对策略使用情况有足够的可见性,以便就可能的撤销或以其他方式限制策略使用做出治理决策。
批准策略时,信息安全官必须决定哪些用户或组应被授予 查看(View) 或 导入(Import) 网络出站策略的能力。这也可以在之后通过控制面板中策略详情页面上的管理共享(Manage Sharing)按钮进行管理。
默认情况下,策略是"选择性加入(opt-in)"的,必须附加到 Foundry 中的工作负载。例如,创建数据连接源时,应具有策略 导入者(Importer) 权限的用户明确地将该源的策略附加到源上。这遵循了最小权限原则(Principle of least privilege) ↗,确保工作负载仅被授予其成功运行所严格必需的出站规则。
:::callout{theme="warning"}
对网络出站策略具有 导入(Import) 访问权限的用户可以在 Foundry 中运行与目标地址通信的任意代码。 确保被授予导入权限的用户是受信任的,并已接受您组织的信息安全策略培训,以避免滥用此访问权限。
:::
策略状态
在网络出站策略的整个生命周期中,它可能处于以下描述的多种状态之一:
| 策略状态 | 描述 |
|---|---|
待批准(Pending approval) |
待批准是新网络出站策略的默认状态。处于此状态的策略可以附加到工作负载,但尝试使用待批准策略的工作负载将无法运行。 |
活动(Active) |
策略一旦获得批准,即变为活动状态。活动策略的导入者能够将其附加到 Foundry 工作负载,以允许该工作负载出站到指定的外部地址。 |
已暂停(Paused) |
Palantir 的信息安全团队已阻止出站到指定地址。尝试使用已暂停策略的工作负载将无法运行。 |
已撤销(Revoked) |
Foundry 注册的信息安全官可以从控制面板撤销策略。尝试使用已撤销策略的工作负载将无法运行。 |
应用策略
请遵循以下步骤成功应用网络策略:
-
在控制面板中创建策略。如果您的 Foundry 策略由 Palantir 管理,请将您的出站策略详情提供给您的 Palantir 代表。这样做将使 Palantir 能够在扩展网络访问之前评估安全风险。如果您的 Foundry 策略管理是完全自助服务的,该策略将自动应用于防火墙。
-
将策略分配给用户工作负载:
-
使用 Foundry 工作节点的数据连接源(Data Connection sources using a Foundry worker): 在创建新源时指定网络策略。
- 代码工作簿(Code Workbook): 细粒度网络管理尚不可用,管理员必须改为创建全局策略。全局策略不加区分地应用于所有工作负载,应仅针对高度信任的网络路由进行配置。
要将策略分配给用户工作负载,需要具有特定出站策略的导入者(Importer)权限。此权限通过相应出站策略上的管理共享(Manage Sharing)设置按策略授予。
限制
您最多可以将 10 个源导入到代码资源或转换中,同时最多可组合使用 50 个采用 TCP 级别白名单(TCP-level allowlisting) 的出站策略。
可观测性
要使用日志和指标监控和排查网络出站策略问题,请查阅我们的网络出站可观测性(Network egress observability)文档。
高级设置
TCP 级别白名单
出站控制可以在 HTTP 或 TCP 级别实施。除了端口 80 和 443(HTTP 和 HTTPS 流量的标准端口)上的直接连接策略外,所有出站策略都需要 TCP 级别白名单。无论是否使用 TCP 级别白名单,连接的安全性都不会改变。
如果非 HTTP(S) 流量通过使用端口 80 或 443 的策略传输,您必须启用 TCP 级别白名单才能成功出站。
常见边缘情况
当存在两个相同的策略,其中一个已暂停/撤销而另一个处于活动状态时,会发生什么?
任何使用活动策略的工作负载将成功运行,而尝试使用已暂停/撤销策略的工作负载将无法运行。
如果策略存在重叠,其中一个已暂停/撤销而另一个处于活动状态,会发生什么?
如果使用单个 IP 地址的策略与指定 CIDR IP 地址块的策略重叠,可能会发生这种情况。
在这种情况下,与相同策略的情况一样,任何使用活动策略的工作负载将成功运行,而尝试使用已暂停/撤销策略的工作负载将无法运行。
如果我提议一个已经存在的策略,会发生什么?
允许重复策略,审查提议的信息安全官可以选择执行以下操作之一:
- 完全拒绝该提议。
- 拒绝该提议,并向提议者授予对现有相同或重叠策略的"导入者访问权限"。
- 批准该提议,并允许重复或重叠策略(不推荐)。
来自 Foundry 的连接来自哪些 IP?
当从 Foundry 发起连接到外部目标时,它们来自某些 IP 范围。有时需要将这些 IP 添加到白名单,Foundry 的连接才会被接受。
当 Foundry 托管在 Palantir 的云基础设施中时,Foundry 流量来源的出站 IP 将显示在控制面板的网络出站管理页面上。在目标系统中添加白名单时,您应复制那里显示的 CIDR 范围。
:::callout{theme="neutral"} 请注意,通过代理(Agents)的连接处理方式不同。使用代理时,到源系统的网络流量始终来自您基础设施上的代理主机;确保代理与目标系统之间的网络连接是您的责任。 :::
云提供商出站
Amazon S3 存储桶策略
:::callout{theme="warning"} S3 存储桶策略已被存储桶端点策略取代,将来需要迁移。这两个概念之间的区别如下:
- 范围: 存储桶端点(Bucket endpoint)策略为每个注册(Enrollment)创建一个 VPC 端点,而 S3 存储桶(S3 bucket)策略为每个 Palantir 平台 Foundry 实例创建一个。这意味着仅基于 VPC 端点允许访问的 S3 存储桶策略可能会允许您组织之外的用户进行未经授权的访问。
- 限制: 您可以创建最多 300 个存储桶端点(Bucket endpoint)策略,但只能创建 10 个 S3 存储桶(S3 bucket)策略。
- 控制: 存储桶端点(Bucket endpoint)策略必须附加到数据源(Data sources)才能生效;只有使用这些源的工作负载才能通过它们路由流量。而 S3 存储桶(S3 bucket)策略则立即生效,并适用于所有尝试直接从 Foundry 出站到该存储桶的工作负载。 :::
对于托管在 AWS 中的 Foundry 实例,当连接到同一区域的 S3 存储桶时,需要额外配置。这是因为 AWS 处理来自同一区域 VPC 网关端点到 S3 的请求的网络方式所致。
要检查您的连接是否需要额外配置,请导航至控制面板中的网络出站(Network egress)页面。如果您找到一个名为 S3 存储桶策略(S3 bucket policies) 的额外选项卡,则您的实例托管在 AWS 中,您必须明确允许来自 Palantir VPC 端点的流量访问同一区域内的任何 S3 存储桶。
如果存在,S3 存储桶策略(S3 bucket policies)选项卡还将显示您的实例托管所在的区域,以及用于将流量从 Foundry 路由到任何同区域 S3 存储桶的 VPC 端点的 Amazon 资源名称(ARN)。
要成功连接到与 Foundry 同区域的存储桶,您必须完成以下步骤:
- 在 AWS 控制台中配置您的存储桶策略,以允许来自您的 Foundry 实例 VPC 端点的流量。了解更多关于 AWS 存储桶策略 ↗ 的信息。
- 确保您所需的存储桶列在控制面板的 网络出站(Network egress) > S3 存储桶策略(S3 bucket policies) > AWS S3 存储桶策略(AWS S3 Bucket Policies) 下。
- 按照上文所述创建适当的网络出站策略,并将其添加到您正在使用的数据连接源(Data Connection source)的配置详情中。
允许从 VPC 端点向您的 Foundry 实例的 S3 传输流量
在 AWS 控制台中,您必须确保您的 S3 存储桶的存储桶策略(Bucket policy) ↗允许来自 网络出站(Network egress) > S3 存储桶策略(S3 bucket policies) 选项卡中显示的 VPC 端点的入站流量,如下所示:
Amazon S3 文档包含一个示例 ↗,说明如何使用存储桶策略将流量限制到特定 VPC 端点的 S3 存储桶。要了解更多关于管理从 VPC 端点进入 S3 的入站流量,请查阅官方 AWS 文档 ↗。
:::callout{theme="warning"} 您可以配置 AWS 存储桶策略,根据流量来源的 VPC 端点来限制流量。但是,您应始终使用某种形式的访问认证来保护您的存储桶安全,因为多个 Foundry 实例可能共享一个 VPC 端点。仅基于 VPC 端点允许访问的存储桶策略可能会允许您组织之外的用户进行未经授权的访问。 :::
添加 S3 存储桶策略
要添加同区域存储桶,请选择添加存储桶策略(Add bucket policy),然后按照提示输入您所需的存储桶名称,如下所示:
表单将自动检查存储桶名称以及区域的有效性。如果有效的存储桶名称与您的 Foundry 实例托管所在的区域匹配,您将能够保存。除了存储桶名称外,您还必须提供 只读(READ ONLY) 或 读写(READ WRITE) 的策略。这规定了您希望 Palantir 在建立与 S3 的连接时请求的访问级别。
:::callout{theme="warning"} 将同区域 S3 存储桶添加到白名单以及所需的存储桶访问策略,应被视为通过您的 Foundry 实例的 VPC 端点保证可用的最低访问级别。
S3 中的数据应通过 AWS 中的适当认证和授权以及 Foundry 内的网络出站策略治理来保护。
Palantir 可能会扩展提供的列表以允许访问额外的同区域存储桶,并且也可能将给定存储桶的访问策略从 只读(READ ONLY) 提升到 读写(READ WRITE)。使用 S3 源类型时的适当认证和授权将确保您不会意外允许未经授权的 Foundry 用户访问您的 S3 存储桶。
:::
使用 S3 存储桶策略
添加后,同区域存储桶策略立即生效,并适用于所有尝试直接从 Foundry 出站到该存储桶的工作负载。与网络出站策略不同,它们不需要附加到 Foundry 中的特定源或其他工作负载。
创建 S3 源时,配置界面会自动检查存储桶是否与 Foundry 位于同一区域,以及该存储桶是否已在控制面板中添加。配置源的用户将看到绿色勾号(表示存储桶已正确添加)或红色勾号(表示需要具有在控制面板中添加 S3 存储桶策略权限的管理员采取行动)。
S3 存储桶策略限制
每个注册最多可以添加 10 个同区域存储桶。如果您需要从您的 Foundry 实例访问超过 10 个同区域 S3 存储桶,请联系 Palantir 支持。
Microsoft Azure 存储策略
对于托管在 Azure 中的 Foundry 实例,当连接到 Azure 存储资源时,需要额外配置,因为流量通过 Azure 服务端点路由。
要检查您的连接是否需要额外配置,请导航至控制面板中的网络出站(Network egress)页面。如果您找到一个名为 Azure 存储策略(Azure Storage policies) 的可选选项卡,则您的实例托管在 Azure 中,您必须明确允许来自 Palantir Azure 子网的流量访问任何具有连接资源的 Azure 存储帐户。
如果存在,Azure 存储策略(Azure Storage policies)选项卡将显示用于将流量从 Foundry 路由到任何 Azure 存储资源的子网 ID。
要成功连接到 Azure 存储资源,您必须完成以下步骤:
- 在 Azure 中配置您的 Azure 存储帐户的虚拟网络规则,以允许来自您的 Foundry 实例子网的流量。了解更多关于管理 Azure 虚拟网络规则 ↗ 的信息。
- 确保您所需的 Azure 存储帐户列在控制面板的 网络出站(Network egress) > Azure 存储策略(Azure Storage policies) 下。
- 按照上文所述创建适当的网络出站策略,并将其添加到您正在使用的数据连接源(Data Connection source)的配置详情中。
允许从子网向您的 Foundry 实例的 Azure 存储帐户传输流量
在您的 Azure 帐户中,您必须确保您的存储帐户的虚拟网络规则(Virtual network rules) ↗允许来自 网络出站(Network egress) > Azure 存储策略(Azure Storage policies) 选项卡中显示的子网 ID 的入站流量,如下所示:
:::callout{theme="warning"} 您可以配置 Azure 存储策略,根据子网 ID 来限制流量。但是,您应始终使用某种形式的访问认证来保护您的 Azure 存储帐户安全,因为多个 Foundry 实例可能共享相同的子网。仅基于子网 ID 允许访问的 Azure 存储策略可能会允许您组织之外的用户进行未经授权的访问。 :::
添加 Azure 存储策略
要添加 Azure 存储出站策略,请选择添加 Azure 存储策略(Add Azure Storage policy),然后按照提示输入您所需的存储帐户资源 ID,如下所示:
表单将自动检查提供的 Azure 存储帐户资源 ID 是否有效。您可以在 Azure 文档 ↗ 中找到有关如何查找 Azure 存储帐户资源 ID 的更多信息。
使用 Azure 存储策略
添加后,Azure 存储策略立即生效,并适用于所有尝试直接从 Foundry 出站到该存储帐户的工作负载。与网络出站策略不同,它们不需要附加到 Foundry 中的特定源或其他工作负载。
创建 ABFS 源时,配置界面会自动检查 Foundry 是否部署在 Azure 上,以及是否存在已在控制面板中添加的有效存储帐户。配置源的用户将看到一条警告,指示需要具有在控制面板中添加 Azure 存储策略权限的管理员采取行动,如下所示。
在创建网络出站策略后,如果出站还需要 Azure 存储策略,也会显示一条警告,如下所示:
![指示此网络策略需要 Azure 存储策略