Configure private link egress for AWS(为 AWS 配置私有链接出站)
:::callout{theme="neutral" title="Beta"} Private link egress is in the beta phase of development and may not be available on your enrollment. Functionality may change during active development. :::
This page outlines how to configure and manage private link egress for AWS-hosted Palantir platforms connecting to customer services, powered by AWS PrivateLink ↗.
Private link egress supports private egress to AWS services, user-owned resources deployed on AWS, or third-party APIs deployed on AWS.
Configure a private link
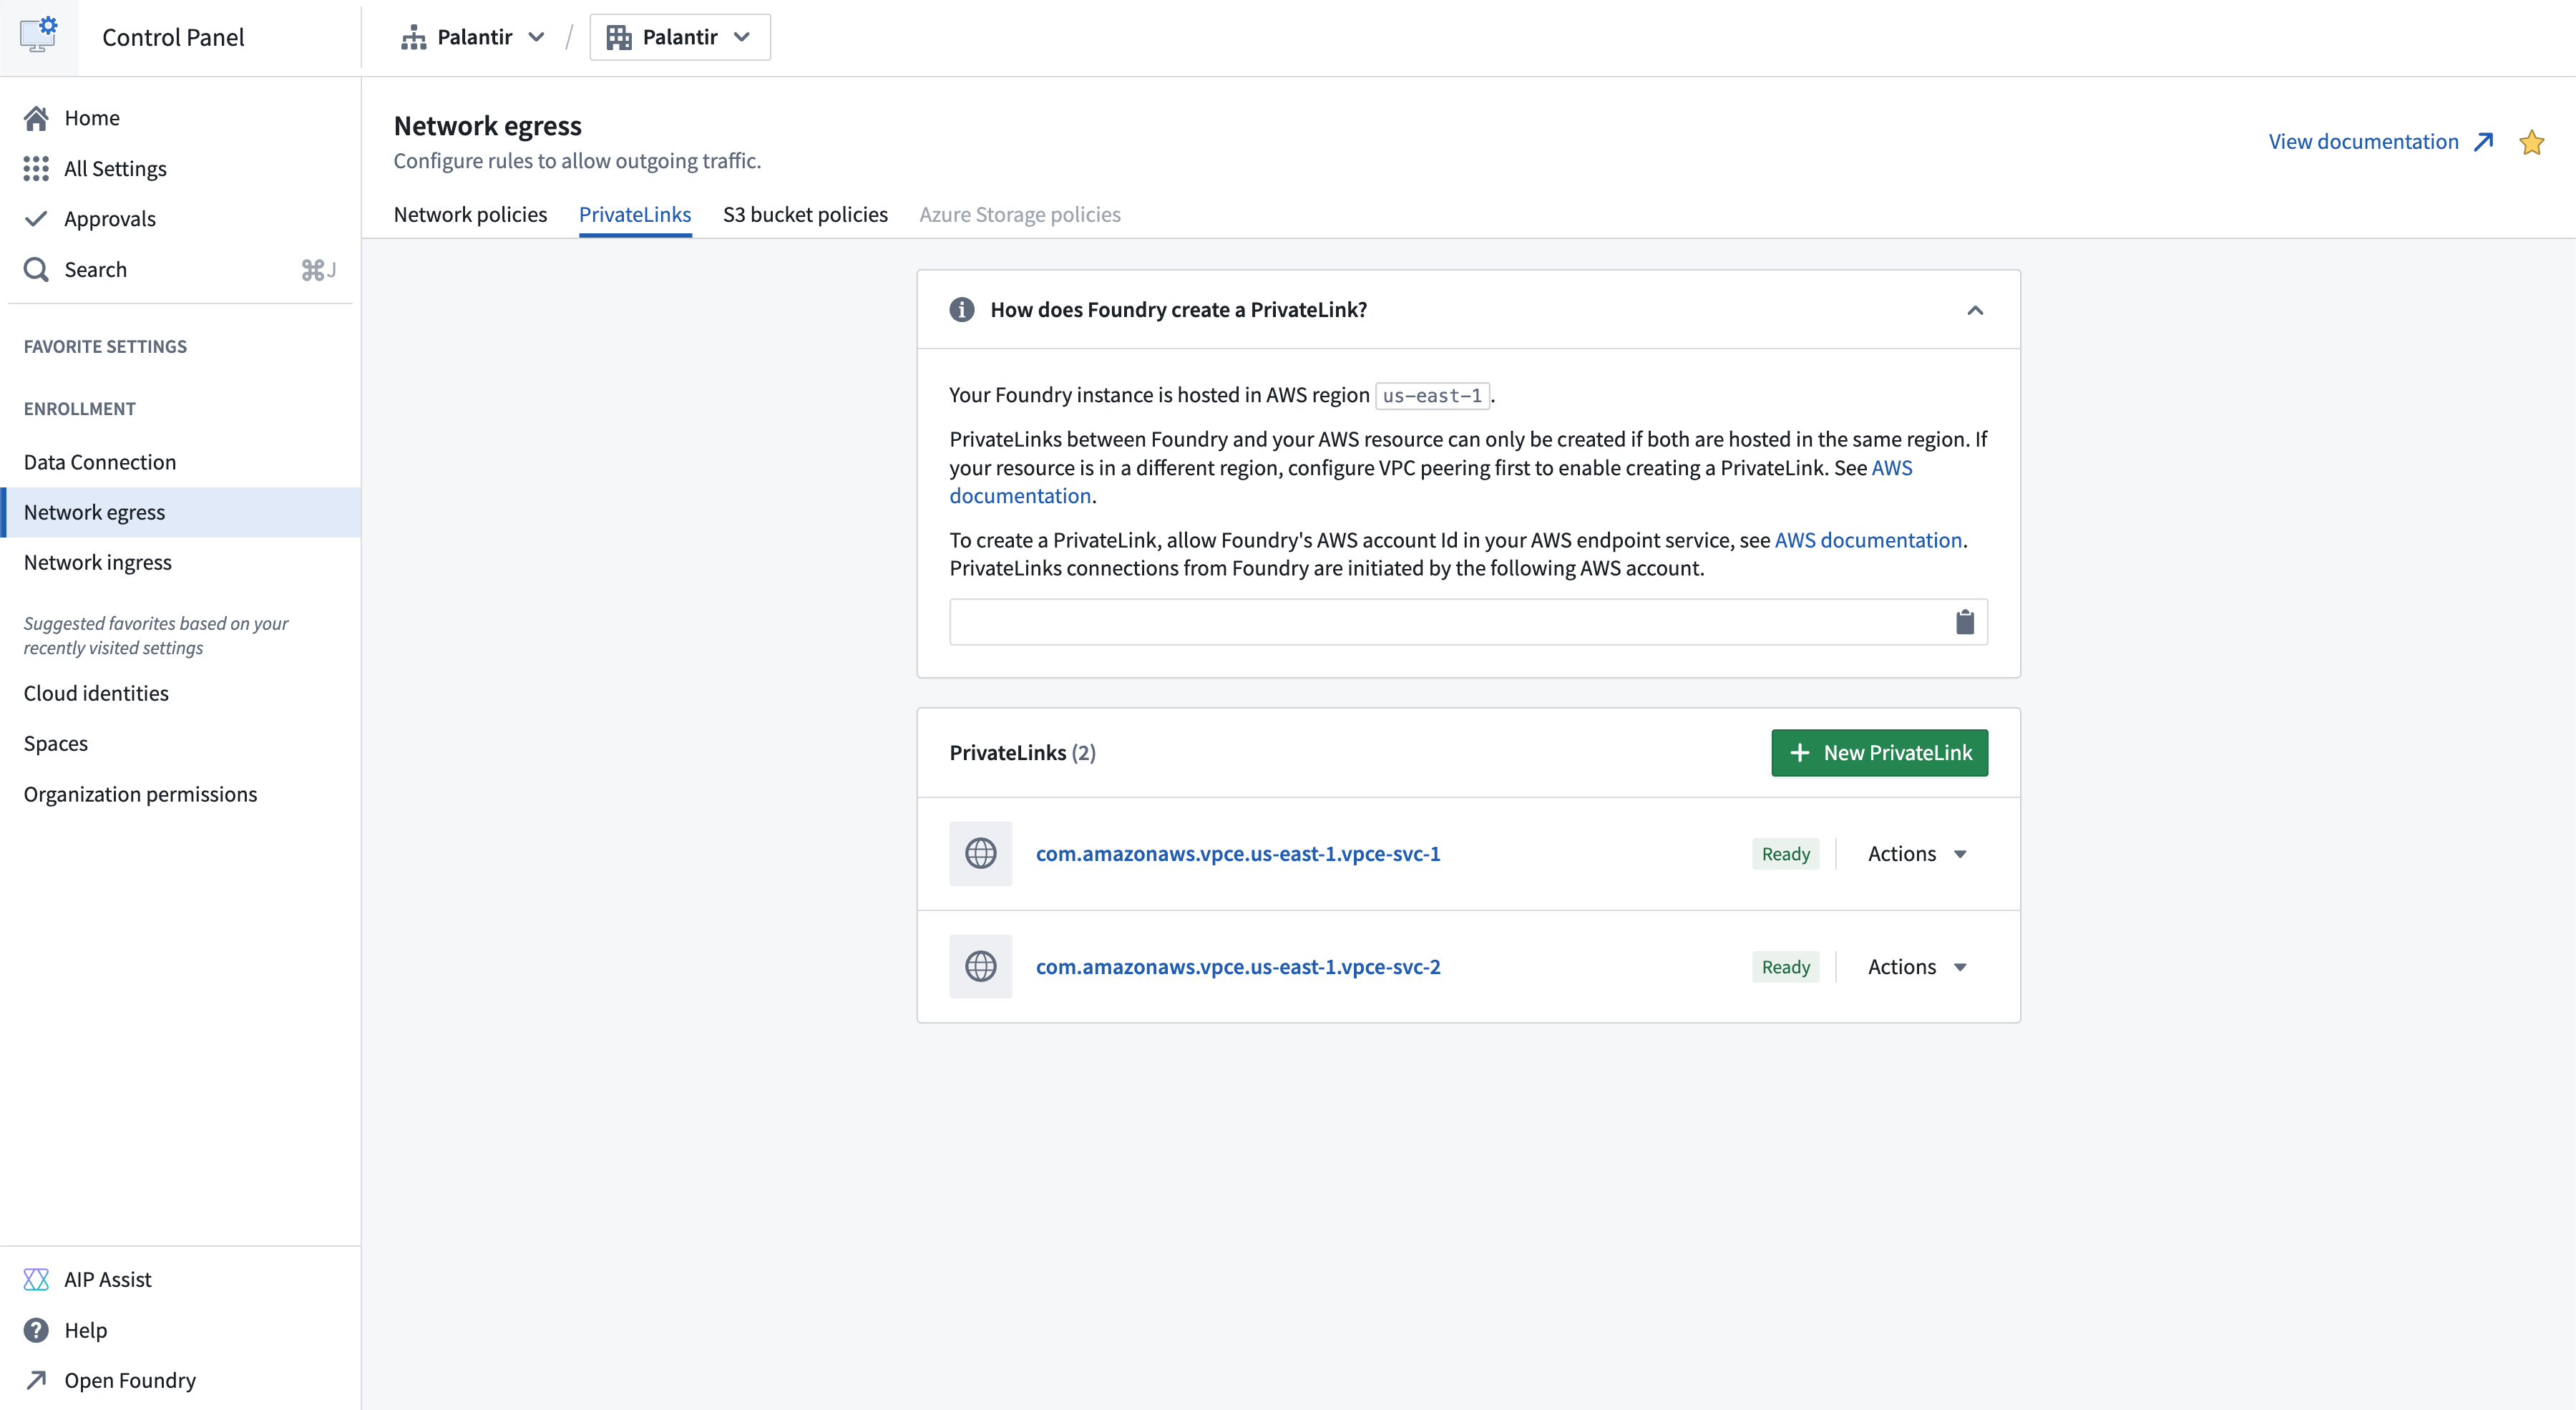
Navigate to the Private links tab in the Network egress page in Control Panel to manage private links.
To successfully create a private link connection:
- Create an endpoint service for your target resource.
- Allow the Palantir platform to access the target resource.
- Provide the target resource endpoint service name.
- Create network egress policies.
Create an endpoint service for your target resource
AWS services
A list of private link compatible AWS services and their endpoint service names can be found in the AWS documentation ↗. Creation of an endpoint service is not required for AWS services; the endpoint service name provided by AWS can be used. An example of an AWS service that supports private links is Amazon Bedrock ↗.
:::callout{theme="neutral"} Private links to AWS S3 are not supported. Use same region S3 bucket policies for private connectivity to S3. :::
User-owned resources on AWS
For a user-owned resource deployed on AWS, create an endpoint service following the steps in the AWS documentation ↗. An example of a user-owned resource is databases powered by AWS RDS ↗.
Third-party APIs on AWS
For user-owned third-party APIs deployed on AWS, create an endpoint service following the steps from the AWS documentation ↗. If owned by another party, request their VPC endpoint service name. For example, Snowflake's VPC endpoint service name can be requested as shown in the Snowflake documentation ↗.
Additionally, request the private domains of third-party APIs if the service uses custom transport layer security (TLS) certificates that are not valid for the AWS-generated domain ↗ of the private link. For example, Snowflake's private domains can be found following the Snowflake documentation ↗. Below is an example of a private third party domain:
abc.us-east-1.privatelink.snowflakecomputing.com
Allow the Palantir platform to access the target resource
To access the target resource through a private link, allow the Palantir platform to access the resource. Add the Palantir platform's AWS account in the allowed principal list of your endpoint service by following the AWS documentation ↗. The allowed principal should look as follows:
arn:aws:iam::<palantir_platform_aws_account_id>:root
Provide the target resource endpoint service name
-
Navigate to Control Panel > Network egress > Private links and select New private link to create a private link.
-
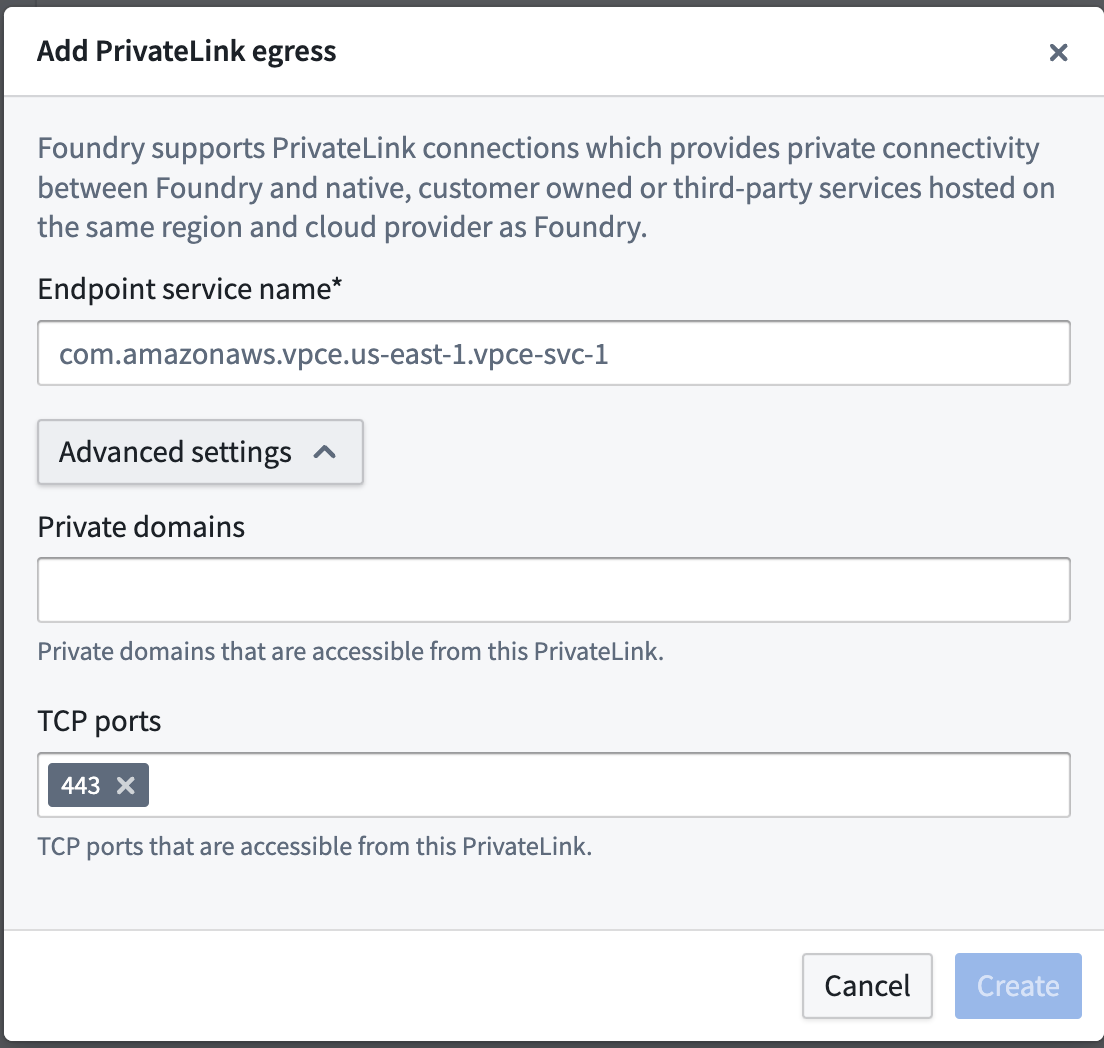
Enter the following details for your target resource for the private link:
-
Endpoint service name: The endpoint service name of the target resource that was retrieved in the step above.

-
Advanced settings:
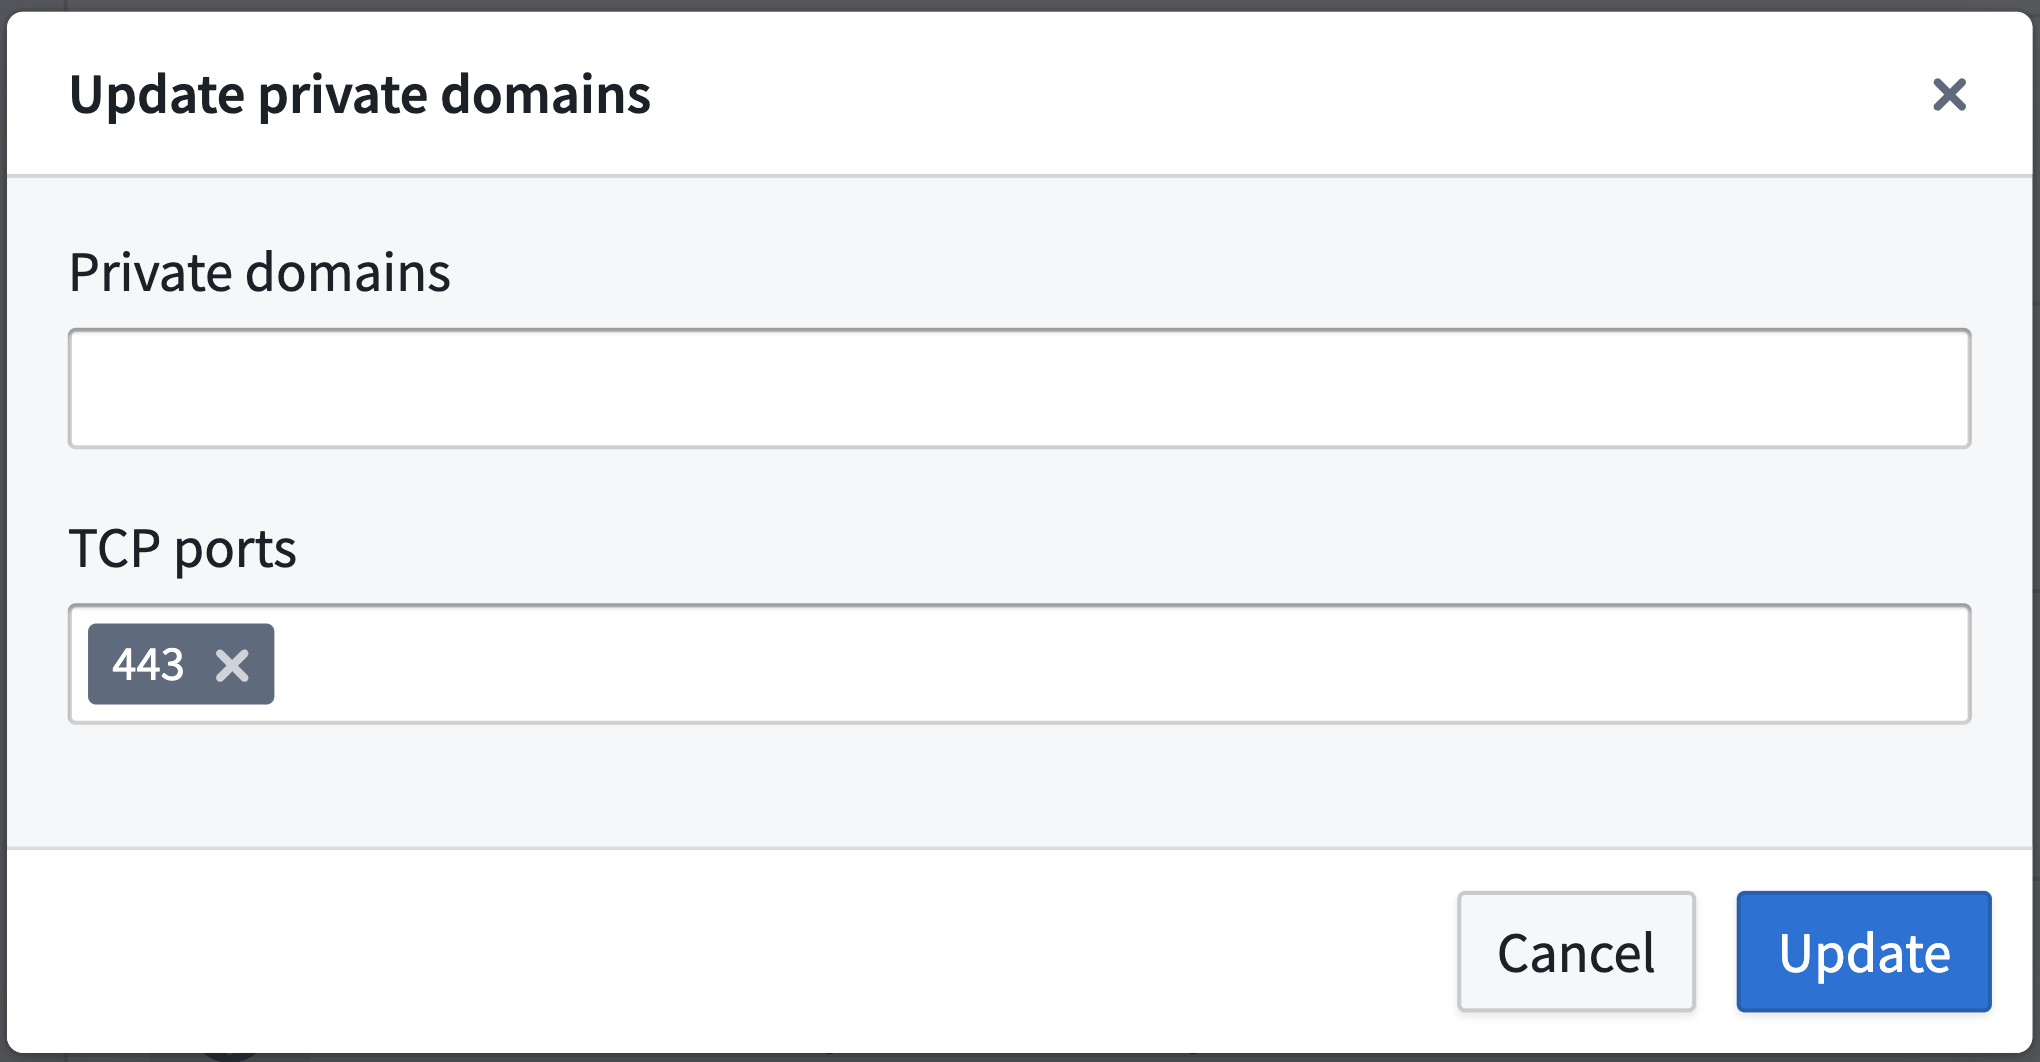
- Private domains: If the private link egresses to a resource that has custom TLS certificates, add those domain entries here. The Palantir platform will create
CNAMErecords for these domains that map to the other end of the private link. - TCP ports: Add ports that should be allowed over this private link; the default port is 443.
- Private domains: If the private link egresses to a resource that has custom TLS certificates, add those domain entries here. The Palantir platform will create
-
After providing the details above, select Create.
The private link may have the following states:
- Creating: Creation of the private link has begun.
- Creating cloud resources: Provisioning cloud resources.
- Managing DNS: Managing DNS records.
- Waiting for cloud resources: Waiting for resources to be created by the cloud provider.
- Pending acceptance: The private link is awaiting acceptance by the service provider.
- Ready: The private link has been successfully created.
If the private link is in the Failed state, one of the following errors has occurred:
- Failed: The connection request failed. Check permissions for your virtual private cloud (VPC) endpoint service configuration in AWS and recreate.
- Rejected: The service provider rejected the connection request. The owner of the VPC endpoint service has rejected the connection, contact them to move forward.
- Expired: The connection request expired. The owner of the VPC endpoint service has not accepted the connection in time, recreate the private link.
- Timeout: Private link creation timed out. This could be a transient error, you should delete and retry. Contact Palantir Support if retrying does not solve the issue.
- Validation failed: Private link validation failed. Contact your Palantir administrator to move forward.
- Cloud provider error: Cloud resource creation failed. Contact your Palantir administrator to move forward.
- DNS management failed: DNS management failed. Contact your Palantir administrator to move forward.
Create private link egress policies
After successful creation of a private link, create private link egress policies to allow egress to the target resource.
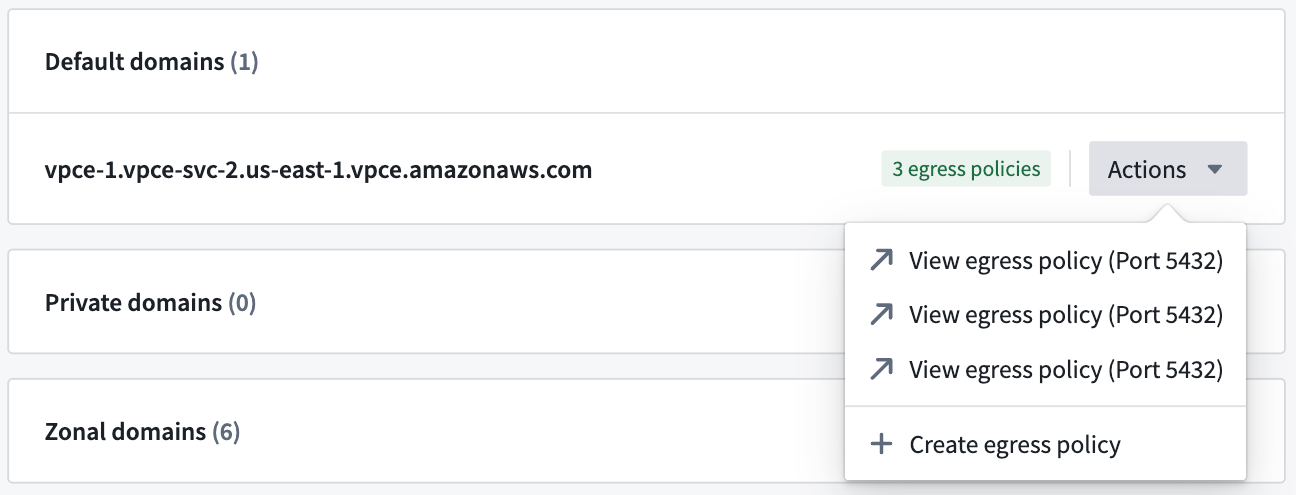
- Create network egress policies by selecting Actions > Create network egress policy in Control Panel.
- Select a Private link type of address and input the port of the target resource per item when creating a network egress policy. These created policies are visible under Actions > View network egress policy in Control Panel.
Cases that require egress policies
- A network egress policy is required for the default domain. If you are connecting to a third-party API, and the AWS generated default domain is not intended for use, a network egress policy is not required.

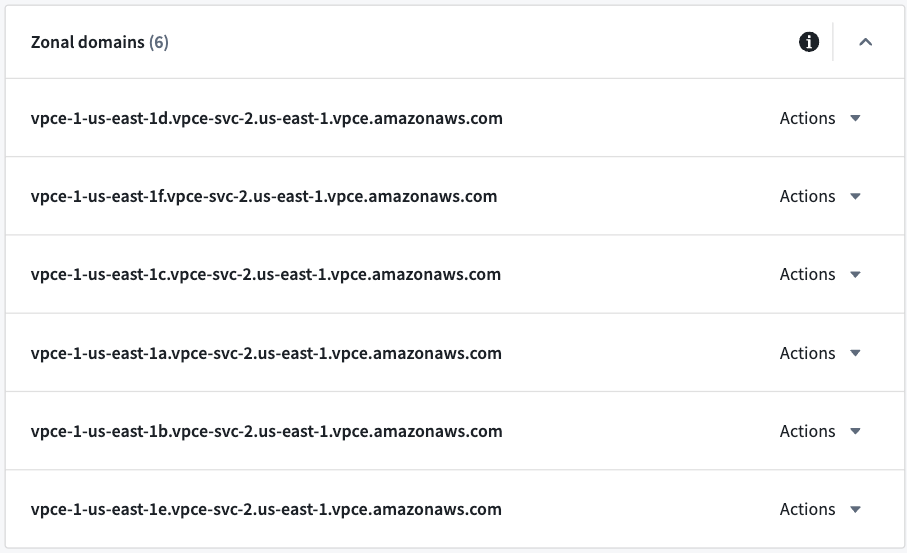
- If you intend to use zonal domains, create network egress policies for the zonal domains. If your VPC is in the same AWS zone as the Palantir platform, then using the same zone domain may be more efficient.
- Create network egress policies for private domains, if configured.

Once the private link is in the Ready state and network egress policies are created, the private link can be used in the Palantir platform.
Manage private links
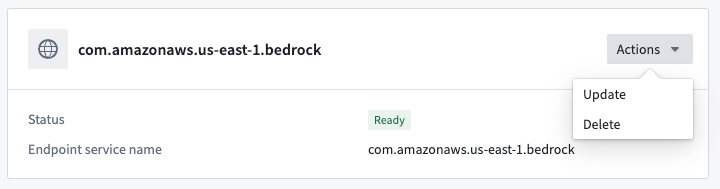
Possible actions on the private link are displayed under Actions in the private link details page, and in the private links page for each item.

Update a private link
A private link's Private domains and TCP ports can be updated by selecting Actions > Update.
Delete a private link
Private links can be deleted by selecting Actions > Delete.
Share network egress policies
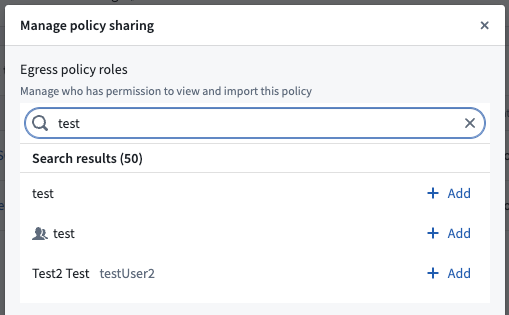
Share the created network egress policies with users who intend to egress to the target resource through the private link. On the domain or IP that is to be shared, select Actions > View network egress policy and navigate to the network policy page. On the network policy page, select Actions > Manage sharing and add the intended user or user group to share the network egress policy.
Use a private link
Data Connection source
In Data Connection, configure a source using the default domain or the third-party API domain, and attach the created network egress policies. After configuring, test connectivity by previewing or exploring the source and verifying that the source's data is accurate.
Snowflake source
To create a Snowflake source connected through a private link, follow these steps:
- Allowlist the Palantir platform cloud provider account in Snowflake.
- Create the private link in Control Panel.
- Create the Snowflake source in Data Connection.
Allowlist the Palantir platform cloud provider account in Snowflake
For the Palantir platform to create a private link to Snowflake, the Palantir platform's account needs to be allowlisted in your Snowflake account. To do this:
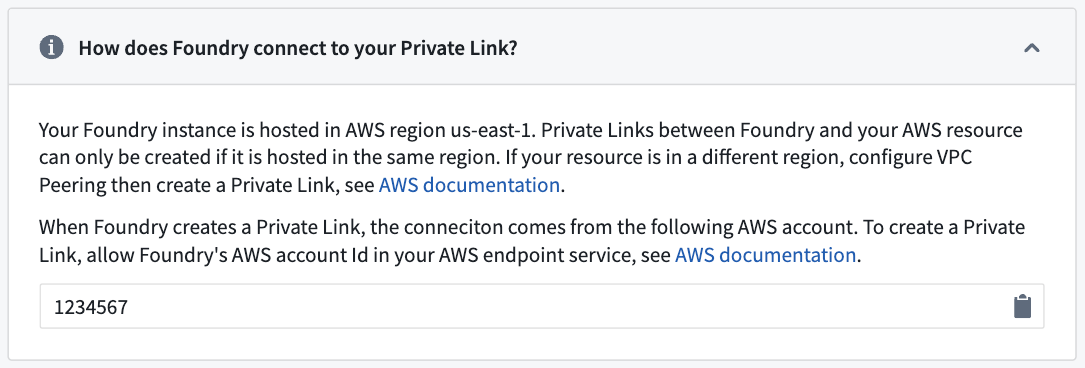
- Find the Palantir platform's cloud provider account ID in Control Panel > Network egress > Private links as shown below:
- Open a support case ↗ with Snowflake and provide the following information:
- The Palantir platform's cloud provider account ID (include the cloud provider; AWS, Azure, or GCP).
- The Snowflake account URL.
- Include that the above account ID needs to be allowlisted for private connectivity with Palantir. Note that
SYSTEM$AUTHORIZE_PRIVATELINKcannot be used, since Palantir users do not have direct access to the underlying cloud provider infrastructure and are not provided with the requiredfederated_token.
Once Snowflake has allowlisted the Palantir platform's cloud provider account, continue to the next step.
Create the private link in Control Panel
Before creating a private link between the Palantir platform and Snowflake, retrieve the private link configuration from Snowflake by running the command SYSTEM$GET_PRIVATELINK_CONFIG ↗. This command outputs the required information to create a private link in the Palantir platform.
- To create a private link, navigate to Control Panel > Network egress > Private links > New private link.
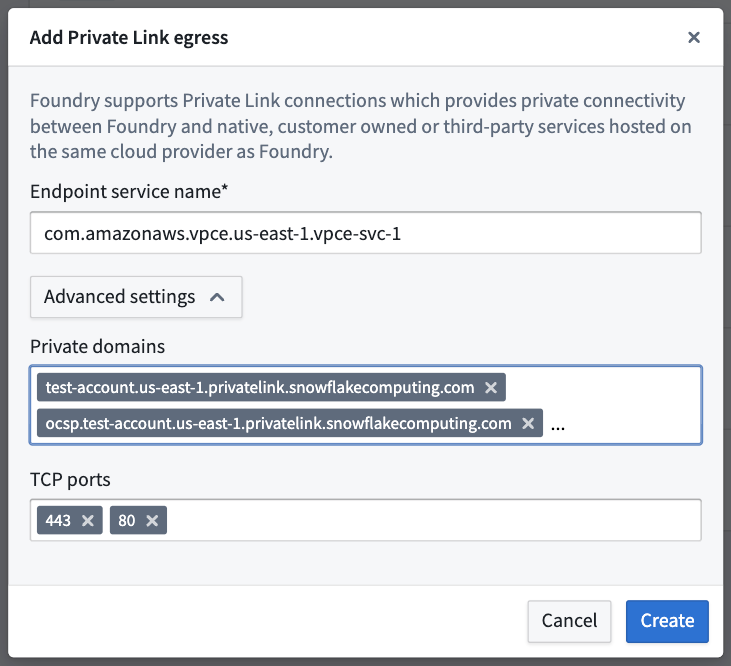
- Enter the following details from the output above to create a private link:
- Endpoint service name: Enter the
privatelink-vpce-idfrom the output ofSYSTEM$GET_PRIVATELINK_CONFIG. - Advanced settings:
- Private domains: The Palantir platform will map these URLs to the other end of the Snowflake private link and route traffic over the private link, maintaining Snowflake's use of Online Certificate Status Protocol (OCSP) for security. Read more about configuring your VPC network ↗ in the Snowflake documentation. The following values can be obtained using
SYSTEM$GET_PRIVATELINK_CONFIG: privatelink-account-urlprivatelink-connection-ocsp-urlsprivatelink-connection-urlsprivatelink-ocsp-urlregionless-privatelink-account-urlregionless-snowsight-privatelink-urlsnowsight-privatelink-url- TCP ports: Enter
443and80as mentioned in the Snowflake documentation ↗.
- Private domains: The Palantir platform will map these URLs to the other end of the Snowflake private link and route traffic over the private link, maintaining Snowflake's use of Online Certificate Status Protocol (OCSP) for security. Read more about configuring your VPC network ↗ in the Snowflake documentation. The following values can be obtained using
Once configured, select Create to create the private link. When the private link is in the Ready state, continue to the next step.
Create the Snowflake source in Data Connection
- To create a Snowflake data source in Data Connection, navigate to Data Connection > New Source > Snowflake.
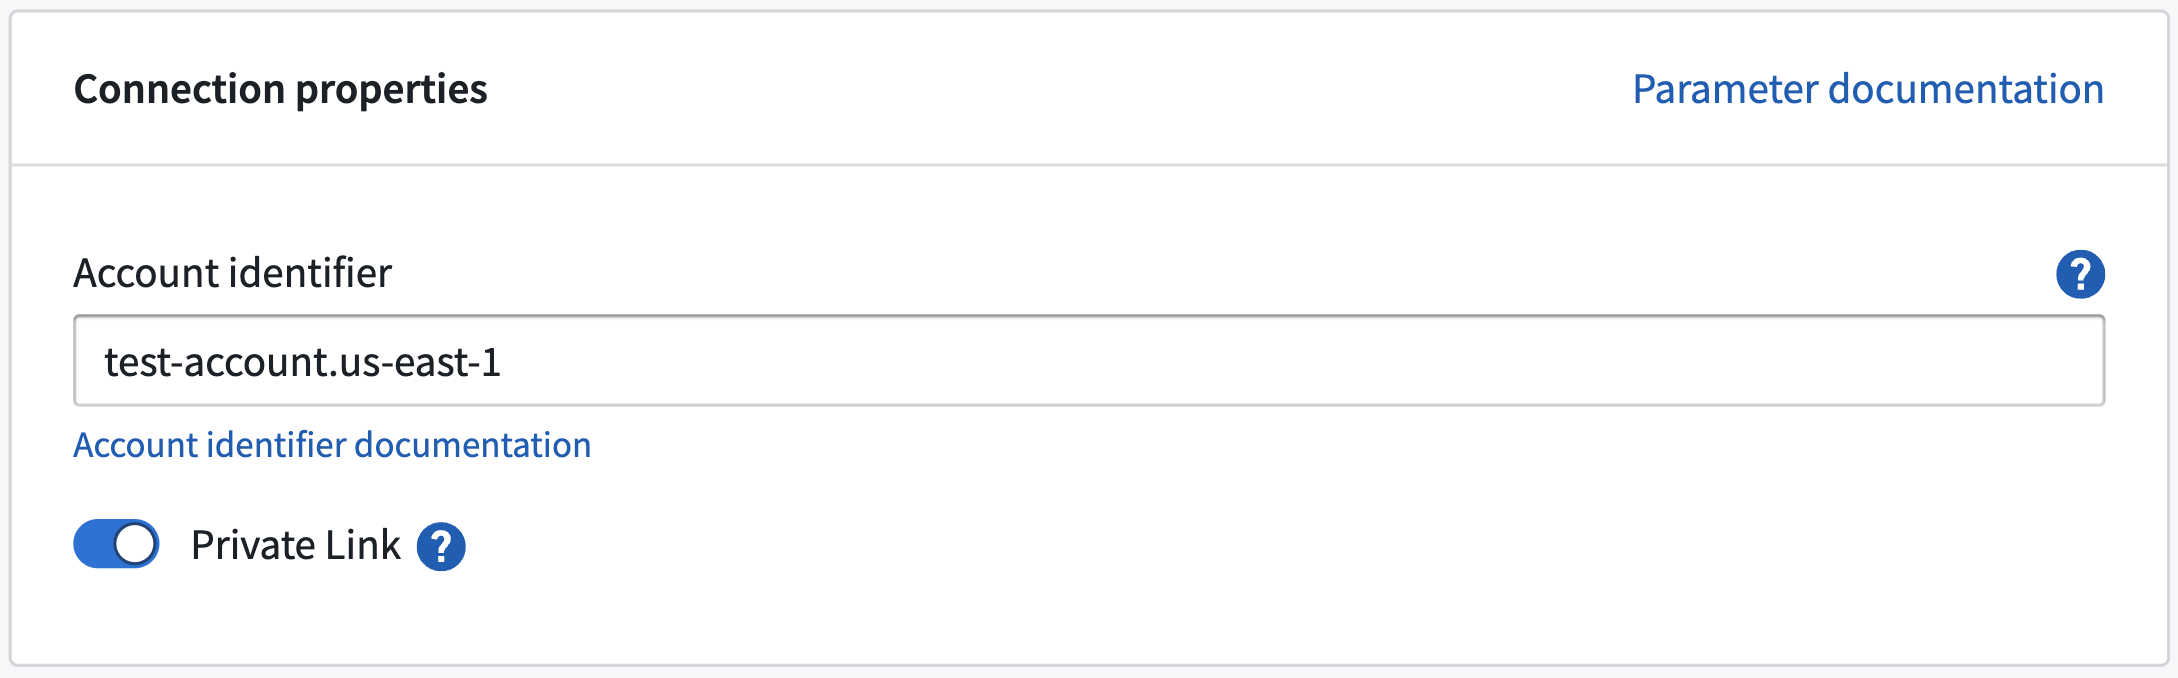
- Configure the source, and do the following in Connection details to use the created private link:
- Account identifier: Input the account ID of the Snowflake account that the private link was created for.
- Private link: Toggle this to use the private link.
Network egress policies
Create network egress policies for all of the URLs output by the command SYSTEM$ALLOWLIST_PRIVATELINK ↗. Additionally, create an S3 bucket policy for the STAGE of the output as shown below:

For more information on Snowflake configuration refer to Palantir's Snowflake documentation.
中文翻译
为 AWS 配置私有链接出站
:::callout{theme="neutral" title="Beta"} 私有链接出站(Private link egress)目前处于 beta 开发阶段,您的实例可能尚未支持。功能在活跃开发期间可能会发生变化。 :::
本文档概述了如何为托管在 AWS 上的 Palantir 平台配置和管理私有链接出站,以连接客户服务。该功能由 AWS PrivateLink ↗ 提供支持。
私有链接出站支持向 AWS 服务、部署在 AWS 上的用户自有资源或部署在 AWS 上的第三方 API 进行私有出站。
配置私有链接
在控制面板(Control Panel)中导航至 网络出站(Network egress) 页面的 私有链接(Private links) 标签页,以管理私有链接。
要成功创建私有链接连接,请执行以下步骤:
为目标资源创建终端节点服务
AWS 服务
兼容私有链接的 AWS 服务及其终端节点服务名称列表可在 AWS 文档 ↗ 中找到。对于 AWS 服务,无需创建终端节点服务;可直接使用 AWS 提供的终端节点服务名称。支持私有链接的 AWS 服务示例包括 Amazon Bedrock ↗。
:::callout{theme="neutral"} 不支持与 AWS S3 建立私有链接。请使用 同区域 S3 存储桶策略 实现与 S3 的私有连接。 :::
部署在 AWS 上的用户自有资源
对于部署在 AWS 上的用户自有资源,请按照 AWS 文档 ↗ 中的步骤创建终端节点服务。用户自有资源的示例包括由 AWS RDS ↗ 支持的数据库。
部署在 AWS 上的第三方 API
对于部署在 AWS 上的用户自有第三方 API,请按照 AWS 文档 ↗ 中的步骤创建终端节点服务。如果 API 由其他方拥有,请向其索取 VPC 终端节点服务名称。例如,可按照 Snowflake 文档 ↗ 中的说明索取 Snowflake 的 VPC 终端节点服务名称。
此外,如果服务使用了自定义传输层安全(TLS)证书,且该证书对私有链接的 AWS 生成域名 ↗ 无效,则需要索取第三方 API 的私有域名。例如,可按照 Snowflake 文档 ↗ 查找 Snowflake 的私有域名。以下是第三方私有域名的示例:
abc.us-east-1.privatelink.snowflakecomputing.com
允许 Palantir 平台访问目标资源
要允许通过私有链接访问目标资源,请将 Palantir 平台的 AWS 账户添加到终端节点服务的允许主体(allowed principal)列表中。具体操作请遵循 AWS 文档 ↗。允许主体的格式应如下所示:
arn:aws:iam::<palantir_platform_aws_account_id>:root
提供目标资源的终端节点服务名称
-
导航至 控制面板 > 网络出站 > 私有链接,选择 新建私有链接(New private link) 以创建私有链接。
-
为目标资源输入以下私有链接详细信息:
-
终端节点服务名称(Endpoint service name): 上一步中获取的目标资源的终端节点服务名称。
-
高级设置(Advanced settings):
- 私有域名(Private domains): 如果私有链接出站的目标资源具有自定义 TLS 证书,请在此处添加这些域名条目。Palantir 平台将为这些域名创建
CNAME记录,并将其映射到私有链接的另一端。 - TCP 端口(TCP ports): 添加允许通过此私有链接的端口;默认端口为 443。
- 私有域名(Private domains): 如果私有链接出站的目标资源具有自定义 TLS 证书,请在此处添加这些域名条目。Palantir 平台将为这些域名创建
-
提供上述详细信息后,选择 创建(Create)。
私有链接可能具有以下状态:
- 创建中(Creating): 已开始创建私有链接。
- 创建云资源中(Creating cloud resources): 正在预配云资源。
- 管理 DNS 中(Managing DNS): 正在管理 DNS 记录。
- 等待云资源中(Waiting for cloud resources): 正在等待云提供商创建资源。
- 待接受(Pending acceptance): 私有链接正在等待服务提供商接受。
- 就绪(Ready): 私有链接已成功创建。
如果私有链接处于 失败(Failed) 状态,则发生了以下错误之一:
- 失败(Failed): 连接请求失败。请检查您在 AWS 中虚拟私有云(VPC)终端节点服务配置的权限,然后重新创建。
- 已拒绝(Rejected): 服务提供商拒绝了连接请求。VPC 终端节点服务的所有者已拒绝连接,请联系他们以继续。
- 已过期(Expired): 连接请求已过期。VPC 终端节点服务的所有者未及时接受连接,请重新创建私有链接。
- 超时(Timeout): 私有链接创建超时。这可能是瞬时错误,您应删除并重试。如果重试无法解决问题,请联系 Palantir 支持。
- 验证失败(Validation failed): 私有链接验证失败。请联系您的 Palantir 管理员以继续。
- 云提供商错误(Cloud provider error): 云资源创建失败。请联系您的 Palantir 管理员以继续。
- DNS 管理失败(DNS management failed): DNS 管理失败。请联系您的 Palantir 管理员以继续。
创建私有链接出站策略
成功创建私有链接后,创建 私有链接出站策略 以允许出站到目标资源。
- 在控制面板中选择 操作(Actions)> 创建网络出站策略(Create network egress policy) 来创建网络出站策略。
- 创建网络出站策略时,选择 私有链接(Private link) 类型的地址,并输入每个目标资源的端口。这些已创建的策略可在控制面板的 操作 > 查看网络出站策略(View network egress policy) 下查看。
需要出站策略的情况
- 默认域名需要网络出站策略。如果您正在连接第三方 API,并且不打算使用 AWS 生成的默认域名,则不需要网络出站策略。
- 如果您打算使用区域域名(zonal domains),请为区域域名创建网络出站策略。如果您的 VPC 与 Palantir 平台位于同一 AWS 区域,则使用相同区域的域名可能更高效。
- 如果配置了私有域名,请为其创建网络出站策略。
一旦私有链接处于 就绪 状态且网络出站策略已创建,即可在 Palantir 平台中使用该私有链接。
管理私有链接
在私有链接详情页面的 操作 下,以及私有链接页面中每个项目的操作菜单中,会显示可对私有链接执行的操作。
更新私有链接
可以通过选择 操作 > 更新(Update) 来更新私有链接的 私有域名 和 TCP 端口。
删除私有链接
可以通过选择 操作 > 删除(Delete) 来删除私有链接。
共享网络出站策略
将已创建的网络出站策略共享给打算通过私有链接出站到目标资源的用户。在要共享的域名或 IP 上,选择 操作 > 查看网络出站策略,然后导航至网络策略页面。在网络策略页面上,选择 操作 > 管理共享(Manage sharing),并添加目标用户或用户组以共享网络出站策略。
使用私有链接
数据连接源
在数据连接(Data Connection)中,使用默认域名或第三方 API 域名 配置一个源,并附加已创建的网络出站策略。配置完成后,通过预览或探索源来测试连接,并验证源的数据是否准确。
Snowflake 源
要创建通过私有链接连接的 Snowflake 源,请遵循以下步骤:
在 Snowflake 中将 Palantir 平台云提供商账户加入白名单
为了让 Palantir 平台创建到 Snowflake 的私有链接,需要将 Palantir 平台的账户加入您的 Snowflake 账户白名单。具体操作如下:
- 在 控制面板 > 网络出站 > 私有链接 中找到 Palantir 平台的云提供商账户 ID,如下所示:
- 向 Snowflake 提交一个 支持案例 ↗,并提供以下信息:
- Palantir 平台的云提供商账户 ID(请注明云提供商:AWS、Azure 或 GCP)。
- Snowflake 账户 URL。
- 说明上述账户 ID 需要被加入白名单,以便与 Palantir 进行私有连接。请注意,不能使用
SYSTEM$AUTHORIZE_PRIVATELINK,因为 Palantir 用户无法直接访问底层云提供商基础设施,也无法获得所需的federated_token。
一旦 Snowflake 将 Palantir 平台的云提供商账户加入白名单,请继续下一步。
在控制面板中创建私有链接
在 Palantir 平台和 Snowflake 之间创建私有链接之前,请通过运行命令 SYSTEM$GET_PRIVATELINK_CONFIG ↗ 从 Snowflake 获取私有链接配置。该命令会输出在 Palantir 平台中创建私有链接所需的信息。
- 要创建私有链接,请导航至 控制面板 > 网络出站 > 私有链接 > 新建私有链接。
- 根据上述输出输入以下详细信息以创建私有链接:
- 终端节点服务名称: 输入
SYSTEM$GET_PRIVATELINK_CONFIG输出中的privatelink-vpce-id。 - 高级设置:
- 私有域名: Palantir 平台会将这些 URL 映射到 Snowflake 私有链接的另一端,并通过私有链接路由流量,从而保持 Snowflake 使用在线证书状态协议(OCSP)的安全性。更多信息请参阅 Snowflake 文档中的 配置您的 VPC 网络 ↗。以下值可通过
SYSTEM$GET_PRIVATELINK_CONFIG获取: privatelink-account-urlprivatelink-connection-ocsp-urlsprivatelink-connection-urlsprivatelink-ocsp-urlregionless-privatelink-account-urlregionless-snowsight-privatelink-urlsnowsight-privatelink-url- TCP 端口: 如 Snowflake 文档 ↗ 所述,输入
443和80。
- 私有域名: Palantir 平台会将这些 URL 映射到 Snowflake 私有链接的另一端,并通过私有链接路由流量,从而保持 Snowflake 使用在线证书状态协议(OCSP)的安全性。更多信息请参阅 Snowflake 文档中的 配置您的 VPC 网络 ↗。以下值可通过
配置完成后,选择 创建 以创建私有链接。当私有链接处于 就绪 状态时,继续下一步。
在数据连接中创建 Snowflake 源
- 要在数据连接中创建 Snowflake 数据源,请导航至 数据连接 > 新建源 > Snowflake。
- 配置源,并在 连接详情(Connection details) 中执行以下操作以使用已创建的私有链接:
- 账户标识符(Account identifier): 输入为其创建私有链接的 Snowflake 账户的账户 ID。
- 私有链接(Private link): 切换此选项以使用私有链接。
网络出站策略
为命令 SYSTEM$ALLOWLIST_PRIVATELINK ↗ 输出的所有 URL 创建网络出站策略。此外,为输出中的 STAGE 创建一个 S3 存储桶策略,如下所示:
有关 Snowflake 配置的更多信息,请参阅 Palantir 的 Snowflake 文档。