Manage groups(管理群组)
In the Platform Settings section of the sidebar, select Groups. Choose a group to view its details in a dashboard view.
You can view a variety of information about the selected group:
- Group name: We recommend not changing group names, though users with Manage permissions are able to do so (see Renaming a group below).
- Group description: Describes the group and is visible to all users in the Organizations that can discover the group.
- Group ID: The permanent, unique ID of the group.
- Group type: The type of group; external, internal, or rule based. Internal realm group membership is managed in Foundry.
- Realm: The authentication source, external or internal. For external groups, the realm identifies the provider that manages the group.
- Organizations: Defines the members of Organizations who can see this group and its description.
- Members: Users who are members of this group. These can be individual users or groups.
- Group permissions: Defines users with permissions to manage aspects of the group. There are two types of administrative permissions:
- Manage permissions: Users who can grant permissions to manage aspects of the group, manage its members, and edit its metadata.
- Manage membership: Users who can manage the group’s members, including membership expiration properties.
- Attributes: Information about a group stored in a key-value format that is typically used by other Foundry services.
:::callout{theme="neutral"}
You will only be able to view groups for which you have View group membership permission on the group's Organization. This permission can be granted from Settings > Platform Settings > Organizations by selecting the Organization of interest and then choosing Manage for Organization permissions. This will display a list of users and groups as well as a search box; for users and groups that have been added, use the dropdown box to enable the View group membership option.
:::
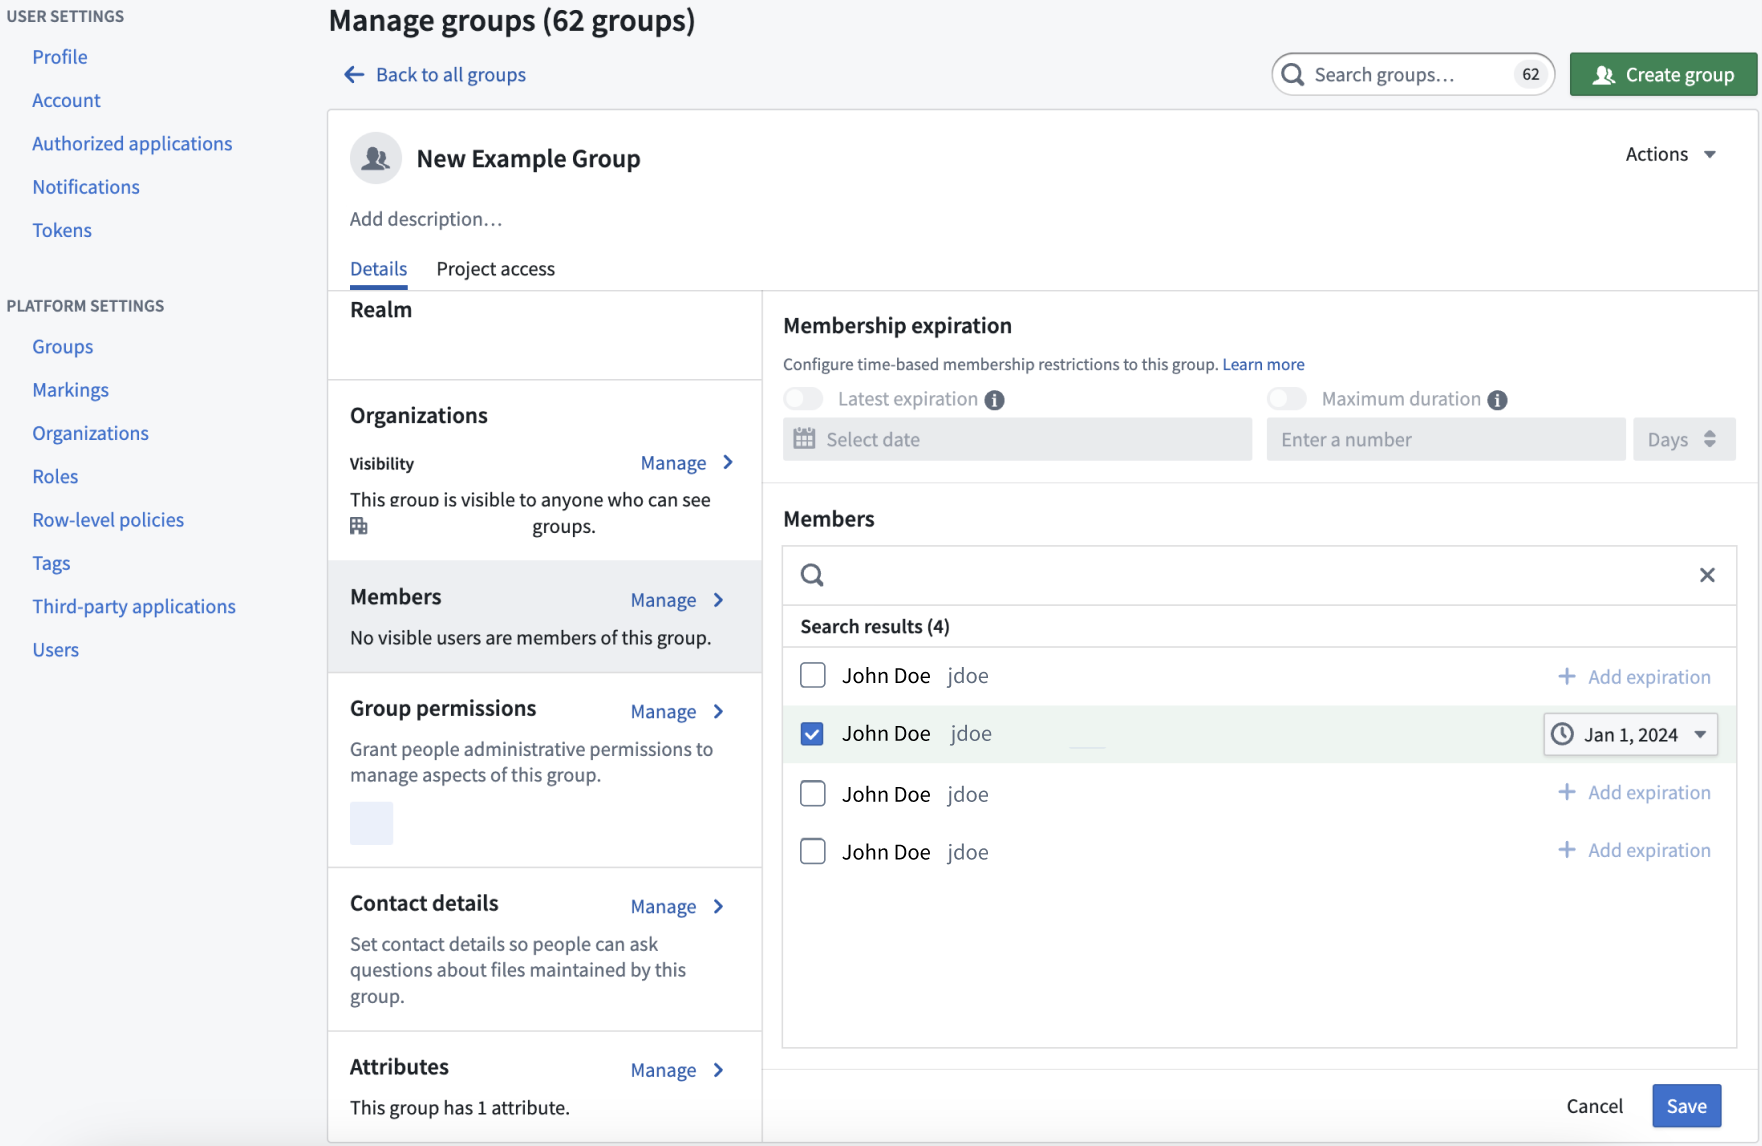
Membership expiration
If you can Manage membership on a given group, you can mandate that new memberships to the group are temporary. Do this by configuring the following group properties:
- Latest expiration: All new memberships must have an expiration date that is earlier than this date.
- Maximum duration: All new memberships must expire within the specified duration.
Either or both of these properties can be simultaneously set. When both are set, the latest allowed expiration will be the most constraining property of the two.
Additionally, if you have Manage membership permissions, you can add temporary members to the group that are set with a membership expiration date property. You can add these temporary members to groups that do not have a set Latest expiration or Maximum duration property.
Any access requests resulting in membership requests for groups that have either Latest expiration or Maximum duration properties will be bounded by a maximum expiration.
Membership expiration notifications
When a temporary group membership expires, a revocation notification is sent to affected users. Additionally, users with temporary membership will receive a reminder notification seven days before their membership expires. However, if a user is added to a group with an expiration set for less than seven days, they will not receive a reminder notification.
If users do not wish to receive these notifications, they can configure platform notification settings in Account > Settings > Notifications from the platform sidebar.
Custom Approvals access request form
If you can manage permissions for a group that has a defined role on a Project, then you can configure custom access request forms for that Project by adding an attribute to the group using the following structure:
- Attribute key:
access-request:'group-category-name' - Attribute value:
'intended group value'
These attributes appear automatically as part of the Request access pop-up window once you add them to the group's Attributes, where a user can select them as part of their access request form.
For example, adding the following group attributes results in the below custom request flow:
- Key:
access-request: Team - Value:
blue
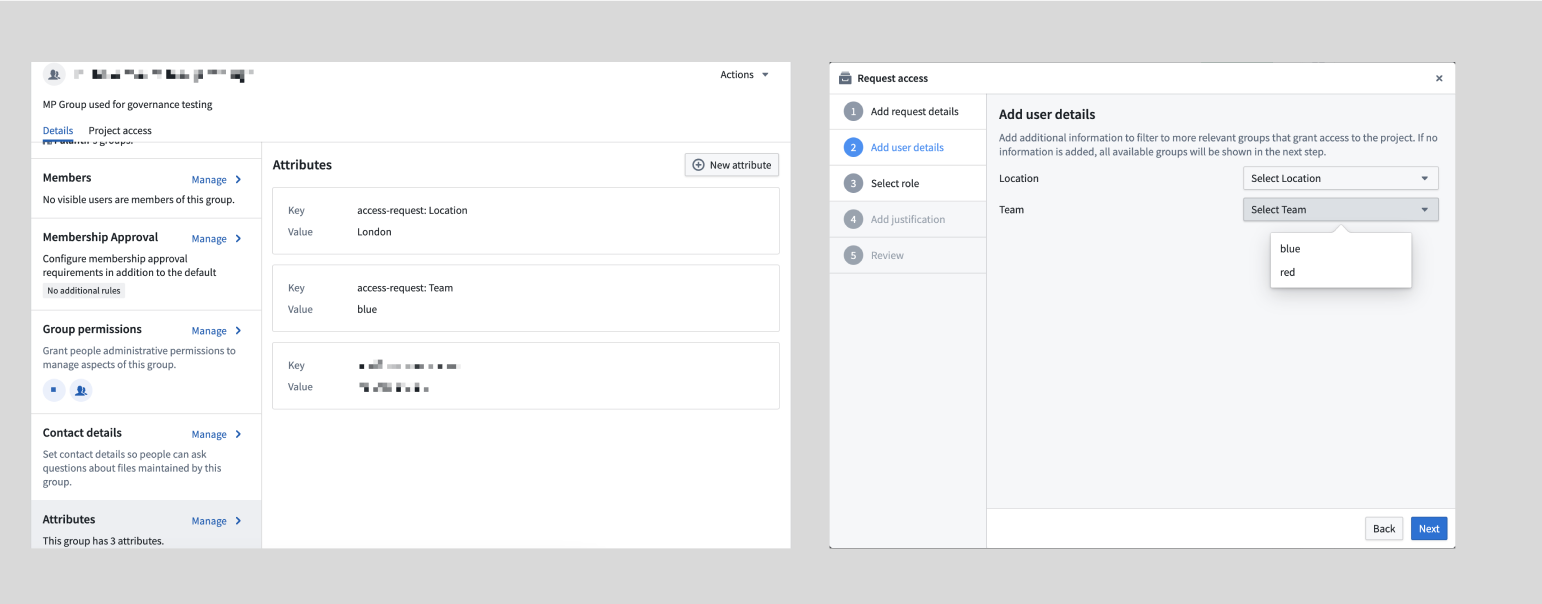
Custom access request forms are particularly useful for Projects with multiple groups, as they provide a streamlined and intuitive access request process to improve the administrator and user experience.
Exclude groups from access request form
By default, all groups with a role in a Project appear in the access request form. If you want to hide certain groups, you can exclude them in the Project settings.
To configure which groups should be excluded from the access request flow for a Project, navigate to the Access panel > Settings > Project access request.
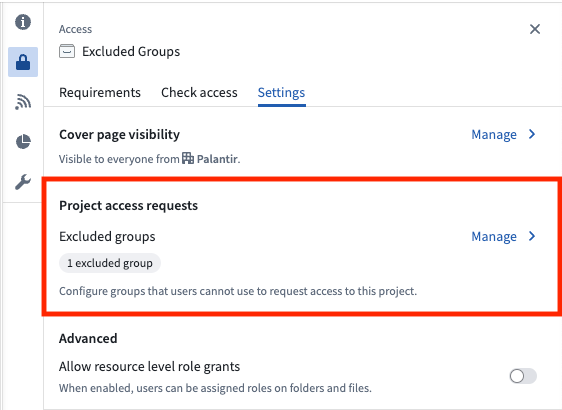
If you are an Owner on a Project, select the Manage button, then choose the groups to hide from the request flow. If you are not an Owner on the Project, you will see a View button that allows you to see which groups are excluded, but you will not be able to make any changes.
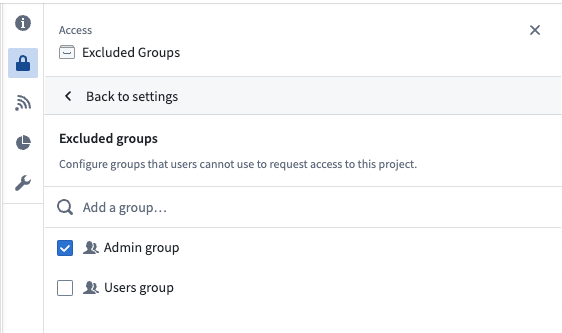
Excluding groups is a per-Project setting, offering flexibility. A group can be excluded from most Projects but included in specific ones. Users can request access to the group in those specific Projects. If approved, they will gain access to all Projects where the group has a role.
This feature helps prevent accidental membership requests to groups like admin groups while still allowing necessary access through designated Projects.
Custom Approvals access request policies [Beta]
:::callout{theme="neutral" title="Beta"} Custom policies are in the beta phase of development and may not be available on your enrollment. Functionality may change during active development. Contact Palantir Support to request access to this feature. :::
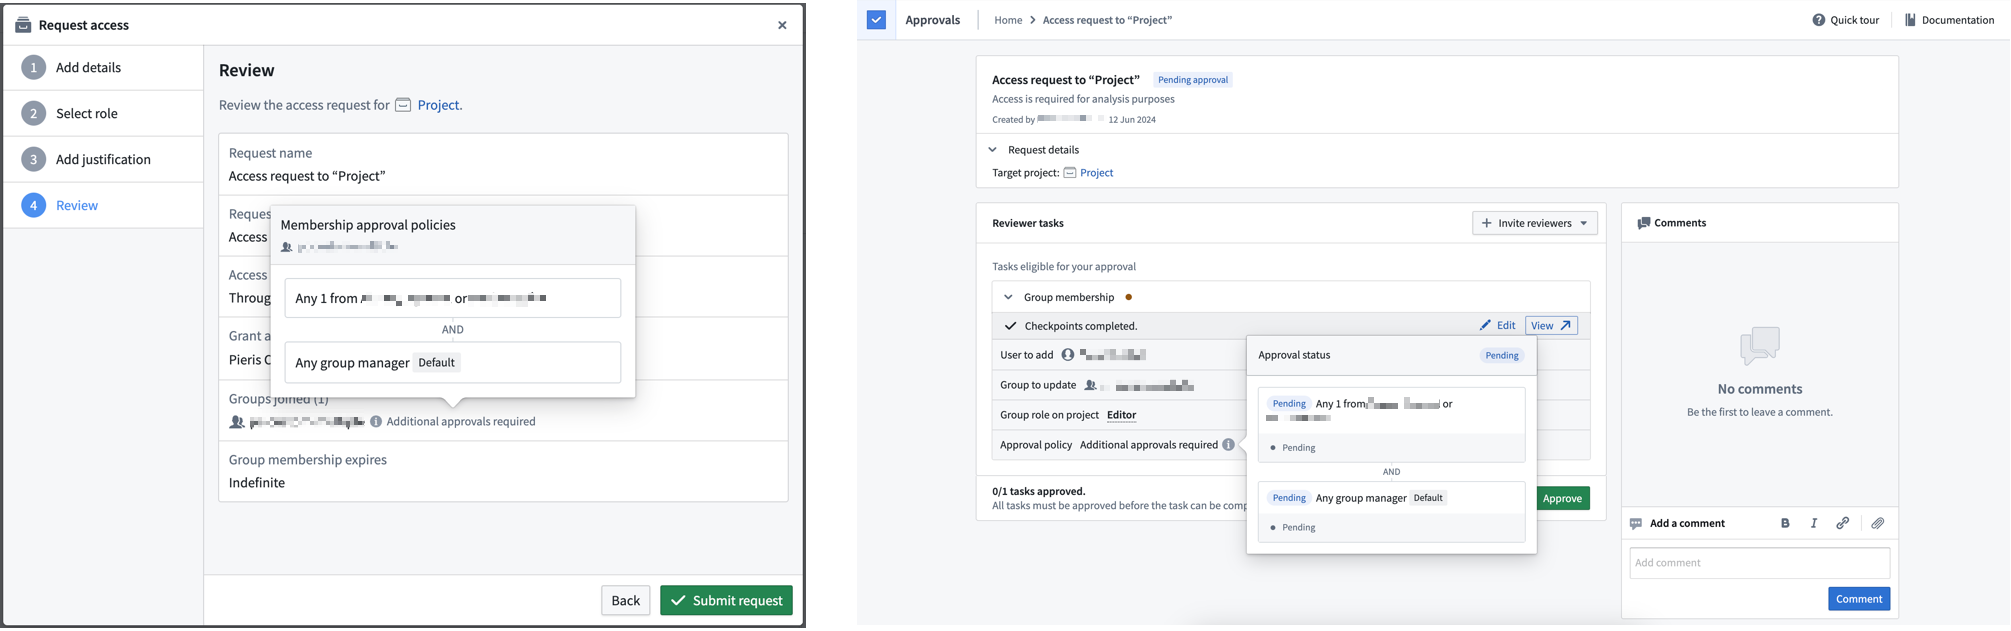
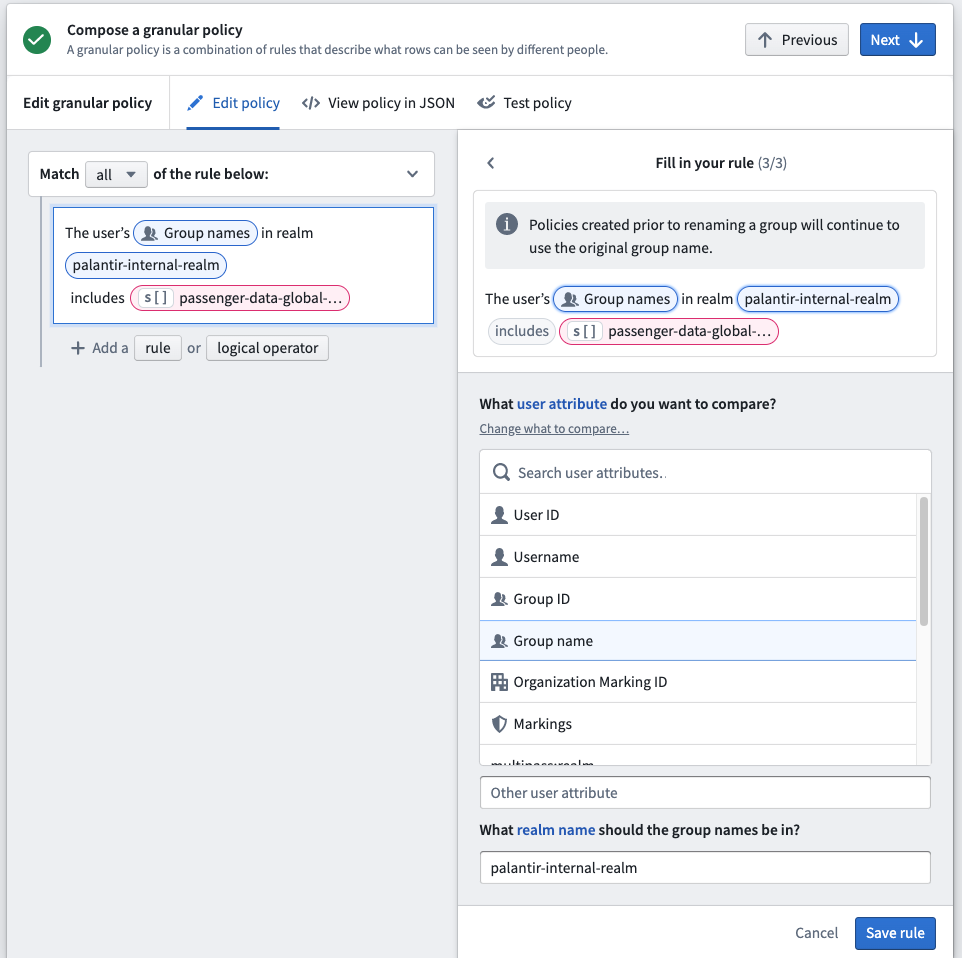
Users with Manage membership or Manage Permissions permissions on the group can configure custom policies that will be applied to any access requests that result in membership requests for the select group. That can be configured through the Membership Approval section as shown below:
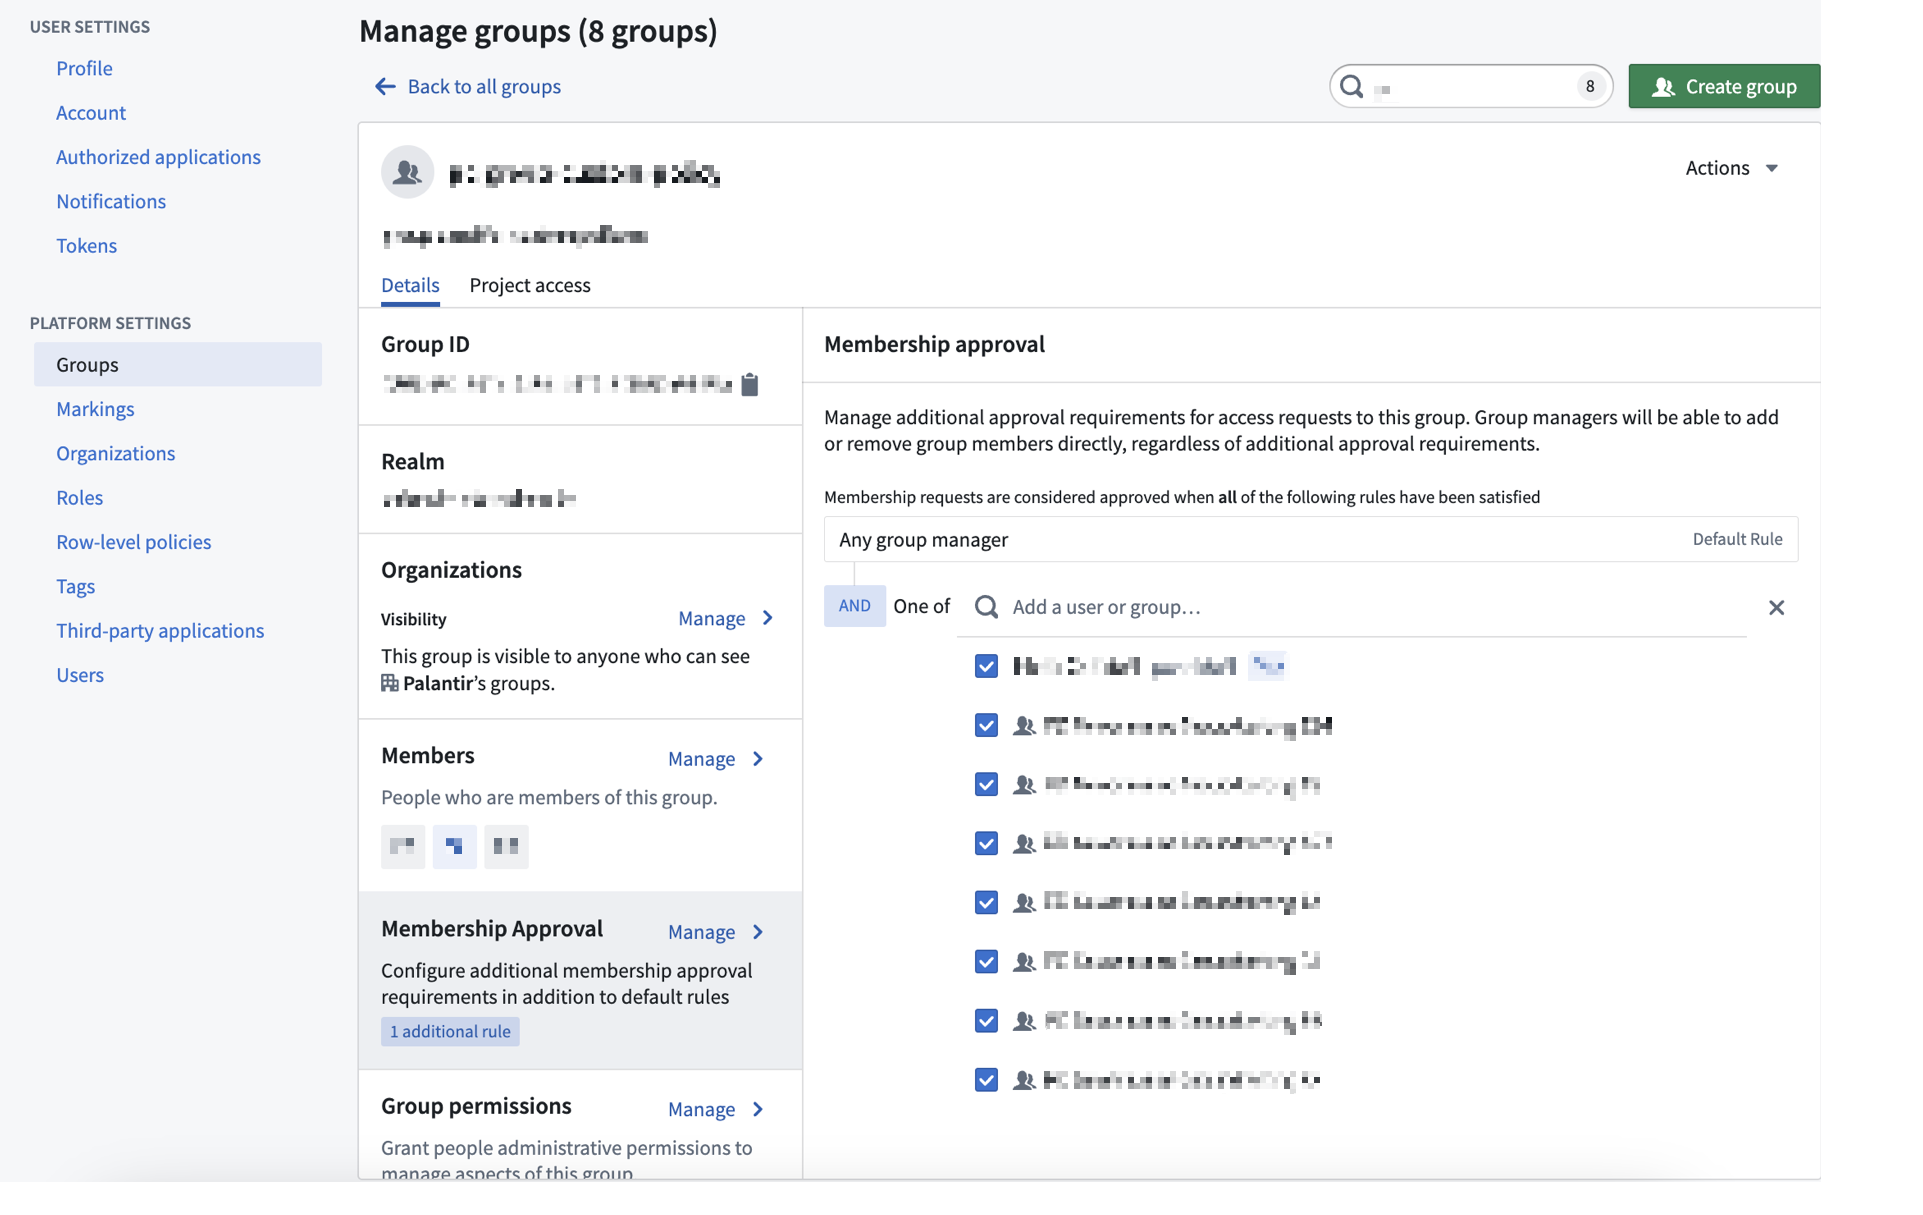
If a group has custom policies configured, then any access request that results in a request to that group will be affected. The custom policy will apply to the Group membership subtask to add members to the specific group. For an access request to be approved, all subtasks must be approved. Approval policies are communicated both when requesting access and when reviewing existing access requests.
Project access
Select Project access next to the Details tab to view Project access details for the selected group.
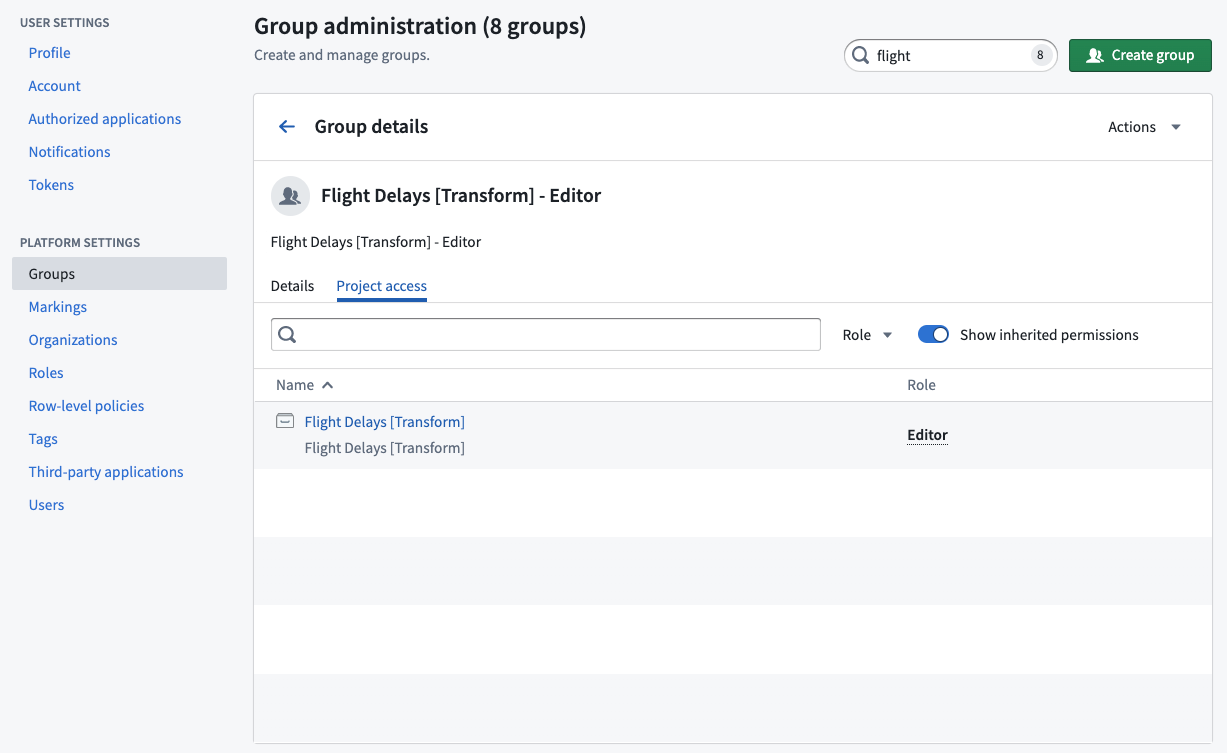
The Project access view allows a group administrator to see all the Projects that a group has access to and the specific Project roles granted to the group. This view is especially helpful when deciding to add or remove users from a group because you can see how access will change.
The Show inherited permissions toggle is on by default and will transverse all nested groups to find what Projects the group has access to. If you turn this toggle off, then the list will only show Projects where the group was directly applied.
Rename a group
Users with Manage membership permissions can rename groups. When a user renames a group, some actions occur automatically:
- The current group will be renamed, and the group ID will remain the same.
- A new group with the original name will be created to support applications that may depend on the original group name.
- The original group will be made a member of the new, renamed group.
Set contact details
You can specify contact details for a group to serve as the point of contact. Users in the manage permissions group can manage permissions. Users can define whether the group should be contacted through Foundry Issues or by a given email.

Setting contact details for a group can be useful if you want to set a group as a Project point of contact in the Project resource sidebar. The Project point of contact can be set by Project owners by selecting Add under the Project point of contact section in the Project overview.

Apply group permissions
Access the Group Permissions view from the Group details dashboard. Users with Manage permissions can use this section to grant access permissions to groups rather than individual users to make permissions more transparent and auditable.
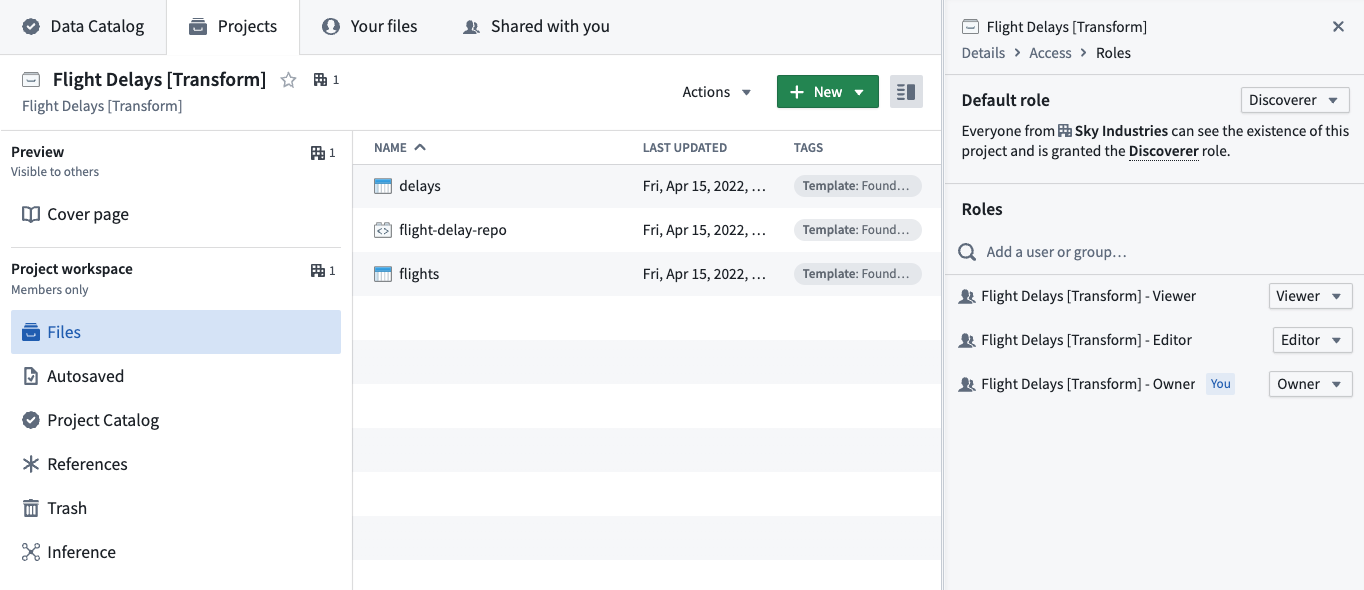
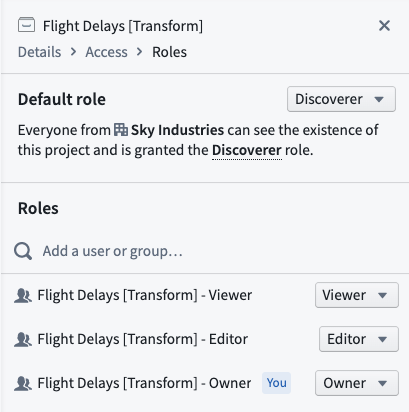
Granting group permissions is particularly useful when assigning permissions for Projects, since administrators can see what Projects a group has access to via the Project access tab mentioned above. We recommend a Project setup with at least three groups, one for each default role: Viewer, Editor, and Owner. You should set the Project default role to Discoverer.
Restricted View group name policies
When creating a Restricted View that uses a Group name as one of the policy terms, you need to specify the realm of the group so it can match the group name accordingly. You can check the group realm in the Platform Settings > Groups interface and change the realm name at the bottom of the Restricted View rule editor.
Realms
User realms
Administrators typically set up external realm providers (such as SSO, SAML realm, or ADFS) in Control Panel. If necessary, Foundry’s Platform Settings come with an internal implementation of an identity provider. This internal identity provider can be used in a number of scenarios where an external authentication system is not suitable.
Group external realms
External realms are groups directly derived from external systems, such as an identity provider like ADFS. The Platform Settings configuration defines the realms where the identity providers are assigned.
External realms cannot be modified in Foundry and exist in a read-only state. Operations that can only be performed in the external system include renaming, adding users to groups, modifying attributes, and creating new groups. External realm groups are ideal for most authorization and authentication-related functions in Foundry, including: * Assigning discretionary and mandatory controls, and * Enabling binary access to the platform (such as allowing or denying a set of users belonging to a particular group).
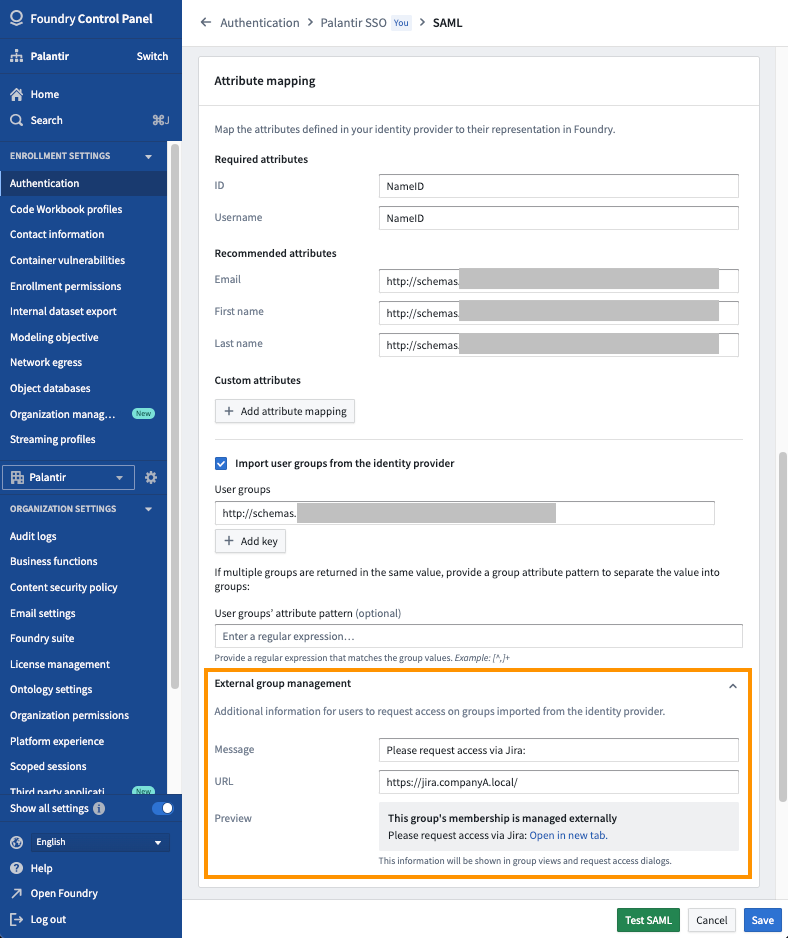
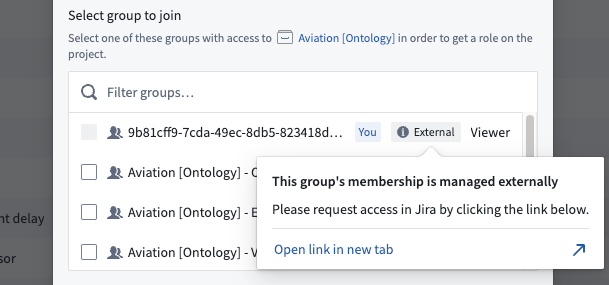
Since external realm groups are in a read-only state, users will not be able to request access to join external realm groups in Foundry. However, in Control Panel, you can configure the message a user receives when trying to request access to an external realm group. Navigate to Control Panel > Authentication > Your SSO > SAML > Manage > Attribute mapping > External group management to set a custom message and URL for the external realm. Only users in the same realm as the external realm will see the custom message and URL. Below is an example where an administrator added a message and link to their internal Jira instance.
After a custom message is configured, you will see this message in Platform Settings when viewing all groups in that external realm.
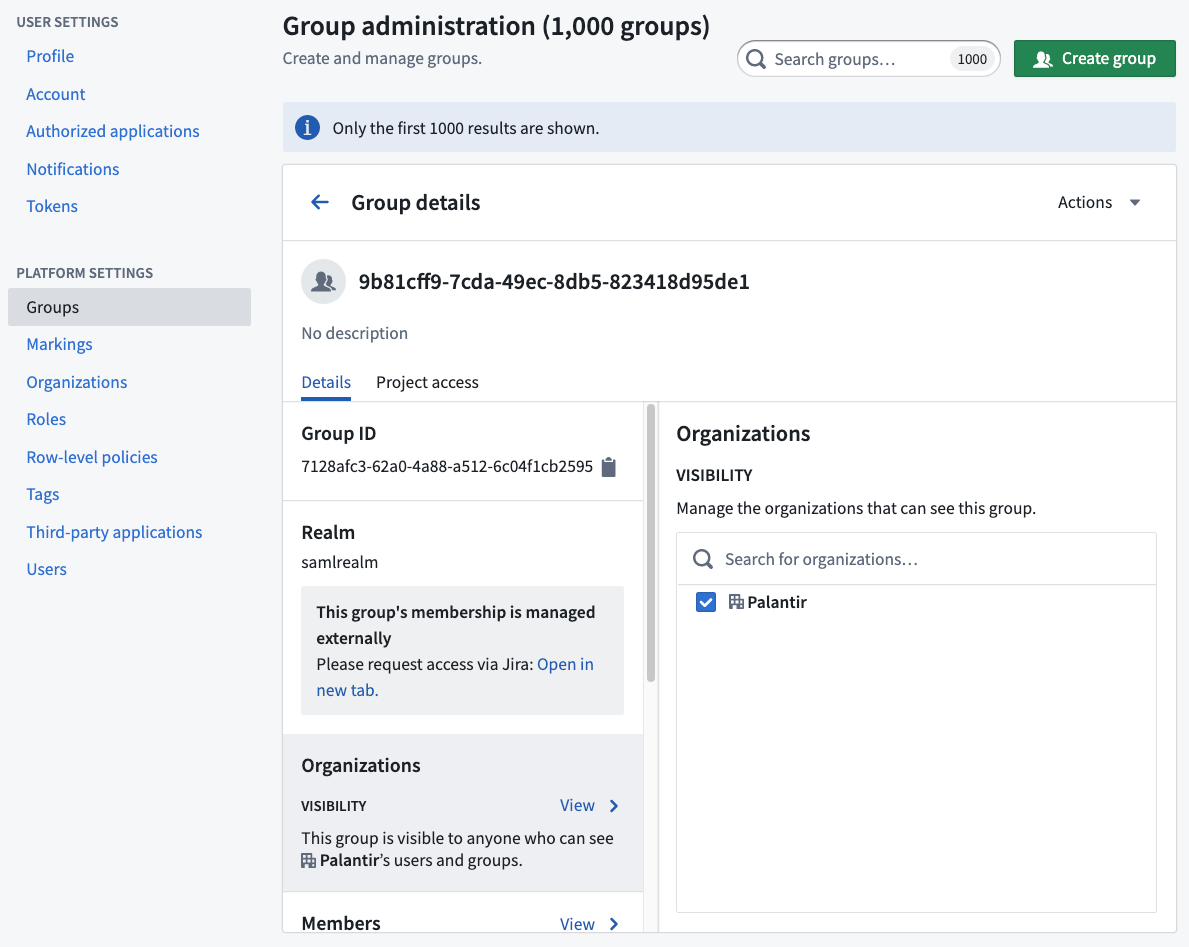
Users will see the message when they try to request access to a Project that grants a role to this group.
Lastly, you can use external realm groups for Organization assignment at login. Often, the information obtained via customer SSO becomes the input for triaging users into different Organizations at login.
:::callout{theme="warning"} All external realm groups must be assigned an Organization. If no Organization is assigned, the group will become visible to all users regardless of their Organization. :::
Group internal realms
Groups created in Foundry are assigned to the internal realm.
Internal realm groups can be modified within Foundry. Operations that can be performed in the Groups interface include renaming, adding users to groups, modifying attributes, and creating new groups. The internal realm group is ideal for granting access to Foundry-level functionality, including bundling service user accounts into an internal realm group for allow-listing or deny-listing purposes (for example, to exclude service user accounts from user account expiry rules).
:::callout{theme="warning"} If external realm groups are being used, then it is important to avoid directly assigning users to internal realm groups. Instead, external realm group(s) to which users are added/removed should be nested within the internal realm group. :::
中文翻译
管理群组
在侧边栏的平台设置部分,选择群组。选择一个群组即可在仪表板视图中查看其详细信息。
您可以查看所选群组的各种信息:
- 群组名称: 建议不要更改群组名称,但拥有管理权限的用户可以更改(请参见下文重命名群组)。
- 群组描述: 描述该群组,对能够发现该群组的组织中的所有用户可见。
- 群组 ID: 群组的永久唯一标识符。
- 群组类型: 群组类型;外部、内部或基于规则。内部领域群组的成员资格在 Foundry 中管理。
- 领域: 身份验证来源,外部或内部。对于外部群组,领域标识管理该群组的提供商。
- 组织: 定义哪些组织的成员可以看到此群组及其描述。
- 成员: 属于此群组的用户。可以是单个用户或其他群组。
- 群组权限: 定义有权管理群组各方面内容的用户。有两种类型的管理权限:
- 管理权限: 可以授予管理群组各方面内容、管理其成员以及编辑其元数据的权限的用户。
- 管理成员资格: 可以管理群组成员(包括成员资格过期属性)的用户。
- 属性: 以键值对格式存储的群组信息,通常被其他 Foundry 服务使用。
:::callout{theme="neutral"}
您只能查看您对其所在组织拥有查看群组成员资格权限的群组。此权限可以通过设置 > 平台设置 > 组织,选择相关组织,然后为组织权限选择管理来授予。这将显示用户和群组列表以及一个搜索框;对于已添加的用户和群组,使用下拉框启用查看群组成员资格选项。
:::
成员资格过期
如果您可以管理成员资格某个群组,您可以强制要求该群组的新成员资格是临时的。通过配置以下群组属性来实现:
- 最晚过期时间: 所有新成员资格的过期日期必须早于此日期。
- 最大持续时间: 所有新成员资格必须在指定持续时间内过期。
可以同时设置这两个属性中的一个或两个。当两者都设置时,允许的最晚过期时间将是两者中限制最严格的属性。
此外,如果您拥有管理成员资格权限,您可以向群组添加设置了成员资格过期日期属性的临时成员。您可以将这些临时成员添加到未设置最晚过期时间或最大持续时间属性的群组中。
任何导致对设置了最晚过期时间或最大持续时间属性的群组产生成员资格请求的访问请求都将受到最大过期时间的限制。
成员资格过期通知
当临时群组成员资格过期时,会向受影响的用户发送撤销通知。此外,拥有临时成员资格的用户将在其成员资格过期前七天收到提醒通知。但是,如果用户被添加到设置了少于七天过期时间的群组,他们将不会收到提醒通知。
如果用户不希望接收这些通知,他们可以在平台侧边栏的账户 > 设置 > 通知中配置平台通知设置。
自定义审批访问请求表单
如果您可以管理一个在项目中定义了角色的群组的权限,那么您可以通过向该群组添加具有以下结构的属性,来为该项目配置自定义访问请求表单:
- 属性键:
access-request:'group-category-name' - 属性值:
'intended group value'
一旦您将这些属性添加到群组的属性中,它们会自动作为请求访问弹出窗口的一部分出现,用户可以在其访问请求表单中选择它们。
例如,添加以下群组属性将产生如下自定义请求流程:
- 键:
access-request: Team - 值:
blue
自定义访问请求表单对于拥有多个群组的项目特别有用,因为它们提供了简化且直观的访问请求流程,从而改善了管理员和用户体验。
从访问请求表单中排除群组
默认情况下,所有在项目中拥有角色的群组都会出现在访问请求表单中。如果您想隐藏某些群组,可以在项目设置中将其排除。
要配置哪些群组应从项目的访问请求流程中排除,请导航至访问面板 > 设置 > 项目访问请求。
如果您是项目的所有者,请选择管理按钮,然后选择要从请求流程中隐藏的群组。如果您不是项目的所有者,您将看到一个查看按钮,允许您查看哪些群组被排除,但您无法进行任何更改。
排除群组是按项目设置的,提供了灵活性。一个群组可以从大多数项目中排除,但包含在特定项目中。用户可以在这些特定项目中请求访问该群组。如果获得批准,他们将获得对该群组拥有角色的所有项目的访问权限。
此功能有助于防止对管理员群组等群组的意外成员资格请求,同时仍允许通过指定项目进行必要的访问。
自定义审批访问请求策略 [Beta]
:::callout{theme="neutral" title="Beta"} 自定义策略处于开发阶段的 beta 阶段,可能在您的注册环境中不可用。功能在活跃开发期间可能会发生变化。请联系 Palantir 支持以请求访问此功能。 :::
对群组拥有管理成员资格或管理权限权限的用户可以配置自定义策略,这些策略将应用于任何导致对所选群组产生成员资格请求的访问请求。可以通过如下所示的成员资格审批部分进行配置:
如果群组配置了自定义策略,那么任何导致对该群组产生请求的访问请求都将受到影响。自定义策略将应用于群组成员资格子任务,以将成员添加到特定群组。要批准访问请求,必须批准所有子任务。审批策略在请求访问和审查现有访问请求时都会传达。
项目访问
选择详细信息选项卡旁边的项目访问,以查看所选群组的项目访问详细信息。
项目访问视图允许群组管理员查看群组有权访问的所有项目以及授予该群组的特定项目角色。此视图在决定向群组添加或移除用户时特别有用,因为您可以查看访问权限将如何变化。
显示继承的权限切换开关默认处于开启状态,它将遍历所有嵌套群组以查找该群组有权访问的项目。如果您将此切换开关关闭,则列表将仅显示直接应用了该群组的项目。
重命名群组
拥有管理成员资格权限的用户可以重命名群组。当用户重命名群组时,会自动发生一些操作:
- 当前群组将被重命名,群组 ID 保持不变。
- 将创建一个具有原始名称的新群组,以支持可能依赖于原始群组名称的应用程序。
- 原始群组将成为新重命名群组的成员。
设置联系方式
您可以指定群组的联系方式作为联系人。管理权限群组中的用户可以管理权限。用户可以定义是否应通过 Foundry Issues 或通过给定的电子邮件联系该群组。
如果您想将某个群组设置为项目资源侧边栏中的项目联系人,设置群组的联系方式会很有用。项目所有者可以通过在项目概览中的项目联系人部分选择添加来设置项目联系人。
应用群组权限
从群组详情仪表板访问群组权限视图。拥有管理权限的用户可以使用此部分将访问权限授予群组而不是单个用户,以使权限更加透明和可审计。
在分配项目权限时,授予群组权限特别有用,因为管理员可以通过上述项目访问选项卡查看群组有权访问哪些项目。我们建议项目设置至少包含三个群组,每个默认角色一个:查看者、编辑者和所有者。您应将项目默认角色设置为发现者。
受限视图群组名称策略
创建使用群组名称作为策略条款之一的受限视图时,您需要指定群组的领域,以便其能够相应地匹配群组名称。您可以在平台设置 > 群组界面中检查群组领域,并在受限视图规则编辑器底部更改领域名称。
领域
用户领域
管理员通常在控制面板中设置外部领域提供商(例如 SSO、SAML 领域或 ADFS)。如有必要,Foundry 的平台设置附带一个内部实现的身份提供商。此内部身份提供商可用于外部身份验证系统不合适的多种场景。
群组外部领域
外部领域是直接从外部系统(例如 ADFS 等身份提供商)派生的群组。平台设置配置定义了分配身份提供商的领域。
外部领域无法在 Foundry 中修改,并且处于只读状态。只能在外部系统中执行的操作包括重命名、向群组添加用户、修改属性和创建新群组。外部领域群组非常适合 Foundry 中大多数与授权和身份验证相关的功能,包括: * 分配自由裁量控制和强制控制,以及 * 启用对平台的二进制访问(例如,允许或拒绝属于特定群组的一组用户)。
由于外部领域群组处于只读状态,用户将无法在 Foundry 中请求加入外部领域群组。但是,在控制面板中,您可以配置用户尝试请求访问外部领域群组时收到的消息。导航至控制面板 > 身份验证 > 您的 SSO > SAML > 管理 > 属性映射 > 外部群组管理,为外部领域设置自定义消息和 URL。只有与外部领域处于同一领域的用户才能看到自定义消息和 URL。以下是一个管理员向其内部 Jira 实例添加了消息和链接的示例。
配置自定义消息后,您将在平台设置中查看该外部领域中的所有群组时看到此消息。
当用户尝试请求访问授予此群组角色的项目时,他们将看到此消息。
最后,您可以在登录时使用外部领域群组进行组织分配。通常,通过客户 SSO 获取的信息成为登录时将用户分类到不同组织的输入。
:::callout{theme="warning"} 所有外部领域群组都必须分配一个组织。如果未分配组织,则该群组将对所有用户可见,无论其组织如何。 :::
群组内部领域
在 Foundry 中创建的群组被分配到内部领域。
内部领域群组可以在 Foundry 内进行修改。可以在群组界面中执行的操作包括重命名、向群组添加用户、修改属性和创建新群组。内部领域群组非常适合授予对 Foundry 级别功能的访问权限,包括将服务用户帐户捆绑到内部领域群组中以用于允许列表或拒绝列表目的(例如,将服务用户帐户排除在用户帐户过期规则之外)。
:::callout{theme="warning"} 如果正在使用外部领域群组,则务必避免直接将用户分配到内部领域群组。相反,应将添加/移除用户的外部领域群组嵌套在内部领域群组内。 :::