Manage markings(管理标记(Markings))
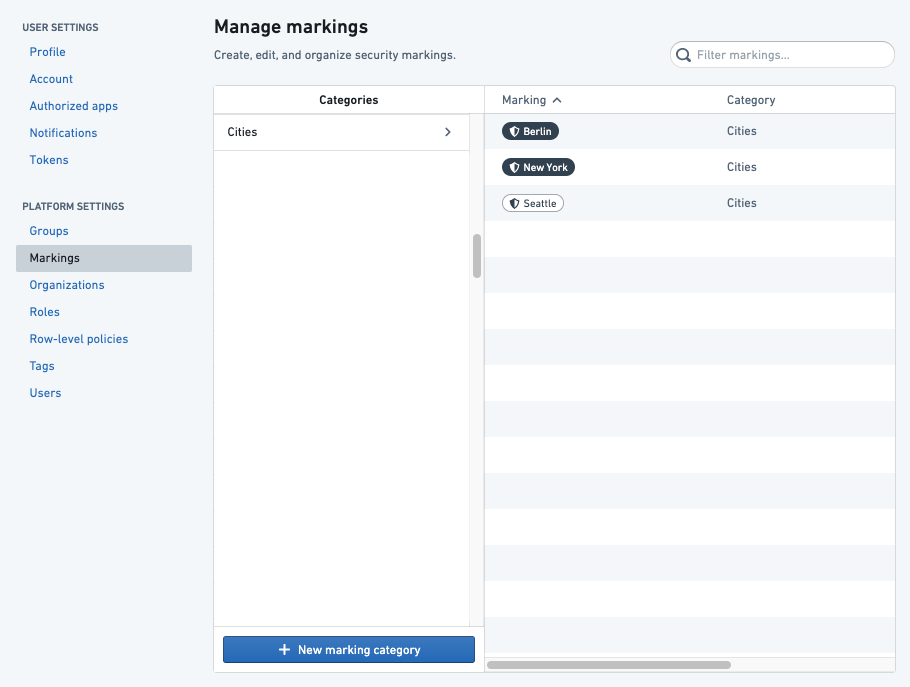
Markings are managed in the Foundry Settings under the Markings section. Markings are then applied on resources across the platform.

Create Marking categories
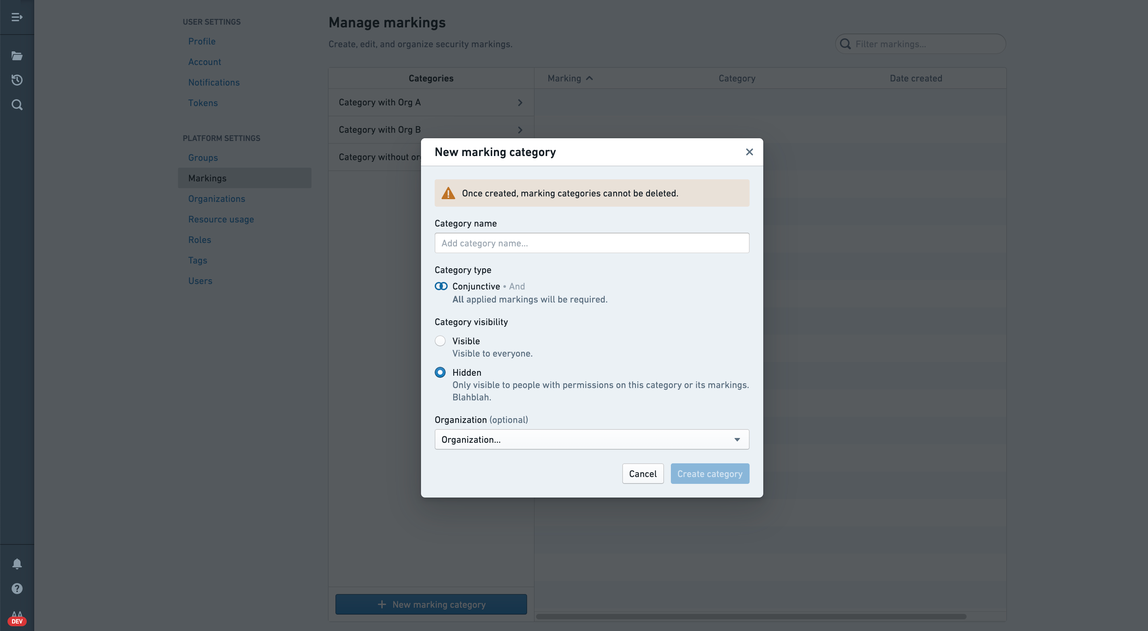
:::callout{theme="warn" title="Category deletion"} Once created, marking categories cannot be deleted. :::
Administrative users can create Markings and Marking categories and control their metadata, visibility, and membership. Access to the Marking section of the Platform Settings requires special platform permissions.
If you are an administrative user with the necessary permissions, you can create Marking categories in the Marking section of Platform Settings by clicking the New marking category button.
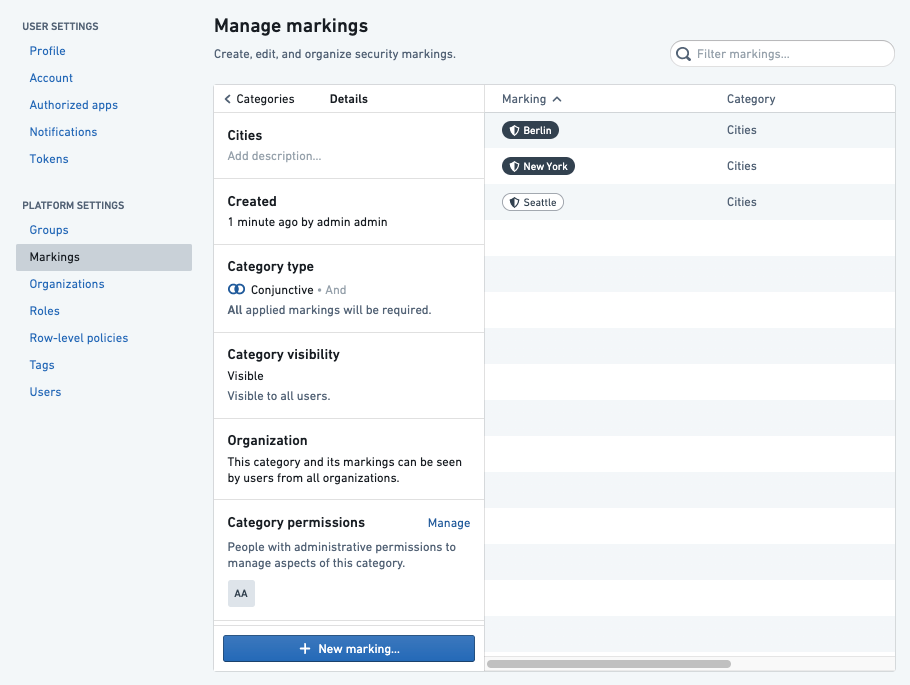
When you create a Marking category, you can set the category visibility and assign category permissions. By default, the category creator will be an administrator. The category creator can choose to remove themselves as the creator and add another administrator instead.
Category visibility
Marking visibility is assigned on a per-category basis, with the exception of the Organization category. Individual Organizations each have their own visibility settings.
In most cases, the names and descriptions of Markings and categories are not sensitive information and should be visible even to users who do not have Marking access. This behavior is determined by the category visibility, which is Visible by default.
If the category visibility is set to Visible, all users in the Organization can see the existence of the category and its Markings in the Marking interface. If users fail to meet Marking permissions, they will not see the existence of the Marking or category.
If a Marking category visibility is Hidden, the existence of this category and its Markings is considered sensitive information. The Hidden category can be made invisible to all users who have not explicitly been granted Category Viewer permissions.
Marking categories ensure these visibility rules:
- Visibility is defined for a category and all of its Markings together; it cannot be assigned on a per-Marking basis.
- All users with access to a Marking can view existence of the category and all other Markings within the category. These users will not appear in API results as “category viewers” but should be assumed.
- All users with roles (administrator, remover) on a Marking can view the category and existence of all Markings within the category. These users will not appear in API results as “category viewers” but should be assumed.
- All users with roles (administrator, viewer) on a category can view the category and the existence of all Markings within the category.
Category permissions
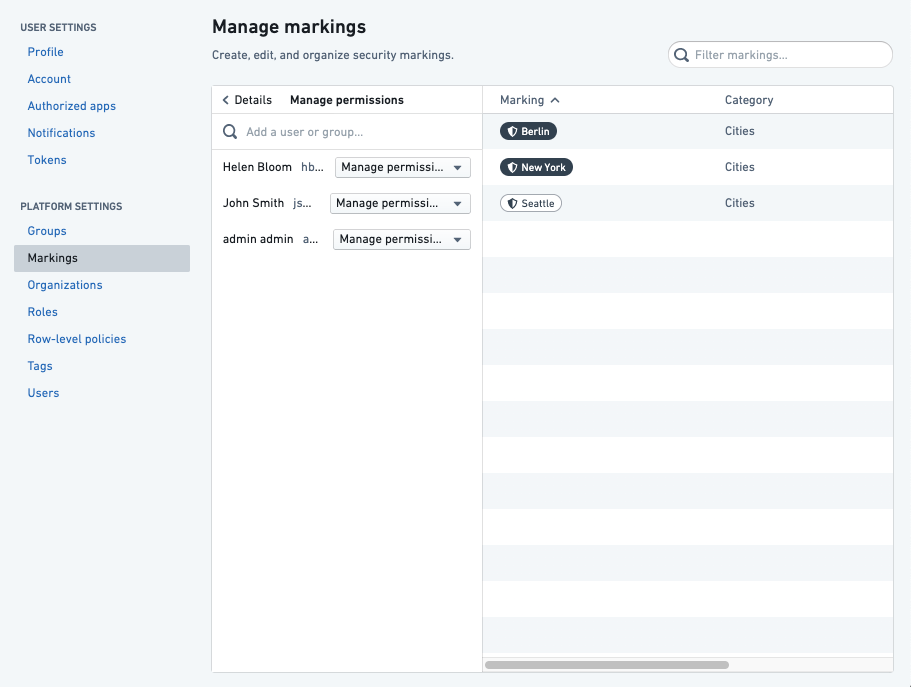
Users can have permissions that designate how they interact with Marking categories:
- Category Administrators: Users who can change the description and permissions for the category and create Markings in the category.
- Category Viewers: Users who can see the existence of the category and all the Markings within it.
Restrict categories by Organization
A Marking category can be restricted to a single Organization to ensure that it is never visible to users outside of that Organization.
Create Markings
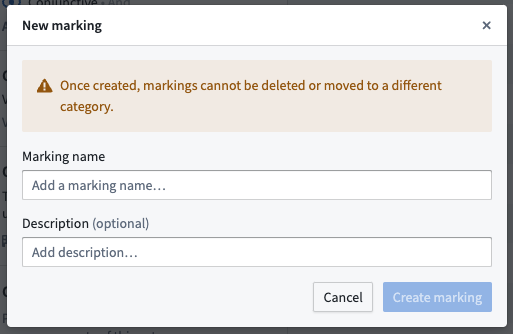
:::callout{theme="warn" title="Marking deletion"} Once created, markings cannot be deleted or moved to a different category. :::
If you are an administrative users with the necessary permissions, you can create new Markings in the Marking section of Platform Settings by clicking the New marking button. You can then assign Marking Administrators and Marking Removers.
When you create Markings from within Foundry, you are automatically granted "Manage permissions" access. We recommend assigning different team members these permissions on new Markings. That way, you can avoid relying on a single administrator to manage all Markings permissions.
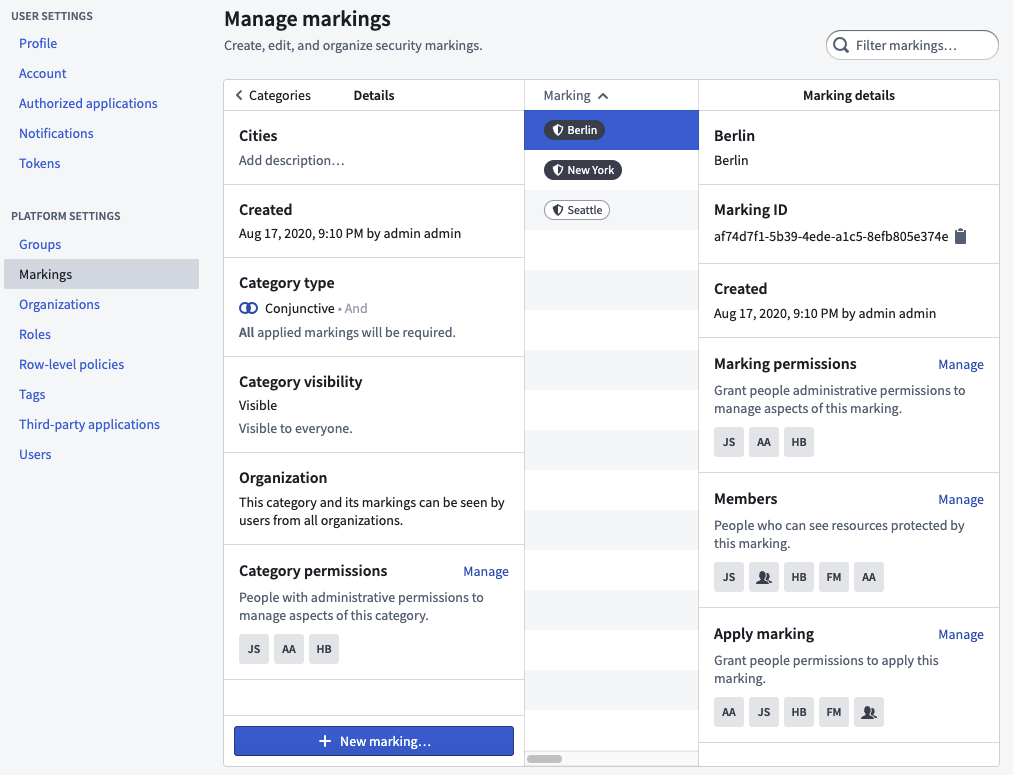
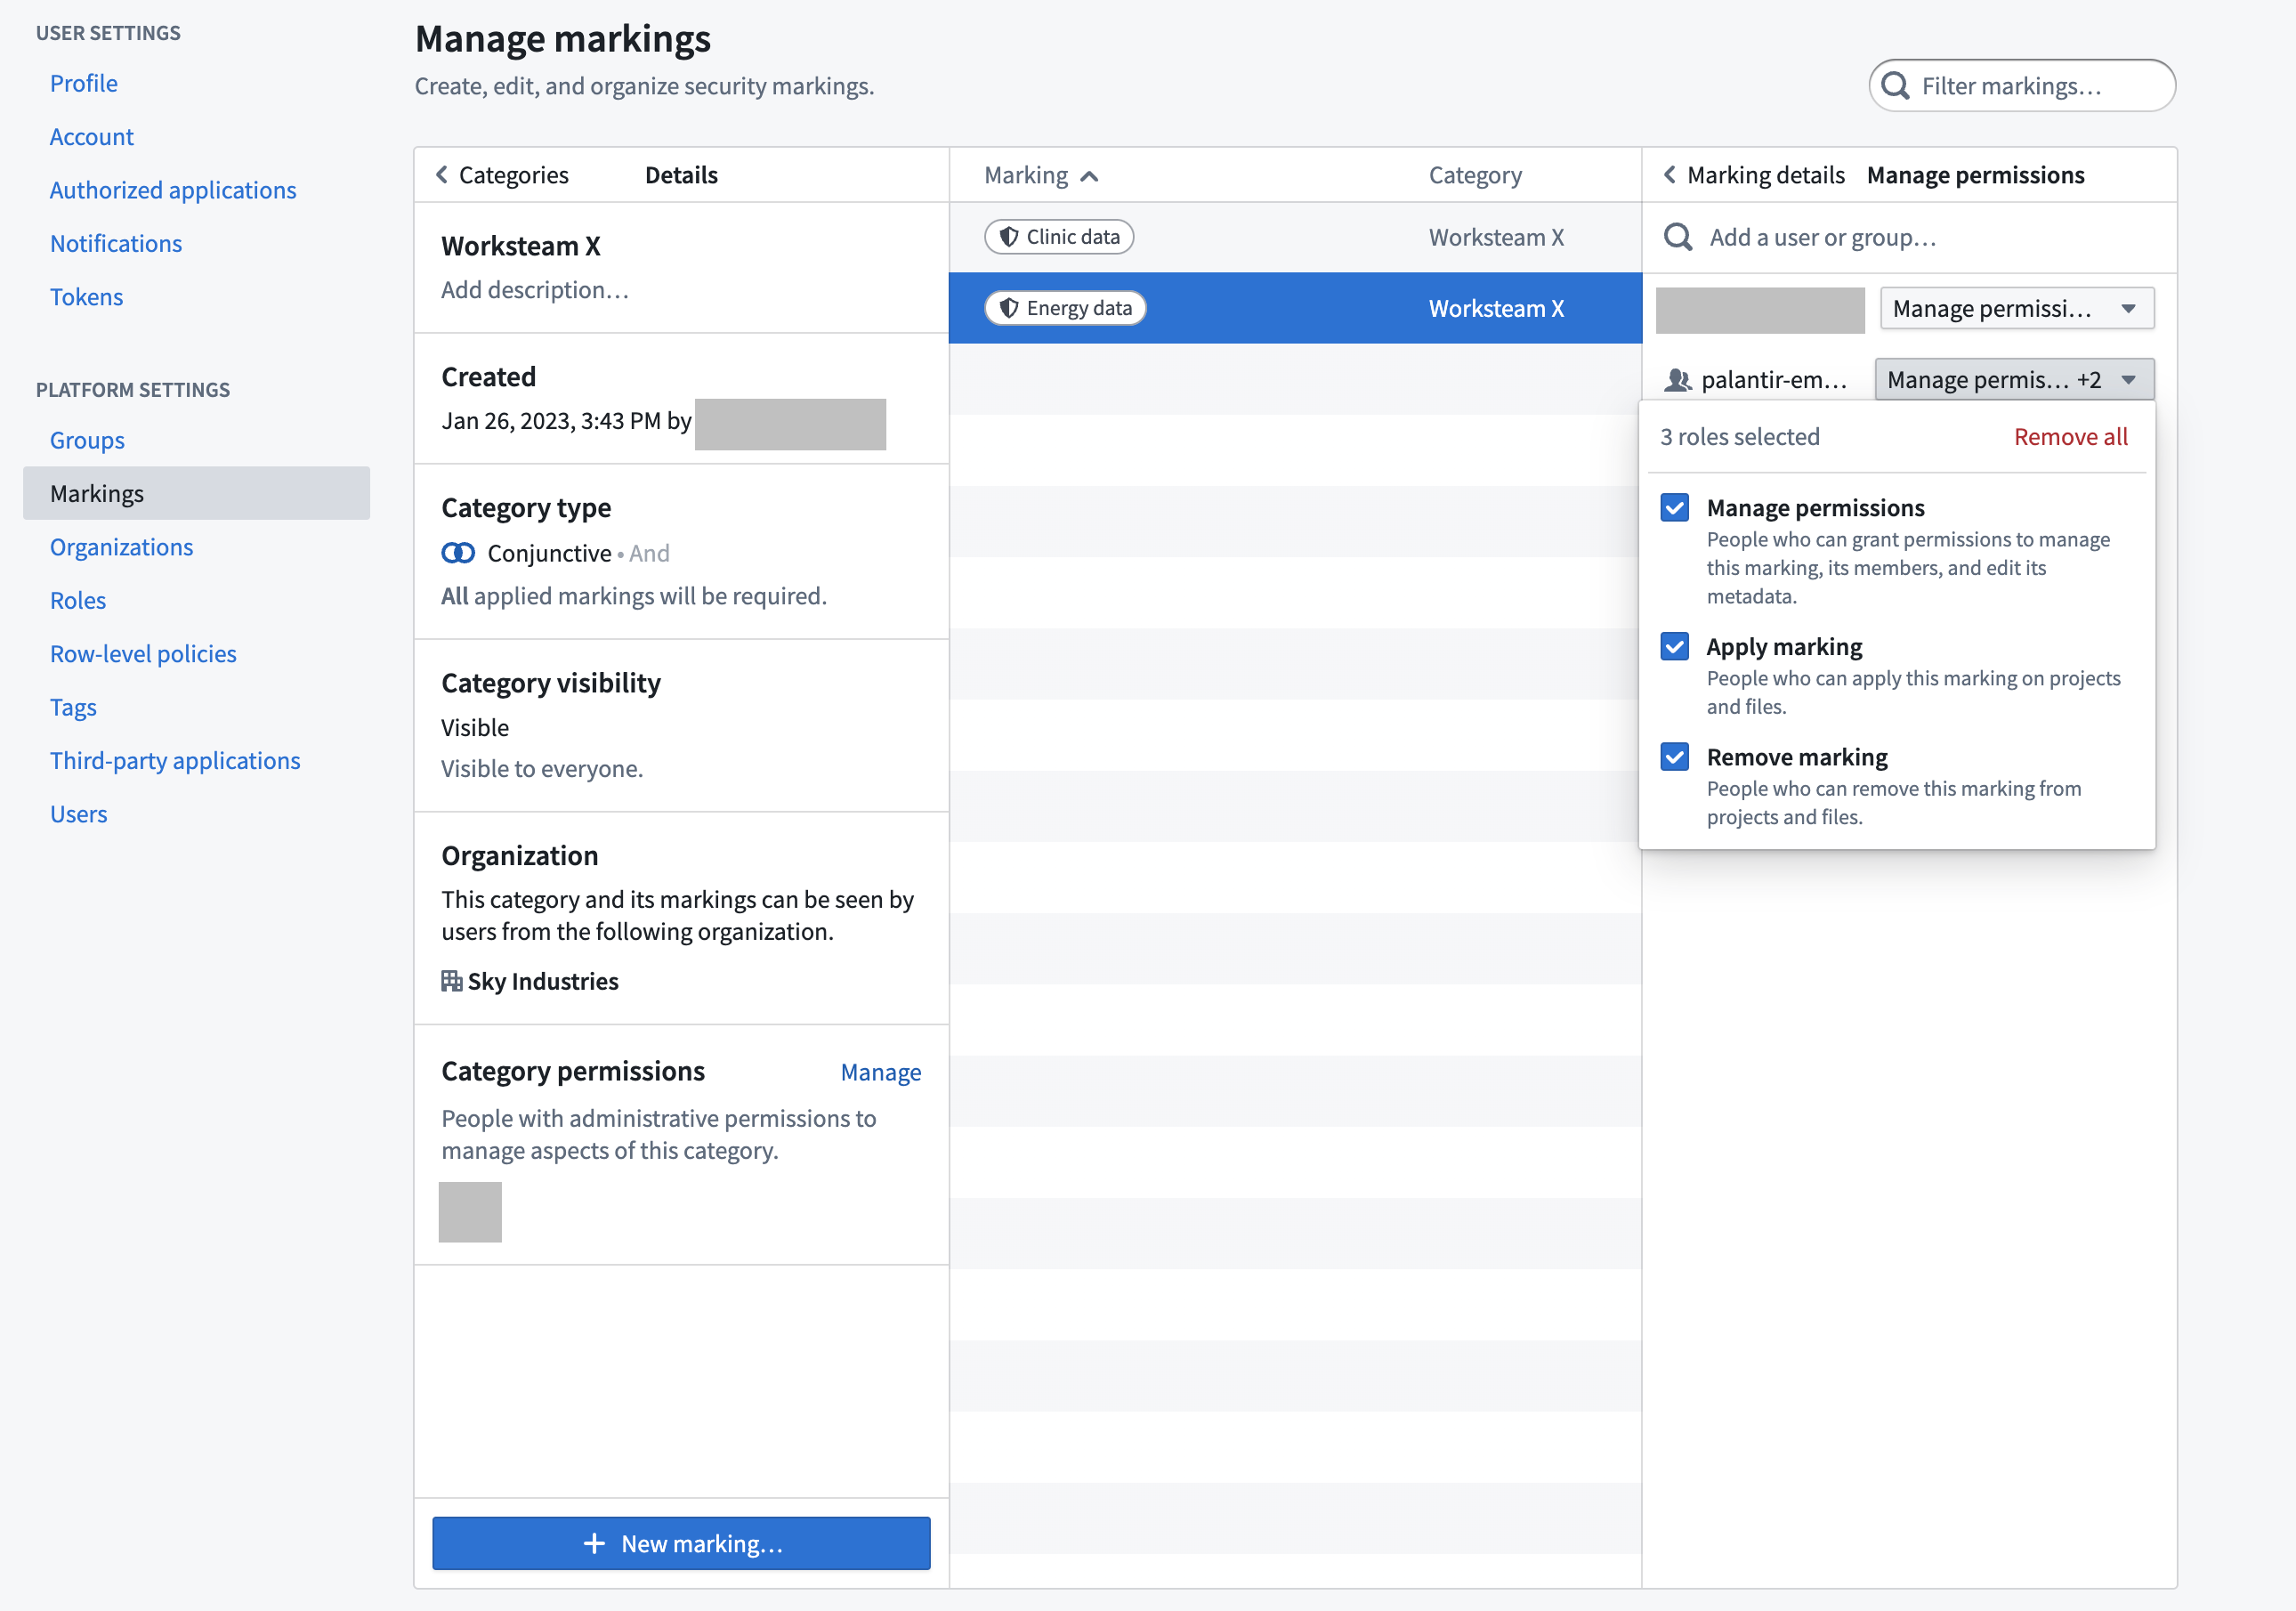
Marking permissions
:::callout{theme="neutral"} The permissions below apply to resource-level markings. Organizations have a separate permission model with their own Apply organization and Expand access permissions. For details on organization-level permissions, see organization permissions. :::
When you create a new Marking, you can add users and groups with different levels of access and permissions:
- Manage permissions: Users who can grant permissions to manage this Marking, its members, and its metadata.
- Apply marking: Users who can apply this Marking to Projects and resources. This permission only grants the ability to apply a Marking and does not grant membership of a Marking.
- Remove marking: Users who can remove this Marking from Projects and resources. To remove a Marking, a user must also be able to apply the Marking.
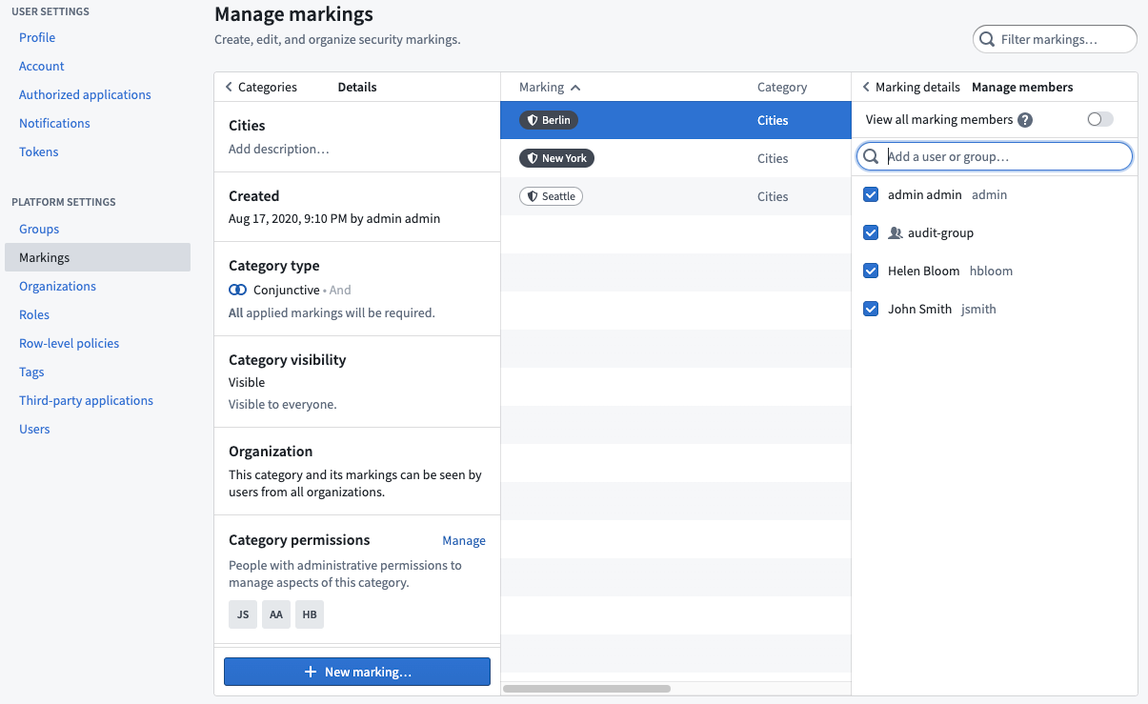
- Members: Users who can see resources and Projects protected by this Marking.
All the permissions above are distinct and do not automatically provide users with membership permissions. For example, a user can have “Apply marking” and "Manage permissions" access on a Marking and not be a member of the Marking. In that situation, the users could apply the Marking to files, folders, and Projects in the platform and manage the Marking, but they could not see the data marked with that Marking.
Grant Markings to users
Markings are granted globally to users. When a user is granted a Marking, the user is globally entitled to view the type of content restricted by that Marking. However, having access to a Marking does not mean that the user can view all content with that Marking; the user must still have permissions through their role. Users cannot grant access to Markings to other users unless they have additional administrative permissions on the Marking.
If Marking permissions are granted to a group, then a new user to the group will inherit those permissions.
Apply Markings
You can apply a Marking on a resource, folder, or Project if you meet two requirements:
- You have the “Apply marking” permission on the Marking.
- You have the “Update Markings on resource” permission, which is included in the Owner role by default.
Applying a Marking is a sensitive operation and can restrict downstream users. Before applying a Marking to an existing pipeline, we recommend taking the following steps:
- Confirm the existence of the Marking: Ensure that the Marking you want to apply has been created, or create the marking.
- Make a branch of your pipeline: Create a new branch to continue with these steps. When applying a Marking to an existing pipeline, you will likely need to stop propagation of the marking at some point in the pipeline (for example, so that a dataset cleaned of PII can be opened by an end user). The
stop_propagatingsyntax will only take effect on protected branches. You cannotstop_propagatingan inherited marking until your new branch is merged into the protected branch. - Review data lineage: Confirm that you have the complete set of nodes on your data lineage graph and confirm that you understand the downstream impact of your potential change.
- Review transaction types in your pipeline: Markings propagate along data dependencies at the transaction level. Incrementally built datasets (of type APPEND or UPDATE) require special treatment. Specifically, the latest view of a dataset built with APPEND transactions will include dependencies from old upstream transactions; by contrast, the latest view of a dataset built with SNAPSHOT transactions (the Foundry default), only depends on the latest transactions from upstream datasets. If you are only dealing with SNAPSHOT transactions, you can continue with these steps. If not, see the documentation on APPEND and UPDATE transactions and on how Markings propagate.
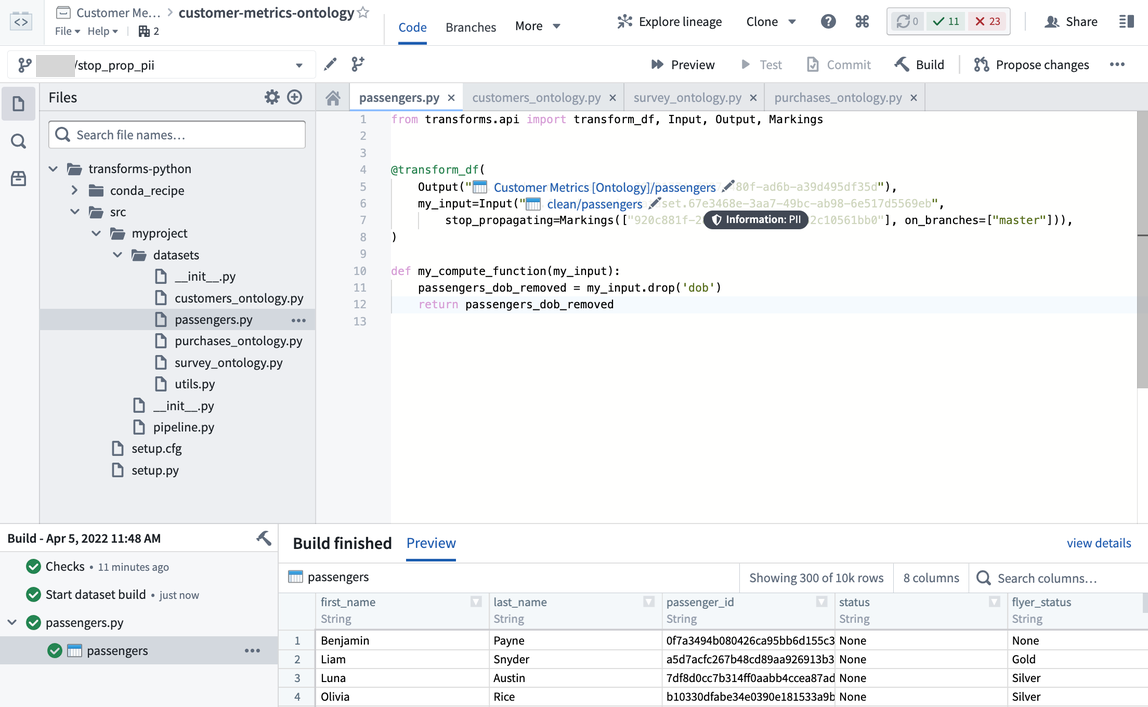
- Determine when to stop inheriting the Marking: Explore the nodes in the data lineage of your pipeline and review columns and data previews in order to determine the point at which you should stop inheriting the Marking you want to apply. For example, you might want to stop propagating a PII marking once the DOB (date of birth) column is removed in a pipeline. You can activate the simulation mode during this step to see where and how the Marking will propagate.
- Preemptively make necessary transform changes: In your branch, add the
stop_propagatingsyntax in the transforms you identified. Merge your branch into the protected branch so that thestop_propagatingsyntax is active. - Build your production pipeline: Build all the transforms downstream, including the nodes you identified to
stop_propagating. You will need to rebuild the datasets that have thestop_propagatingsyntax and all the datasets downstream of thestop_propagatingtransforms. If you have downstreamAPPENDorUPDATEdatasets, review this guide. - Review the simulated change: Review the final simulated data lineage of your pipeline. Confirm that datasets downstream of your
stop_propagatingtransforms are not affected by the application of the new Marking. Ensure that sensitive columns do not appear in datasets that will not receive the propagated Marking. - Apply the Marking: The steps above should establish that applying the Marking will protect datasets containing sensitive data and that the Marking will not propagate beyond what is necessary. At this point, you can apply the marking.
:::callout{theme="neutral"} If you notice a mistake after applying the Marking (for example, a large group of users can’t see data they should be able to see), you can remove the Marking and it will immediately stop propagating. Then, you should review simulated changes again to identify the cause of the issue. :::
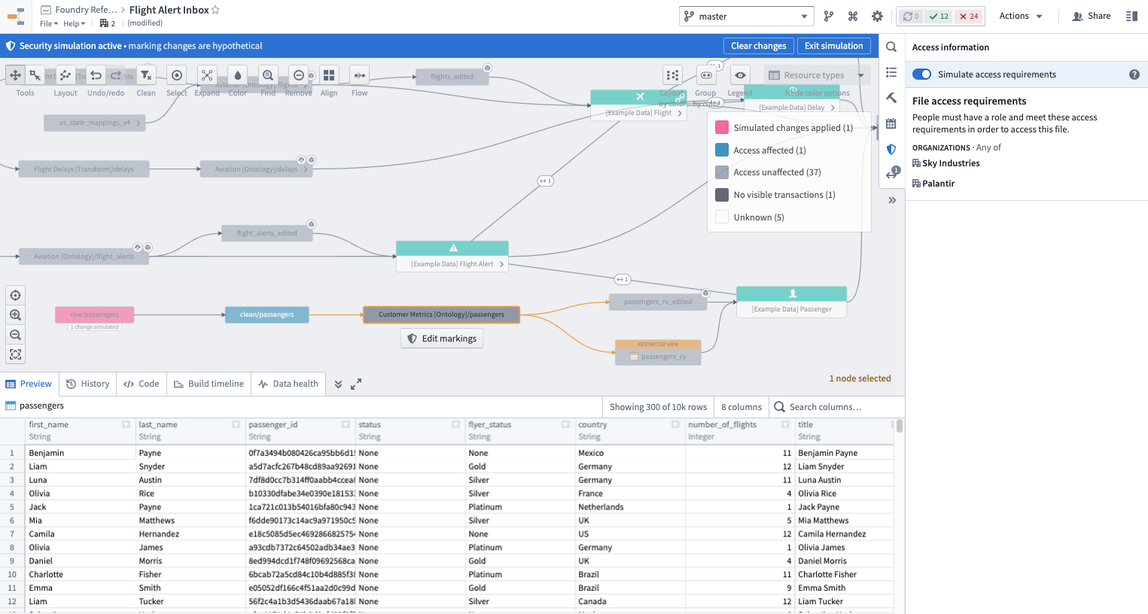
In the example below, the DOB column was removed and the stop_propagating syntax was applied on the ontology passengers dataset. The PII marking was applied on the raw passenger dataset and only propagated to the clean passenger dataset.
Remove Markings
You can remove Markings to give access to more users, re-classify transformed data, or to separate derived resources from inherited Markings.
For example, assume that dataset A contains PII and a marking protects datasets derived from dataset A. If dataset B is derived from dataset A but has been transformed to remove the PII, you may want to remove the marking from dataset B to allow broader use of the data.
To remove a Marking, you must have permission to both apply and remove the specific Marking. You also need access to the resource of interest through a role that allows you to change its Markings. If you are using default roles, this access is available with the Owner role.
Remove a directly-applied Marking
Removing a Marking directly from a file, folder, or Project will immediately remove the Marking from any dependencies that inherited the Marking. You do not need to rebuild datasets downstream after directly removing a Marking since the Marking will immediately be removed downstream. The following notional example shows a directly-applied PII Marking.
Remove an inherited Marking
You can only remove inherited Markings from Restricted Views and datasets. If restricted content is removed or obfuscated while deriving a dependent file, you can remove the Marking from the derived file. When the inherited Marking is removed, the downstream datasets will not be protected by the Marking and more users may have access to the dataset. Users will still need access to the Marking to see upstream data.
To remove an inherited Marking from a Restricted View, edit the Restricted Views and click Stop Propagating next to the appropriate Marking.
To remove an inherited Marking from a dataset, use the stop_propagating syntax in your transformation code. To safely remove an inherited Marking, follow these steps:
- Determine where to remove sensitive data: Review your full pipeline and decide where you want to remove the sensitive data.
- Create a branch: The
stop_propagatingsyntax will only take effect on branches that are both protected and have the settingRequire security approvals before mergingenabled. You won’t be able tostop_propagatingan inherited Marking until your branch is merged into the protected branch. - Make necessary transform changes: In your selected datasets, remove the sensitive data and add the
stop_propagatingsyntax to the transforms. - Build your branch: Build your branch and confirm that the sensitive data is removed in the output dataset. The
stop_propagatingsyntax won’t stop the Marking from being inherited at this point since you are on a non-protected branch. - Merge your branch: After confirming that your sensitive data is removed, you can safely merge your transform changes into the main branch. Merging your branch will apply the
stop_propagatingsyntax. - Build your main branch and downstream dependencies: The
stop-propagatingchange must propagate along the latest transactions in your pipeline, which requires you to rebuild the datasets that have thestop_propagatingsyntax and all the datasets downstream of thestop_propagatingtransforms. Once all the datasets are built, confirm that the inherited Marking was removed. If there are downstream APPEND or UPDATE transactions, review additional documentation.
In the notional example below, the DOB column was removed and the stop_propagating syntax was applied on the Ontology passengers dataset to stop the PII marking from propagating further downstream.
Investigate marking inheritance
Markings are inherited along both the file hierarchy and data dependencies. This means the file itself can be protected by a Marking and/or the data itself is protected by a Marking. Sometimes you need to investigate where a Marking is coming from and conceptually understanding the different ways a Marking can be inherited is important.
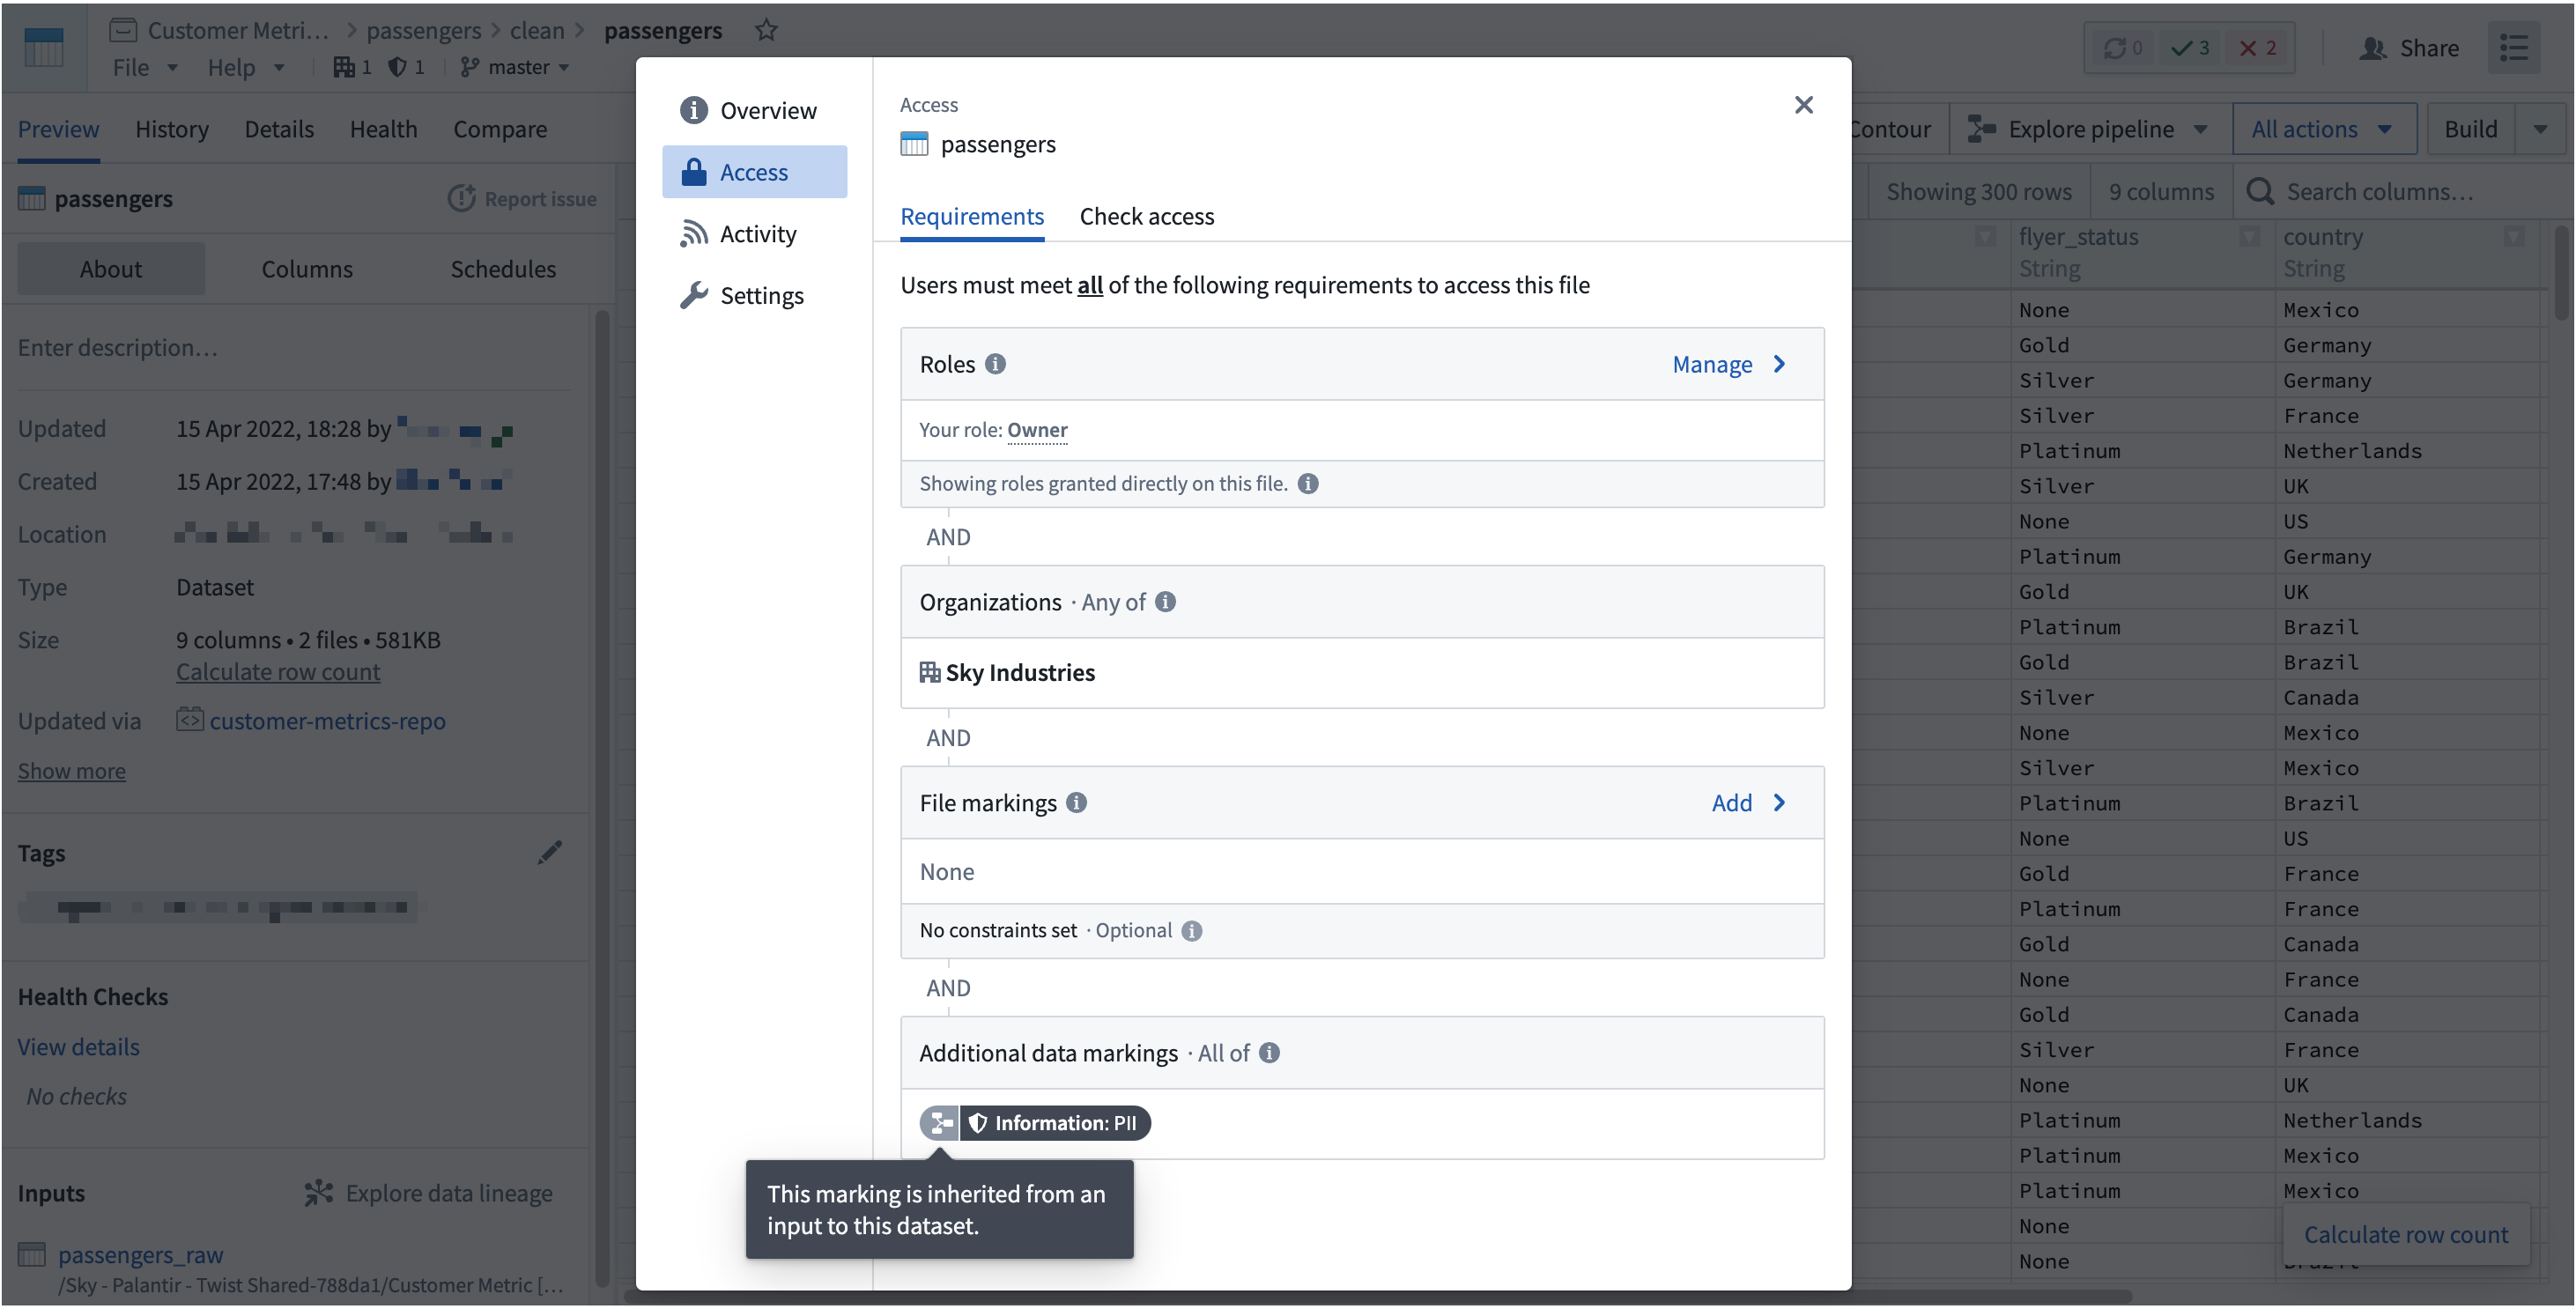
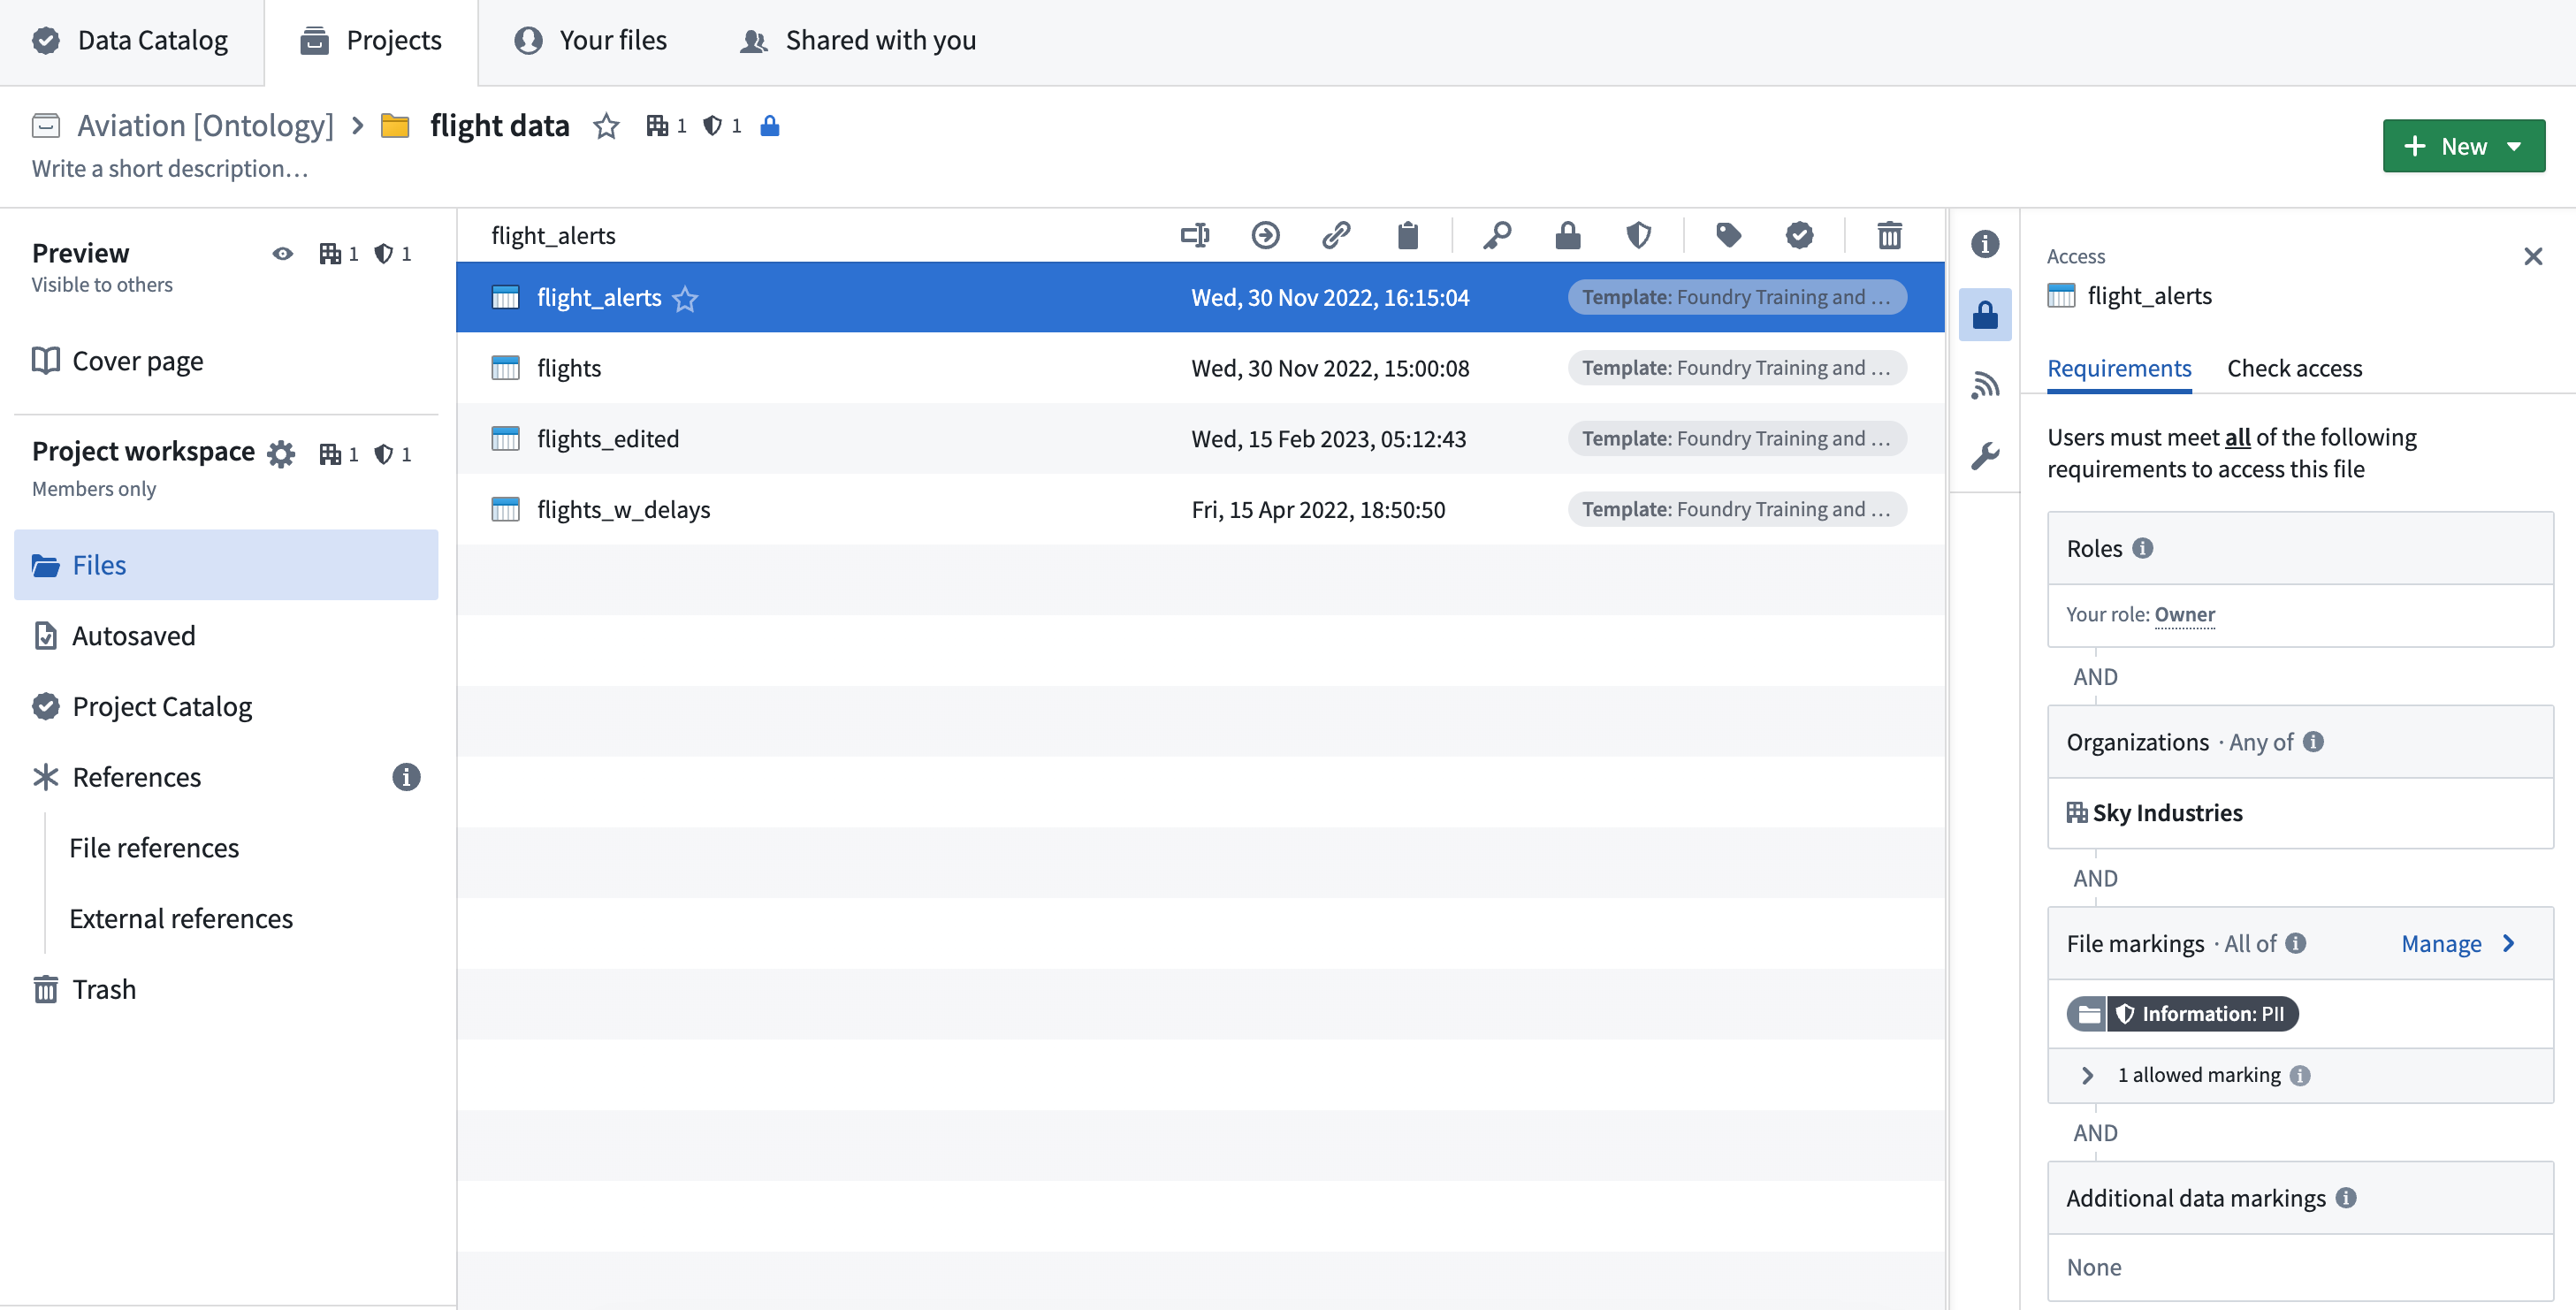
You can view a file's marking by selecting it to open the right-side detail pane, and looking under the Access requirements > Markings section.
Investigate file hierarchy
To view a file's marking, select it and open the resource panel. Look under the Access section.
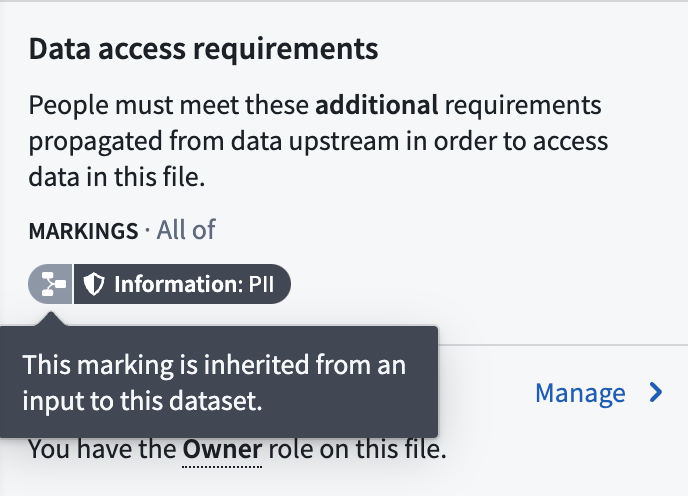
A marking inherited along the file hierarchy is indicated by a folder sidecar icon.
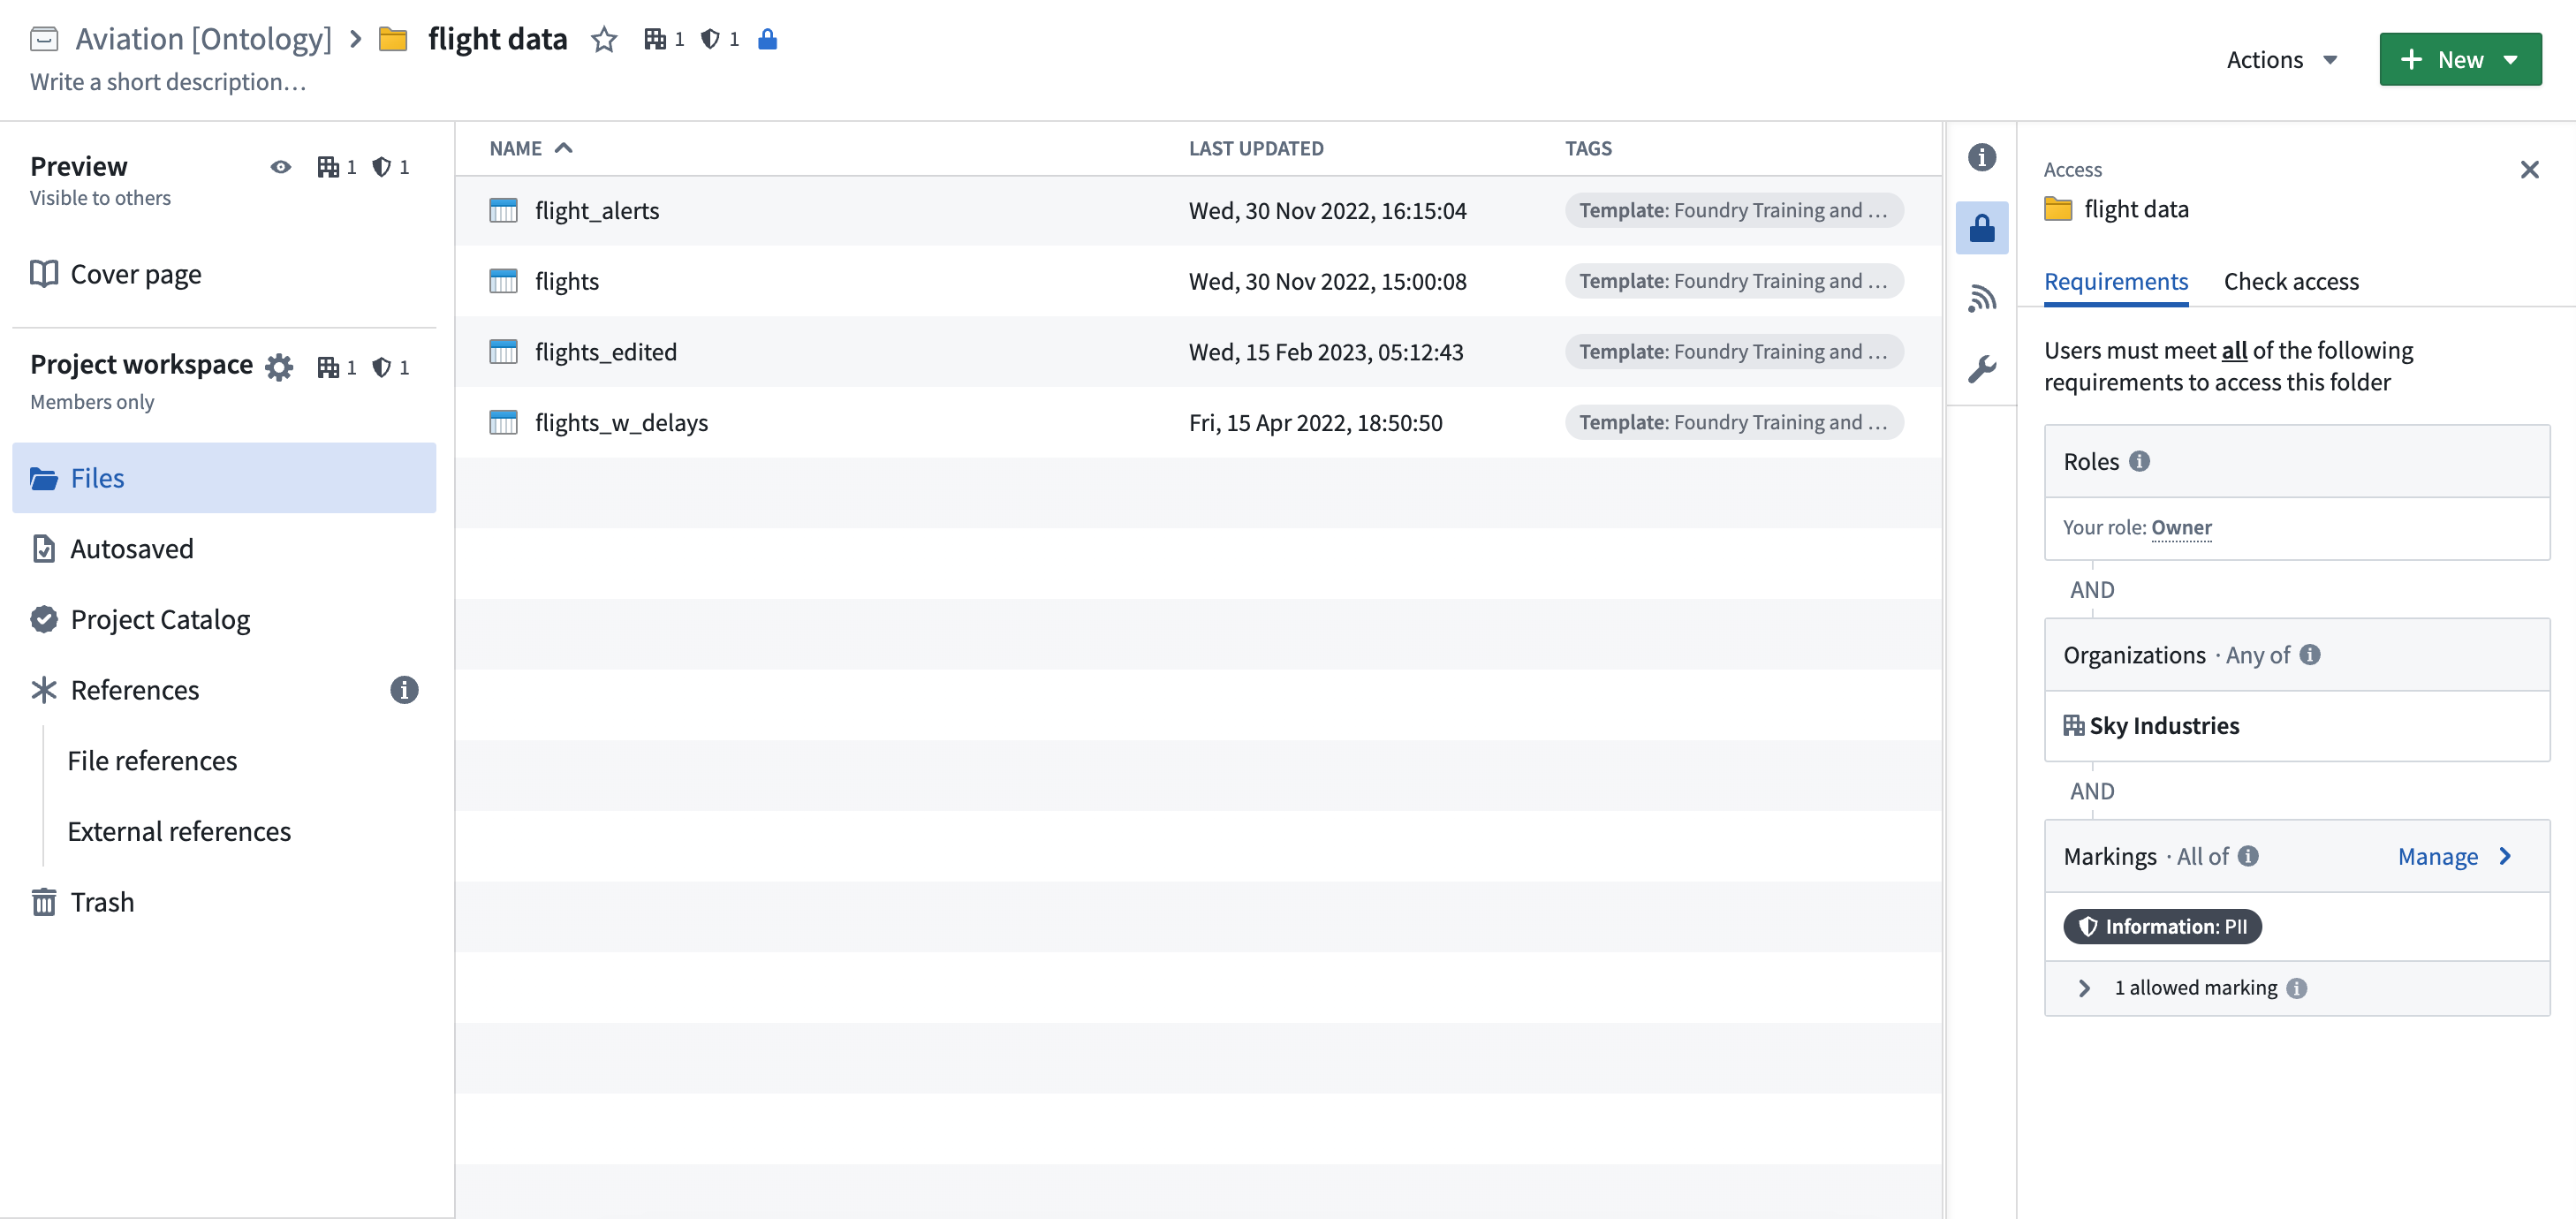
To figure out at which point in the file hierarchy the Marking originates, traverse the file hierarchy in the Foundry workspace. In the notional example below, we can verify the flight data folder as having PII Marking having traversed the file hierarchy starting from the original file and that of the folder resource. Access information is shown on the resource sidebar.
Investigate data dependencies
To figure out which data dependency the Marking originates from, you can use the Data lineage application or use the Compare tab after opening a dataset file.
As Markings are applied at the file level but propagate along transactions, it can be difficult to figure out when a Marking was introduced for a dataset. We recommend first checking the Data Lineage application to see where a Marking originated.
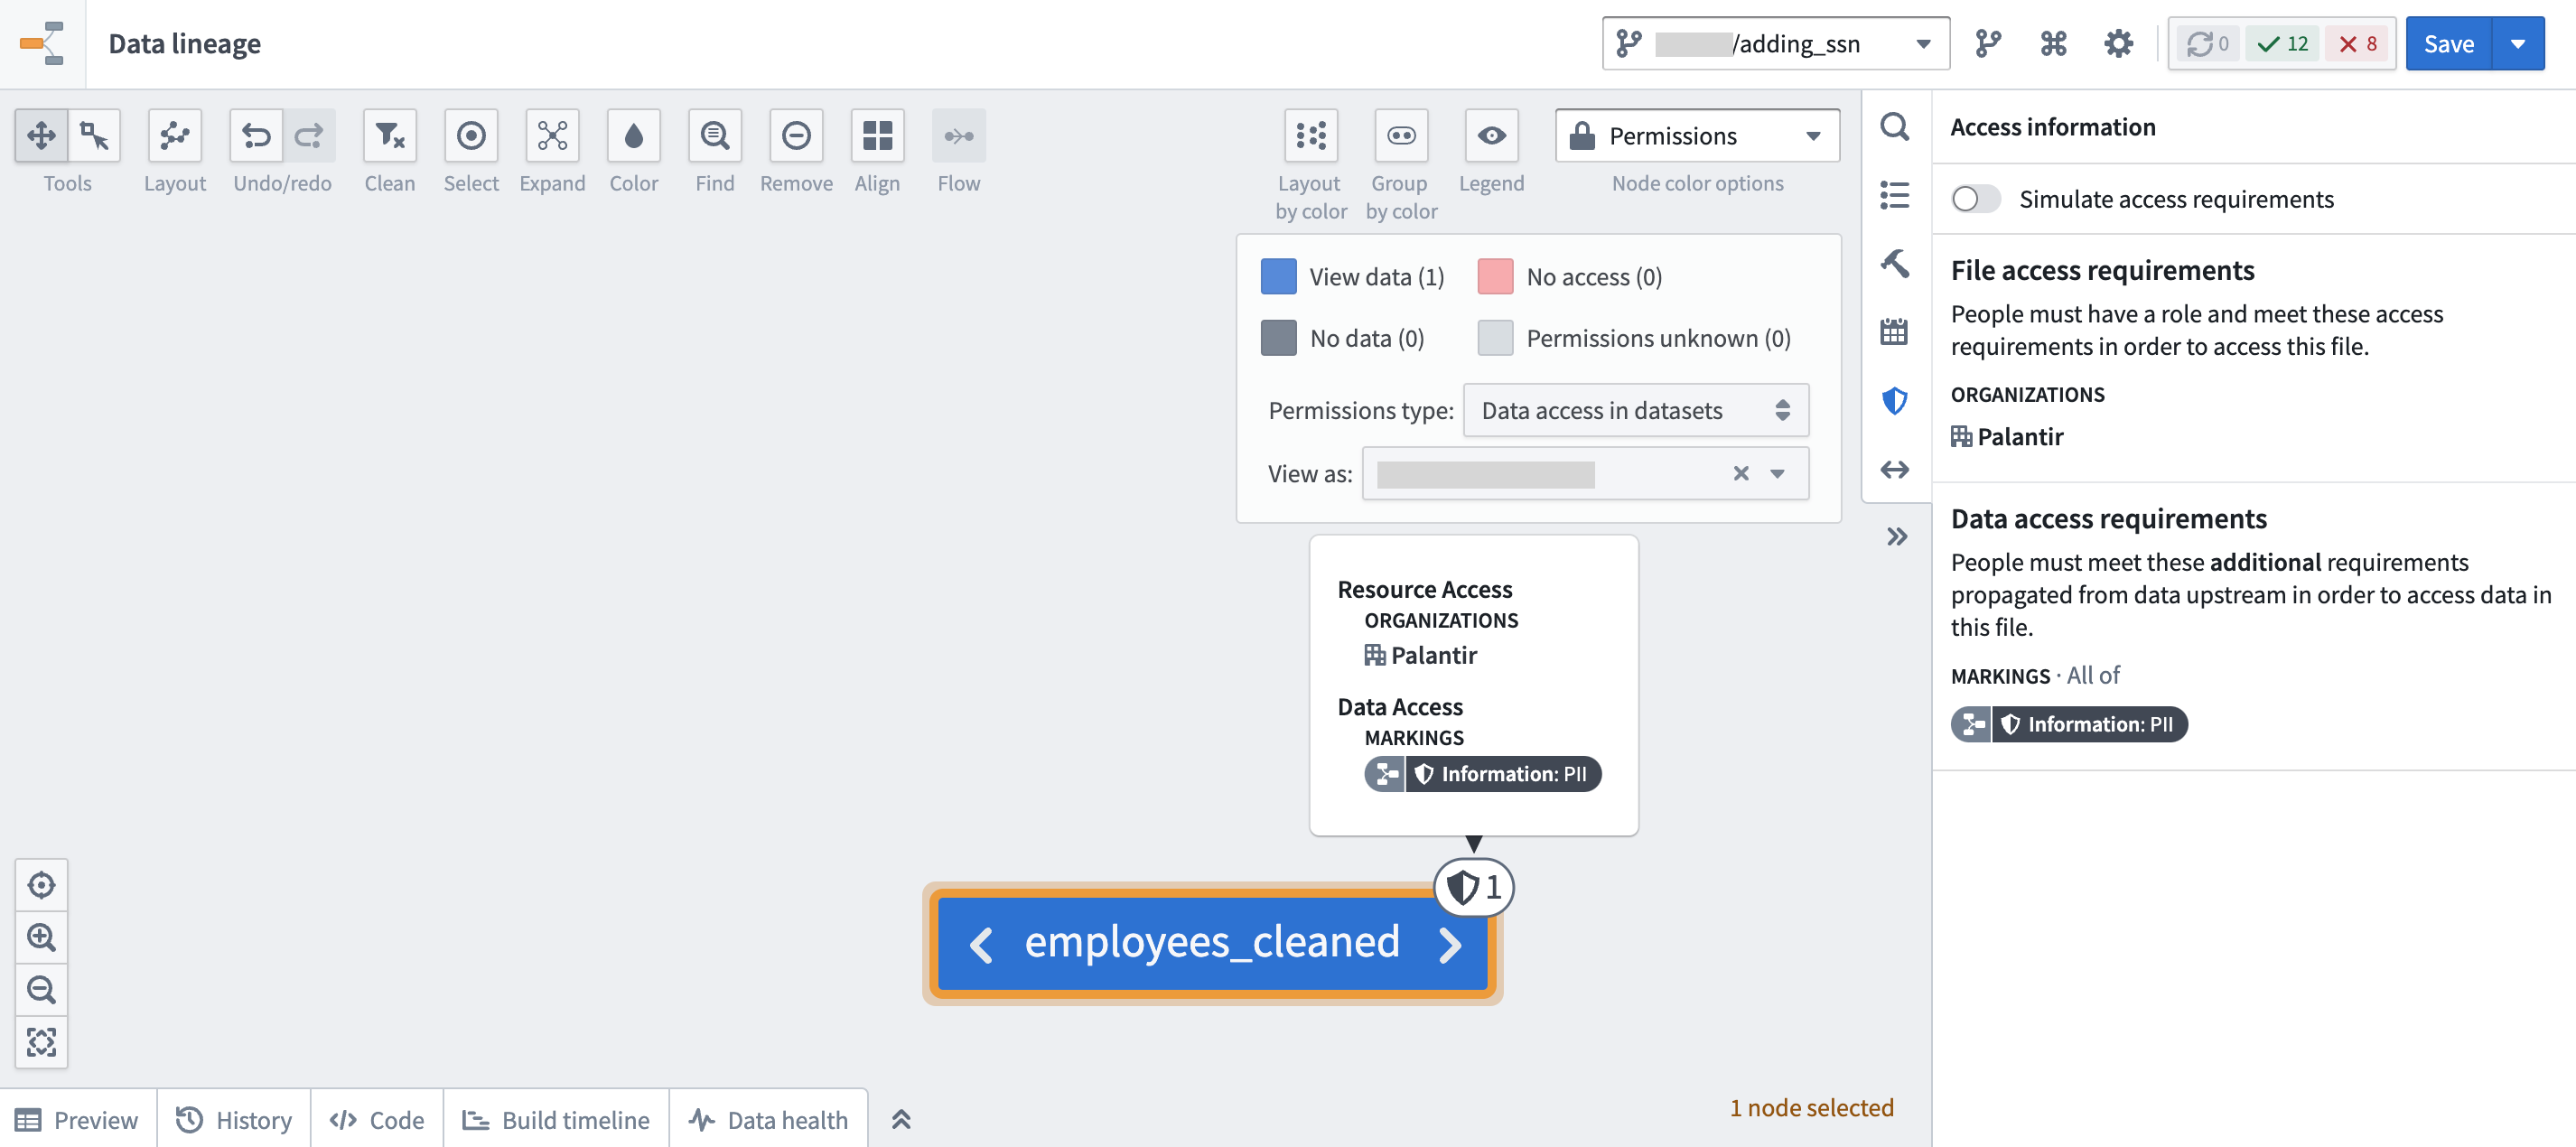
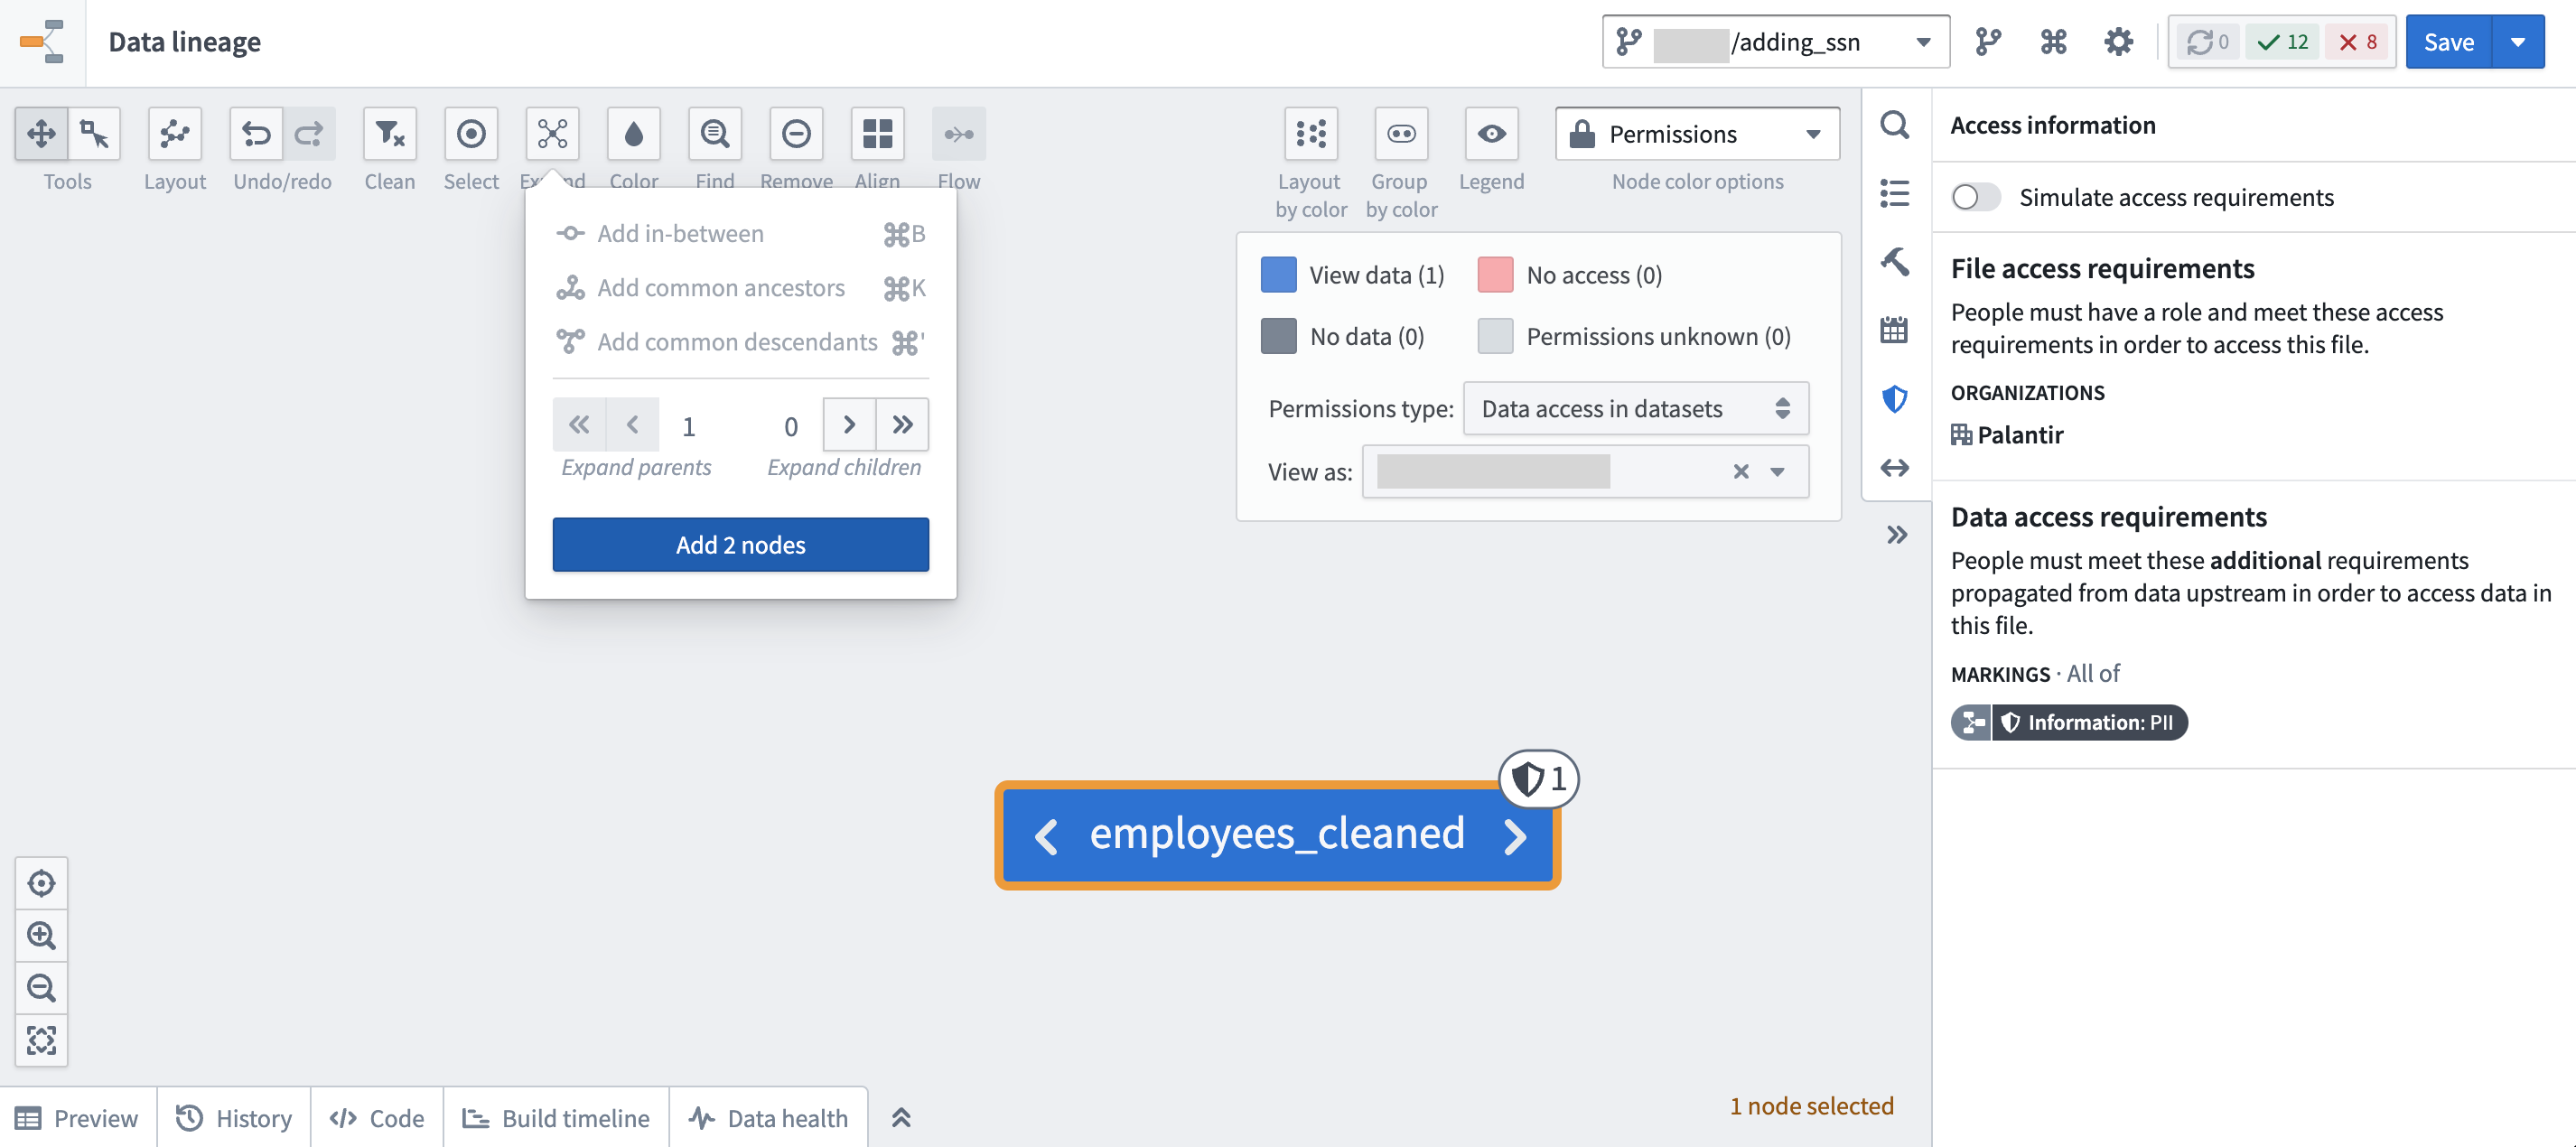
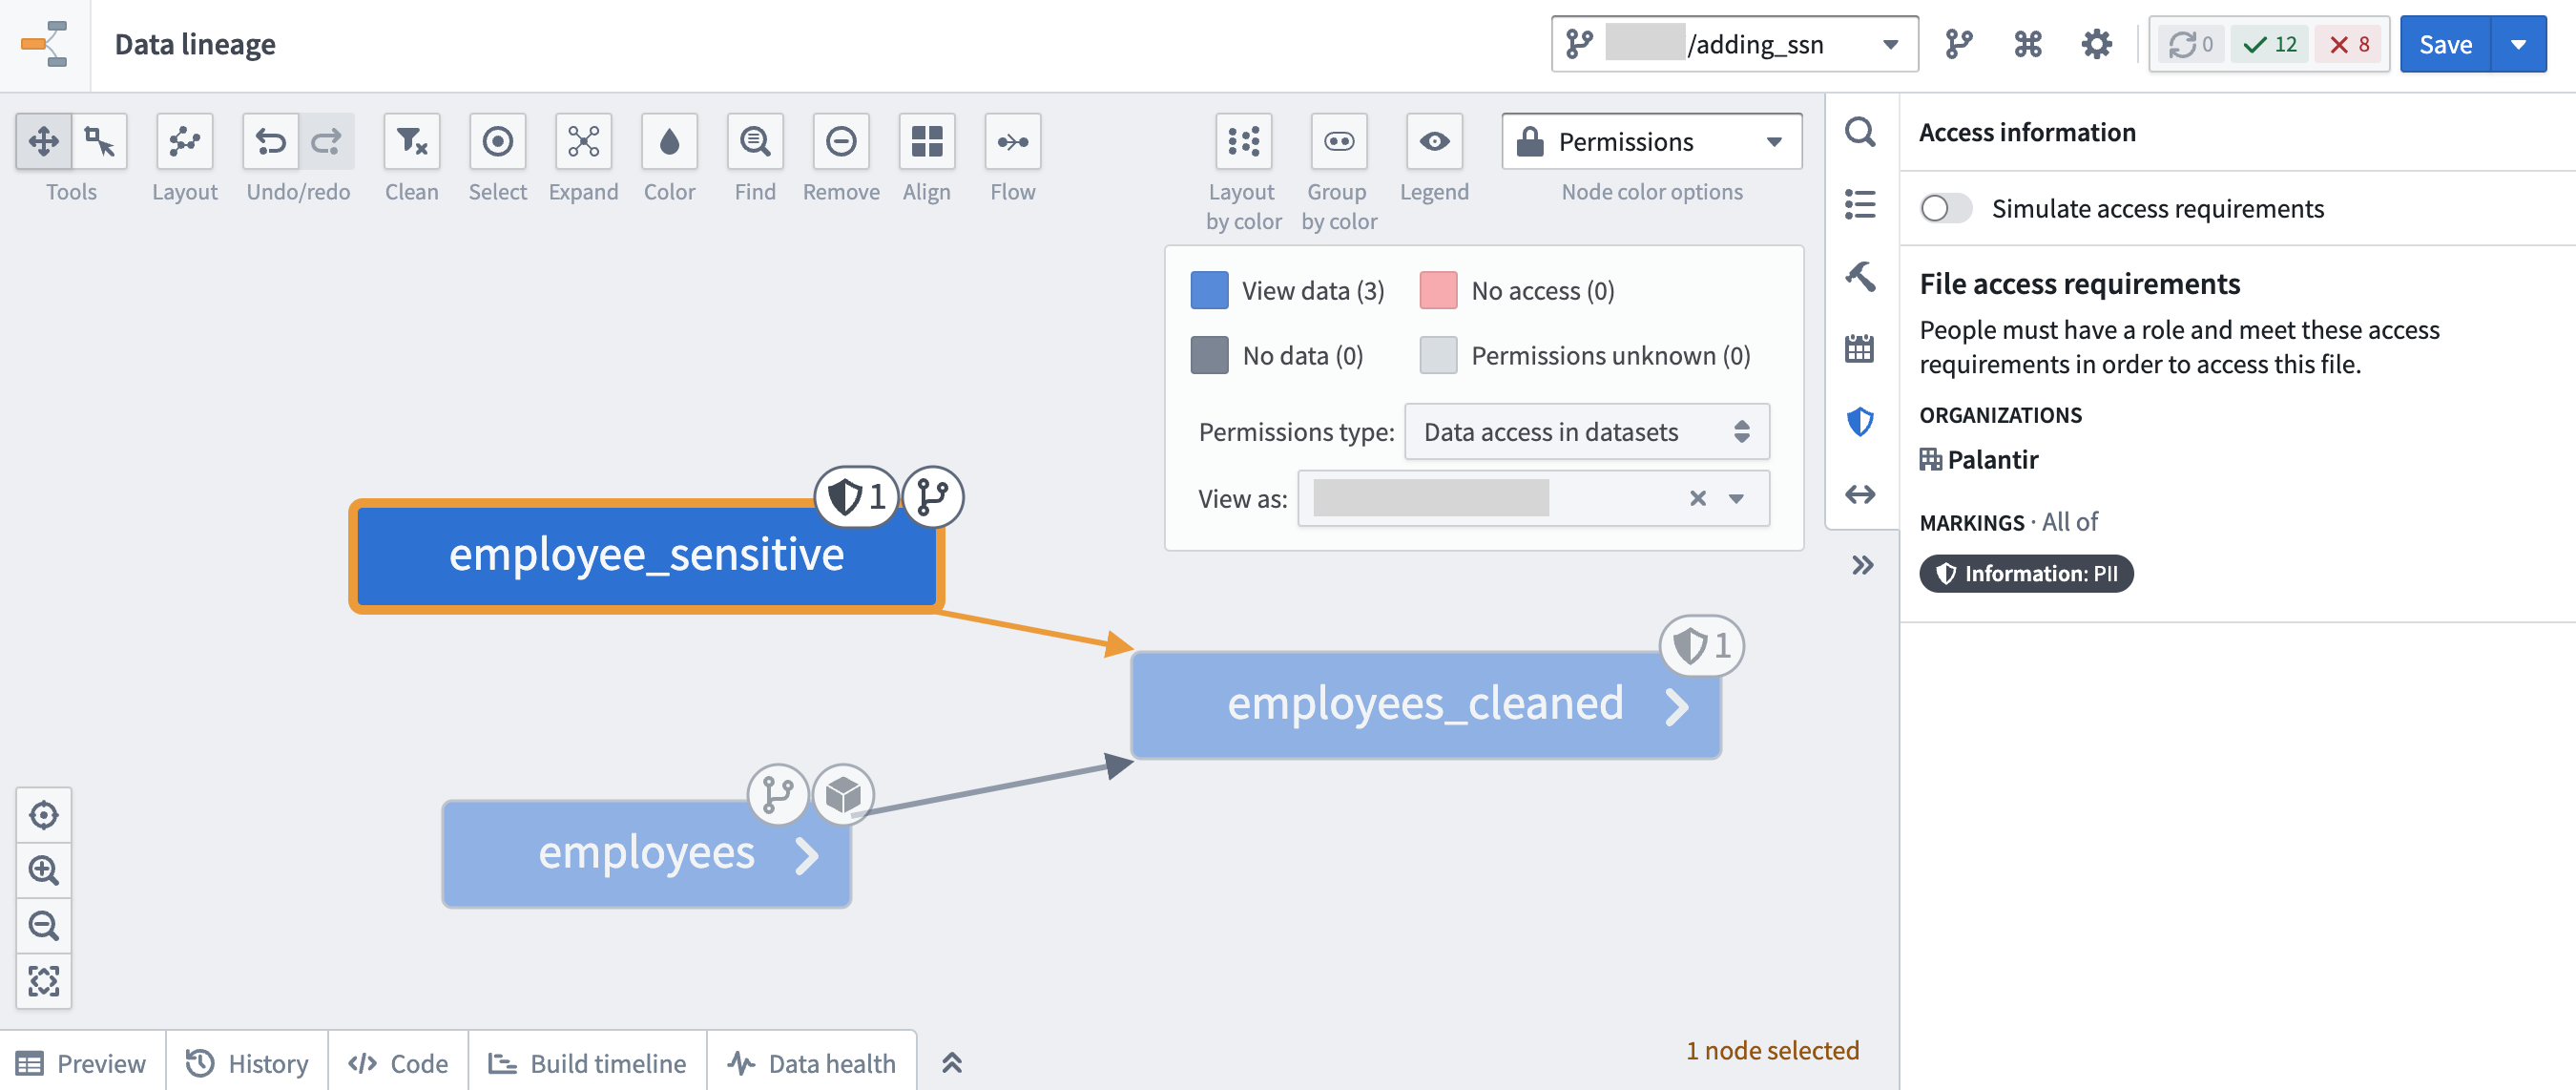
Using the Data lineage application, click Legend > Permissions type: Data access in datasets. Then expand all upstream nodes of the data lineage and traverse the data lineage to see where a Marking originated. A marking inherited along a data dependency is indicated by a data lineage sidecar icon.
In the following example screenshots below, the employee_sensitive dataset is where the PII Marking originates:
To get the full picture about when a Marking was specifically introduced, look at the transactions on the file of interest. Open the specific file and navigate to the Compare tab to compare different transactions from both branches and timestamps to learn what security and logic changes happened over time.
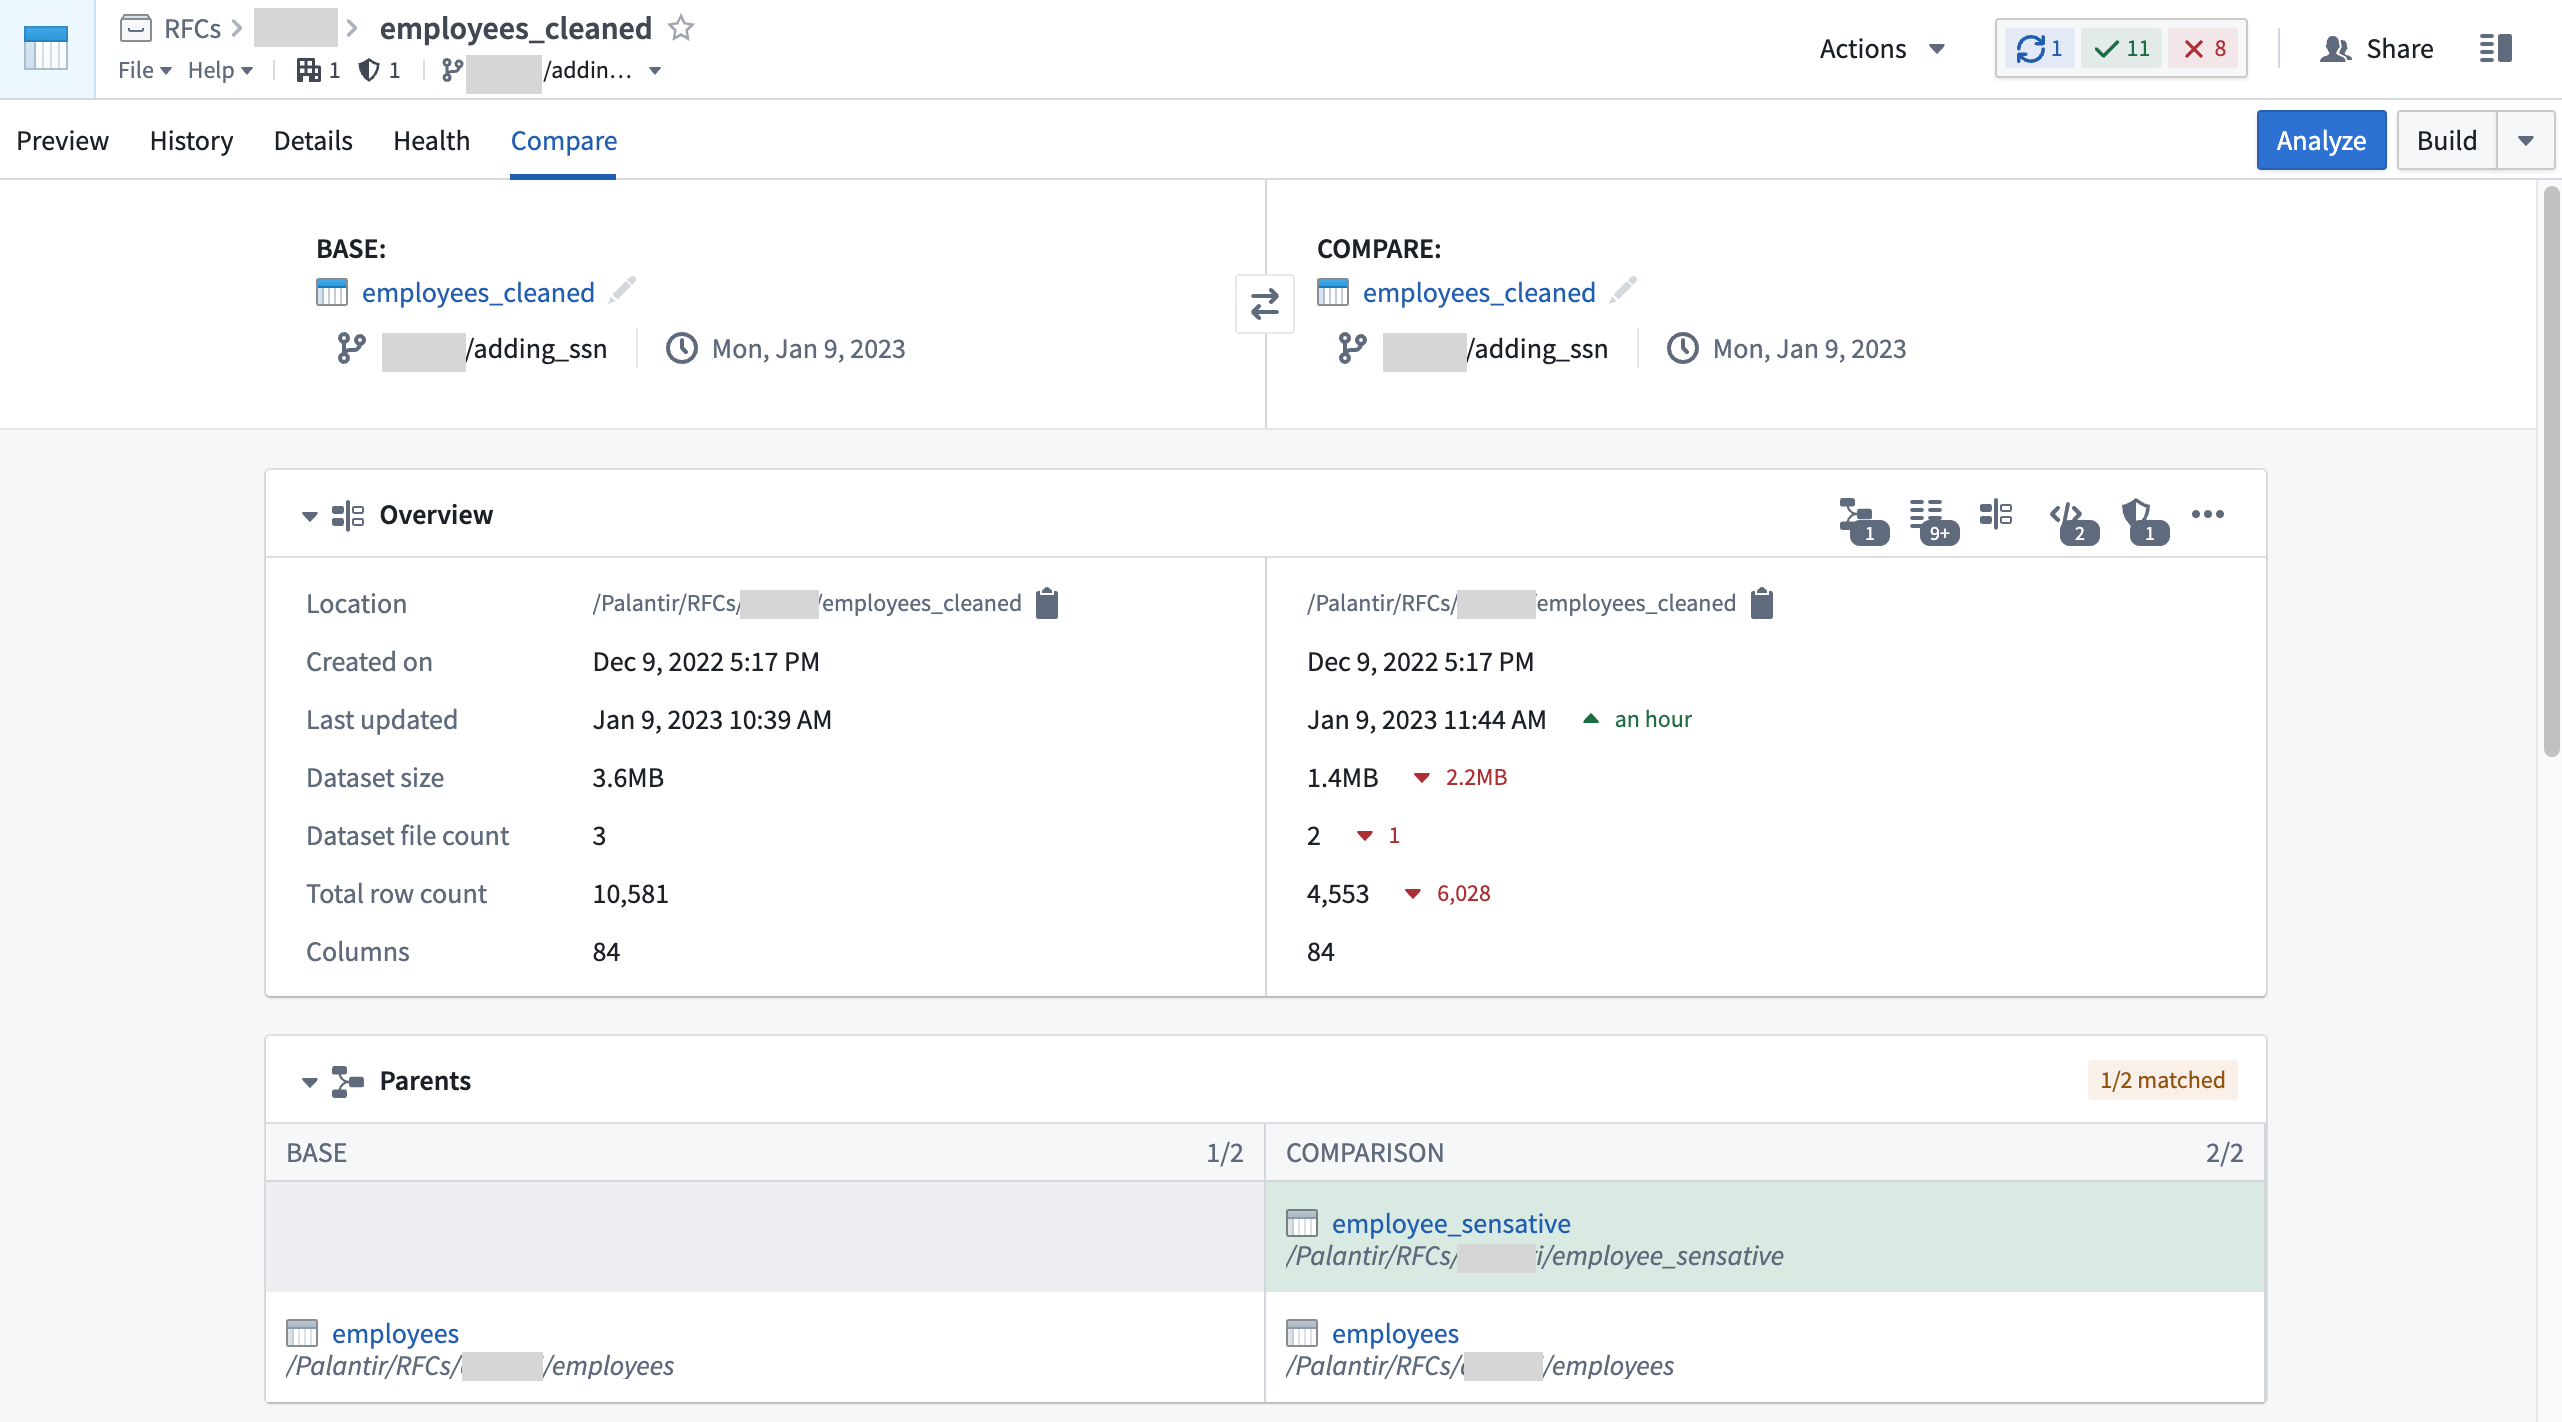
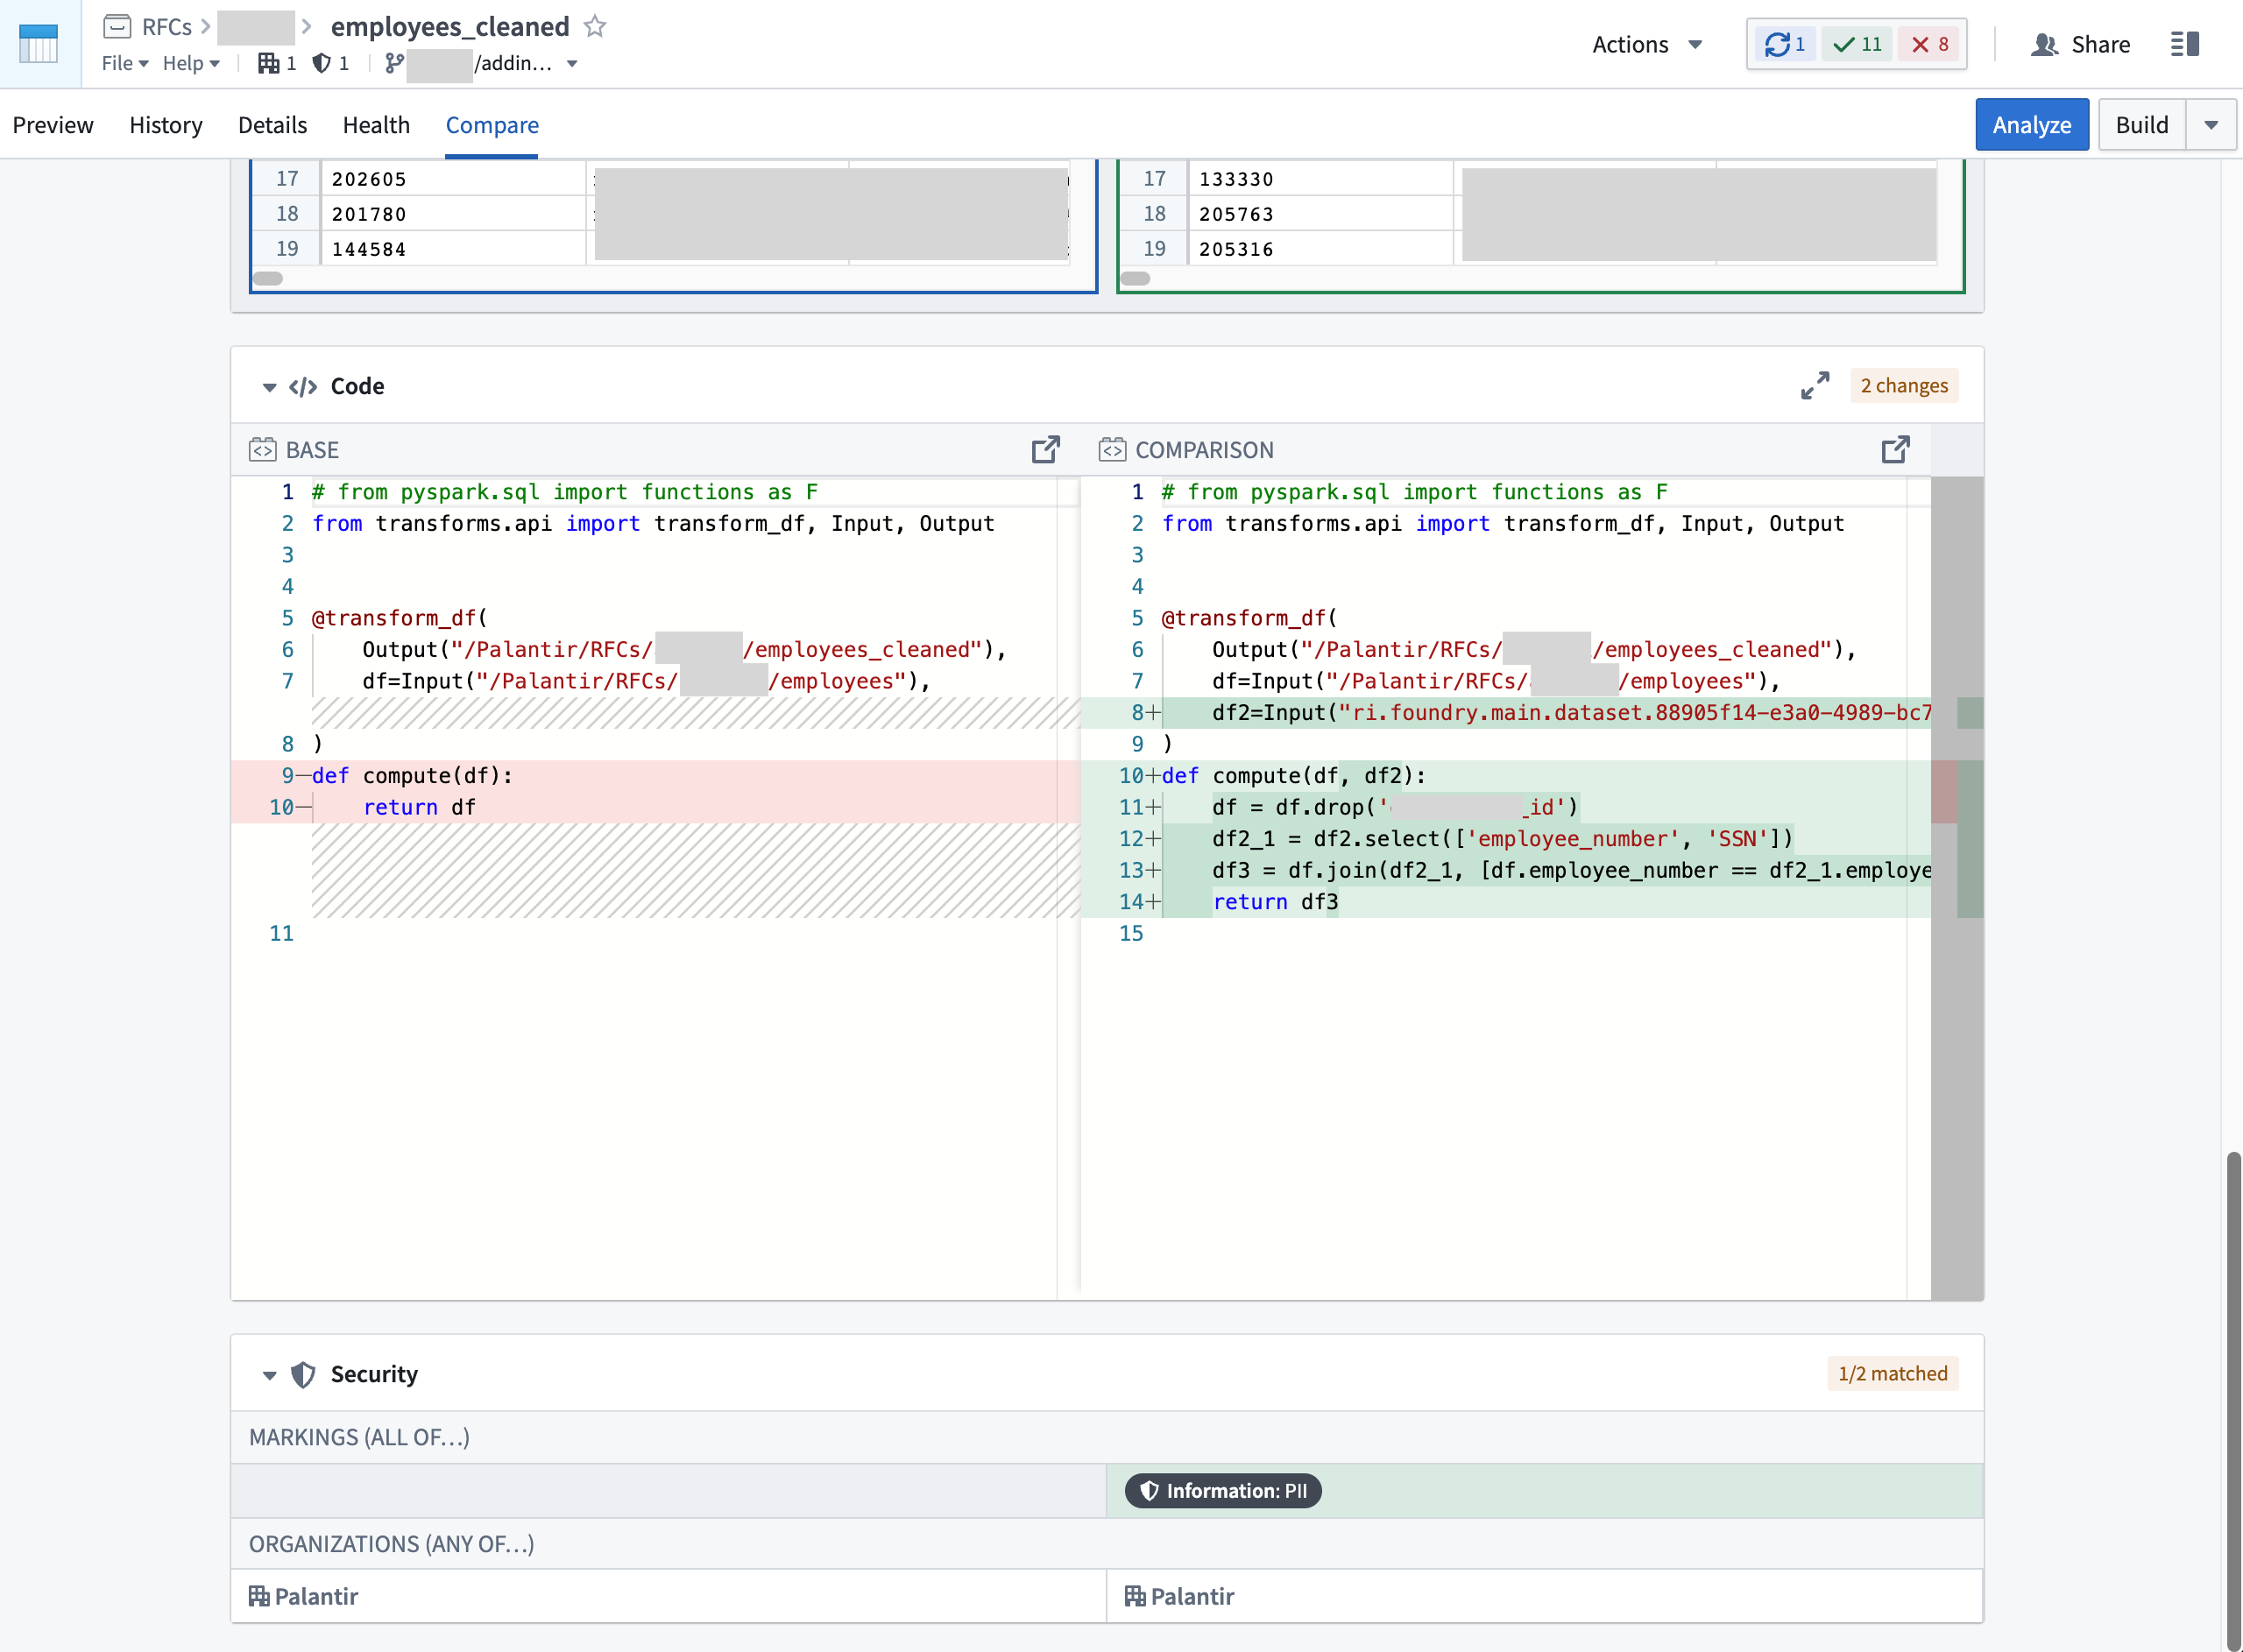
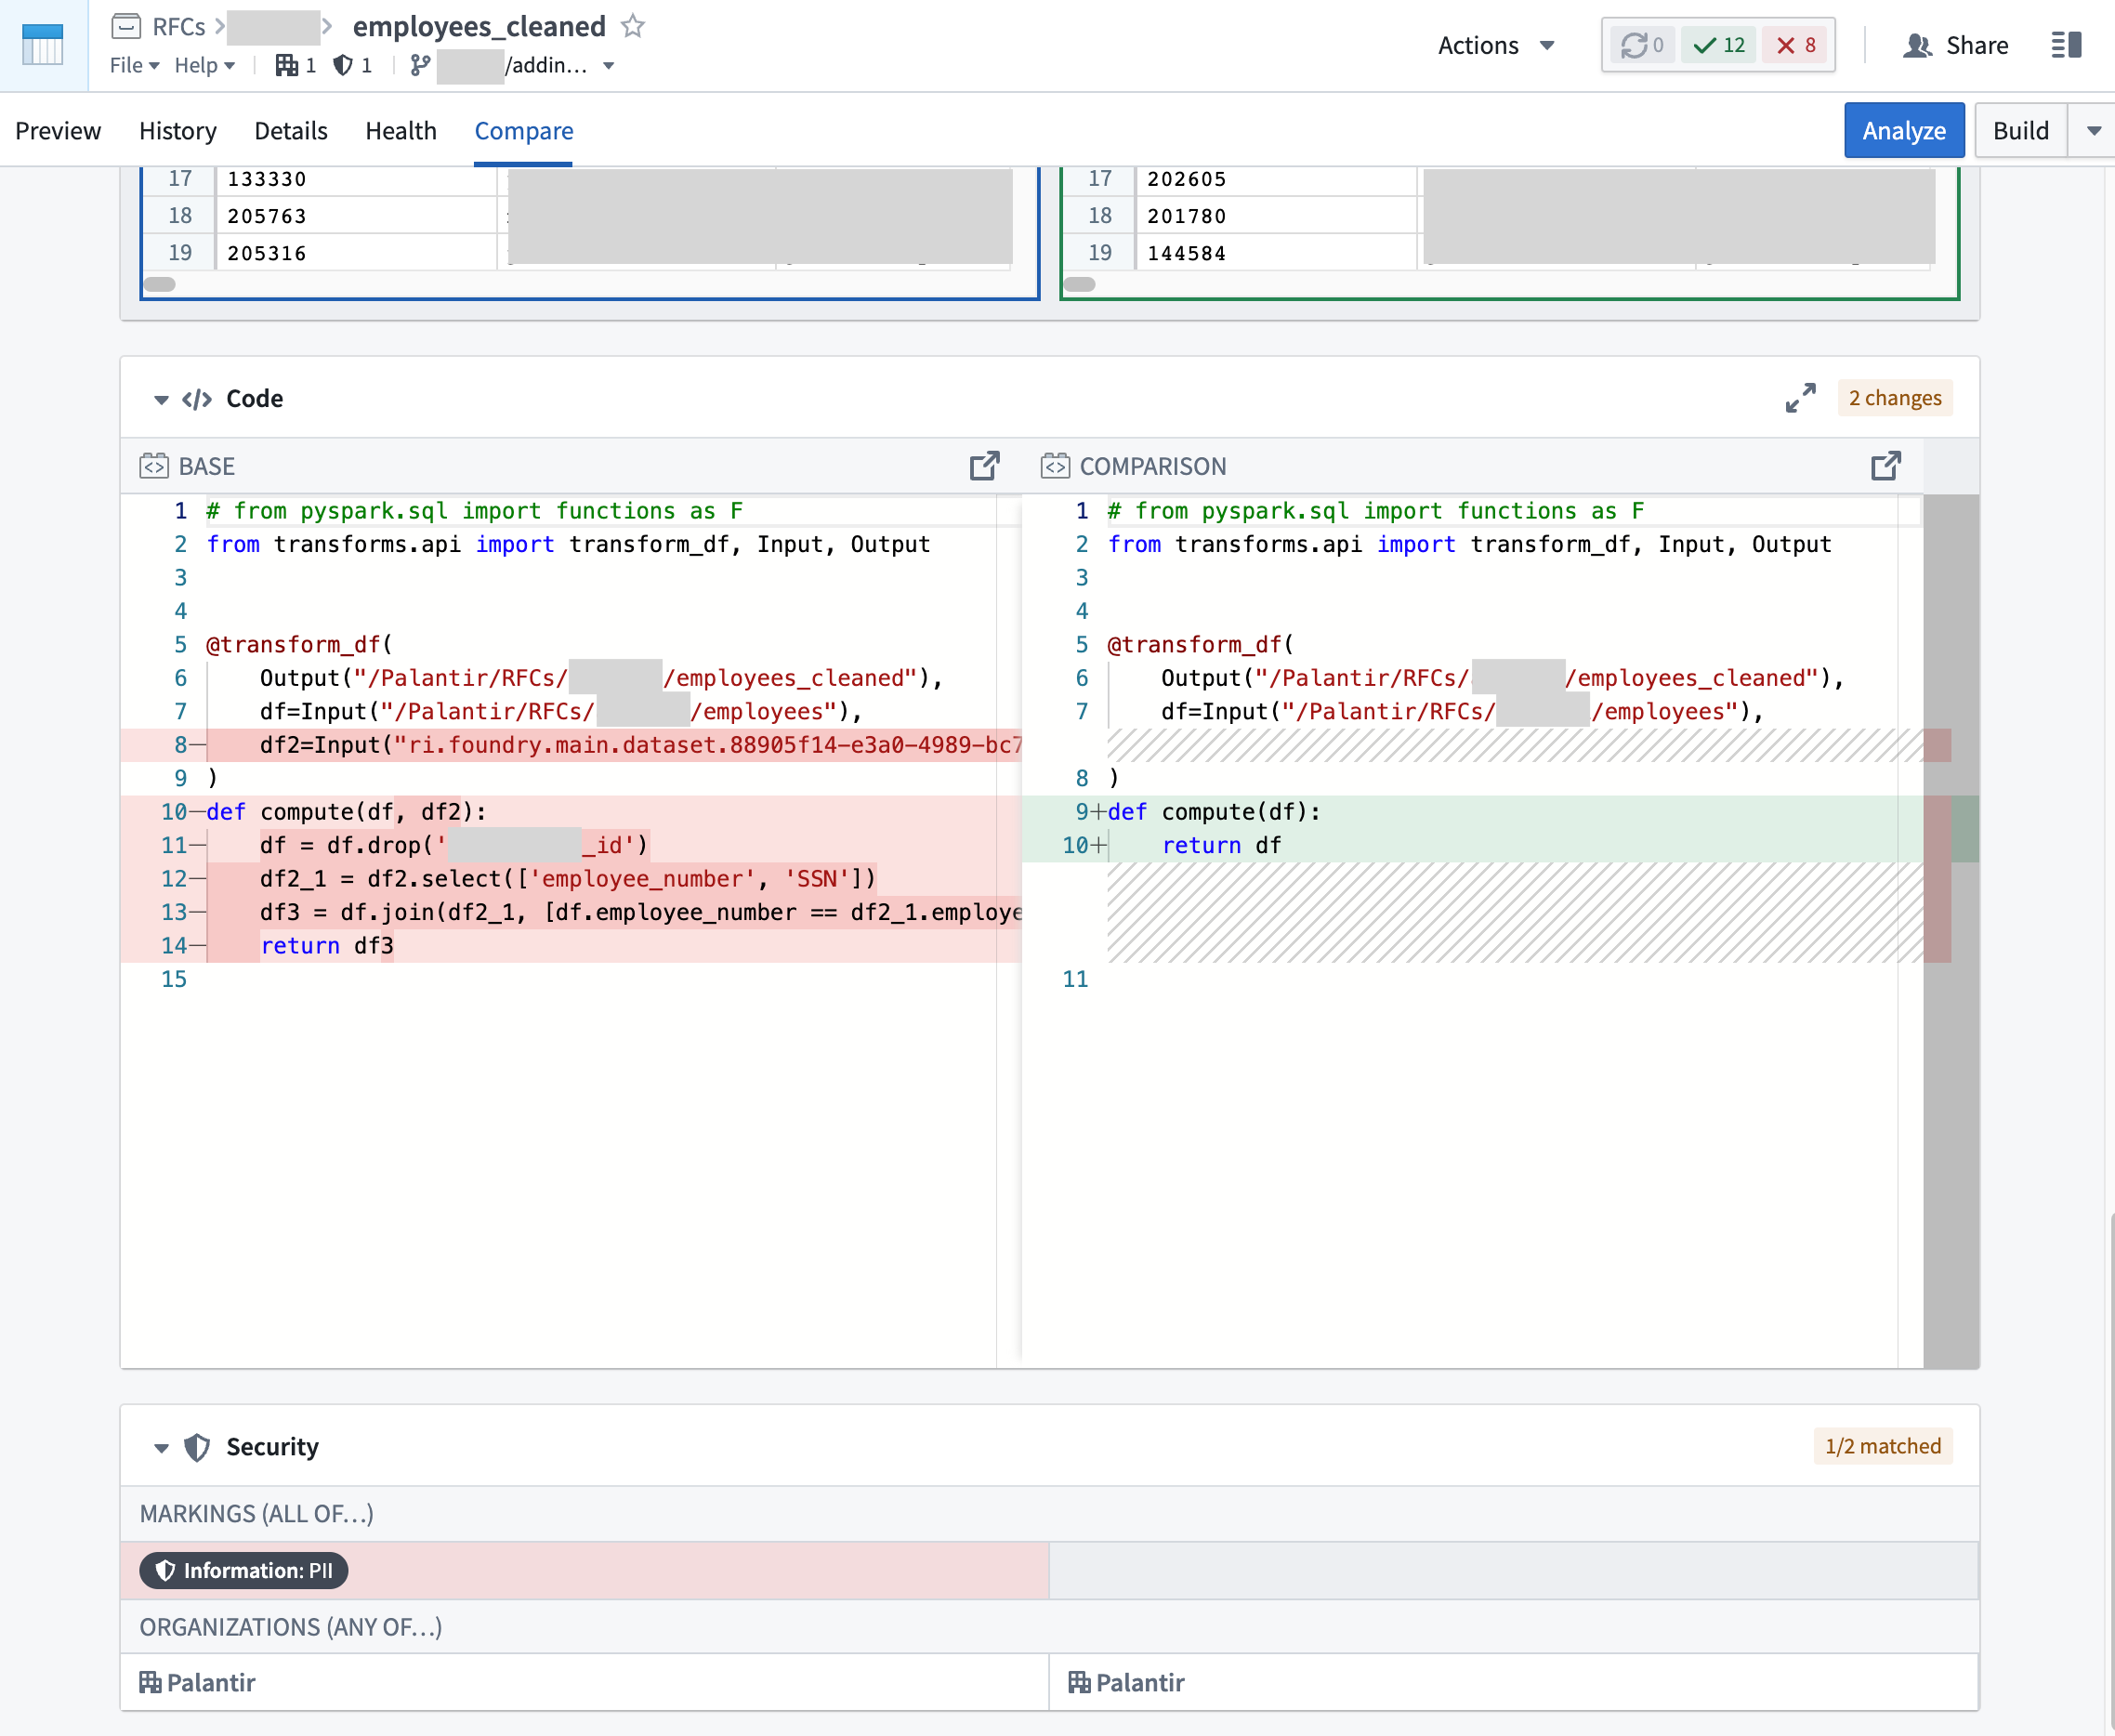
At the bottom of the transaction comparison tool, you can see both the logic and security changes which will help you figure out exactly when a Marking was introduced or removed. The example below shows a new input was added which introduced the PII Marking:
The example below shows PII Marking being removed due to an input being dropped from the logic:
中文翻译
管理标记(Markings)
标记在 Foundry 设置的"标记"部分进行管理。随后,标记会被应用于平台上的各类资源。
创建标记类别(Marking categories)
:::callout{theme="warn" title="类别删除"} 标记类别一旦创建,便无法删除。 :::
管理员用户可以创建标记和标记类别,并控制其元数据、可见性和成员资格。访问平台设置中的"标记"部分需要特殊的平台权限。
如果您是具有必要权限的管理员用户,可以在平台设置的"标记"部分点击新建标记类别按钮来创建标记类别。
创建标记类别时,您可以设置类别可见性并分配类别权限。默认情况下,类别创建者将成为管理员。类别创建者可以选择移除自己的创建者身份,并添加其他管理员。
类别可见性(Category visibility)
标记可见性按类别分配,但"组织"类别除外。各个组织都有自己的可见性设置。
在大多数情况下,标记和类别的名称及描述并非敏感信息,即使是没有标记访问权限的用户也应能看到。此行为由类别可见性决定,默认设置为可见。
如果类别可见性设置为可见,组织中的所有用户都可以在标记界面中看到该类别及其标记的存在。如果用户不符合标记权限要求,他们将看不到该标记或类别的存在。
如果标记类别的可见性设置为隐藏,则该类别及其标记的存在被视为敏感信息。隐藏类别可以对所有未被明确授予类别查看者权限的用户不可见。
标记类别确保以下可见性规则:
- 可见性是为一个类别及其所有标记共同定义的;不能按单个标记分配。
- 所有拥有标记访问权限的用户都可以查看该类别以及该类别中所有其他标记的存在。这些用户不会在API结果中显示为"类别查看者",但应视为具有此权限。
- 所有在标记上拥有角色(管理员、移除者)的用户都可以查看该类别以及该类别中所有标记的存在。这些用户不会在API结果中显示为"类别查看者",但应视为具有此权限。
- 所有在类别上拥有角色(管理员、查看者)的用户都可以查看该类别以及该类别中所有标记的存在。
类别权限(Category permissions)
用户可以拥有指定其如何与标记类别交互的权限:
- 类别管理员: 可以更改类别描述和权限,并在类别中创建标记的用户。
- 类别查看者: 可以看到类别及其所有标记存在的用户。
按组织限制类别
可以将标记类别限制在单个组织内,以确保该组织外的用户永远无法看到该类别。
创建标记
:::callout{theme="warn" title="标记删除"} 标记一旦创建,便无法删除或移动到其他类别。 :::
如果您是具有必要权限的管理员用户,可以在平台设置的"标记"部分点击新建标记按钮来创建新标记。然后,您可以分配标记管理员和标记移除者。
当您在 Foundry 中创建标记时,您会自动获得"管理权限"访问权限。我们建议为不同的团队成员分配新标记上的这些权限。这样,您可以避免依赖单个管理员来管理所有标记权限。
标记权限(Marking permissions)
:::callout{theme="neutral"} 以下权限适用于资源级别的标记。组织拥有独立的权限模型,包含自己的应用组织和扩展访问权限。有关组织级别权限的详细信息,请参阅组织权限。 :::
创建新标记时,您可以添加具有不同访问级别和权限的用户和组:
- 管理权限: 可以授予管理此标记、其成员及其元数据权限的用户。
- 应用标记: 可以将此标记应用于项目和资源的用户。此权限仅授予应用标记的能力,并不授予标记的成员资格。
- 移除标记: 可以从项目和资源中移除该标记的用户。要移除标记,用户还必须能够应用该标记。
- 成员: 可以查看受此标记保护的资源和项目的用户。
以上所有权限都是独立的,不会自动为用户提供成员权限。例如,用户可以在标记上拥有"应用标记"和"管理权限"访问权限,但并非该标记的成员。在这种情况下,用户可以将标记应用于平台上的文件、文件夹和项目,并管理该标记,但他们无法查看带有该标记的数据。
向用户授予标记
标记是全局授予用户的。当用户被授予标记时,该用户全局有权查看受该标记限制的内容类型。但是,拥有标记访问权限并不意味着用户可以查看所有带有该标记的内容;用户还必须通过其角色拥有权限。除非用户在标记上拥有额外的管理权限,否则用户不能向其他用户授予标记访问权限。
如果将标记权限授予某个组,则该组的新用户将继承这些权限。
应用标记
如果您满足以下两个要求,则可以在资源、文件夹或项目上应用标记:
- 您拥有该标记的"应用标记"权限。
- 您拥有"更新资源上的标记"权限,该权限默认包含在"所有者"角色中。
应用标记是一项敏感操作,可能会限制下游用户。在将标记应用于现有管道之前,我们建议执行以下步骤:
- 确认标记的存在: 确保您要应用的标记已创建,或创建标记。
- 创建管道分支: 创建一个新分支以继续执行这些步骤。将标记应用于现有管道时,您可能需要在管道的某个点停止标记传播(例如,以便已清除PII的数据集可以被最终用户打开)。
stop_propagating语法仅在受保护分支上生效。在新分支合并到受保护分支之前,您无法对继承的标记执行stop_propagating操作。 - 审查数据沿袭: 确认您拥有数据沿袭图上的完整节点集,并确认您了解潜在变更的下游影响。
- 审查管道中的事务类型: 标记在事务级别沿数据依赖关系传播。增量构建的数据集(APPEND或UPDATE类型)需要特殊处理。具体来说,使用APPEND事务构建的数据集的最新视图将包含来自旧上游事务的依赖关系;相比之下,使用SNAPSHOT事务(Foundry默认)构建的数据集的最新视图仅依赖于上游数据集的最新事务。如果您只处理SNAPSHOT事务,可以继续执行这些步骤。如果不是,请参阅关于APPEND和UPDATE事务以及标记如何传播的文档。
- 确定何时停止继承标记: 探索管道数据沿袭中的节点,并审查列和数据预览,以确定应停止继承您要应用的标记的点。例如,当管道中移除了DOB(出生日期)列时,您可能希望停止传播PII标记。在此步骤中,您可以激活模拟模式,查看标记将在何处以及如何传播。
- 预先进行必要的转换更改: 在您的分支中,在您确定的转换中添加
stop_propagating语法。将您的分支合并到受保护分支,以便stop_propagating语法生效。 - 构建您的生产管道: 构建所有下游转换,包括您确定为
stop_propagating的节点。您需要重新构建包含stop_propagating语法的数据集以及stop_propagating转换下游的所有数据集。如果您有下游的APPEND或UPDATE数据集,请查阅本指南。 - 审查模拟变更: 审查管道的最终模拟数据沿袭。确认
stop_propagating转换下游的数据集不受新标记应用的影响。确保敏感列不会出现在不会接收传播标记的数据集中。 - 应用标记: 上述步骤应确保应用标记将保护包含敏感数据的数据集,并且标记不会超出必要范围传播。此时,您可以应用标记。
:::callout{theme="neutral"} 如果您在应用标记后发现错误(例如,大量用户无法看到他们本应能看到的数据),您可以移除标记,它将立即停止传播。然后,您应再次审查模拟变更以确定问题的原因。 :::
在下面的示例中,DOB列已被移除,并且stop_propagating语法已应用于本体passengers数据集。PII标记已应用于原始passenger数据集,并且仅传播到干净的passenger数据集。
移除标记
您可以移除标记以向更多用户授予访问权限,重新分类已转换的数据,或将派生资源与继承的标记分离。
例如,假设数据集A包含PII,并且有一个标记保护从数据集A派生的数据集。如果数据集B是从数据集A派生的,但已通过转换移除了PII,您可能希望从数据集B中移除标记,以允许更广泛地使用数据。
要移除标记,您必须同时拥有应用和移除特定标记的权限。您还需要通过允许您更改其标记的角色来访问相关资源。如果您使用默认角色,则所有者角色提供此访问权限。
移除直接应用的标记
直接从文件、文件夹或项目中移除标记将立即从任何继承该标记的依赖项中移除该标记。直接移除标记后,您无需重新构建下游数据集,因为标记将立即在下游被移除。以下示意性示例显示了一个直接应用的PII标记。
移除继承的标记
您只能从受限视图和数据集中移除继承的标记。如果在派生依赖文件时移除了或混淆了受限内容,您可以从派生文件中移除标记。当继承的标记被移除时,下游数据集将不再受该标记保护,更多用户可能可以访问该数据集。用户仍然需要标记访问权限才能查看上游数据。
要从受限视图中移除继承的标记,请编辑受限视图,并在相应标记旁边点击停止传播。
要从数据集中移除继承的标记,请在转换代码中使用stop_propagating语法。要安全地移除继承的标记,请遵循以下步骤:
- 确定在何处移除敏感数据: 审查您的完整管道,并决定在何处移除敏感数据。
- 创建分支:
stop_propagating语法仅在同时满足以下条件的分支上生效:受保护且启用了"合并前需要安全审批"设置。在您的分支合并到受保护分支之前,您无法对继承的标记执行stop_propagating操作。 - 进行必要的转换更改: 在您选定的数据集中,移除敏感数据并在转换中添加
stop_propagating语法。 - 构建您的分支: 构建您的分支,并确认输出数据集中已移除敏感数据。此时,
stop_propagating语法不会阻止标记被继承,因为您处于非受保护分支上。 - 合并您的分支: 确认敏感数据已移除后,您可以安全地将转换更改合并到主分支。合并分支将应用
stop_propagating语法。 - 构建主分支及其下游依赖项:
stop_propagating更改必须沿管道中的最新事务传播,这要求您重新构建包含stop_propagating语法的数据集以及stop_propagating转换下游的所有数据集。所有数据集构建完成后,确认继承的标记已被移除。如果存在下游的APPEND或UPDATE事务,请查阅附加文档。
在下面的示意性示例中,DOB列已被移除,并且stop_propagating语法已应用于本体passengers数据集,以阻止PII标记进一步向下游传播。
调查标记继承
标记沿文件层次结构和数据依赖关系继承。这意味着文件本身可能受标记保护,和/或数据本身受标记保护。有时您需要调查标记的来源,从概念上理解标记可以继承的不同方式非常重要。
您可以通过选择文件打开右侧详细信息窗格,并查看访问要求 > 标记部分来查看文件的标记。
调查文件层次结构
要查看文件的标记,请选择它并打开资源面板。查看访问部分。
沿文件层次结构继承的标记由文件夹侧边栏图标指示。
要确定标记在文件层次结构中的起源点,请在 Foundry 工作区中遍历文件层次结构。在下面的示意性示例中,我们可以通过从原始文件开始遍历文件层次结构并检查文件夹资源,验证flight data文件夹具有PII标记。访问信息显示在资源侧边栏上。
调查数据依赖关系
要确定标记源自哪个数据依赖关系,您可以使用数据沿袭应用程序,或在打开数据集文件后使用"比较"选项卡。
由于标记在文件级别应用,但沿事务传播,因此可能难以确定标记何时被引入数据集。我们建议首先检查数据沿袭应用程序,以查看标记的来源。
使用数据沿袭应用程序,点击图例 > 权限类型:数据集中的数据访问。然后展开数据沿袭的所有上游节点,并遍历数据沿袭以查看标记的来源。沿数据依赖关系继承的标记由数据沿袭侧边栏图标指示。
在下面的示例截图中,employee_sensitive数据集是PII标记的起源:
要全面了解标记具体何时被引入,请查看相关文件的事务。打开特定文件并导航到比较选项卡,比较来自不同分支和时间戳的不同事务,以了解随时间发生的安全和逻辑更改。
![]()
在事务比较工具的底部,您可以看到逻辑和安全更改,这将帮助您准确确定标记何时被引入或移除。下面的示例显示添加了一个新输入,从而引入了PII标记:
下面的示例显示由于从逻辑中删除了一个输入,PII标记被移除: