Create Match Actions(创建匹配操作)
Match actions allow Sensitive Data Scanner to perform an automatic action on your behalf on a dataset that is detected as a match. There are three types of match actions:
- "Apply Markings" Match Action: Instructs Sensitive Data Scanner to apply markings on the datasets that matched any of the specified match conditions.
- "Create Issues" Match Action: Instructs Sensitive Data Scanner to create an issue on the columns with match any of the specified match conditions.
- "Obfuscate Data" Match Actions: Instructs Sensitive Data Scanner to encrypt or hash the matched data using Cipher.
:::callout{theme="warning" title="Test your match conditions"} If your sensitive data scan covers a large number of datasets, we recommend that you test the match conditions before proceeding further since misconfigured match conditions can produce false positives in the form of unwanted issues or Markings on datasets.
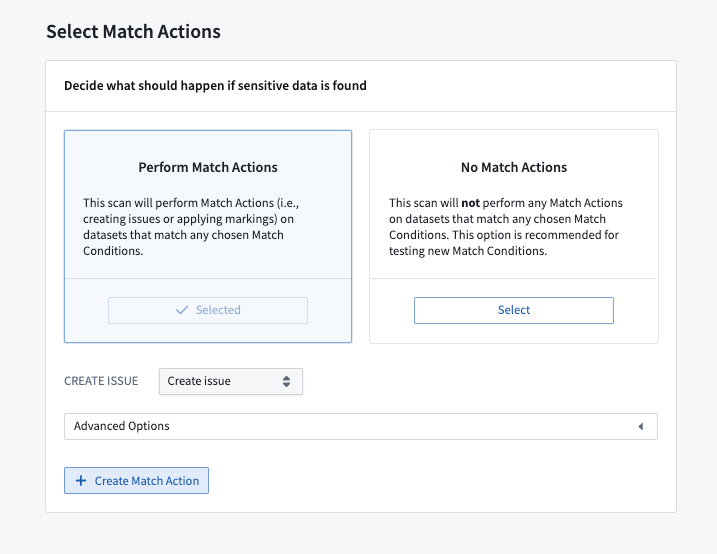
You can test the match conditions by selecting No Match Actions for your scan. Once you have verified that the match condition matches the expected format of data, you can then select one of the other Match actions for future one-time scans or Recurring Scans. :::
Similar to creating match conditions, there are two ways to start creating match actions — either from the Sensitive Data Scanner landing page, or while creating an sensitive data scan.
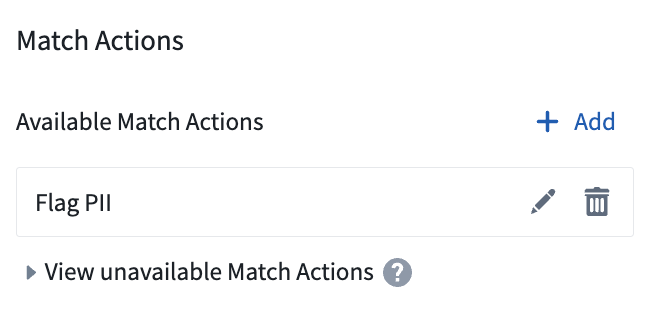
From the landing page, select Add above the Available match actions listed in the match actions sidebar.
While creating a sensitive data scan, on the Select match actions page, you can also create an match action by clicking Create match action and immediately use that in your scan.
Both of these starting points open the same match action creation process. From there you can choose whether to create an Add markings match action, or a Create issues match action.
Create an “Apply Markings” Match Action
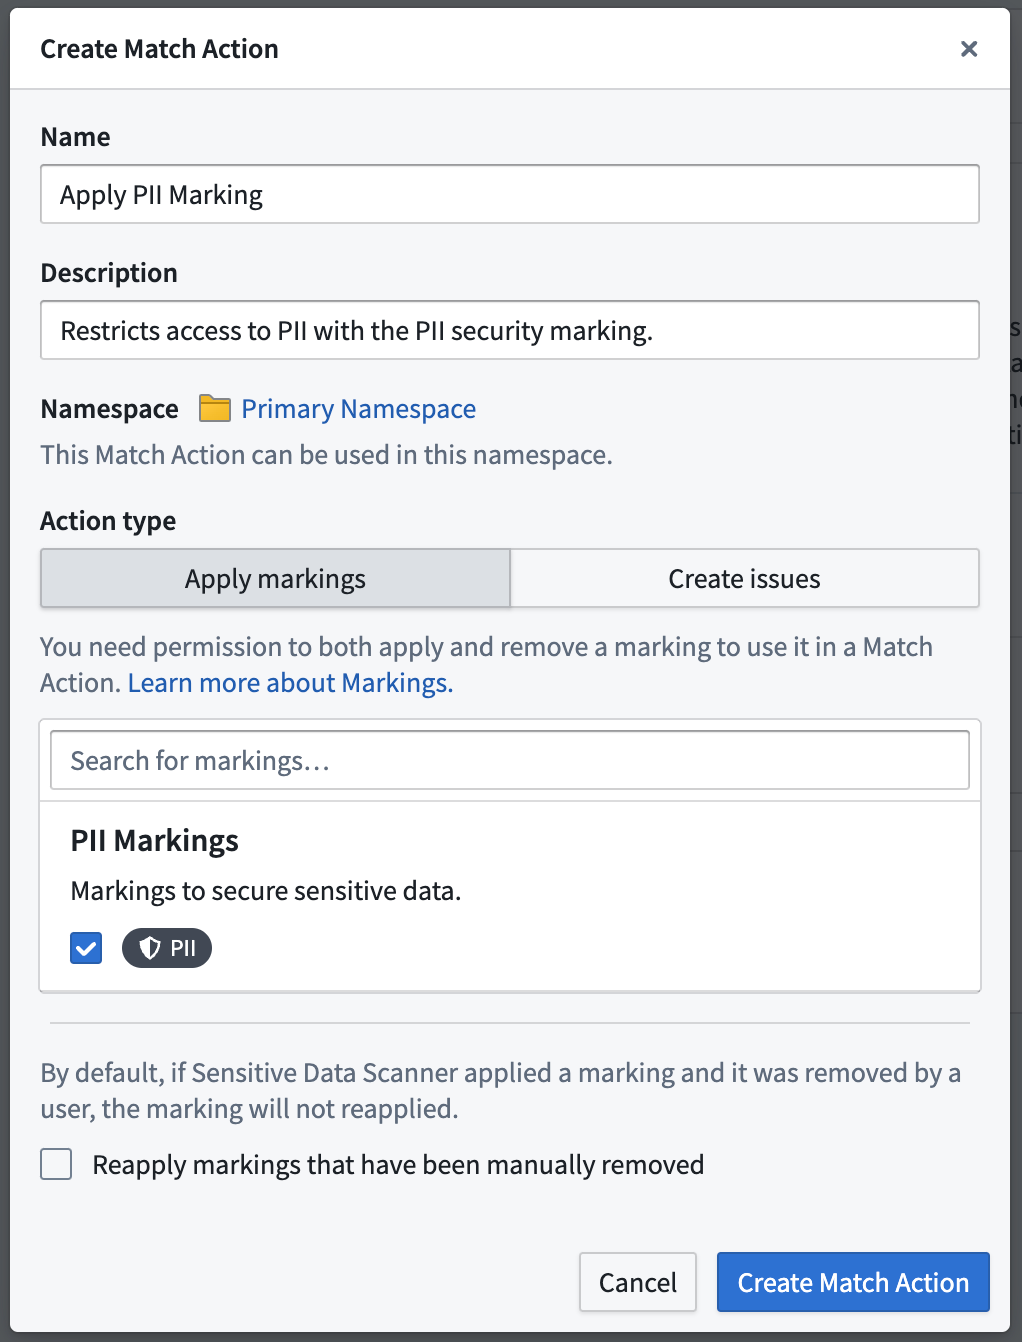
This is an example of the creation process for an "Apply markings" match action. In this example, the PII Marking will be applied on matching datasets.
Additionally, the Reapply markings that have been manually removed option is unselected, meaning that if the marking was previously applied by Sensitive Data Scanner (for example, during a previous scan), and was manually removed by the user, the marking will not be re-applied. Enabling the option allows the marking to be re-applied.
Create a “Create Issues” Match Action
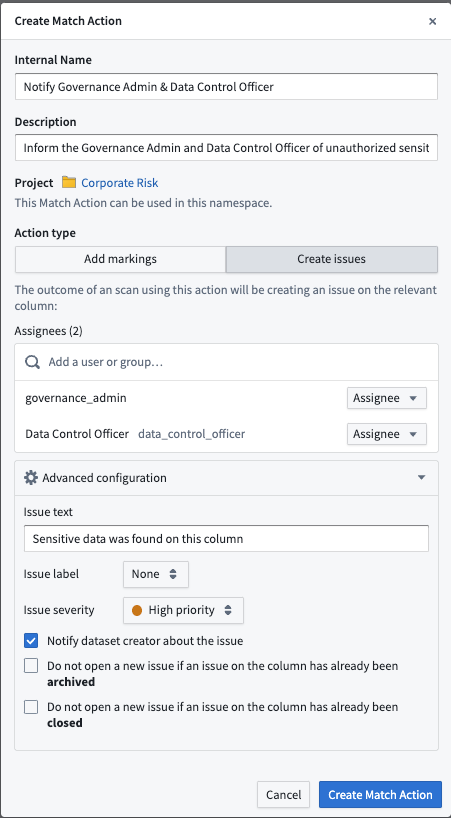
This is an example of the creation process for a Create issues match action. Here, you will notice that two users have been selected as Assignees of the issues that Sensitive Data Scanner will create upon highlighting a match — “Governance admin” and “Data control officer”.
Additionally, there are advanced configurations available for “Create Issues” match actions:
- Issue text: You can customize the text that the issue will have in it when the match action is performed.
- Issue label: You can select one of the issue labels available to your space to facilitate effective triaging of issues.
- Issue severity: You can set the priority of the issue, depending on the scan you would like to run.
- Notify dataset creator about the issue: If checked, the user that created the dataset will be informed that sensitive data was found in the dataset that they created.
- Do not open new issue if:
- Archived — If checked, Sensitive Data Scanner will not create a new issue if a previous scan created an issue that was then manually archived.
- Closed — If checked, Sensitive Data Scanner will not create a new issue if a previous scan created an issue that was then manually closed.
Create an "Obfuscate Data" Match Action
Obfuscate Data Match Actions allow you to automatically encrypt or hash matched data using Cipher. For each scanned resource, Sensitive Data Scanner will create an output dataset containing the obfuscated data.
To create a new Obfuscate Data Match Action, you can open the Create Match Action dialog and select Obfuscate data.
You will need a Cipher Channel and a Cipher License. If you do not have those already, you can create them in Cipher.
The Cipher Channel specifies the cryptographic algorithm used for the obfuscation. Sensitive Data Scanner supports:
- Probabilistic encryption: AES GCM SIV
- Deterministic encryption: AES SIV
- Hashing: SHA512 and SHA256
Note that Visual obfuscation channels are not supported in Sensitive Data Scanner.
A Cipher License grants a set of permissions to interact with a Cipher channel. Sensitive Data Scanner requires an Admin License, as it requires cryptographic key access to perform the obfuscation.
Once you made sure you have a Cipher License available, you can select it in the Create Match Action dialog.
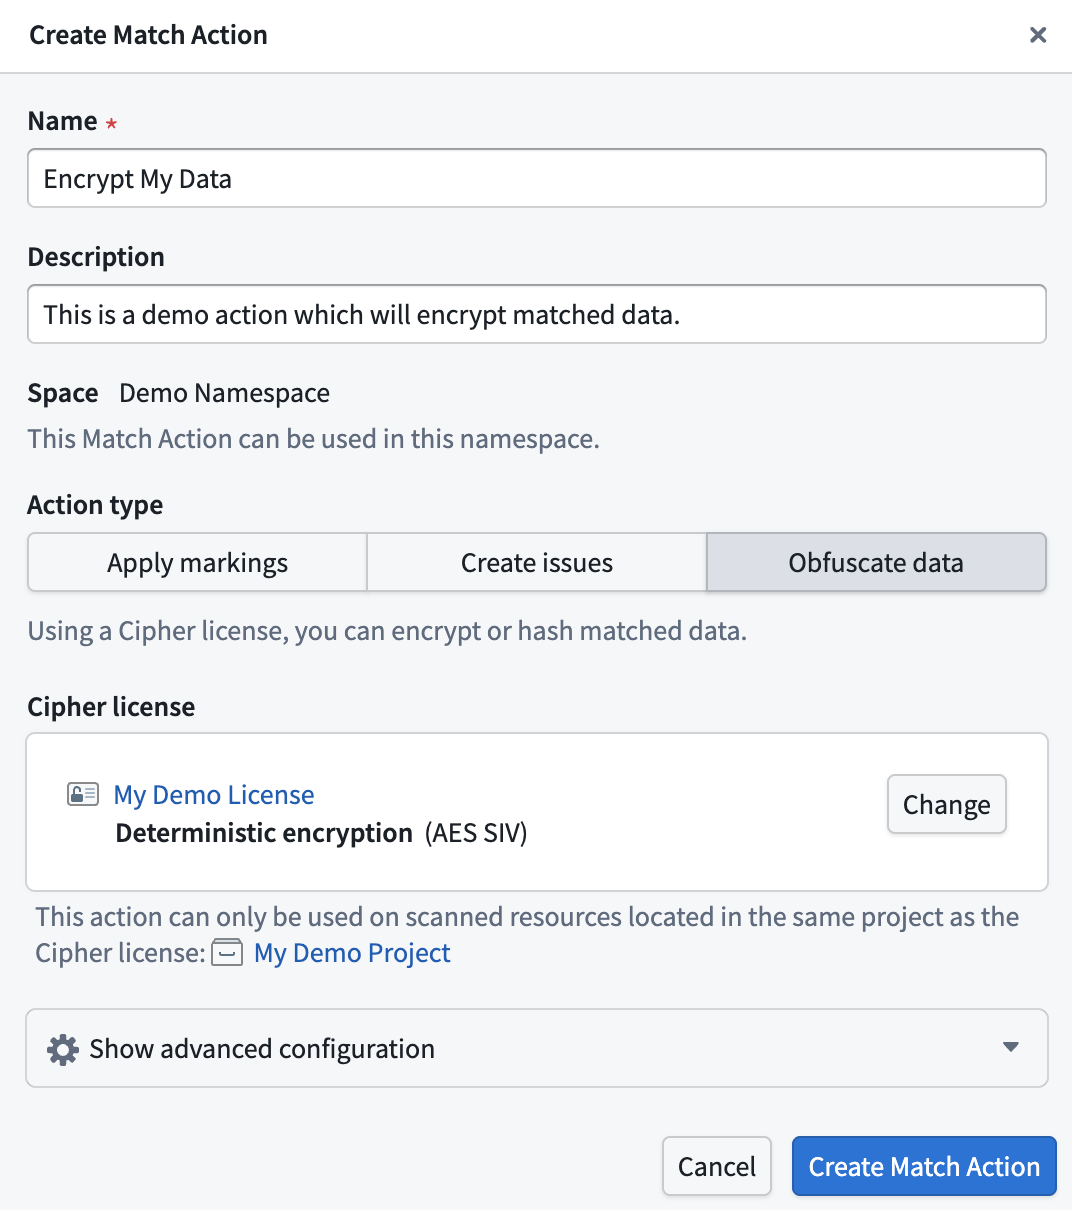
The Match Action can only be applied on scanned resources that are located in the same project as the Cipher license.
:::callout{theme="warning"} An Obfuscate Data Action will create an output dataset for every scanned dataset. Depending on the number of scanned resources, this can lead to a large amount of created output datasets. We recommend running this scan on a small amount of data.
Obfuscate Data Actions are not reversible through the Sensitive Data Scanner. Any datasets created by Sensitive Data Scanner must be deleted manually. :::
Obfuscation modes
Select the Show advanced configuration panel to expand a set of four different options to customize the obfuscation mode. This defines what specific data will be obfuscated in case of a match:
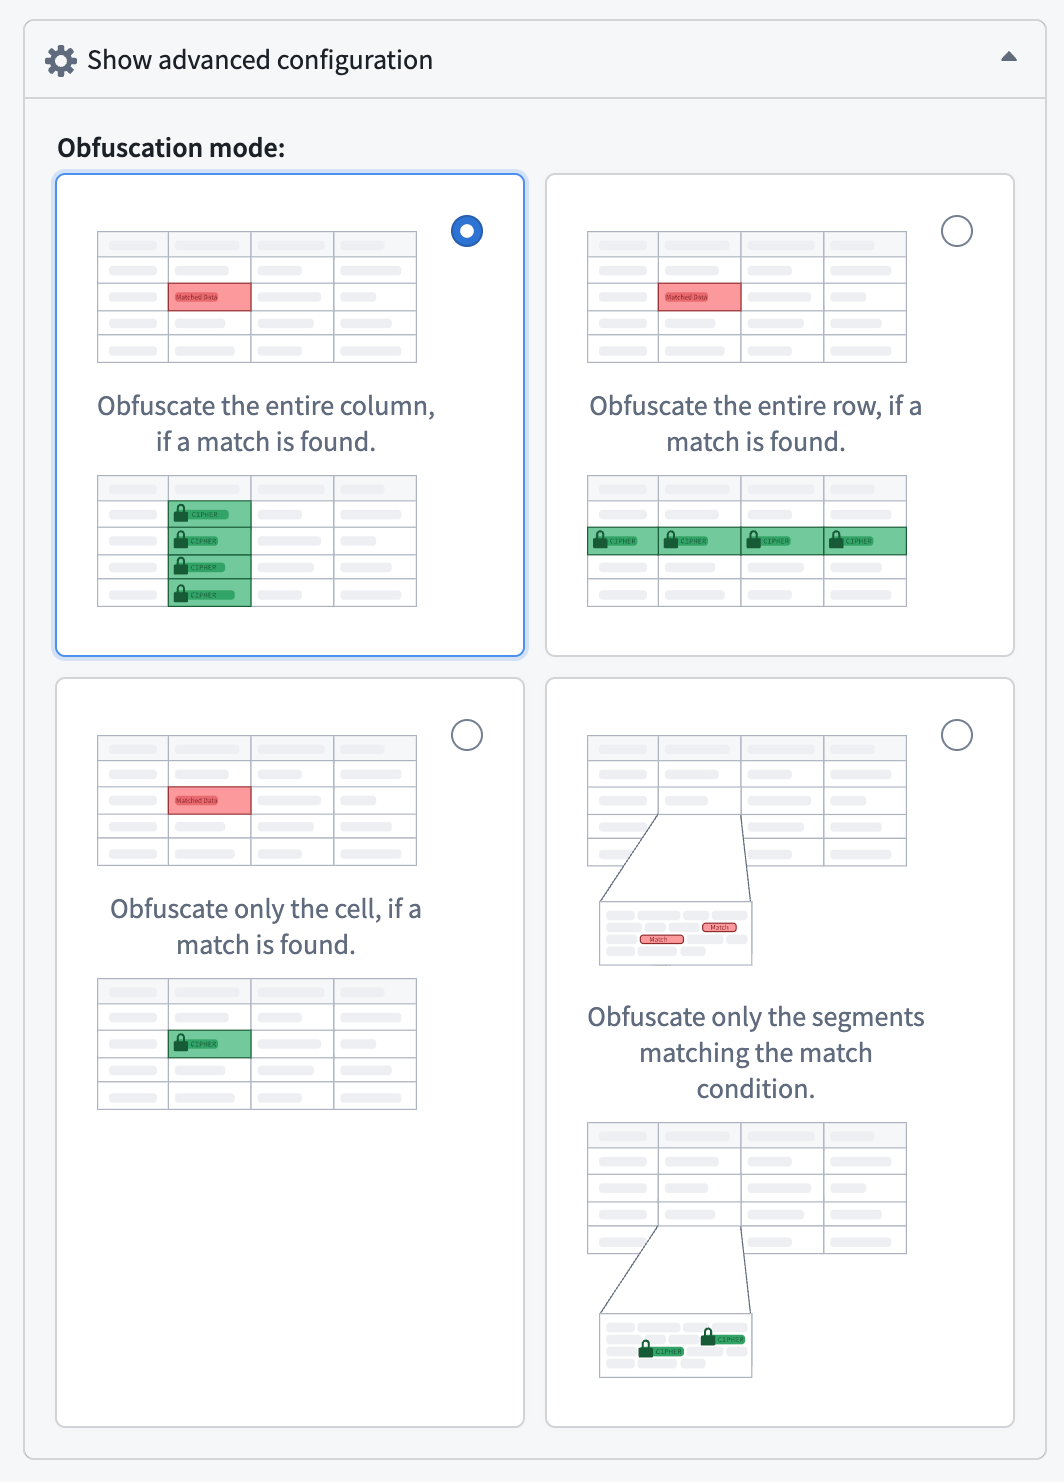
- Entire column (default): Obfuscate the entire column if a match is found.
- Entire row: Obfuscate the entire row if a match is found.
- Matched cell only: Obfuscate only the cells in which a match is found.
- Matched segments only: Obfuscate only the text segments that match the match condition.
中文翻译
创建匹配操作
匹配操作允许敏感数据扫描器(Sensitive Data Scanner)在检测到匹配的数据集上自动执行操作。共有三种类型的匹配操作:
- "应用标记"匹配操作: 指示敏感数据扫描器对匹配任何指定匹配条件的数据集应用标记。
- "创建问题"匹配操作: 指示敏感数据扫描器在匹配任何指定匹配条件的列上创建问题。
- "混淆数据"匹配操作: 指示敏感数据扫描器使用Cipher对匹配的数据进行加密或哈希处理。
:::callout{theme="warning" title="测试您的匹配条件"} 如果您的敏感数据扫描覆盖大量数据集,建议您先测试匹配条件再继续操作,因为配置错误的匹配条件可能会在数据集上产生误报,表现为不必要的问题或标记。
您可以通过为扫描选择无匹配操作来测试匹配条件。确认匹配条件与预期数据格式匹配后,即可为后续的一次性扫描或定期扫描选择其他匹配操作。 :::
与创建匹配条件类似,开始创建匹配操作也有两种方式——从敏感数据扫描器首页,或在创建敏感数据扫描时进行。
从首页开始,点击匹配操作侧边栏中可用匹配操作上方的添加按钮。
在创建敏感数据扫描时,进入选择匹配操作页面后,您也可以点击创建匹配操作来创建匹配操作,并立即在扫描中使用。
这两种入口都会打开相同的匹配操作创建流程。在此流程中,您可以选择创建添加标记匹配操作或创建问题匹配操作。
创建"应用标记"匹配操作
以下是创建"应用标记"匹配操作的示例流程。在此示例中,PII标记将被应用于匹配的数据集。
此外,重新应用已手动移除的标记选项未被选中,这意味着如果该标记之前由敏感数据扫描器应用(例如在之前的扫描中),后被用户手动移除,则不会重新应用该标记。启用该选项后,标记将被重新应用。
创建"创建问题"匹配操作
以下是创建"创建问题"匹配操作的示例流程。您会注意到,已选择两名用户作为敏感数据扫描器在发现匹配时创建问题的受理人——"治理管理员"和"数据管控官"。
此外,"创建问题"匹配操作还提供高级配置选项:
- 问题文本: 您可以自定义执行匹配操作时问题中包含的文本内容。
- 问题标签: 您可以选择空间中可用的问题标签,以便高效分类处理问题。
- 问题严重级别: 您可以根据要运行的扫描设置问题的优先级。
- 通知数据集创建者: 如果勾选,数据集创建者将被告知其创建的数据集中发现了敏感数据。
- 在以下情况下不创建新问题:
- 已归档 — 如果勾选,当之前的扫描已创建问题且该问题被手动归档时,敏感数据扫描器将不会创建新问题。
- 已关闭 — 如果勾选,当之前的扫描已创建问题且该问题被手动关闭时,敏感数据扫描器将不会创建新问题。
创建"混淆数据"匹配操作
混淆数据匹配操作允许您使用Cipher自动加密或哈希处理匹配的数据。对于每个扫描的资源,敏感数据扫描器将创建一个包含混淆后数据的输出数据集。
要创建新的混淆数据匹配操作,您可以打开创建匹配操作对话框并选择混淆数据。
您需要拥有一个Cipher通道和一个Cipher许可证。如果您尚未拥有这些资源,可以在Cipher中创建。
Cipher通道指定用于混淆的加密算法。敏感数据扫描器支持:
- 概率性加密:AES GCM SIV
- 确定性加密:AES SIV
- 哈希处理:SHA512 和 SHA256
请注意,敏感数据扫描器不支持可视化混淆通道。
Cipher许可证授予一组与Cipher通道交互的权限。敏感数据扫描器需要管理员许可证,因为它需要加密密钥访问权限来执行混淆操作。
确认拥有可用的Cipher许可证后,您可以在创建匹配操作对话框中选择它。
该匹配操作只能应用于与Cipher许可证位于同一项目中的扫描资源。
:::callout{theme="warning"} 混淆数据操作会为每个扫描的数据集创建一个输出数据集。根据扫描资源的数量,这可能导致大量输出数据集的创建。建议对少量数据运行此扫描。
混淆数据操作不可通过敏感数据扫描器逆转。敏感数据扫描器创建的任何数据集必须手动删除。 :::
混淆模式
选择显示高级配置面板可展开四种不同选项,用于自定义混淆模式。这定义了在匹配情况下哪些具体数据将被混淆:
- 整列(默认):如果发现匹配,混淆整个列。
- 整行:如果发现匹配,混淆整个行。
- 仅匹配单元格:仅混淆发现匹配的单元格。
- 仅匹配片段:仅混淆与匹配条件匹配的文本片段。