Installations in Foundry Marketplace(Foundry Marketplace 中的安装(Installations))
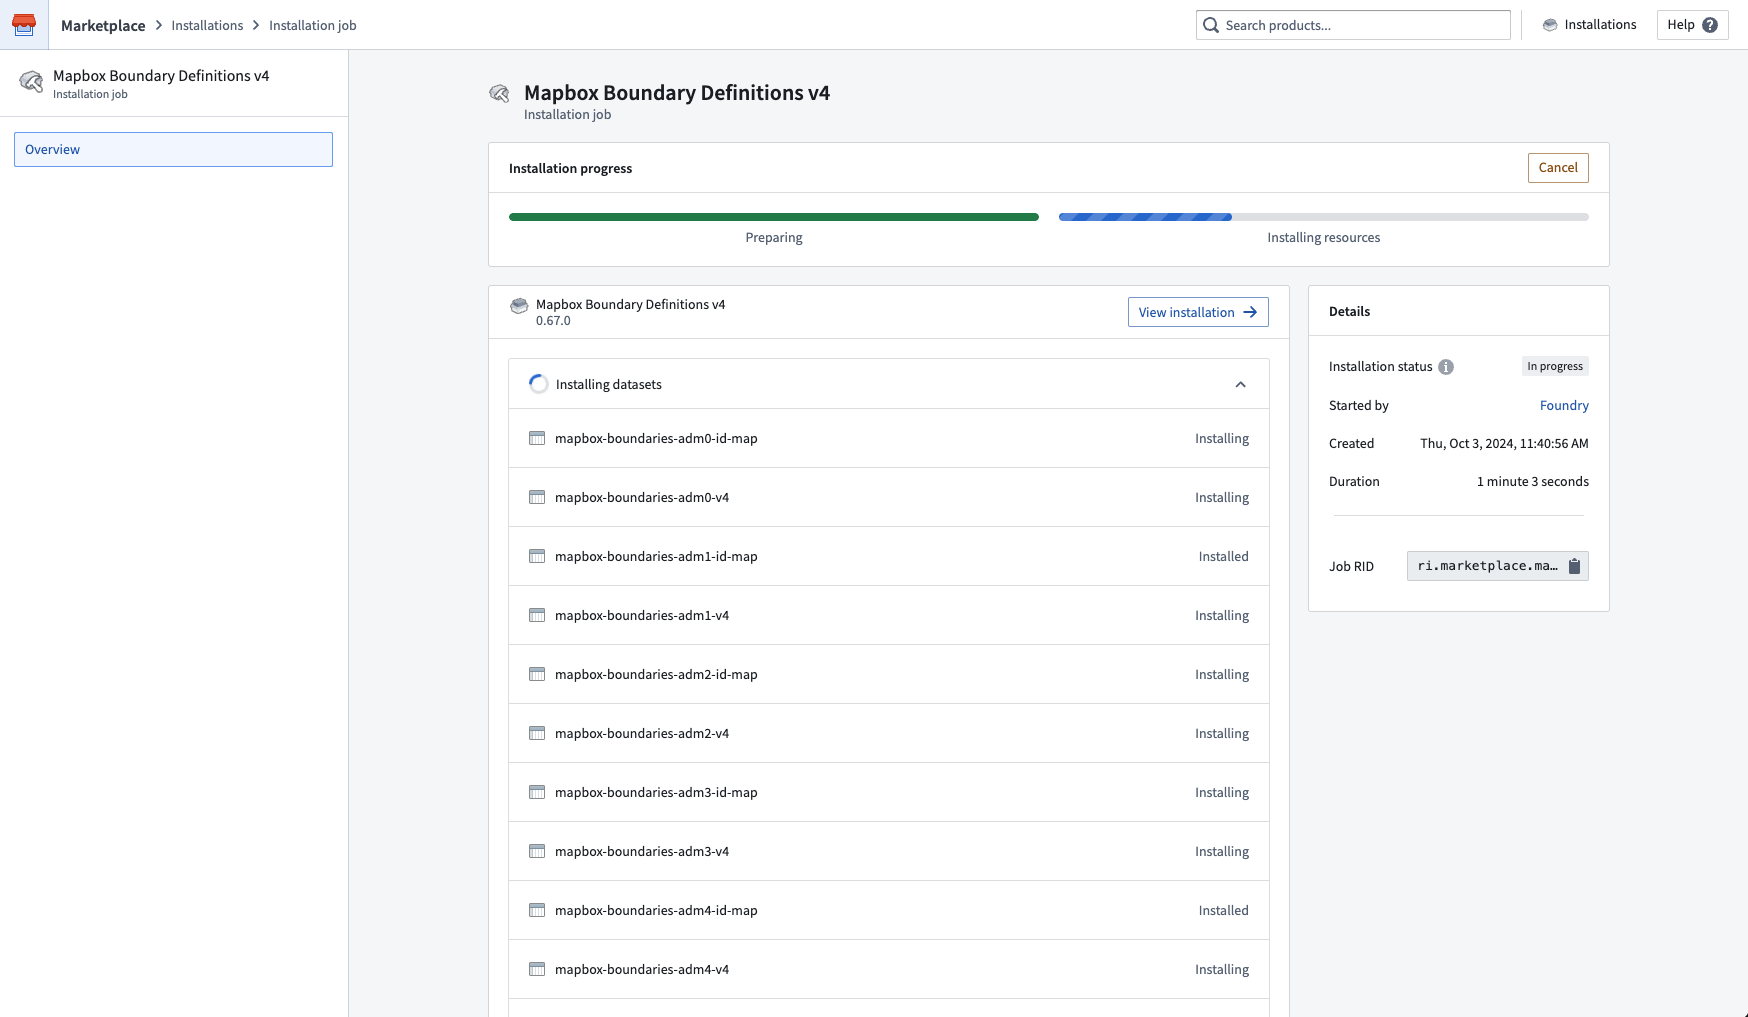
Once you’ve begun a product installation, you can monitor your installation job. The screenshot below shows the installation job view of Marketplace.
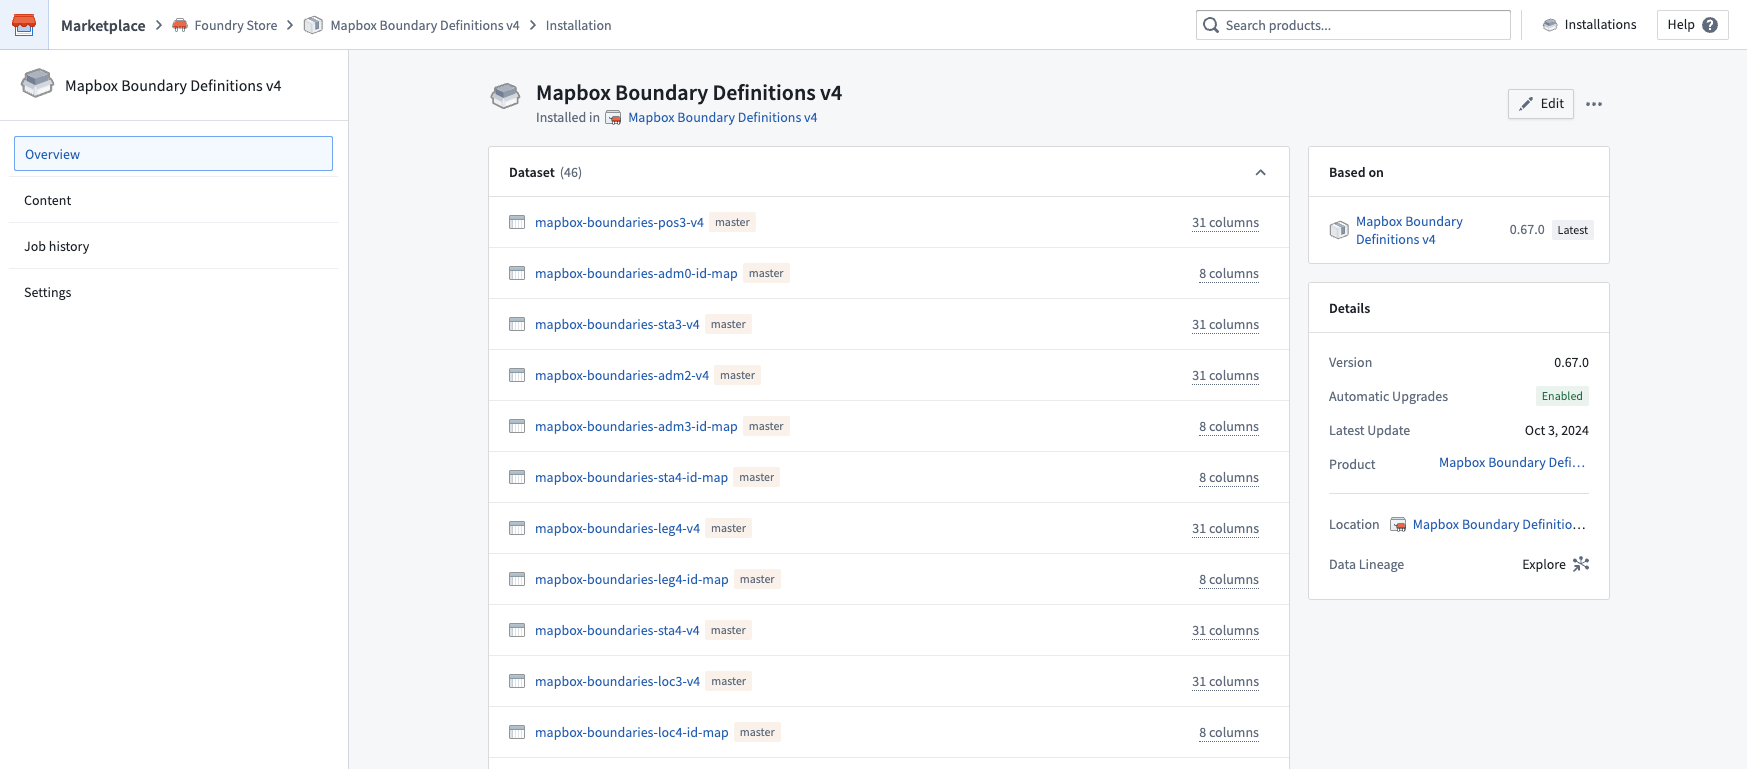
Select View installation in the top right to see your completed installation. From here, you can navigate to your installed resources to begin using them. The project or folder location where your resources are saved is linked in the right panel.
The screenshot below shows a completed product installation in Marketplace.
Installation settings
After installation, you can configure a number of options for an installation from the Settings panel.
- Release channel: You can set the release channel you would like your installation to track. New versions that are tagged with that release channel will be surfaced as new versions available for upgrade. See upgrades for more information.
- Automatic upgrades: You can enable automatic upgrades for new product versions; see automatic upgrades for more information.
- Maintenance windows: This setting allows you to control the timing of upgrades; for instance, you can set upgrades to occur as soon as they are available, or to take place during a specified period of time (the maintenance window).
- Lock or unlock your installation: Locking an installation prevents edits to downstream content. Keep your installation locked if you want to guarantee safe upgrades; you can unlock your installation to fork the content you’ve installed. The default lock/unlock behavior for your installation will depend on the installation mode (Production mode or Bootstrap mode) specified by the product builder.
The screenshot below shows the Settings panel of Marketplace's installation view. From here, the automatic upgrades configuration can be set and the installation can be locked or unlocked to allow edits to the installed content.

Known limitations
For some resource types, unlocking an installation may not allow edits to the installed resources. Note that Code Repositories must be packaged with the source code for it to be editable in an installation.
Upgrades
Automatic upgrades [Beta]
:::callout{theme="neutral" title="Beta"} Automatic upgrades in Marketplace is in the beta phase of development and may not be available on your enrollment. Functionality may change during active development. :::
Automatic upgrades are disabled by default for both Production mode and Bootstrap mode products. When installing Production mode products, you will be prompted to choose a release channel and maintenance window in the new versions installation step. You can always change these settings in the installation settings. Automatic upgrade settings include:
- The maintenance windows during which you would like to receive automatic upgrades. You can select "Always open" if you want to take upgrades as soon as they are available. Note that upgrades will cause downtime for installed resources, so we recommend adding a maintenance window to avoid downtime.
- The release channel your installation should track. During any maintenance windows you have configured, your installation will automatically upgrade to versions tagged to that release channel as long as the upgrade does not require manual action.
Release channels are hierarchical rather than mutually exclusive. Depending on the track:
- Release: The installation receives the versions tagged as Release, Test, or Stable.
- Test: The installation receives the versions tagged as Test and Stable.
- Stable: The installation receives the versions tagged as Stable.
Upgrades will still require manual action if the new product version includes new inputs that must be mapped. If this is the case, you will be guided through the same manual configuration workflow as manual upgrades.
Manual upgrades
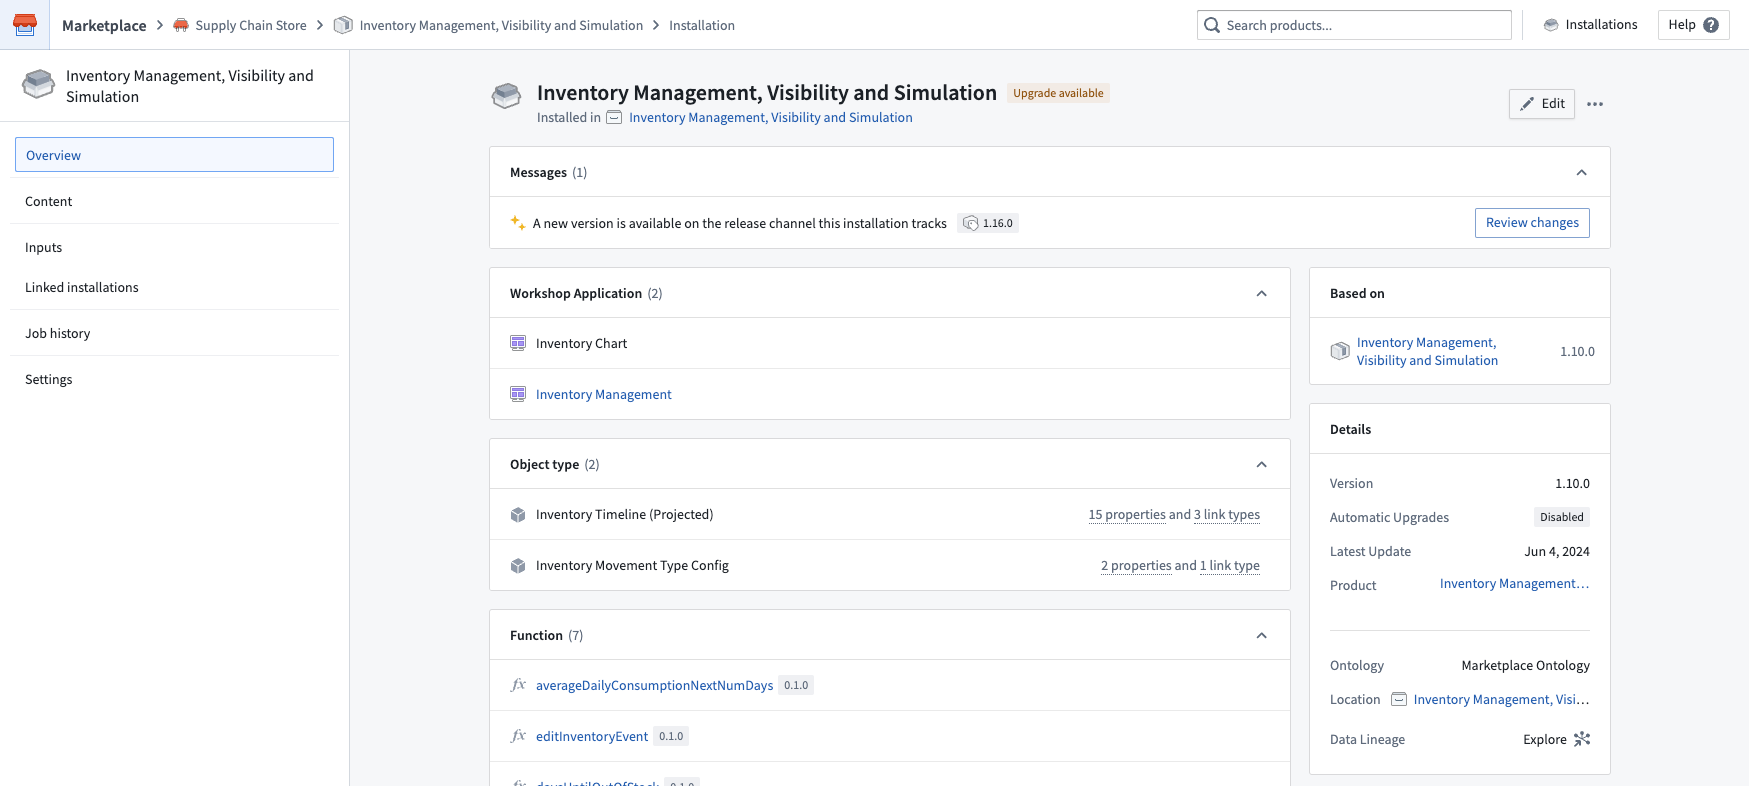
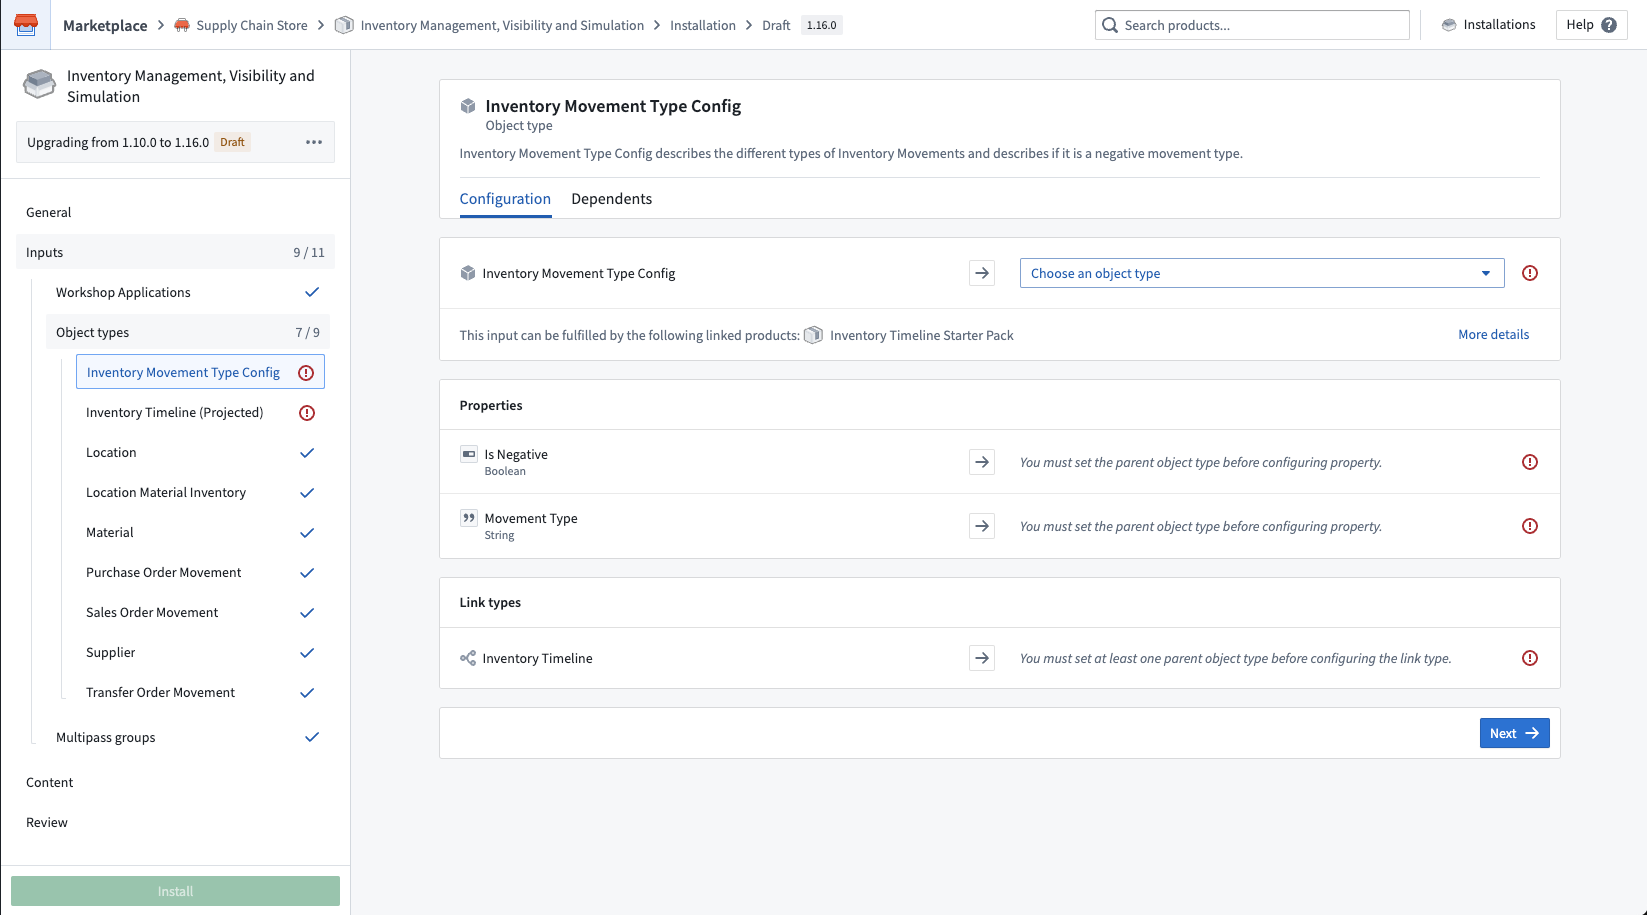
If you do not have automatic upgrades enabled, you will see a banner at the top of your installation with information about new versions when they become available. You will have the option to review changes that may require manual configuration, as shown below.
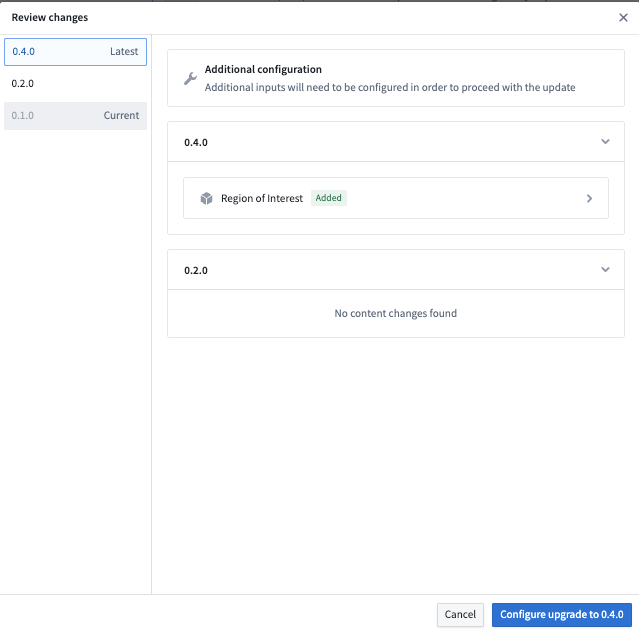
Select Review changes to learn more about the new version. If you have made any edits to your installed content, these edits will be overwritten by the content in the new product version. The screenshot below shows the list of changes for an example upgrade.
If the new product version requires manual configuration (for example, new inputs to map), you will need to action these steps before you can take the upgrade. You will be guided through the manual steps you need to take in the upgrade form as shown in the screenshot below.
Downgrades
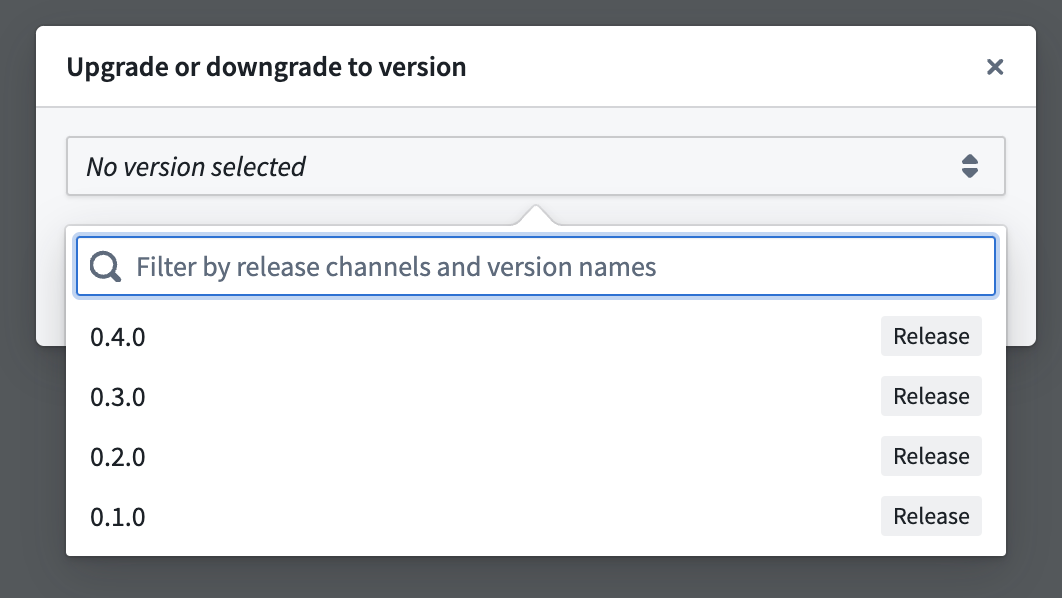
To downgrade to a previous version or upgrade to a specific version of a product, start by selecting the ellipsis in the top right corner of the installation page. Next, choose Upgrade or downgrade to version, as demonstrated in the screenshot below.

Selecting this option will open a dialog where you can choose the exact version you need. After making your selection, initiate the upgrading or downgrading process by selecting Create a draft.
Deleting installations
To delete an installation along with all its resources, start by selecting the ellipsis (...) in the upper-right corner of the installation page. Next, choose Delete installation permanently, as shown in the screenshot below.

Selecting Delete installation permanently will show a preview of the resources that will be permanently deleted if you proceed.
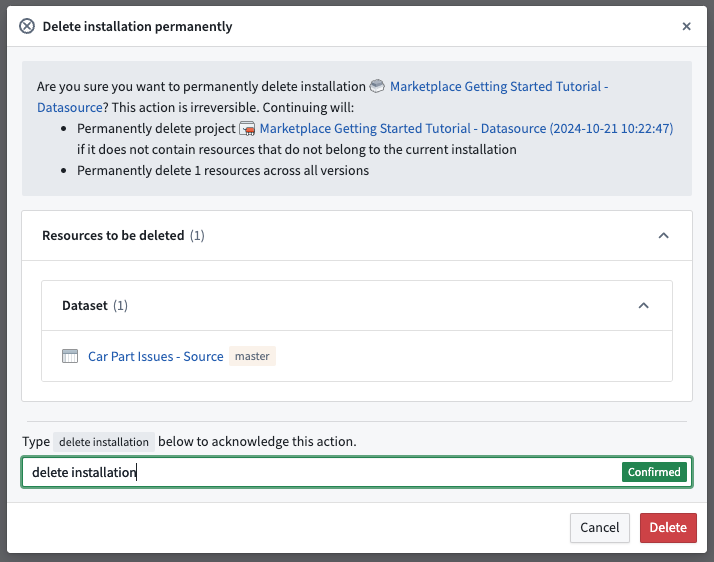
Next, type delete installation in the confirmation text box and select Delete to initiate the uninstallation process.
:::callout{theme="danger"} Warning: Deleting an installation is irreversible. Uninstallation will permanently delete resources across all installation versions as well as the installation itself. If the installation project or folder only contains resources that belong to the installation selected for deletion, uninstallation will also permanently delete the installation project or folder. Otherwise, the deletion of the project or folder will be skipped. :::
If uninstallation is successful, you will be redirected to the installations page. If uninstallation fails, you will receive an error message, as shown below:
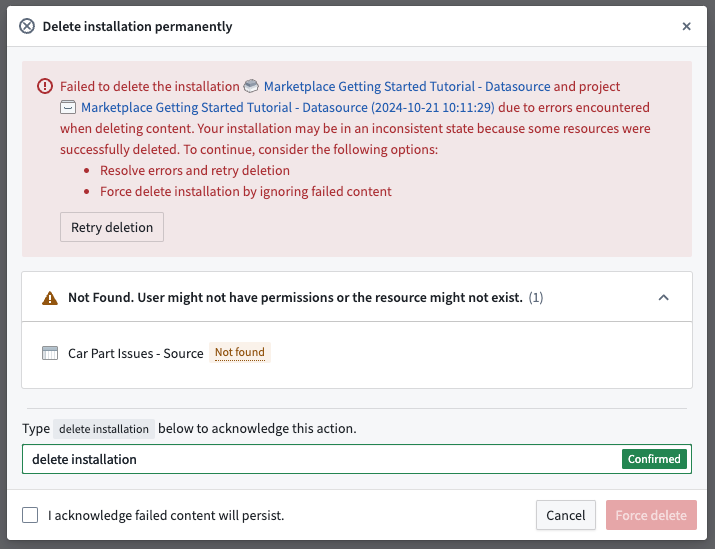
The error message will list the resources that failed to be deleted and the reasons for the failure, as well as the resources that were successfully deleted. You can choose to resolve issues with failed resources before retrying uninstallation, or you can tick the box acknowledging that failed content will persist and select the Force delete button. This will ignore failed resources and delete the installation. The installation project or folder will also be deleted, provided that the project or folder does not contain any other resources that do not belong to the given installation.
中文翻译
Foundry Marketplace 中的安装(Installations)
启动产品安装后,您可以监控安装任务。下方截图展示了 Marketplace 的安装任务视图。
点击右上角的 查看安装(View installation) 即可查看已完成的安装。在此页面中,您可以导航至已安装的资源并开始使用它们。资源保存的项目或文件夹位置会链接在右侧面板中。
下方截图展示了 Marketplace 中已完成的产品安装。
安装设置(Installation settings)
安装完成后,您可以通过 设置(Settings) 面板为安装配置多项选项。
- 发布渠道(Release channel): 您可以设置安装所要跟踪的发布渠道。标记为该发布渠道的新版本将作为可升级的新版本显示。更多信息请参见升级。
- 自动升级(Automatic upgrades): 您可以启用新产品版本的自动升级;更多信息请参见自动升级。
- 维护窗口(Maintenance windows): 此设置允许您控制升级的时机;例如,您可以设置升级在可用时立即进行,或在指定时间段(即维护窗口)内进行。
- 锁定或解锁安装(Lock or unlock your installation): 锁定安装可防止对下游内容进行编辑。如果您希望确保安全升级,请保持安装锁定;您可以解锁安装以对已安装的内容进行分支(fork)。安装的默认锁定/解锁行为取决于产品构建者指定的安装模式(生产模式(Production mode) 或引导模式(Bootstrap mode))。
下方截图展示了 Marketplace 安装视图的 设置(Settings) 面板。在此处可以配置自动升级设置,并可以锁定或解锁安装以允许编辑已安装的内容。
已知限制(Known limitations)
对于某些资源类型,解锁安装可能无法允许编辑已安装的资源。请注意,代码仓库(Code Repositories) 必须附带源代码才能在安装中进行编辑。
升级(Upgrades)
自动升级(Automatic upgrades)[Beta]
:::callout{theme="neutral" title="Beta"} Marketplace 中的自动升级功能处于开发阶段的 beta 阶段,可能不适用于您的注册环境。功能在活跃开发期间可能会发生变化。 :::
对于生产模式和引导模式产品,自动升级默认处于禁用状态。安装生产模式产品时,系统会提示您在新版本安装步骤中选择发布渠道和维护窗口。您可以随时在安装设置中更改这些设置。自动升级设置包括:
- 维护窗口(Maintenance windows):您希望在此时间段内接收自动升级。如果您希望在升级可用时立即进行,可以选择"始终开放(Always open)"。请注意,升级会导致已安装资源停机,因此我们建议添加维护窗口以避免停机。
- 发布渠道(Release channel):您的安装应跟踪的发布渠道。在您配置的任何维护窗口期间,只要升级不需要手动操作,您的安装将自动升级到标记为该发布渠道的版本。
发布渠道是层级结构而非互斥关系。根据跟踪渠道的不同:
- 发布(Release): 安装接收标记为发布(Release)、测试(Test) 或稳定(Stable) 的版本。
- 测试(Test): 安装接收标记为测试(Test) 和稳定(Stable) 的版本。
- 稳定(Stable): 安装接收标记为稳定(Stable) 的版本。
如果新产品版本包含必须映射的新输入(inputs),升级仍需要手动操作。在这种情况下,系统将引导您完成与手动升级相同的手动配置工作流程。
手动升级(Manual upgrades)
如果您未启用自动升级,当新版本可用时,安装页面顶部会显示一个横幅,其中包含新版本信息。您可以选择查看可能需要手动配置的更改,如下所示。
选择 查看更改(Review changes) 以了解新版本的更多信息。如果您对已安装的内容进行了任何编辑,这些编辑将被新产品版本中的内容覆盖。下方截图展示了一个示例升级的更改列表。
如果新产品版本需要手动配置(例如,需要映射的新输入),您需要先完成这些步骤才能进行升级。系统将在升级表单中引导您完成所需的手动步骤,如下方截图所示。
降级(Downgrades)
要降级到先前版本或升级到产品的特定版本,请先点击安装页面右上角的省略号。然后选择 升级或降级到版本(Upgrade or downgrade to version),如下方截图所示。
选择此选项将打开一个对话框,您可以在其中选择所需的精确版本。做出选择后,选择 创建草稿(Create a draft) 来启动升级或降级过程。
删除安装(Deleting installations)
要删除安装及其所有资源,请先点击安装页面右上角的省略号(...)。然后选择 永久删除安装(Delete installation permanently),如下方截图所示。
选择 永久删除安装(Delete installation permanently) 将显示一个预览,列出如果继续操作将被永久删除的资源。
接下来,在确认文本框中输入 delete installation,然后选择 删除(Delete) 以启动卸载过程。
:::callout{theme="danger"} 警告: 删除安装是不可逆的。卸载将永久删除所有安装版本的资源以及安装本身。如果安装项目或文件夹仅包含属于所选删除安装的资源,卸载还将永久删除该安装项目或文件夹。否则,将跳过项目或文件夹的删除。 :::
如果卸载成功,您将被重定向到安装页面。如果卸载失败,您将收到一条错误消息,如下所示:
错误消息将列出删除失败的资源及失败原因,以及成功删除的资源。您可以选择解决失败资源的问题后重试卸载,或者勾选确认失败内容将保留的复选框,然后选择 强制删除(Force delete) 按钮。这将忽略失败的资源并删除安装。如果项目或文件夹不包含任何不属于该安装的其他资源,安装项目或文件夹也将被删除。