Configure Foundry for consumer mode(配置 Foundry 以支持消费者模式)
Before building consumer-facing applications, you must first configure Foundry to support consumer mode. This page guides you through the requirements to properly configure consumer mode in Foundry.
:::callout{theme="neutral"} This setup is only required when using Foundry user permissions and authentication. If you are using a client credentials flow in your consumer application, you can skip this section. :::
Prerequisites
Before configuring Foundry, ensure you have the following:
- Enrollment Administrator permission to create organizations, update authentication providers, and manage permissions configuration.
- Access to Control Panel for platform configuration.
- Understanding of your consumer authentication requirements.
Step 1: Create a consumer organization
First, create a dedicated organization for consumer users that is isolated from internal platform users.

- Navigate to Control Panel > Organization management.
- Select Create organization.
- Configure the following organization settings:
- Name: Add a descriptive name for your consumer organization (for example, "Customer Portal Users").
- Organization administrator: Assign an appropriate admin user or group.
- Collaboration: Add your internal organization to allow discovery of your organization's Roles. Ensure all boxes are unchecked to prevent cross-organization user and group discovery.
- Private space: Choose
Nofor consumer organizations.
Note that enrollments are limited to five organizations by default.
Step 2: Disable member discovery
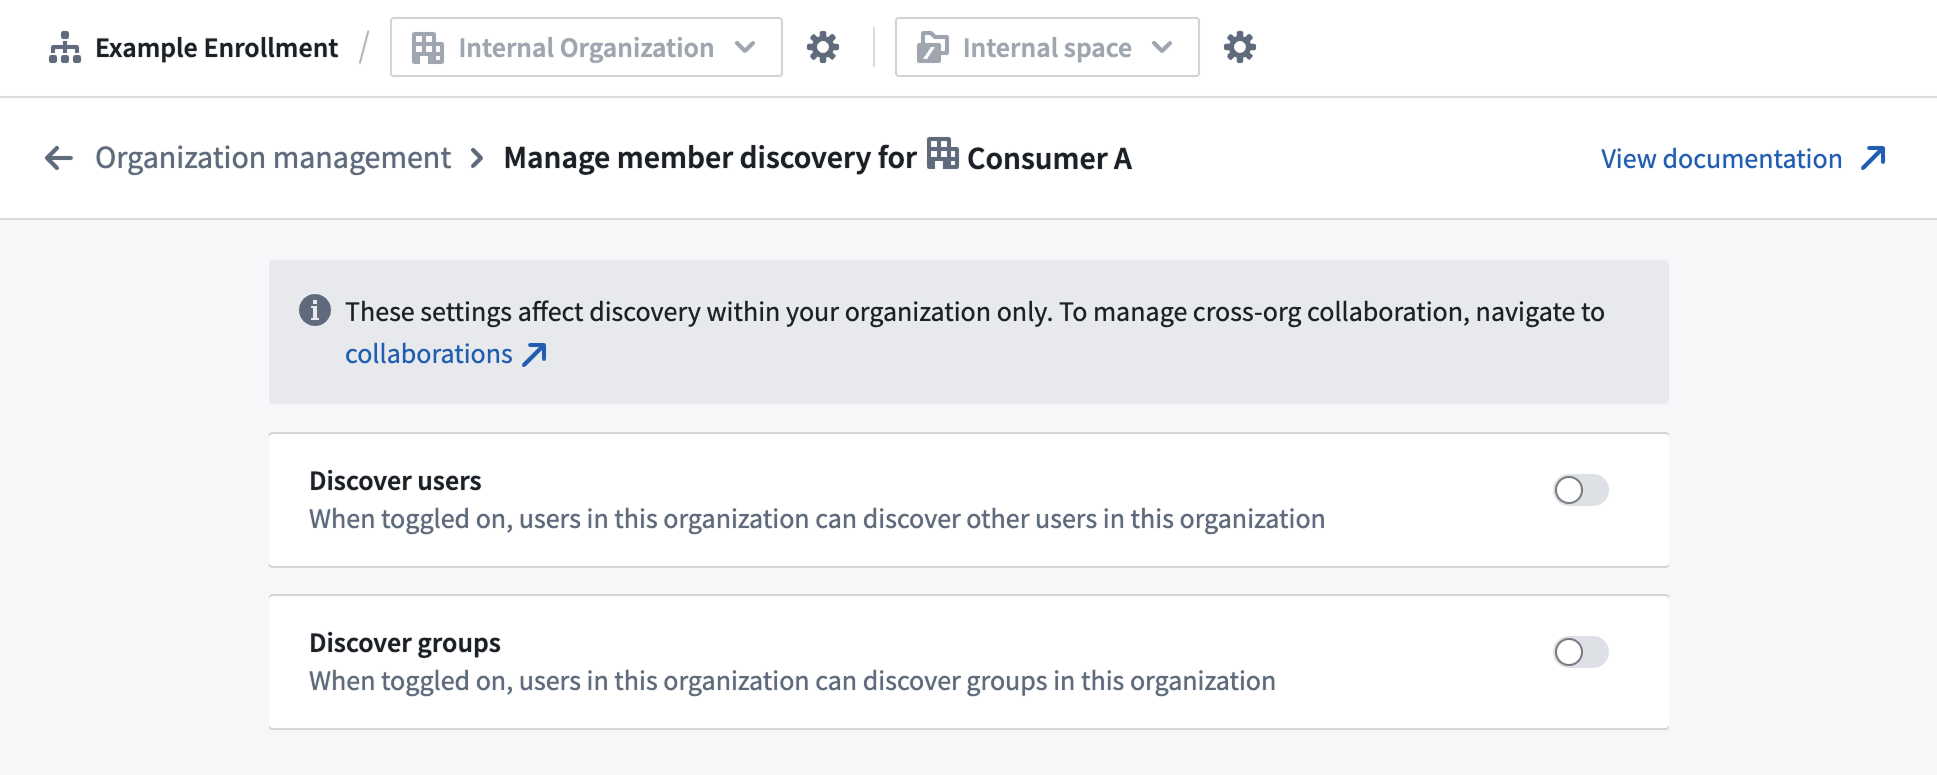
Next, configure your consumer organization to prevent users from discovering other users and groups within the organization, providing additional privacy and security isolation.
- Navigate to Control Panel > Organization management.
- Find your consumer organization and select Actions > Manage member discovery.
- Configure the following member discovery settings:
- Discover users: Disable this setting to prevent users in this organization from discovering other users in the same organization.
- Discover groups: Disable this setting to prevent users in this organization from discovering groups in the organization.
Learn more about cross-organization collaboration and member discovery.
In some B2B cases, user or group discovery within a consumer organization is expected for collaborative Foundry capabilities, like the Workshop comments widget. In such cases, you may ignore this step and elect to leave user and/or group discovery enabled.
Step 3: Configure the authentication provider and triaging rules
The next step in configuring consumer mode is to set up an authentication provider that automatically assigns consumer users to your consumer organization.
Create or update the authentication provider
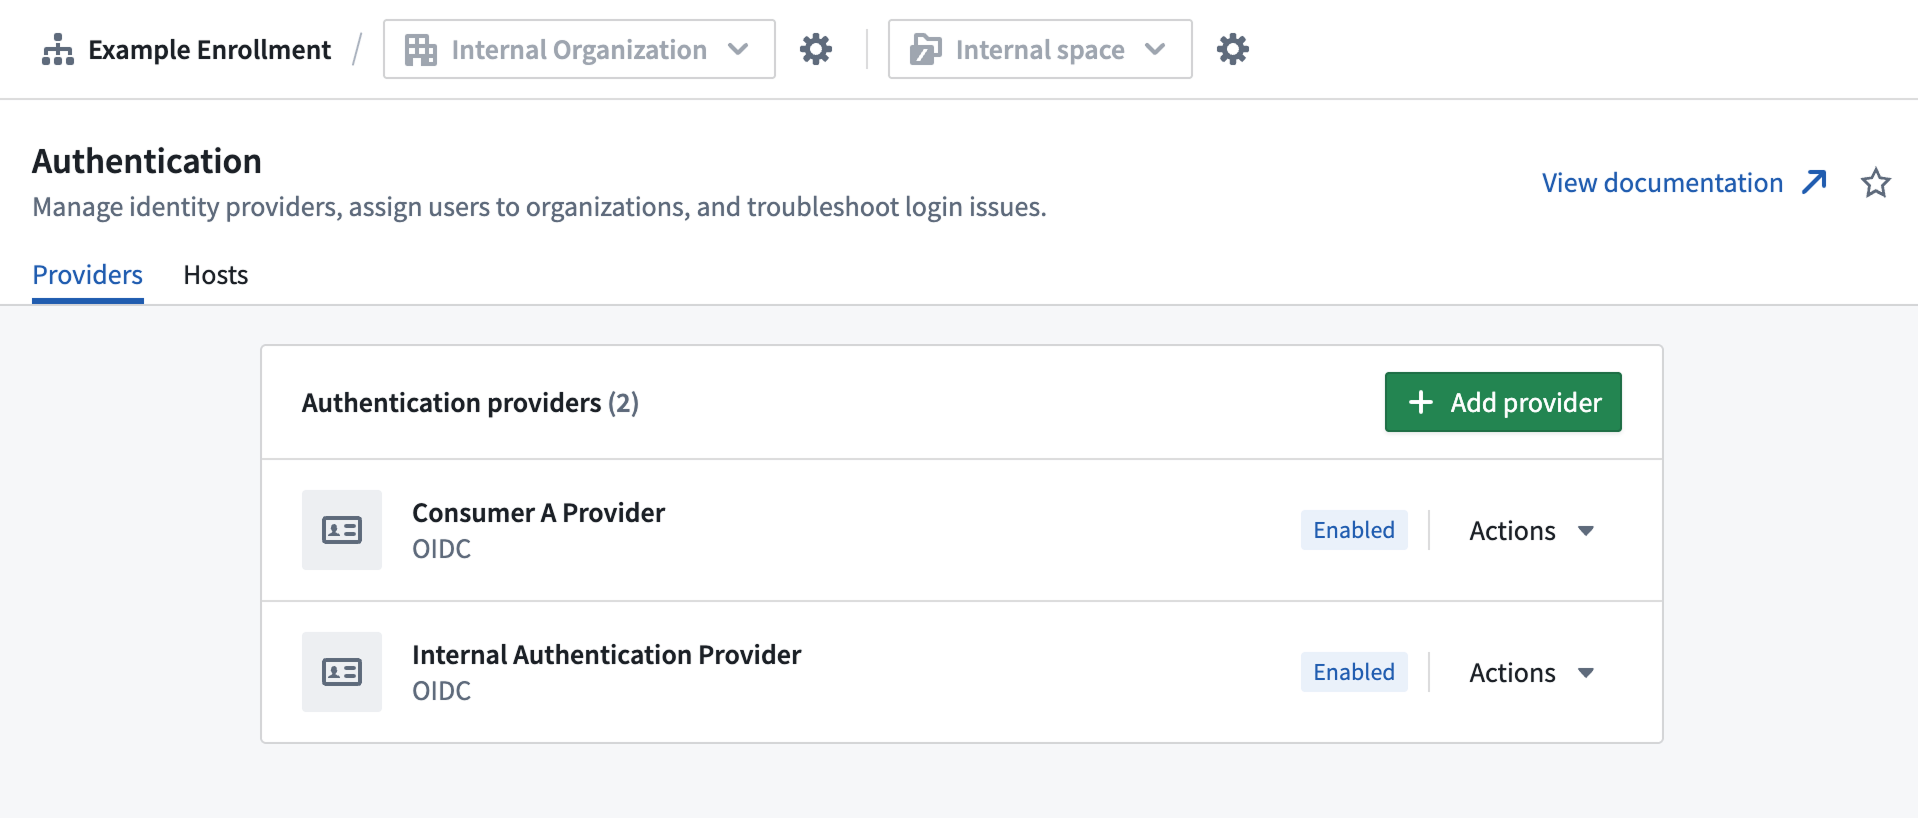
- Navigate to Control Panel > Authentication, then choose the Providers tab.
- Select Add provider to configure a new authentication provider, or select an existing provider to edit.
- Configure the following provider settings:
- Provider type: Choose SAML or OIDC based on your requirements.
- Provider configuration: Complete authentication provider details according to your IDP.
- Egress policies: Add required egress policies for authentication.
- Multi-factor authentication: Enable if required by your security policies.
Set up organization triaging rules
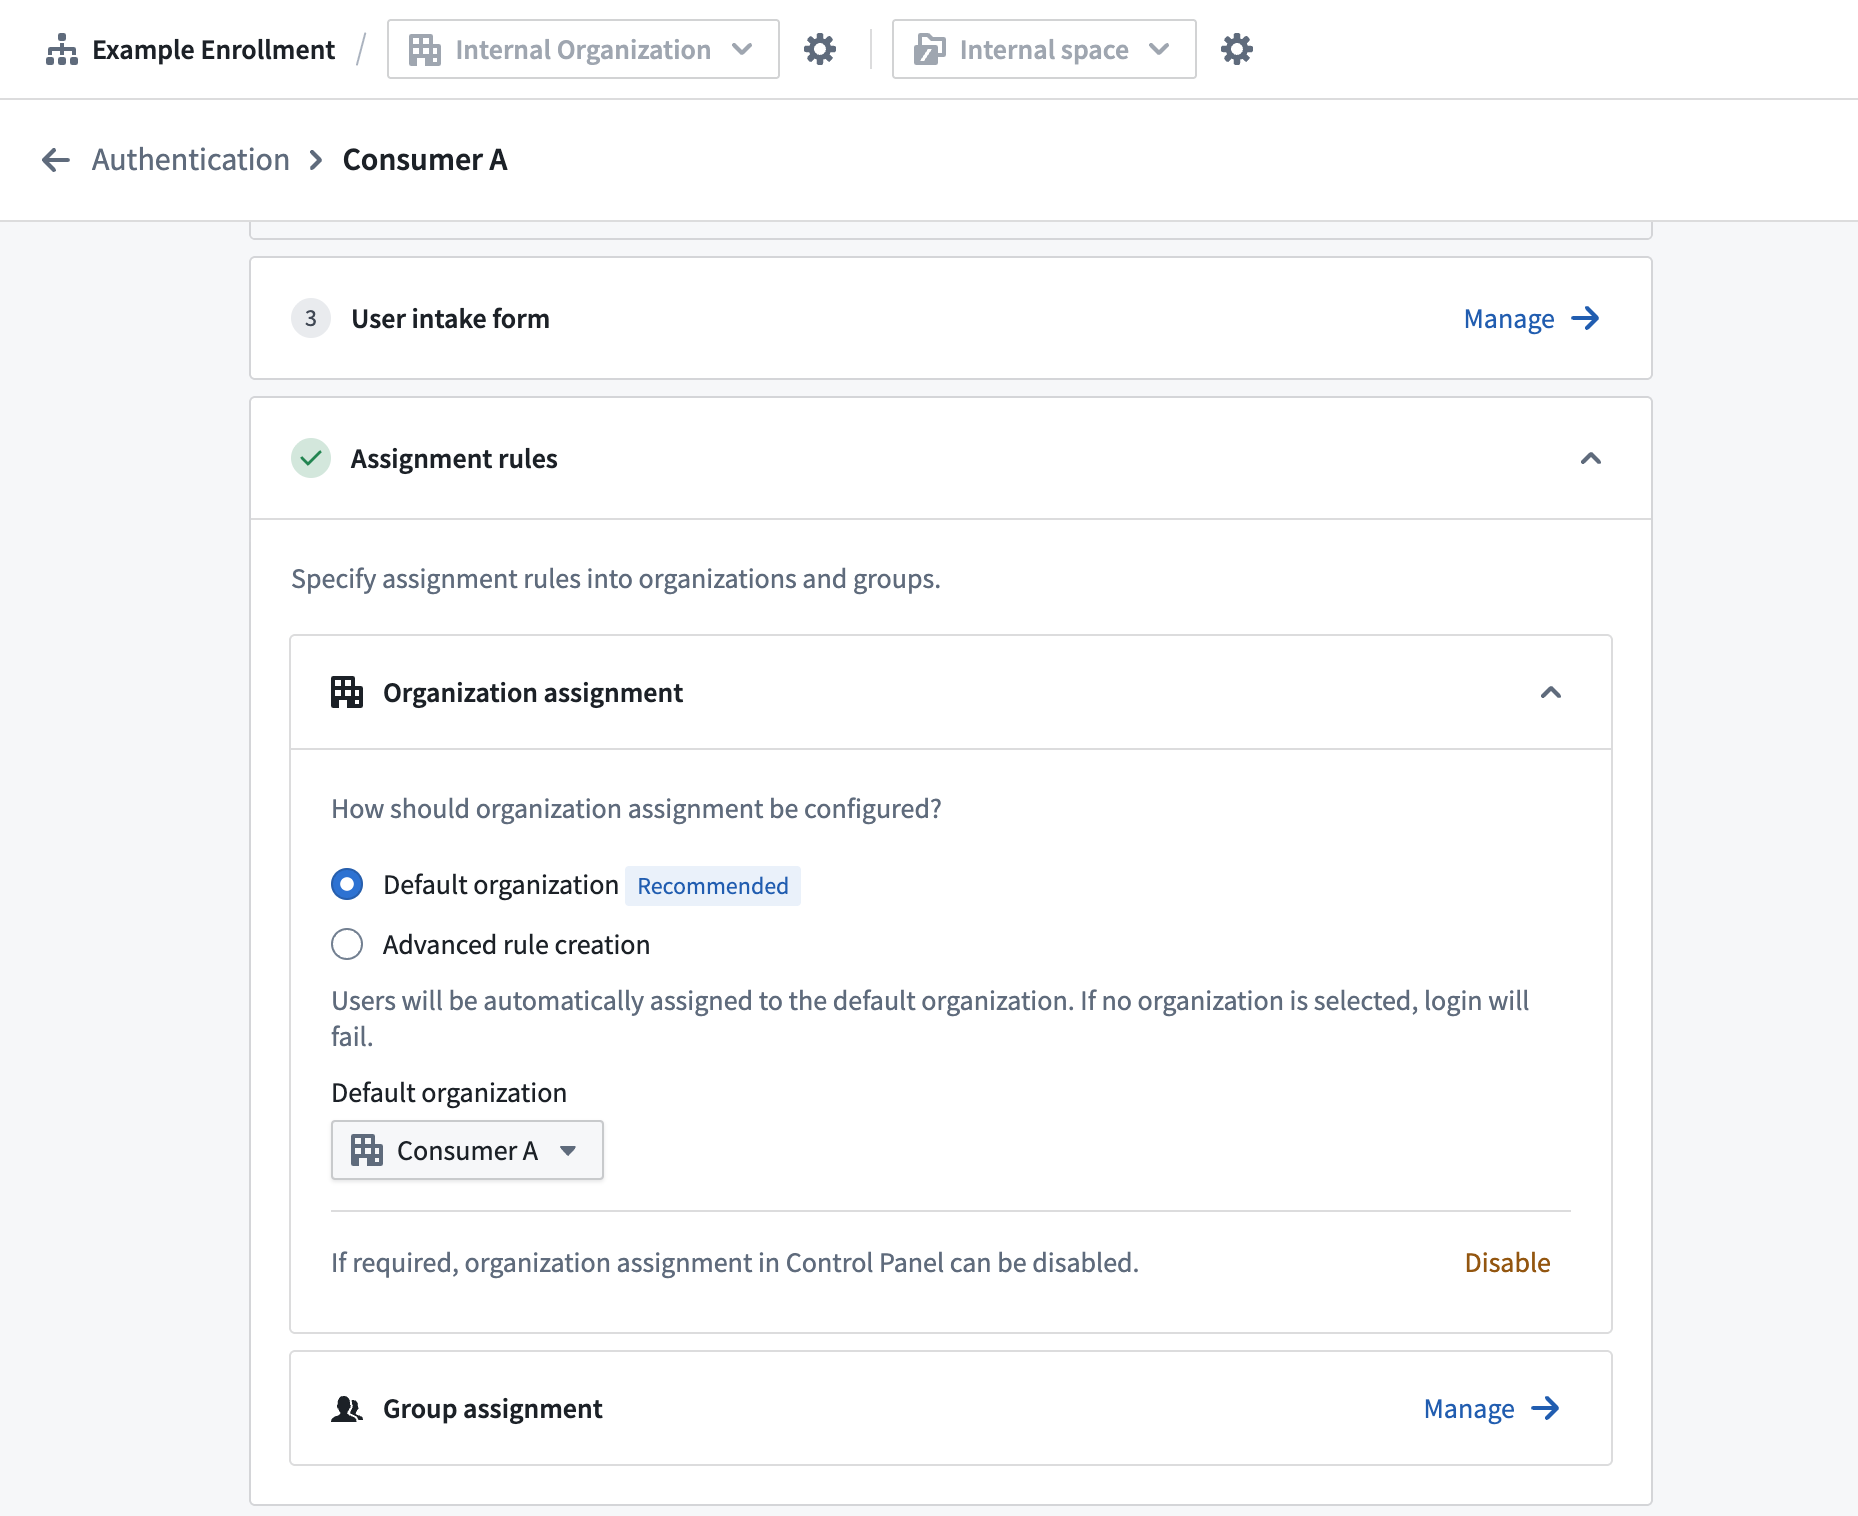
- In the authentication provider settings, configure the Organization assignment.
- Select an automatic assignment rule to direct users to your consumer organization.
- Default organization: All users given the default organization.
- Advanced rule creation: Configure rules based on email domain, group membership, or other attributes. If none of the criteria match, the default organization will serve as fallback.
Step 4: Create rule-based consumer group
Create a group that aligns with your consumer organization for consistent permission management. After this step, you should have one or more automatically updating groups to permission all your consumer users. If all users belong to a single organization, you must create a single rule-based group for the organization; if users belong to multiple organizations, create a rule-based group for each organization.
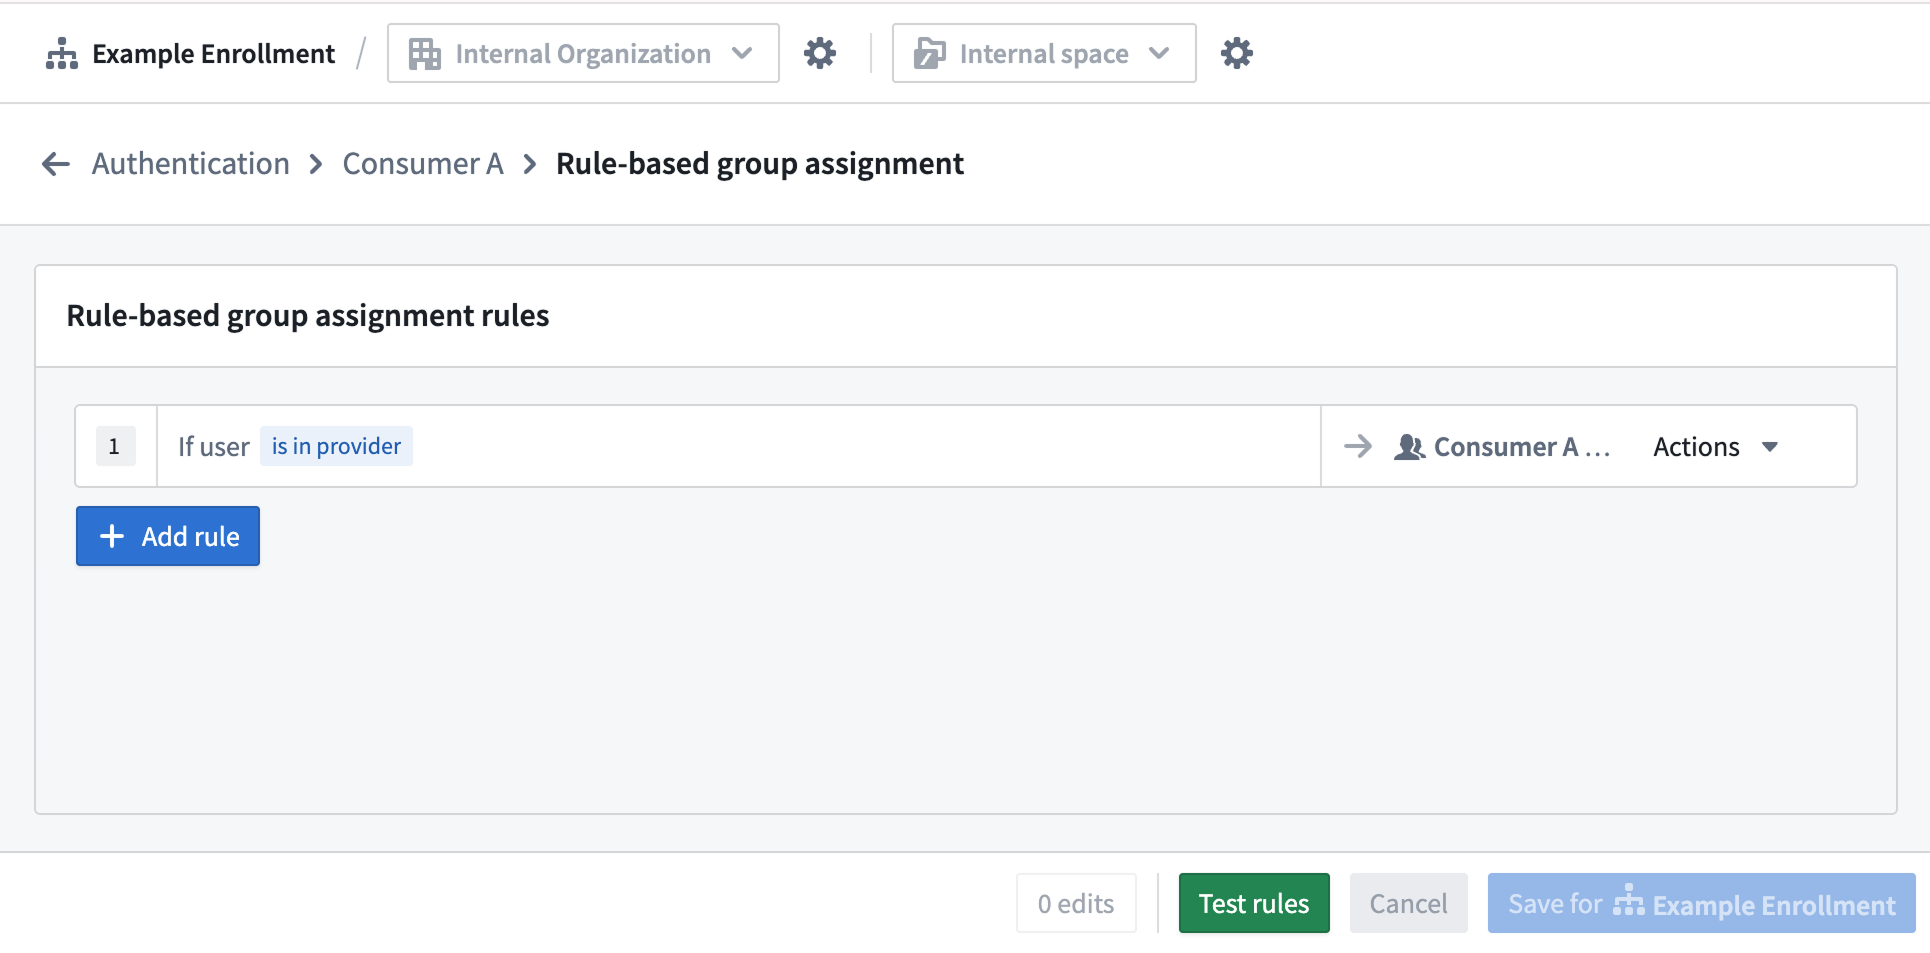
- From your authentication provider page in Control Panel, select Group assignment.
- Select + Add rule.
- From the Select group... dropdown menu, choose + Create new rule-based group and configure the following:
- Name: Match your consumer organization (for example, "Consumer Portal Users").
- Description: Add a description, such as "Contains all members from {your consumer} organization".
- Organization: Select the related consumer organization.
- Configure the rule parameters to match your organization assignment rules.
- Repeat steps 2 through 4 for each consumer organization.
Consumer Builder and Administrator groups
For ease of permissions management when building and managing consumer applications, we recommend designating both a "Builder" and "Administrator" group. Create these groups in your identify provider if managing groups outside Foundry, or refer to our managing groups documentation for creating the groups within Foundry.
Step 5: Configure a consumer role set
Configure a role set that provide appropriate permissions for consumer users.
- Select your user image in the bottom left of your screen and select Settings > Roles.
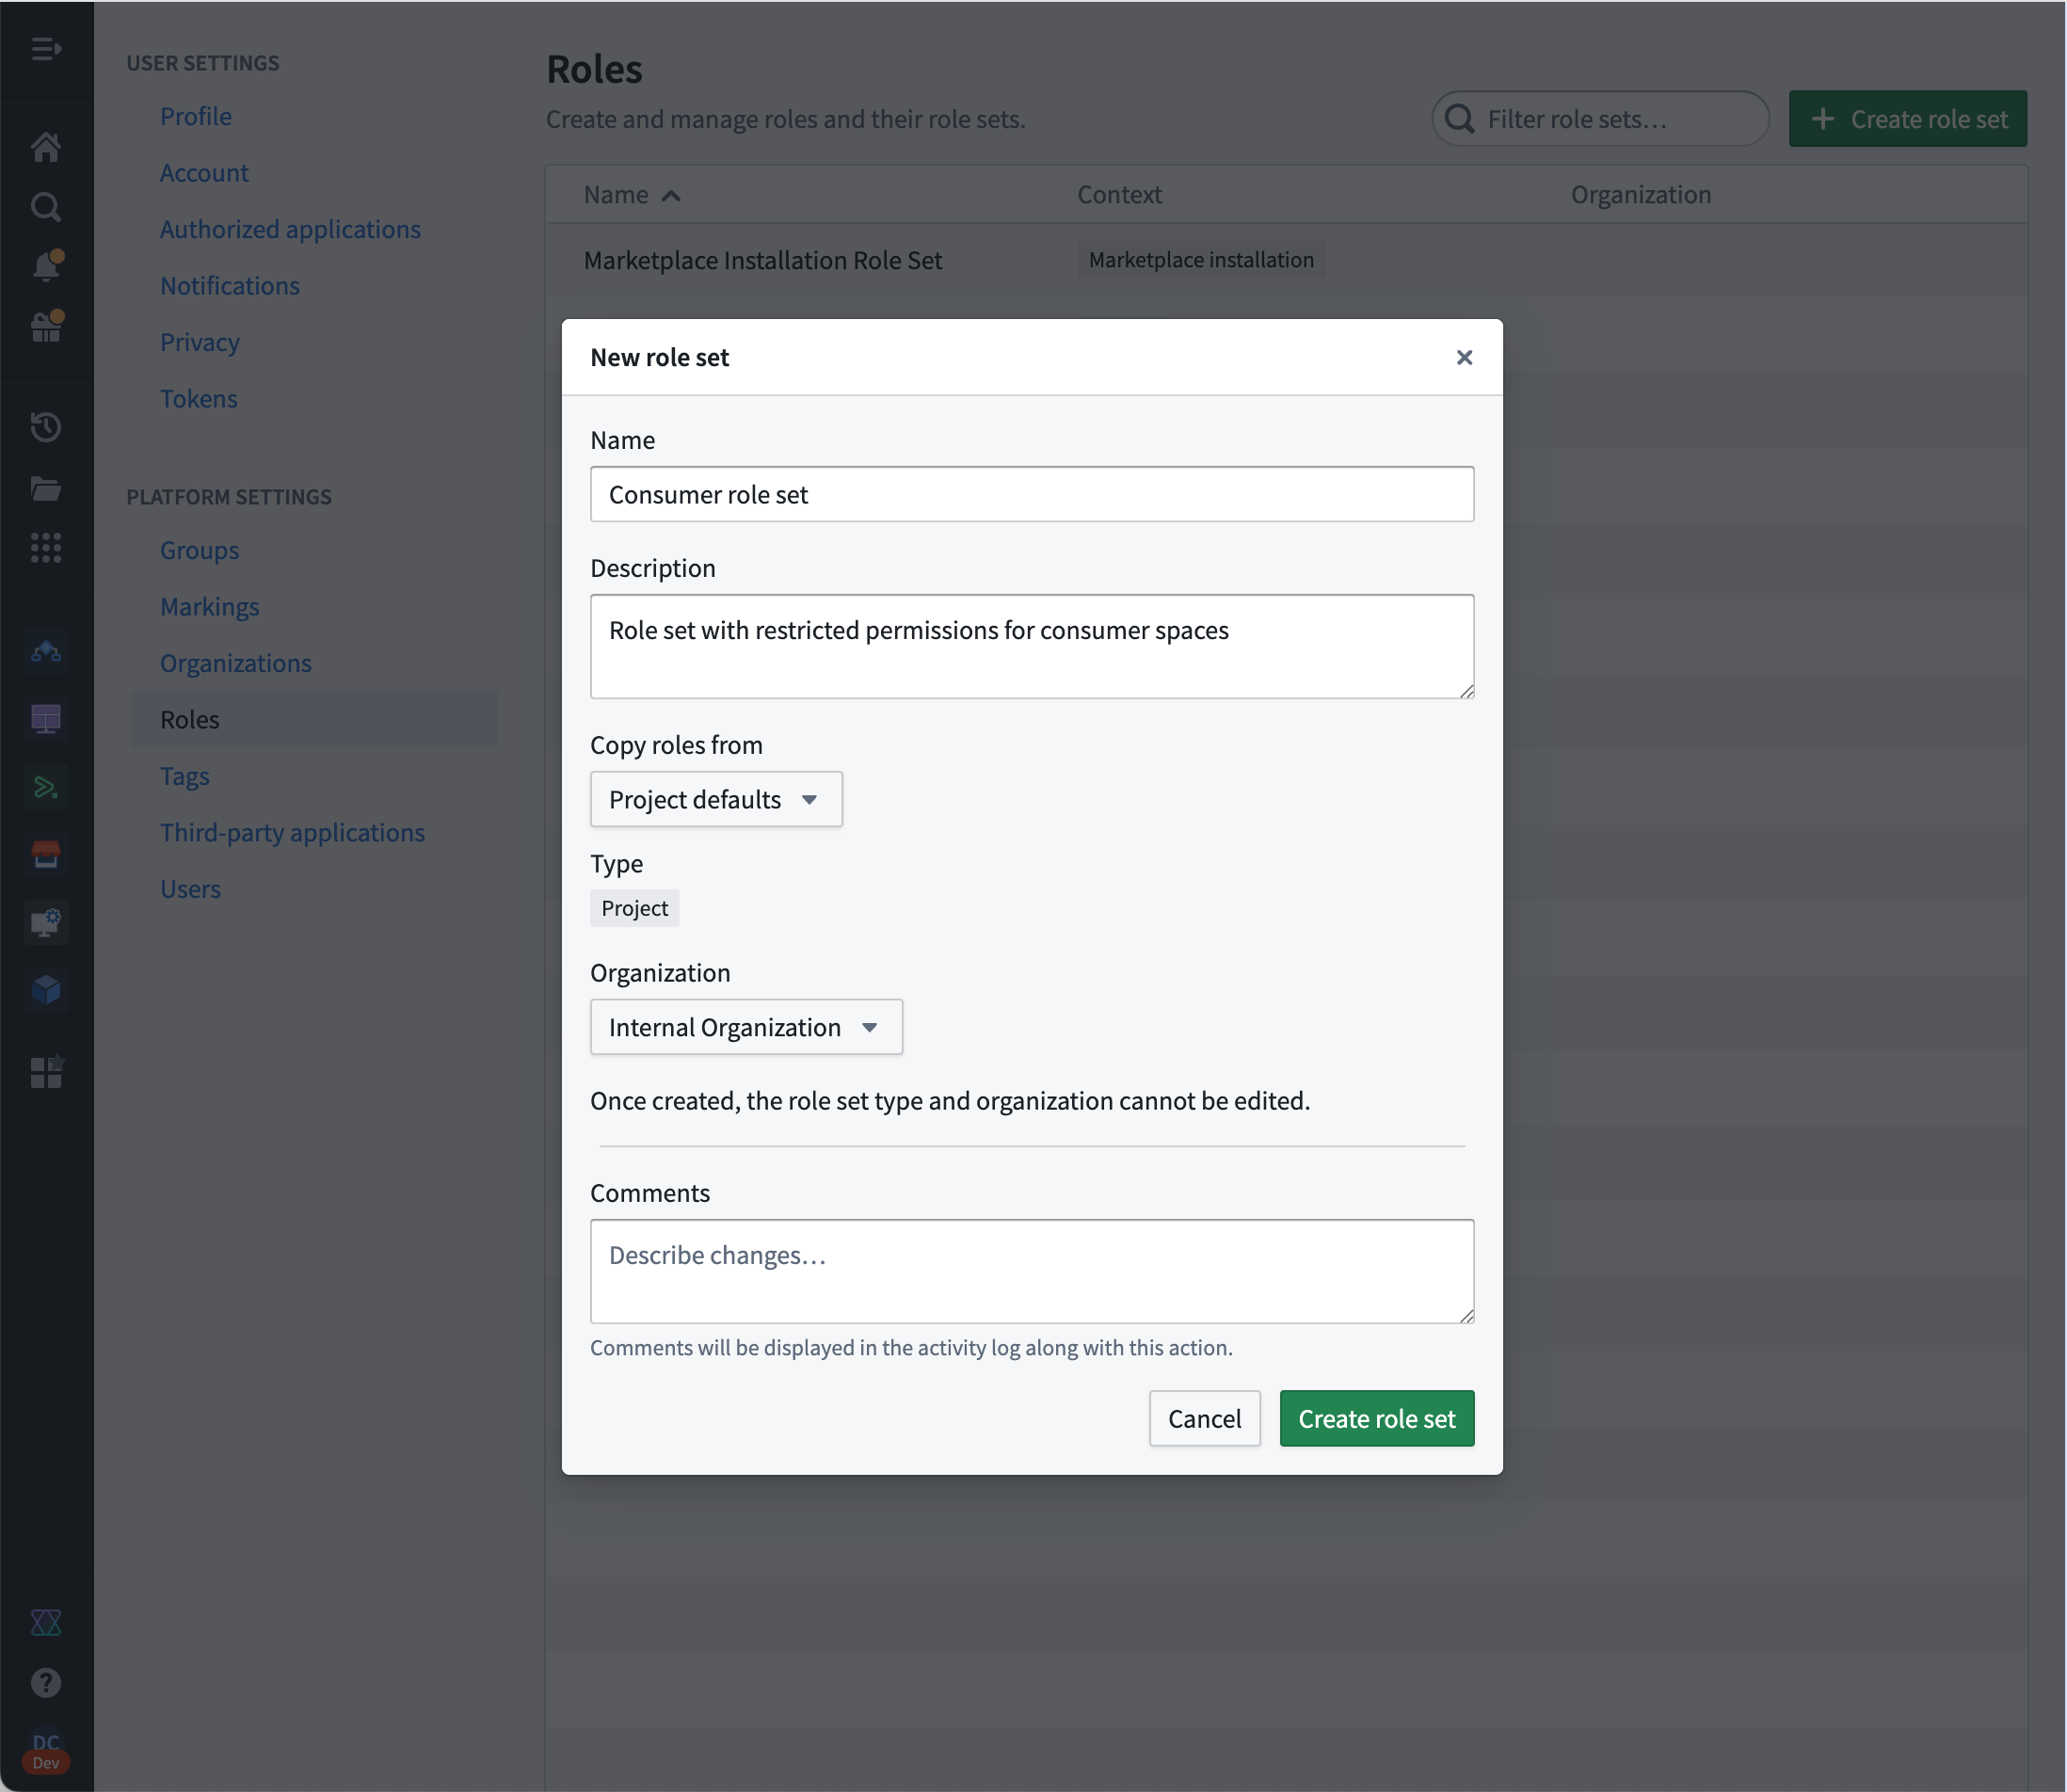
- Select Create role set.
- Name: Add a descriptive name for a consumer role set (for example,
Consumer roles). - Description: "Roles with reduced operations for consumer applications".
- Copy roles from: Project defaults
- Organization: Your internal organization
- In your new role set, select New role and add the following details to create your
Consumerrole:
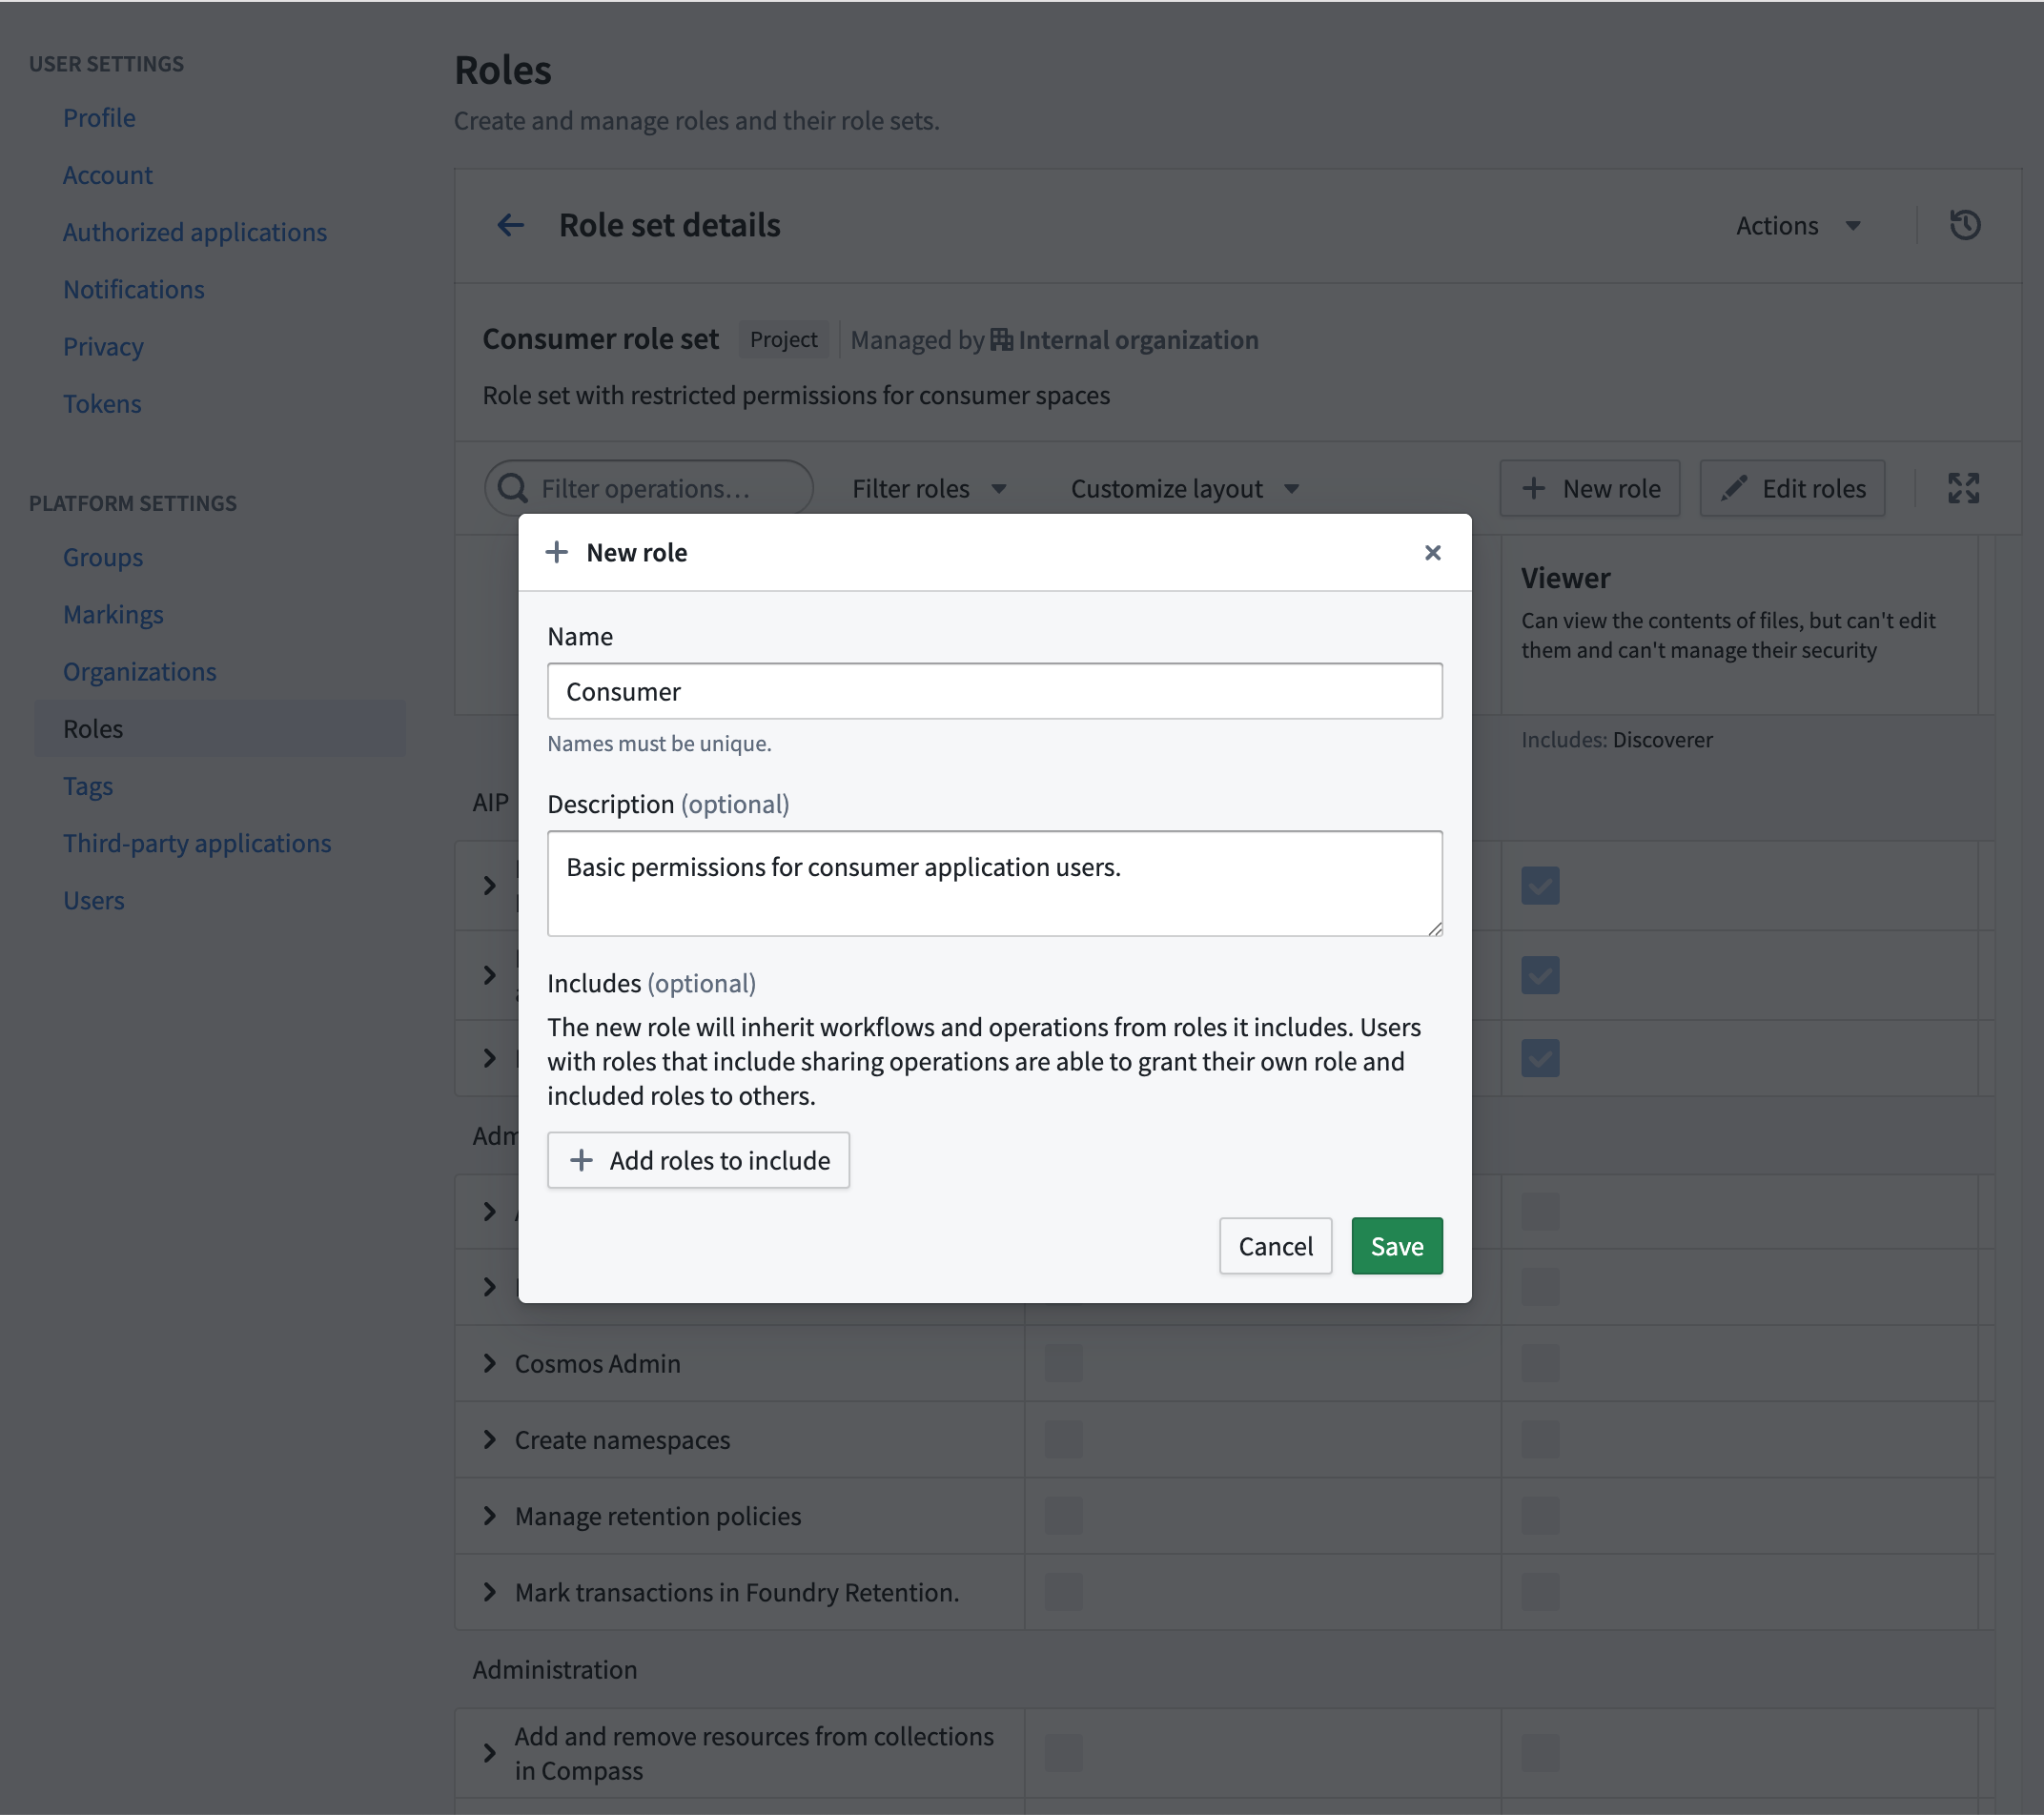
- Name: "Consumer"
- Description: "Basic permissions for consumer application users."
- Includes: Leave this optional section empty.
After creating the new Consumer role, add the following operations to the role:
carbon:view-workspaceeddie:view-aip-logicfoundry:read-datafunction-executor:execute-functionfunction-registry:read-contractfunction-registry:read-functionhubble:object-view:viewlime:searchobject-set-service:read-versioned-object-setobjects:read-dataontology:view-action-typeontology:view-datasourceontology:view-object-typeontology:view-relationsalt:blobster:readslate:run-query-v2slate:view-documentslate:view-stylesheetthird-party-application:view-applicationworkshop-server:view-module
Depending on the specific workflow, additional operations may be required. Review our documentation on understanding roles and operations for more details.
Step 6: Create a consumer space
Consumer spaces provide isolation and access control. After this step, you should have a dedicated space where consumer users can access projects.
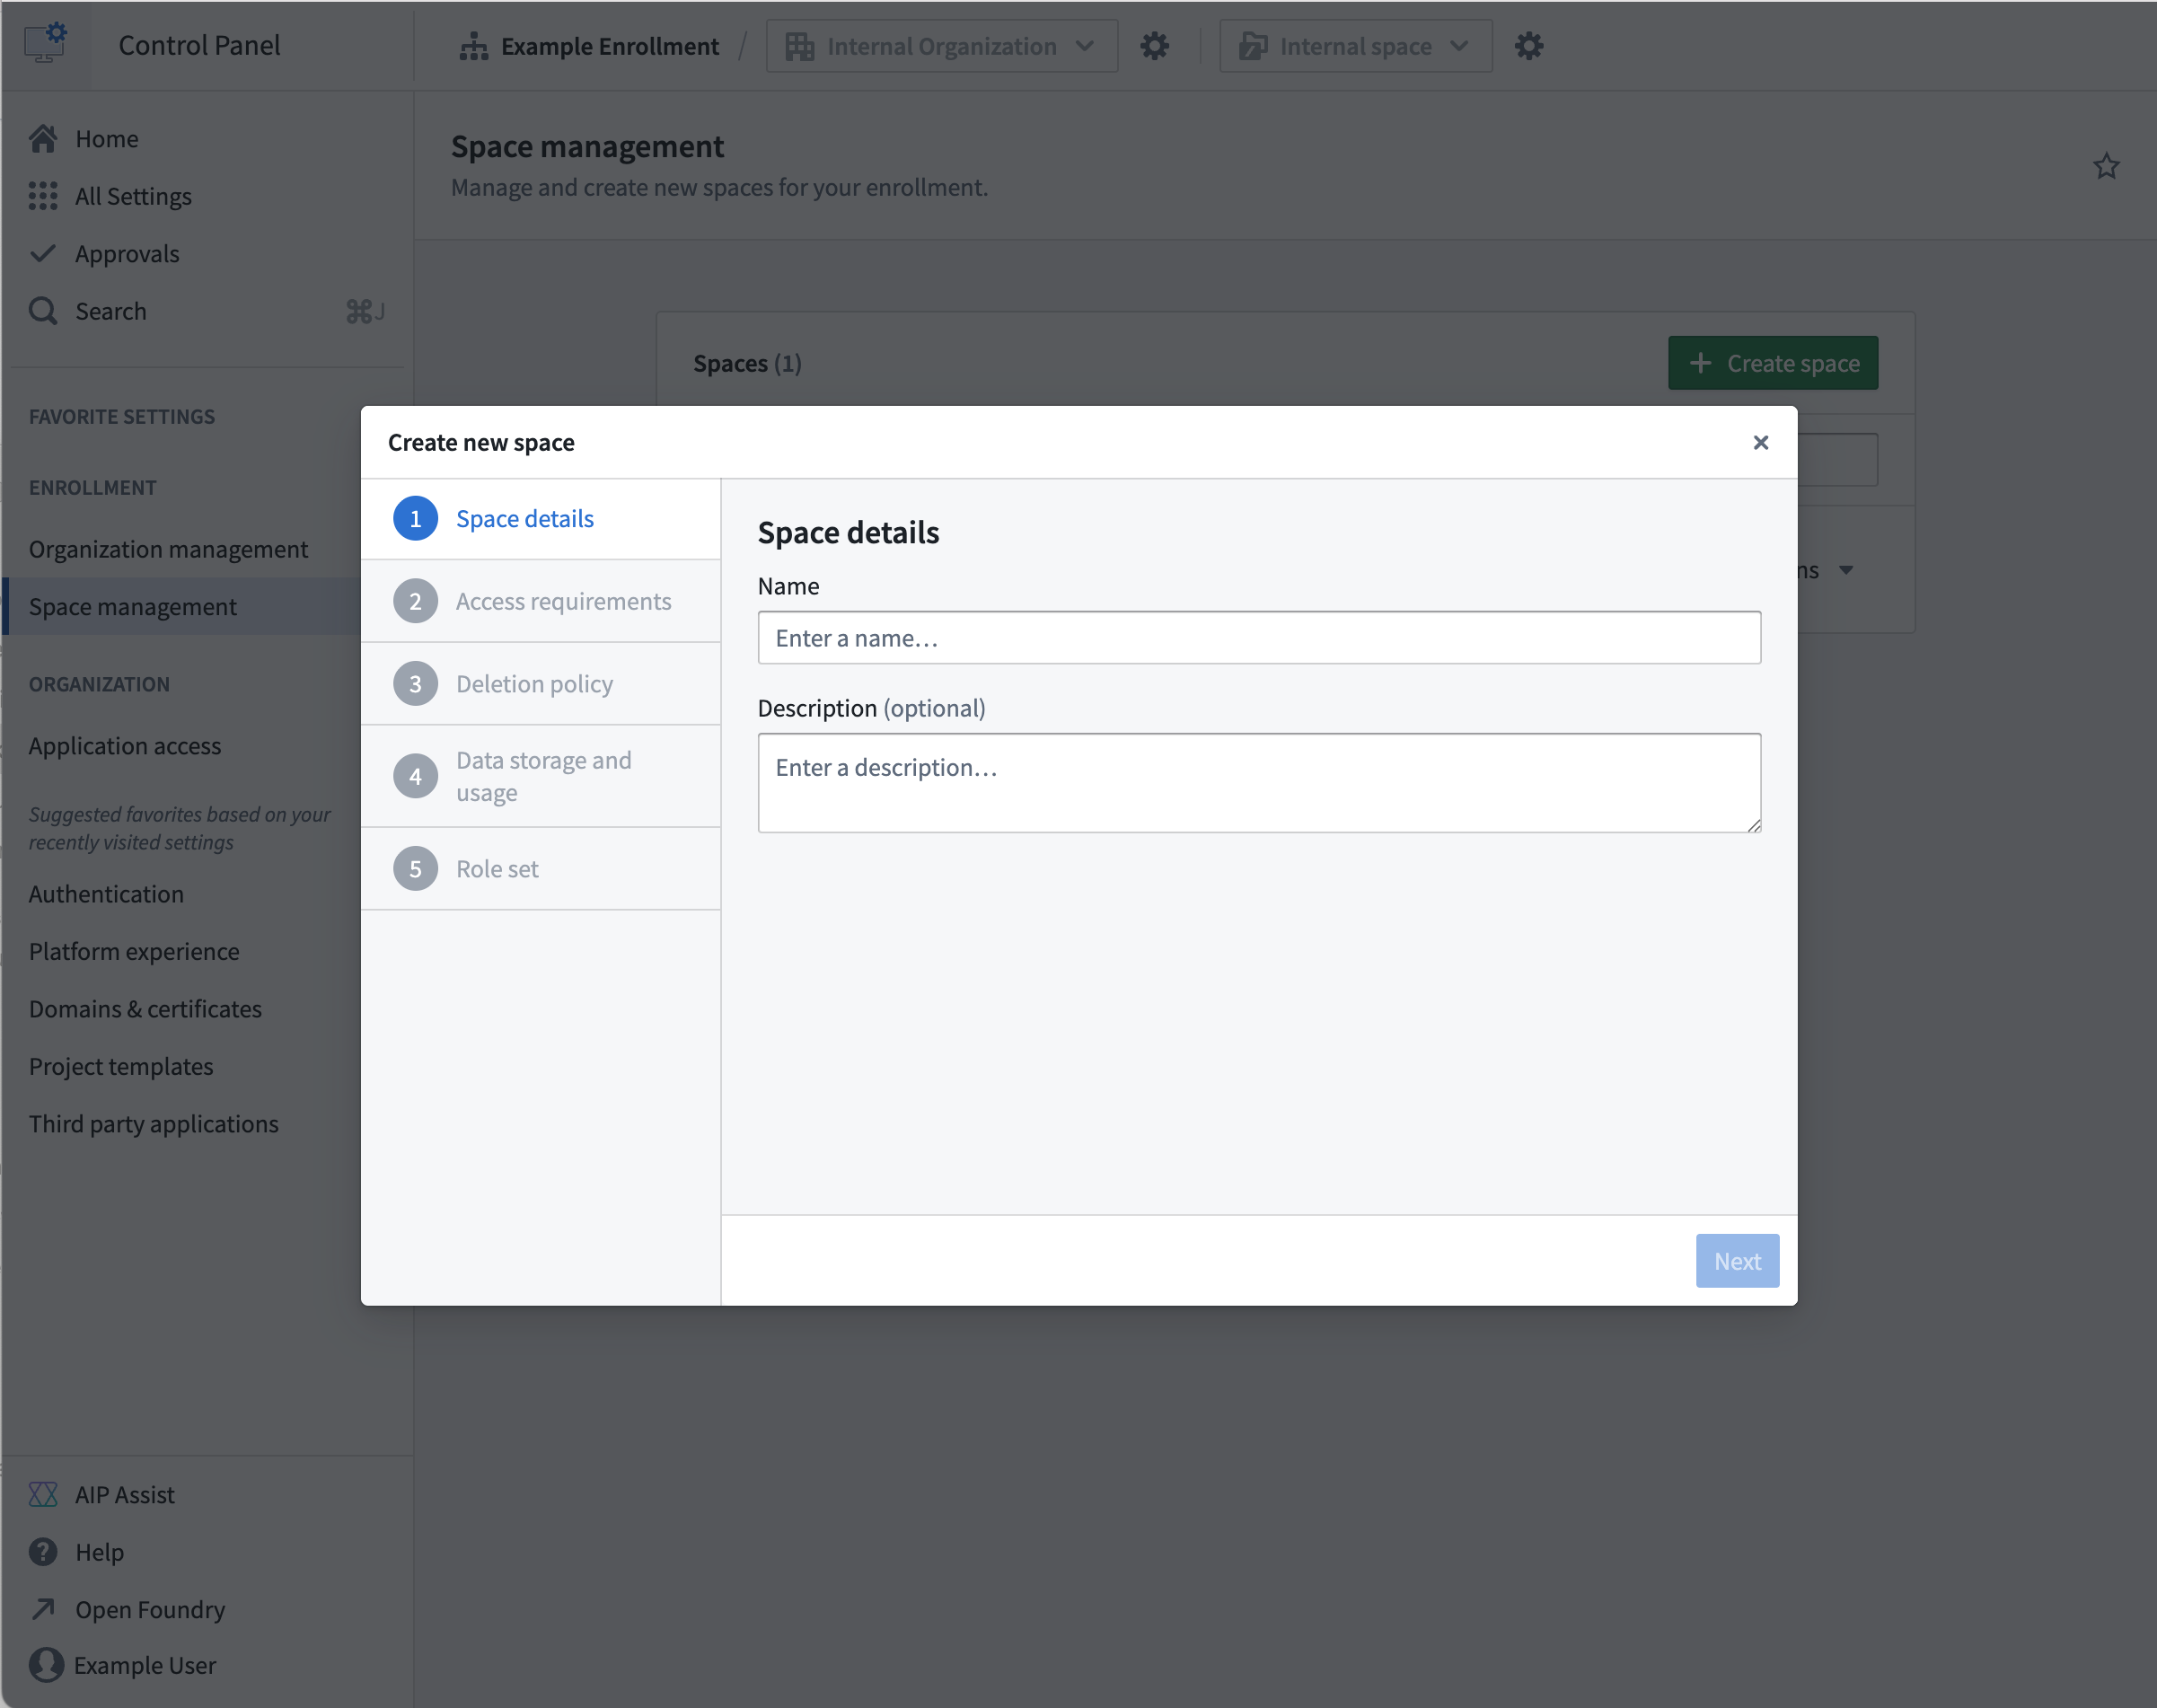
- Navigate to Control Panel → Spaces.
- Select Create space.
-
Configure the following space settings:
-
Name: Add a descriptive name for the consumer space.
- Access requirements:
- Set the internal organization as an access requirement.
- Set the consumer organization as an access requirement.
- Default permissions: Configure appropriate default permissions for consumer users.
Step 7: Create a consumer project template
Create a project template that automatically configures appropriate roles for consumer projects, ensuring consistent project creation.
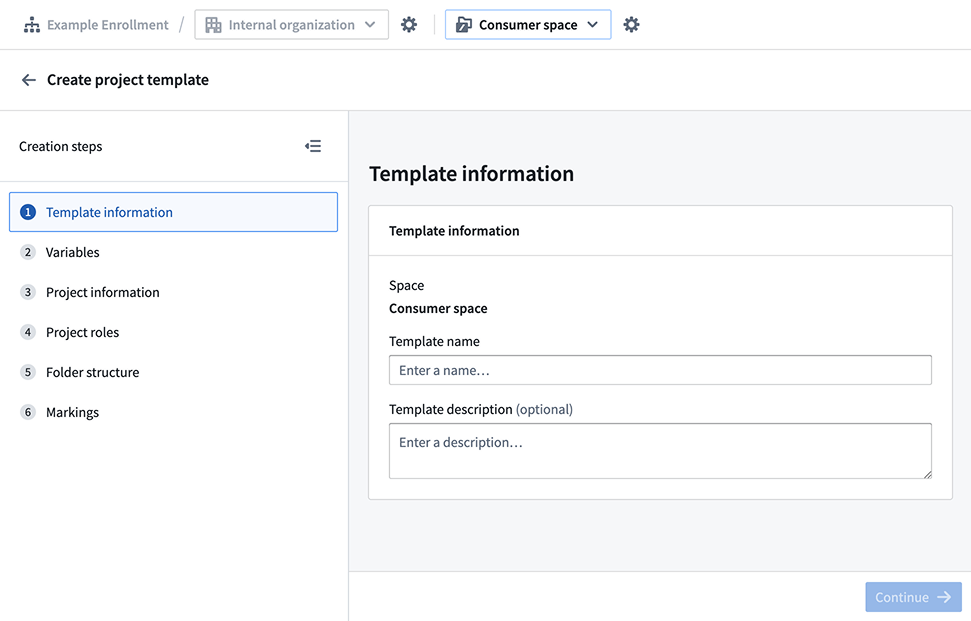
- Navigate to Control Panel > Project templates.
- Select Create template.
-
Configure the following template settings:
-
Template name: "Consumer Application Template"
- Template description: "Project template for consumer-facing applications"
- Template Variables: Keep the default
Namevariable. - Project information:
- Organizations: Choose Selected on project creation.
- Project roles:
- Default role: Select your
Consumerrole. - Existing user and groups: Add your Builder and Administrator groups, and grant the following roles to the relevant group:
- The "Builder" group has the
Editorrole. - The "Admin" group has the
Ownerrole.
- Default role: Select your
Step 8: (Optional) Configure a consumer domain
Set up a custom domain configured for consumer access with automatic authentication redirect enabled.
Create a custom domain
Navigate to Control Panel > Domains & certificates, then follow our documentation guidance to create a custom domain for consumer use.
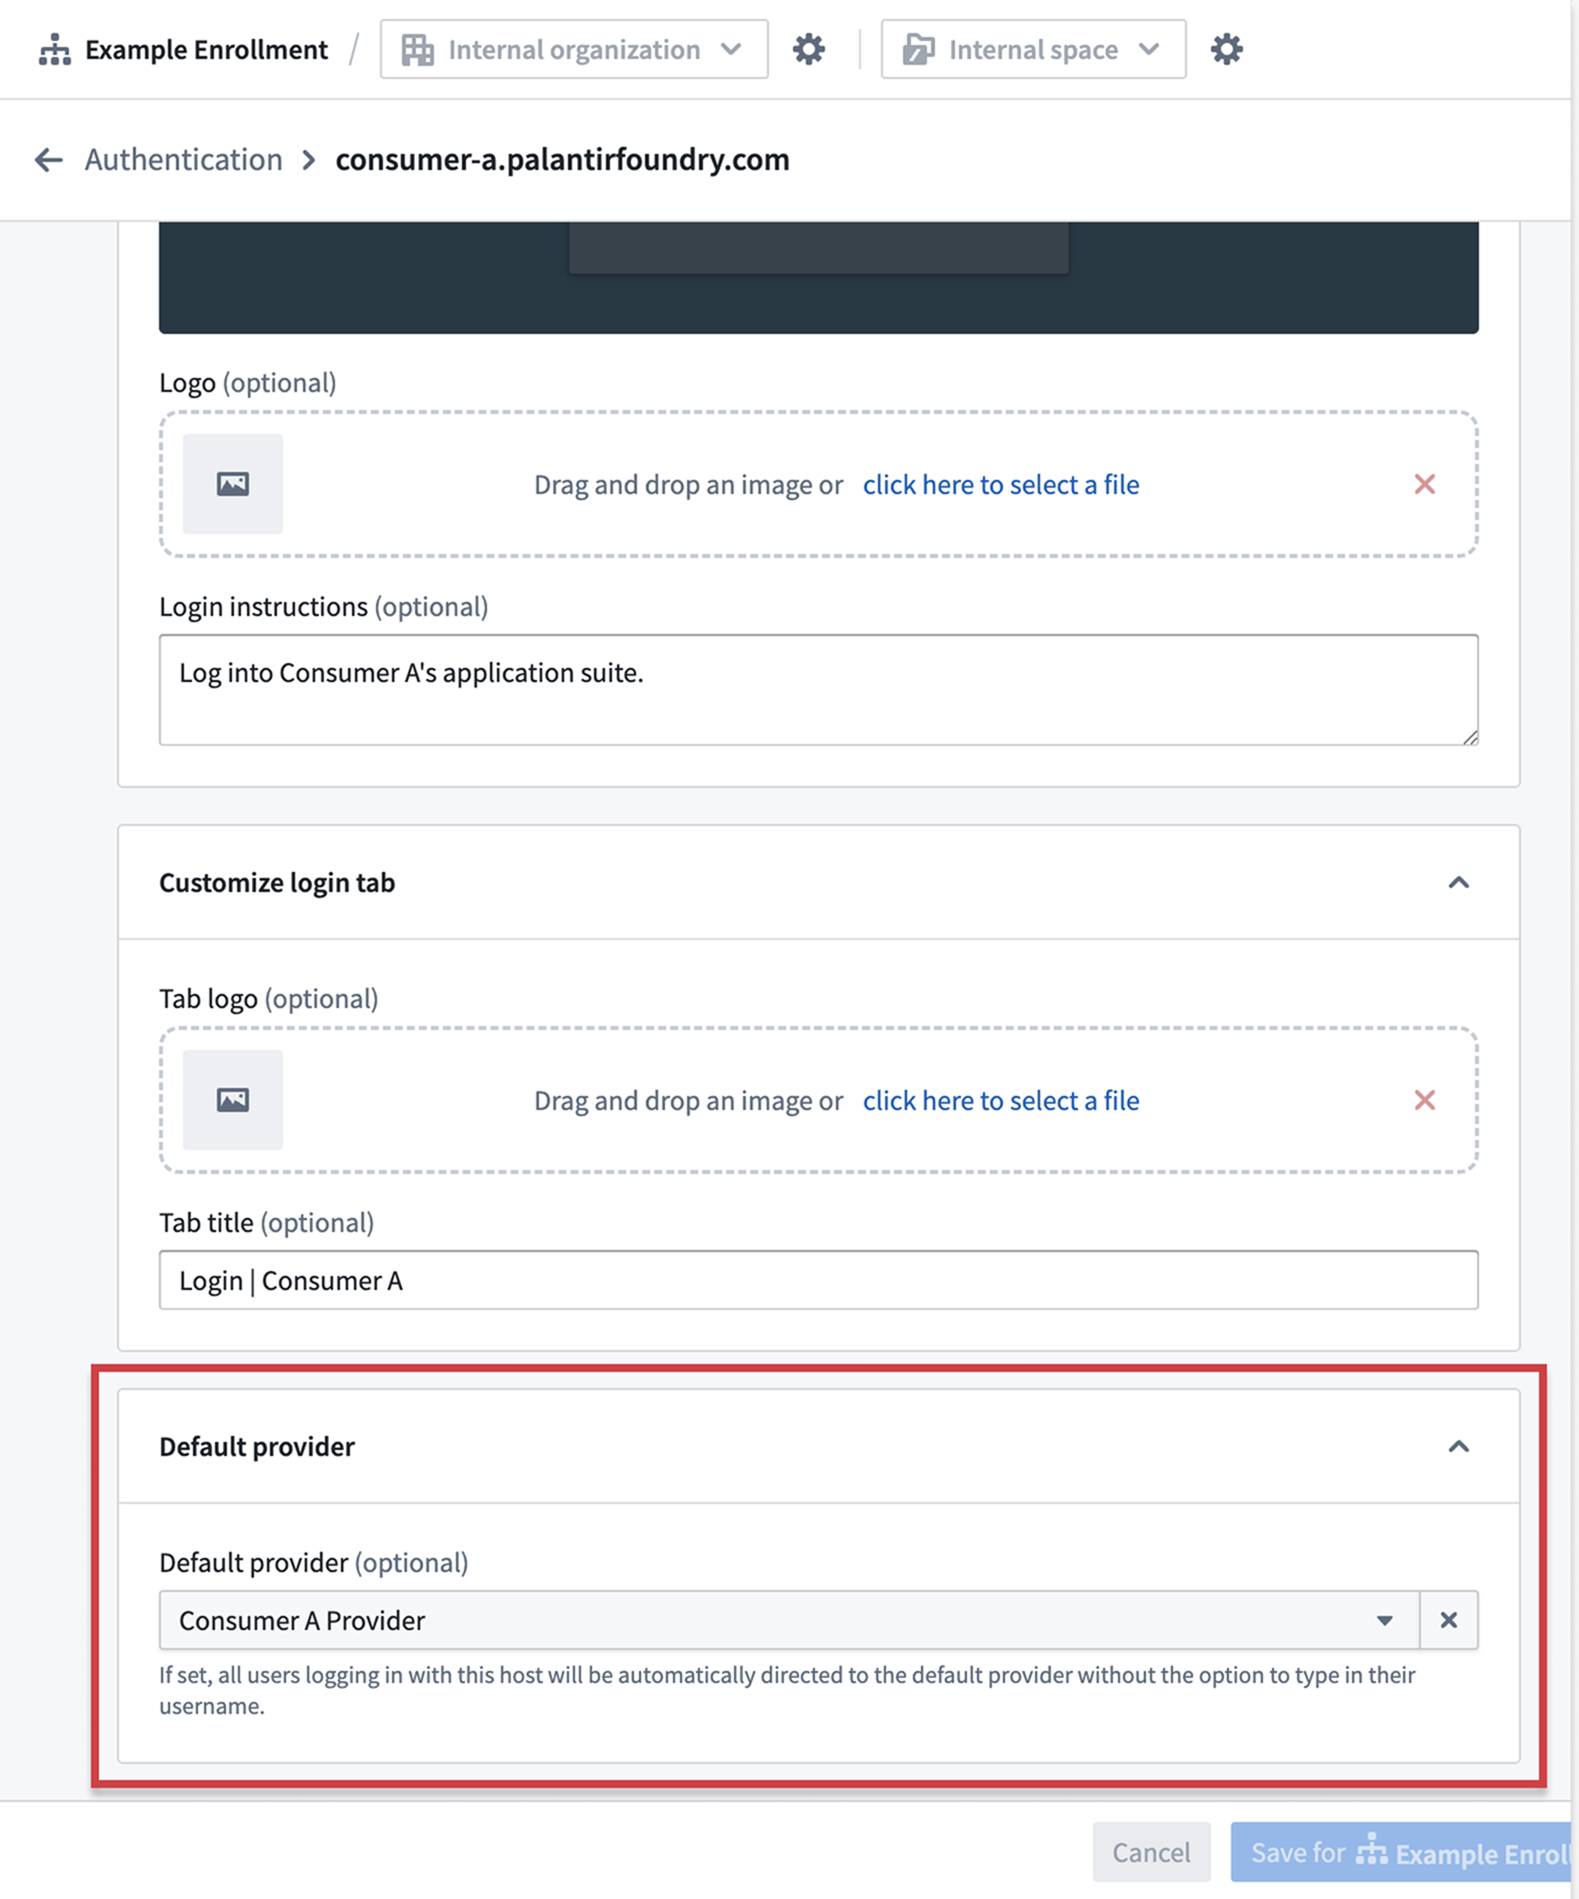
Configure a default authentication provider
- Navigate to Control Panel > Authentication > Hosts.
- Find your custom domain, then select Actions > Manage.
- Configure Default provider for the host to immediately redirect from the login page.
:::callout{theme="warning" title="Multiple IDPs configuration"}
When multiple IDPs are configured for a single domain, use the realm parameter to specify the provider:
https://consumer.yourdomain.com/workspace/application/[rid]?_realm=auth0-realm-id
You can find the realm ID Control Panel > Authentication > [Provider Name] > Advanced Settings > Realm.
:::
Step 9: Configure platform access restrictions
Prevent consumer users from accessing the broader Foundry platform and ensure they only have access to applications needed for their consumer experience.
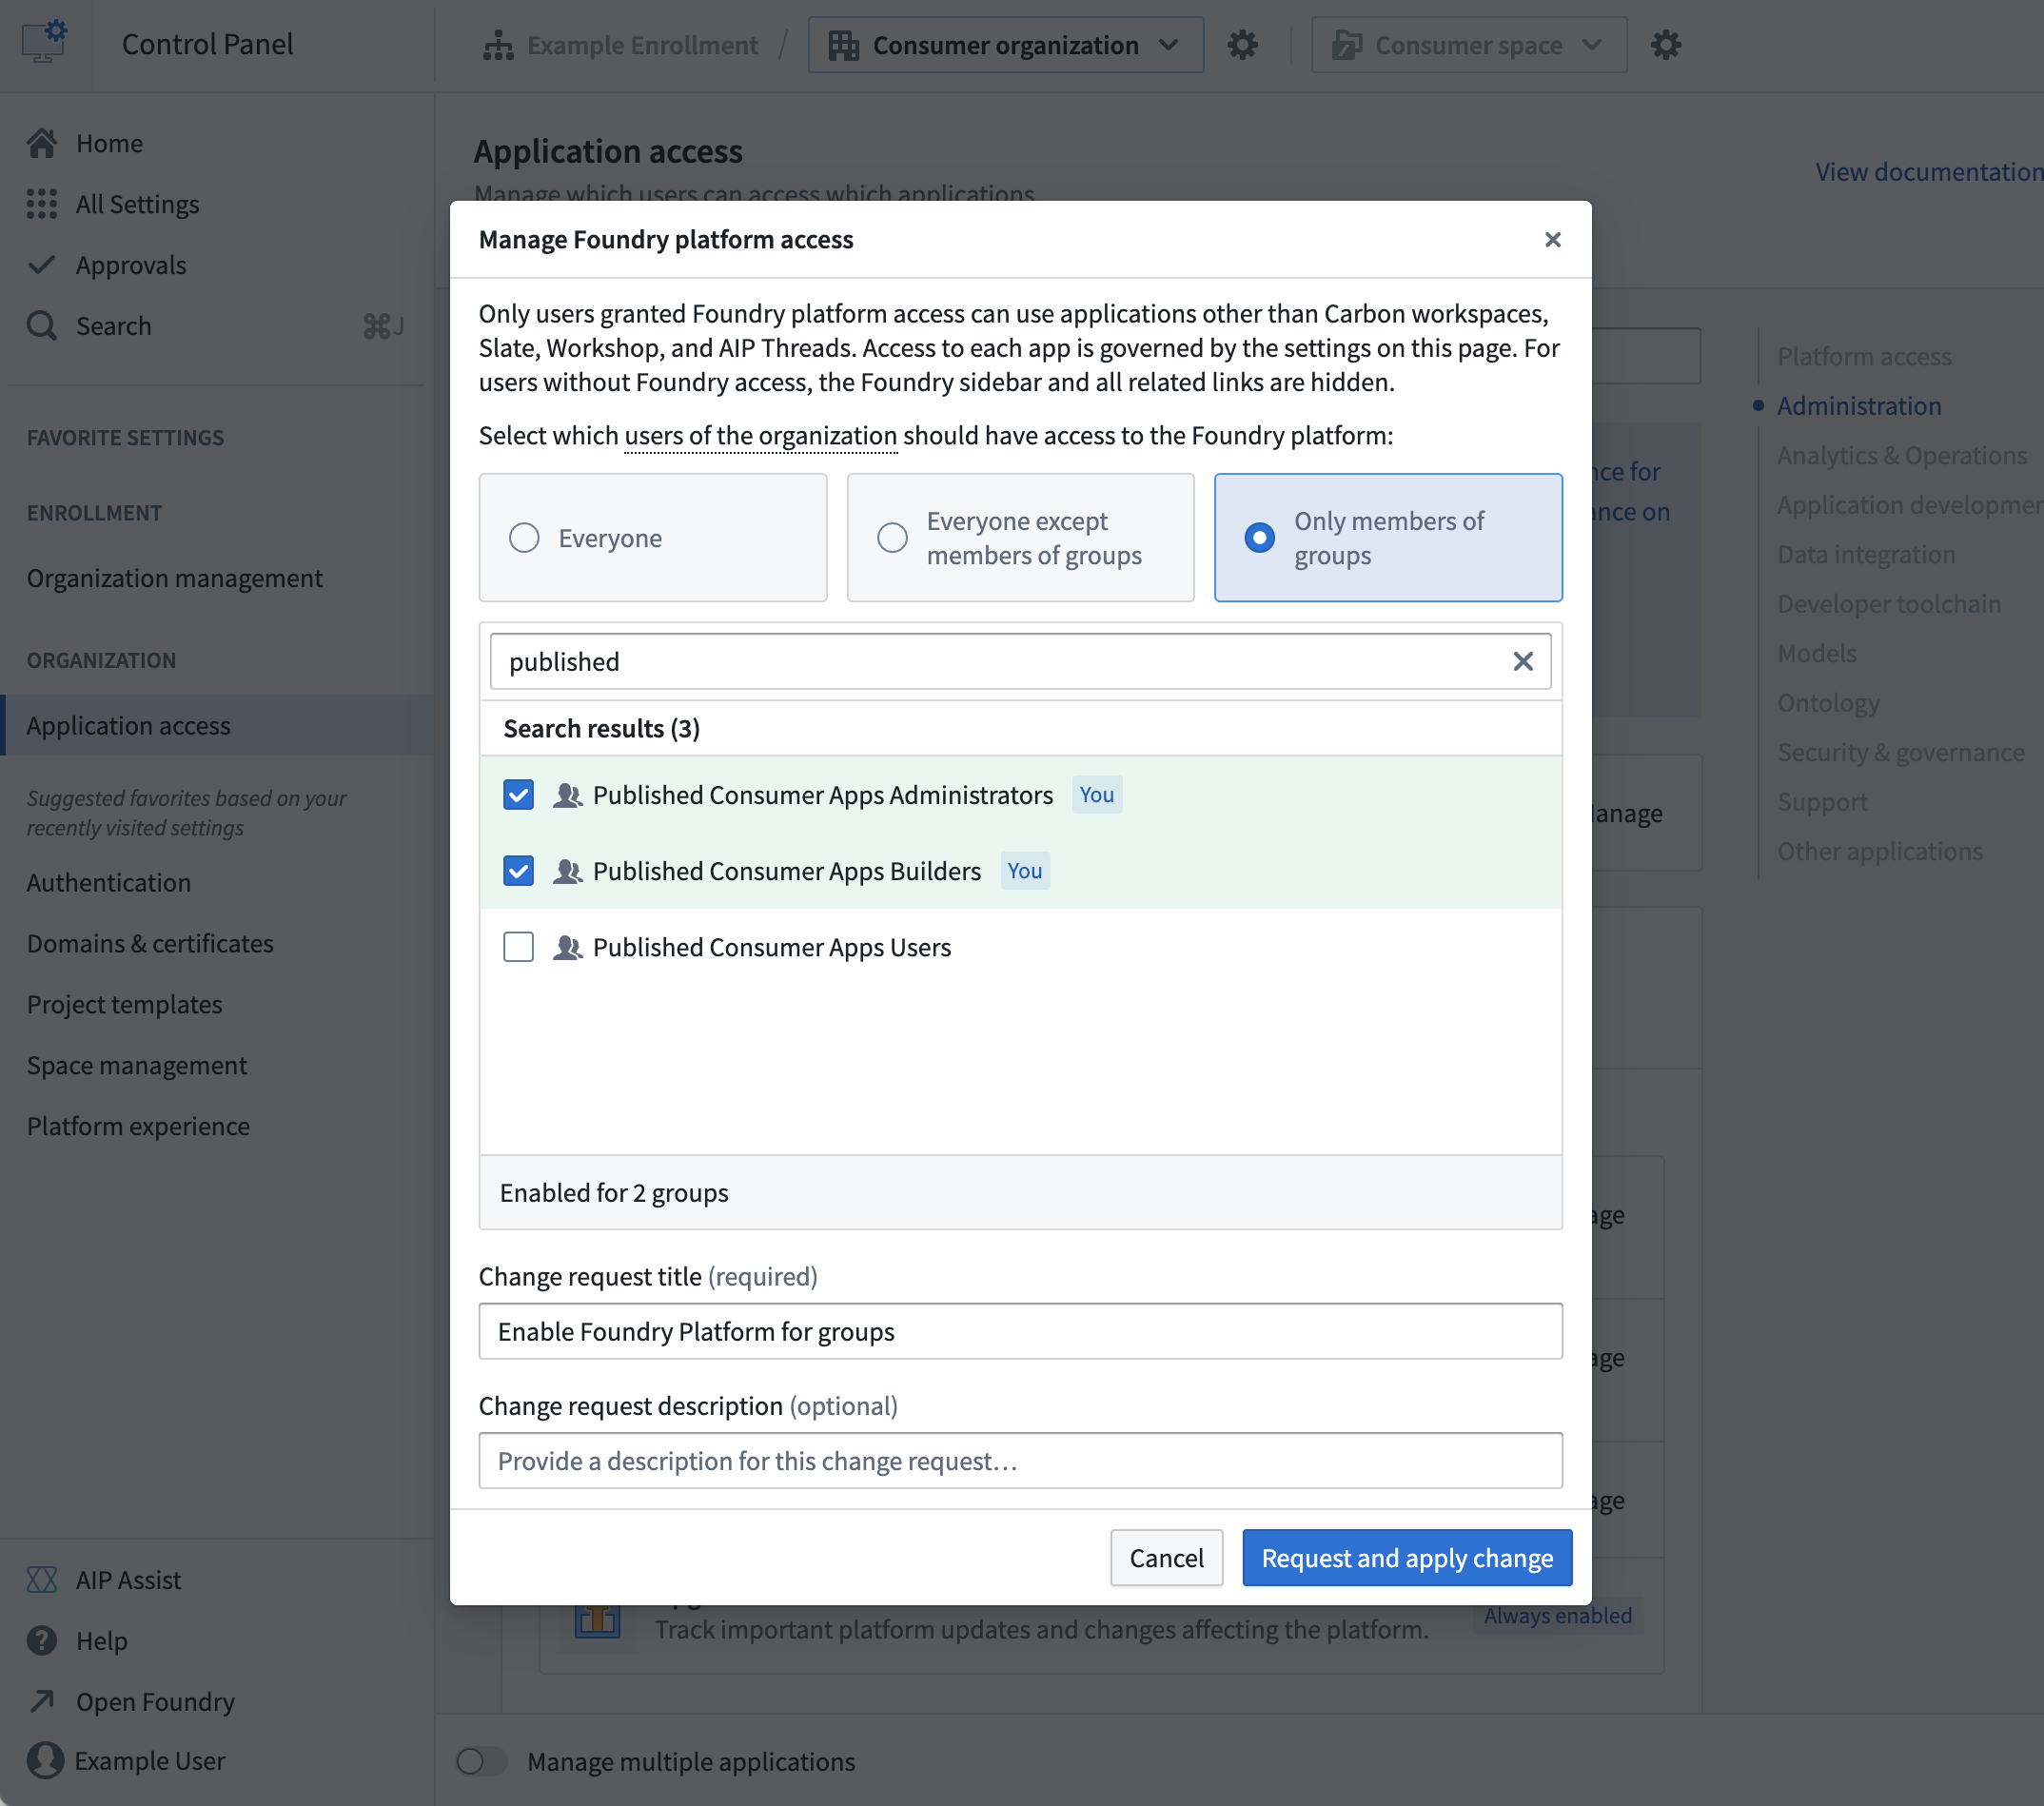
- Navigate to Control Panel > Application access.
- Select Foundry Platform, then Manage.
- Configure the following restrictions for your consumer organization:
- Disable platform access for consumer organization members using the rule-based group.
- Disable applications if they are not needed for consumer use:
- Workshop
- Slate
- AIP Threads
- Carbon
Step 10: Configure a default consumer application
Build a consumer application, and set up automatic redirection to the application on login.
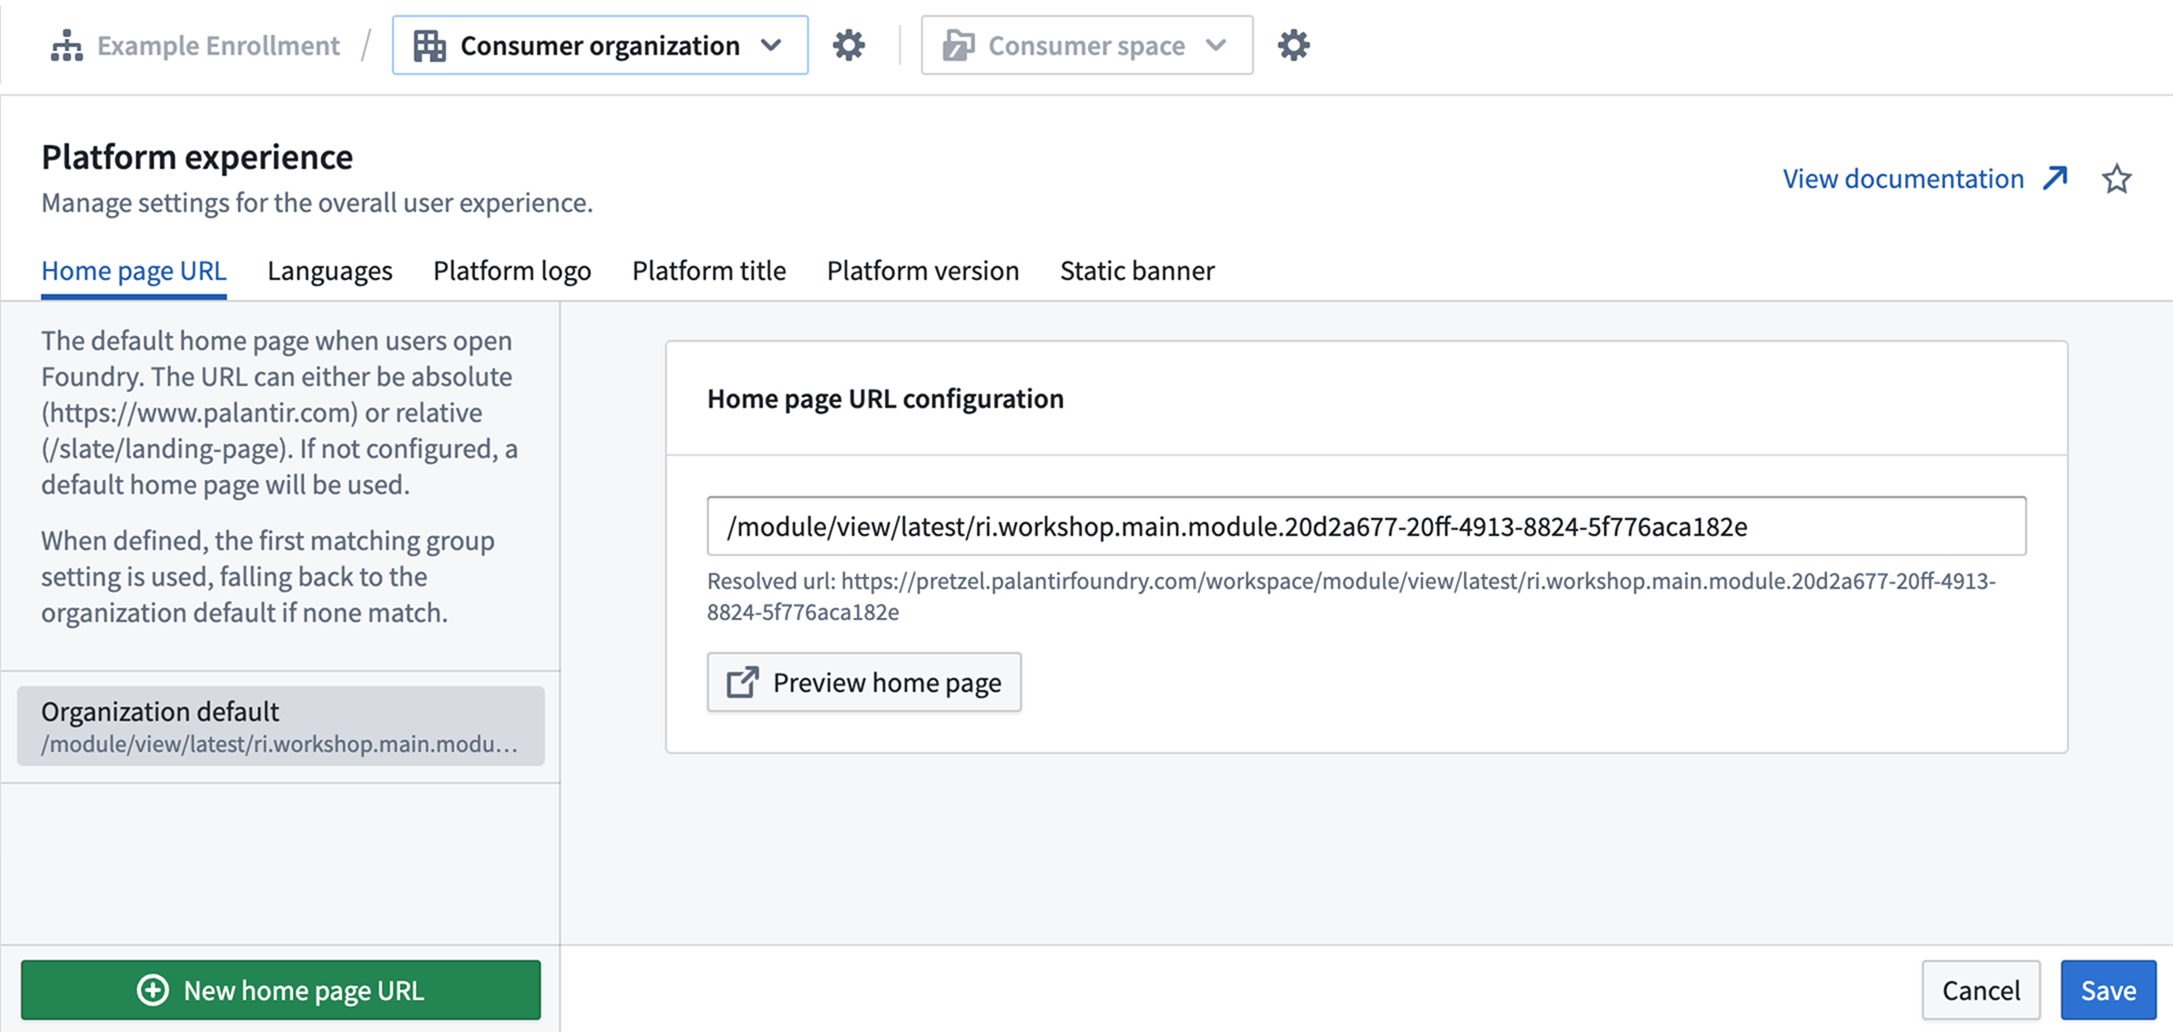
- Navigate to Control Panel > Platform experience.
- Select your consumer organization.
- Configure the following default application settings:
- Home page URL: Add the URL of the consumer application that users should be redirected to after login. Examples:
- For Workshop modules:
/module/view/latest/{module-rid} - For Slate dashboards:
/slate/app/{dashboard-rid-or-permalink} - For Carbon workspaces:
/carbon/{workspace-rid}
- For Workshop modules:
- Languages: Configure available languages for your consumer users with browser language preferences support.
- Platform title: Replace default "Palantir" branding with your organization's name.
- Platform version: Set the default platform version (
stable,beta, orprior), and configure version switcher access. - Static banner: Add organization-specific messaging or announcements.
Your Foundry platform is now configured for consumer mode.
Verify consumer mode configuration
After configuring consumer mode for Foundry, verify your set up using the following validation process:
- Create a project in the consumer space using the consumer project template:
- Navigate to your consumer space.
- Create a new project using the "Consumer Template".
-
Verify that role assignments are applied automatically.
-
Create a temporary resource, such as a Workshop application, for permissions validation:
- In the consumer project, create a simple Workshop application.
- Configure basic functionality to test access permissions.
-
Note the application URL for testing.
-
Create a consumer user in the consumer IDP and log in to Foundry:
- Create a test user account in your consumer identity provider.
- Verify the user is automatically assigned to the consumer organization.
-
Test login flow and confirm automatic redirect to the consumer application.
-
Switch back to your user and use the Check Access panel:
- Navigate to the consumer project's file view.
- Use the Check access tab in the project Access settings to validate permissions:
- Confirm the consumer user has access to the consumer project.
- Verify the consumer user does NOT have access to internal projects.
- Check that role assignments are working correctly.
Troubleshooting
The organization assignment is not working
- Check triaging rules in the authentication provider configuration.
- Verify group membership criteria are correctly configured.
- Review user attributes being passed from your IDP.
Authentication redirects are not working
- Verify domain configuration and DNS setup.
- Check default provider settings for your domain.
- Review CORS and CSP configuration if using custom domains.
Role permissions are too restrictive/permissive
- Review role definitions and adjust permissions as needed.
- Test with consumer users to ensure applications function correctly.
Next steps
Once your Foundry consumer mode setup is complete, proceed with setting up your specific consumer application type:
- In-platform application: Quickly build low-code Workshop, Slate, or Carbon applications.
- OAuth application: Build OSDK applications hosted in Foundry.
- Client credentials application Create externally hosted applications with service-to-service authentication.
中文翻译
配置 Foundry 以支持消费者模式
在构建面向消费者的应用程序之前,您必须先将 Foundry 配置为支持消费者模式。本页将指导您完成在 Foundry 中正确配置消费者模式所需满足的要求。
:::callout{theme="neutral"} 仅当在您的消费者应用程序中使用 Foundry 用户权限和身份验证时,才需要进行此设置。如果您使用的是客户端凭证流程(Client Credentials Flow),则可以跳过此部分。 :::
前提条件
在配置 Foundry 之前,请确保您具备以下条件:
- 注册管理员(Enrollment Administrator) 权限,用于创建组织、更新身份验证提供者以及管理权限配置。
- 访问控制面板(Control Panel) 以进行平台配置。
- 了解您的消费者身份验证要求。
步骤 1:创建消费者组织
首先,为消费者用户创建一个专用组织,使其与内部平台用户隔离。
- 导航至控制面板 > 组织管理。
- 选择创建组织。
- 配置以下组织设置:
- 名称: 为您的消费者组织添加一个描述性名称(例如,“客户门户用户”)。
- 组织管理员: 分配一个合适的管理员用户或用户组。
- 协作: 添加您的内部组织,以允许发现您组织的角色。确保所有复选框均未选中,以防止跨组织的用户和用户组发现。
- 私有空间: 为消费者组织选择
否。
请注意,默认情况下,每个注册最多只能有五个组织。
步骤 2:禁用成员发现
接下来,配置您的消费者组织,以防止用户发现组织内的其他用户和用户组,从而提供额外的隐私和安全隔离。
- 导航至控制面板 > 组织管理。
- 找到您的消费者组织,然后选择操作 > 管理成员发现。
- 配置以下成员发现设置:
- 发现用户: 禁用此设置,以防止此组织中的用户发现同一组织中的其他用户。
- 发现用户组: 禁用此设置,以防止此组织中的用户发现组织中的用户组。
在某些 B2B 场景下,为了支持 Foundry 的协作功能(如 Workshop 评论组件),消费者组织内的用户或用户组发现是预期行为。在这种情况下,您可以忽略此步骤,并选择保持启用用户和/或用户组发现。
步骤 3:配置身份验证提供者与分流规则
配置消费者模式的下一步是设置一个身份验证提供者,该提供者会自动将消费者用户分配到您的消费者组织。
创建或更新身份验证提供者
- 导航至控制面板 > 身份验证,然后选择提供者选项卡。
- 选择添加提供者以配置新的身份验证提供者,或选择现有提供者进行编辑。
- 配置以下提供者设置:
设置组织分流规则
- 在身份验证提供者设置中,配置组织分配。
- 选择一个自动分配规则,将用户引导至您的消费者组织。
- 默认组织: 所有用户都被分配默认组织。
- 高级规则创建: 基于电子邮件域名、用户组成员身份或其他属性配置规则。如果没有任何条件匹配,默认组织将作为后备方案。
步骤 4:创建基于规则的消费者用户组
创建一个与您的消费者组织对齐的用户组,以实现一致的权限管理。完成此步骤后,您应该拥有一个或多个自动更新的用户组,用于为所有消费者用户授权。如果所有用户都属于单个组织,则必须为该组织创建一个基于规则的用户组;如果用户属于多个组织,则为每个组织创建一个基于规则的用户组。
- 在控制面板的身份验证提供者页面中,选择用户组分配。
- 选择+ 添加规则。
- 从选择用户组... 下拉菜单中,选择+ 创建新的基于规则的用户组,并配置以下内容:
- 名称: 与您的消费者组织名称匹配(例如,“消费者门户用户”)。
- 描述: 添加描述,例如“包含来自 {您的消费者} 组织的所有成员”。
- 组织: 选择相关的消费者组织。
- 配置规则参数以匹配您的组织分配规则。
- 为每个消费者组织重复步骤 2 到 4。
消费者构建者与管理员用户组
为便于在构建和管理消费者应用程序时进行权限管理,我们建议指定一个“构建者(Builder)”用户组和一个“管理员(Administrator)”用户组。如果在 Foundry 外部管理用户组,请在您的身份提供商中创建这些用户组;如果在 Foundry 内部创建,请参考我们的管理用户组文档。
步骤 5:配置消费者角色集
配置一个角色集,为消费者用户提供适当的权限。
- 选择屏幕左下角的用户头像,然后选择设置 > 角色。
- 选择创建角色集。
- 名称: 为消费者角色集添加描述性名称(例如,
Consumer roles)。 - 描述: “为消费者应用程序减少操作权限的角色”。
- 从以下位置复制角色: 项目默认值
- 组织: 您的内部组织
- 名称: 为消费者角色集添加描述性名称(例如,
- 在您的新角色集中,选择新角色并添加以下详细信息以创建您的
Consumer角色:
- 名称: “Consumer”
- 描述: “消费者应用程序用户的基本权限。”
- 包含: 将此可选部分留空。
创建新的 Consumer 角色后,向该角色添加以下操作:
carbon:view-workspaceeddie:view-aip-logicfoundry:read-datafunction-executor:execute-functionfunction-registry:read-contractfunction-registry:read-functionhubble:object-view:viewlime:searchobject-set-service:read-versioned-object-setobjects:read-dataontology:view-action-typeontology:view-datasourceontology:view-object-typeontology:view-relationsalt:blobster:readslate:run-query-v2slate:view-documentslate:view-stylesheetthird-party-application:view-applicationworkshop-server:view-module
根据具体的工作流程,可能需要额外的操作。请查阅我们关于理解角色与操作的文档以获取更多详细信息。
步骤 6:创建消费者空间
消费者空间提供隔离和访问控制。完成此步骤后,您应该拥有一个专用空间,消费者用户可以在其中访问项目。
- 导航至控制面板 → 空间。
- 选择创建空间。
-
配置以下空间设置:
-
名称: 为消费者空间添加一个描述性名称。
- 访问要求:
- 将内部组织设置为访问要求。
- 将消费者组织设置为访问要求。
- 默认权限: 为消费者用户配置适当的默认权限。
步骤 7:创建消费者项目模板
创建一个项目模板,该模板会自动为消费者项目配置适当的角色,确保项目创建的一致性。
- 导航至控制面板 > 项目模板。
- 选择创建模板。
-
配置以下模板设置:
-
模板名称: “消费者应用程序模板”
- 模板描述: “面向消费者的应用程序的项目模板”
- 模板变量: 保留默认的
Name变量。 - 项目信息:
- 组织: 选择在项目创建时选定。
- 项目角色:
- 默认角色: 选择您的
Consumer角色。 - 现有用户和用户组: 添加您的构建者和管理员用户组,并为相关用户组授予以下角色:
- “构建者”用户组拥有
Editor角色。 - “管理员”用户组拥有
Owner角色。
- “构建者”用户组拥有
- 默认角色: 选择您的
步骤 8:(可选)配置消费者域名
设置一个为消费者访问配置的自定义域名,并启用自动身份验证重定向。
创建自定义域名
导航至控制面板 > 域名与证书,然后按照我们的文档指南创建一个供消费者使用的自定义域名。
配置默认身份验证提供者
- 导航至控制面板 > 身份验证 > 主机。
- 找到您的自定义域名,然后选择操作 > 管理。
- 配置主机的默认提供者,以便从登录页面立即重定向。
:::callout{theme="warning" title="多个 IDP 配置"}
当为单个域名配置了多个 IDP 时,请使用 realm 参数指定提供者:
https://consumer.yourdomain.com/workspace/application/[rid]?_realm=auth0-realm-id
您可以在 控制面板 > 身份验证 > [提供者名称] > 高级设置 > Realm 中找到 realm ID。
:::
步骤 9:配置平台访问限制
阻止消费者用户访问更广泛的 Foundry 平台,确保他们只能访问其消费者体验所需的应用程序。
- 导航至控制面板 > 应用程序访问。
- 选择 Foundry 平台,然后选择管理。
- 为您的消费者组织配置以下限制:
- 使用基于规则的用户组禁用消费者组织成员的平台访问。
- 禁用消费者使用不需要的应用程序:
- Workshop
- Slate
- AIP Threads
- Carbon
步骤 10:配置默认消费者应用程序
构建一个消费者应用程序,并设置在登录时自动重定向到该应用程序。
- 导航至控制面板 > 平台体验。
- 选择您的消费者组织。
- 配置以下默认应用程序设置:
- 主页 URL: 添加用户登录后应重定向到的消费者应用程序的 URL。示例:
- 对于 Workshop 模块:
/module/view/latest/{module-rid} - 对于 Slate 仪表板:
/slate/app/{dashboard-rid-or-permalink} - 对于 Carbon 工作区:
/carbon/{workspace-rid}
- 对于 Workshop 模块:
- 语言: 为您的消费者用户配置可用语言,并支持浏览器语言偏好。
- 平台标题: 将默认的“Palantir”品牌替换为您组织的名称。
- 平台版本: 设置默认平台版本(
stable、beta或prior),并配置版本切换器访问权限。 - 静态横幅: 添加组织特定的消息或公告。
- 主页 URL: 添加用户登录后应重定向到的消费者应用程序的 URL。示例:
您的 Foundry 平台现已配置为消费者模式。
验证消费者模式配置
为 Foundry 配置消费者模式后,使用以下验证流程检查您的设置:
-
使用消费者项目模板在消费者空间中创建一个项目:
- 导航到您的消费者空间。
- 使用“消费者模板”创建一个新项目。
- 验证角色分配是否自动应用。
-
创建一个临时资源(例如 Workshop 应用程序)以进行权限验证:
- 在消费者项目中,创建一个简单的 Workshop 应用程序。
- 配置基本功能以测试访问权限。
- 记下用于测试的应用程序 URL。
-
在消费者 IDP 中创建一个消费者用户并登录 Foundry:
- 在您的消费者身份提供商中创建一个测试用户帐户。
- 验证该用户是否被自动分配到消费者组织。
- 测试登录流程并确认自动重定向到消费者应用程序。
-
切换回您的用户并使用检查访问面板:
- 导航到消费者项目的文件视图。
- 使用项目访问设置中的检查访问选项卡来验证权限:
- 确认消费者用户有权访问消费者项目。
- 验证消费者用户没有权限访问内部项目。
- 检查角色分配是否正常工作。
故障排除
组织分配不起作用
- 检查身份验证提供者配置中的分流规则。
- 验证用户组成员身份条件是否正确配置。
- 审查从您的 IDP 传递的用户属性。
身份验证重定向不起作用
- 验证域名配置和 DNS 设置。
- 检查您域名的默认提供者设置。
- 审查 CORS 和 CSP 配置(如果使用自定义域名)。
角色权限过于严格/宽松
- 审查角色定义并根据需要调整权限。
- 使用消费者用户进行测试,确保应用程序正常运行。
后续步骤
一旦您的 Foundry 消费者模式设置完成,请继续设置您的特定消费者应用程序类型:
- 平台内应用程序: 快速构建低代码的 Workshop、Slate 或 Carbon 应用程序。
- OAuth 应用程序: 构建托管在 Foundry 中的 OSDK 应用程序。
- 客户端凭证应用程序: 创建具有服务到服务身份验证的外部托管应用程序。