Set up a Public Application(设置公共应用(Public Application))
The instructions in the sections below outline the end-to-end process to set up a Public Application in Developer Console and Control Panel.
:::callout{theme="warning" title="Information Security Officer review required"} Public Applications expose ontology data and actions to anyone on the public internet. Each application requires an Information Security Officer in your enrollment to review and approve the intended use case before enablement. Discuss your intended use case, exposed ontology resources, and intended audience with your Information Security Officer before completing the steps below to create a Public Application in Developer Console. :::
Prerequisites
Before you set up your Public Application, ensure that:
- Your Foundry enrollment supports Public Applications. If you are not sure, contact Palantir Support.
- You have the Developer Console permissions required to create a new application.
- You can identify an Information Security Officer in your enrollment who can both approve the use case and approve the subdomain registration in Control Panel. The same role performs both approvals.
- You have permission to declassify every Marking on each resource you intend to add to the application. If you do not, Foundry will block the resource from being added, as the resource does not meet the proper export controls.
Step 1: Create the application in Developer Console
- Navigate to Developer Console and select + New application.
- Step through the creation wizard and enable an Ontology SDK on the Resources page.
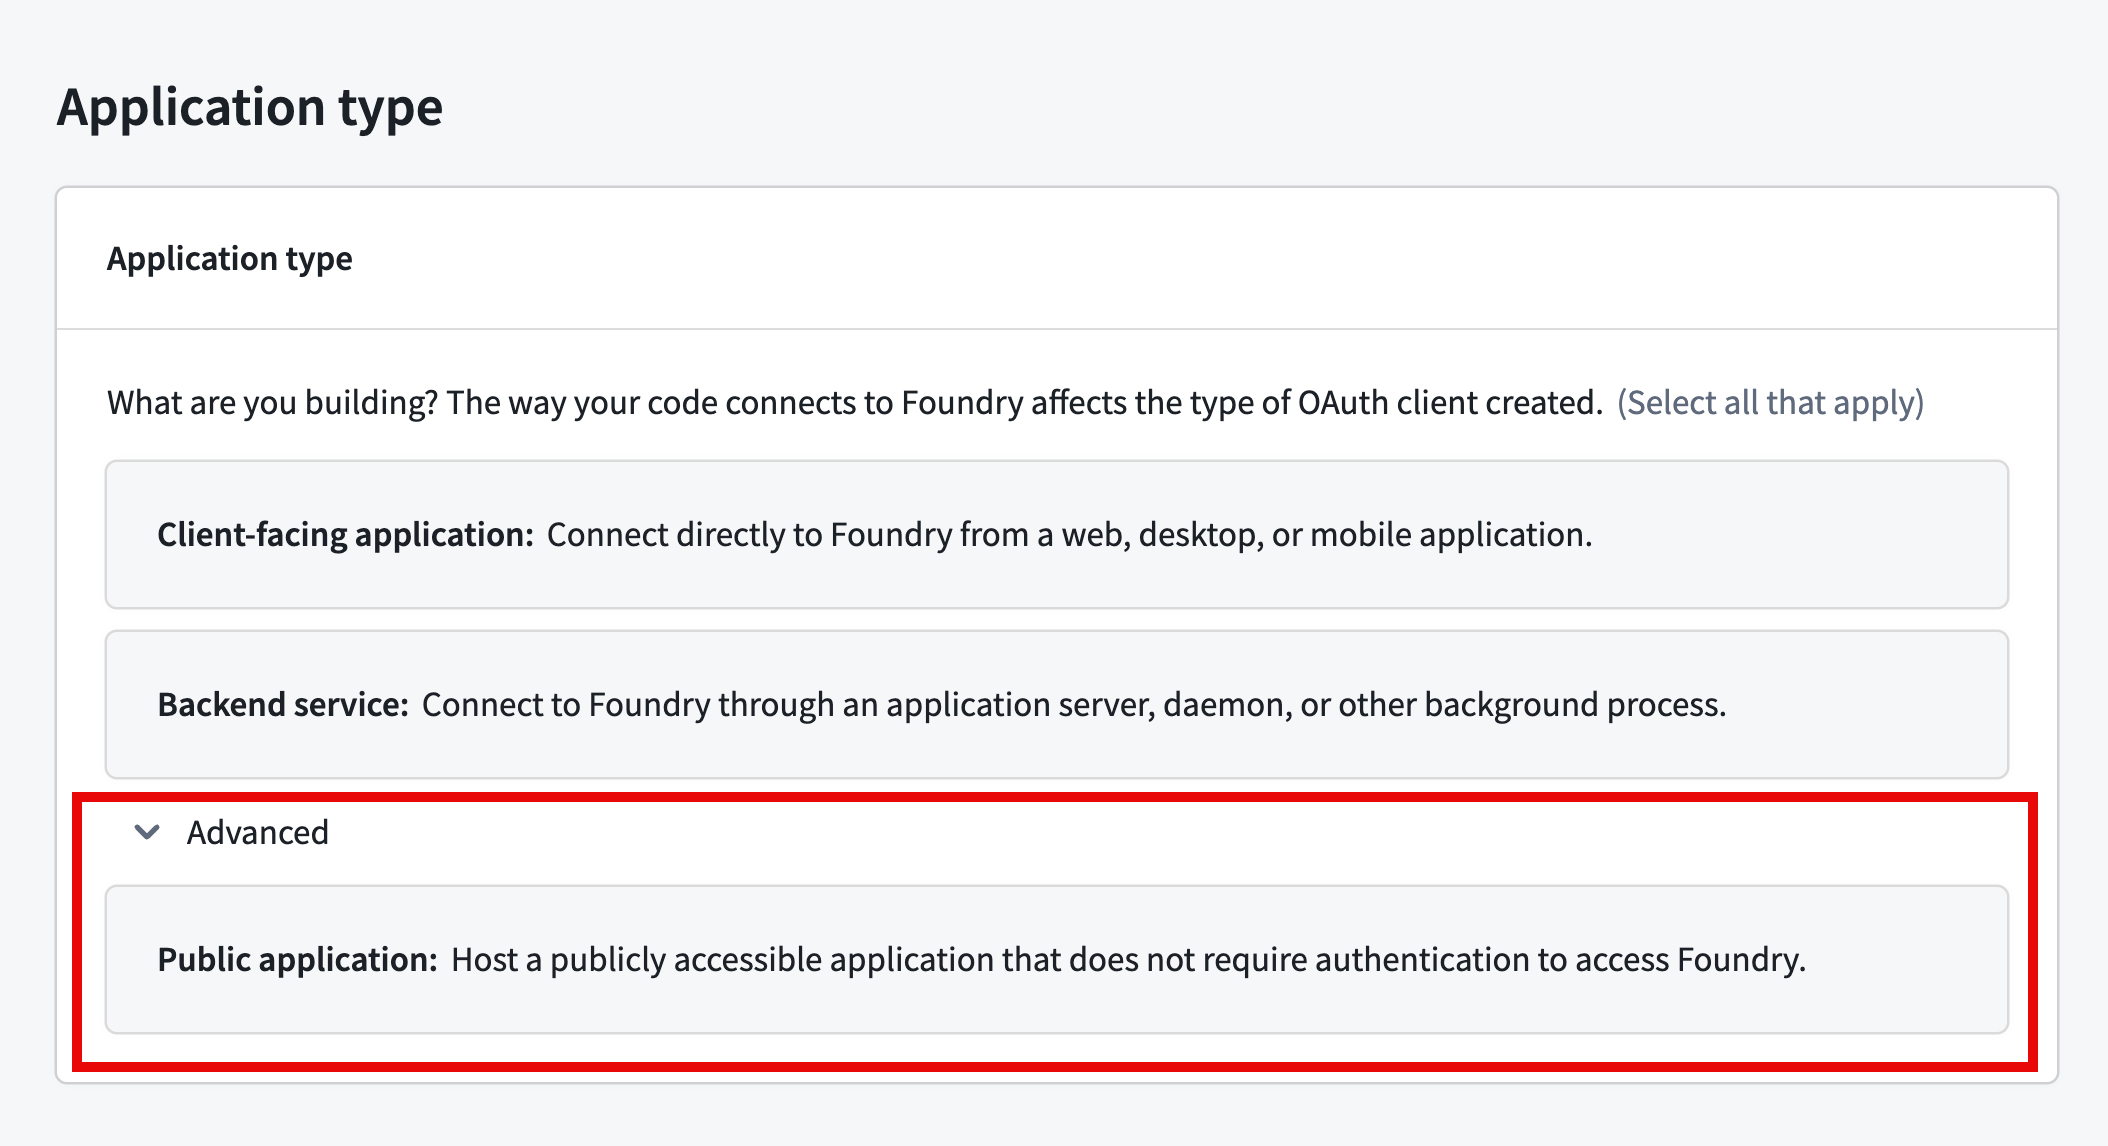
- Expand the Advanced section on the Application type step and select Public application.
- Continue through the Developer Console creation flow and select Create application.
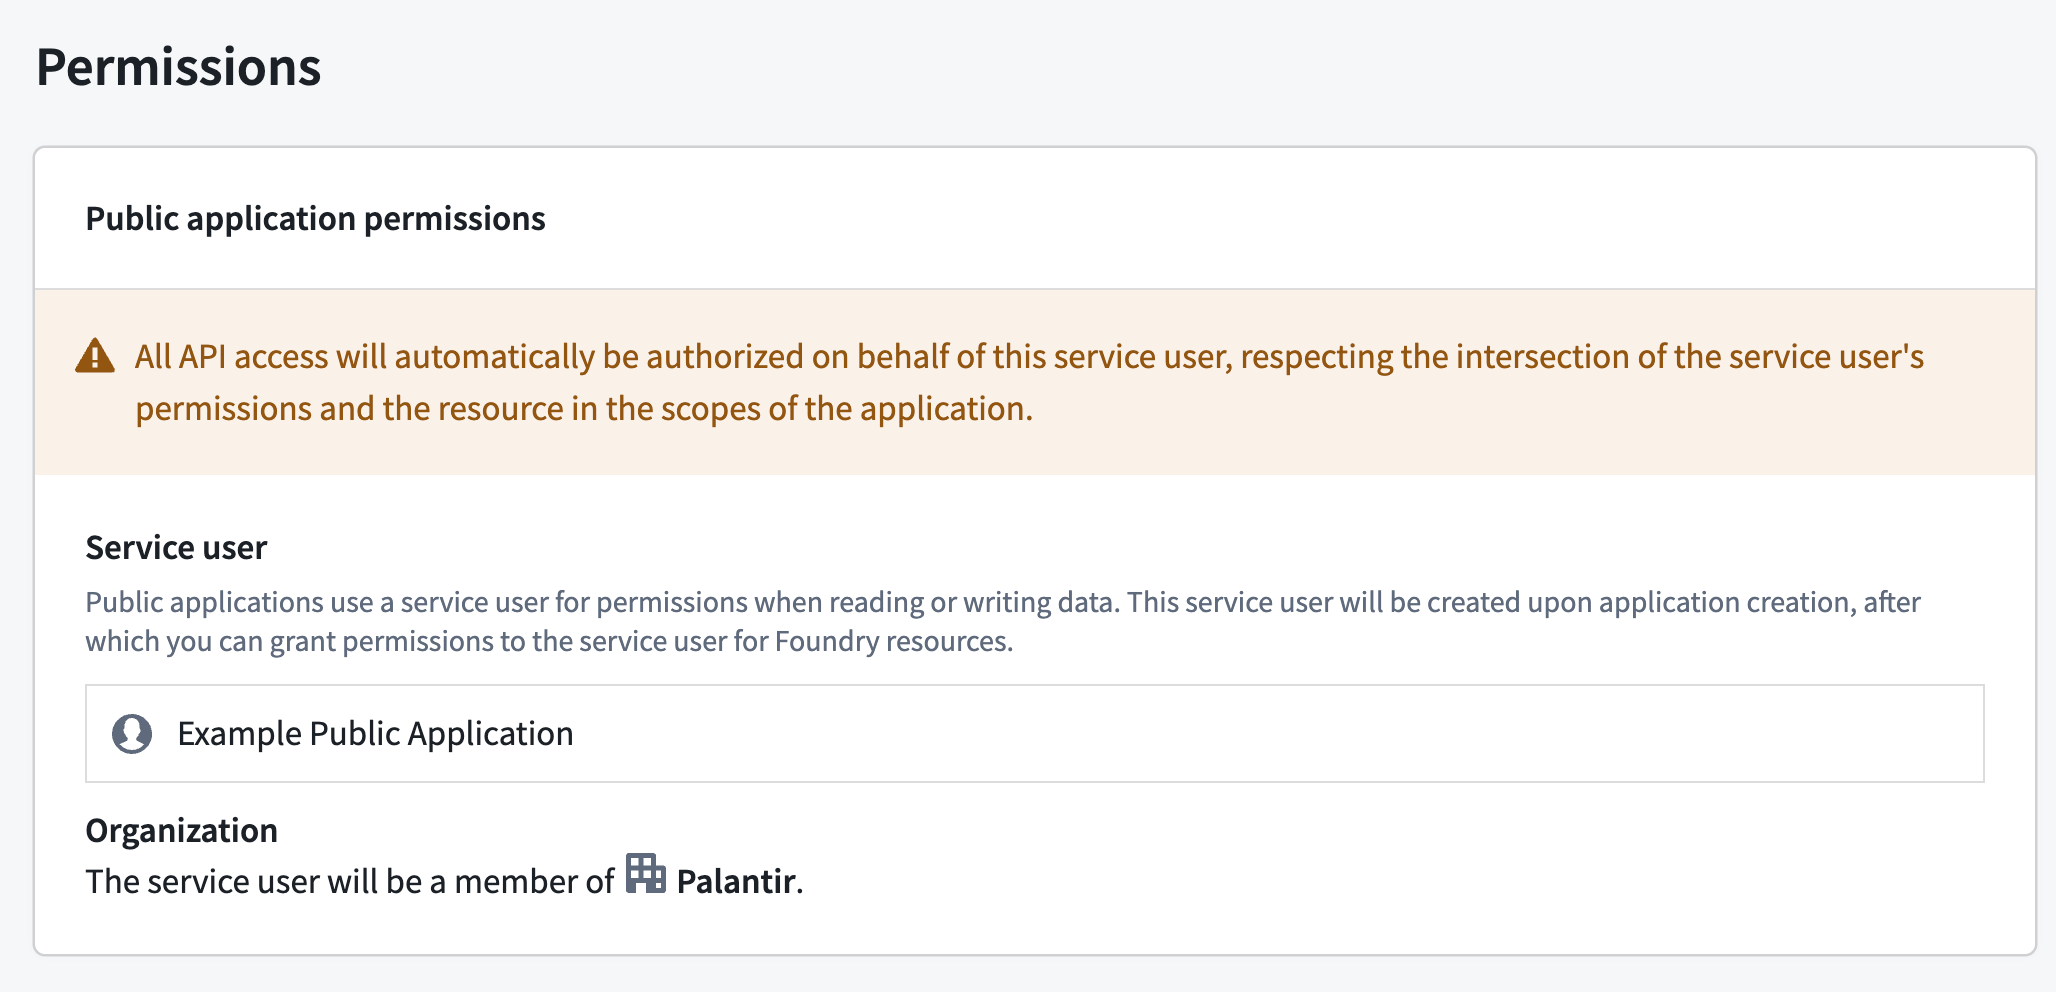
Public Applications use a service user for permissions when reading or writing data. Foundry creates the service user when you create the application in Developer Console, after which you can grant permissions for Foundry resources to the service user.
Step 2: Request the unauthenticated subdomain and unauthenticated endpoints
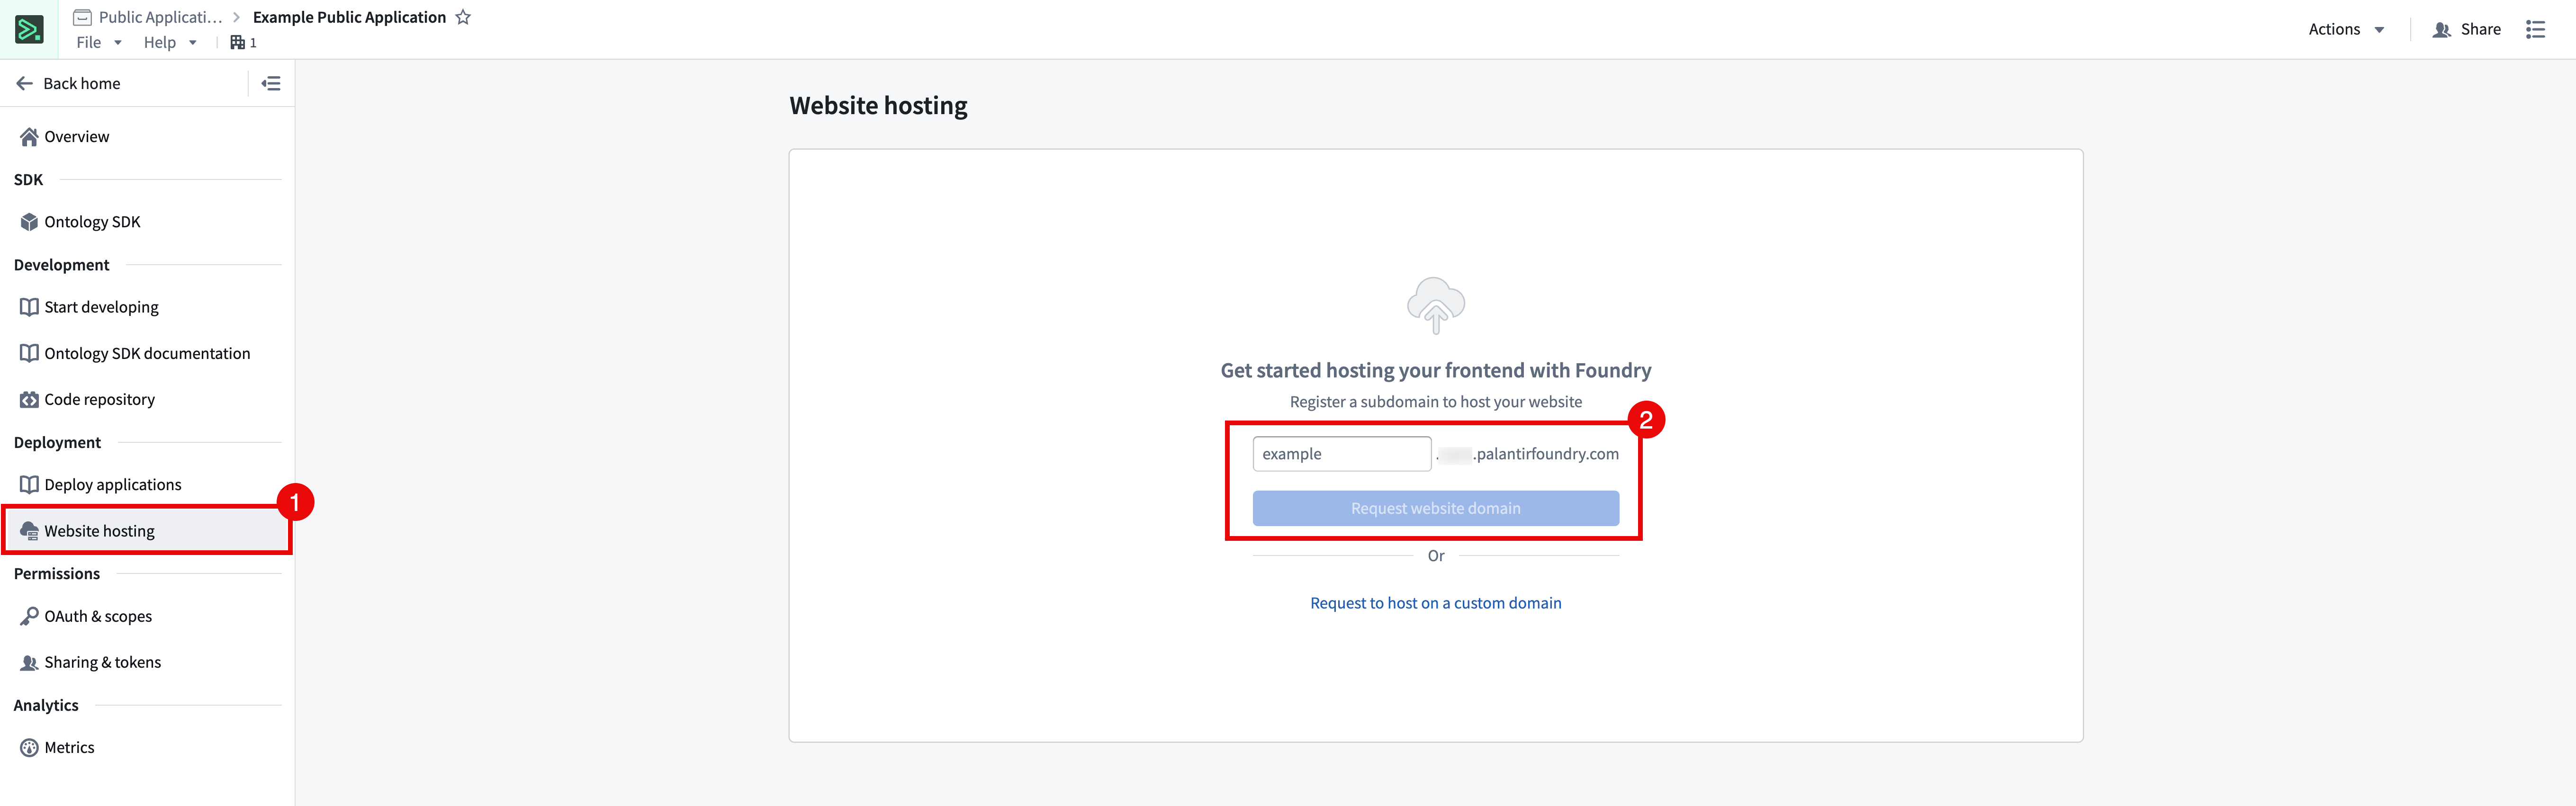
- Select Website hosting from the left panel.
- Enter a subdomain name and select Request application domain. Foundry serves your application from
<your-subdomain>.<your-enrollment>.palantirfoundry.com. Optionally, select Request to host on a custom domain to host the application on a domain of your choosing, such ascustom-domain.com.
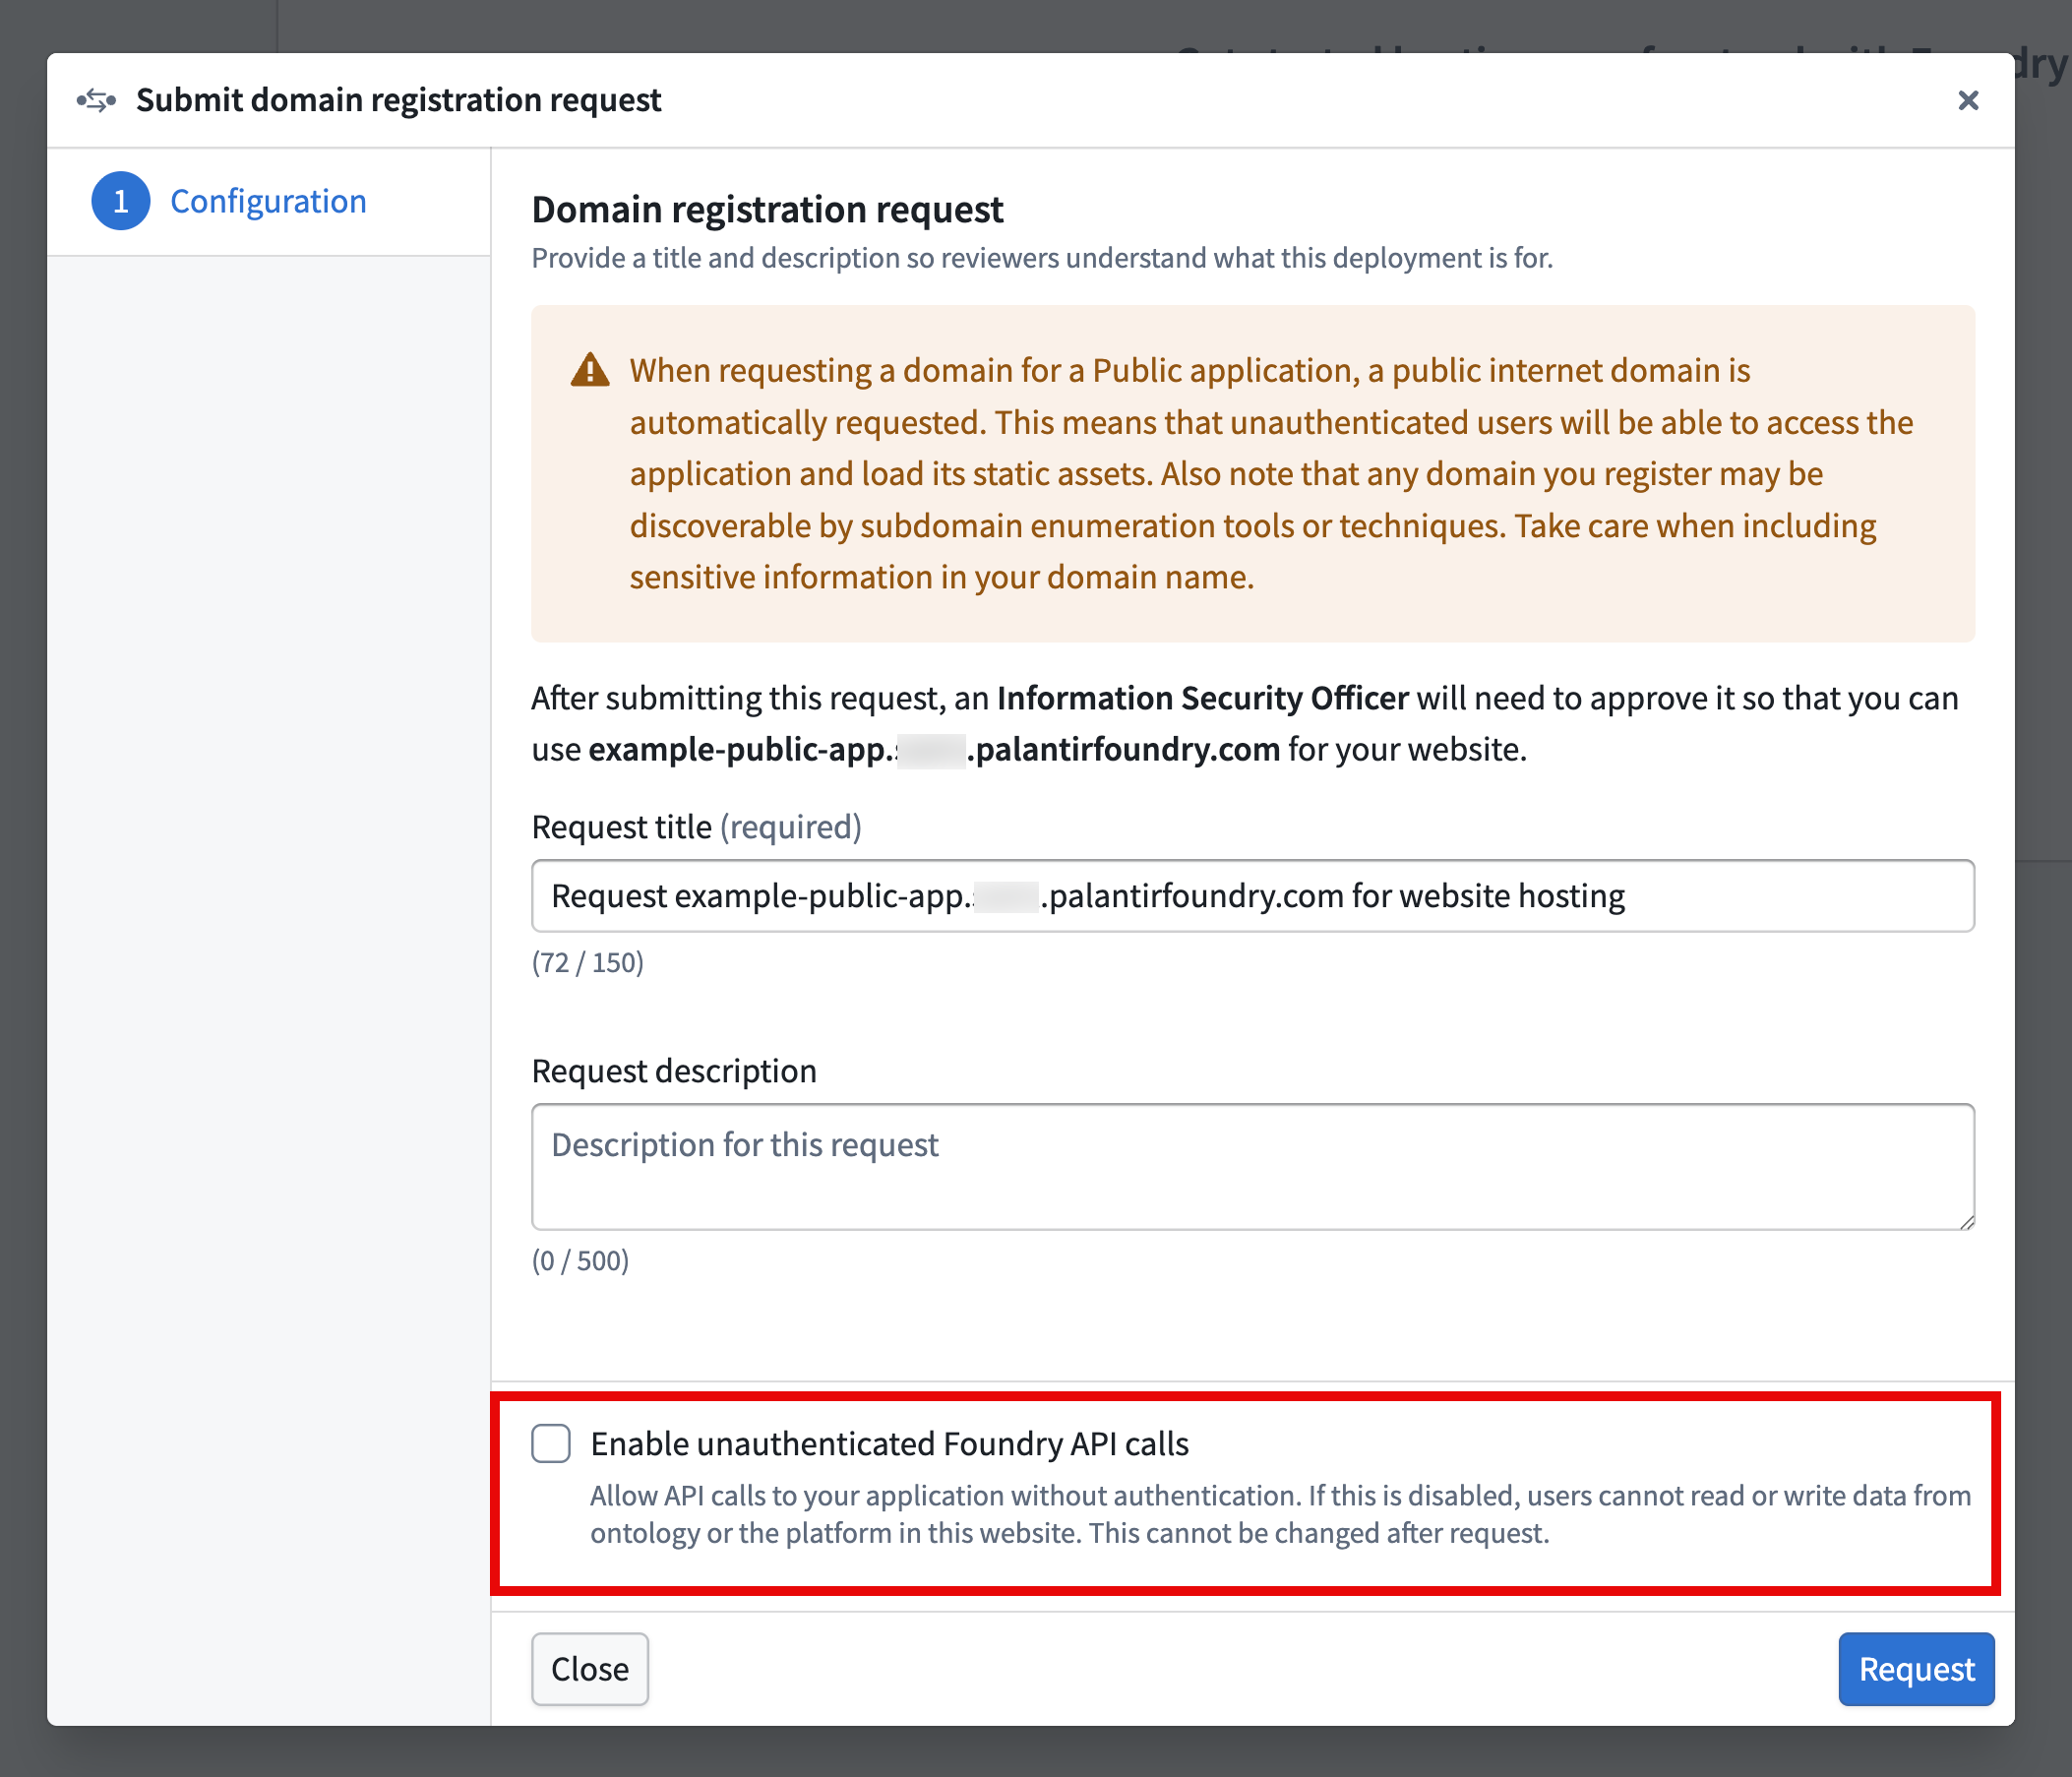
- When you request a domain for a Public Application, Foundry automatically requests a public internet domain, enabling unauthenticated users to access the application and load its static assets. Confirm whether or not you want your Public Application to additionally Enable unauthenticated Foundry API calls, which exposes all OSDK resources without authentication. Select the checkbox to enable the feature and choose Request to proceed.
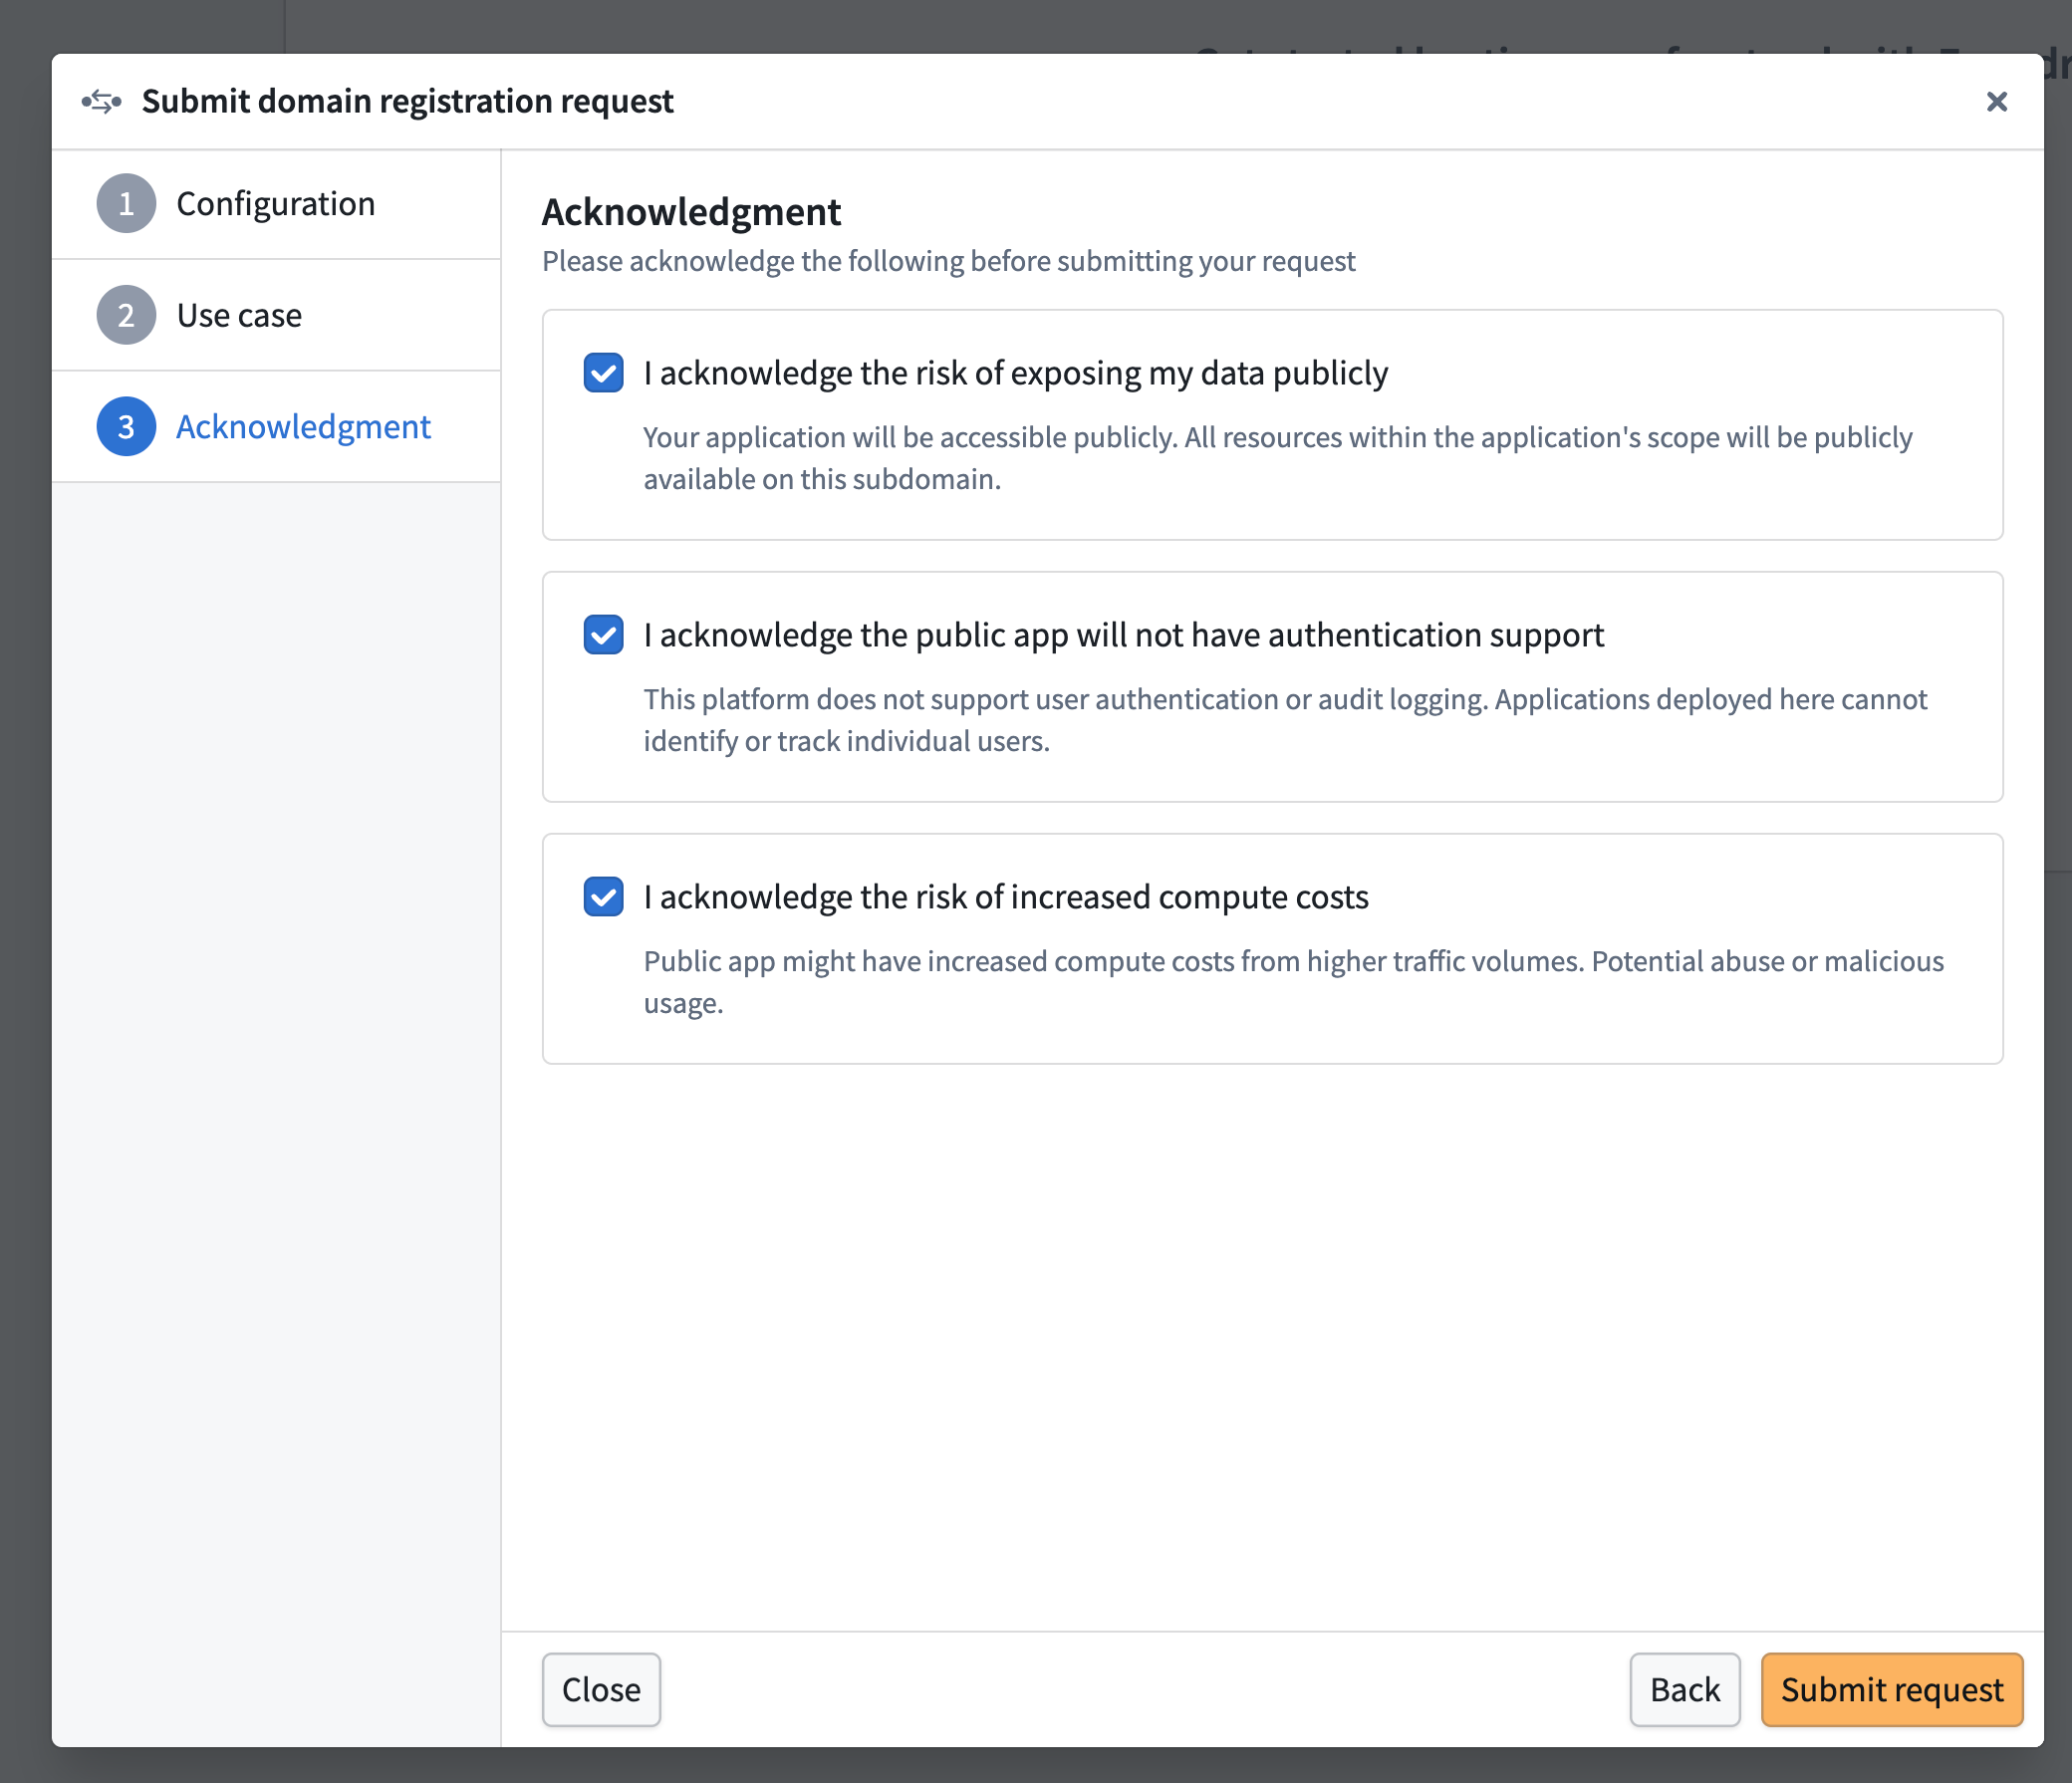
- If you choose to Enable unauthenticated Foundry API calls, Developer Console prompts you to acknowledge the additional risks from users being able to make unauthenticated Foundry API calls. Select Submit request after reviewing and acknowledging each.
Step 3: Request approval for the Public Application in Control Panel
An Information Security Officer in your enrollment must approve your subdomain registration request in Control Panel's Approvals inbox.
If you are an Information Security Officer, follow the instructions below to review and approve the request:
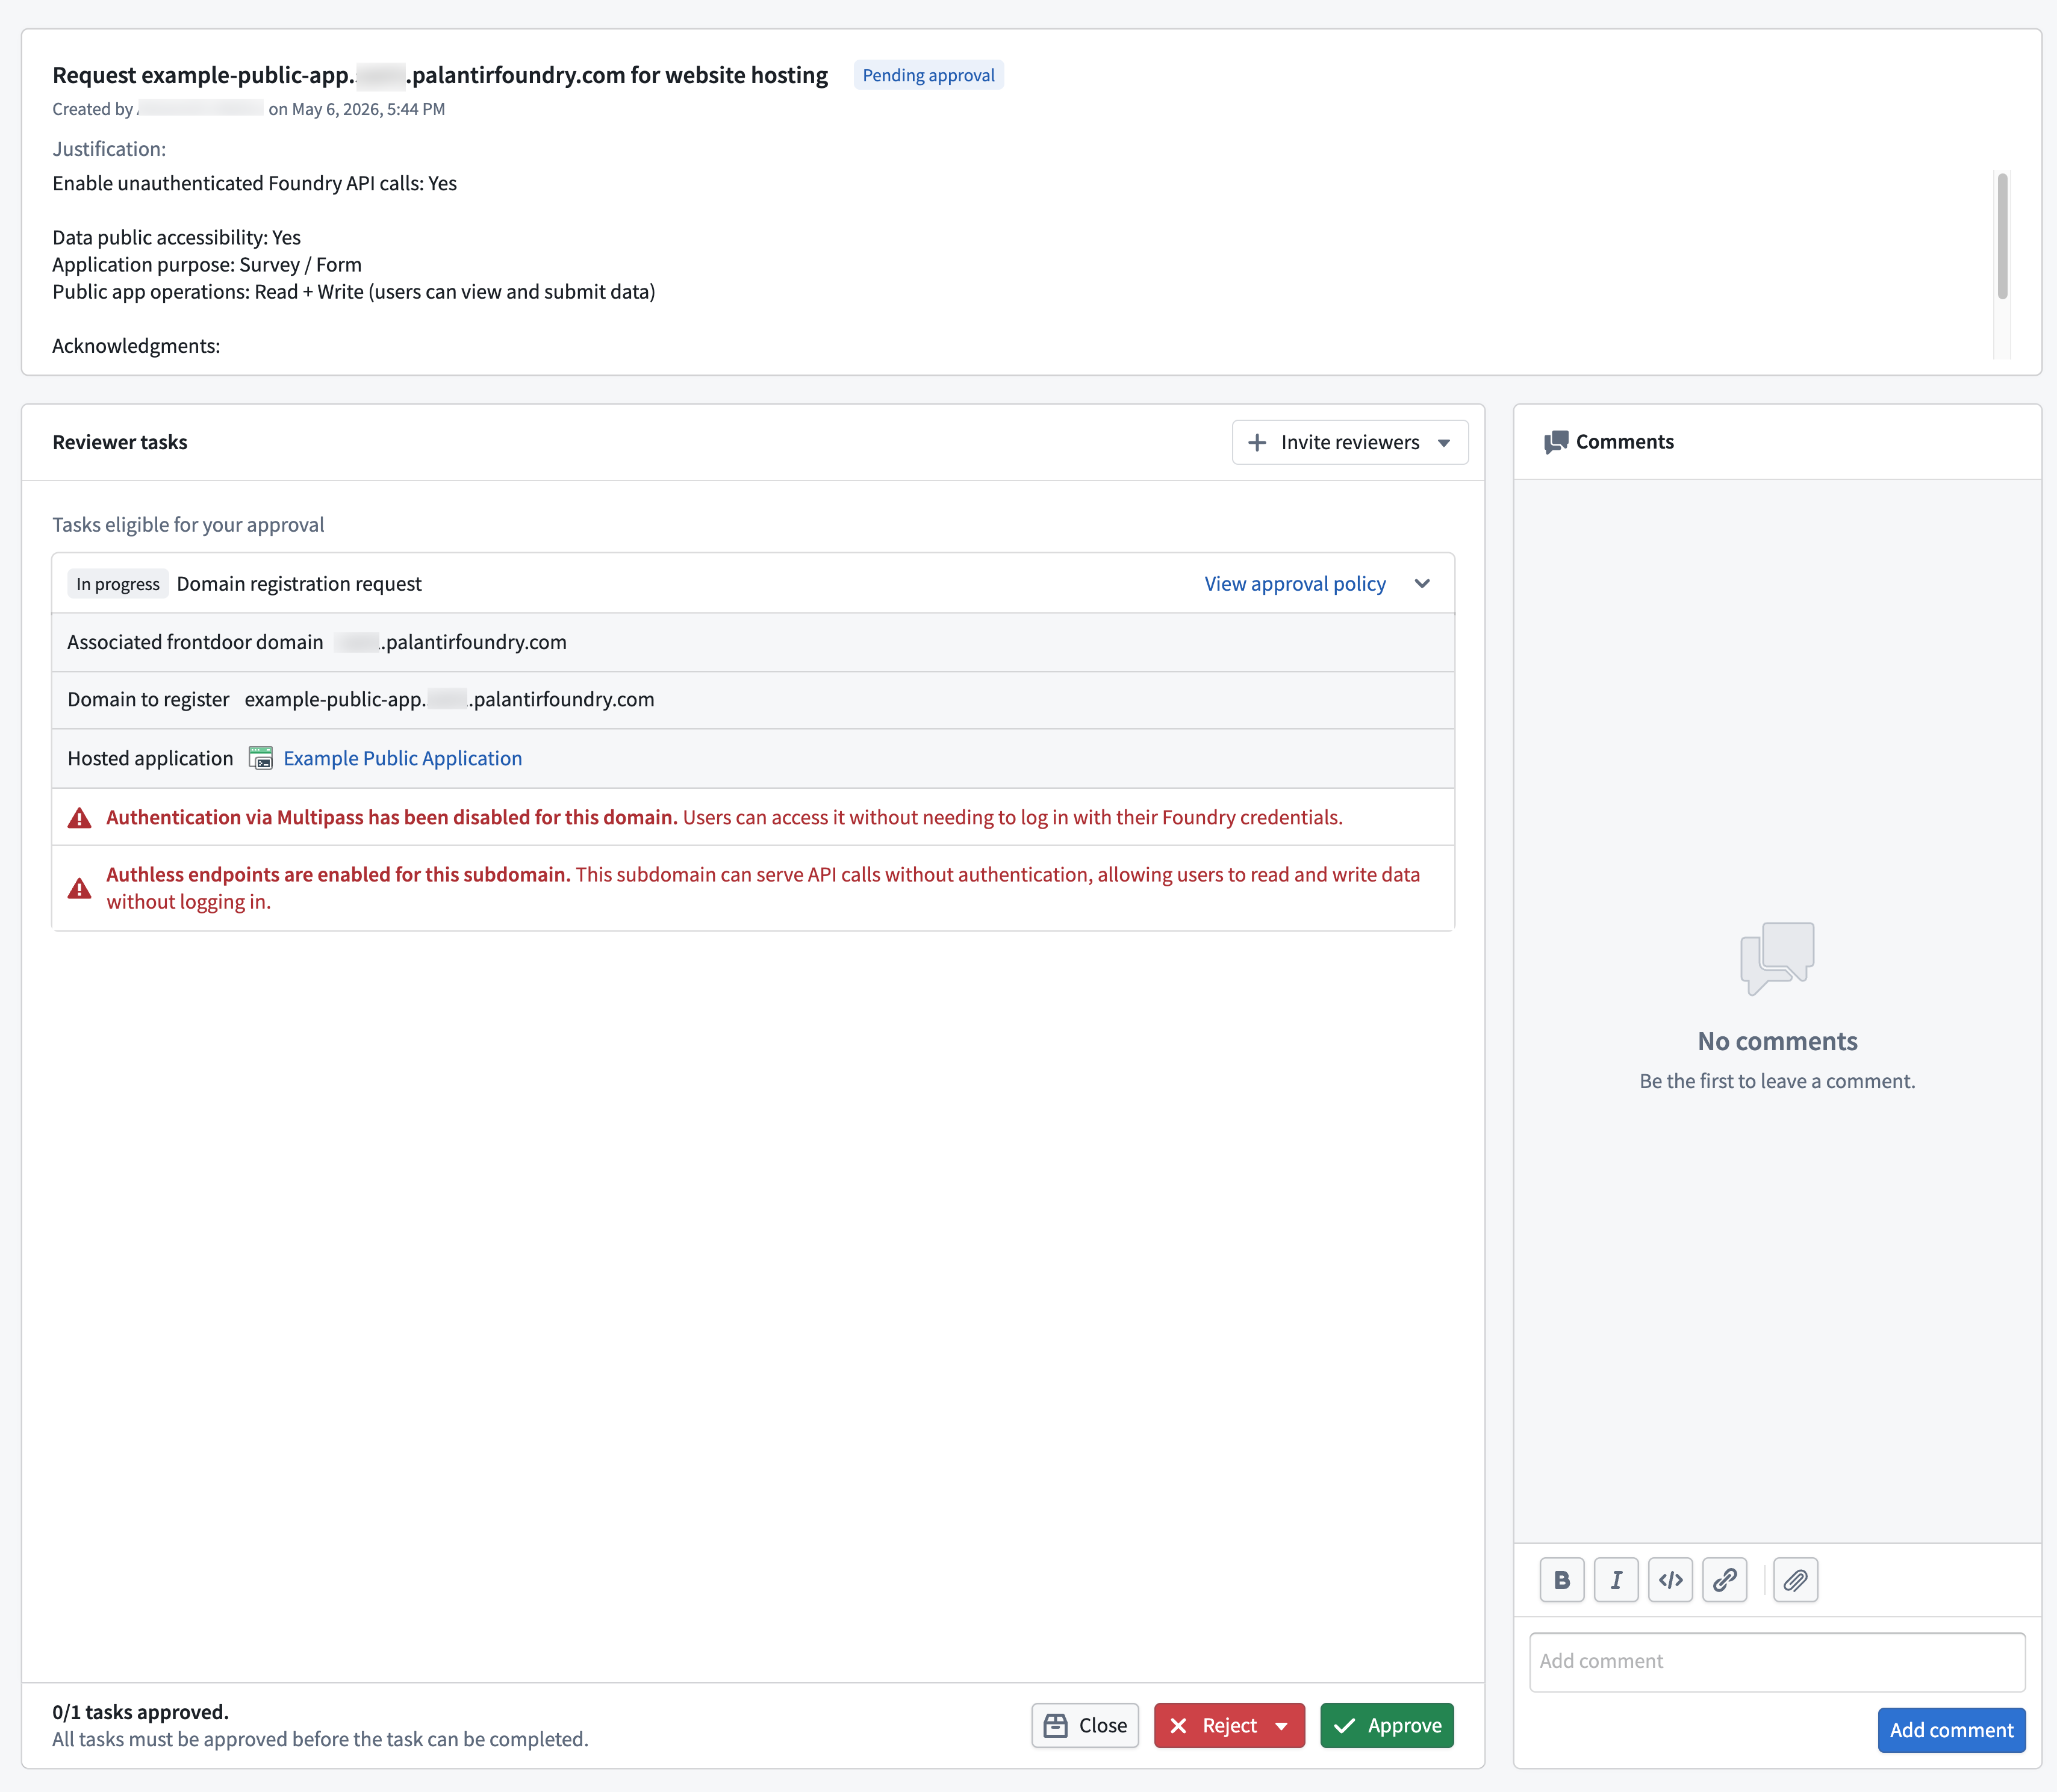
- Review the content in the Justification section to determine if the requester's use case is valid.
- Confirm that the Public Application request is for an unauthenticated subdomain and check whether or not it enables unauthenticated Foundry API calls. The Reviewer tasks section of the approval form explicitly states whether Authentication via Multipass has been disabled for this domain or Authless endpoints are enabled for this subdomain to indicate whether one or both conditions are true.
- Approve, Reject, or Close the request.
Step 4: Wait for the domain to become ready
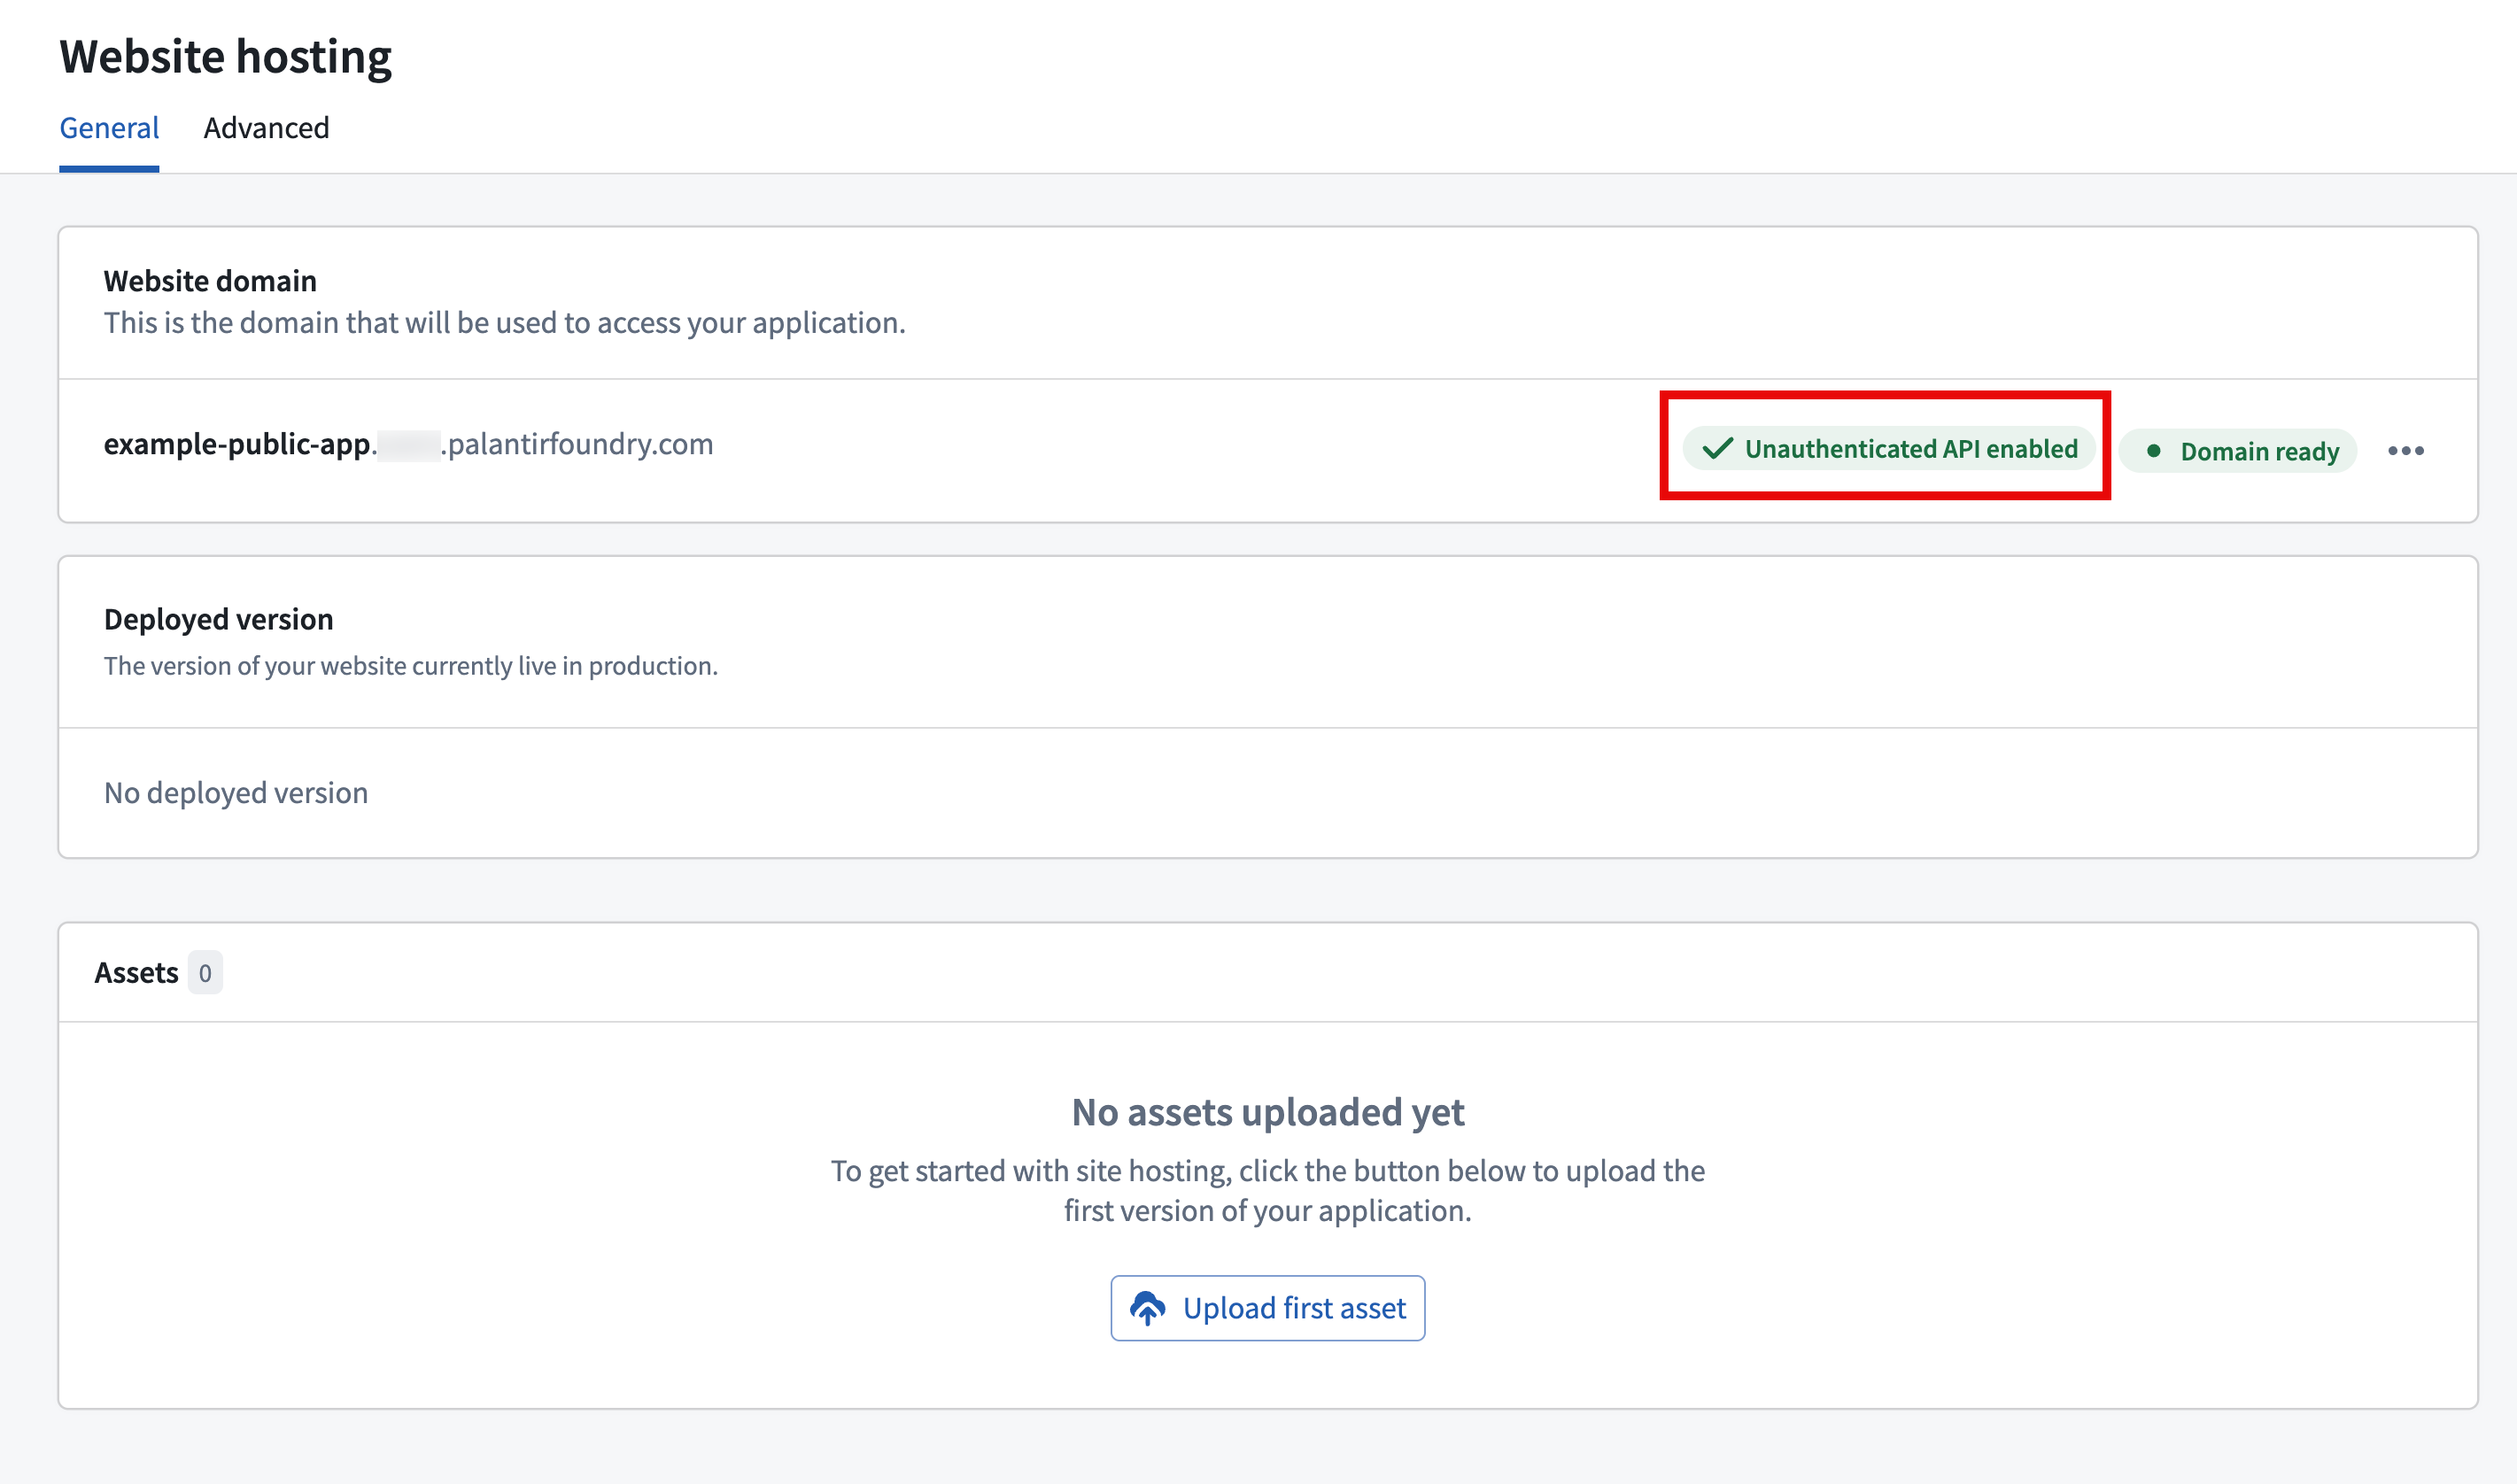
After the Information Security Officer approves your request in Control Panel, return to the Website hosting tab in Developer Console and refresh the page. After a few minutes, the domain status will transition from Provisioning to Domain ready. Developer Console also displays a status tag indicating if the application enables unauthenticated API calls.
:::callout{theme="neutral"} Review the Developer Console documentation to learn more about building frontend-only applications using the OSDK. :::
Step 5: Add unauthenticated ontology resources
If you enable unauthenticated API calls for your Public Application, you can next select the Ontology SDK tab in Developer Console to add all required object types and action types as application Resources. Foundry enforces strict export controls on Public Applications, so you can only add a resource if you have permission to declassify all of its Markings and Organization Markings. Foundry restricts Public Applications to a small set of ontology operations, so you should review the list of currently supported operations before populating your application's resources to confirm your intended workflow is supported.
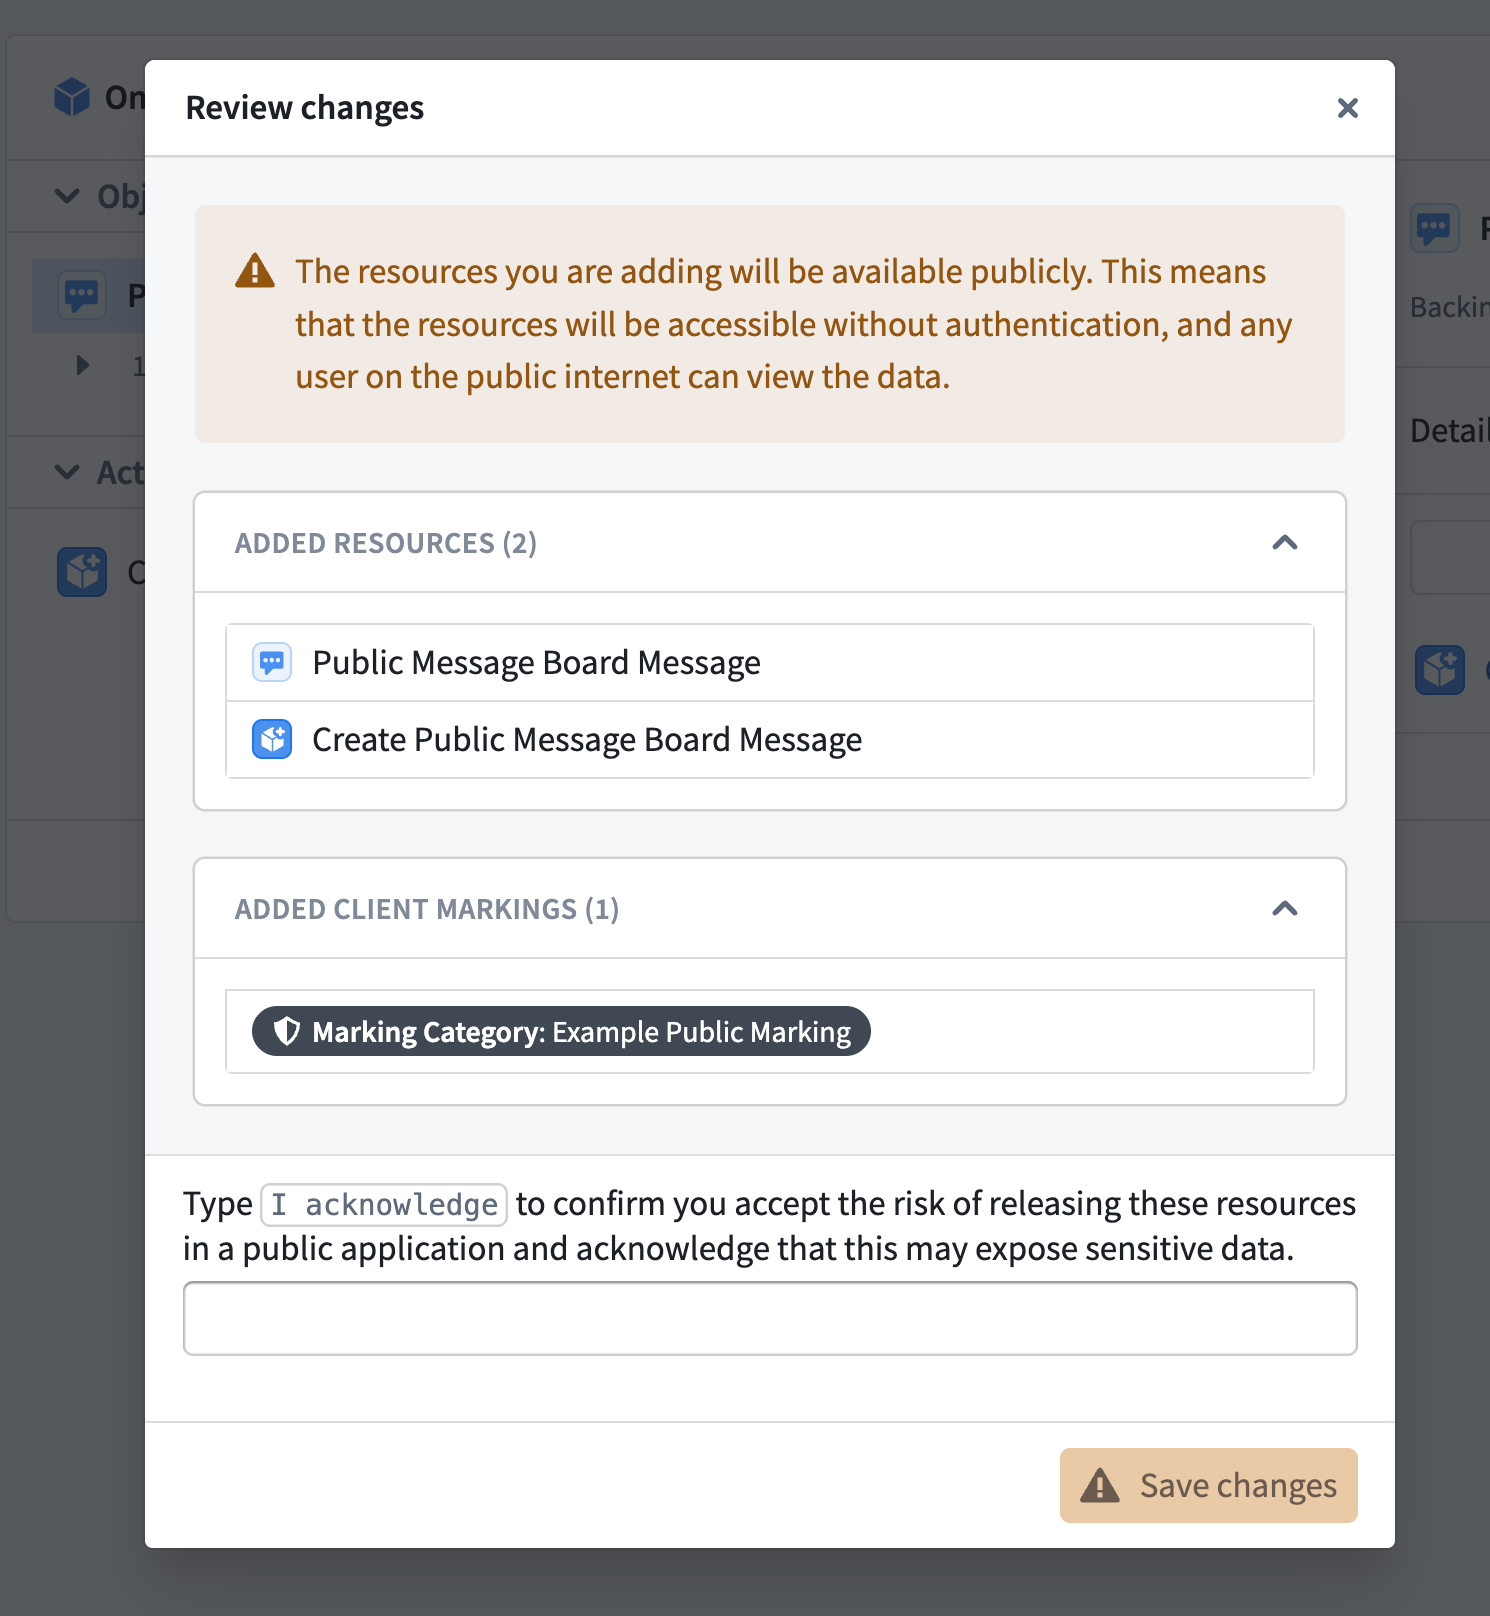
Once you add all relevant ontology resources to your application, Developer Console prompts you to review each change before saving. Once saved, all resources in your application's scope will be accessible without authentication.
Step 6: Create the linked code repository
With your Public Application's Ontology SDK resources added, you will next create a code repository linked to your application by following the steps below:
- Select Code repository in the Development section of your application in Developer Console.
- Create a new code repository from the Authless code template. The template provides the scaffolding required for a website that uses the unauthenticated ontology API.
- Wait for the initial build of your website to complete. The build status appears under the Tags tab of your code repository, and a link to your website appears under Website hosting.
Your linked code repository houses your Public Application's code. Review the existing how-to guides in the Developer Console documentation to learn how to add your OSDK to the application and bootstrap its development in various languages, such as TypeScript, Python, or Java.
Step 7: Verify unauthenticated access
Open your Public Application's subdomain URL in an incognito or private browser window, and the application will load without showing a Foundry login prompt.
中文翻译
设置公共应用(Public Application)
以下章节中的说明概述了在开发者控制台(Developer Console)和控制面板(Control Panel)中设置公共应用(Public Application)的端到端流程。
:::callout{theme="warning" title="需要信息安全官(Information Security Officer)审核"} 公共应用(Public Application)会将本体论(Ontology)数据和操作暴露给公共互联网上的任何人。每个应用都需要您组织中的信息安全官(Information Security Officer)在启用前审核并批准预期用例。在完成以下在开发者控制台(Developer Console)中创建公共应用(Public Application)的步骤之前,请与您的信息安全官(Information Security Officer)讨论您的预期用例、暴露的本体论(Ontology)资源以及目标受众。 :::
前提条件
在设置公共应用(Public Application)之前,请确保:
- 您的Foundry组织支持公共应用(Public Application)。如果不确定,请联系Palantir支持。
- 您拥有创建新应用所需的开发者控制台(Developer Console)权限。
- 您能够找到组织中的一位信息安全官(Information Security Officer),该人员既能批准用例,也能批准控制面板(Control Panel)中的子域名注册。同一角色执行这两项审批。
- 您有权对计划添加到应用中的每个资源上的每个标记(Marking)进行降密。如果没有,Foundry将阻止添加该资源,因为该资源不符合适当的出口管制要求。
步骤1:在开发者控制台(Developer Console)中创建应用
- 导航至开发者控制台(Developer Console),选择+ 新建应用(New application)。
- 逐步完成创建向导,在资源(Resources)页面上启用本体论SDK(Ontology SDK)。
- 在应用类型(Application type)步骤中展开高级(Advanced)部分,选择公共应用(Public application)。
- 继续完成开发者控制台(Developer Console)创建流程,选择创建应用(Create application)。
公共应用(Public Application)在读取或写入数据时使用服务用户(service user)进行权限管理。当您在开发者控制台(Developer Console)中创建应用时,Foundry会创建该服务用户,之后您可以将Foundry资源的权限授予该服务用户。
步骤2:请求未经身份验证的子域名和未经身份验证的端点
- 从左侧面板选择网站托管(Website hosting)。
- 输入子域名名称,选择请求应用域名(Request application domain)。Foundry将从
<您的子域名>.<您的组织>.palantirfoundry.com提供您的应用。可选地,选择请求托管在自定义域名上(Request to host on a custom domain),将应用托管在您选择的域名上,例如custom-domain.com。
- 当您为公共应用(Public Application)请求域名时,Foundry会自动请求一个公共互联网域名,使未经身份验证的用户能够访问应用并加载其静态资源。确认您是否希望公共应用(Public Application)额外启用未经身份验证的Foundry API调用(Enable unauthenticated Foundry API calls),这将暴露所有OSDK资源而无需身份验证。选中复选框以启用该功能,选择请求(Request)继续。
- 如果您选择启用未经身份验证的Foundry API调用(Enable unauthenticated Foundry API calls),开发者控制台(Developer Console)会提示您确认用户能够进行未经身份验证的Foundry API调用所带来的额外风险。在查看并确认每项风险后,选择提交请求(Submit request)。
步骤3:在控制面板(Control Panel)中请求批准公共应用(Public Application)
您组织中的信息安全官(Information Security Officer)必须在控制面板(Control Panel)的审批收件箱(Approvals inbox)中批准您的子域名注册请求。
如果您是信息安全官(Information Security Officer),请按照以下说明审核并批准请求:
- 查看理由(Justification)部分的内容,判断请求者的用例是否有效。
- 确认公共应用(Public Application)请求是针对未经身份验证的子域名,并检查是否启用了未经身份验证的Foundry API调用。审批表单的审核者任务(Reviewer tasks)部分明确说明此域已禁用通过Multipass的身份验证(Authentication via Multipass has been disabled for this domain)或此子域已启用无身份验证端点(Authless endpoints are enabled for this subdomain),以指示是否满足其中一个或两个条件。
- 批准(Approve)、拒绝(Reject)或关闭(Close)该请求。
步骤4:等待域名就绪
在信息安全官(Information Security Officer)在控制面板(Control Panel)中批准您的请求后,返回开发者控制台(Developer Console)中的网站托管(Website hosting)标签页并刷新页面。几分钟后,域名状态将从正在配置(Provisioning)转变为域名就绪(Domain ready)。开发者控制台(Developer Console)还会显示一个状态标签,指示应用是否启用了未经身份验证的API调用。
:::callout{theme="neutral"} 查阅开发者控制台(Developer Console)文档,了解有关使用OSDK构建纯前端应用的更多信息。 :::
步骤5:添加未经身份验证的本体论(Ontology)资源
如果您为公共应用(Public Application)启用了未经身份验证的API调用,接下来可以在开发者控制台(Developer Console)中选择本体论SDK(Ontology SDK)标签页,将所有必需的对象类型和操作类型添加为应用资源(Resources)。Foundry对公共应用(Public Application)强制执行严格的出口管制,因此只有您有权降密所有标记(Marking)和组织标记(Organization Marking)时,才能添加资源。Foundry将公共应用(Public Application)限制为一小组本体论(Ontology)操作,因此在填充应用的资源之前,您应查看当前支持的操作列表,以确认您的预期工作流受支持。
一旦将所有相关本体论(Ontology)资源添加到应用中,开发者控制台(Developer Console)会提示您在保存前审核每项更改。保存后,应用范围内的所有资源将无需身份验证即可访问。
步骤6:创建链接的代码仓库
添加了公共应用(Public Application)的本体论SDK(Ontology SDK)资源后,接下来按照以下步骤创建链接到应用的代码仓库(code repository):
- 在开发者控制台(Developer Console)中的应用开发(Development)部分选择代码仓库(Code repository)。
- 从无身份验证代码模板(Authless code template)创建新的代码仓库。该模板提供了使用未经身份验证的本体论(Ontology)API的网站所需的脚手架。
- 等待网站的初始构建完成。构建状态显示在代码仓库的标签(Tags)标签页下,网站的链接显示在网站托管(Website hosting)下。
您的链接代码仓库存放着公共应用(Public Application)的代码。查阅开发者控制台(Developer Console)文档中的现有操作指南,了解如何将OSDK添加到应用以及如何用各种语言引导其开发,例如TypeScript、Python或Java。
步骤7:验证未经身份验证的访问
在无痕或隐私浏览器窗口中打开公共应用(Public Application)的子域名URL,应用将加载而不会显示Foundry登录提示。