Configure ontology peering(配置本体对等连接)
After you establish a peering relationship between two spaces, you can use Peer Manager to create and approve object type mappings which enable you to peer its objects over the connection.
:::callout{theme="neutral" title="Note"}
To synchronize objects and links through a peering relationship, the object type to peer must exist on both enrollments, and its properties must remain in sync. A peering relationship where properties fall out of sync will be unable to send new object data until the synchronization is restored. Use Marketplace to create a product on the source enrollment that contains the object type to peer before deploying the product to the remote enrollment. When schematic changes are made to the object type on the source enrollment, then the remote enrollment can receive those updates through the product's configured release channel.
Review the core concepts for ontology peering before you proceed. :::
Make the object type available to peer
Navigate to Peer Manager and follow the instructions below for both the local and remote sides of the peer connection to make the object type available to peer:
- Choose the relevant peer connection and select the Ontology tab from the top of your screen.
- Select the Unmapped tab before choosing + Add ontology entities.
- Search for and select one or multiple object types you will make available for peering over the connection before choosing Confirm selection to launch the Configure peering permissions popup window.
- Optionally change Peer Manager's default peer permissions state, which allows both exports and imports of the associated ontology resources' data.
:::callout{theme="neutral"} If you want to establish a unidirectional object type peering relationship where the local space sends objects to the remote space without receiving object edits the remote side makes, then you can select Imports blocked. :::
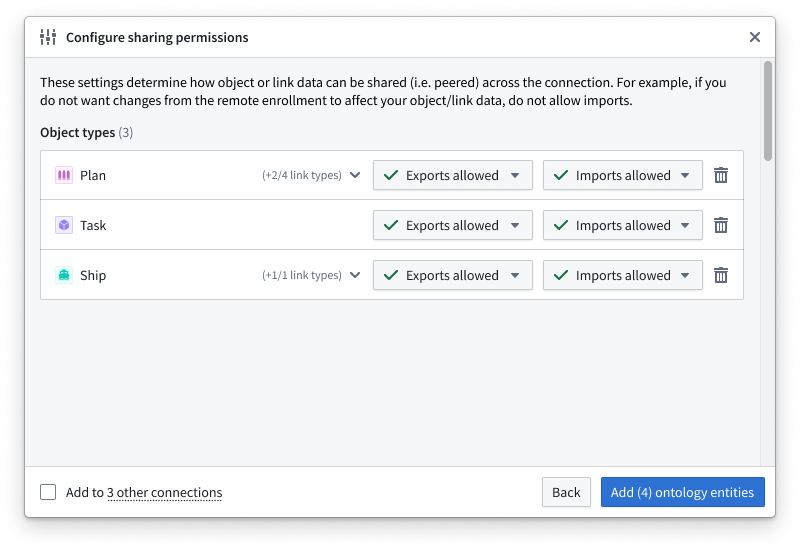
- Select Add ontology entities to finish adding the object types to the Unmapped section of the Ontology.
Create the object type mapping
Once you make the object type available to peer across both sides of the peer connection, you can next follow the instructions below to configure the object type mapping from either side of the relationship:
- Align the corresponding object types from the Local ontology and Remote ontology in the Unmapped section of the Ontology tab.
- Select + on the right side of the Remote ontology object type to launch the Create ontology mapping popup window.
- Map the corresponding properties across the local and remote object types in the Map properties section.
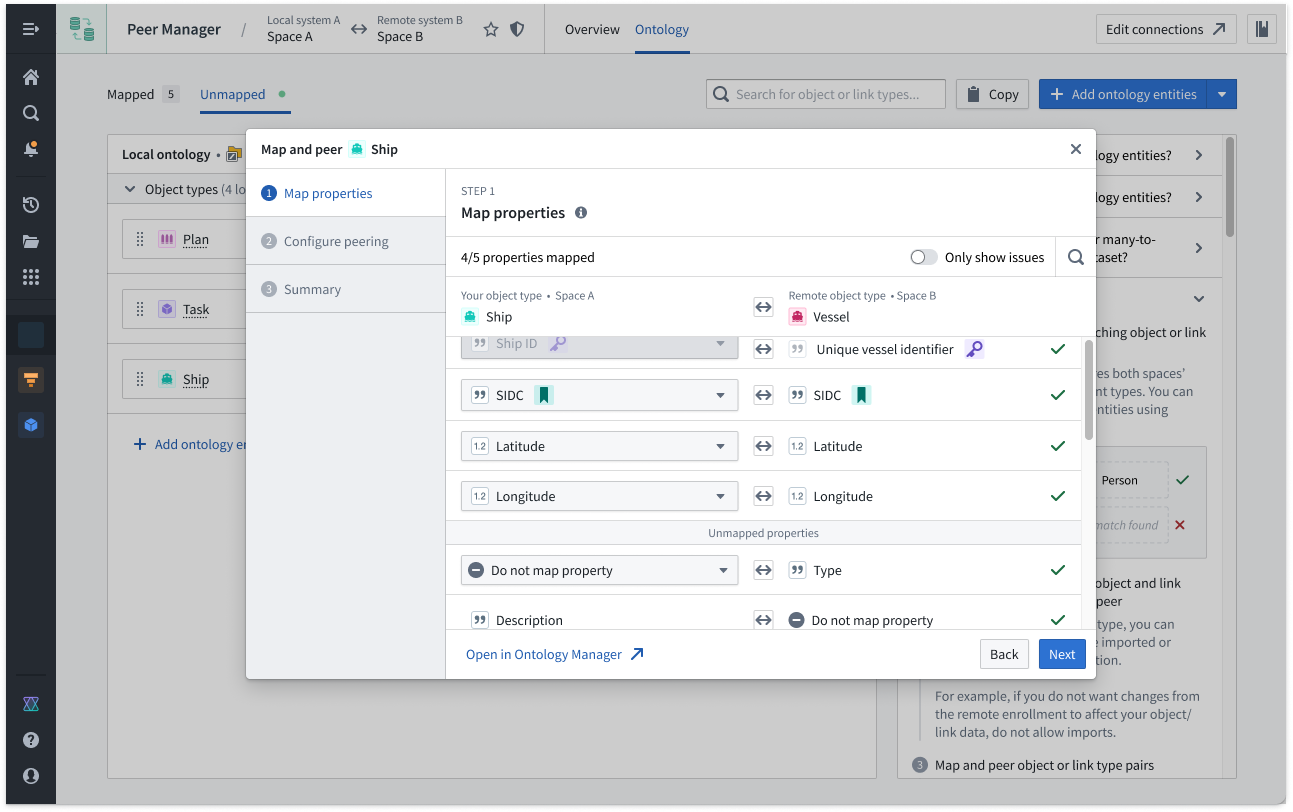
:::callout{theme="neutral"} You do not need to map every property; however, you must map any properties you wish to peer over the established connection. :::
-
Configure the peering relationship's Source data and Actions directionality in the Configure peering section. Learn more about peer relationship directionality.
-
Source data is the base data for the object type derived from its backing datasources, such as datasets, virtual tables, or restricted views. Support for source data peering depends on the type of backing data as well as the environment type. Learn more about source data peering.
-
Actions produce data from user edits applied onto Source data. In most cases, you should bidirectionally peer Actions if edits are enabled for the object type, so you should ensure both Export and Import are selected.
-
Review the configuration for the object type in the Summary section and choose Submit to save the mapping.
Foundry immediately instantiates the peering relationship for your object type after you press submit. You can monitor the connection's health in Peer Manager's Overview panel.
中文翻译
配置本体对等连接
在在两个空间之间建立对等关系后,您可以使用 Peer Manager 创建并批准对象类型映射,从而通过该连接实现对象对等。
:::callout{theme="neutral" title="注意"}
要通过对等关系同步对象和链接,对等的对象类型必须同时存在于两个注册环境中,且其属性必须保持同步。若对等关系中属性出现不同步,将无法发送新的对象数据,直至同步恢复。建议使用 Marketplace 在源注册环境中创建一个包含待对等对象类型的产品,然后将该产品部署到远程注册环境。当源注册环境中的对象类型发生架构变更时,远程注册环境可通过产品配置的发布渠道接收这些更新。
在继续操作前,请先查阅本体对等核心概念。 :::
使对象类型可对等
导航至 Peer Manager,并按照以下说明在本地和远程两端分别操作,以使对象类型可对等:
- 选择相关的对等连接,然后点击屏幕顶部的 本体 标签页。
- 选择 未映射 标签页,然后点击 + 添加本体实体。
- 搜索并选择一个或多个要用于对等的对象类型,然后点击 确认选择 以打开 配置对等权限 弹窗。
- 可选:更改 Peer Manager 的默认对等权限状态(默认允许同时导出和导入关联本体资源的数据)。
:::callout{theme="neutral"} 如果您希望建立单向对象类型对等关系(即本地空间向远程空间发送对象,但不接收远程空间所做的对象编辑),则可以选择 阻止导入。 :::
- 点击 添加本体实体,完成将对象类型添加到 本体 的 未映射 部分。
创建对象类型映射
在两端均使对象类型可对等后,接下来按照以下说明从任意一端配置对象类型映射:
- 在 本体 标签页的 未映射 部分中,将 本地本体 和 远程本体 中对应的对象类型对齐。
- 点击 远程本体 对象类型右侧的 +,打开 创建本体映射 弹窗。
- 在 映射属性 部分中,映射本地和远程对象类型之间的对应属性。
:::callout{theme="neutral"} 您无需映射所有属性,但必须映射任何希望通过已建立连接进行对等的属性。 :::
-
在 配置对等 部分中,配置对等关系的 源数据 和 操作 方向性。了解更多关于对等关系方向性的信息。
-
源数据 是对象类型的基础数据,来源于其底层数据源,例如数据集、虚拟表或受限视图。源数据对等的支持取决于底层数据类型及环境类型。了解更多关于源数据对等的信息。
-
操作 产生于用户对 源数据 的编辑。在大多数情况下,如果对象类型启用了编辑功能,您应双向对等 操作,因此请确保同时选中 导出 和 导入。
-
在 摘要 部分中检查对象类型的配置,然后点击 提交 以保存映射。
提交后,Foundry 会立即为您的对象类型实例化对等关系。您可以在 Peer Manager 的 概览 面板中监控连接的健康状况。