Peer profiles(对等配置文件)
:::callout{theme="neutral" title="Beta"} Peer profiles are in the beta phase of development and may not be available on your enrollment. Functionality may change during active development. Contact Palantir Support with questions about enabling peer profiles. :::
A peer profile defines how data is shared between Foundry enrollments across peer connections and serves as a reusable template: you define your peer configuration once, and then Foundry applies that configuration consistently across many connections at once.
Use peer profiles to streamline authorized data sharing across peer connections
Peer profiles simplify the configuration and management of authorized data sharing through Ontology and file peering across multiple peer connections within a network of Foundry enrollments, particularly when many enrollments require the same peering configuration.
While you can configure each peer connection one at a time, you should use peer profiles to define your peering configuration once and apply it everywhere it is needed across a mesh of enrollments, such as a central hub connected to many edge enrollments.
Additionally, peer profiles streamline data sharing across many peer connections by enabling you to:
- Automatically create and configure peer connections: Use peer profiles to automatically create peer connections, share data from your ontology, and configure file peering.
- Future-proof your mesh of connections: New enrollments that join the mesh automatically receive the correct configuration without any manual setup steps.
- Enforce consistent configuration: Every enrollment using the same profile receives the same data sharing setup, reducing the risk of mismatches or errors.
- Distribute peer profiles via Marketplace: Profiles can be published to Marketplace, making them easy to install on target enrollments through a familiar self-service workflow.
Key concepts
Mesh
A mesh is a secure network of connected Apollo environments that automatically enables data sharing across multiple peer connections defined by a peer profile.
:::callout{theme="neutral"} Before you create a peer profile, contact Palantir Support to create a mesh for you that contains all environments you plan to connect through the peer profile. :::
Profile pairs
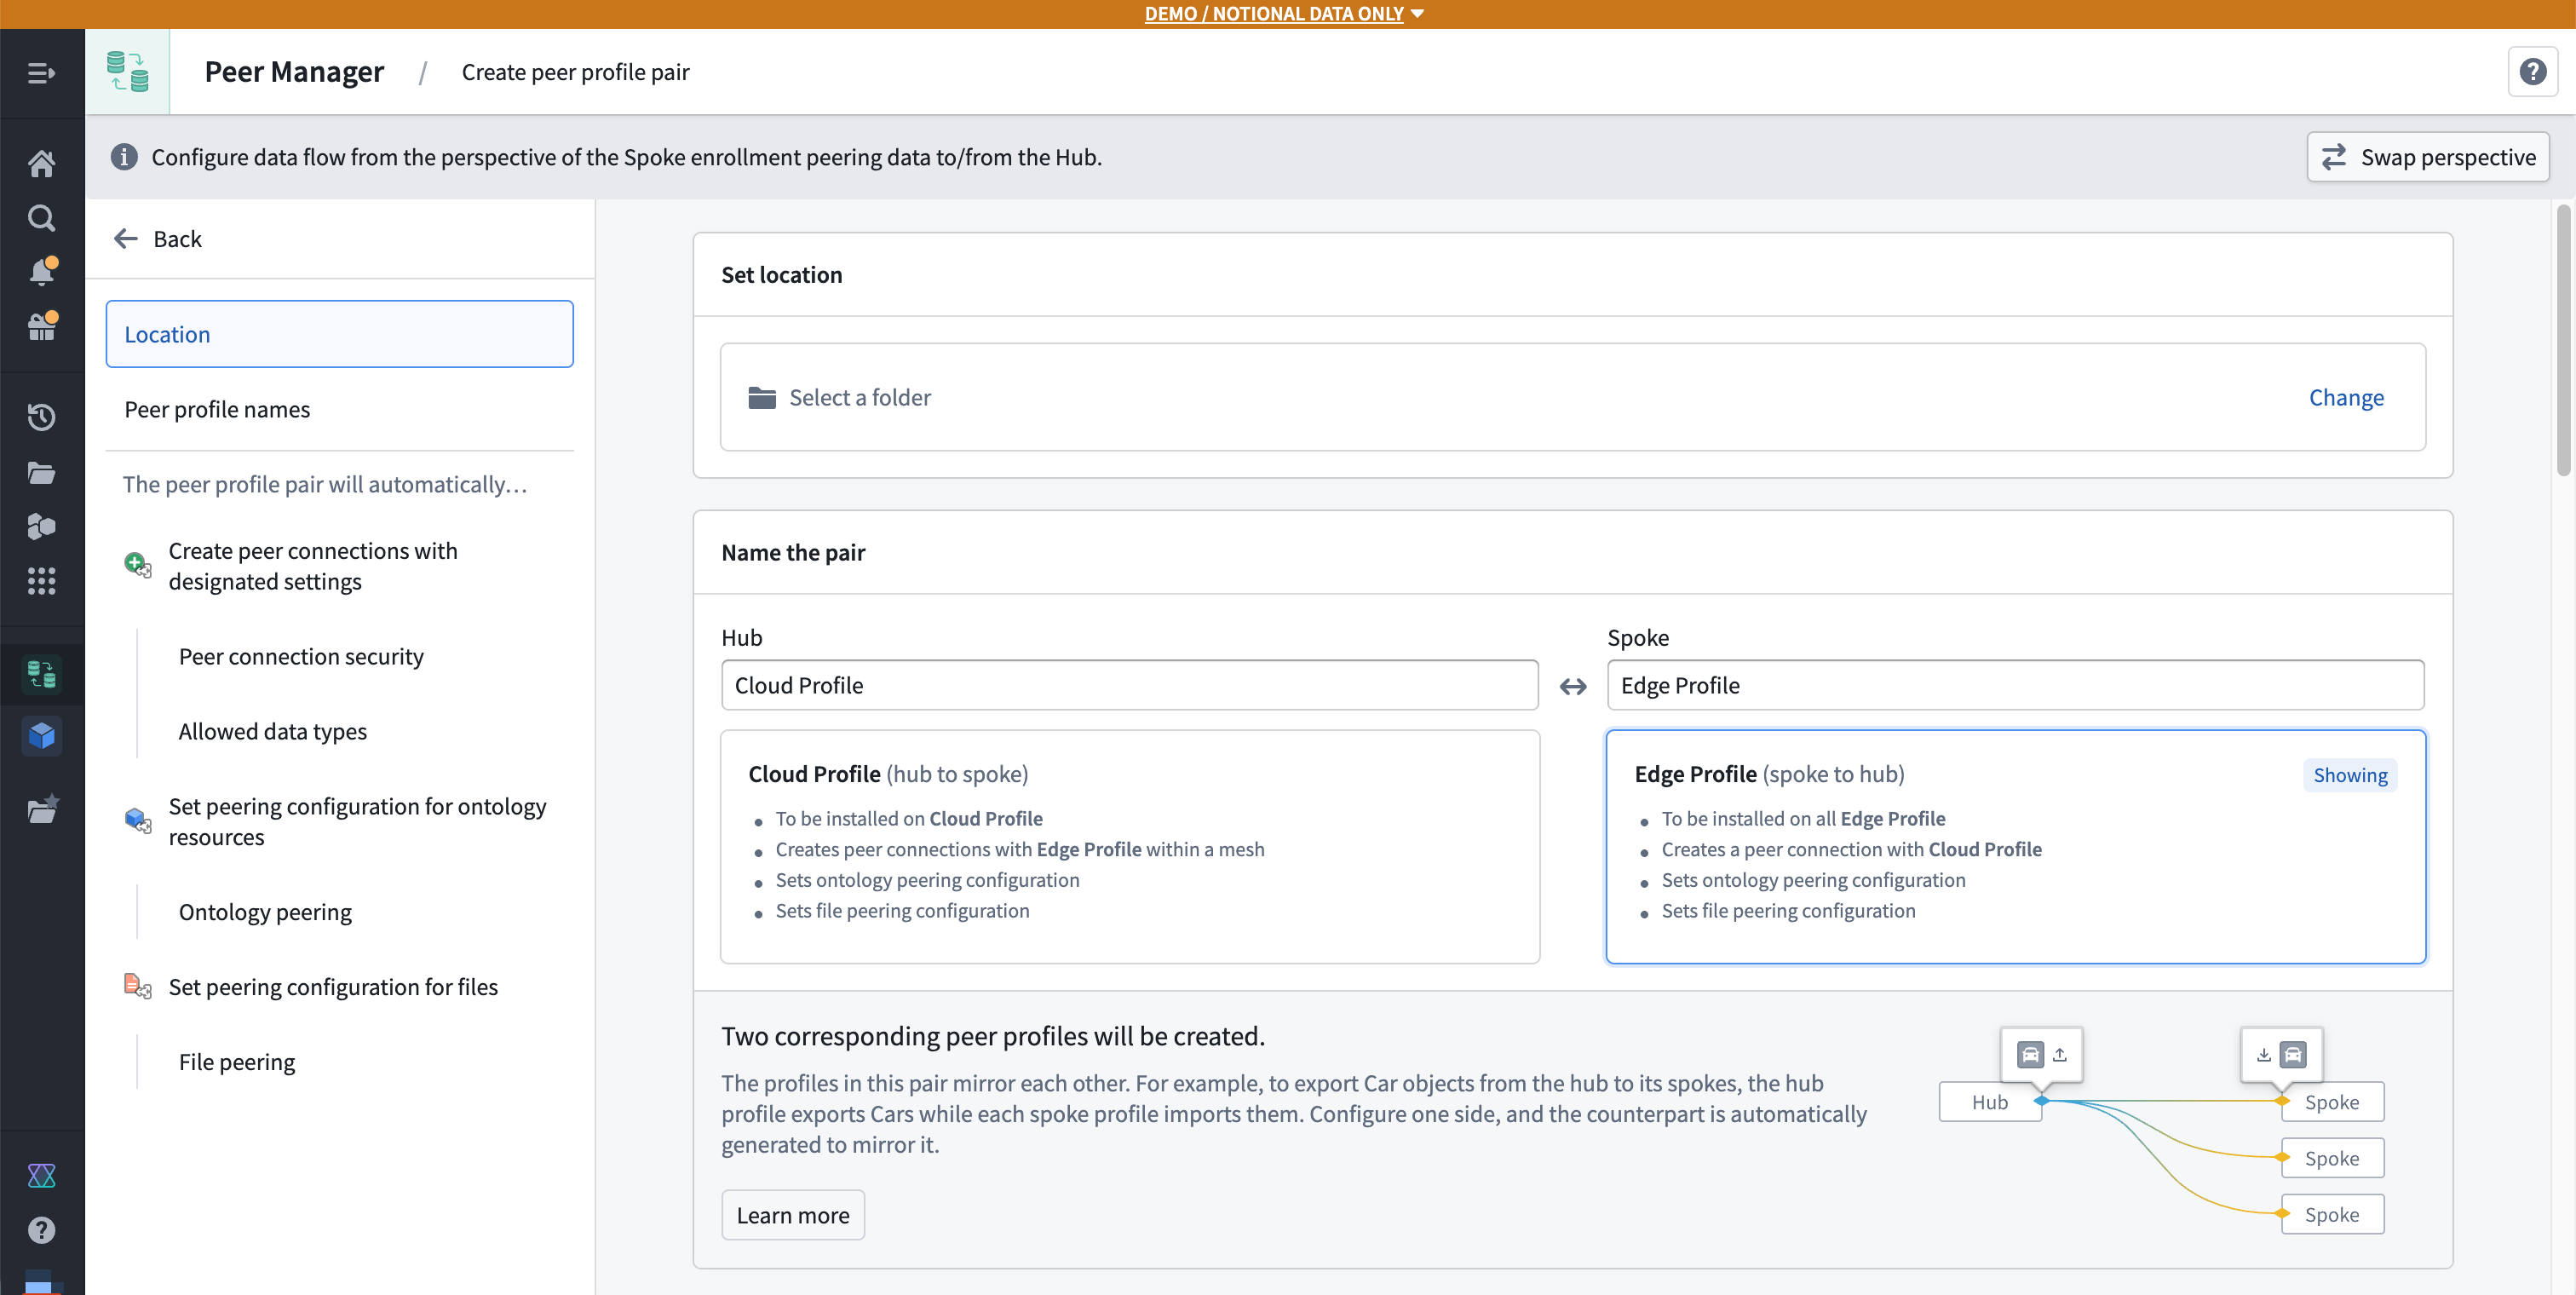
You will create a profile pair for each peer profile you configure in Peer Manager, with one profile for each side of the peer connection. These two profiles mirror each other automatically.
For example, consider a setup with a hub and multiple spoke enrollments, where the:
- Hub is the central or primary enrollment.
- Spokes are enrollments that connect to the hub.
If the hub profile is configured to export a certain object type, the corresponding spoke profile is automatically set to import that same object type. When creating a peer profile, you only need to configure one side of that profile pair, as Peer Manager generates the counterpart profile for you.
Remote strategy
When installing a profile, you choose which remote enrollments it applies to. The available options include:
- All: Apply to all available remote enrollments.
- Specific enrollment: Apply to a single, named enrollment.
- Mesh: Apply to all enrollments within a mesh created by Palantir Support.
- Mesh node labels: Apply to enrollments in a mesh that have specific labels. This option is useful for targeting subsets of a larger network.
Peer profile configurations
Use a single peer profile to bundle configuration for peer connections to share ontology resources and files.
Peer connections
Peer profiles can automatically create and manage peer connections, including:
- Connection security: Define which classification markings and security labels are permitted to flow across connections. Data must satisfy these requirements to be shared. Review the connection security documentation for more information.
- Allowed data types: Share ontology resources and files and specify their direction (export, import, or both).
Ontology peering
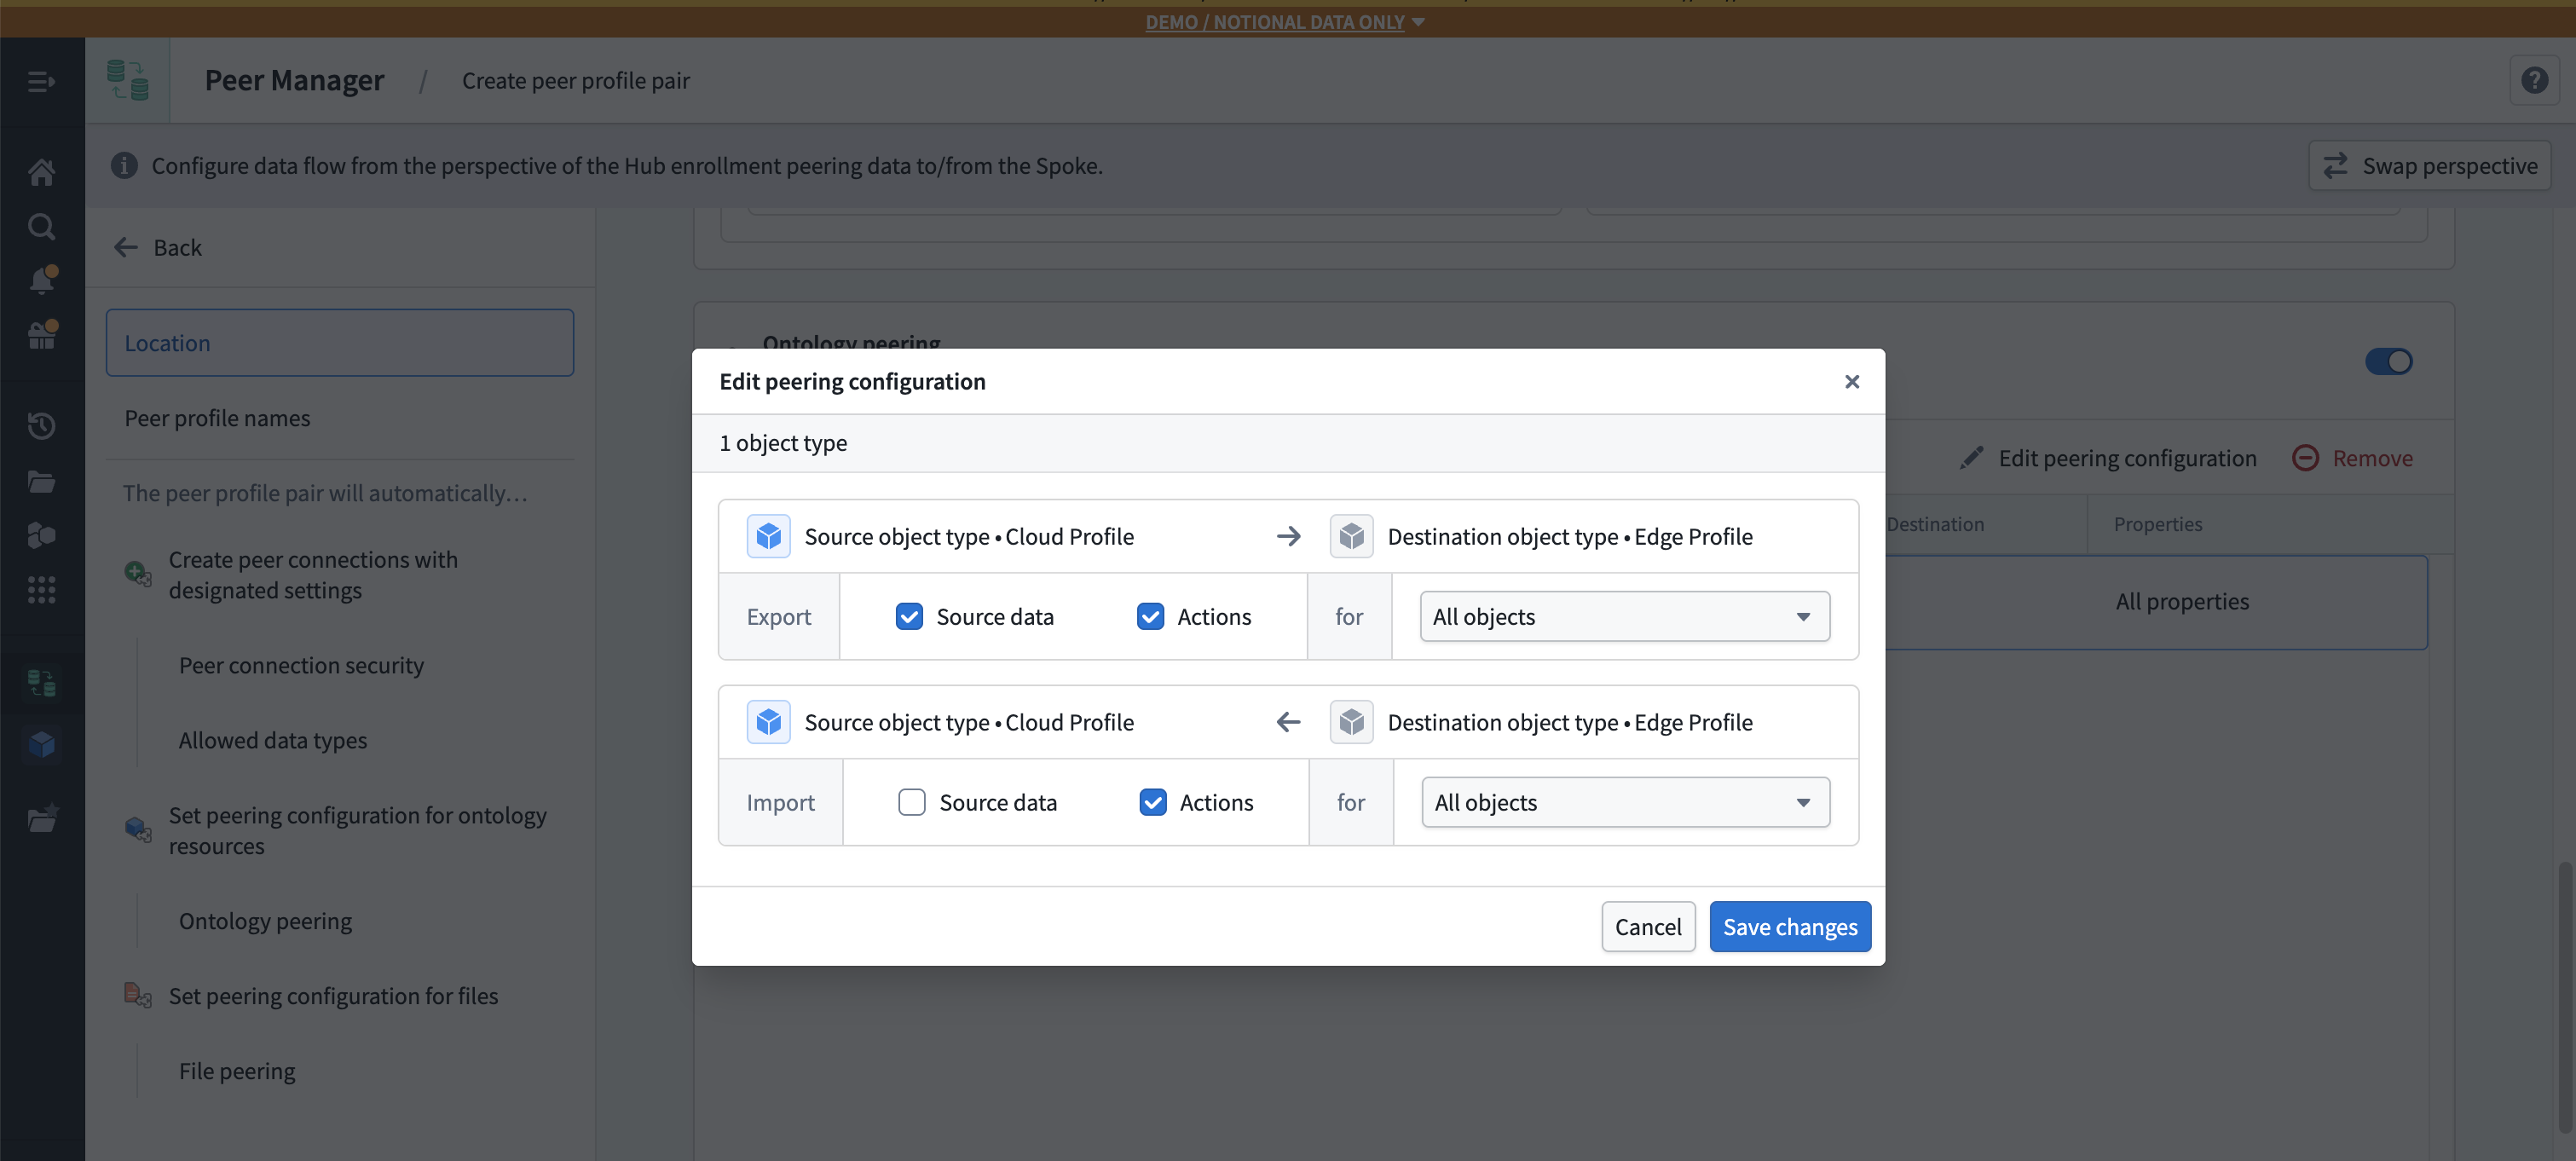
Ontology peering synchronizes object types and link types between enrollments. Within a peer profile, you can specify:
- Which object types to share.
- Which direction each object type flows (export from hub, import to spokes, or both).
- Which link types to include.
This enables cross-enrollment object synchronization, including real-time action peering so user edits on one enrollment flow to others.
File peering
File peering synchronizes Gotham files, such as Gaia maps, between enrollments. Within a peer profile, you can specify:
- Which file types to include.
- The peering direction for each file type.
- The peering tags that users should see to initiate file peering.
File types not included in the profile are unaffected.
How to create and use peer profiles
Step 1: Create a peer profile pair
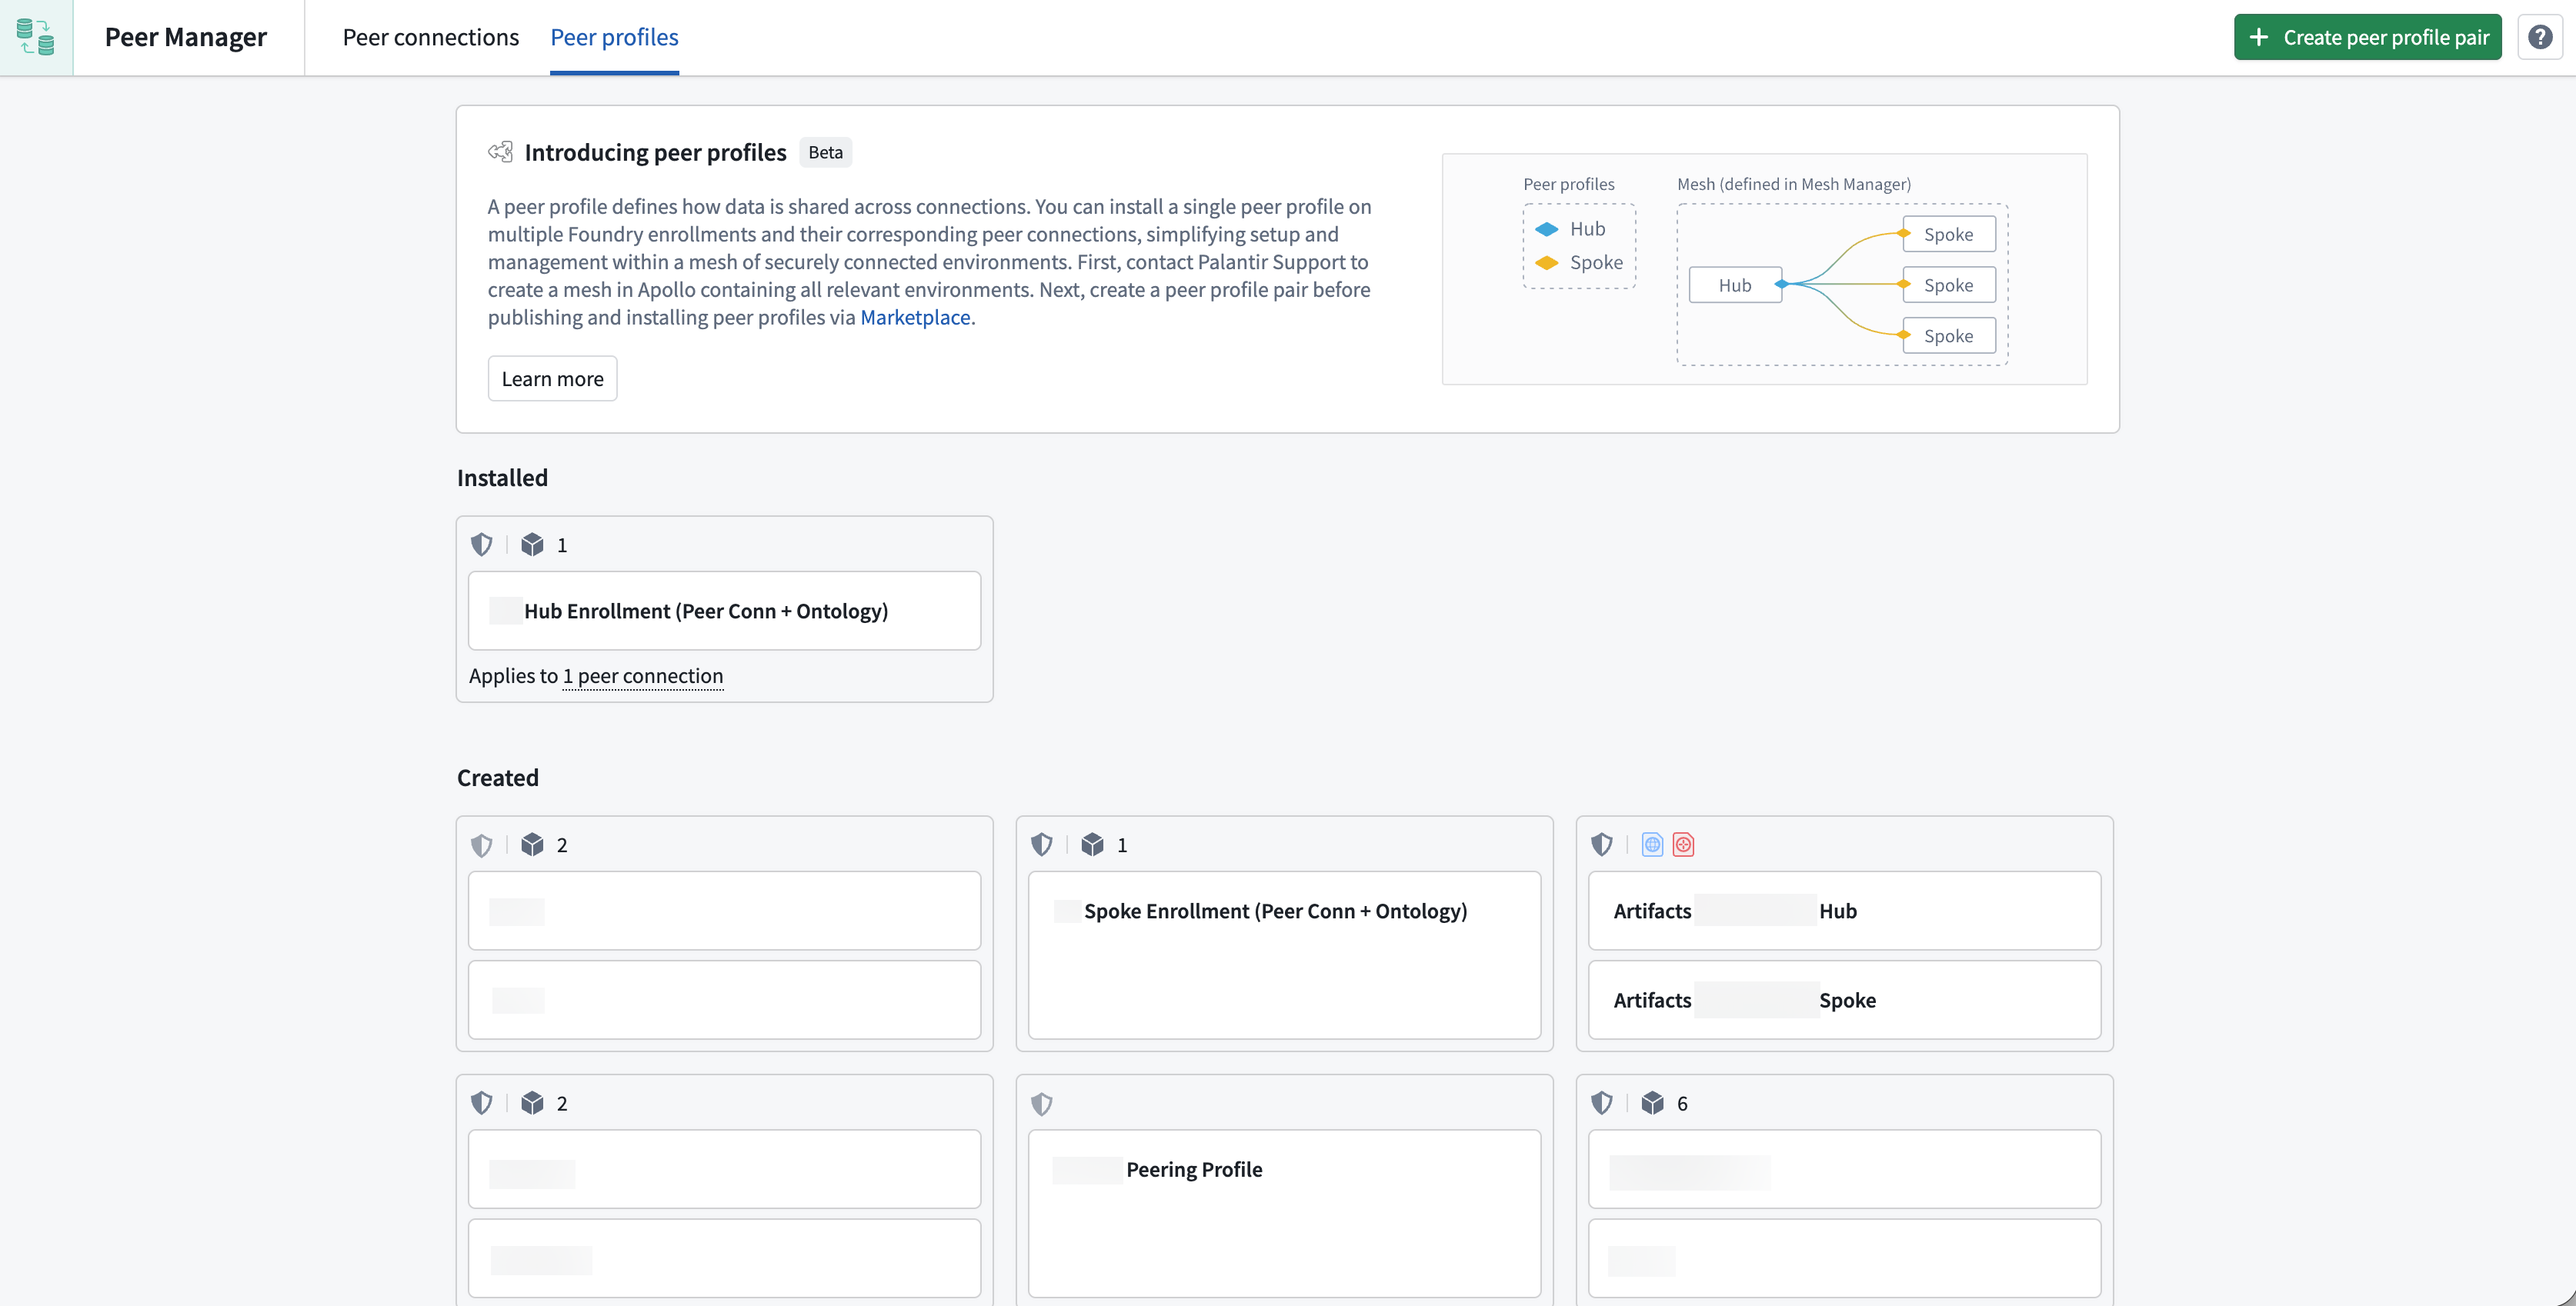
- Open Peer Manager and navigate to the Peer profiles tab.
- Select Create peer profile pair.
- Select Change in the Set location section and choose a Project where you will save the peer profiles.
- Enter names for the Hub profile and Spoke profile in the Name the pair section. The terms
HubandSpokeare placeholders for each side of your peer connection.
:::callout{theme="neutral"} Select Swap perspective to toggle between the hub and spoke perspectives while configuring a peer profile. Peer Manager automatically mirrors changes to one side on the other. :::
- Optionally enable automatic peer connection creation at the top of the Creation and settings section.
- Set the Peer connection security by selecting the relevant Classification markings and Other markings.
- Select the governance strategy for ontology resources by setting their sharing direction in the Ontology section.
- Select the governance strategy for files by setting their sharing direction in the Files section.
- Add all object and link types to peer in the Ontology peering section and configure their sharing direction.
Next, follow the instructions below to set the peering configuration for your selected file types in the File peering section:
- Select Add and choose the relevant file types before selecting Add [N] file types.
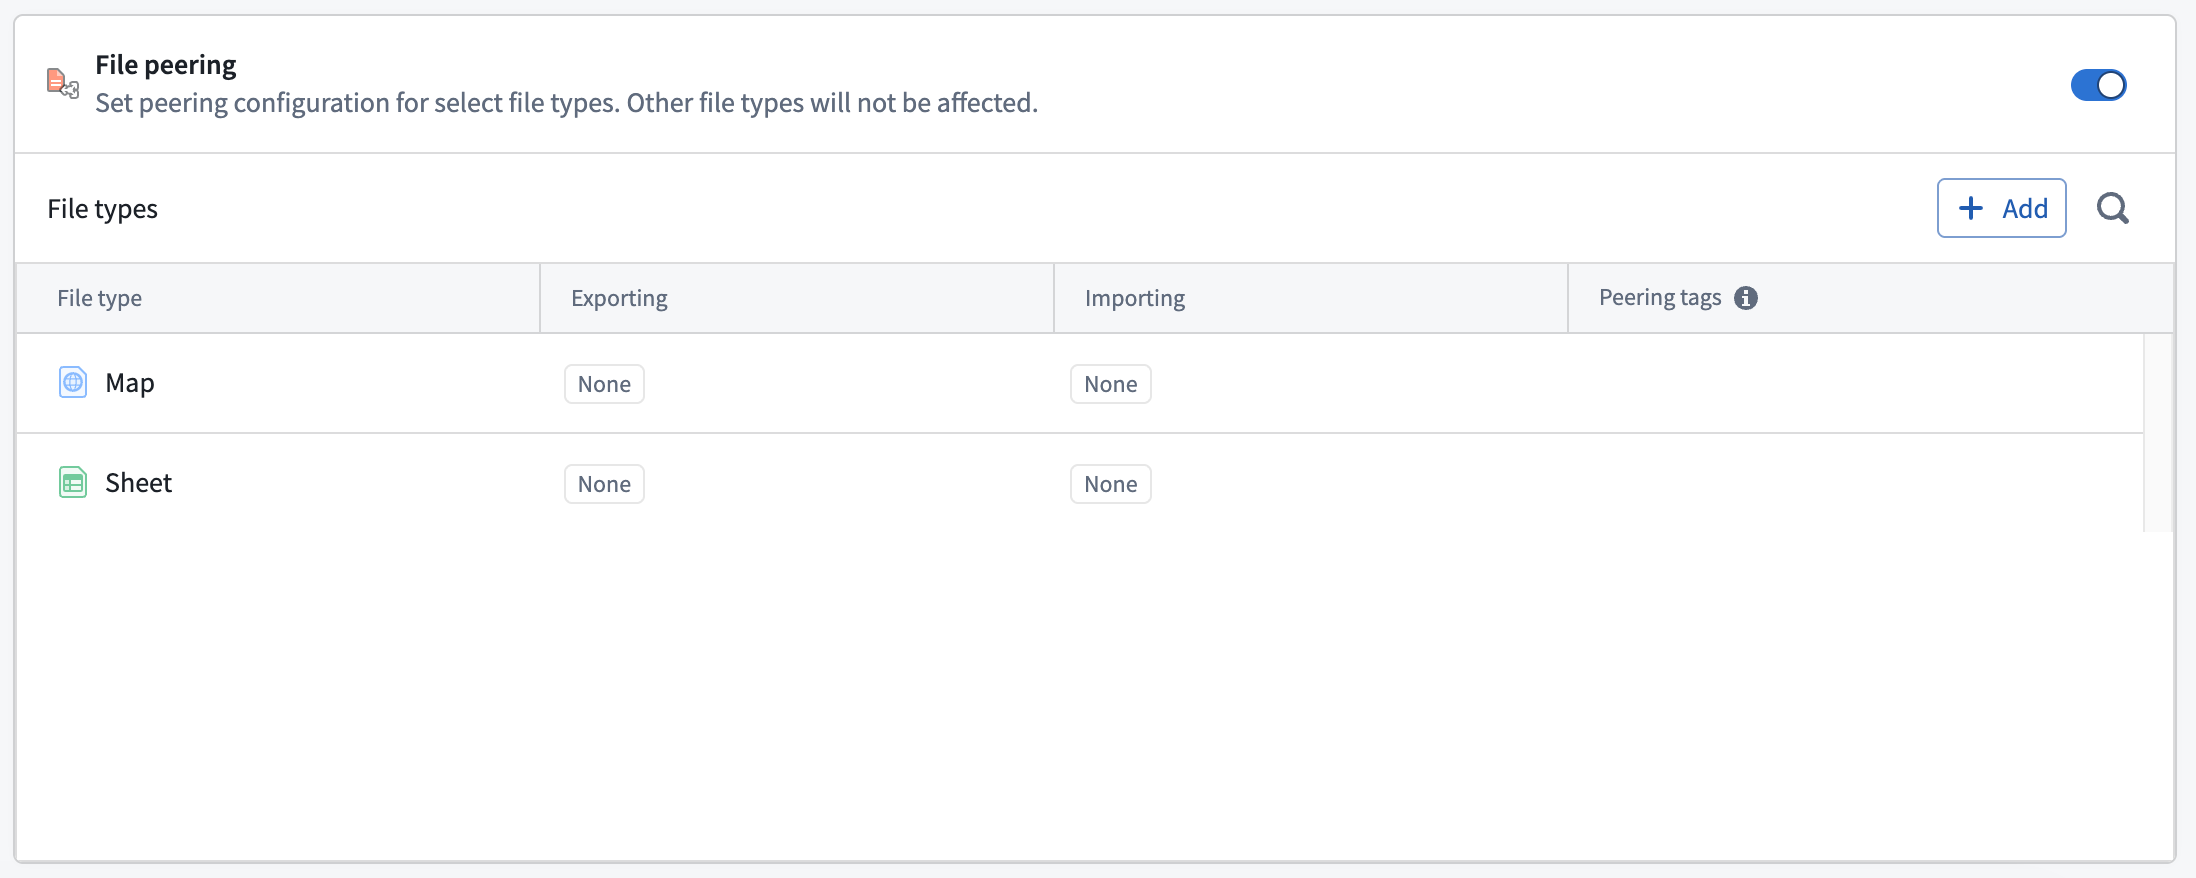
- Choose a file type from the File types list to display the type's peering configuration drawer on the right side of your screen.
- Choose your desired Export selection configuration to peer all files of the type or enable users to select which files to peer by applying a peering tag.
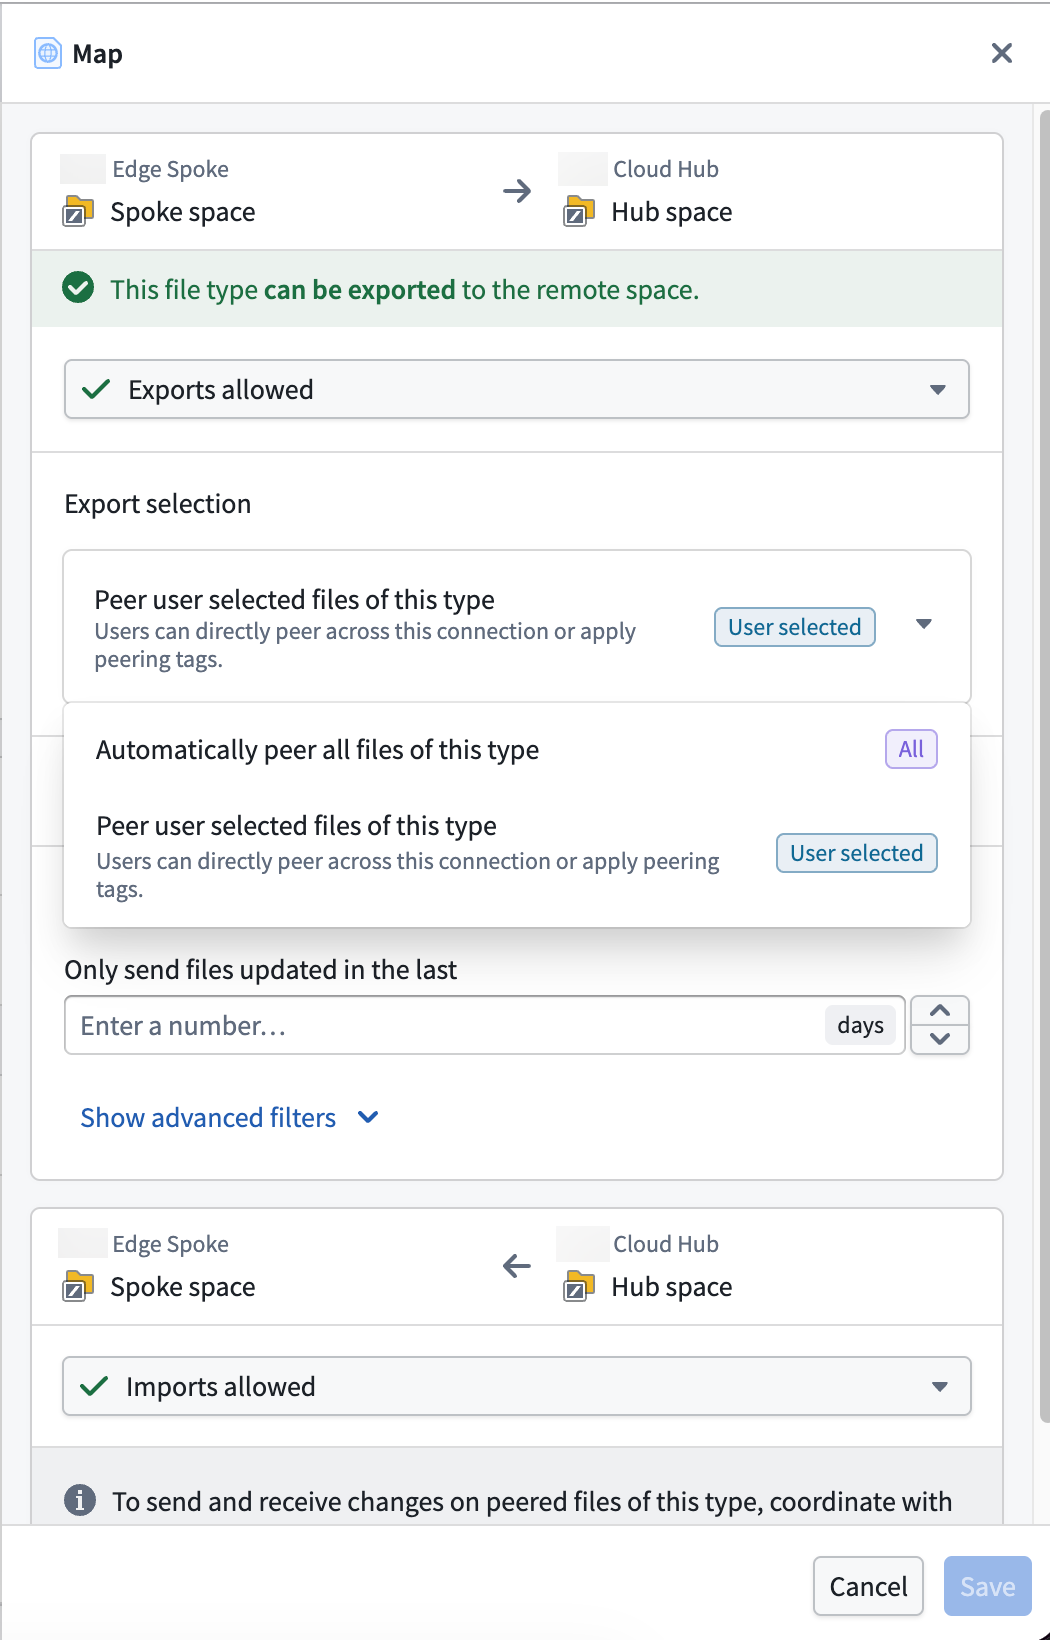
- Optionally create a peering tag by selecting Add > Create new peering tag in the Peering tags section to launch the Create new peering tag modal.
- Provide a user-facing Name and Description for the peering tag before entering a unique ID.
- Select Create to close the modal and add the tag back in the Peering tags section.
- Optionally Filter files to only send files over the peer connection that have been updated in a given time window.
- Select Save.
Now that you have configured file peering for the peer profile, select Create peer profile, and Peer Manager will create two draft peer profiles: one for each side of the peer connection.
Step 2: Publish to Marketplace
:::callout{theme="neutral"} Review the Marketplace and DevOps documentation before proceeding to learn more about creating, publishing, and installing products via the Marketplace storefront on your Foundry enrollment. :::
After you select Create peer profile, Peer Manager loads the Next steps needed to publish each profile in your pair to Marketplace and make them available for installation on the hub and spoke enrollments. Peer Manager provides checklist boxes for you to track your progress.
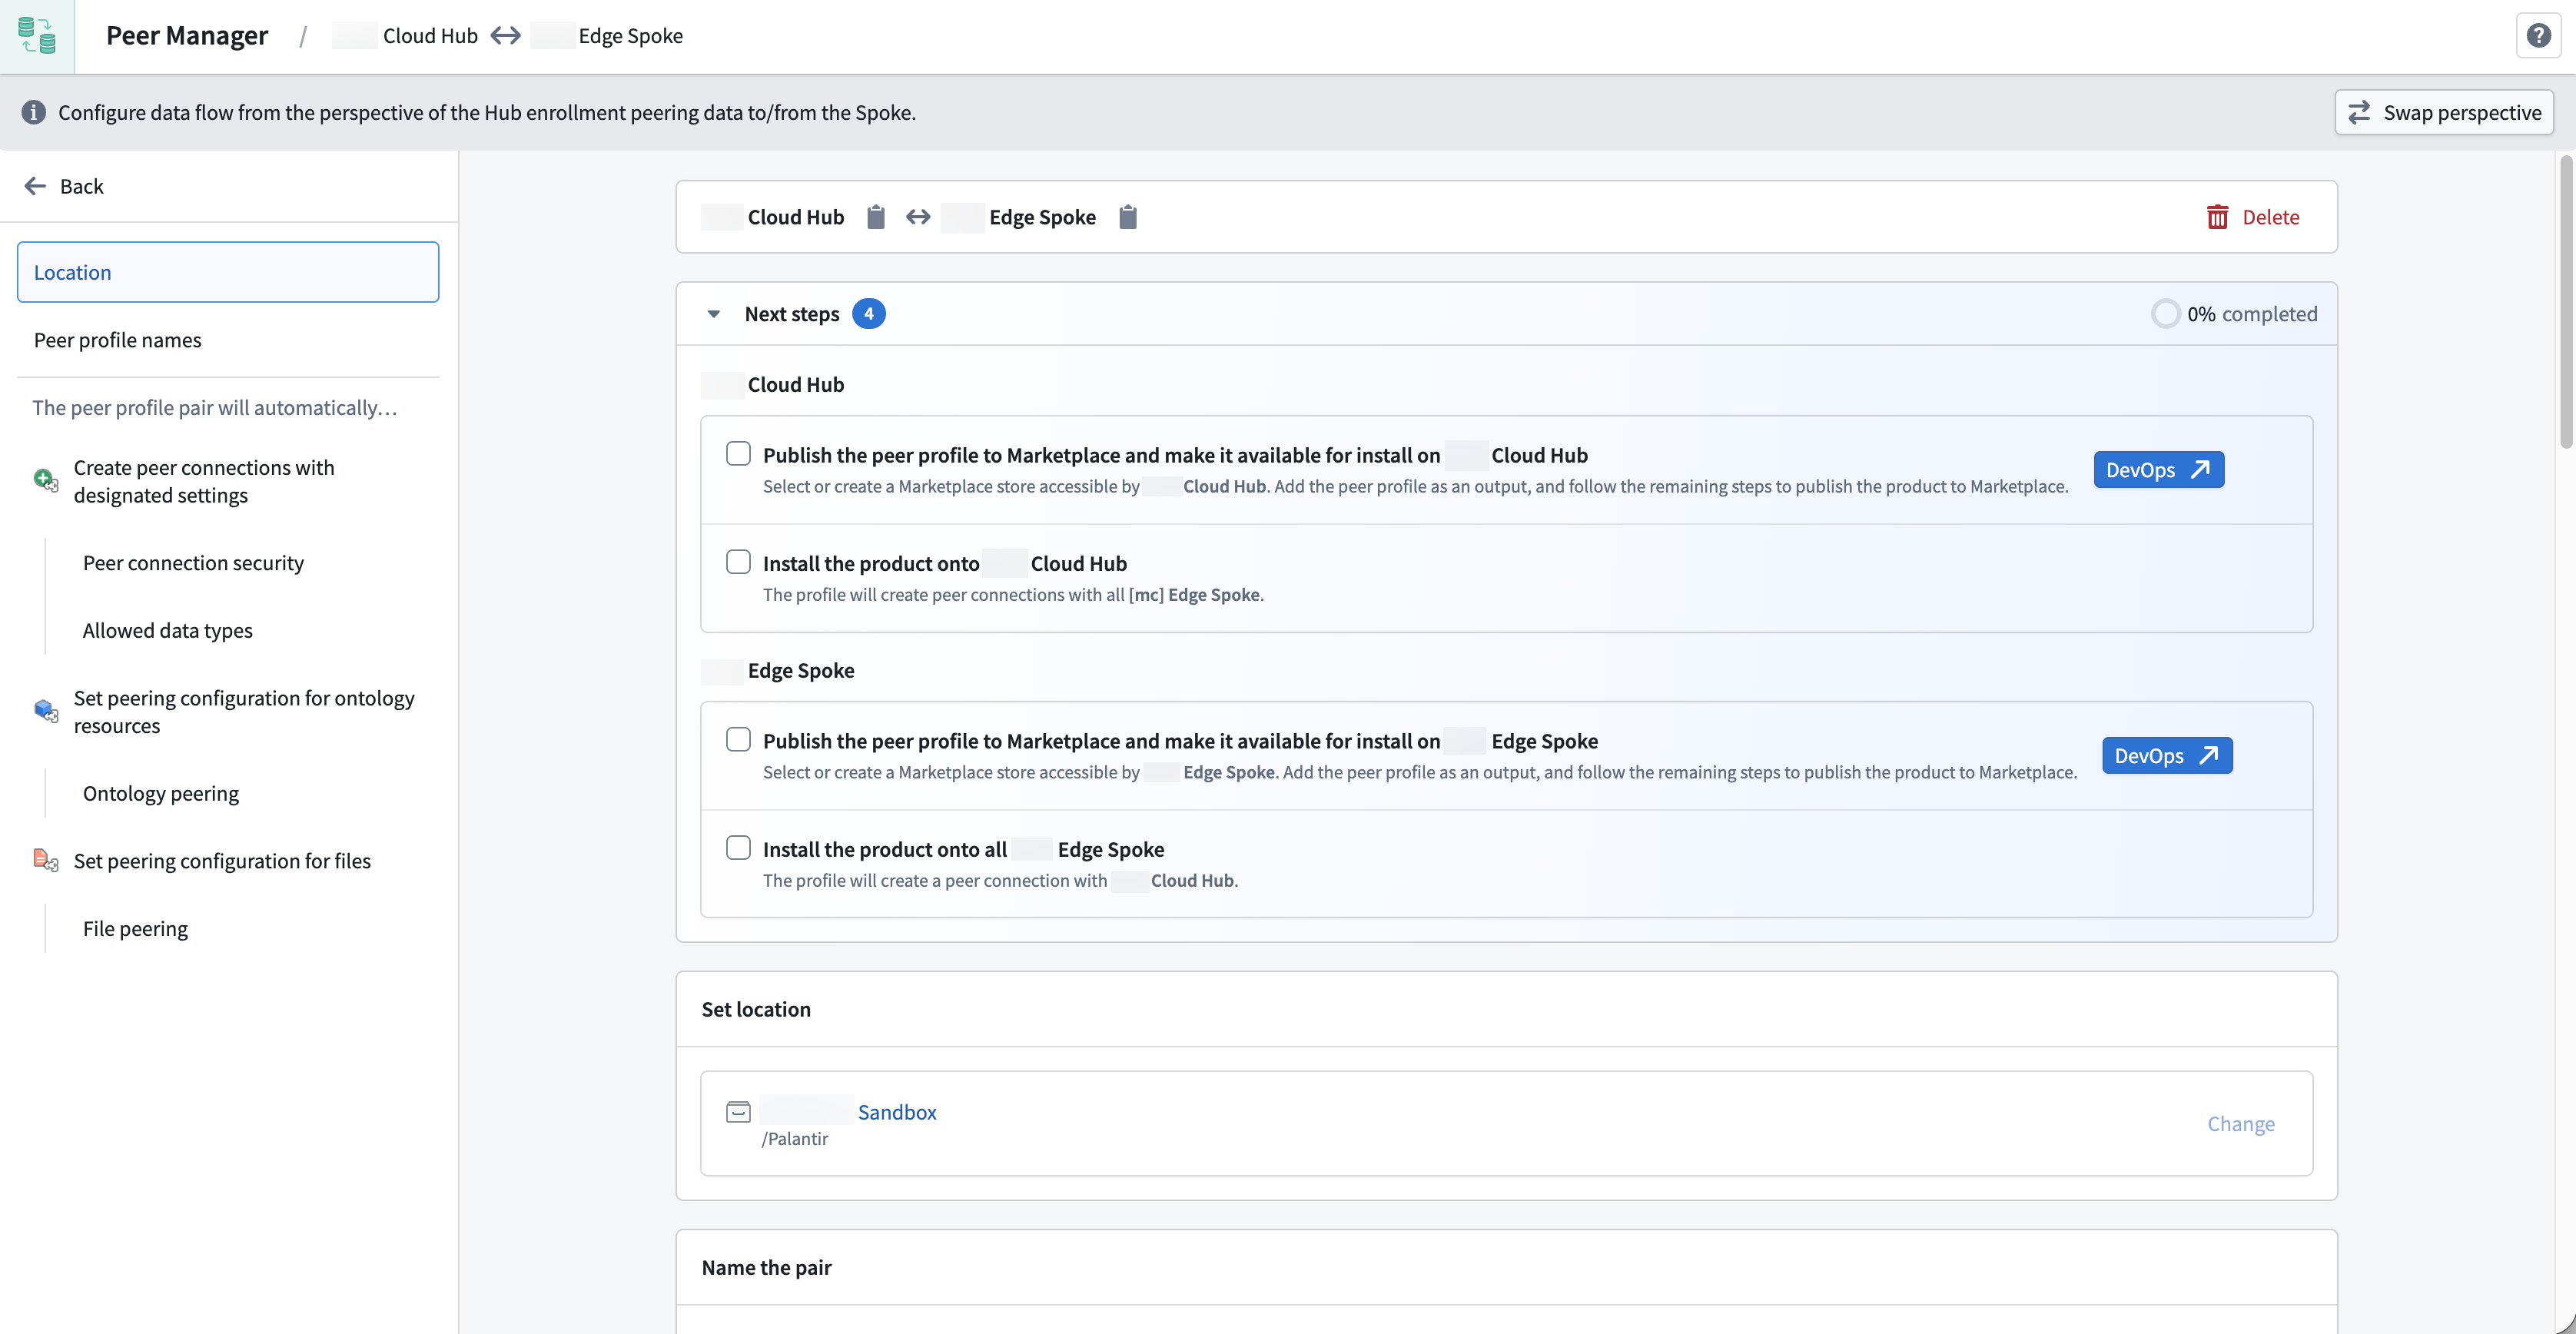
Select DevOps ↗ to open each profile as a pre-configured product draft in DevOps.
Step 3: Install on target enrollments
Use Marketplace to install the published profile on each target enrollment. During installation, select:
- The local space on the enrollment.
- The remote strategy, which determines which remote enrollments this profile should connect to.
Once installed, the profile automatically creates or configures the appropriate peer connections and begins sharing data according to your peer connection's settings.
Learn more about installations in Marketplace.
:::callout{theme="neutral"} You cannot edit a peer profile after installation. Uninstall the peer profile, make and save your changes, then reinstall it on the target enrollment. :::
Step 4: Monitor and manage your peer profiles
After you install the peer profile on each target enrollment, you can select it from the Installed section of the Peer profiles page to view its:
- Connection status, which displays each peer connection's health and troubleshooting information if the connection is not healthy, such as a network path not found, a security mismatch, or an indication that the remote side has not installed its corresponding profile yet.
- Ontology mapping progress, which quantifies the number of ontology resources successfully mapped on each connection.
FAQs
What happens when I install a peer profile?
Peer connections within the mesh are automatically created with the configuration defined in the profile. If a peer connection already exists, the profile's configuration is applied to the existing connection.
Do peer profiles handle new enrollments that join the mesh later?
Yes, depending on the remote strategy that the installed peer profile uses. For example, if the peer profile uses a Mesh remote strategy, the peer profile applies to any current and future peer connections that are part of the specified mesh.
What if the remote side of a peer connection has not installed its peer profile yet?
The connection will show a status indicating that the remote system does not have a matching installed configuration. Once the remote side installs the corresponding hub or spoke profile, the connection will become healthy.
中文翻译
对等配置文件
:::callout{theme="neutral" title="Beta"} 对等配置文件(Peer profiles)目前处于beta开发阶段,您的环境中可能尚未提供此功能。在活跃开发期间,功能可能会发生变化。如需启用对等配置文件,请联系Palantir支持团队。 :::
对等配置文件定义了如何在对等连接之间跨Foundry环境共享数据,并作为可重复使用的模板:您只需定义一次对等配置,然后Foundry即可将该配置一致地应用于多个连接。
使用对等配置文件简化跨对等连接的授权数据共享
对等配置文件通过本体和文件对等功能,简化了跨Foundry环境网络内多个对等连接的授权数据共享的配置和管理,特别是在许多环境需要相同对等配置的情况下。
虽然您可以逐个配置每个对等连接,但建议使用对等配置文件一次性定义您的对等配置,并将其应用于环境网格中所有需要的位置,例如连接到多个边缘环境的中心枢纽。
此外,对等配置文件通过以下功能简化了跨多个对等连接的数据共享:
- 自动创建和配置对等连接: 使用对等配置文件自动创建对等连接、共享本体中的数据以及配置文件对等。
- 为您的连接网格提供前瞻性保障: 新加入网格的环境将自动接收正确的配置,无需任何手动设置步骤。
- 强制执行一致的配置: 使用相同配置文件的每个环境都将获得相同的数据共享设置,从而降低不匹配或错误的风险。
- 通过Marketplace分发对等配置文件: 配置文件可以发布到Marketplace,使目标环境能够通过熟悉的自助服务工作流程轻松安装。
关键概念
网格(Mesh)
网格是一个由连接的Apollo环境组成的安全网络,可自动启用由对等配置文件定义的跨多个对等连接的数据共享。
:::callout{theme="neutral"} 在创建对等配置文件之前,请联系Palantir支持团队为您创建一个网格,该网格应包含您计划通过对等配置文件连接的所有环境。 :::
配置文件对(Profile pairs)
对于您在Peer Manager中配置的每个对等配置文件,您将创建一个配置文件对,对等连接的每一侧各有一个配置文件。这两个配置文件会自动相互镜像。
例如,考虑一个包含中心和多个分支环境的设置,其中:
- 中心是中央或主要环境。
- 分支是连接到中心的各个环境。
如果中心配置文件配置为导出某个对象类型,则相应的分支配置文件会自动设置为导入该相同的对象类型。在创建对等配置文件时,您只需配置该配置文件对中的一侧,因为Peer Manager会为您生成对应的配置文件。
远程策略(Remote strategy)
安装配置文件时,您需要选择它应用于哪些远程环境。可用选项包括:
- 全部: 应用于所有可用的远程环境。
- 特定环境: 应用于单个指定的环境。
- 网格: 应用于由Palantir支持团队创建的网格内的所有环境。
- 网格节点标签: 应用于网格中具有特定标签的环境。此选项适用于定位较大网络中的子集。
对等配置文件配置
使用单个对等配置文件来捆绑对等连接的配置,以共享本体资源和文件。
对等连接
对等配置文件可以自动创建和管理对等连接,包括:
- 连接安全性: 定义允许跨连接流动的分类标记和安全标签。数据必须满足这些要求才能被共享。请查阅连接安全文档了解更多信息。
- 允许的数据类型: 共享本体资源和文件,并指定其方向(导出、导入或两者兼有)。
本体对等
本体对等可在环境之间同步对象类型和链接类型。在对等配置文件中,您可以指定:
- 要共享哪些对象类型。
- 每个对象类型的流动方向(从中心导出、导入到分支,或两者兼有)。
- 要包含哪些链接类型。
这实现了跨环境的对象同步,包括实时操作对等,因此用户在一个环境中的编辑会流向其他环境。
文件对等
文件对等可在环境之间同步Gotham文件,例如Gaia地图。在对等配置文件中,您可以指定:
- 要包含哪些文件类型。
- 每种文件类型的对等方向。
- 用户应看到的用于启动文件对等的对等标签。
未包含在配置文件中的文件类型不受影响。
如何创建和使用对等配置文件
步骤1:创建对等配置文件对
- 打开Peer Manager并导航到对等配置文件选项卡。
- 选择创建对等配置文件对。
- 在设置位置部分选择更改,然后选择一个项目来保存对等配置文件。
- 在命名该对部分,为中心配置文件和分支配置文件输入名称。术语
中心和分支是对等连接每一侧的占位符。
:::callout{theme="neutral"} 选择交换视角可在配置对等配置文件时在中心和分支视角之间切换。Peer Manager会自动将一侧的更改镜像到另一侧。 :::
- 可选:在创建和设置部分顶部启用自动创建对等连接。
- 通过选择相关的分类标记和其他标记来设置对等连接安全性。
- 通过在本体部分设置本体资源的共享方向来选择其治理策略。
- 通过在文件部分设置文件的共享方向来选择其治理策略。
- 在本体对等部分添加所有要对等的对象类型和链接类型,并配置其共享方向。
接下来,按照以下说明在文件对等部分为您选择的文件类型设置对等配置:
- 选择添加并选择相关的文件类型,然后选择添加 [N] 个文件类型。
- 从文件类型列表中选择一个文件类型,以在屏幕右侧显示该类型的对等配置抽屉。
- 选择所需的导出选择配置,以对等该类型的所有文件,或通过应用对等标签使用户能够选择要对等的文件。
- 可选:在对等标签部分选择添加 > 创建新对等标签以启动创建新对等标签模态框,从而创建对等标签。
- 为对等标签提供面向用户的名称和描述,然后输入唯一的ID。
- 选择创建以关闭模态框并将标签添加回对等标签部分。
- 可选:过滤文件以仅发送在给定时间窗口内更新过的文件通过对等连接。
- 选择保存。
现在您已为对等配置文件配置了文件对等,选择创建对等配置文件,Peer Manager将创建两个草稿对等配置文件:对等连接的每一侧各一个。
步骤2:发布到Marketplace
:::callout{theme="neutral"} 在继续操作之前,请查阅Marketplace和DevOps文档,以了解更多关于通过Foundry环境上的Marketplace商店创建、发布和安装产品的信息。 :::
选择创建对等配置文件后,Peer Manager会加载将配置文件对中的每个配置文件发布到Marketplace所需的后续步骤,并使其可在中心和分支环境上安装。Peer Manager提供复选框列表供您跟踪进度。
选择DevOps ↗以将每个配置文件作为预配置的DevOps中的产品草稿打开。
步骤3:在目标环境上安装
使用Marketplace在目标环境上安装已发布的配置文件。在安装过程中,选择:
- 环境上的本地空间。
- 远程策略,该策略决定了此配置文件应连接到哪些远程环境。
安装后,配置文件会自动创建或配置相应的对等连接,并根据对等连接的设置开始共享数据。
:::callout{theme="neutral"} 安装后无法编辑对等配置文件。请卸载对等配置文件,进行更改并保存,然后重新安装到目标环境上。 :::
步骤4:监控和管理您的对等配置文件
在目标环境上安装对等配置文件后,您可以从对等配置文件页面的已安装部分选择它,以查看其:
- 连接状态,显示每个对等连接的健康状况,如果连接不健康则显示故障排除信息,例如未找到网络路径、安全不匹配,或指示远程侧尚未安装其对应的配置文件。
- 本体映射进度,量化每个连接上成功映射的本体资源数量。
常见问题解答
安装对等配置文件时会发生什么?
网格内的对等连接将使用配置文件中定义的配置自动创建。如果对等连接已存在,则配置文件的配置将应用于现有连接。
对等配置文件是否处理稍后加入网格的新环境?
是的,这取决于已安装的对等配置文件所使用的远程策略。例如,如果对等配置文件使用网格远程策略,则该对等配置文件将应用于指定网格中的任何当前和未来的对等连接。
如果对等连接的远程侧尚未安装其对等配置文件,会发生什么?
该连接将显示一个状态,指示远程系统没有匹配的已安装配置。一旦远程侧安装了相应的中心或分支配置文件,该连接将变为健康状态。