Monitoring views(监控视图(Monitoring views))
Monitoring at scale reduces the time required to monitor Foundry resources by introducing enhanced capabilities. Monitoring views are a collection of monitoring rules and health checks.
Monitoring views offer expanded functionality beyond what is available in check groups and we recommend upgrading all existing check groups to monitoring views.
With monitoring views, you can monitor the following resource types:
| Resource type | Supported scope |
|---|---|
| Agent | Single, Project |
| Object type | Single, Project |
| Link type | Single, Project |
| Schedule | Single, Project |
| Streaming dataset | Single, Folder, Project |
| Live deployment | Project |
| Time series sync | Single |
| Geotemporal observation | Single |
| Automation | Single, Project |
| Dataset | Single, Folder, Project |
| Function | Single, Project, Workflow Lineage, Workshop, OSDK application |
| Action type | Single, Project, Workflow Lineage, Workshop, OSDK application |
If you need detailed content and schema validation, consider using health checks.
:::callout{theme="neutral"} To use project scope with ontology resources, you will need to first migrate your ontology to project-based permissions. :::
Create a new monitoring view
To create a new monitoring view, navigate to the Monitoring View tab in the top right corner of the Data Health application and select New monitoring view.
Add a monitoring rule
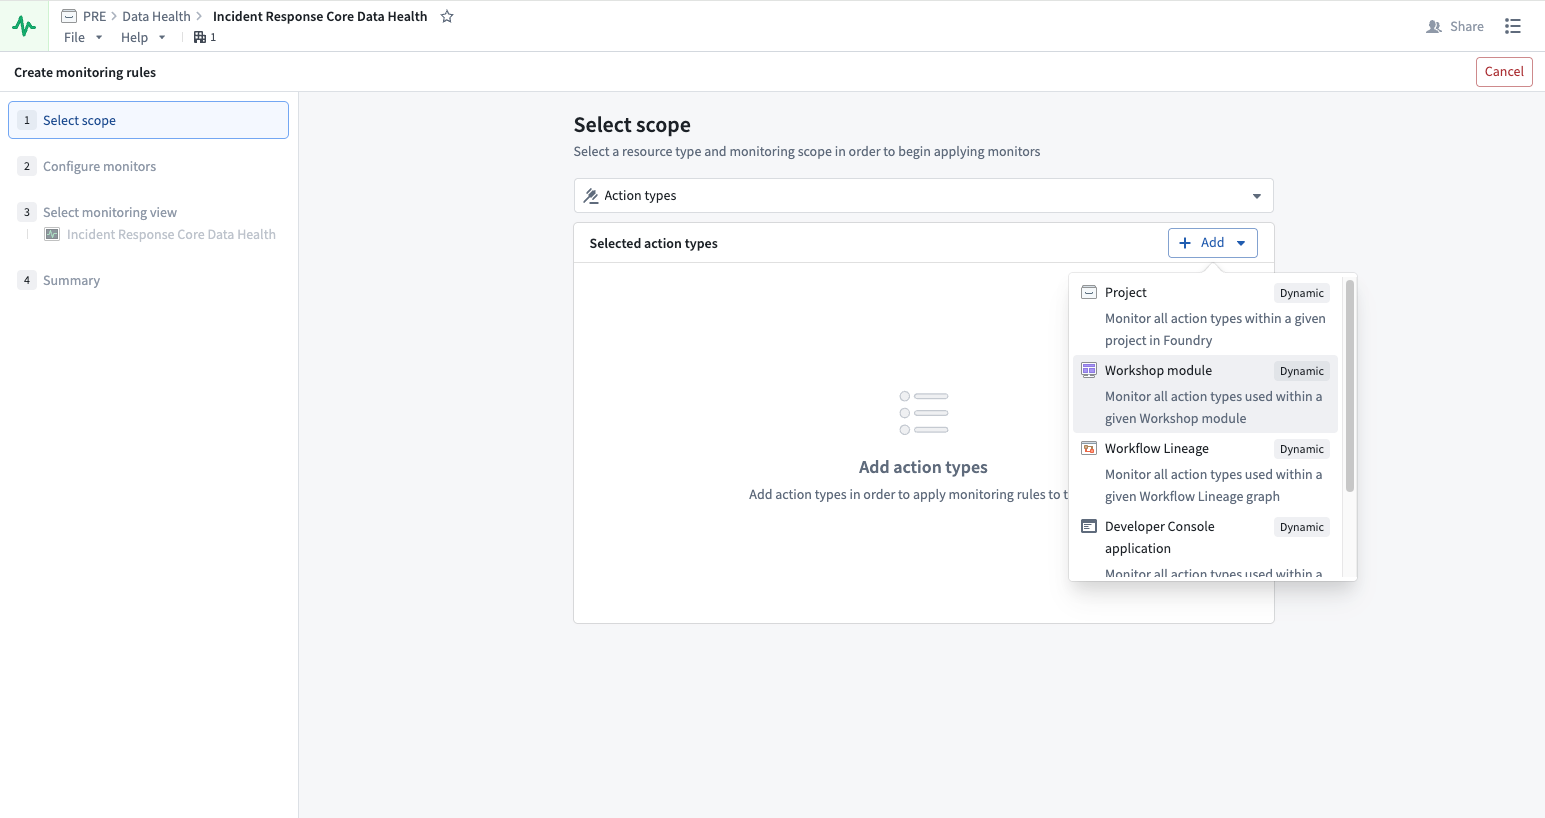
In your new monitoring view, you can Add monitoring rules on the Manage monitors tab. First, select the resource type you are looking to monitor and then select a scope.
With a static scope, you select a specific resource to monitor. With a dynamic scope, the monitor automatically updates as resources are added or removed, without requiring manual changes. Dynamic scopes include Folder, Project, Workflow Lineage, Workshop, and OSDK application, though availability varies by resource type. See the supported scope table for details.
:::callout{theme="neutral"}
You must have Viewer permission on the resources to monitor them. To receive alerts triggered by monitoring rules, you must have Viewer permission on the resources and the monitoring view.
:::
Additionally, you can review the Monitoring rules resource reference.
Configure monitors
Monitors are set on the metrics emitted by a resource. As you set up your monitors, we suggest certain configurations based on Foundry’s standards for health. However, you can change the values or choose to only monitor certain metrics. You can also determine the level of severity for the alert: low, medium, and high.
Edit monitors
You can edit your monitors by selecting from the list of monitors and choosing Edit on the side panel that appears.
Add a health check
You can add existing health checks to a monitoring view from the Data Health application:
- Select Add health check in the top-right corner of the Data Health application.
- In the resource selection dialog, select multiple datasets and choose the existing health checks you want to add to the monitoring view.
- The selected health checks are grouped in the monitoring view.
:::callout{theme="neutral"} This dialog adds existing health checks to a monitoring view. To bulk-create new health checks across multiple datasets, refer to bulk adding health checks. :::
Set up and manage alert notifications
Once you have configured your monitoring rules, you will need to set up how and where alerts are delivered when issues are detected.
Subscribe to alerts
To subscribe to alerts, navigate to the Manage subscriptions tab where all the subscribed users are listed. You can add users and user groups, and configure their alerts based on severity. When a monitor rule triggers an alert, the user subscribed to the monitoring view containing that alert will be notified via email and Foundry notifications. Note that you must have Viewer permission on the resources and the monitoring view to be able to receive alerts.
Integrate with external systems
You can send alerts to external systems such as PagerDuty or Slack with built-in integrations or by using a webhook to hit arbitrary REST endpoints. Learn more about sending alerts to external systems.
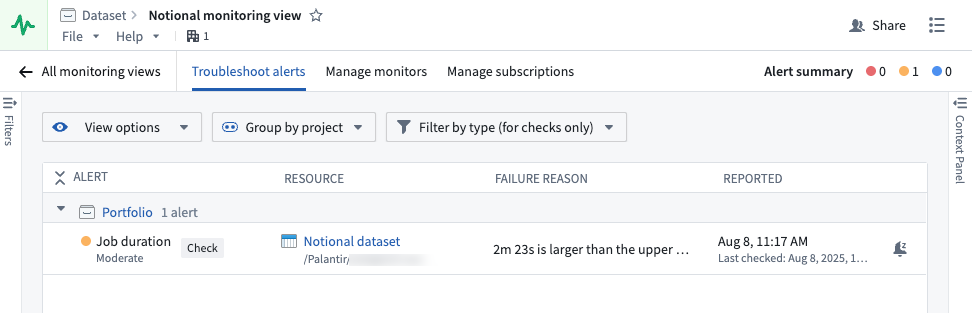
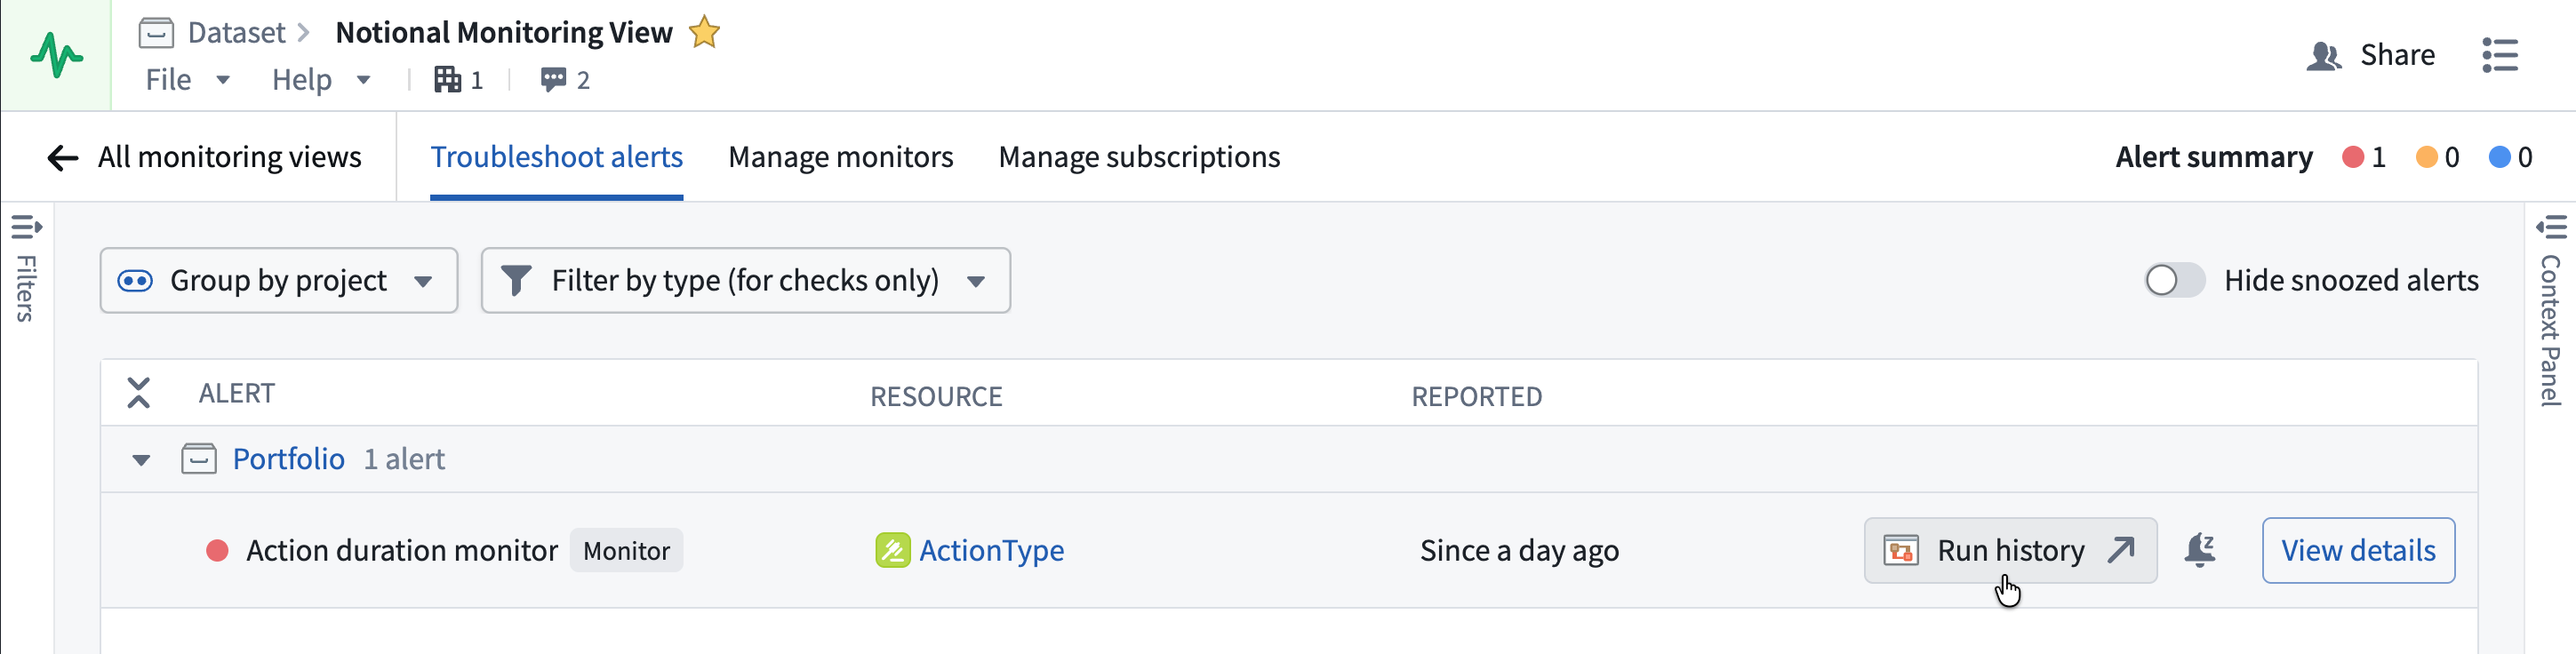
Troubleshoot alerts
On the Troubleshoot alerts tab, you can review your alerts by alert name, resource, failure reason, and the time of reported alert. Additionally, you can view options, group by project, or filter by type (for checks only).
For individual monitor rules, you can open the alert debug page to view detailed metrics, alert history, and diagnostic information.
Snooze alerts after they fire
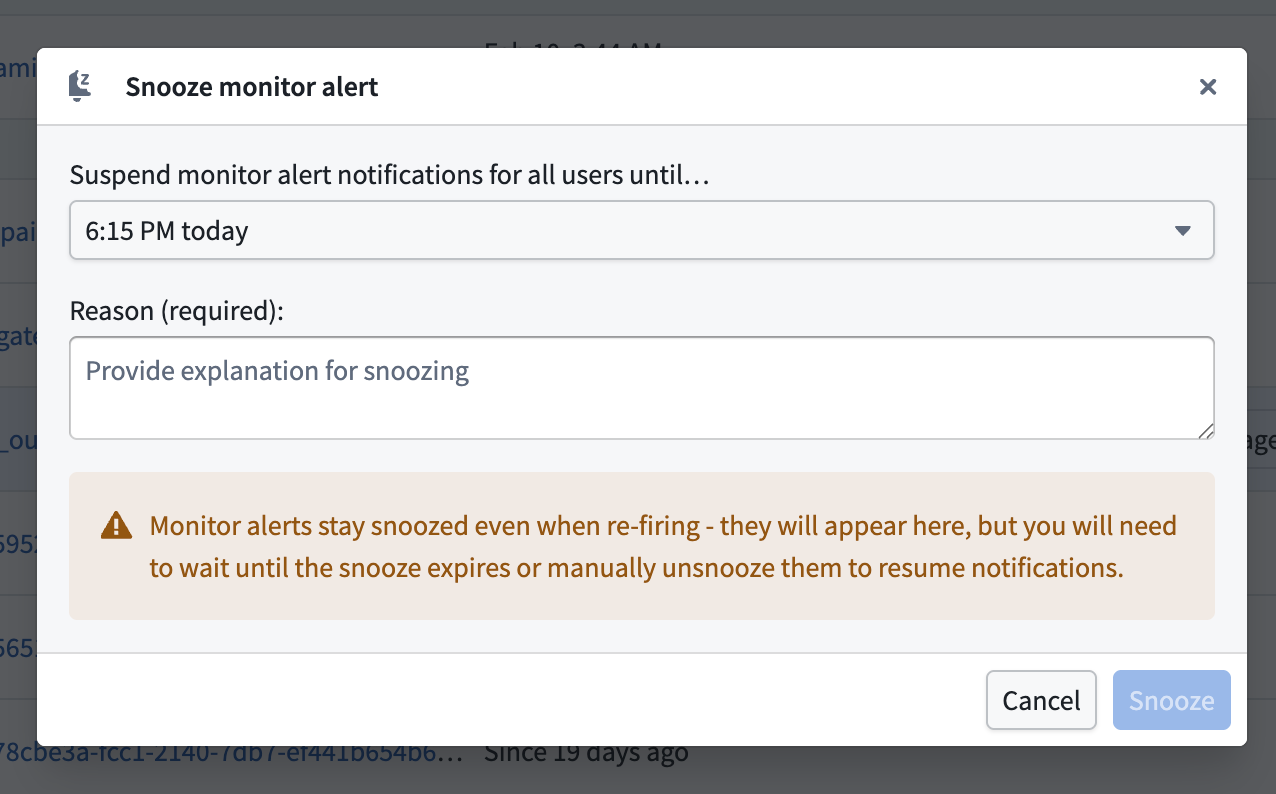
You can snooze an individual alert after it fires for both health checks and monitors to temporarily suppress notifications. To snooze an alert, select it from the Troubleshoot alerts panel and choose Snooze from the toolbar displayed in the bottom of your screen. Additionally, you can select the bell icon in the About tab of the Context Panel that renders after you select the alert. Configure a suspension duration and provide a reason for snoozing before selecting Snooze.
Snoozed alerts contain an inline bell icon tag that displays who snoozed the alert, when, and why upon hover. Use the Hide snoozed alerts toggle in the top right to hide snoozed alerts from view. Once hidden, a banner in the footer of the Troubleshoot alerts panel displays the number of currently snoozed alerts.

To resume an alert's notifications, select Unsnooze from the toolbar at the bottom of your screen or wait for the snooze duration to expire.
:::callout{theme="neutral"} Unlike health check alerts, snoozed monitor alerts remain snoozed even if they re-fire. You must wait for the snooze to expire or manually un-snooze to resume notifications. :::
Snooze monitor rules
In addition to snoozing individual alerts, you can snooze an entire monitor rule to silence alerts across all targets within that rule's scope at once. This is particularly useful when you are aware of a known issue and want to suppress all alerts tied to a particular rule in a single action.
To snooze a monitor rule, navigate to the Manage monitors tab in your monitoring view, select the rule you want to snooze, and choose Snooze from the available actions.
:::callout{theme="warning"} When you snooze a monitor rule, any existing target-level snoozes for that rule will be replaced by the new rule-level snooze. :::
Navigate to resource lineage from an alert
From an alert on the Troubleshoot alerts tab or the alert debug page, you can navigate directly to the resource's lineage view.
- Datasets, schedules, and object types will open in Data Lineage.
- Functions, action types, and automations will open in Workflow Lineage with the Run history tab selected.
For function and action type monitoring rules, pre-filters are automatically applied to the run history based on the monitor rule type to surface the most relevant executions.
| Rule type | Run time range | Status | Timestamp range | Failure reason |
|---|---|---|---|---|
| Duration p95 | Set to the monitor's threshold value, showing only executions that exceeded the threshold. | — | — | — |
| Number of failures in window | — | Set to Failed | Start of the monitor's time window at the time the alert fired. | — |
| Number of user-facing failures in window | — | Set to Failed | Start of the monitor's time window at the time the alert fired. | Set to User facing error |
:::callout{theme="neutral"} Pre-filtered run history navigation is currently available for function and action type resources only. :::
Upgrade an existing check group to a monitoring view
To upgrade an existing check group, open your check group in the Data Health application. In the top banner, select Upgrade to monitoring view.
You can create a new monitoring view or move all the checks to an existing monitoring view.
:::callout{theme="neutral"} * Monitoring views are filesystem resources. If you are creating a new monitoring view, be sure to store it in a project accessible to potential subscribers. * After upgrading your check group, checks will continue to be supported exactly as they are now. There are no changes to email digest, alerting, subscriptions, or any other workflow related to health checks. * Each check group can be linked to a single monitoring view and vice versa; therefore, you can only upgrade one check group to a single existing monitoring view, or create a new monitoring view if a suitable one does not exist. :::
中文翻译
监控视图(Monitoring views)
大规模监控通过引入增强功能,缩短了监控 Foundry 资源所需的时间。监控视图是监控规则(monitoring rules)与健康检查(health checks)的集合。
监控视图提供了超越检查组(check groups)的扩展功能,我们建议将所有现有检查组升级为监控视图。
借助监控视图,您可以监控以下资源类型:
| 资源类型 | 支持范围 |
|---|---|
| 代理(Agent) | 单个、项目 |
| 对象类型(Object type) | 单个、项目 |
| 链接类型(Link type) | 单个、项目 |
| 调度(Schedule) | 单个、项目 |
| 流式数据集(Streaming dataset) | 单个、文件夹、项目 |
| 实时部署(Live deployment) | 项目 |
| 时序同步(Time series sync) | 单个 |
| 地理时空观测(Geotemporal observation) | 单个 |
| 自动化(Automation) | 单个、项目 |
| 数据集(Dataset) | 单个、文件夹、项目 |
| 函数(Function) | 单个、项目、工作流谱系、Workshop、OSDK 应用 |
| 操作类型(Action type) | 单个、项目、工作流谱系、Workshop、OSDK 应用 |
如需详细内容和模式验证,请考虑使用健康检查。
:::callout{theme="neutral"} 若要对本体资源使用项目范围,您需要先将本体迁移至基于项目的权限。 :::
创建新的监控视图
要创建新的监控视图,请导航至 Data Health 应用程序右上角的 监控视图 标签页,并选择 新建监控视图。
添加监控规则
在新建的监控视图中,您可以在 管理监控器 标签页上 添加监控规则。首先,选择您要监控的资源类型,然后选择范围。
使用 静态 范围时,您需要选择特定的资源进行监控。使用 动态 范围时,监控器会在资源添加或移除时自动更新,无需手动更改。动态范围包括 文件夹、项目、工作流谱系、Workshop 和 OSDK 应用,但具体可用性因资源类型而异。详情请参阅支持范围表。
:::callout{theme="neutral"}
您必须对资源拥有 查看者 权限才能进行监控。要接收由监控规则触发的警报,您必须对资源和监控视图均拥有 查看者 权限。
:::
此外,您可以查阅监控规则资源参考。
配置监控器
监控器基于资源发出的指标进行设置。在设置监控器时,我们会根据 Foundry 的健康标准建议某些配置。但您可以更改这些值,或选择仅监控特定指标。您还可以确定警报的严重级别:低、中、高。
编辑监控器
您可以通过从监控器列表中选择监控器,并在出现的侧面板中选择 编辑 来编辑监控器。
添加健康检查
您可以从 Data Health 应用程序将现有健康检查添加到监控视图中:
- 在 Data Health 应用程序的右上角选择 添加健康检查。
- 在资源选择对话框中,选择多个数据集,并选择要添加到监控视图的现有健康检查。
- 所选健康检查将分组显示在监控视图中。
:::callout{theme="neutral"} 此对话框将现有健康检查添加到监控视图。如需跨多个数据集批量创建新的健康检查,请参阅批量添加健康检查。 :::
设置并管理警报通知
配置好监控规则后,您需要设置检测到问题时如何以及在哪里发送警报。
订阅警报
要订阅警报,请导航至 管理订阅 标签页,其中列出了所有已订阅的用户。您可以添加用户和用户组,并根据严重级别配置他们的警报。当监控规则触发警报时,订阅了包含该警报的监控视图的用户将通过电子邮件和 Foundry 通知收到通知。请注意,您必须对资源和监控视图拥有 查看者 权限才能接收警报。
与外部系统集成
您可以通过内置集成或使用 webhook 访问任意 REST 端点,将警报发送到外部系统,例如 PagerDuty 或 Slack。了解更多关于向外部系统发送警报的信息。
排查警报
在 排查警报 标签页上,您可以按警报名称、资源、失败原因和报告警报的时间来查看警报。此外,您还可以 查看选项、按项目分组 或 按类型筛选(仅适用于检查)。
对于单个监控规则,您可以打开警报调试页面查看详细的指标、警报历史和诊断信息。
警报触发后将其静音
您可以在健康检查和监控器的单个警报触发后将其静音,以暂时抑制通知。要静音警报,请从 排查警报 面板中选择该警报,然后从屏幕底部显示的工具栏中选择 静音。此外,您也可以在选择警报后渲染的 上下文面板 的 关于 标签页中选择铃铛图标。配置静音持续时间并提供静音原因,然后选择 静音。
已静音的警报包含一个内联的铃铛图标标签,悬停时会显示谁、何时以及为何静音了该警报。使用右上角的 隐藏已静音警报 开关来隐藏已静音的警报。隐藏后,排查警报 面板页脚中的横幅会显示当前静音的警报数量。
要恢复警报的通知,请从屏幕底部的工具栏中选择 取消静音,或等待静音持续时间结束。
:::callout{theme="neutral"} 与健康检查警报不同,已静音的监控器警报即使再次触发也会保持静音状态。您必须等待静音到期或手动取消静音才能恢复通知。 :::
静音监控规则
除了静音单个警报外,您还可以将整个监控规则静音,以一次性静音该规则范围内所有目标的警报。当您已知某个问题并希望一次性抑制与特定规则相关的所有警报时,这尤其有用。
要静音监控规则,请导航至监控视图中的 管理监控器 标签页,选择要静音的规则,然后从可用操作中选择 静音。
:::callout{theme="warning"} 当您静音监控规则时,该规则下任何现有的目标级静音都将被新的规则级静音所取代。 :::
从警报导航至资源谱系
从 排查警报 标签页或警报调试页面上的警报,您可以直接导航至资源的谱系视图。
- 数据集、调度和对象类型将在数据谱系(Data Lineage)中打开。
- 函数、操作类型和自动化将在工作流谱系(Workflow Lineage)中打开,并选中 运行历史 标签页。
对于函数和操作类型的监控规则,系统会根据监控规则类型自动对运行历史应用预过滤器,以显示最相关的执行记录。
| 规则类型 | 运行时间范围 | 状态 | 时间戳范围 | 失败原因 |
|---|---|---|---|---|
| 持续时间 p95 | 设置为监控器的阈值,仅显示超过阈值的执行。 | — | — | — |
| 窗口内失败次数 | — | 设置为 失败 | 警报触发时监控器时间窗口的开始时间。 | — |
| 窗口内面向用户的失败次数 | — | 设置为 失败 | 警报触发时监控器时间窗口的开始时间。 | 设置为 面向用户的错误 |
:::callout{theme="neutral"} 预过滤的运行历史导航目前仅适用于函数和操作类型资源。 :::
升级现有检查组至监控视图
要升级现有检查组,请在 Data Health 应用程序中打开您的检查组。在顶部横幅中,选择 升级至监控视图。
您可以创建一个新的监控视图,或将所有检查移至现有的监控视图。
:::callout{theme="neutral"} * 监控视图是文件系统资源。如果创建新的监控视图,请确保将其存储在潜在订阅者可访问的项目中。 * 升级检查组后,检查将继续完全按原样得到支持。电子邮件摘要、警报、订阅或与健康检查相关的任何其他工作流程均无变化。 * 每个检查组可以链接到一个监控视图,反之亦然;因此,您只能将一个检查组升级到单个现有监控视图,或者如果不存在合适的监控视图,则创建一个新的监控视图。 :::