Create an offline-capable application with the embedded ontology(使用嵌入式本体创建支持离线功能的应用程序)
The embedded ontology enables applications to sync ontology data locally, allowing users to interact with data without network connectivity and install applications as progressive web apps ↗ (PWAs). This guide offers a walkthrough for creating a Foundry application with offline support using the embedded ontology React template in the @palantir/lohi-ts library.
Prerequisites
Before starting, complete standard application setup with the steps below.
- Create a client-facing application in Developer Console. See Create an application using Developer Console for detailed instructions. On the Application type page, select Client-facing application.
- Select your ontology and the object types you want to include.
- Generate the SDK for your application.
- Configure website hosting, including subdomain and redirect URLs. Refer to Deploy a custom application on Foundry for more information.
1. Enable WebAssembly execution in the content security policy
To support offline functionality, your application will use WebAssembly (Wasm). You must configure the content security policy to allow Wasm execution.
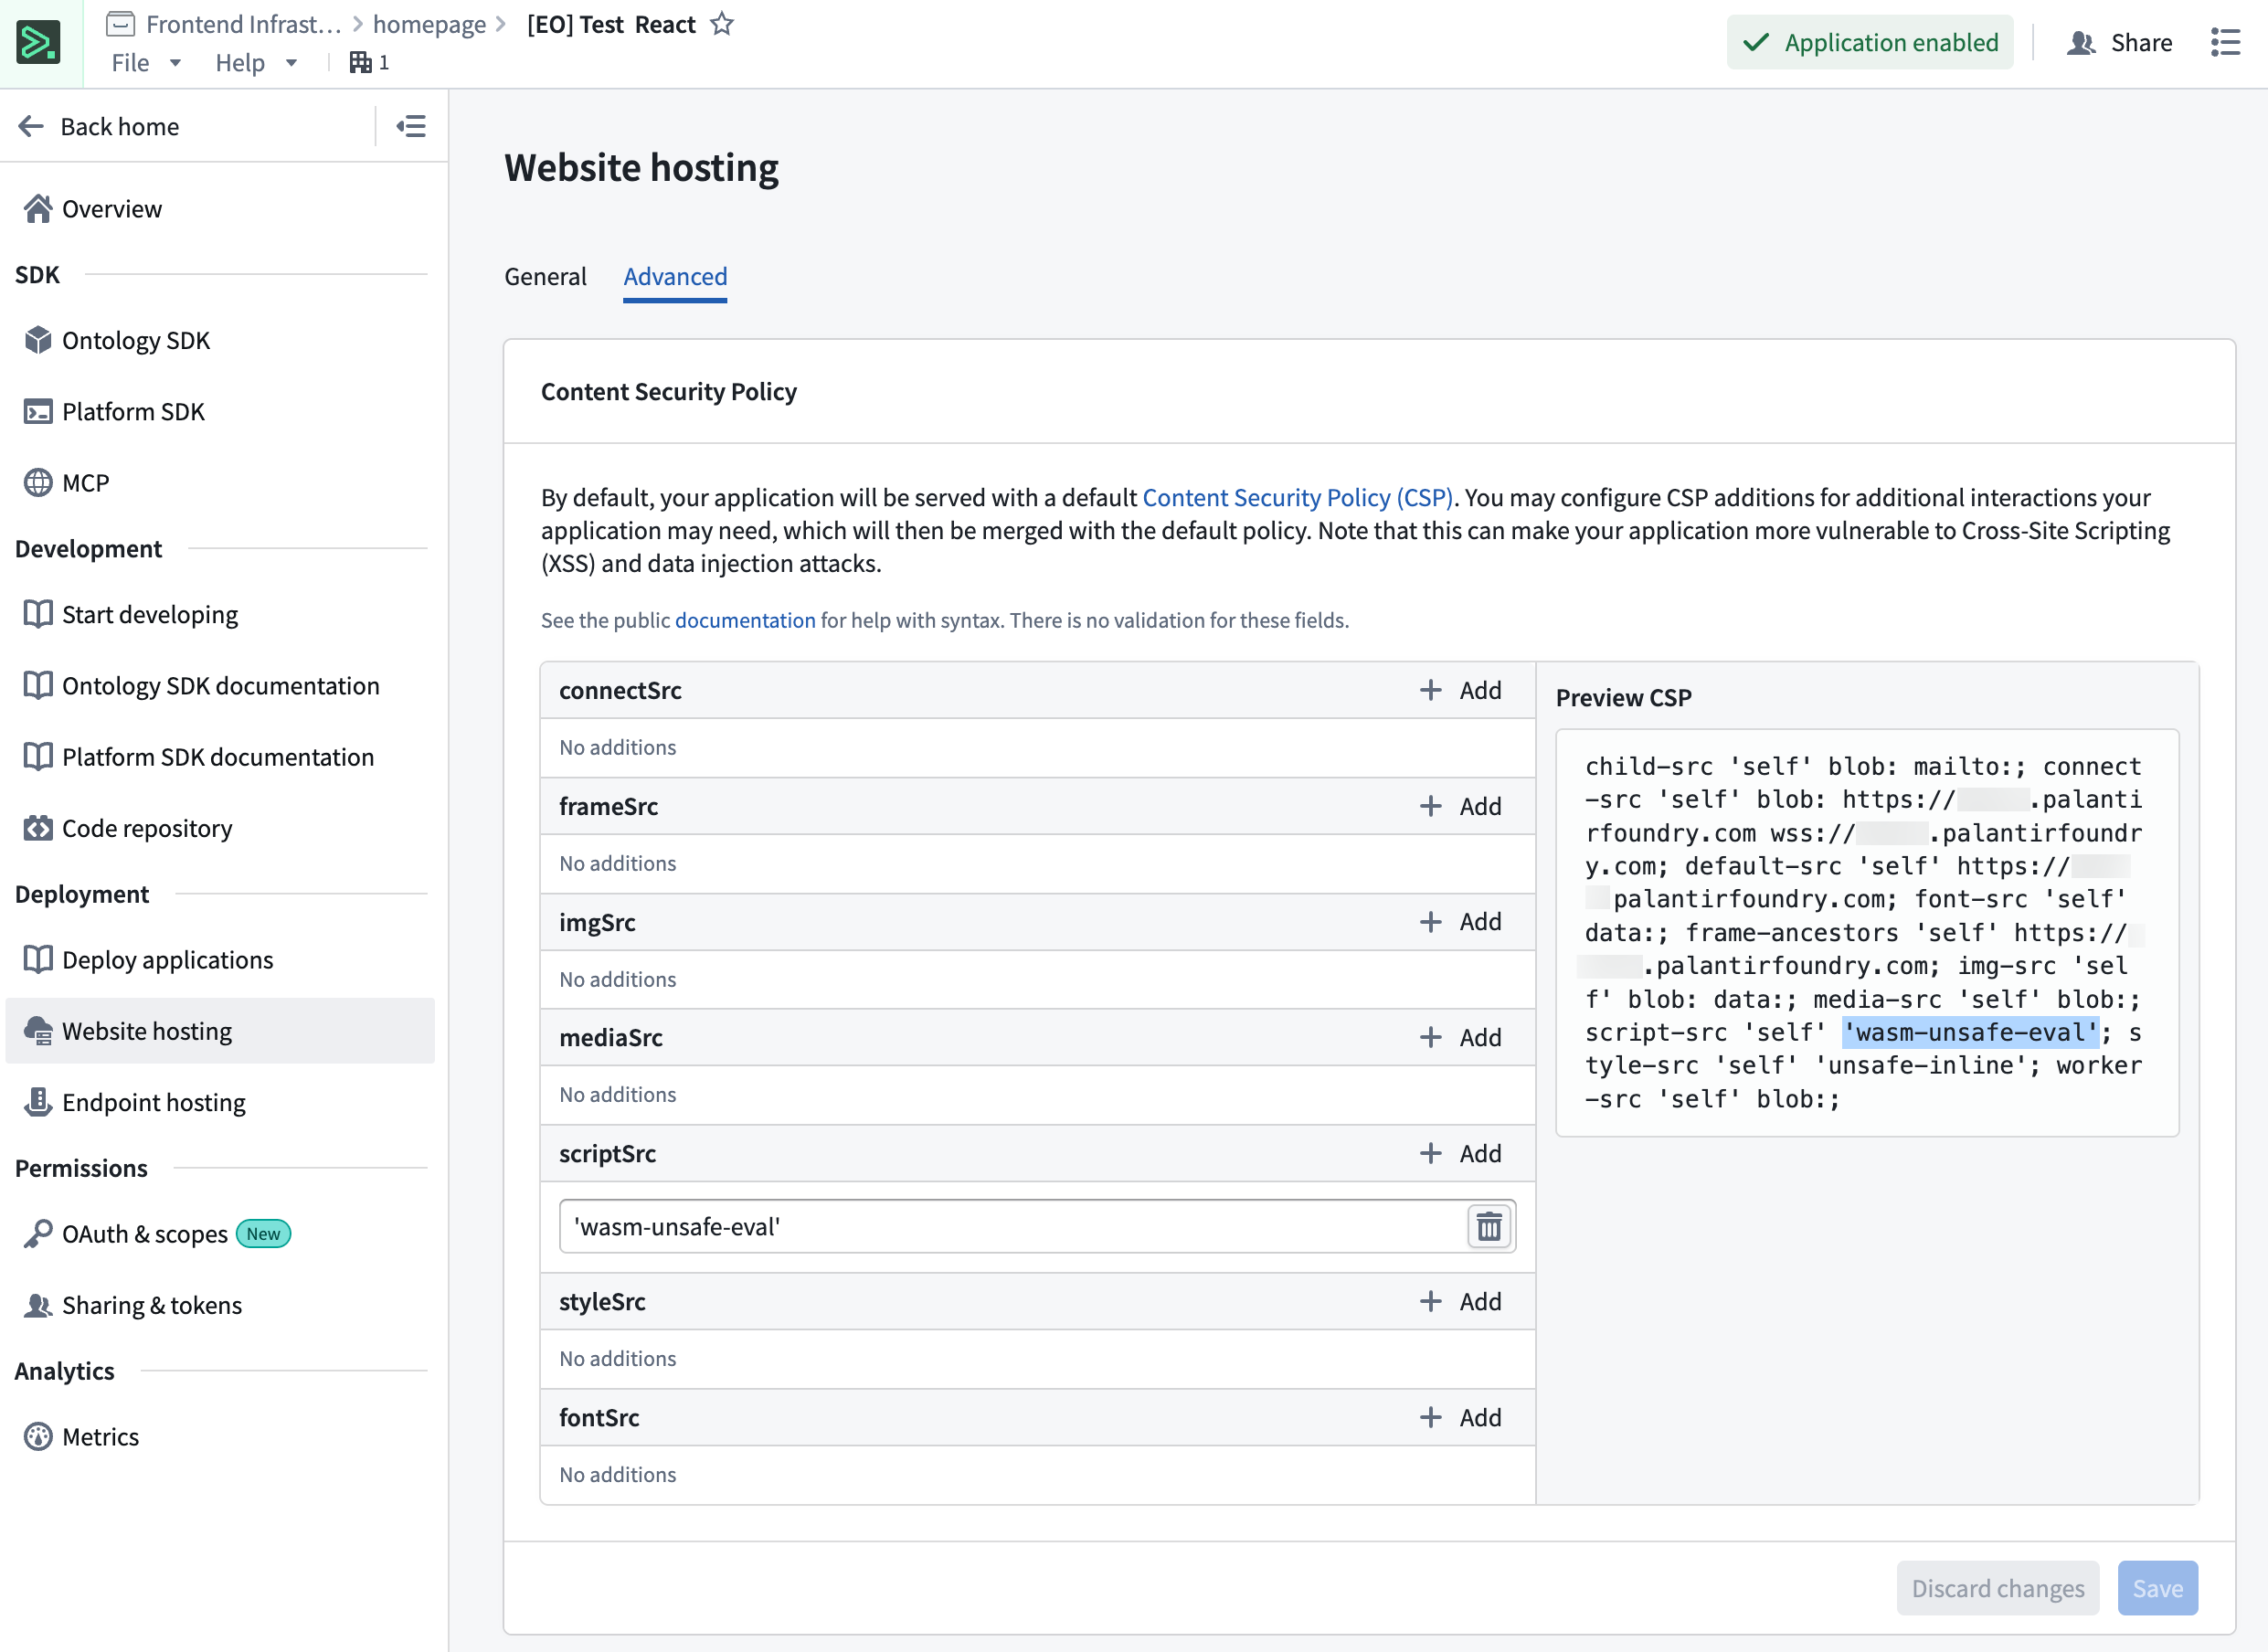
- In Developer Console, navigate to Website Hosting and open the Advanced tab.
- Under the scriptSrc section, add:
'wasm-unsafe-eval', including the single quotes. - Verify that the configuration appears in the preview panel on the right.
:::callout{theme="warning"} Without this CSP configuration, your deployed application will fail to initialize. This must be configured before deploying. :::
2. Bootstrap a repository with the embedded ontology React template
Use the repository bootstrapper to create your repository with the ontology React template.
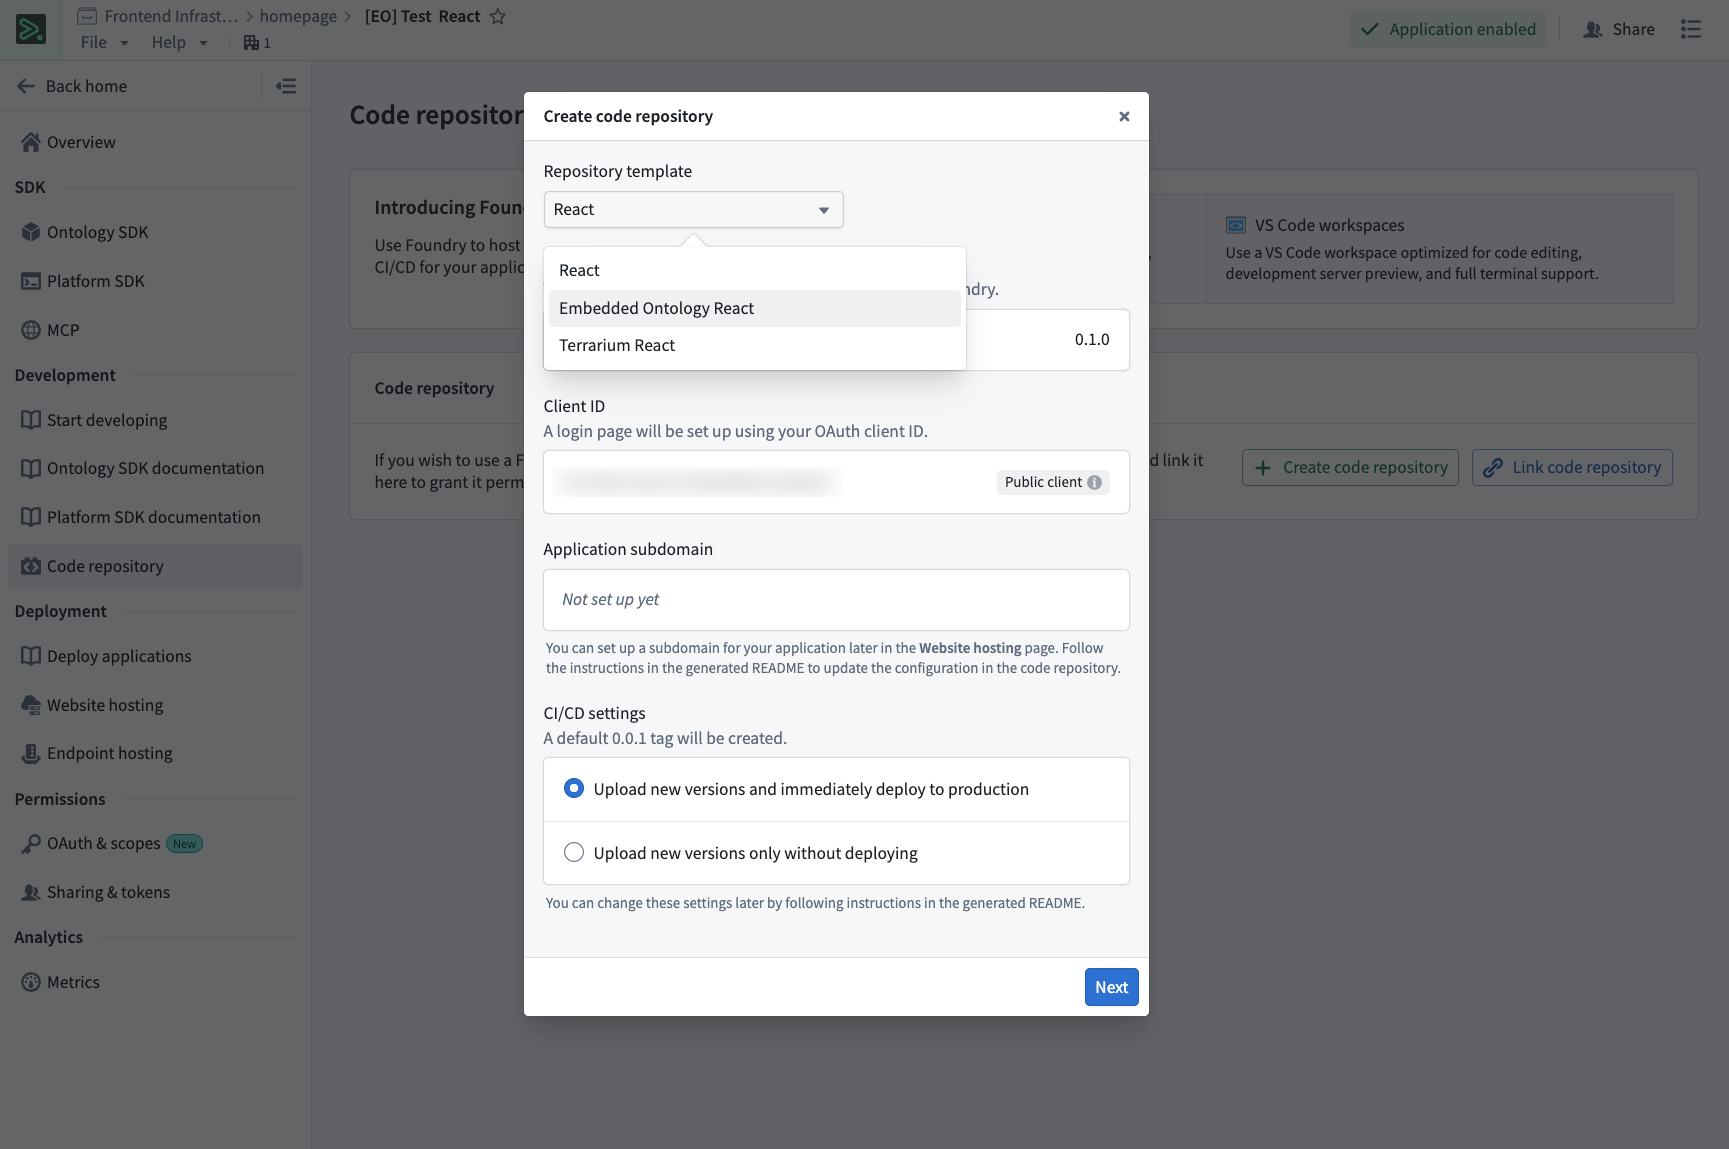
- In Developer Console, navigate to Start developing > Bootstrap in Foundry.
- From the template dropdown, select Embedded Ontology React.
- Select Generate repo.
The template will be configured with the following backing repositories:
osdk-templates-bundle: Provides the embedded ontology (lohi-ts) application template.lohi-asset-bundle: Contains thelohi-tslibrary and dependencies.nodejs-bundle: Node.js runtime for CI/CD.
3. Configure your application
Verify environment configuration
- Open
.env.productionin your repository. - Update
VITE_FOUNDRY_REDIRECT_URLwith your website subdomain, substitutingyour-enrollmentwith your enrollment name.
VITE_FOUNDRY_REDIRECT_URL=https://your-subdomain.your-enrollment.palantirfoundry.com/auth/callback
:::callout{theme="neutral"} Ensure that your Developer Console OAuth configuration includes this redirect URL. :::
Configure objects to be synced
The template comes with a pre-configured client.ts file that uses lohi-ts. You need to specify which ontology objects to sync for offline use.
- Open
src/client.ts. - Import the object types from your generated SDK as shown below:
import { Employee, Task } from "@your-app/sdk";import { type ObjectTypeDefinition } from "@osdk/client";
- Update the
syncObjectsarray with the objects you want available offline:
const syncObjects: ObjectTypeDefinition[] = [Employee, Task];
:::callout{theme="neutral"} Only include the objects that users need offline access to. Syncing too many objects can impact initial load time and storage usage. :::
The template includes a working example in src/components/LohiExample.tsx that demonstrates the sync pattern.
import { SyncState, type Client } from "@palantir/lohi-ts";import { useOsdkClient } from "@osdk/react";
function YourComponent() {
  const client = useOsdkClient() as Client;
  const [syncState, setSyncState] = useState<SyncState | null>(null);

  useEffect(() => {
    (async () => {
      const currentState = await client.syncState();
      setSyncState(currentState);

      if (currentState !== SyncState.Ready) {
        await client.sync();
        setSyncState(await client.syncState());
      }
    })();
  }, [client]);

  *// Your component logic here*
}
For more details on using an embedded ontology in your application, refer to the README.md in your generated repository.
4. Develop your application
With the template configured, you can now develop your application logic offline, or in a VS Code workspace.
- Use the embedded ontology client to query and load objects.
- Apply actions and edits as needed.
- The template handles offline sync automatically.
The template is pre-configured with the following features:
- Preinstalled
@palantir/lohi-tsdependency. - The
lohi-tsVite plugin configured for Wasm optimization. - A client configured with proper error handling.
- Example components showing the correct sync pattern.
5. Deploy your application
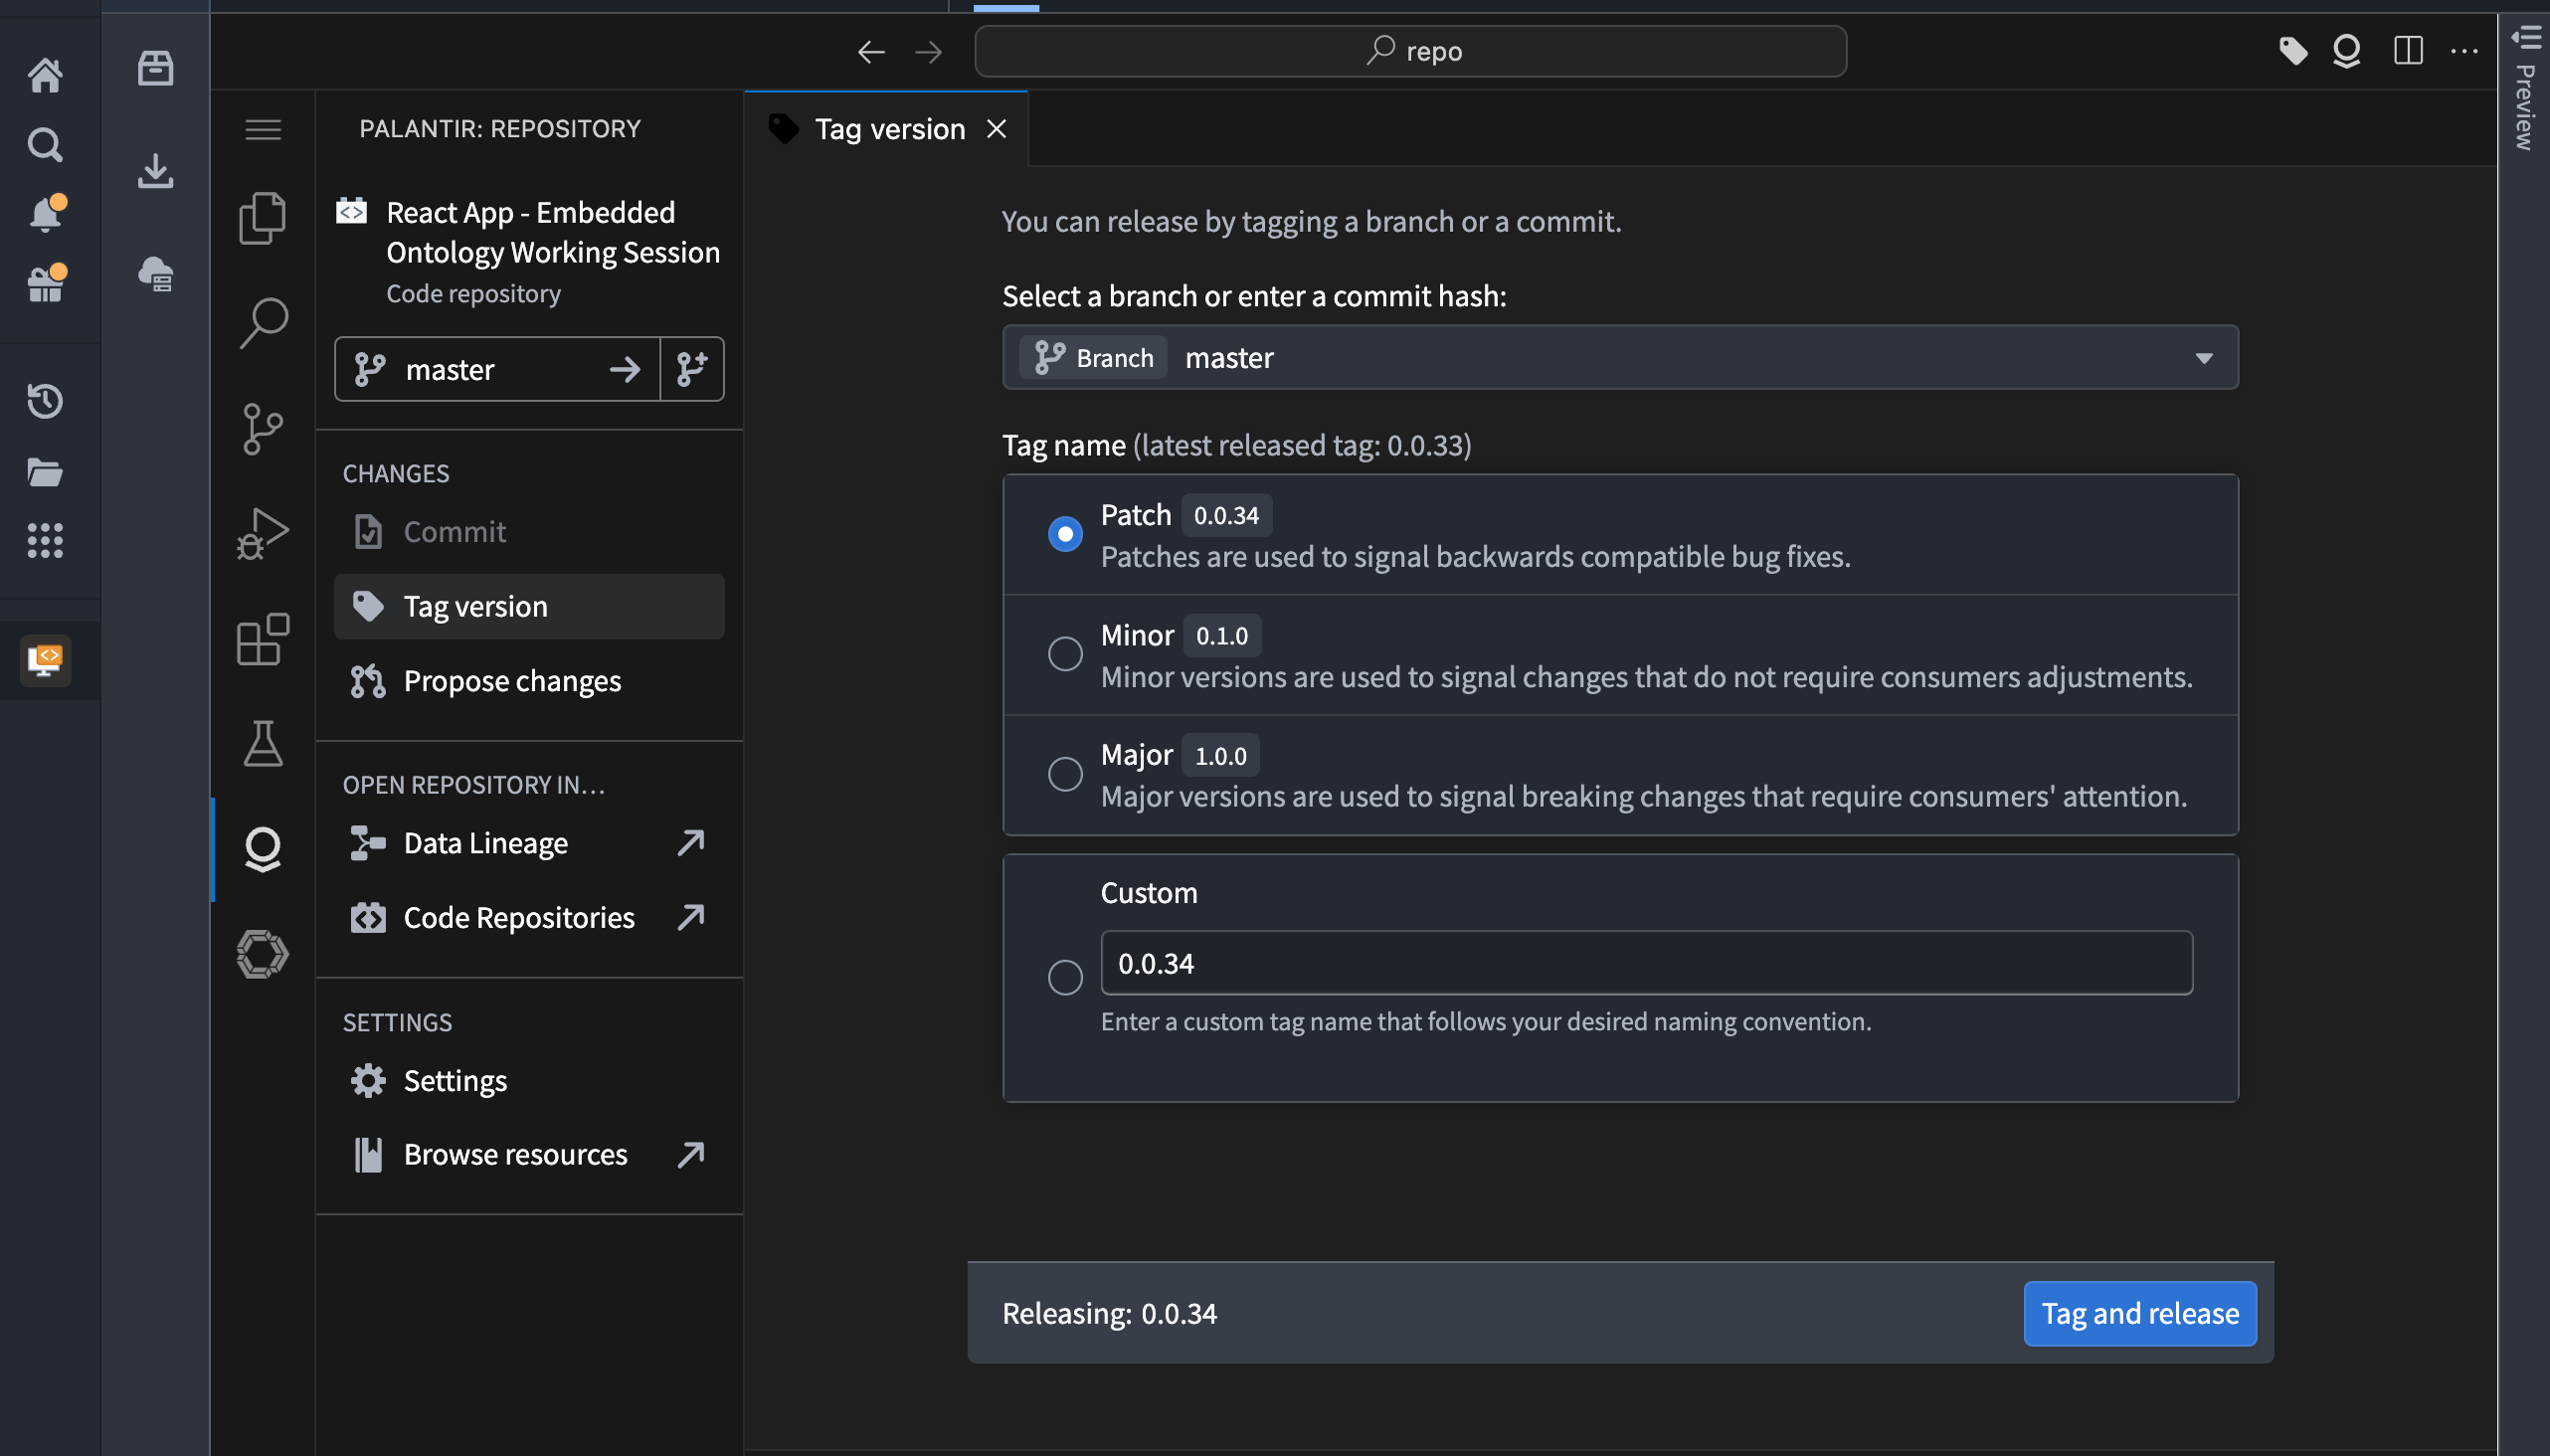
You can use the tag version feature in a Foundry VS Code workspace or code repository to create a version tag for your application’s release.
You can also deploy your application using git tags if you are working offline:
git tag 1.0.0
git push origin tag 1.0.0
Code Repositories will automatically build and deploy your application to the configured subdomain. For more details on deployment options, refer to Deploy a custom application on Foundry.
6. Install as a progressive web app
Once your application is deployed, users can install it as a progressive web app for offline access and a native-like experience.
Install the application
- Navigate to your deployed application in a supported browser. This includes Chrome, Edge, Safari, or other Chromium-based browsers.
-
Look for the Install or Add to Home Screen prompt:
-
Desktop browsers: An install icon typically appears in the address bar as shown below:
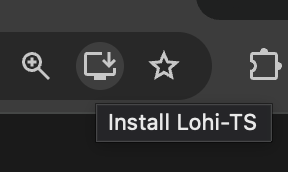
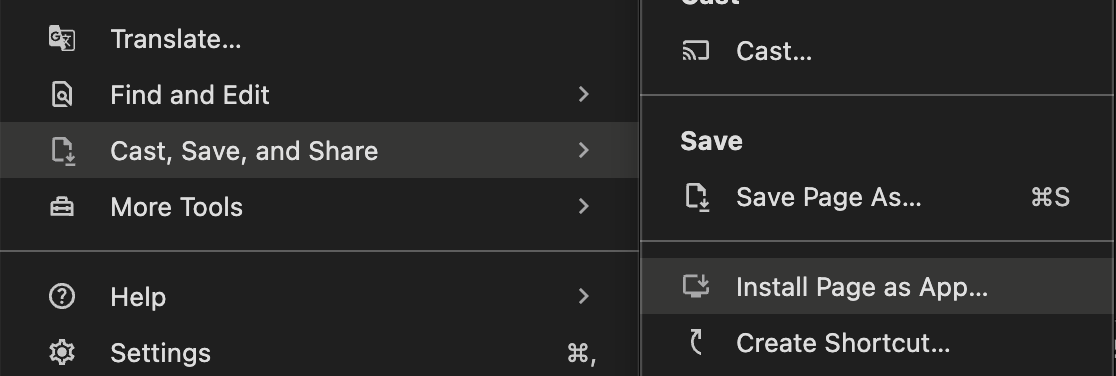
You can also navigate to Cast, Save, and Share > Install Page as App... from the menu button to the right of the address bar.
- Mobile browsers: An Add to Home Screen option appears in the browser menu.
- Select Install and follow the browser's prompts.
- The application will be installed and can be launched from your device like a native application.
Use the application offline
After installation, you can launch the application from your installed apps or home screen. The application will work offline using synced ontology data. When connectivity is restored, the application will automatically sync the latest data. Users can continue working with local data even without network access.
:::callout{theme="neutral"}
Only the ontology objects configured in syncObjects will be available offline. Ensure that you have configured the appropriate objects before users install the application.
:::
Enable peering (optional)
By default, every time the embedded ontology syncs data (via lohi-ts) from remote Foundry, it will load all objects for the configured object types. This can be very slow, depending on the amount of data loading. You can turn on peering mode for your object types, which will only sync diffs from the previous sync and significantly speed up periodic data syncs.
In Ontology Manager, enable Offline App Sync for each configured object type:
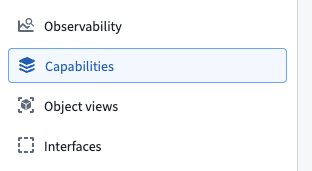
- Navigate to the Capabilities tab.
- Enable Offline App Sync mode.

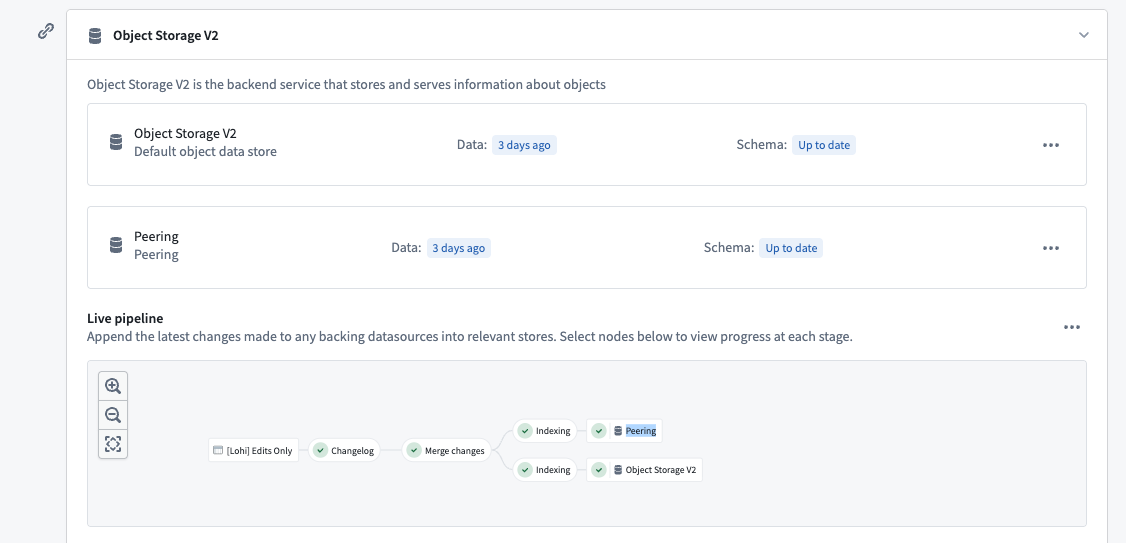
- In the Datasources tab, wait until the Peering objects database successfully indexes your object type. This database is the backend service for the ontology to which you are connected through peering.
Common issues
CORS errors
Ensure that your Foundry enrollment allows CORS for the following:
- Development:
http://localhost:8080 - Production: Your website subdomain
Configure CORS in Control Panel if you have permission, or contact your Foundry administrator.
TypeScript errors on client.sync()
If you see TypeScript errors when calling client.sync() or client.syncState(), ensure that you are casting the client as follows:
const client = useOsdkClient() as Client;
Build failures with dev-dist
If you see build errors related to the dev-dist directory, delete the directory. This directory is automatically generated and is already included in the .gitignore.
Next steps
- Explore the template README for advanced usage patterns.
- Test your application offline by disabling network connectivity.
- Configure additional PWA features like custom icons and splash screens.
- Share your PWA install link with users.
中文翻译
使用嵌入式本体创建支持离线功能的应用程序
嵌入式本体(embedded ontology)使应用程序能够将本体数据同步到本地,让用户无需网络连接即可与数据交互,并可将应用程序安装为渐进式Web应用 ↗(PWA)。本指南将逐步介绍如何使用 @palantir/lohi-ts 库中的嵌入式本体 React 模板创建支持离线功能的 Foundry 应用程序。
前提条件
开始之前,请按照以下步骤完成标准应用程序设置。
- 在开发者控制台中创建客户端应用程序。详细说明请参阅使用开发者控制台创建应用程序。在应用程序类型页面上,选择客户端应用程序。
- 选择您的本体以及要包含的对象类型。
- 为您的应用程序生成 SDK。
- 配置网站托管,包括子域名和重定向 URL。更多信息请参考在 Foundry 上部署自定义应用程序。
1. 在内容安全策略中启用 WebAssembly 执行
为了支持离线功能,您的应用程序将使用 WebAssembly(Wasm)。您必须配置内容安全策略以允许 Wasm 执行。
- 在开发者控制台中,导航至网站托管并打开高级选项卡。
- 在 scriptSrc 部分下,添加:
'wasm-unsafe-eval'(包括单引号)。 - 确认配置显示在右侧的预览面板中。
:::callout{theme="warning"} 如果没有此 CSP 配置,您部署的应用程序将无法初始化。必须在部署之前完成此配置。 :::
2. 使用嵌入式本体 React 模板引导仓库
使用仓库引导工具创建包含本体 React 模板的仓库。
- 在开发者控制台中,导航至开始开发 > 在 Foundry 中引导。
- 从模板下拉菜单中,选择嵌入式本体 React。
- 选择生成仓库。
该模板将配置以下支持仓库:
osdk-templates-bundle:提供嵌入式本体(lohi-ts)应用程序模板。lohi-asset-bundle:包含lohi-ts库及其依赖项。nodejs-bundle:用于 CI/CD 的 Node.js 运行时。
3. 配置您的应用程序
验证环境配置
- 在仓库中打开
.env.production。 - 将
VITE_FOUNDRY_REDIRECT_URL更新为您的网站子域名,将your-enrollment替换为您的注册名称。
VITE_FOUNDRY_REDIRECT_URL=https://your-subdomain.your-enrollment.palantirfoundry.com/auth/callback
:::callout{theme="neutral"} 确保您的开发者控制台 OAuth 配置包含此重定向 URL。 :::
配置要同步的对象
该模板附带一个预配置的 client.ts 文件,该文件使用 lohi-ts。您需要指定哪些本体对象需要同步以供离线使用。
- 打开
src/client.ts。 - 从生成的 SDK 中导入对象类型,如下所示:
import { Employee, Task } from "@your-app/sdk";import { type ObjectTypeDefinition } from "@osdk/client";
- 使用您希望离线可用的对象更新
syncObjects数组:
const syncObjects: ObjectTypeDefinition[] = [Employee, Task];
:::callout{theme="neutral"} 仅包含用户需要离线访问的对象。同步过多对象可能会影响初始加载时间和存储空间使用。 :::
该模板在 src/components/LohiExample.tsx 中包含一个工作示例,演示了同步模式。
import { SyncState, type Client } from "@palantir/lohi-ts";import { useOsdkClient } from "@osdk/react";
function YourComponent() {
  const client = useOsdkClient() as Client;
  const [syncState, setSyncState] = useState<SyncState | null>(null);

  useEffect(() => {
    (async () => {
      const currentState = await client.syncState();
      setSyncState(currentState);

      if (currentState !== SyncState.Ready) {
        await client.sync();
        setSyncState(await client.syncState());
      }
    })();
  }, [client]);

  *// 您的组件逻辑在此处*
}
有关在应用程序中使用嵌入式本体的更多详细信息,请参阅生成的仓库中的 README.md。
4. 开发您的应用程序
配置好模板后,您现在可以在离线环境或 VS Code 工作区中开发应用程序逻辑。
- 使用嵌入式本体客户端查询和加载对象。
- 根据需要应用操作和编辑。
- 模板会自动处理离线同步。
该模板预配置了以下功能:
- 预安装的
@palantir/lohi-ts依赖项。 - 配置了 Wasm 优化的
lohi-tsVite 插件。 - 配置了适当错误处理的客户端。
- 展示正确同步模式的示例组件。
5. 部署您的应用程序
您可以在 Foundry VS Code 工作区或代码仓库中使用标签版本功能为应用程序的发布创建版本标签。
如果您在离线环境中工作,也可以使用 git 标签部署应用程序:
git tag 1.0.0
git push origin tag 1.0.0
代码仓库将自动构建并将您的应用程序部署到配置的子域名。有关部署选项的更多详细信息,请参阅在 Foundry 上部署自定义应用程序。
6. 安装为渐进式Web应用
部署应用程序后,用户可以将其安装为渐进式Web应用,以便离线访问并获得类似原生应用的体验。
安装应用程序
- 在支持的浏览器中导航到已部署的应用程序。支持的浏览器包括 Chrome、Edge、Safari 或其他基于 Chromium 的浏览器。
-
查找安装或添加到主屏幕提示:
-
桌面浏览器: 地址栏中通常会显示安装图标,如下所示:
您也可以从地址栏右侧的菜单按钮导航至投射、保存和共享 > 将页面安装为应用...。
- 移动浏览器: 浏览器菜单中会出现添加到主屏幕选项。
- 选择安装并按照浏览器的提示操作。
- 应用程序将被安装,您可以像原生应用程序一样从设备启动它。
离线使用应用程序
安装后,您可以从已安装的应用或主屏幕启动应用程序。应用程序将使用同步的本体数据离线工作。当网络连接恢复时,应用程序将自动同步最新数据。即使没有网络访问,用户也可以继续使用本地数据。
:::callout{theme="neutral"}
只有在 syncObjects 中配置的本体对象才能离线使用。请确保在用户安装应用程序之前已配置了适当的对象。
:::
启用对等同步(可选)
默认情况下,每次嵌入式本体从远程 Foundry 同步数据(通过 lohi-ts)时,都会加载配置对象类型的所有对象。根据加载的数据量,这可能会非常慢。您可以为对象类型启用对等同步模式(peering mode),该模式仅同步与上次同步的差异,从而显著加快定期数据同步速度。
在本体管理器中,为每个配置的对象类型启用离线应用同步:
- 导航至功能选项卡。
- 启用离线应用同步模式。
- 在数据源选项卡中,等待对等同步对象数据库成功索引您的对象类型。该数据库是通过对等同步连接的本体的后端服务。
常见问题
CORS 错误
确保您的 Foundry 注册允许以下地址的 CORS:
- 开发环境:
http://localhost:8080 - 生产环境: 您的网站子域名
如果您有权限,请在控制面板中配置 CORS,或联系您的 Foundry 管理员。
client.sync() 的 TypeScript 错误
如果在调用 client.sync() 或 client.syncState() 时出现 TypeScript 错误,请确保按如下方式转换客户端:
const client = useOsdkClient() as Client;
dev-dist 导致的构建失败
如果出现与 dev-dist 目录相关的构建错误,请删除该目录。此目录是自动生成的,已包含在 .gitignore 中。
后续步骤
- 探索模板 README 以了解高级使用模式。
- 通过禁用网络连接来测试应用程序的离线功能。
- 配置其他 PWA 功能,如自定义图标和启动画面。
- 与用户分享您的 PWA 安装链接。