Host an OSDK application on Foundry(在 Foundry 上托管 OSDK 应用)
The web hosting feature in Developer Console adds the option for developers building frontend-only applications using the OSDK to host these applications on Foundry, removing the need for additional hosting infrastructure.
The web hosting feature only supports hosting static assets and does not support running a server, similar to GitHub Pages. This means you can host:
- HTML, CSS, and JavaScript files
- Single-page applications (React, Vue, Angular, etc.) that run entirely in the browser
- Images, fonts, and other static resources
You cannot use this feature to run server-side code such as Node.js backends, Python servers, or server-side rendering. Your application must make API calls to Foundry via the OSDK or other external services for any server-side functionality.
:::callout{theme="neutral"} Website hosting is only available for applications configured as a Client-facing application. If your application is also configured as a Backend service, the website hosting option will not appear because this combination creates a confidential client intended for server-side applications. :::
Each hosted website can be served from either a subdomain of your Foundry enrollment domain or a custom domain that you own. By default, you will choose a subdomain and your application will be served from <YOUR-APPLICATION-SUBDOMAIN>.[YOUR-ENROLLMENT].palantirfoundry.com. Alternatively, you can host your application on a custom domain such as [your-organization].com. See Host your website on a custom domain for more details.
:::callout{theme="warning"}
If your Foundry enrollment is not served from a domain ending with .palantirfoundry.com, contact Palantir Support to help set up web hosting as additional coordination is required.
:::
Prepare your application
The following section describes the steps required to host your Developer Console application on Foundry.
Single-page application rendering
If you do not include a custom 404 page in your application, Foundry will assume this is a single-page application ↗ and will route any request to a path under this subdomain to the index.html.
Updating the redirect URL
As part of the authentication flow, you will need to update the redirect URL to include your hosting domain followed by /auth/callback. If you are using an enrollment subdomain, this will be <YOUR-APPLICATION-SUBDOMAIN>.[YOUR-ENROLLMENT].palantirfoundry.com/auth/callback. If you are using a custom domain, this will be <YOUR-CUSTOM-DOMAIN>/auth/callback.
You must also add the same redirect URL to your application in Developer Console. Review create a new OSDK for more information.
Prepare the asset
Compress the content of the directory containing a production build of your website files. Do not include the directory itself. The directory is typically dist/ for common web frameworks.
If you include any directories in your compressed file, these directories will be included in the path to your website.
Set up the domain
From within your application on Developer Console, choose Website hosting on the left side menu.
Host your website on a subdomain
To host your website on a subdomain of your enrollment's domain, follow the steps below.
-
Select the subdomain for your application; this may be the application name or any other name you choose. Then, select Request application domain. In the example below, we are selecting
my-first-hosted-app.example.palantirfoundry.com:
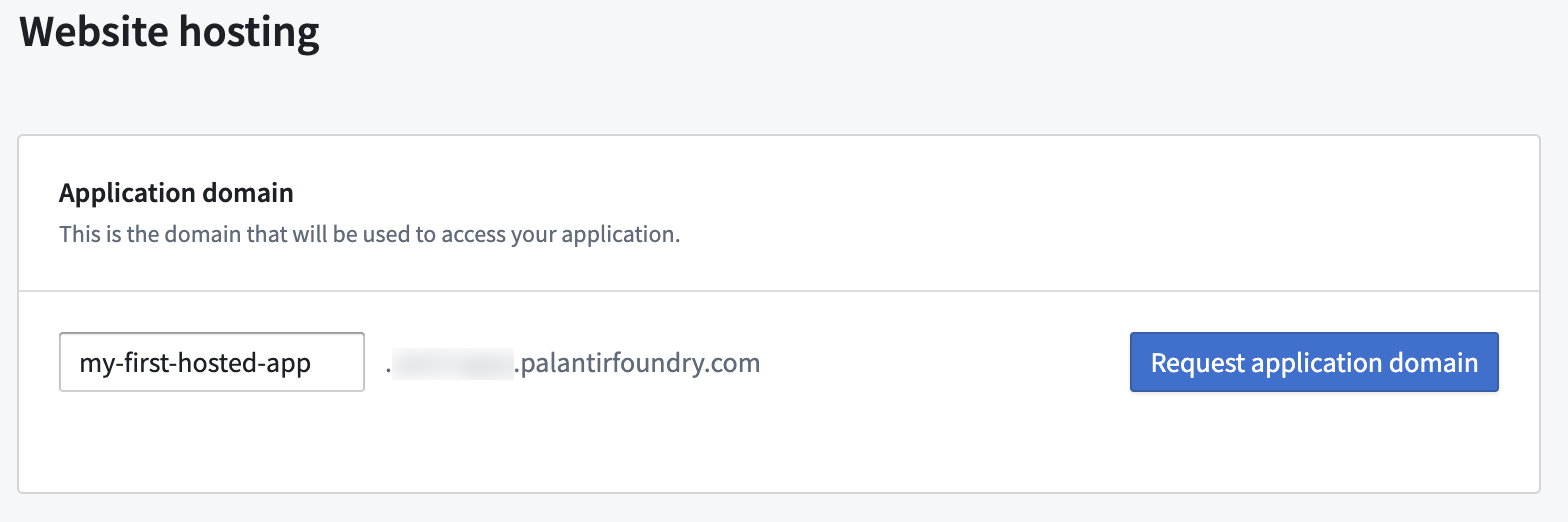
-
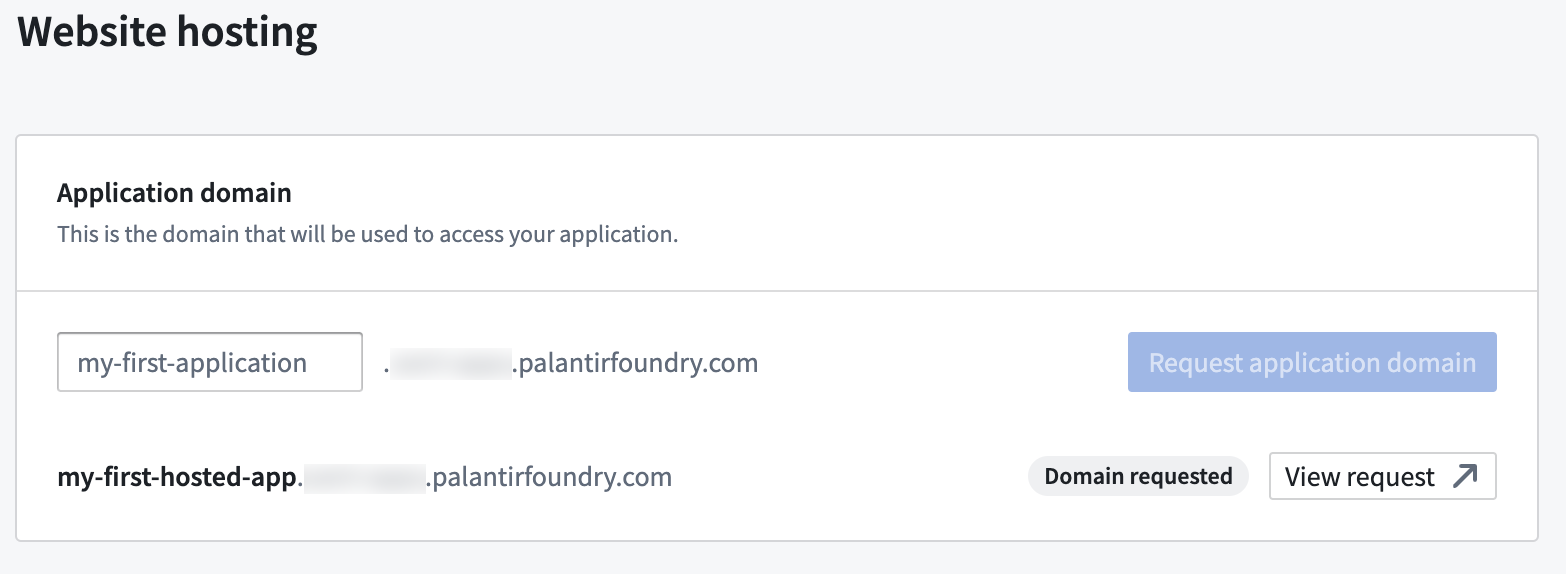
Request approval from an Information Security Officer in your enrollment, or approve it yourself if you have the necessary permissions by selecting View request. An enrollment administrator can manage enrollment permissions in Control Panel.
-
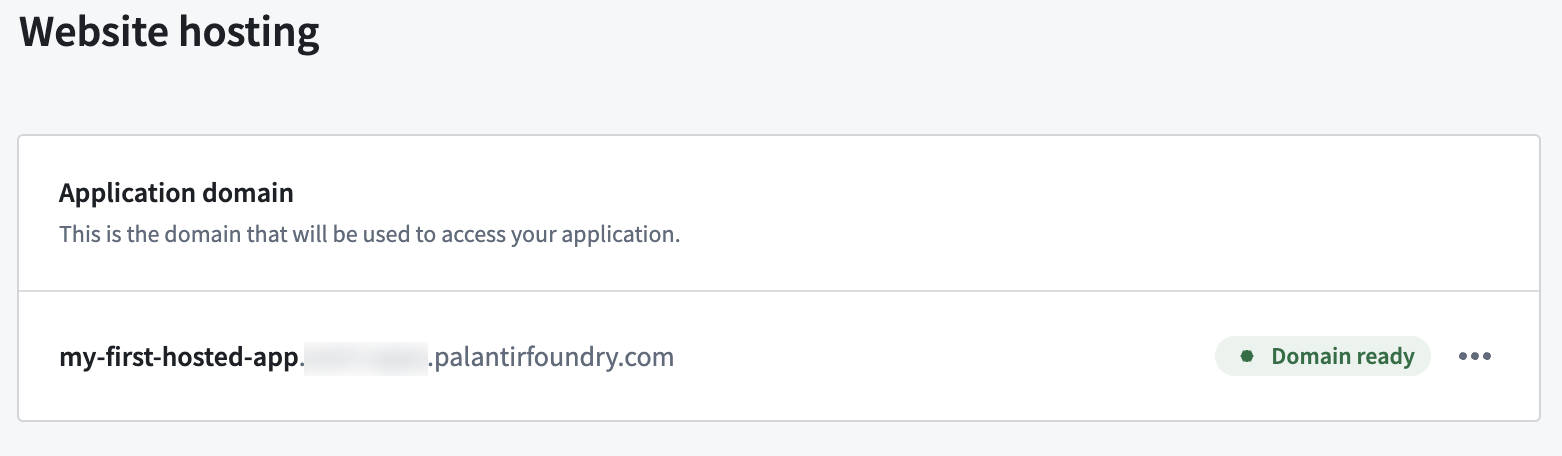
After the request is approved, refresh the page. At this point, Domain ready should now appear, indicating the domain is prepared for use. This may take a few minutes to complete.
Host your website on a custom domain
Instead of using an enrollment subdomain, you can host your application on a custom domain that you own, such as [your-organization].com. This is useful when you want your application to be accessible from a branded or public-facing domain.
:::callout{theme="neutral"} Custom domain hosting may not be available on all enrollments. If the option does not appear in your Developer Console application, contact your Palantir representative for assistance. :::
Prerequisites
Before requesting a custom domain for your application, ensure that a certificate covering your domain has been created in Control Panel. If no certificate exists for the domain, the approval request will not succeed. See Configure domains and certificates for instructions on creating certificates.
Request a custom domain
From within your application on Developer Console, choose Website hosting on the left side menu.
-
Select Request to host on a custom domain. This option appears below the enrollment subdomain registration form.
-
In the dialog that appears, enter your custom domain (for example,
[your-organization].com), a request title, and an optional description. Then select Request.
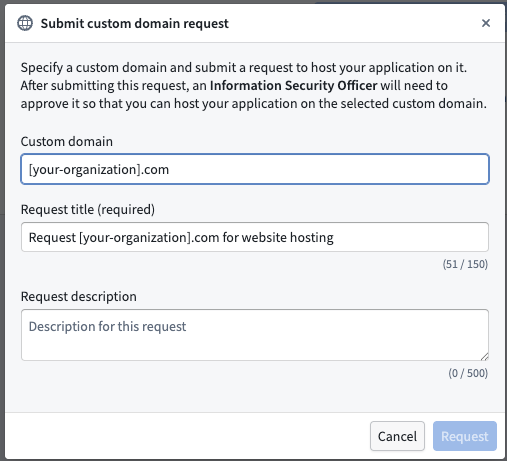
-
This creates an approval task that must be approved by an Information Security Officer in your enrollment. You can select View in the success notification to navigate to the approval request in Control Panel.
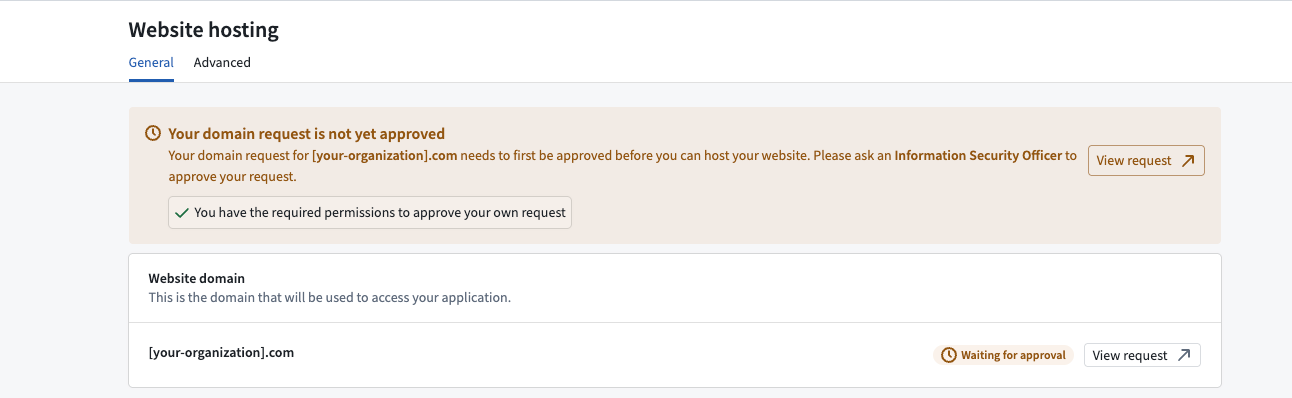
-
After the request is approved, the custom domain is associated with your application. You may need to refresh the page for the updated status to appear. Note that the domain you used to log into Foundry will be associated with the custom domain you have configured. In other words, network ingress and authentication provider configuration will be inherited from this domain.

:::callout{theme="warning"} You must also update the DNS settings for your custom domain to point to your Foundry environment. See Configure domains and certificates for guidance on updating DNS records. :::
Upload your assets and deploy
As a developer, you can choose between uploading assets manually using the Developer Console website hosting user interface or by using the @osdk/cli command line tool.
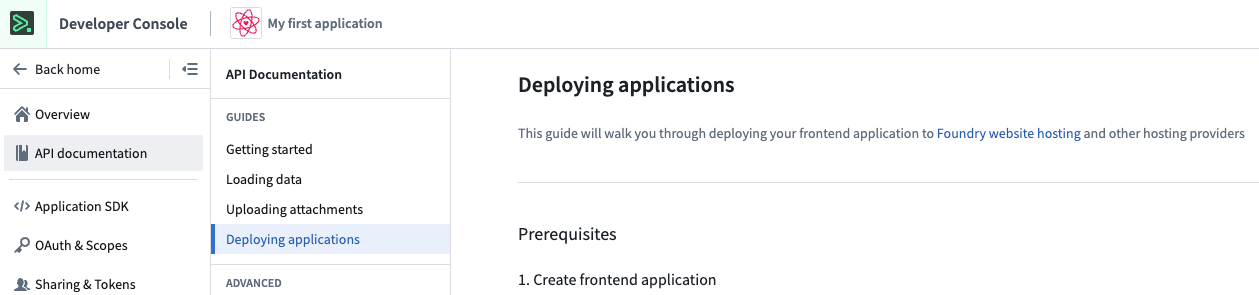
- To learn how to upload using the Developer Console user interface, follow the guide below.
- To learn how to upload assets using the command line interface, follow the Deploying applications guide in the platform, as shown in the screenshot below. You can find more details on the
@osdk/clicommand line tool in the public npm repository ↗.
Upload assets using the Developer Console
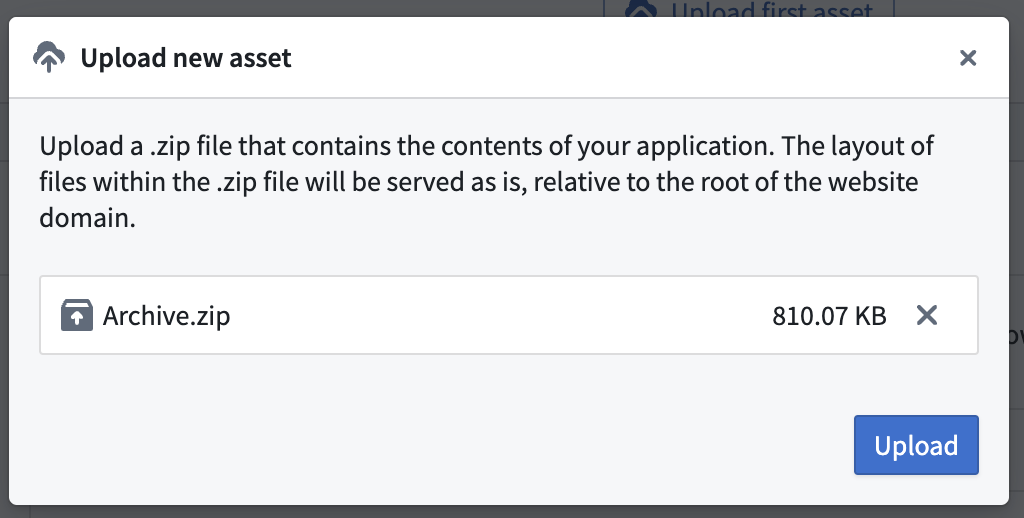
In the following step, we take the compressed asset created earlier and upload it to Foundry.
-
Select Upload new asset in the Assets section on the page.
-
Drop your zip archive file here, or choose from your computer and select Upload.
-
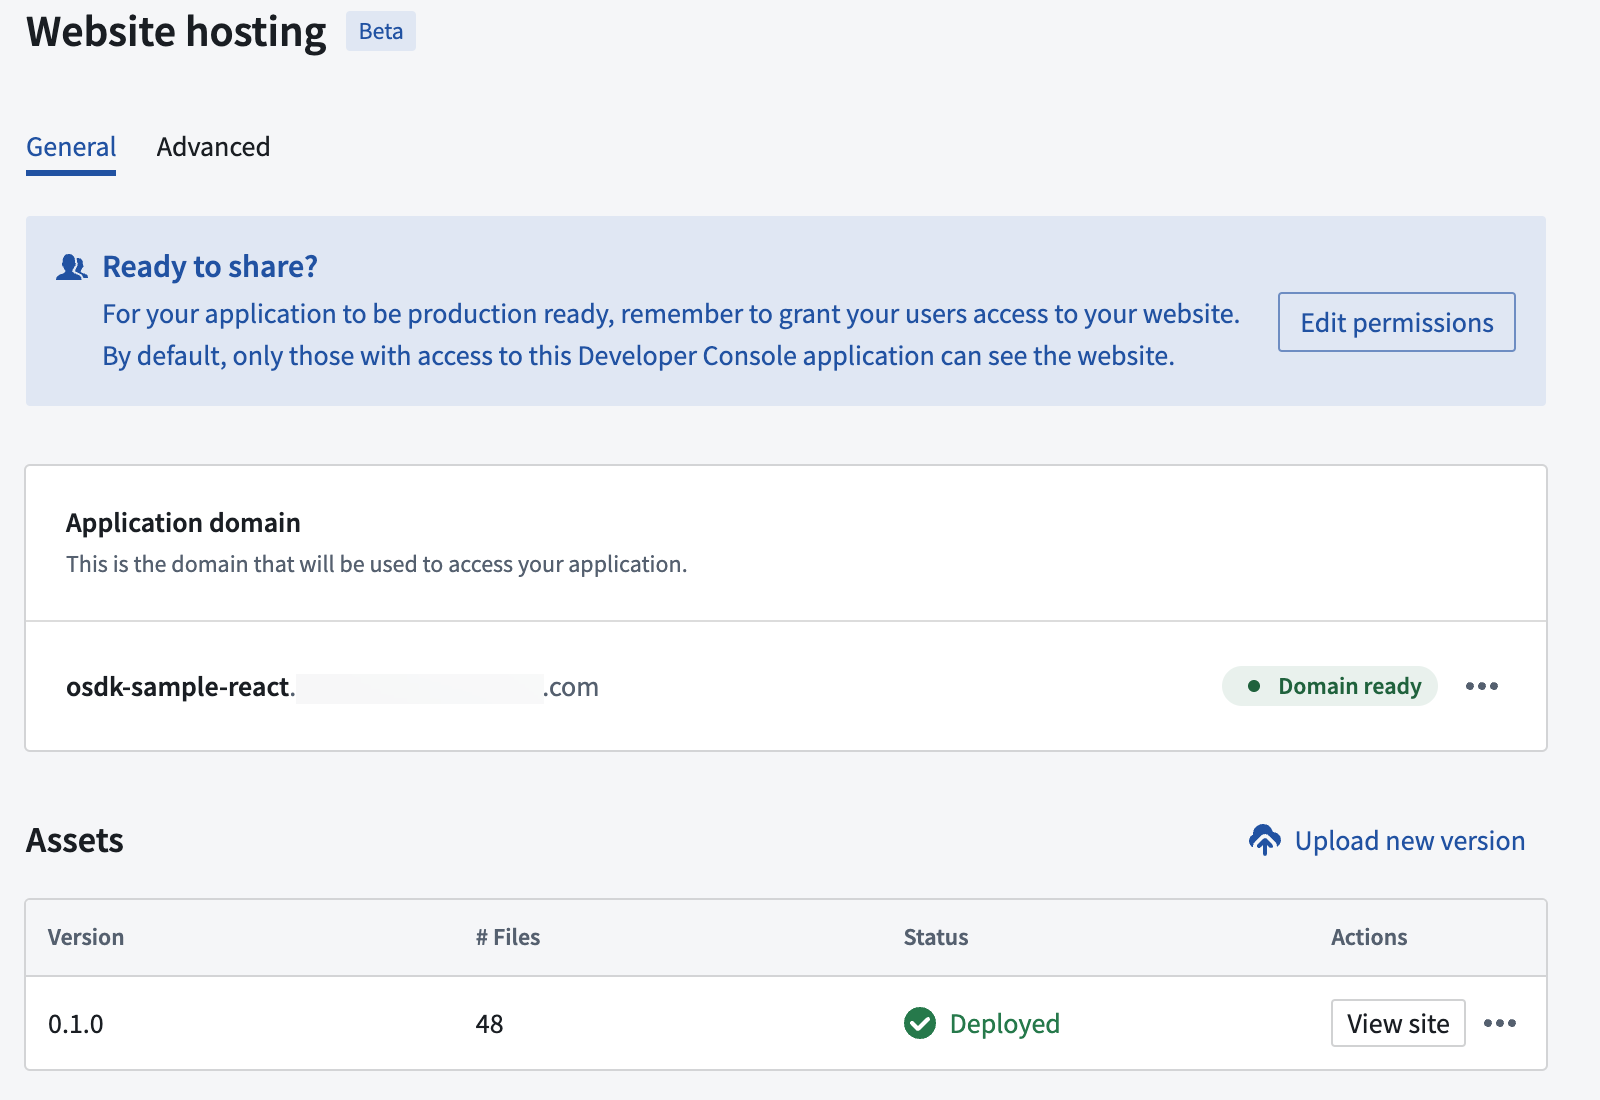
Once the upload is complete, use Preview to preview your site before deploying to production or use the ... option to Deploy to production, as shown below.
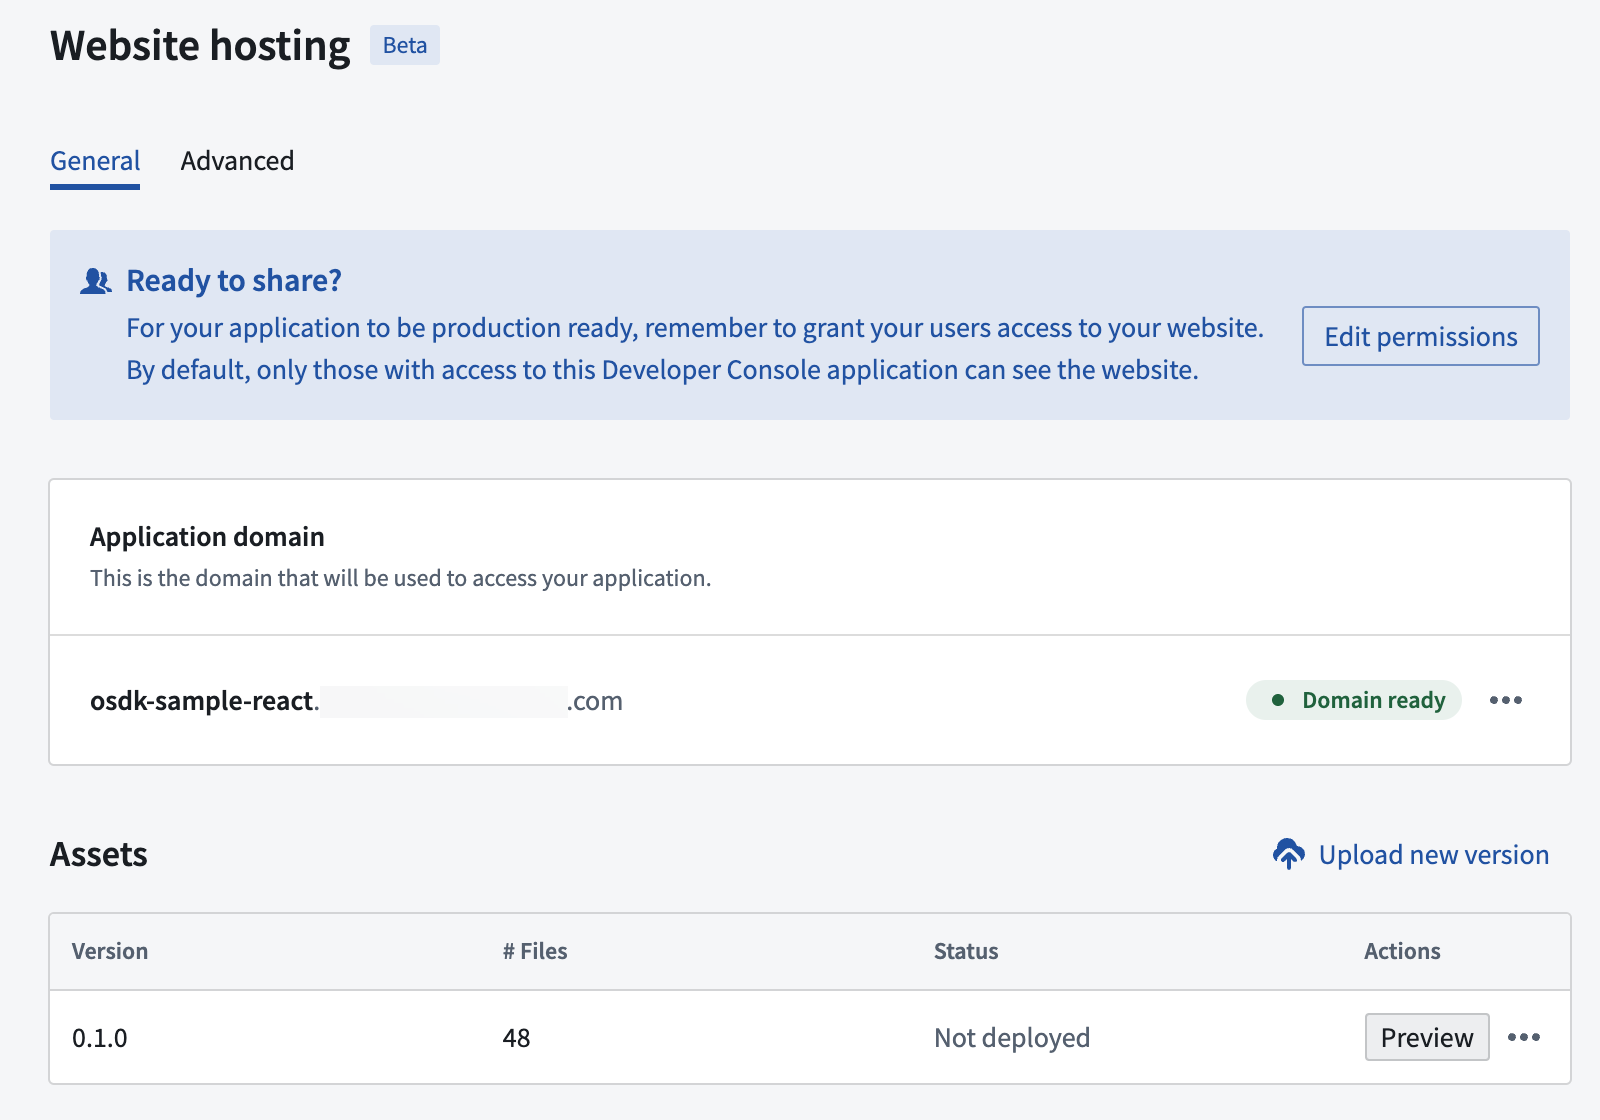
Once you select Deploy to production, that version will serve all users. We recommend to first Preview site.
- Now, select View site to visit the deployed site.
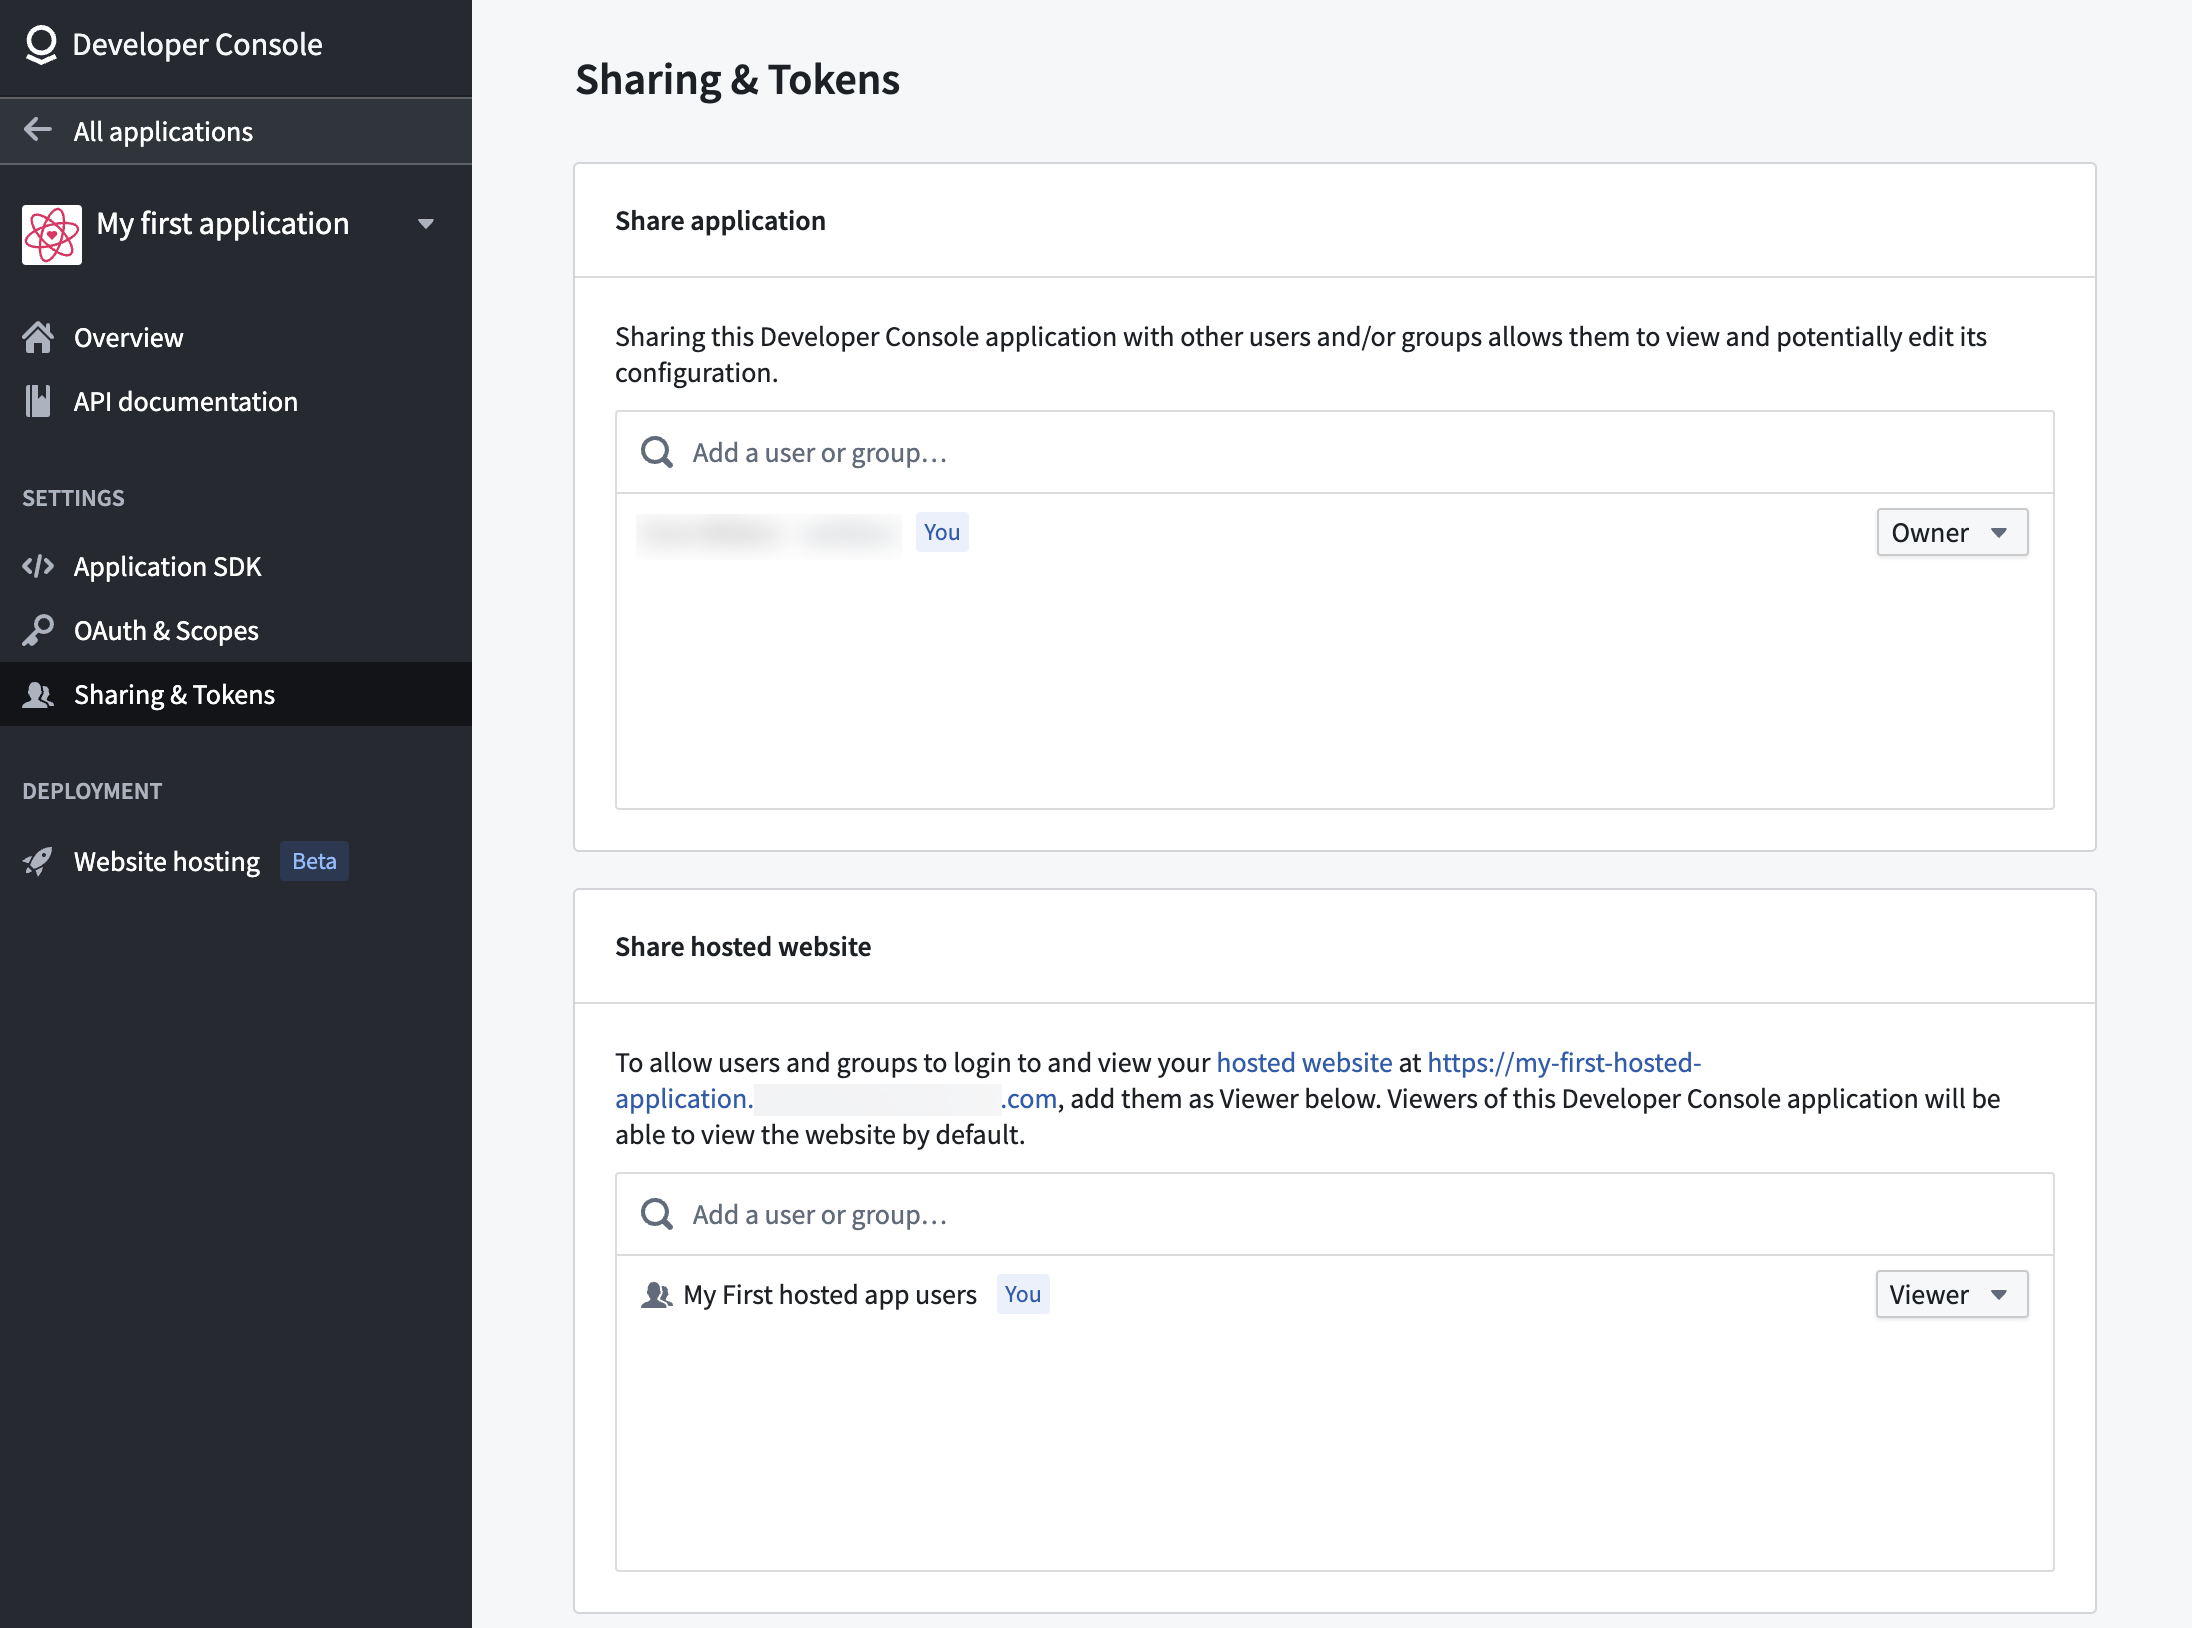
Grant website access
Websites hosted by Foundry will only be available for users with Foundry login credentials. By default, any user that has access to your Developer Console application will also have access to the deployed site, but this is likely to include only you and your development team. To make your site accessible to other Foundry users, navigate to the Sharing & Tokens menu to the left. Add the names of the users under the Share hosted website section of the page, as shown below.
Advanced configuration
You can find additional configuration options in the Advanced tab of the Website hosting page.
Content security policy
By default, your application will be served with a restricted Content Security Policy (CSP) ↗ which only allows for loading resources from your subdomain. If needed, you can configure additional CSP rules for specific interactions within your application and they will be merged with the default policy. However, be aware that making these changes can increase your application's vulnerability to Cross-Site Scripting (XSS) and data injection attacks.
From within the Content Security Policy section, shown in the image below, you can control the CSP for your application. Updating the CSP is crucial when retrieving images or content hosted elsewhere and when making calls to external services.
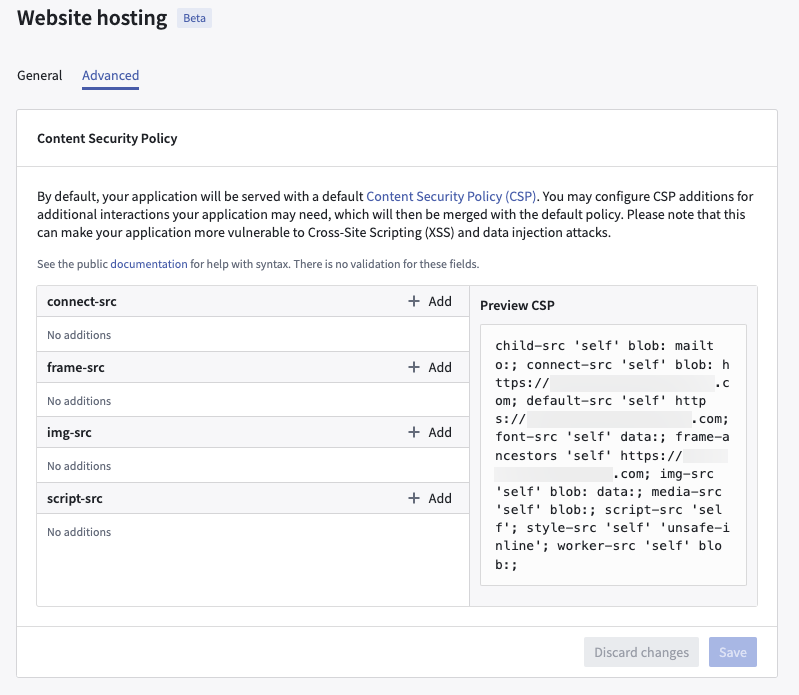
See Mozilla's documentation ↗ for help with syntax. There is no validation for these fields.
Route matching rules
Foundry supports serving HTML pages on routes both with and without extensions and trailing slashes.
Given the following layout of website files:
├── file.html
├── folder
│   └── index.html
├── both.html
└── both
    └── index.html
Foundry serves these HTML pages on the following routes:
| Route | File |
|---|---|
| /file | /file.html |
| /file/ | /file.html |
| /file.html | /file.html |
| /folder | /folder/index.html |
| /folder/ | /folder/index.html |
| /folder/index.html | /folder/index.html |
| /both | /both.html |
| /both.html | /both.html |
| /both/ | /both/index.html |
| /both/index.html | /both/index.html |
Foundry does not redirect to a preferred route format such as enforcing trailing slashes or removing extensions from the route.
Custom 404 page
You can add a 404.html page to the root of the website to serve as a custom error page when routes are not matched. This will disable the default behavior to serve the root index.html page for unmatched routes described in single-page application (SPA) rendering.
中文翻译
在 Foundry 上托管 OSDK 应用
开发者控制台(Developer Console)中的网站托管功能为使用 OSDK 构建纯前端应用的开发者提供了在 Foundry 上托管这些应用的选项,无需额外的基础设施支持。
网站托管功能仅支持托管静态资源,不支持运行服务器,类似于 GitHub Pages。这意味着您可以托管:
- HTML、CSS 和 JavaScript 文件
- 完全在浏览器中运行的单页应用(React、Vue、Angular 等)
- 图片、字体及其他静态资源
您不能使用此功能运行服务器端代码,例如 Node.js 后端、Python 服务器或服务器端渲染。您的应用必须通过 OSDK 或其他外部服务向 Foundry 发起 API 调用,以实现任何服务器端功能。
:::callout{theme="neutral"} 网站托管仅适用于配置为面向客户的应用(Client-facing application)的应用。如果您的应用同时配置为后端服务(Backend service),则网站托管选项将不会出现,因为这种组合会创建一个用于服务器端应用的机密客户端(confidential client)。 :::
每个托管的网站可以从您 Foundry 注册域的子域或您拥有的自定义域提供服务。默认情况下,您需要选择一个子域,您的应用将通过 <YOUR-APPLICATION-SUBDOMAIN>.[YOUR-ENROLLMENT].palantirfoundry.com 提供服务。或者,您也可以在自定义域上托管您的应用,例如 [your-organization].com。更多详情请参阅在自定义域上托管您的网站。
:::callout{theme="warning"}
如果您的 Foundry 注册域不是以 .palantirfoundry.com 结尾,请联系 Palantir 支持以协助设置网站托管,因为需要额外的协调工作。
:::
准备您的应用
以下部分描述了在 Foundry 上托管您的开发者控制台应用所需的步骤。
单页应用渲染
如果您在应用中未包含自定义 404 页面,Foundry 将假定这是一个单页应用 ↗,并将对该子域下任何路径的请求路由到 index.html。
更新重定向 URL
作为身份验证流程的一部分,您需要更新重定向 URL,使其包含您的托管域名后跟 /auth/callback。如果您使用的是注册子域,则重定向 URL 为 <YOUR-APPLICATION-SUBDOMAIN>.[YOUR-ENROLLMENT].palantirfoundry.com/auth/callback。如果您使用的是自定义域,则重定向 URL 为 <YOUR-CUSTOM-DOMAIN>/auth/callback。
您还必须在开发者控制台中将相同的重定向 URL 添加到您的应用中。更多信息请参阅创建新的 OSDK。
准备资源文件
压缩包含您网站文件生产构建版本的目录内容。不要包含目录本身。对于常见的 Web 框架,该目录通常是 dist/。
如果您在压缩文件中包含任何目录,这些目录将包含在您网站的路径中。
设置域名
在开发者控制台的应用中,从左侧菜单中选择网站托管(Website hosting)。
在子域上托管您的网站
要在您注册域的子域上托管您的网站,请按照以下步骤操作。
-
为您的应用选择子域;这可以是应用名称或您选择的任何其他名称。然后,选择请求应用域(Request application domain)。在下面的示例中,我们选择了
my-first-hosted-app.example.palantirfoundry.com:
-
请求您注册域中的信息安全官(Information Security Officer)批准,或者如果您拥有必要权限,通过选择查看请求(View request)自行批准。注册管理员可以在控制面板(Control Panel)中管理注册权限。
-
请求批准后,刷新页面。此时应显示域名就绪(Domain ready),表示该域名已准备好使用。此过程可能需要几分钟才能完成。
在自定义域上托管您的网站
您可以使用您拥有的自定义域(例如 [your-organization].com)来托管您的应用,而不是使用注册子域。当您希望应用通过品牌化或面向公众的域名可访问时,这非常有用。
:::callout{theme="neutral"} 自定义域托管可能并非在所有注册域中都可用。如果该选项未出现在您的开发者控制台应用中,请联系您的 Palantir 代表寻求帮助。 :::
前提条件
在请求为您的应用使用自定义域之前,请确保已在控制面板中创建了涵盖该域的证书。如果该域不存在证书,则批准请求将不会成功。有关创建证书的说明,请参阅配置域和证书。
请求自定义域
在开发者控制台的应用中,从左侧菜单中选择网站托管(Website hosting)。
-
选择请求在自定义域上托管(Request to host on a custom domain)。此选项出现在注册子域注册表单下方。
-
在出现的对话框中,输入您的自定义域(例如
[your-organization].com)、请求标题以及可选的描述。然后选择请求(Request)。
-
这将创建一个审批任务,需要由您注册域中的信息安全官(Information Security Officer)批准。您可以在成功通知中选择查看(View),以导航到控制面板中的审批请求。
-
请求批准后,自定义域将与您的应用关联。您可能需要刷新页面才能看到更新后的状态。请注意,您用于登录 Foundry 的域将与您配置的自定义域关联。换句话说,网络入口和身份验证提供程序配置将从该域继承。
:::callout{theme="warning"} 您还必须更新自定义域的 DNS 设置,使其指向您的 Foundry 环境。有关更新 DNS 记录的指导,请参阅配置域和证书。 :::
上传资源并部署
作为开发者,您可以选择使用开发者控制台网站托管用户界面手动上传资源,或使用 @osdk/cli 命令行工具进行上传。
- 要了解如何使用开发者控制台用户界面上传,请按照下面的指南操作。
- 要了解如何使用命令行界面上传资源,请按照平台中的部署应用(Deploying applications)指南操作,如下方截图所示。您可以在公共 npm 仓库 ↗中找到有关
@osdk/cli命令行工具的更多详细信息。
使用开发者控制台上传资源
在以下步骤中,我们将获取之前创建的压缩资源并将其上传到 Foundry。
-
在页面上的资源(Assets)部分选择上传新资源(Upload new asset)。
-
将您的 zip 存档文件拖放到此处,或从您的计算机中选择文件,然后选择上传(Upload)。
-
上传完成后,使用预览(Preview)在部署到生产环境之前预览您的站点,或使用...选项部署到生产环境(Deploy to production),如下所示。
一旦您选择部署到生产环境(Deploy to production),该版本将为所有用户提供服务。我们建议先预览站点(Preview site)。
- 现在,选择查看站点(View site)以访问已部署的站点。
授予网站访问权限
由 Foundry 托管的网站仅对拥有 Foundry 登录凭据的用户可用。默认情况下,任何有权访问您的开发者控制台应用的用户也将有权访问已部署的站点,但这可能只包括您和您的开发团队。 要使您的站点对其他 Foundry 用户可访问,请导航到左侧的共享与令牌(Sharing & Tokens)菜单。在页面的共享托管网站(Share hosted website)部分添加用户名称,如下所示。
高级配置
您可以在网站托管(Website hosting)页面的高级(Advanced)选项卡中找到其他配置选项。
内容安全策略
默认情况下,您的应用将使用受限的内容安全策略(CSP) ↗提供服务,该策略仅允许从您的子域加载资源。如果需要,您可以为应用中的特定交互配置额外的 CSP 规则,这些规则将与默认策略合并。但请注意,进行这些更改可能会增加您的应用遭受跨站脚本攻击(XSS)和数据注入攻击的脆弱性。
在内容安全策略(Content Security Policy)部分(如下图所示),您可以控制应用的 CSP。当检索托管在其他地方的图片或内容以及调用外部服务时,更新 CSP 至关重要。
有关语法帮助,请参阅 Mozilla 的文档 ↗。这些字段没有验证。
路由匹配规则
Foundry 支持在带和不带扩展名及尾部斜杠的路由上提供 HTML 页面服务。
给定以下网站文件布局:
├── file.html
├── folder
│   └── index.html
├── both.html
└── both
    └── index.html
Foundry 在以下路由上提供这些 HTML 页面服务:
| 路由 | 文件 |
|---|---|
| /file | /file.html |
| /file/ | /file.html |
| /file.html | /file.html |
| /folder | /folder/index.html |
| /folder/ | /folder/index.html |
| /folder/index.html | /folder/index.html |
| /both | /both.html |
| /both.html | /both.html |
| /both/ | /both/index.html |
| /both/index.html | /both/index.html |
Foundry 不会重定向到首选的路由格式,例如强制使用尾部斜杠或从路由中移除扩展名。
自定义 404 页面
您可以在网站的根目录添加一个 404.html 页面,当路由不匹配时,该页面将作为自定义错误页面提供服务。这将禁用单页应用(SPA)渲染中描述的为不匹配路由提供根 index.html 页面的默认行为。