Use DevOps for release management(使用 DevOps 进行发布管理)
This guide outlines the steps to set up a release management process using DevOps, Marketplace, and spaces. Assuming you have already established a workflow in your development environment, these instructions below aim to guide you through the process of setting up additional environments and deploying your existing workflow into these new settings.
:::callout{theme="neutral"} Using DevOps and Marketplace, as outlined below, is one way to implement a release management process. There are other ways to do this in the Palantir platform, such as using Global Branching. :::
1. Set up environments using spaces
Use spaces in the Palantir platform for environments. Create one space per environment that you need. For example, you can create Development, Test, and Production spaces. All resources and projects in the Palantir platform exist within a space, so the current space that your resources are in can be used as your Development space. If you would like to use that current space as your Development space, you only need to create additional Test and Production spaces.
Refer to documentation on spaces to learn how to create and configure spaces.
Multiple workflows can exist within a space, and resources can be shared across them.
If the ability to create a space is disabled on your enrollment, contact Palantir Support to create a new space.
Environments can be managed from the DevOps application and are configured across the enrollment and affect all stores. You can configure environment settings by navigating to the Settings option for the table, followed by Configure environments.
From the Environments settings, users can add suggested environments, spaces that contain installations for the given store, or select another space. You can also re-order the list of environments to determine how they are displayed on this page. Users can only edit, add, or remove environments for the spaces the user holds owner access to, and the spaces must only be associated with one enrollment.

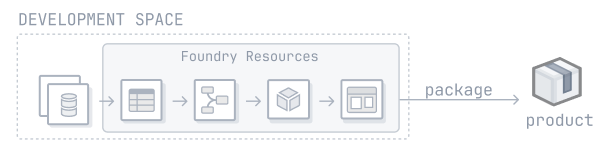
2. Package resources into products
Use DevOps to package resources from your development environment into products. You can package your workflow into one or more products. A typical split might look like:
- Datasource product containing data connection resources.
- Ontology product containing object types and their backing datasets, and generic Actions and Functions.
- One or more Use case products containing Workshop modules, and workflow-specific Actions and Functions.
Review our guide on how to create a product.
In general, it is best practice to package an entire Project as a product to maintain a 1:1 relationship between Projects and products. This simplifies the process of determining the appropriate product for a resource.
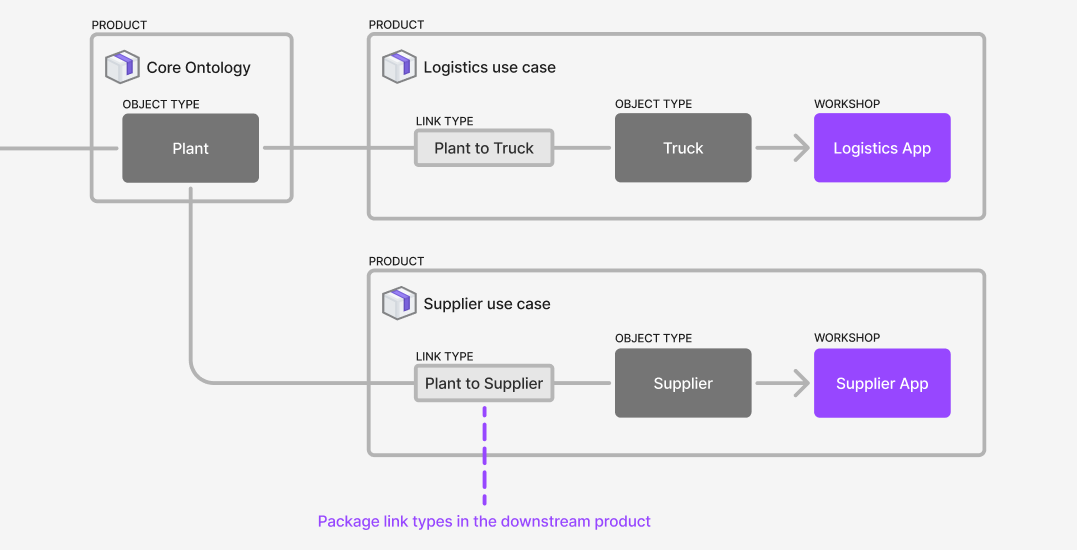
Ontology entities are not part of any Project. Consider the following guidance when deciding where to package object types, link types, action types, and functions:
-
Object types should be packaged in the product where the backing dataset is packaged.
-
Out of the two object types used in a link type, the link type should be packaged in the product as the object type that is most downstream. For example, given a use case product called
Logistics Use Casewith an object type calledTruckwhich has a link to thePlantobject type in theCore Ontologyproduct, the link type should be packaged in theLogistics Use Caseproduct. In this situation, we can say that theLogistics Use Caseproduct sits downstream of theCore Ontologyproduct, and that theCore Ontologyproduct sits upstream of theUse Case Xproduct. If both object types are in the same product, then package the link type in that product as well.
-
For action types, consider the following:
-
Action types are usually implicitly associated with a use case. In these cases, you should package the action type in the relevant use case product. For example, if the
Reroute Truckaction type is used by applications in theLogistics Use Case, package the action type with the use case. - Action types can be backed by Functions. In these cases, the action type will have a dependency on the Function that backs it. Package the action type in the same product as the Function that backs it.
-
An action type may be used in multiple use cases that are packaged in separate products. In these cases, you can factor out the common functionality, such as the action types and potentially the Functions that back them, into their own product or into a core Ontology product.
-
Functions should be packaged within the same product as the source that produces them, such as the functions code repository or logic resource.
Guidance on packaging multiple Projects
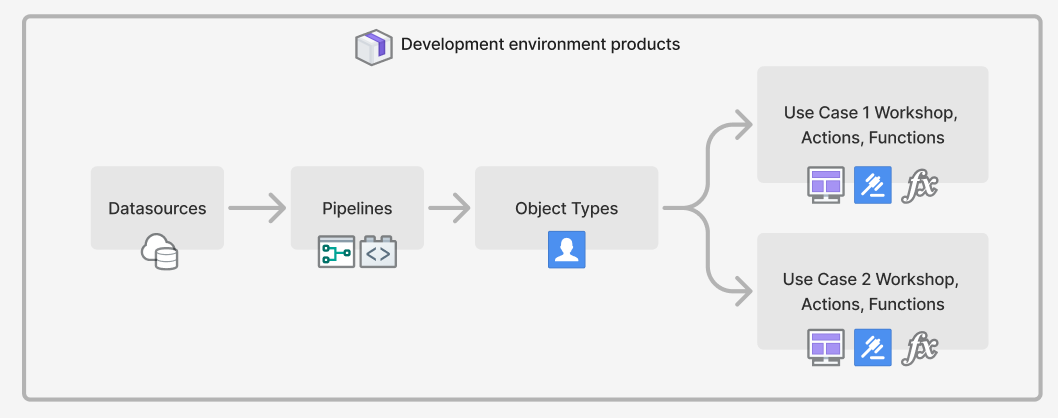
Workflows often rely on resources across multiple Projects, the same applies when Projects are packaged into products: the Products compose together because the resources packaged in one product can be used as the inputs for products that sit downstream. This means you can release manage larger workflows across multiple Projects. For example, you can package a data source product, a core Ontology product, and multiple use case products. Use case products will likely contain Workshop applications or other resources that rely on object types that will be part of the core Ontology product. In this situation, the use case products will require those object types as inputs and those inputs will be satisfied by the core Ontology product.
Package the relevant Projects into products. The products should compose together, so that the contents of one product can satisfy the inputs of downstream products.
Learn more about linked products.
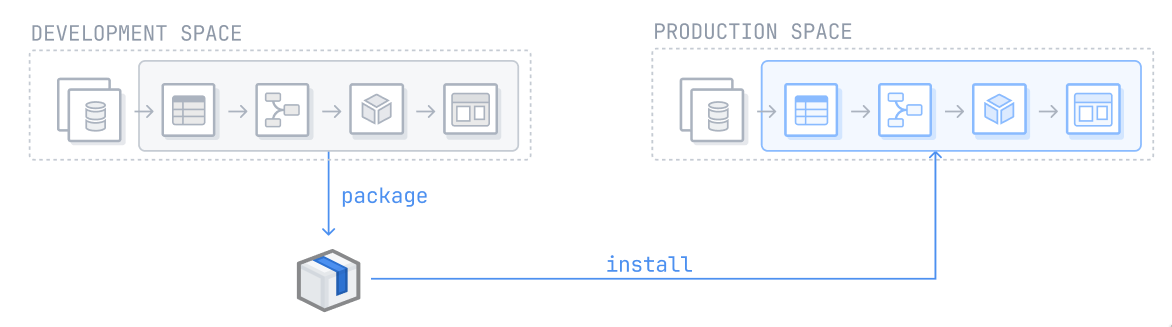
3. Release manage your products
Once your Projects have been packaged into products, you can now install these products into your second environment. In a release management process with Development, Test, and Production environments, this would be the Test environment. Learn more about installing a product through Marketplace.
Repeat this process for every subsequent environment. After installing a product in an environment, you can automate upgrades by customizing your installation settings. Additional customizations, such as release channels and maintenance windows can also be configured during the initial installation.
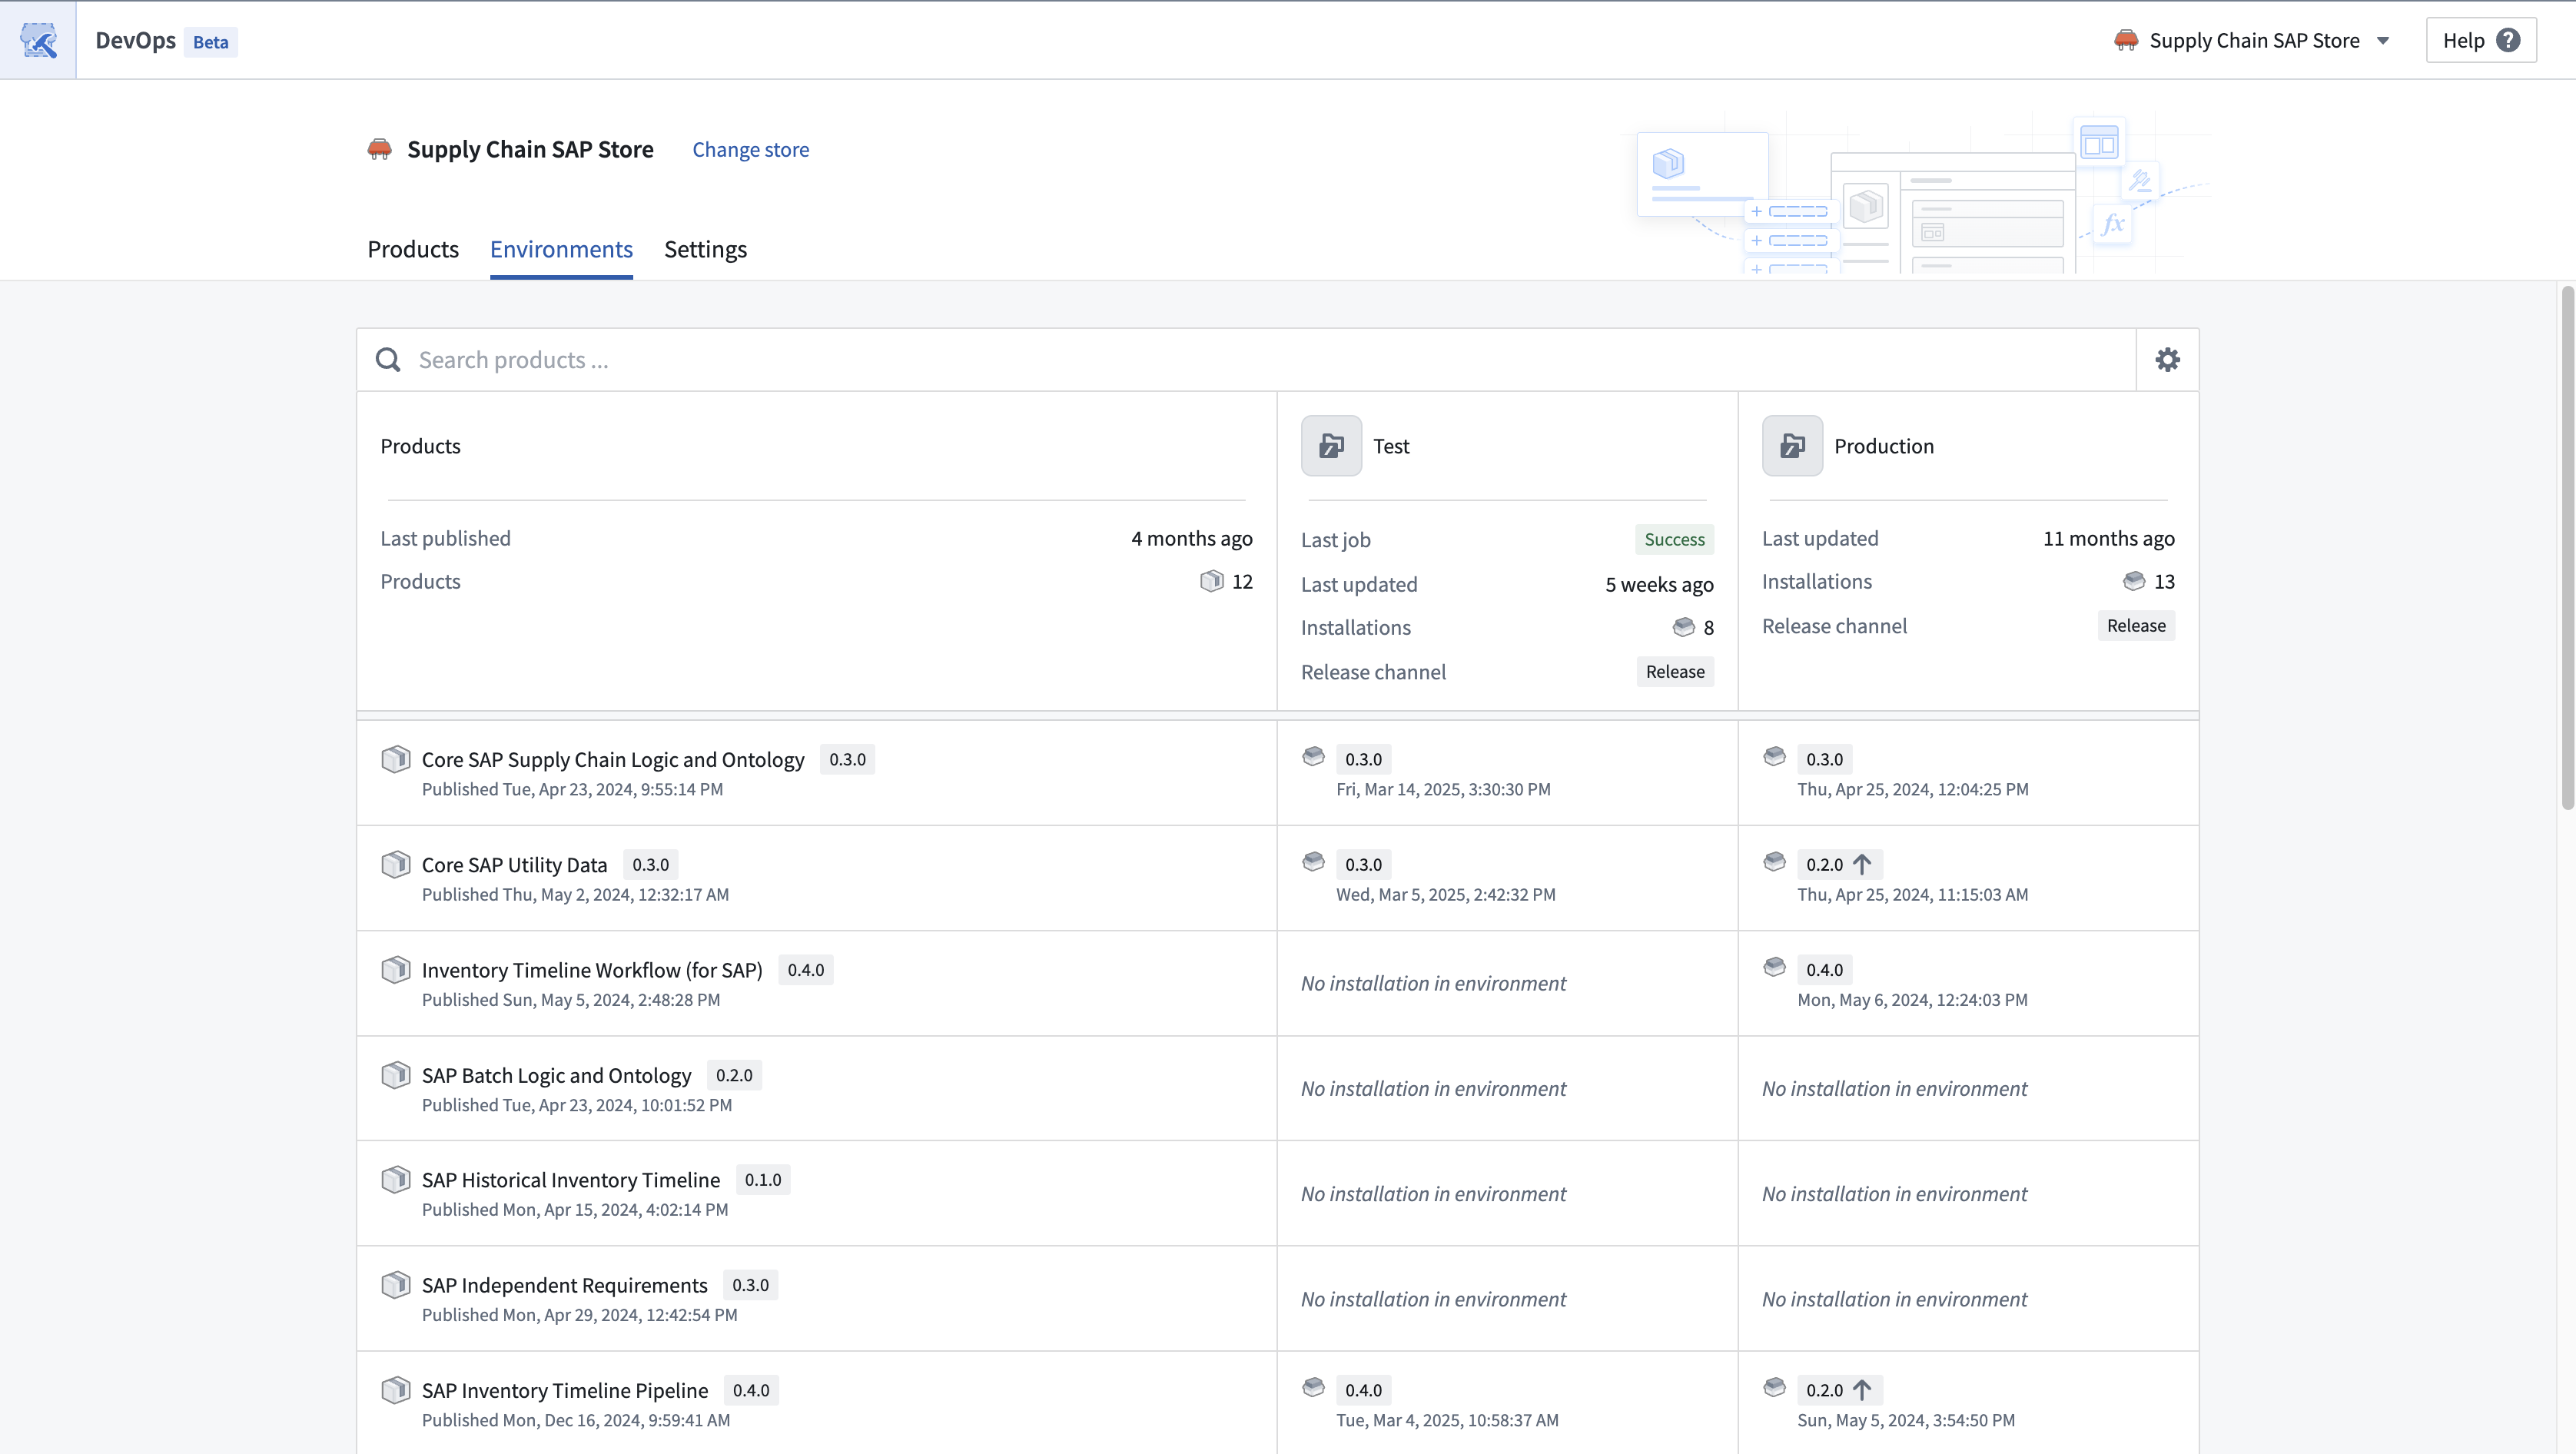
You can view environments in the Environments tab in the DevOps application. Users can view product installations in their configured environments. The products packaged in the store are displayed in the left column and these products can be installed and upgraded in the user-configured environments such as in development, test, production environments.
Users can see a high-level view of the installations in their environments, as well as some summary information of each environment. From here, users can navigate to the installations directly and take actions such as install, upgrade, edit release channels and locking installations.
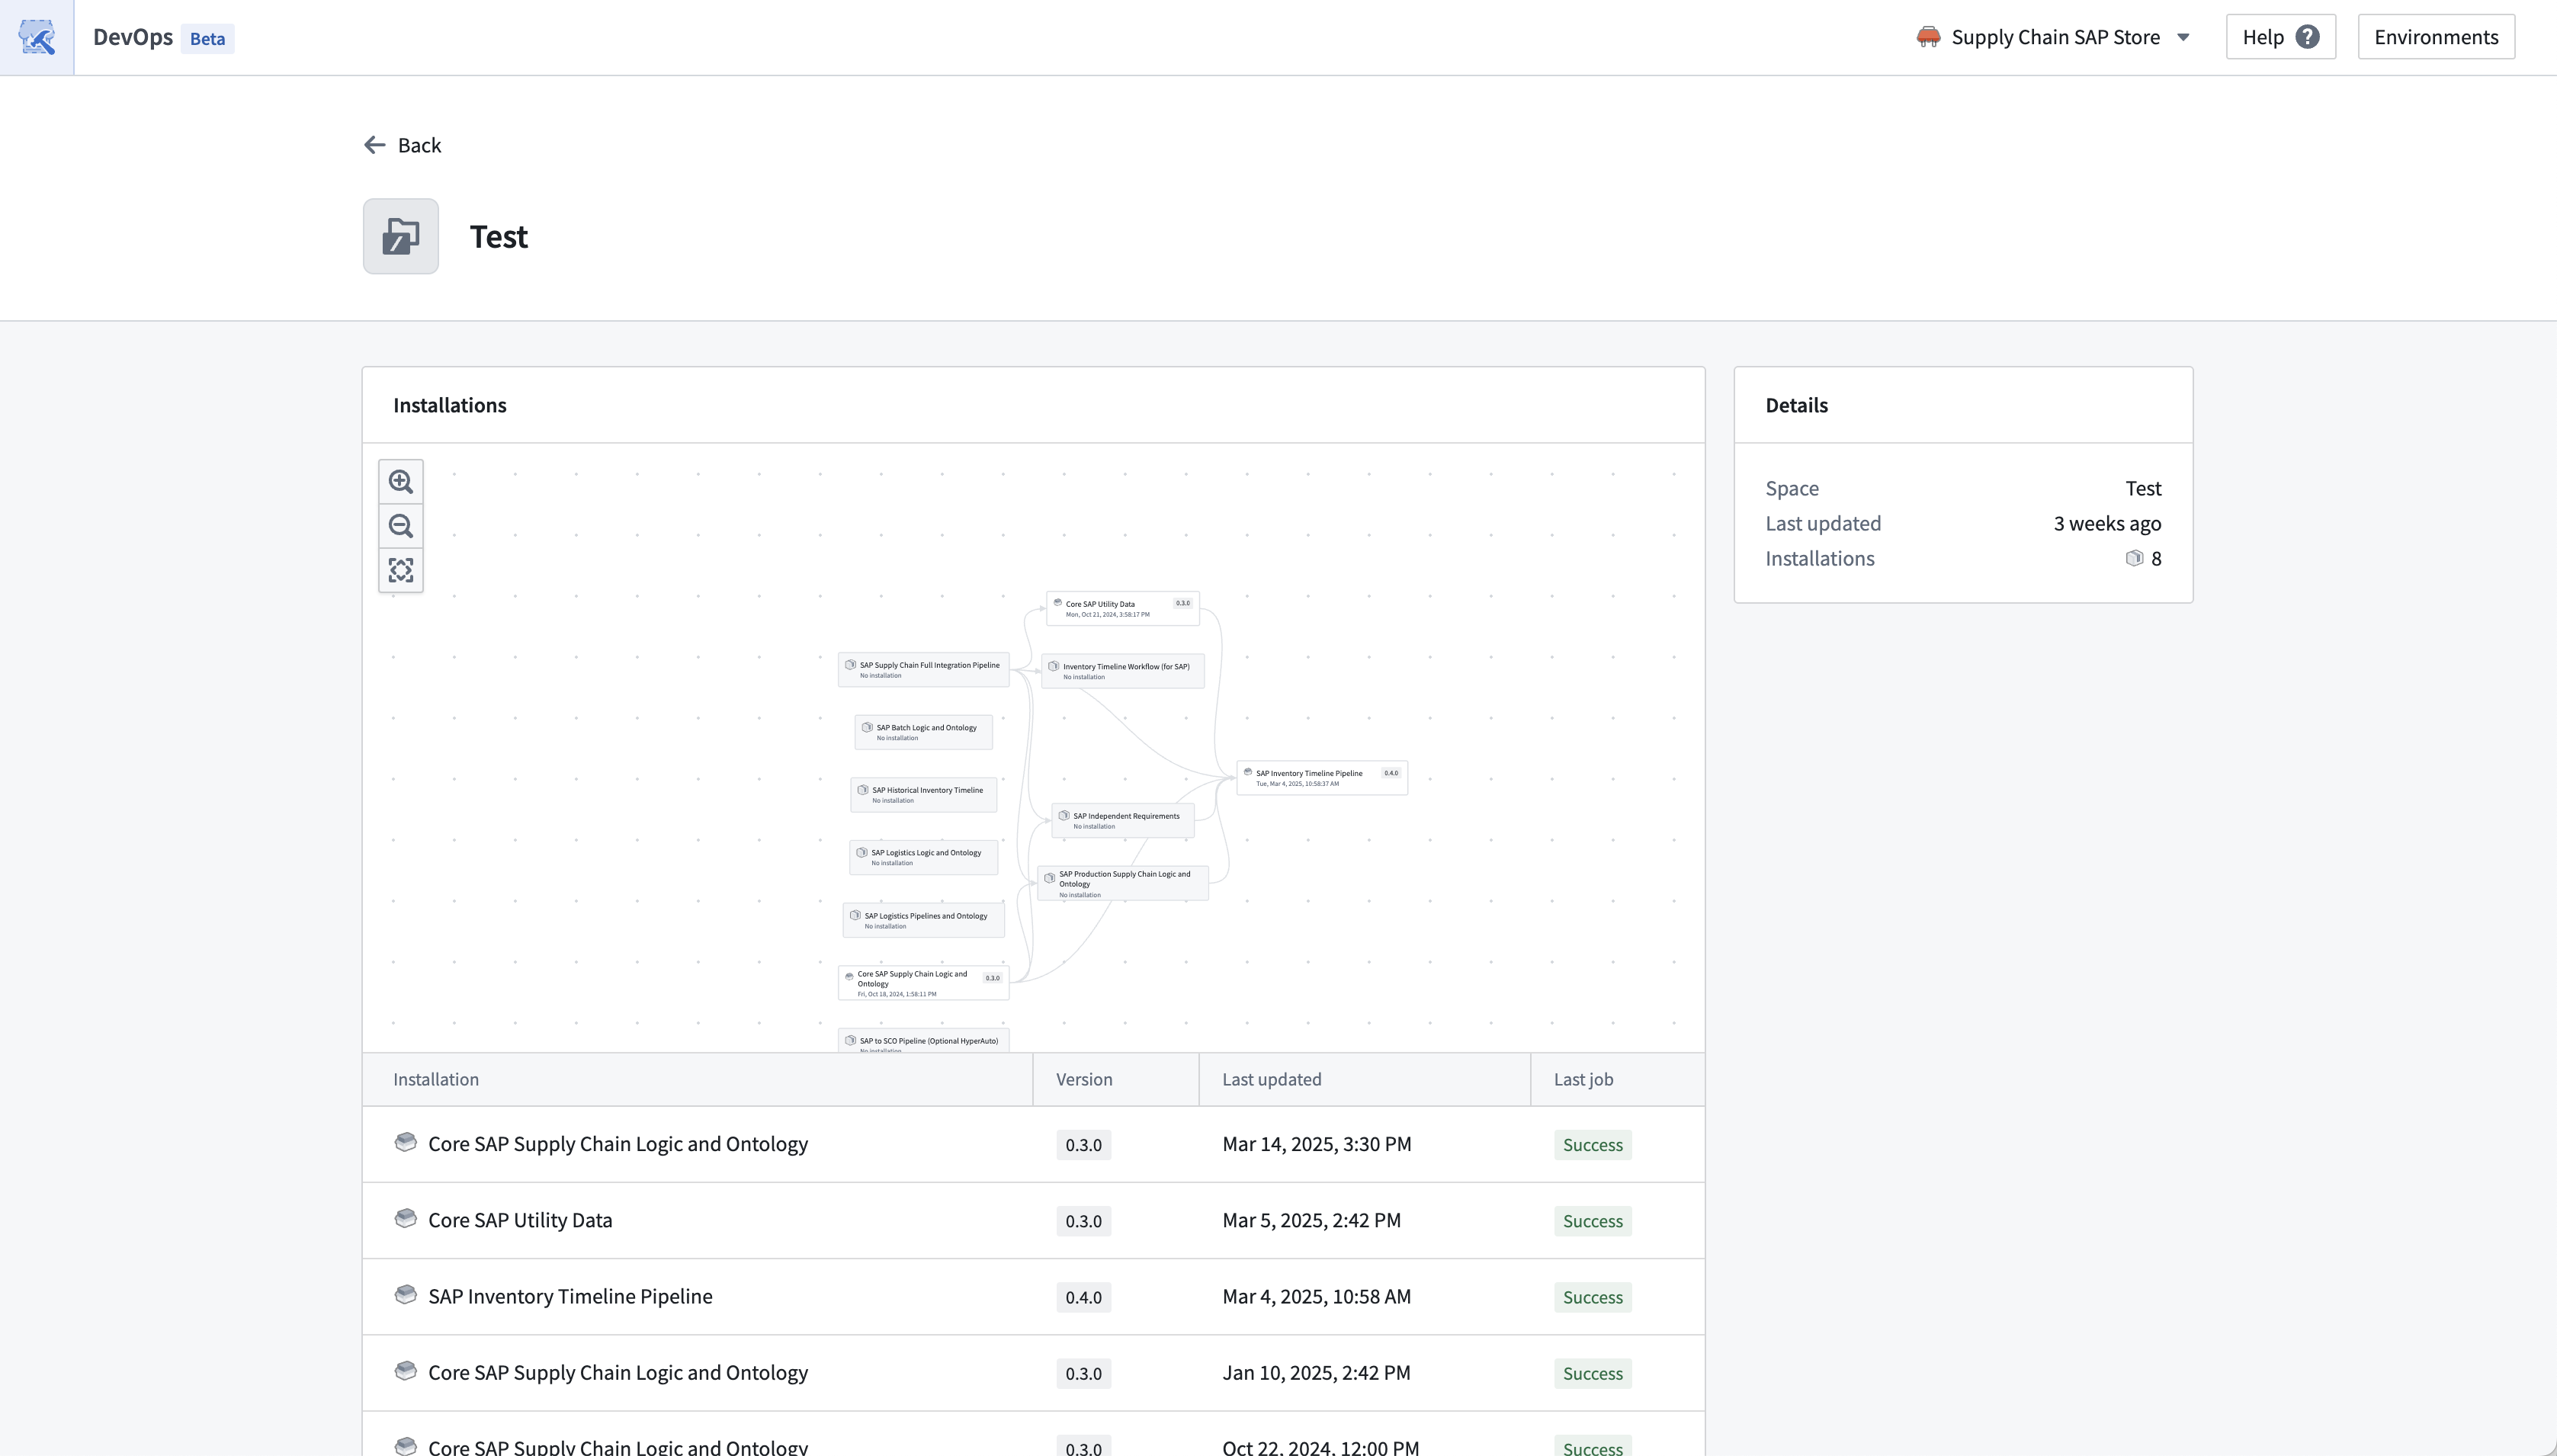
A more detailed view of an environment can be found by selecting the individual environment.
Guidance on installing multiple products
If you are installing more than one product at a time, take into account the ordering of products when doing this. Upstream products need to be installed before their downstream dependencies. When you install downstream products, their inputs should typically be satisfied by resources in the same environment, for example, use resources from your Test environment as inputs to the Test environment installations, and similarly for other environments.
The linked products feature will show you which products satisfy each other’s inputs when packaging.

View environments in DevOps
You can view environments in the Environments tab in the DevOps application. For a given store, the development environment contains the source products of the store that users are able to install into their other environments. Users can view these product installations in their configured environments. The products packaged in the store represent the development environment and then these products are installed and upgraded in the user-configured environments such as in development, test, production environments.
中文翻译
使用 DevOps 进行发布管理
本指南概述了如何使用 DevOps、Marketplace 和空间(spaces)来设置发布管理流程。假设您已在开发环境中建立了工作流,以下说明旨在指导您完成设置额外环境并将现有工作流部署到这些新环境中的过程。
:::callout{theme="neutral"} 如下所述,使用 DevOps 和 Marketplace 是实现发布管理流程的一种方式。在 Palantir 平台中还有其他方式可以实现此目的,例如使用全局分支。 :::
1. 使用空间设置环境
在 Palantir 平台中使用空间作为环境。为您需要的每个环境创建一个空间。例如,您可以创建 Development、Test 和 Production 空间。Palantir 平台中的所有资源和项目都存在于某个空间内,因此您资源当前所在的空间可用作您的 Development 空间。如果您希望将当前空间用作 Development 空间,则只需额外创建 Test 和 Production 空间。
请参阅空间文档了解如何创建和配置空间。
一个空间内可以存在多个工作流,并且资源可以在它们之间共享。
如果您的注册中禁用了创建空间的功能,请联系 Palantir 支持以创建新空间。
环境可以从 DevOps 应用程序进行管理,并在整个注册中进行配置,影响所有存储(stores)。您可以通过导航到表的 设置 选项,然后选择 配置环境 来配置环境设置。
在 环境 设置中,用户可以添加建议的环境、包含给定存储安装的空间,或选择其他空间。您还可以对环境列表重新排序,以决定它们在此页面上的显示方式。用户只能编辑、添加或删除其拥有所有者访问权限的空间的环境,并且这些空间必须仅与一个注册关联。
2. 将资源打包成产品
使用 DevOps 将开发环境中的资源打包成产品。您可以将工作流打包成一个或多个产品。一个典型的拆分可能如下所示:
- 包含数据连接资源的数据源产品(Datasource product)。
- 包含对象类型(object types)及其支持数据集(backing datasets),以及通用操作(Actions)和函数(Functions)的本体产品(Ontology product)。
- 一个或多个包含 Workshop 模块以及特定工作流操作和函数的用例产品(Use case products)。
查看我们关于如何创建产品的指南。
通常,最佳实践是将整个项目(Project)打包为一个产品,以保持项目与产品之间 1:1 的关系。这简化了为资源确定合适产品的过程。
本体实体不属于任何项目。在决定将对象类型、链接类型(link types)、操作类型(action types)和函数打包到何处时,请考虑以下指导:
-
对象类型 应打包在其支持数据集所在的产品中。
-
对于链接类型中使用的两个对象类型,链接类型应打包在最下游的对象类型所在的产品中。例如,假设有一个名为
Logistics Use Case的用例产品,其中包含一个名为Truck的对象类型,该对象类型链接到Core Ontology产品中的Plant对象类型,则链接类型应打包在Logistics Use Case产品中。在这种情况下,我们可以说Logistics Use Case产品位于Core Ontology产品的下游,而Core Ontology产品位于Use Case X产品的上游。如果两个对象类型位于同一产品中,则也将链接类型打包在该产品中。
-
对于操作类型,请考虑以下事项:
-
操作类型通常隐式地与某个用例关联。在这些情况下,您应将操作类型打包在相关的用例产品中。例如,如果
Reroute Truck操作类型被Logistics Use Case中的应用程序使用,则将该操作类型与用例打包在一起。 - 操作类型可以由函数支持。在这些情况下,操作类型将依赖于支持它的函数。将操作类型与支持它的函数打包在同一产品中。
-
一个操作类型可能被多个打包在不同产品中的用例使用。在这些情况下,您可以将通用功能(例如操作类型以及可能支持它们的函数)提取到它们自己的产品中,或提取到核心本体产品中。
-
函数 应打包在与其来源(例如函数代码仓库或逻辑资源)相同的产品中。
关于打包多个项目的指导
工作流通常依赖于多个项目中的资源,当项目被打包成产品时也是如此:产品会组合在一起,因为一个产品中打包的资源可以用作下游产品的输入。这意味着您可以跨多个项目对更大的工作流进行发布管理。例如,您可以打包一个数据源产品、一个核心本体产品和多个用例产品。用例产品可能包含 Workshop 应用程序或其他依赖于核心本体产品中对象类型的资源。在这种情况下,用例产品将需要这些对象类型作为输入,而这些输入将由核心本体产品提供。
将相关项目打包成产品。这些产品应能够组合在一起,以便一个产品的内容可以满足下游产品的输入。
3. 对产品进行发布管理
一旦您的项目被打包成产品,您现在可以将这些产品安装到您的第二个环境中。在具有 Development、Test 和 Production 环境的发布管理流程中,这将是 Test 环境。了解更多关于通过 Marketplace 安装产品的信息。
对后续的每个环境重复此过程。在环境中安装产品后,您可以通过自定义安装设置来自动升级。在初始安装期间,还可以配置其他自定义项,例如发布渠道(release channels)和维护窗口(maintenance windows)。
您可以在 DevOps 应用程序的“环境”选项卡中查看环境。用户可以查看其配置环境中的产品安装情况。存储在左侧列中显示已打包的产品,这些产品可以在用户配置的环境(例如 development、test、production 环境)中安装和升级。
用户可以查看其环境中安装的高级视图,以及每个环境的一些摘要信息。从这里,用户可以直接导航到安装并执行操作,例如安装、升级、编辑发布渠道和锁定安装。
通过选择单个环境可以找到更详细的环境视图。
关于安装多个产品的指导
如果您要同时安装多个产品,请考虑安装顺序。上游产品需要在其下游依赖项之前安装。当您安装下游产品时,其输入通常应由同一环境中的资源满足,例如,使用 Test 环境中的资源作为 Test 环境安装的输入,其他环境同理。
关联产品功能将在打包时向您显示哪些产品满足彼此的输入。
在 DevOps 中查看环境
您可以在 DevOps 应用程序的 环境 选项卡中查看环境。对于给定的存储,开发环境包含该存储的源产品,用户可以将这些产品安装到他们的其他环境中。用户可以查看其配置环境中的这些产品安装情况。存储中打包的产品代表 development 环境,然后这些产品会在用户配置的环境(例如 development、test、production 环境)中安装和升级。