Resource protection and project approval policies(资源保护与项目审批策略)
Protecting resources through branching and approval policies ensures that all contributions are made safely and in a controlled manner. When resources are protected, changes must be submitted via branches and can only be merged after receiving approval according to the project's defined policies.
Resource protection
To safeguard critical workflows or maintain development best practices, you can choose to protect the main branch of your resources. Protected resources cannot be changed directly; instead, changes must be made on a branch and then approved before merging into the main branch.
A branch may include both protected and unprotected resources; however, only protected resources require changes to be made on a branch in accordance with the project’s approval policy. Changes to unprotected resources will still require approval from a user with edit-level permissions unless specified otherwise.
Protected resources can be identified by the ![]() icon (branch lock) in the Compass file system.
icon (branch lock) in the Compass file system.
Any user with owner permissions on a resource can choose to protect or unprotect that resource. Resources can be protected from your file system, individually or in bulk (by multi-selection). To protect a resource, right-click on a resource and choose Protect or Unprotect (depending on the current status). Workshop resources can also be protected from within the Workshop application by navigating to Settings and choosing the Branch protection tab.
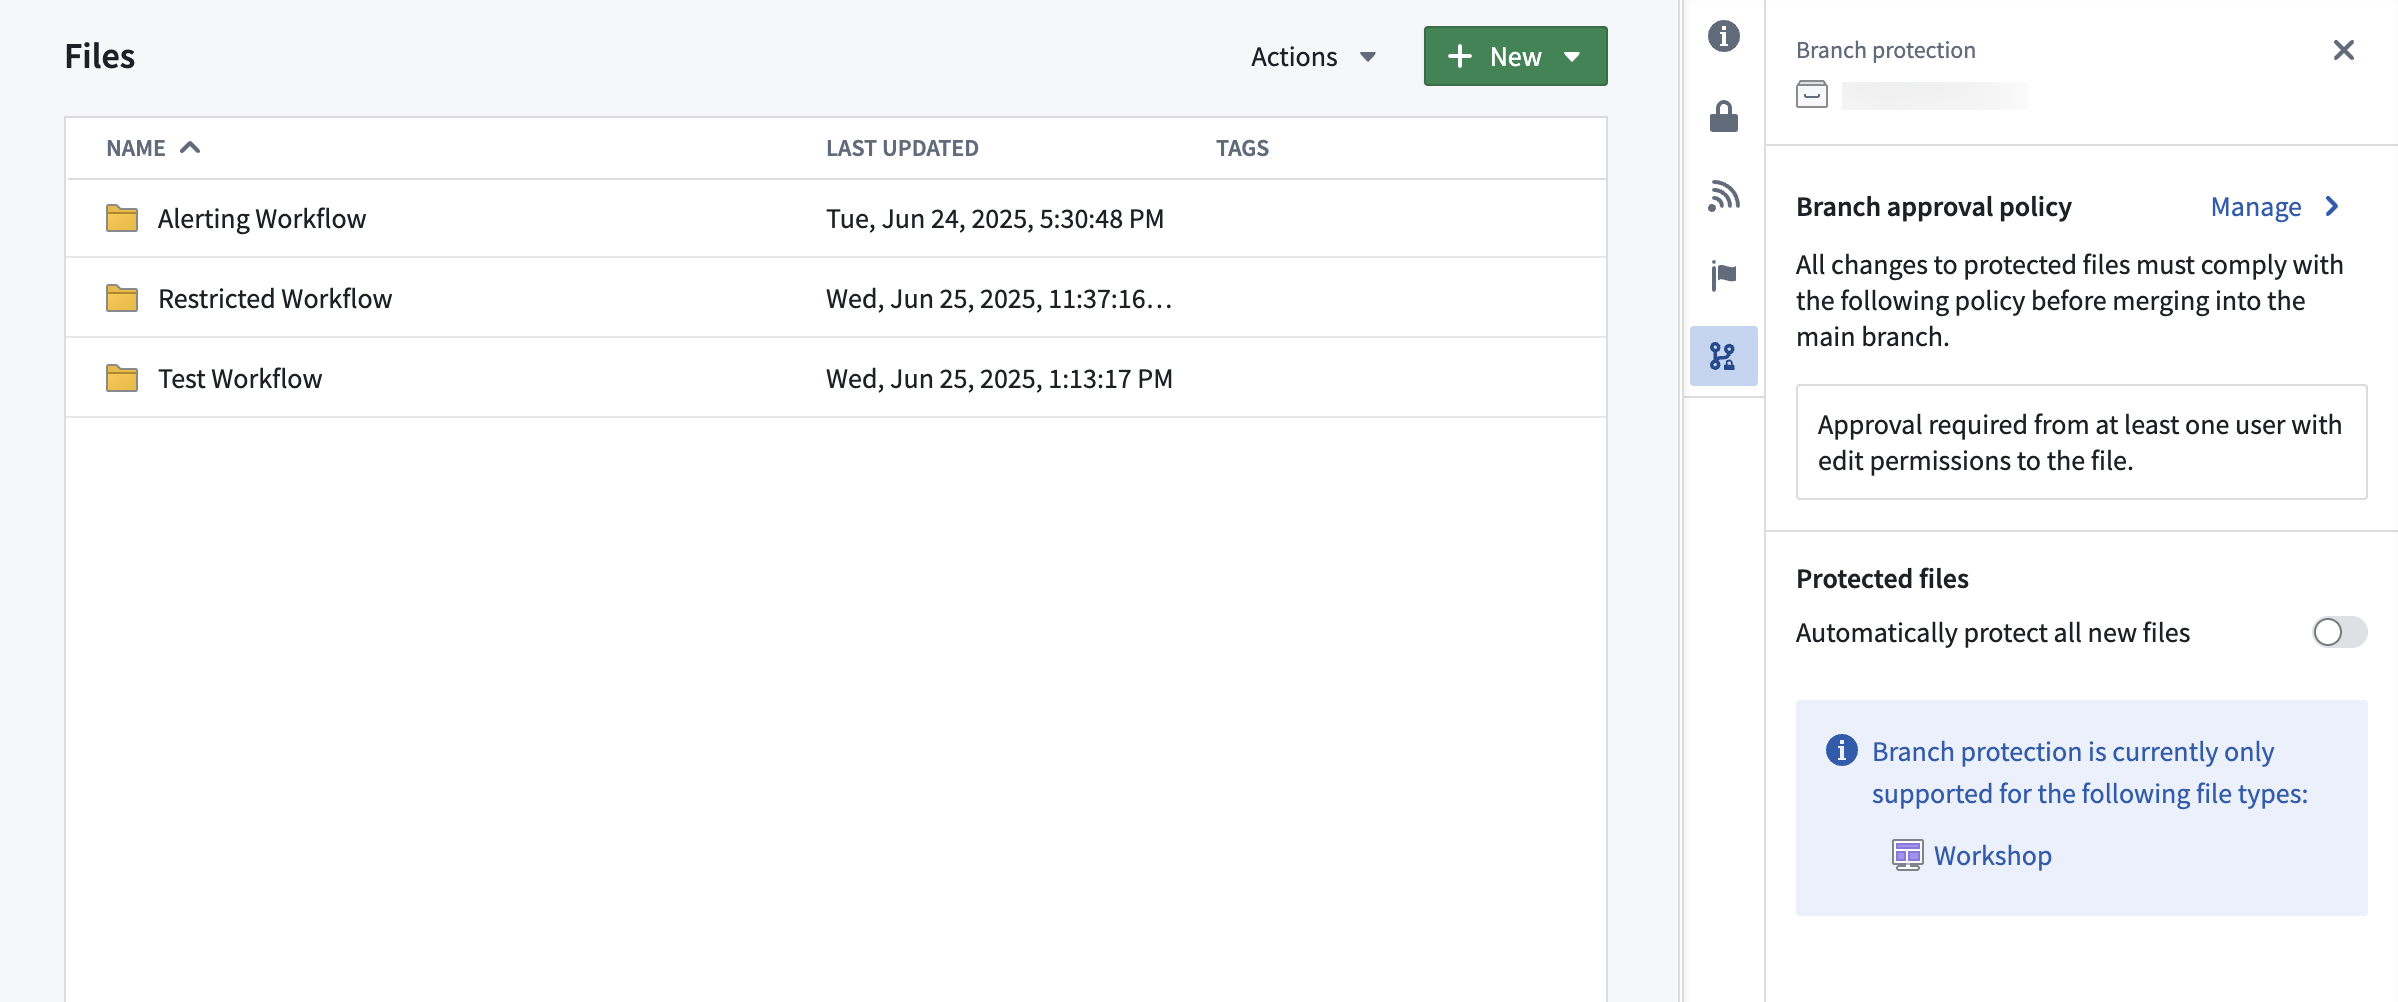
Branch protection tab
The branch protection tab in a project serves two purposes:
- Defining branch approval policy: Owners of projects can define a project approval policies in the branch protection tab.
- Automatically protecting new files: When toggled on, this setting will automatically protect all new files created in the project.
Project approval policies
Once a resource is protected, any change to that resource will have to be made on a branch and go through an approval process. The approval policy is set at the project level, and defines the approval required to merge changes to protected resources.
Default approval policies
Choosing the default approval policy option for a project means each resource in the project is protected only by its respective default policies. For each resource, the application that owns the resource defines these policies — for example, the ontology defines default policies for object types.
These policies are typically simple: contributors and approvers must have edit access on the resource itself. Some cases are more complex. To see the exact policies for a given resource, see Viewing a resource's approval policies below.
Default policies are satisfied in one of two ways:
- Automatically, when the contributor's own permissions cover the policy.
- Through review, when a separate user with the required permission approves the change.
For example, suppose SomeResource has two default policies:
- Policy 1 requires permission
X - Policy 2 requires permission
Y
In this case:
- User A has permission
X. They modify the resource on a branch, which automatically satisfies Policy 1. - User B has permission
Y. They review and approve the change, which satisfies Policy 2. - Both default policies are now satisfied, and the change can proceed.
A single user can also satisfy both policies on their own. User C has both permission X and permission Y, so they can modify the resource and merge the change without a separate approver — their permissions cover both policies.
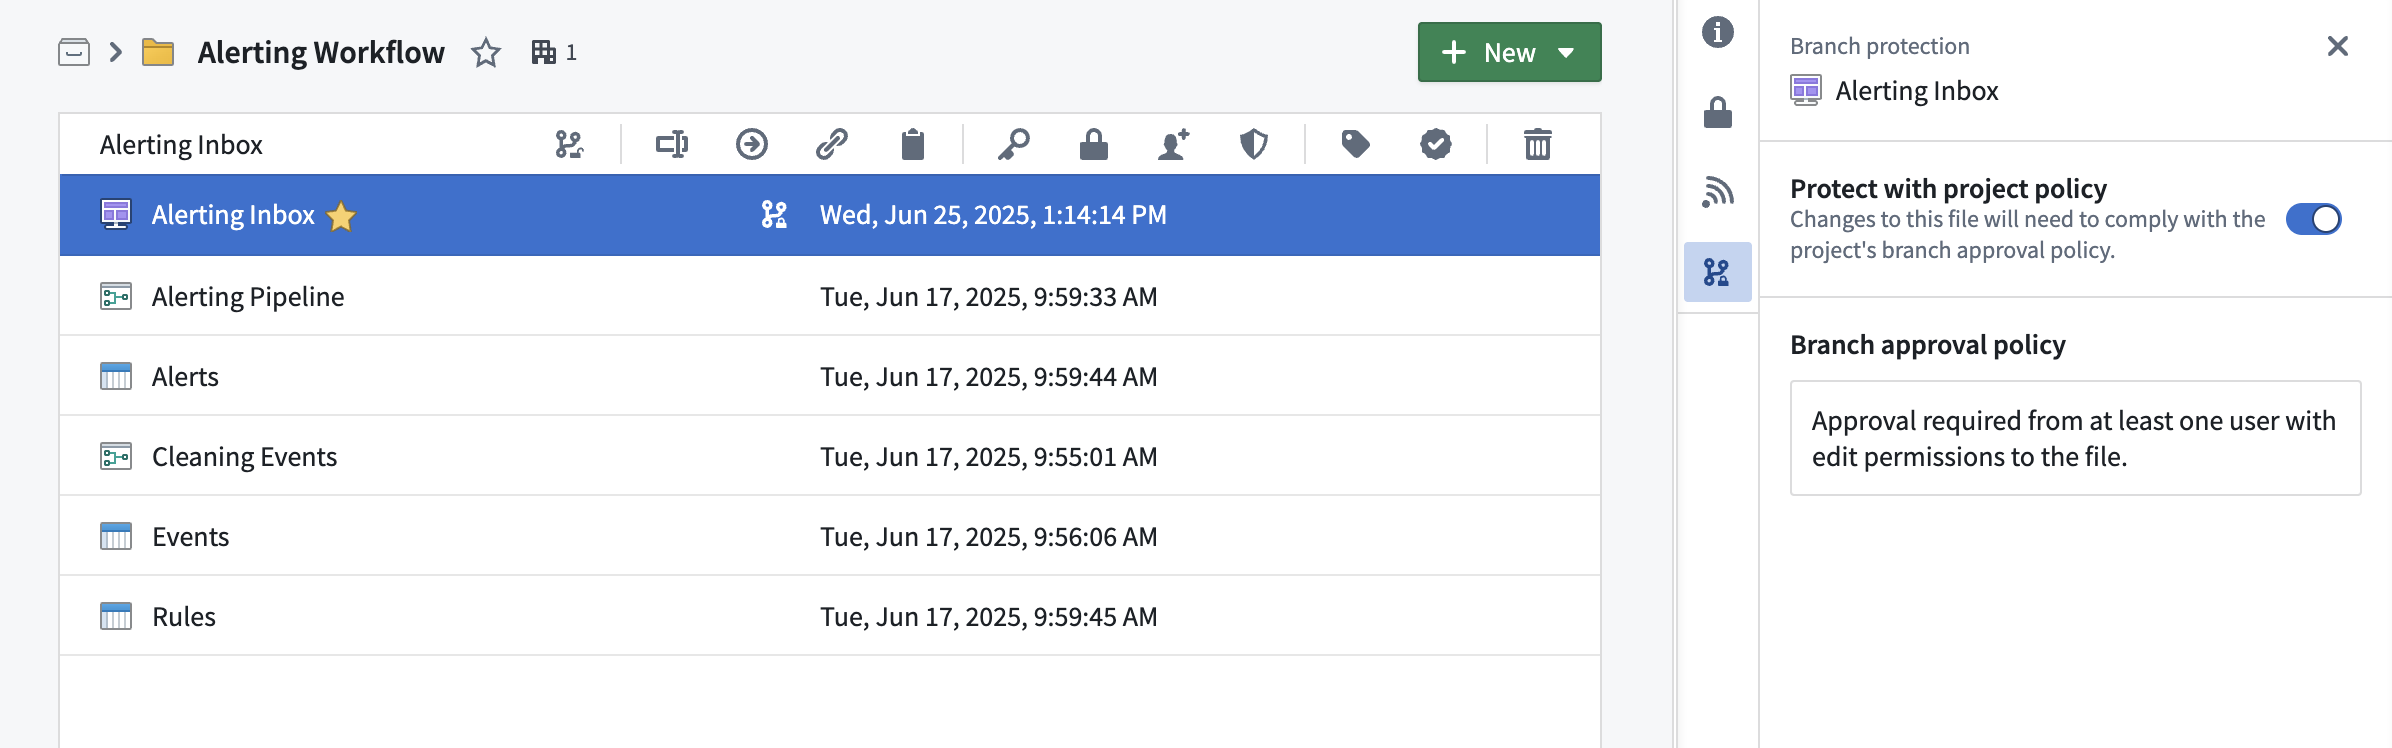
Example project with default approval policy:
Custom approval policy
Approval policies have three customizable parameters:
- Eligible reviewers: Users or groups allowed to review and approve changes to the main branch of a protected resource.
- Number of approvals required: The minimum number of approvals needed.
- Contributor approval: Specify whether contributors to the resource are allowed to approve changes to that resource. A contributor is any user who has made a change to that resource on the branch.
Once a policy has been created on a project, it will apply immediately to all protected resources in that project when you create a branch and then a proposal. Additionally, if you update the policy to be more or less restrictive, proposals linked to that policy will be refreshed and have their status reevaluated against the new policy requirements. Only users that are owners on the project can update its custom policy.
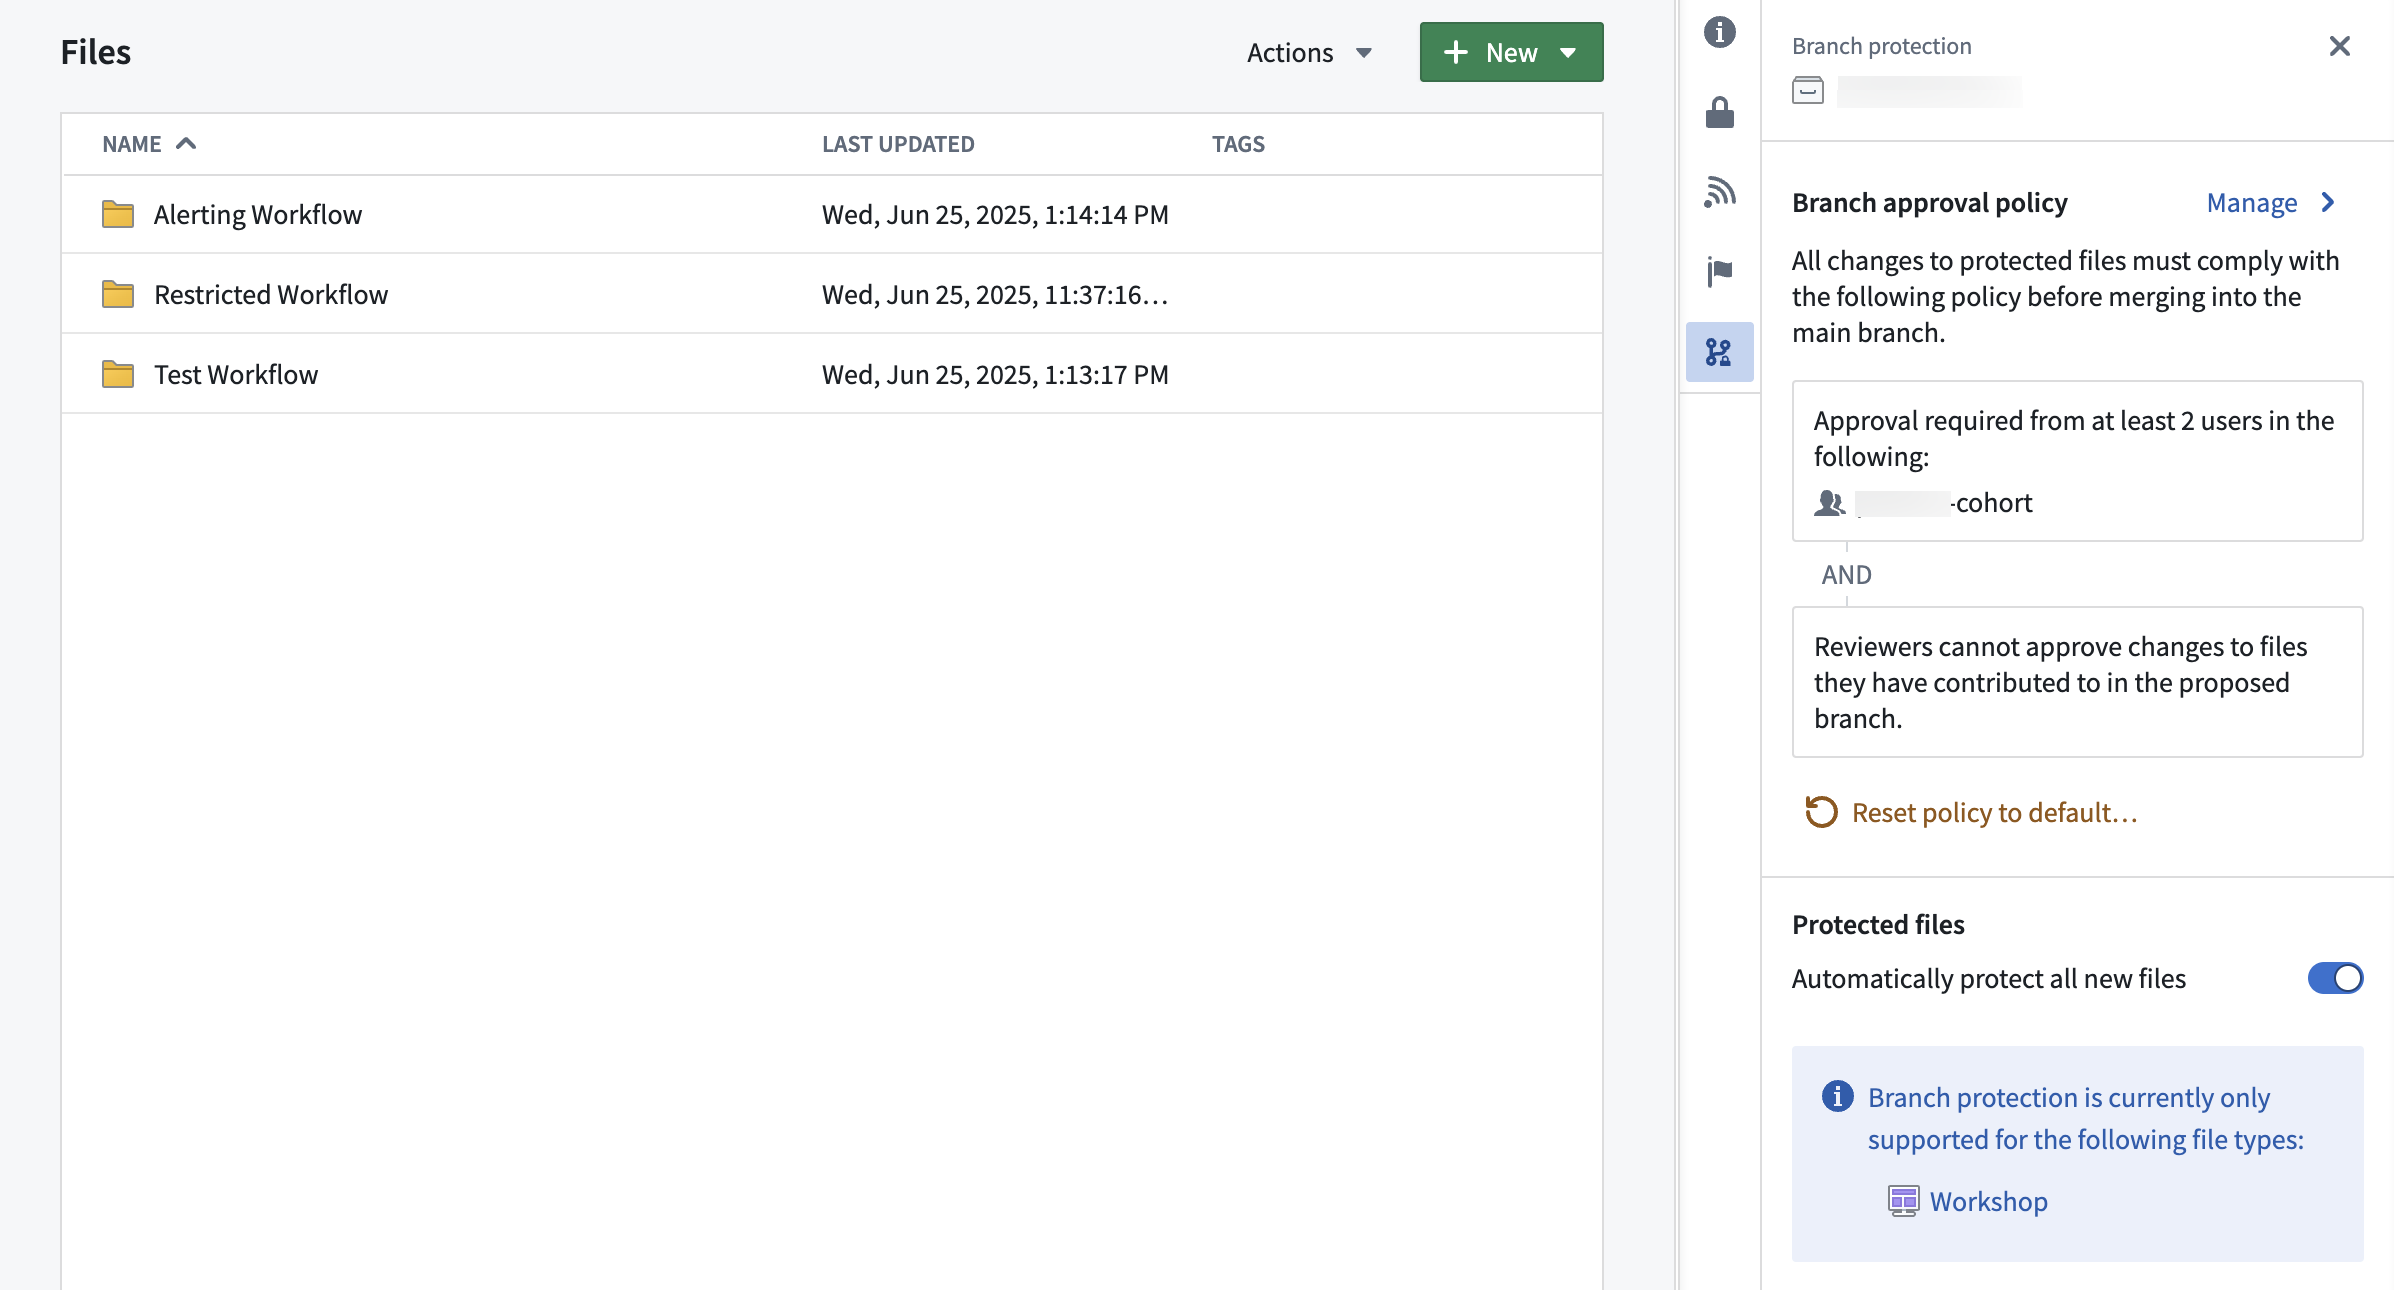
Example project with custom approval policy:
Moving a resource to a new project
A resource's protection status is preserved when moving resources between projects. For example:
- Moving a protected resource to a new project: The resource will remain protected in the new project.
- Moving an unprotected resource to a new project: The resource will remain unprotected in the new project.
When a protected resource moves to a new project, any change to that protected resource must be made on a branch and will be governed by the approval policy of the new project.
:::callout{theme="neutral" title="Moving a resource with an open proposal"} If a resource with an open proposal is moved to a new project, the existing proposal may take up to 1 day before the resource's policy displays the new project policy. Updating the module on the branch or attempting to merge the proposal will also trigger a refresh of the resource's policy to match the new project policy. :::
Using project policies alongside local branch protection
Code repositories and Pipeline Builder both have local branch protection mechanisms and approval policies. These will remain in place.
In the future, users will have the option to opt into the project approval policy for their code repositories and builder pipelines.
Viewing a resource's approval policies
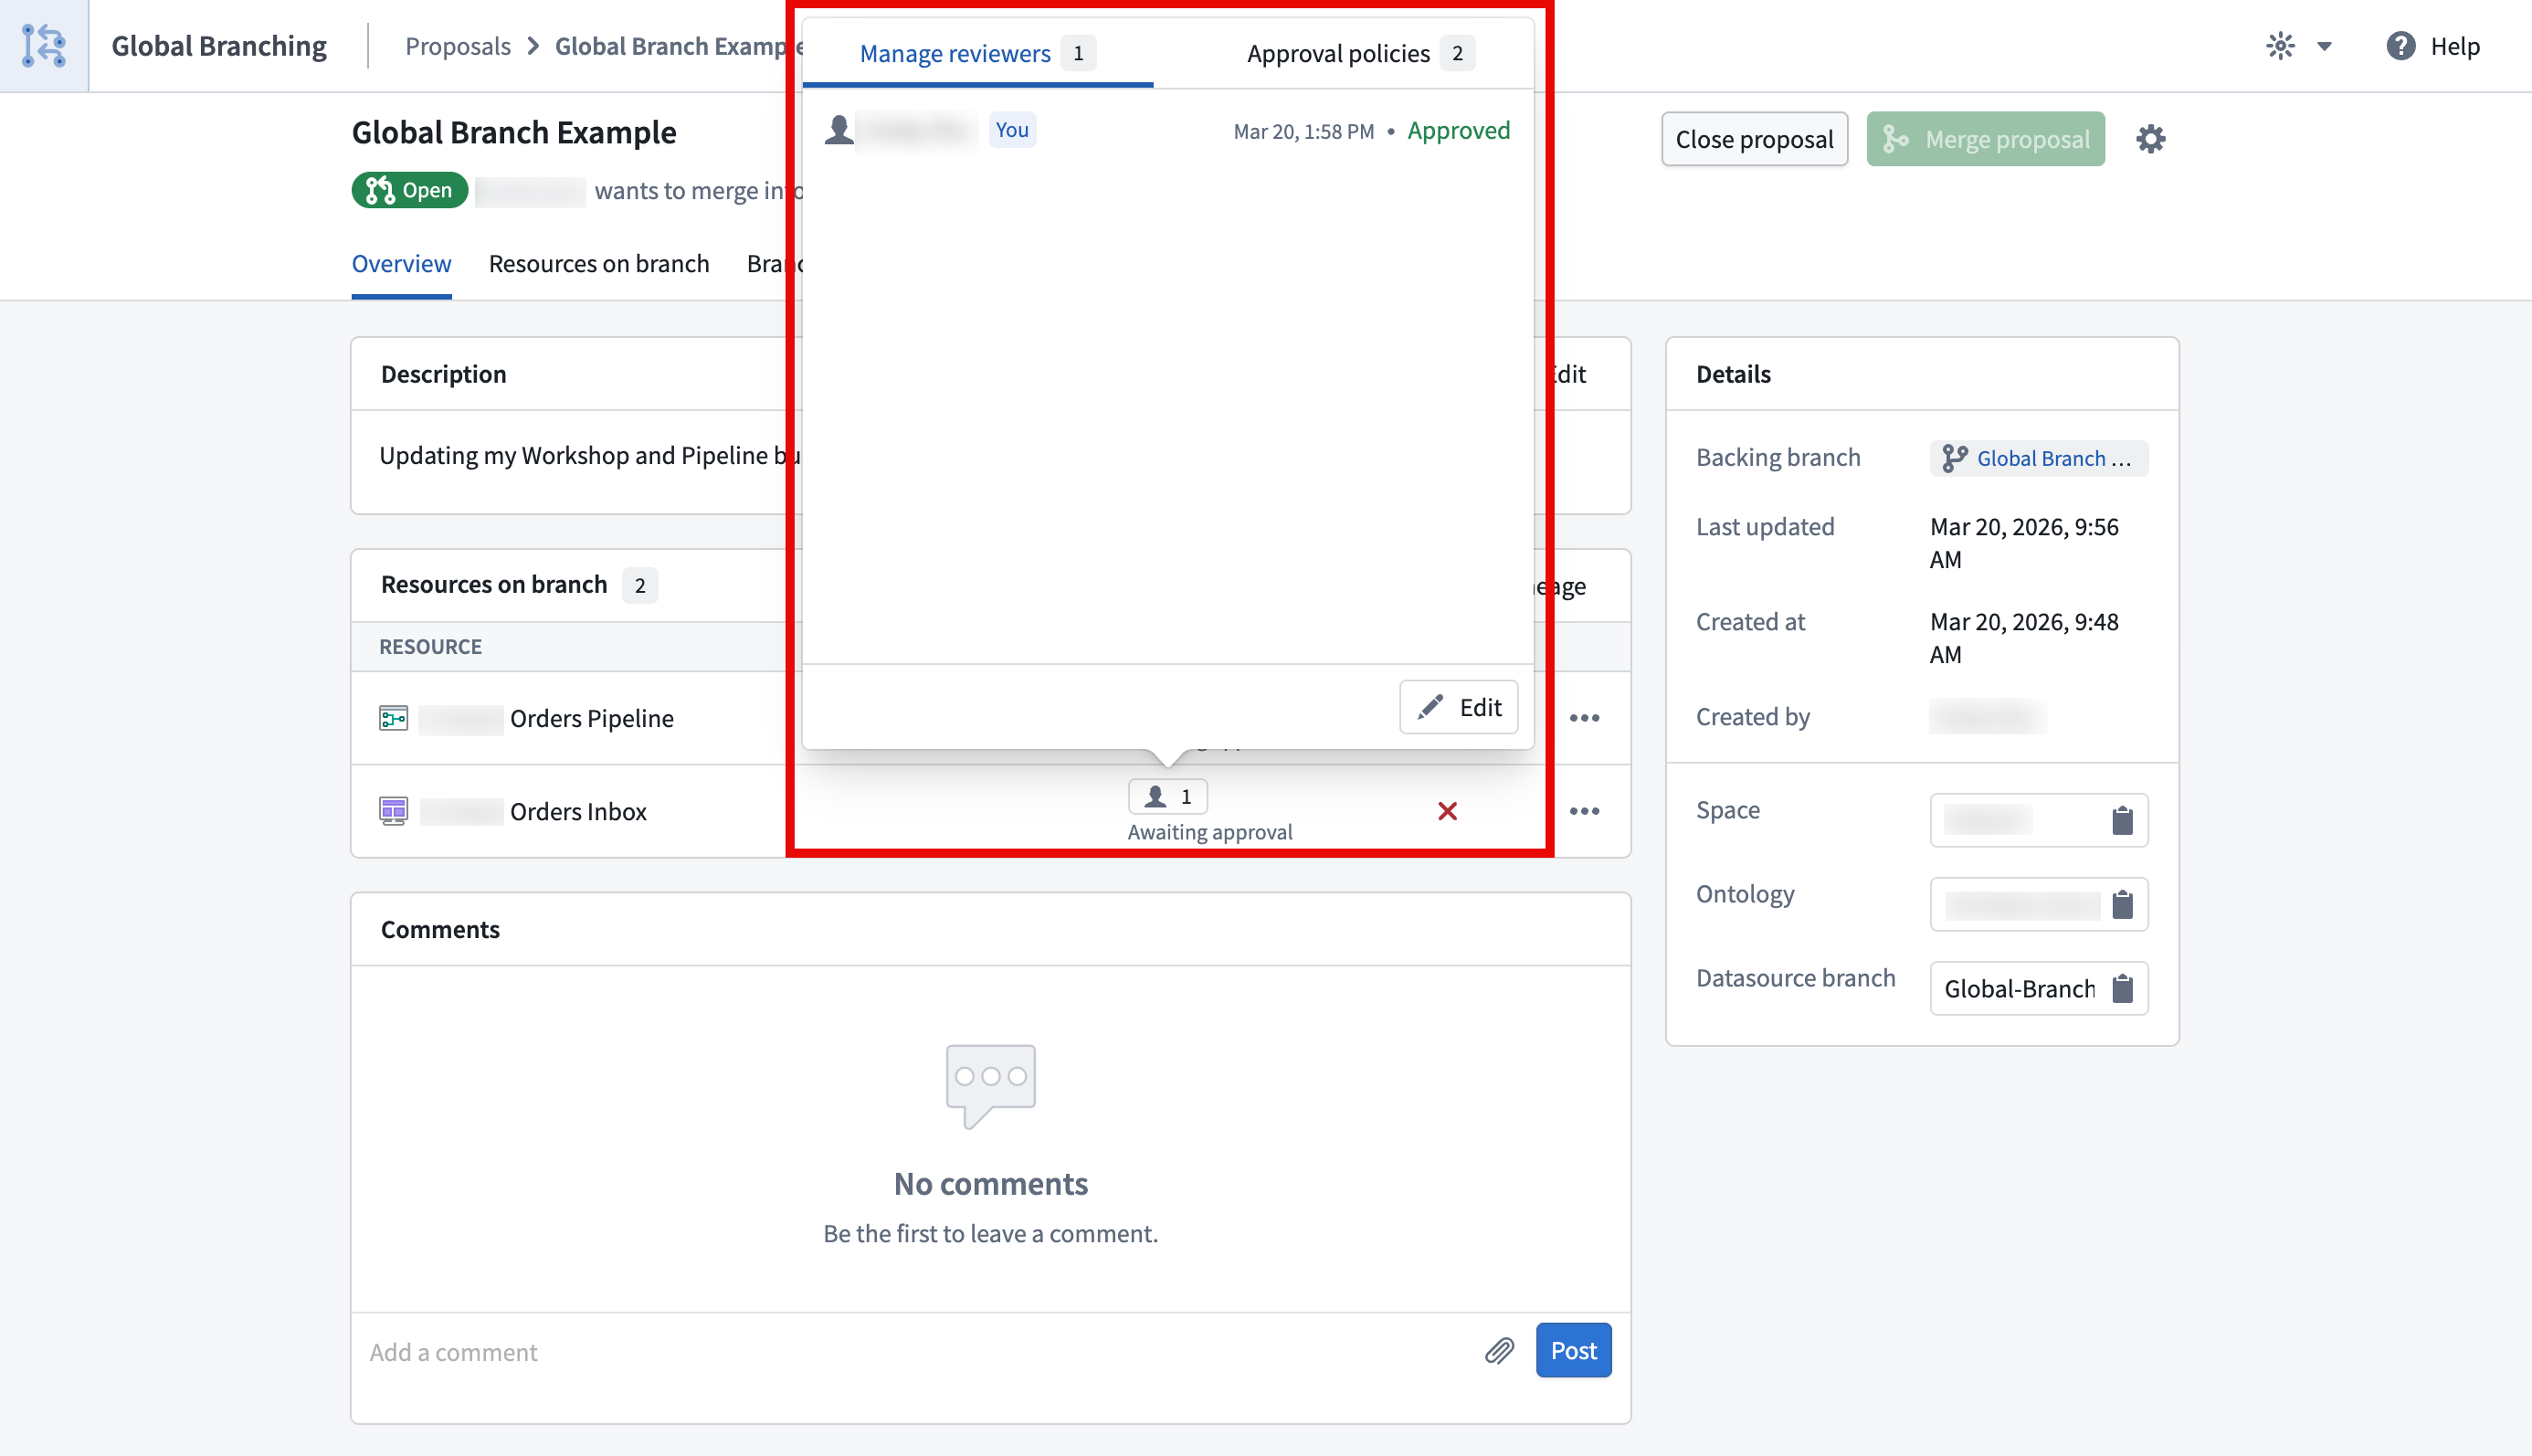
You can view the approval policies that apply to a resource by selecting the 👤 button in the reviewers column on the proposal page or in the branch taskbar. This will open a popover with two tabs, Manage reviewers and Approval policies.
The Approval policies tab will show both custom policies (set at the project or the resource level) and default policies that apply to a given resource. For each policy, you will also be able to see additional information including the eligible reviewers, the number of approvals required, and whether contributor approval is allowed.
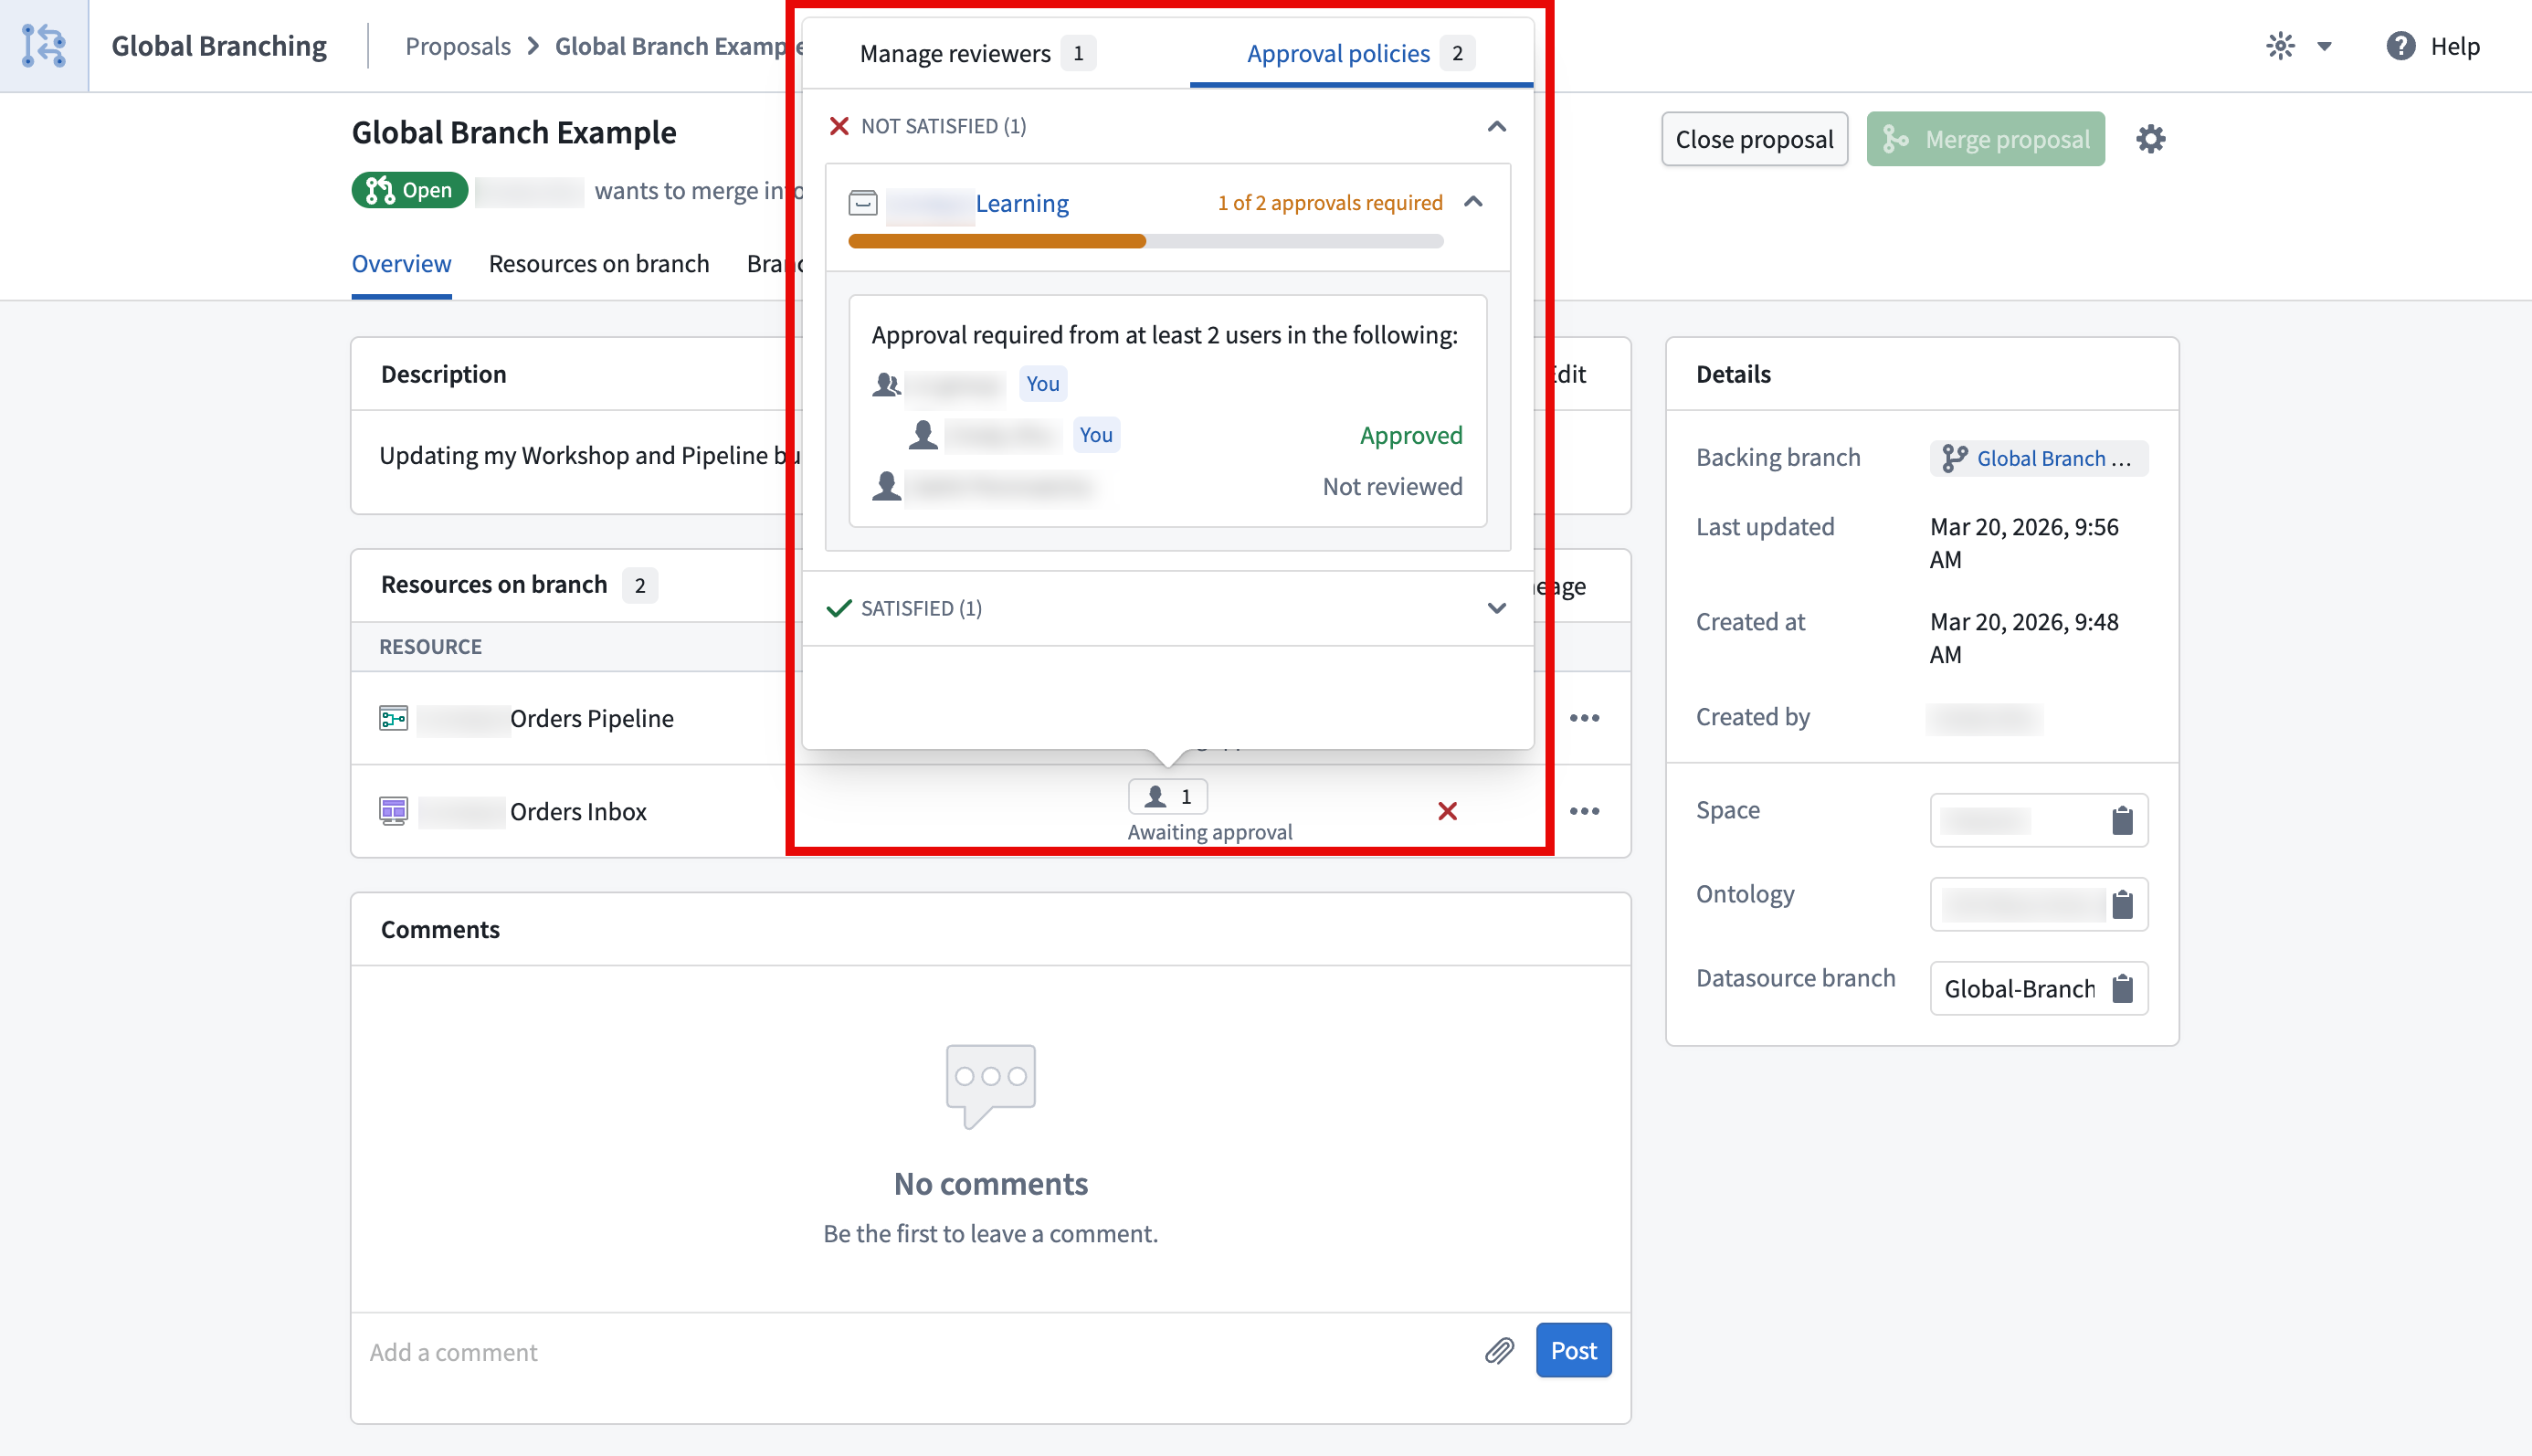
The Manage reviewers tab shows who you have requested review from and the status of the review. You can also use the edit button to add or remove reviewers.
中文翻译
资源保护与项目审批策略
通过分支(Branching)和审批策略(Approval policies)来保护资源,能够确保所有贡献都在安全、受控的环境下进行。当资源受到保护时,任何更改都必须通过分支提交,并且只有在符合项目既定策略并获得批准后方可合并。
资源保护
为了保护关键工作流或维护开发最佳实践,您可以选择保护资源的主分支(Main branch)。受保护的资源无法直接更改;相反,必须在分支上进行更改,然后在合并到主分支之前获得批准。
一个分支可能同时包含受保护和未受保护的资源;但是,只有受保护的资源才需要根据项目的审批策略在分支上进行更改。除非另有规定,对未受保护资源的更改仍然需要具有编辑级别权限的用户批准。
在 Compass 文件系统中,可以通过 ![]() 图标(分支锁)来识别受保护的资源。
图标(分支锁)来识别受保护的资源。
任何对资源拥有所有者权限的用户都可以选择保护或取消保护该资源。您可以从文件系统中单独或批量(通过多选)保护资源。要保护资源,请右键单击资源并选择保护或取消保护(取决于当前状态)。Workshop 资源也可以在 Workshop 应用程序内进行保护,方法是导航到设置并选择分支保护选项卡。
分支保护选项卡
项目中的分支保护选项卡有两个用途:
- 定义分支审批策略: 项目所有者可以在分支保护选项卡中定义项目审批策略。
- 自动保护新文件: 开启此设置后,将自动保护在项目中创建的所有新文件。
项目审批策略
资源一旦受到保护,对该资源的任何更改都必须在分支上进行并经过审批流程。审批策略在项目级别设置,并定义了合并受保护资源更改所需的审批要求。
默认审批策略
为项目选择默认审批策略选项意味着项目中的每个资源仅受其各自的默认策略保护。对于每个资源,拥有该资源的应用程序会定义这些策略——例如,本体(Ontology)为对象类型定义默认策略。
这些策略通常很简单:贡献者和审批者必须对资源本身具有编辑访问权限。某些情况则更为复杂。要查看特定资源的确切策略,请参阅下方的查看资源的审批策略。
默认策略可通过以下两种方式之一来满足:
- 自动满足,当贡献者自身的权限涵盖该策略时。
- 通过审查,当具有所需权限的其他用户批准该更改时。
例如,假设 SomeResource 有两个默认策略:
- 策略 1 需要权限
X - 策略 2 需要权限
Y
在这种情况下:
- 用户 A 拥有权限
X。他们在分支上修改了资源,这自动满足了策略 1。 - 用户 B 拥有权限
Y。他们审查并批准了该更改,这满足了策略 2。 - 现在两个默认策略均已满足,更改可以继续推进。
单个用户也可以自行满足这两个策略。用户 C 同时拥有权限 X 和权限 Y,因此他们可以修改资源并合并更改,而无需单独的审批者——他们的权限涵盖了这两个策略。
具有默认审批策略的示例项目:
自定义审批策略
审批策略具有三个可自定义的参数:
- 合格审查者: 允许审查和批准受保护资源主分支更改的用户或组。
- 所需批准数量: 所需的最少批准数量。
- 贡献者批准: 指定是否允许资源的贡献者批准对该资源的更改。贡献者是指在分支上对该资源进行过任何更改的用户。
在项目中创建策略后,当您创建分支然后创建提案(Proposal)时,该策略将立即应用于该项目中的所有受保护资源。此外,如果您将策略更新为更严格或更宽松,链接到该策略的提案将被刷新,并根据新的策略要求重新评估其状态。只有项目的所有者才能更新其自定义策略。
具有自定义审批策略的示例项目:
将资源移动到新项目
在项目之间移动资源时,资源的保护状态会被保留。例如:
- 将受保护的资源移动到新项目: 该资源在新项目中将保持受保护状态。
- 将未受保护的资源移动到新项目: 该资源在新项目中将保持未受保护状态。
当受保护的资源移动到新项目时,对该受保护资源的任何更改都必须在分支上进行,并受新项目的审批策略管辖。
:::callout{theme="neutral" title="移动包含未决提案的资源"} 如果将包含未决提案的资源移动到新项目,现有提案可能需要长达 1 天的时间才能在资源策略中显示新项目策略。更新分支上的模块或尝试合并提案也会触发资源策略的刷新,以匹配新项目策略。 :::
结合使用项目策略与本地分支保护
代码仓库和 Pipeline Builder 都具有本地分支保护机制和审批策略。这些机制和策略将保持不变。
未来,用户将可以选择为其代码仓库和构建器流水线启用项目审批策略。
查看资源的审批策略
您可以通过在提案页面或分支任务栏的审查者列中选择 👤 按钮,查看适用于某资源的审批策略。这将打开一个包含两个选项卡的弹出窗口:管理审查者和审批策略。
审批策略选项卡将显示自定义策略(在项目或资源级别设置)以及适用于特定资源的默认策略。对于每个策略,您还可以查看其他信息,包括合格的审查者、所需的批准数量以及是否允许贡献者批准。
管理审查者选项卡显示您已请求审查的人员以及审查状态。您还可以使用编辑按钮添加或删除审查者。