Deploy an application(部署应用)
This page walks through deploying a Pilot application to production. Deployment is a guided three-step process managed in the Pilot deployment panel. For building your application, see Build an application.
:::callout{theme="warning"}
Deployment requires permissions at the project, organization, and enrollment levels. You need at least the Editor role on the project, the Third-party application administrator role in Control Panel to create the Developer Console application, and an enrollment administrator to approve the subdomain request. See the relevant sections below for details, or contact your administrator if you encounter permission errors.
:::
Editor and deploy views
Pilot has two views that control which data your application displays, toggled from the top-right corner of the workspace.

For an overview of editor and deploy views, see Workspace overview.
:::callout{theme="neutral"} If your application appears empty in deploy view, verify that the ontology entities have been created on a branch and that the backing datasets contain data. In editor view, Pilot displays seed data generated inside the container. :::
:::callout{theme="warning"}
When you preview your application in deploy view on Main, you are viewing and interacting with production data. Any actions you perform in the application, such as creating or editing objects, are ontology edits that take immediate effect. When previewing on a deployment branch, ontology edits are scoped to that branch and do not propagate to Main.
:::
Check deployability
Before starting the deployment process, verify that your application is ready to deploy. Select the status indicator in the top-right corner of the workspace to open the status monitoring popover. The Deployability status must be Deployable before you can create a branch.
Common deployability blockers include:
- Invalid ontology entities: Object types or action types that have configuration errors, such as missing required properties or references to entities that do not exist
- Outdated package dependencies: Dependencies that need to be upgraded before deployment
- Build errors: Compilation or runtime errors in the application code
To resolve blockers, select the three-dot menu (...) next to the Deployability status and choose Fix with Pilot. Pilot diagnoses the issue and applies a fix automatically. If the issue persists, you can prompt Pilot in the chat panel to describe and resolve the problem.
Start deployment
Select Deploy from the top-right corner of the Pilot workspace to open the deployment panel. The panel presents three steps:
- Implement ontology entities
- Configure application and subdomain
- Pass all CI checks
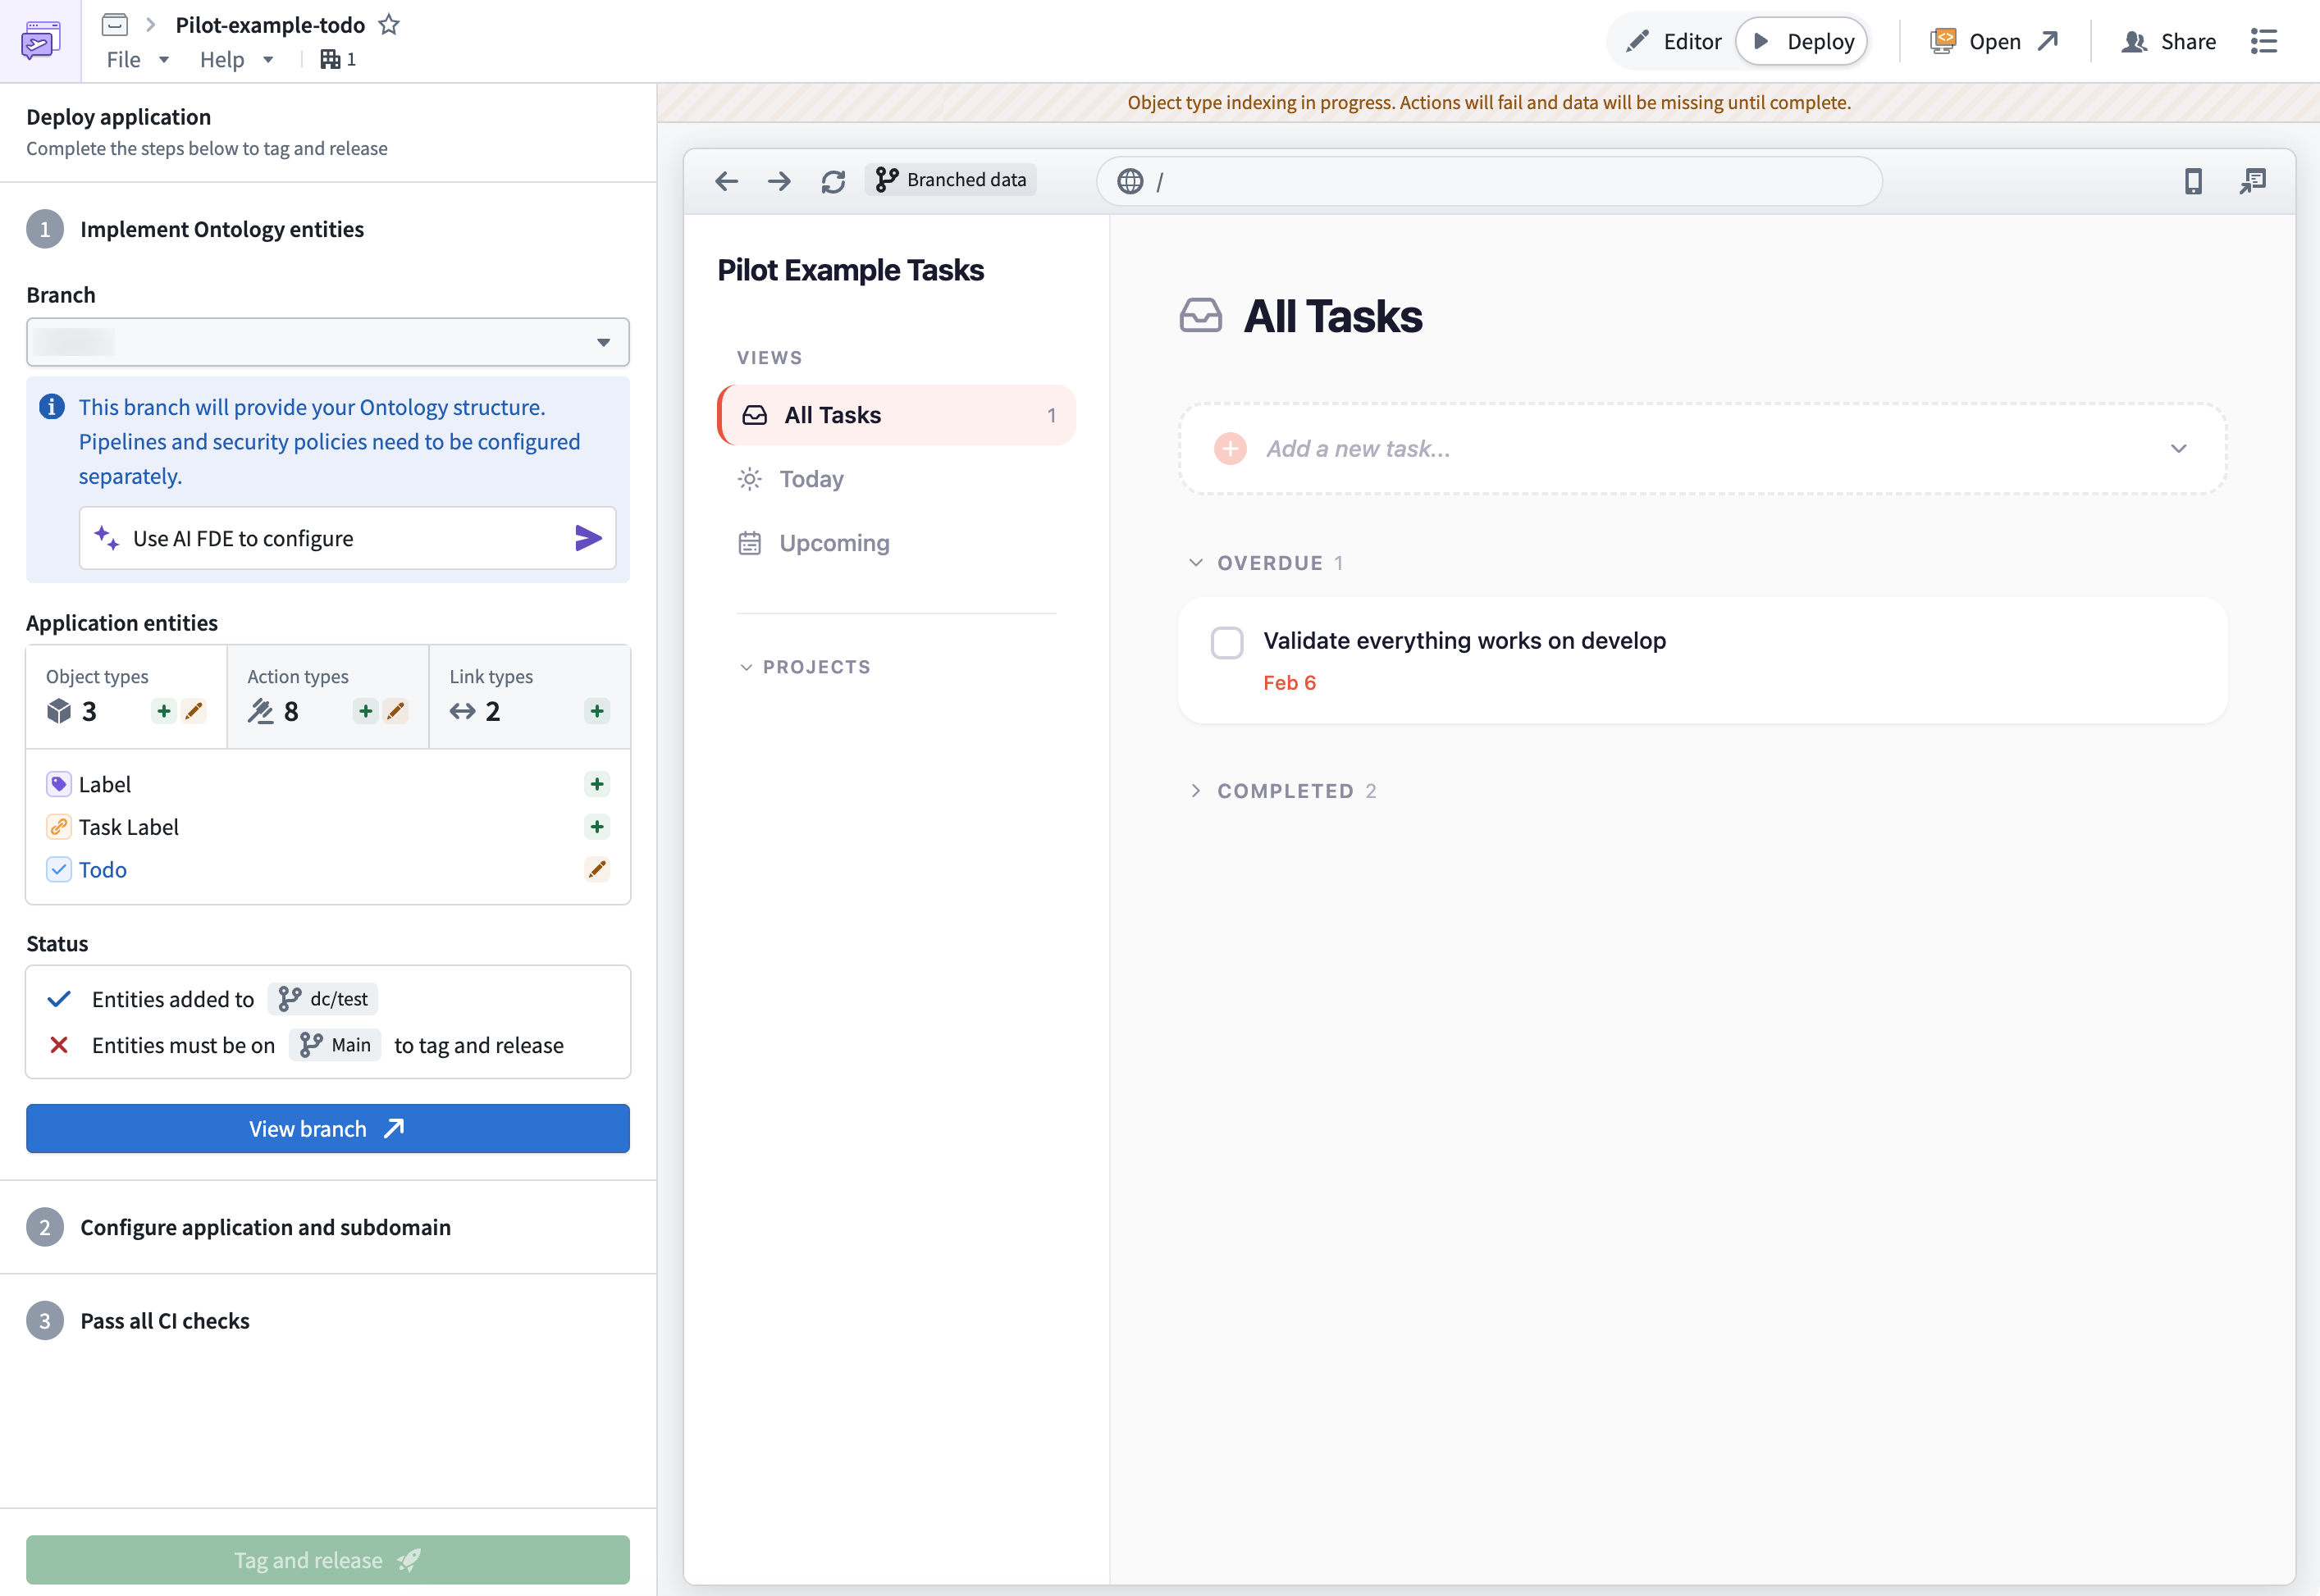
1. Implement ontology entities
Ontology changes created in the Pilot container must be promoted to the main ontology before the production application can use them. Pilot uses Global Branching for this process. Global Branching lets you make ontology changes on an isolated branch, test them against real data, and merge to Main without affecting production until you are ready.
Create a deployment branch
In the Implement ontology entities step, Pilot displays which entities need to be created on a branch, including object types, action types, and link types.
- Select Create branch to generate a deployment branch containing these ontology changes.
- Enter a branch name and confirm.
Once created, Pilot pushes ontology definitions to the branch and starts indexing. Indexing makes the object types and actions available on the branch so you can preview your application against real data in the deploy view and perform actions before merging to Main.
:::callout{theme="neutral"} If branch creation fails, verify that the Deployability status is passing. Check the ontology tab for any remaining Pilot edits that need to be resolved. You can also try creating a new branch with a different name. :::
Review and merge through Global Branching
After the branch is created, review and merge the ontology changes.
- Select View branch to open Global Branching, where you can see the resources on the branch and their state.
- Select Create proposal and enter a proposal name and optional description.
- Select Create to submit the proposal.
- Once checks pass, select Merge proposal to apply the ontology entities to
Main.
Depending on your enrollment configuration, proposal approval may be automatic or may require manual review by a user with the appropriate permissions.
After the merge completes, Pilot prompts you to switch back to Main. The Implement ontology entities step then shows all entities as up to date.
2. Configure application and subdomain
With ontology entities on Main, you can configure the hosted application that will serve your generated UI.
Create the Developer Console application
In the Configure application and subdomain step, select Configure application. A dialog appears with the following fields:
- Developer Console application name: Pilot suggests a name tied to your Pilot project.
- Organization: Select the organization where the application will live.
- Subdomain: Choose a subdomain for your application. Pilot checks availability and the resulting URL follows the pattern
<subdomain>.<enrollment>.palantirfoundry.com.
Select Create application to proceed. Pilot creates the Developer Console application record and defines the application's restrictions, automatically including the relevant object types and action types.
:::callout{theme="neutral"} Creating a Developer Console application requires specific permissions. For details, see Developer Console permissions. :::
Approve the subdomain request
Subdomain registration requires approval through Control Panel. An enrollment administrator must navigate to Control Panel > Approvals and complete the following:
- Review the subdomain request details, including the Foundry domain, requested subdomain, and the hosted application.
- Select Approve.
Once approved, the hosted domain is registered and mapped to the Developer Console application. Back in Pilot, the Configure application and subdomain step confirms that the application's restrictions are up to date.
:::callout{theme="neutral"} Subdomain approval timelines vary by enrollment. If you are blocked waiting for approval, contact your enrollment administrator. On some enrollments, subdomain registration may require additional security review. :::
3. Run CI checks and release
With ontology entities implemented and the Developer Console application configured, you can generate deployment files and release your application.
Generate deployment files
In the Pass all CI checks step, select Generate deployment files to enable checks. Pilot generates CI and environment configuration files into your repository, including:
.env.productionci.ymlfoundry.config.json- Additional build and settings scripts
Pilot then builds a production-ready artifact using the generated configuration. CI checks start automatically.
Failing CI checks
If CI checks fail, try the following:
- Select Generate deployment files again to regenerate the configuration files. This resolves issues caused by outdated deployment configuration.
- Switch to editor view and prompt Pilot to fix the build error. For example,
The CI checks are failing. Can you check the build output and fix any errors? - After Pilot applies a fix, switch back to the deploy view and select Generate deployment files to retrigger CI checks.
Tag and release
When CI checks pass, you can tag and release the application.
- Select Tag and release.
- In the Tag and release dialog:
- Confirm the Branch or specific commit.
- Choose a version type: Patch for backward-compatible fixes, Minor for additive changes, Major for breaking changes, or Custom for a custom tag.
- Select Tag and release to start the release.
Pilot tracks the release progress and surfaces a confirmation when the tag is created.
Open your production application
Once deployment is complete, Pilot displays App successfully deployed! with a link to View app. Select View app to open the newly deployed application at your subdomain.
The first time you visit, you are prompted with an OAuth consent screen. Select Allow to grant the Developer Console application access to the required ontology entities and media datasets. You then land in your production application, which operates on real data through the ontology.
After deployment
After your application is deployed, you can continue iterating in Pilot.
- Switch to the Editor view and make changes through follow-up prompts, just as you did during the initial build.
- When you are ready to release an update, switch to the Deploy view.
- If your changes include new or modified ontology entities, create a new branch or reset the existing one, merge through Global Branching, and tag a new release.
- If your changes are code-only (no ontology modifications), generate new deployment files and tag a new release directly.
:::callout{theme="neutral"} Your production application always uses real data from the ontology. Seed data from the Pilot container is never deployed and is not accessible in the production application. :::
中文翻译
部署应用
本文档将引导您完成将 Pilot 应用部署到生产环境的过程。部署是一个由 Pilot 部署面板管理的三步引导流程。关于构建应用,请参阅构建应用。
:::callout{theme="warning"}
部署需要在项目、组织和注册层级拥有相应权限。您需要至少拥有项目的 Editor 角色、在控制面板中拥有 Third-party application administrator 角色以创建 Developer Console 应用,以及需要注册管理员批准子域名请求。详情请参阅下文相关章节,如遇到权限错误请联系管理员。
:::
编辑器视图与部署视图
Pilot 有两种视图控制应用显示的数据,可通过工作区右上角的开关进行切换。
关于编辑器视图和部署视图的概述,请参阅工作区概述。
:::callout{theme="neutral"} 如果您的应用在部署视图中显示为空,请确认本体实体(ontology entities)已在某个分支上创建,并且底层数据集包含数据。在编辑器视图中,Pilot 会显示容器内生成的种子数据。 :::
:::callout{theme="warning"}
当您在 Main 分支上预览部署视图中的应用时,您正在查看和操作生产数据。您在应用中执行的任何操作(如创建或编辑对象)都是本体编辑操作,会立即生效。在部署分支上预览时,本体编辑操作仅限于该分支,不会传播到 Main 分支。
:::
检查可部署性
在开始部署流程之前,请确认您的应用已准备好部署。选择工作区右上角的状态指示器,打开状态监控弹出窗口。可部署性状态必须为 Deployable,您才能创建分支。
常见的可部署性阻碍因素包括:
- 无效的本体实体: 存在配置错误的对象类型或操作类型,例如缺少必需属性或引用了不存在的实体
- 过时的包依赖: 需要在部署前升级的依赖项
- 构建错误: 应用代码中的编译或运行时错误
要解决阻碍因素,请选择可部署性状态旁边的三点菜单(...),然后选择使用 Pilot 修复。Pilot 会诊断问题并自动应用修复。如果问题仍然存在,您可以在聊天面板中提示 Pilot 描述并解决问题。
开始部署
选择 Pilot 工作区右上角的部署,打开部署面板。面板显示三个步骤:
- 实现本体实体
- 配置应用和子域名
- 通过所有 CI 检查
1. 实现本体实体
在 Pilot 容器中创建的本体更改必须先提升到主本体,生产应用才能使用它们。Pilot 使用全局分支来完成此过程。全局分支允许您在隔离的分支上进行本体更改,针对真实数据进行测试,并在准备好之前不影响生产环境的情况下合并到 Main 分支。
创建部署分支
在实现本体实体步骤中,Pilot 会显示需要在分支上创建的实体,包括对象类型、操作类型和链接类型。
- 选择创建分支以生成包含这些本体更改的部署分支。
- 输入分支名称并确认。
创建完成后,Pilot 会将本体定义推送到分支并开始索引。索引使对象类型和操作在分支上可用,这样您就可以在部署视图中预览应用对真实数据的操作,并在合并到 Main 分支之前执行操作。
:::callout{theme="neutral"} 如果分支创建失败,请确认可部署性状态已通过。检查本体选项卡中是否有任何需要解决的剩余 Pilot 编辑。您也可以尝试使用不同的名称创建新分支。 :::
通过全局分支进行审查和合并
分支创建完成后,审查并合并本体更改。
- 选择查看分支打开全局分支,您可以查看分支上的资源及其状态。
- 选择创建提案,输入提案名称和可选的描述。
- 选择创建提交提案。
- 检查通过后,选择合并提案将本体实体应用到
Main分支。
根据您的注册配置,提案批准可能是自动的,也可能需要具有适当权限的用户进行手动审查。
合并完成后,Pilot 会提示您切换回 Main 分支。实现本体实体步骤随后会显示所有实体均为最新状态。
2. 配置应用和子域名
本体实体已在 Main 分支上,您可以配置将服务于生成的 UI 的托管应用。
创建 Developer Console 应用
在配置应用和子域名步骤中,选择配置应用。将出现一个包含以下字段的对话框:
- Developer Console 应用名称: Pilot 会建议一个与您的 Pilot 项目关联的名称。
- 组织: 选择应用所在的组织。
- 子域名: 为您的应用选择一个子域名。Pilot 会检查可用性,生成的 URL 格式为
<子域名>.<注册名称>.palantirfoundry.com。
选择创建应用继续。Pilot 会创建 Developer Console 应用记录并定义应用的限制,自动包含相关的对象类型和操作类型。
:::callout{theme="neutral"} 创建 Developer Console 应用需要特定权限。详情请参阅 Developer Console 权限。 :::
批准子域名请求
子域名注册需要通过控制面板批准。注册管理员需要导航到控制面板 > 审批并完成以下操作:
- 查看子域名请求详情,包括 Foundry 域名、请求的子域名和托管应用。
- 选择批准。
批准后,托管域名即注册完成并映射到 Developer Console 应用。回到 Pilot 中,配置应用和子域名步骤会确认应用的限制已更新。
:::callout{theme="neutral"} 子域名批准时间因注册而异。如果您因等待批准而受阻,请联系您的注册管理员。在某些注册中,子域名注册可能需要额外的安全审查。 :::
3. 运行 CI 检查并发布
本体实体已实现,Developer Console 应用已配置完成,现在可以生成部署文件并发布应用。
生成部署文件
在通过所有 CI 检查步骤中,选择生成部署文件以启用检查。Pilot 会在您的仓库中生成 CI 和环境配置文件,包括:
.env.productionci.ymlfoundry.config.json- 其他构建和设置脚本
然后,Pilot 会使用生成的配置构建一个可用于生产环境的制品。CI 检查会自动开始。
CI 检查失败
如果 CI 检查失败,请尝试以下操作:
- 再次选择生成部署文件以重新生成配置文件。这可以解决由过时的部署配置引起的问题。
- 切换到编辑器视图,提示 Pilot 修复构建错误。例如:
CI 检查失败了。你能检查构建输出并修复任何错误吗? - Pilot 应用修复后,切换回部署视图并选择生成部署文件以重新触发 CI 检查。
打标签并发布
当 CI 检查通过后,您可以打标签并发布应用。
- 选择打标签并发布。
- 在打标签并发布对话框中:
- 确认分支或特定提交。
- 选择版本类型:补丁用于向后兼容的修复,次要用于增量更改,主要用于破坏性更改,或自定义用于自定义标签。
- 选择打标签并发布开始发布。
Pilot 会跟踪发布进度,并在标签创建完成时显示确认信息。
打开您的生产应用
部署完成后,Pilot 会显示应用部署成功!并附带查看应用的链接。选择查看应用即可在您的子域名下打开新部署的应用。
首次访问时,系统会提示 OAuth 同意屏幕。选择允许以授予 Developer Console 应用访问所需本体实体和媒体数据集的权限。然后您将进入生产应用,该应用通过本体对真实数据进行操作。
部署之后
应用部署完成后,您可以继续在 Pilot 中进行迭代。
- 切换到编辑器视图,通过后续提示进行更改,就像您在初始构建过程中所做的那样。
- 当您准备好发布更新时,切换到部署视图。
- 如果您的更改包含新的或修改过的本体实体,请创建新分支或重置现有分支,通过全局分支进行合并,然后打标签发布新版本。
- 如果您的更改仅涉及代码(无本体修改),则直接生成新的部署文件并打标签发布新版本。
:::callout{theme="neutral"} 您的生产应用始终使用本体中的真实数据。Pilot 容器中的种子数据永远不会被部署,也无法在生产应用中访问。 :::