User-attributed SAP writeback with OAuth 2.0(使用 OAuth 2.0 的用户属性 SAP 回写)
This page contains instructions for setting up the OAuth 2.0 server in SAP and setting up the OAuth 2.0 client in Foundry.
Setting up the OAuth 2.0 server in SAP
Prerequisites
- SP21 or above of the Palantir Foundry Connector 2.0 for SAP Applications ("Connector")
- The Foundry technical user in SAP should be a
SYSTEMuser /PALANTIR/OAUTH_CLIENTshould be assigned to the Foundry technical user and any end users wishing to write back to SAP from Foundry/PALANTIR/CONTENT_FUNCTION_ALLshould be assigned to end user- All services under the
/sap/public/bcnode to be activated (for OAuth 2.0 configuration) /sap/bc/sec/oauth2*/default_host/sap/bc/webdynpro/sap/oauth2_authority- SAP Gateway is active
- SAP_BASIS (the technical component version, applicable to both SAP NetWeaver and SAP S/4HANA systems) 7.4 SP09 or above (support for OAuth 2.0 and OData)
Reference
- Note 1688545 - OAuth 2.0 Server in AS ABAP troubleshooting ↗ (SAP login required)
- Help: OAuth 2.0 Server for AS ABAP ↗
OAuth 2.0 configuration
- Run the
SOAUTH2transaction. - Select Create....
- Enter the username of the Foundry technical user as the OAuth 2.0 Client ID.
- Select Next >.
- Enter the username of the Foundry technical user as the User ID.
- Ensure Client User ID and Password and SSL Client Certificate are both checked.
- Select Next >.
- Set the Redirect URI as
https://<FOUNDRY_DOMAIN>/workspace/oauth2-clients/callback. - Select Next >.
- Add a Scope Assignment with an OAuth 2.0 Scope ID of
/PALANTIR/SRV_0001and a description such asPalantir Foundry writeback using SAP functions. - Select Next > and then Finish.
OData configuration
- In the Maintain service page within SAP, follow the hierarchy of services to find opu > odata > palantir.
- Right-click on palantir and select Activate Service.
- Select Yes when prompted.
- On the Create/Change a Service tab, select GUI Configuration under Interactive Options.
- Add parameter with name
~CHECK_CSRF_TOKENand value0(zero). - Disable CSRF_TOKEN validation as outlined here: https://help.sap.com/doc/saphelp_hba/1.0/de-DE/e6/cae27d5e8d4996add4067280c8714e/content.htm
- Run the
/IWFND/MAINT_SERVICEtransaction. - Select Add System Alias under System Aliases.
- Add a system alias with the following values:
- Service Doc. Identifier:
/PALANTIR/SRV_0001 - User Role: blank
- Host Name: blank
- SAP System Alias:
LOCAL - Metadata Default: unchecked
- Default System: checked
- Tech. Svc. Name:
/PALANTIR/SRV - Ext. Service Name:
ODATA_SRV - Version:
1 - User Name: blank
Setting up the OAuth 2.0 client in Foundry
This follows the general approach outlined in Configure outbound applications but has been tailored specifically to SAP systems.
Outbound application setup
- Navigate to Control Panel and select Outbound applications under Organization settings.
- Select New application.
- Provide an Application name, for example, the name of your SAP system.
- Set the Approval prompt to describe the authorization action, for example,
Allow Foundry to act on your behalf in SAP?. - Under OAuth 2.0 server connection, select the Foundry Worker option.
- Set the Authorization page URL to the SAP OAuth 2.0 authorization endpoint:
https://<SAP_DOMAIN>/sap/bc/sec/oauth2/authorize
- Set the Token endpoint URL to the SAP OAuth 2.0 token endpoint:
https://<SAP_DOMAIN>/sap/bc/sec/oauth2/token
- Under Egress policy, select an agent proxy egress policy that routes traffic through a Data Connection agent installed in your network with access to the SAP system.
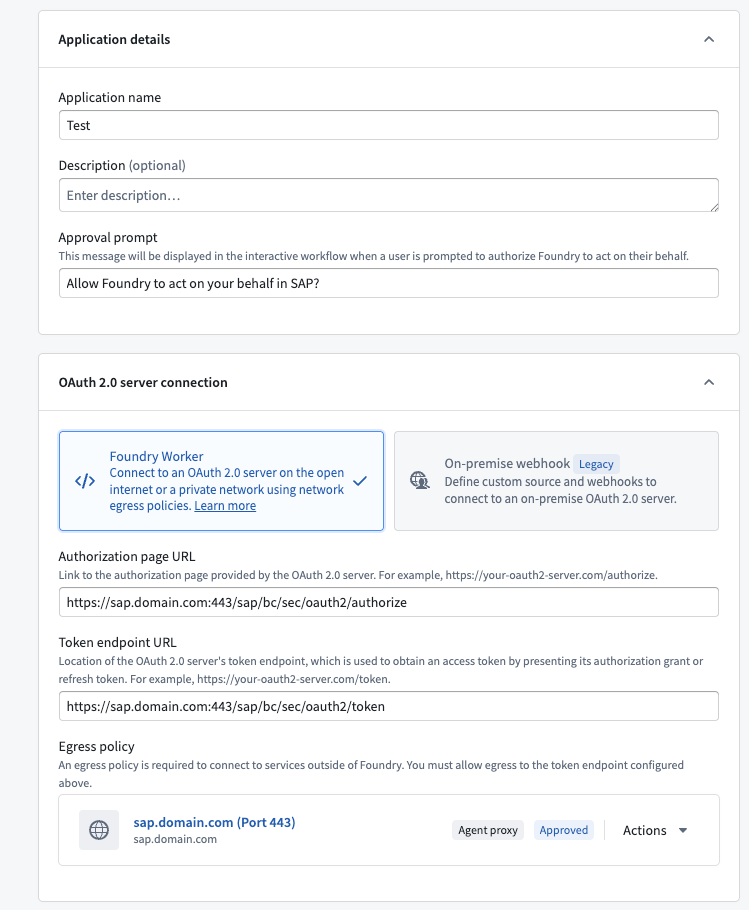
- Under OAuth 2.0 settings, set the Client ID to the client ID from the SAP OAuth 2.0 server configuration. Under Scopes, add
/PALANTIR/SRV_0001. - Save the outbound application.
- This outbound application can now be used when creating an SAP webhook.
For more details on outbound application configuration options, see Configure outbound applications.
(Legacy) Webhook-based OAuth 2.0 configuration
:::callout{theme="warning" title="Legacy"} The webhook-based OAuth 2.0 configuration described below is in the legacy phase of development and no additional development is expected. Use the standard outbound application setup above instead. For more information on the legacy approach, see (Legacy) Custom webhook-based OAuth 2.0 handshakes. :::
Previously, configuring OAuth 2.0 for SAP required creating a dedicated REST API source with webhooks to handle the token and refresh flows manually. If your existing SAP integration uses this approach, it will continue to work. However, for new configurations, use the standard outbound application setup above.
Source connection setup
:::callout{theme="warning" title="Warning"} Ensure that the SAP source URL is using HTTPS, or webhooks will fail when using an OAuth flow. :::
- Create a new REST API source.

- Configure the source with the base domain URL and port used for the SAP source.
- Select Basic authentication and add the username and password used to connect to SAP.
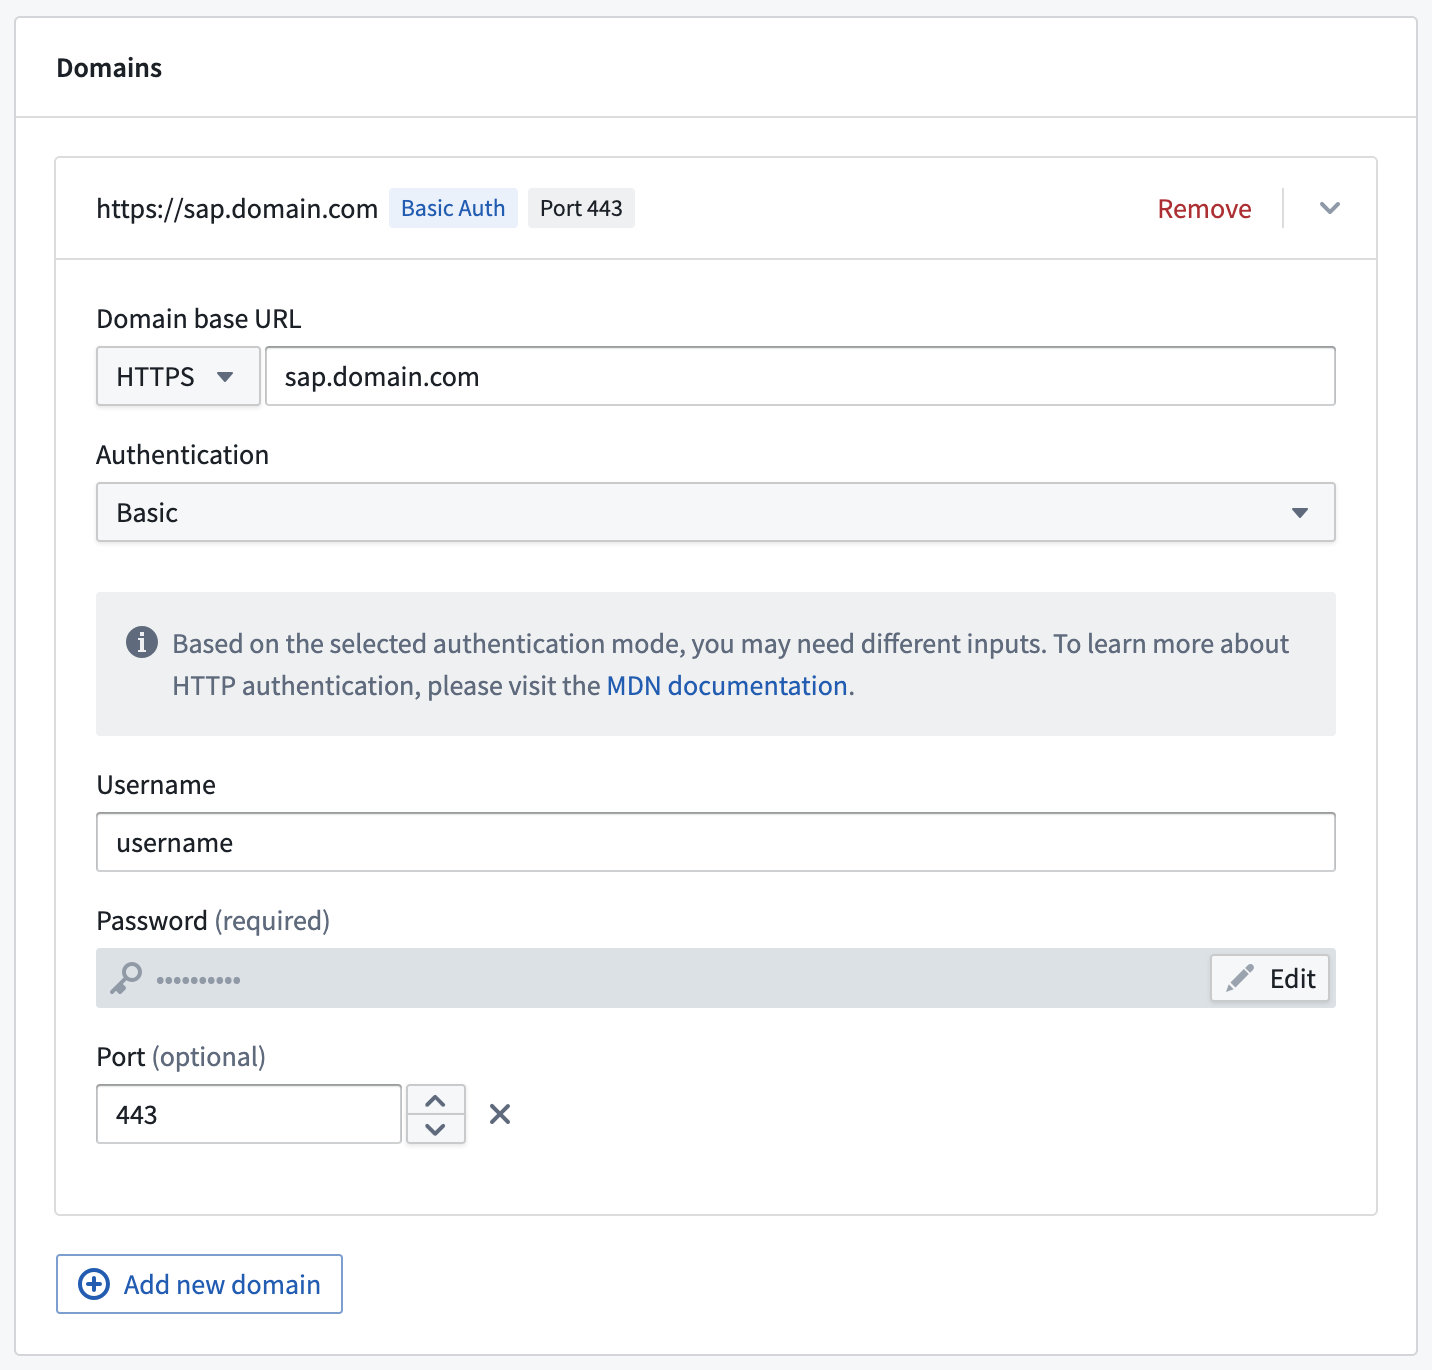
- Save the source.
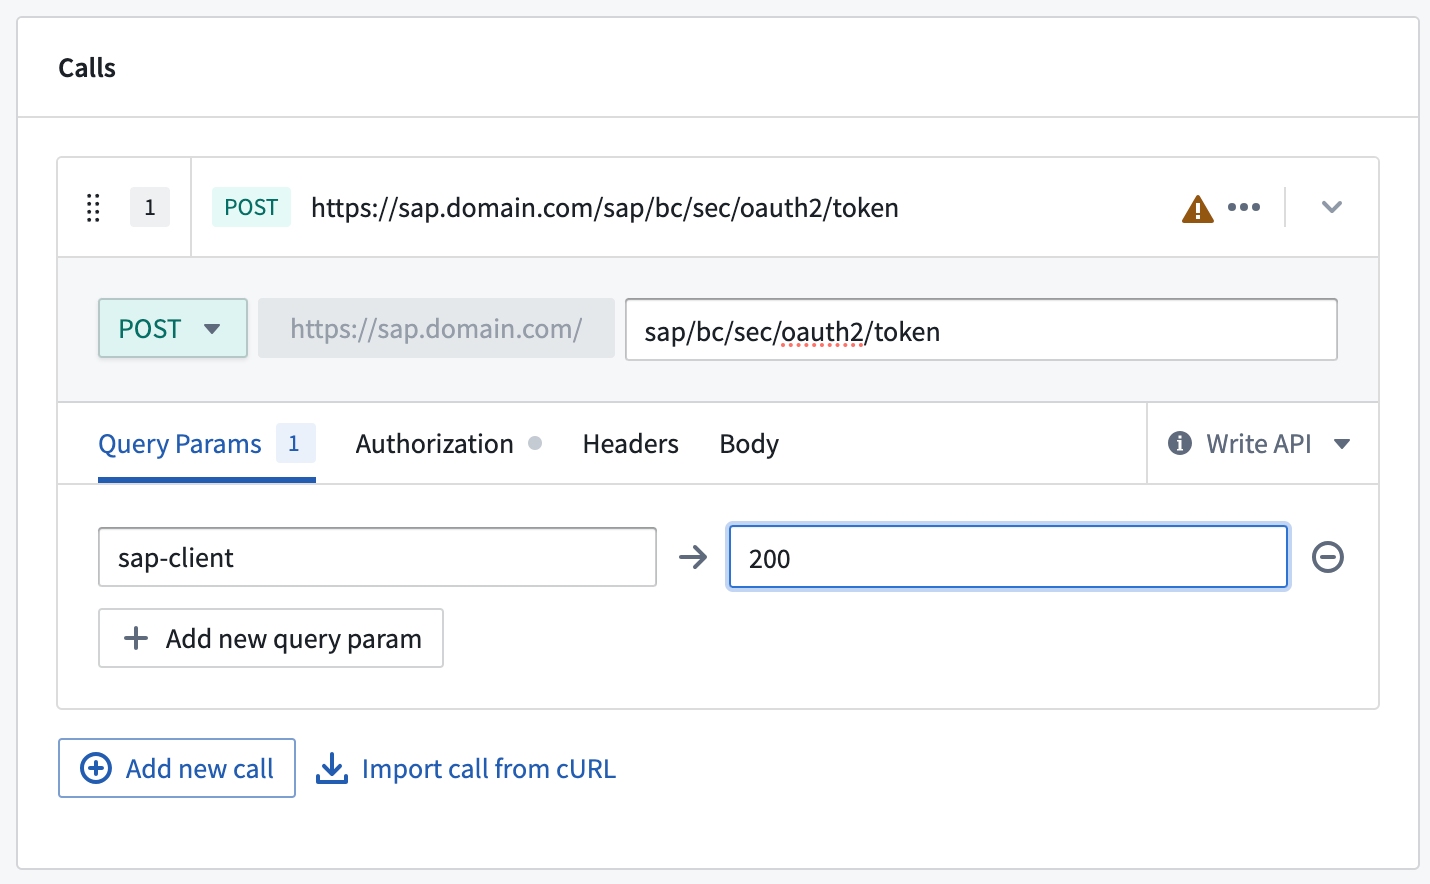
OAuth 2.0 authorization flow webhook setup
:::callout{theme="warning" title="Webhooks published as functions are incompatible"} Webhooks published as functions cannot be used in legacy custom webhook-based OAuth 2.0 outbound applications. When creating your token and refresh webhooks, ensure function publishing is disabled. :::
-
On the overview page of the new REST API source, select Create webhook.
-
Give the webhook a name (such as
SAP OAuth2 authorization code flow webhook). Ensure that Function Configuration is toggled off. -
Advance to the Request configuration step.
-
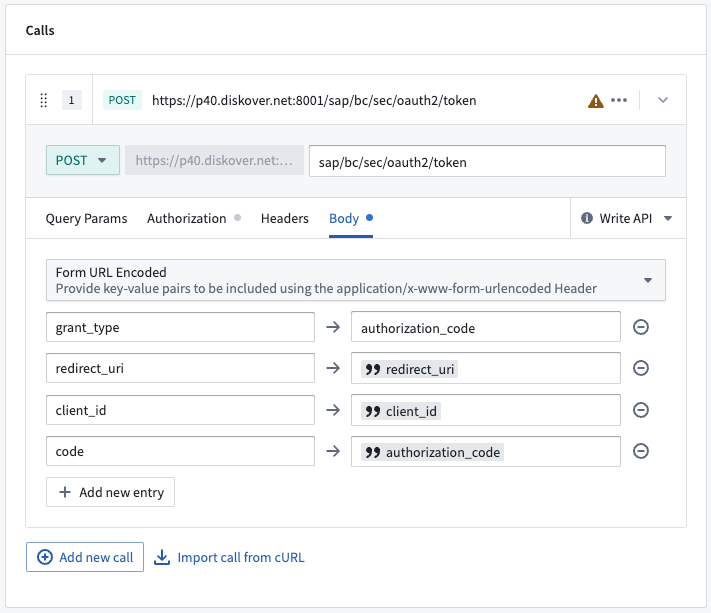
Under Calls, select POST as the request type and enter
sap/bc/sec/oauth2/tokenas the path. -
Under Query Params,
sap-clientmight have to be set if the client used is not the default client.
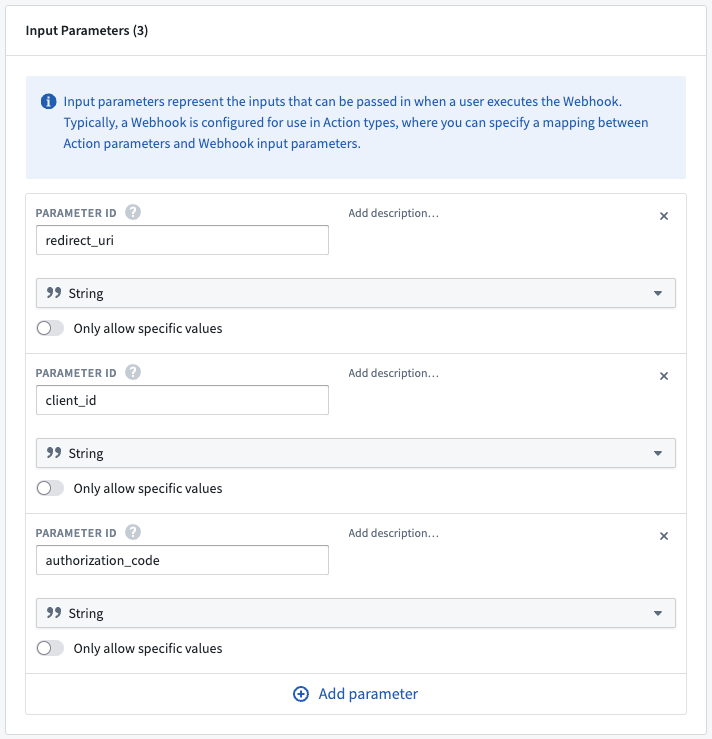
-
Scroll down to Input Parameters and add the following three parameters (all string type):
-
redirect_uri client_idauthorization_code
- Scroll back up to Calls and select the Body tab.
-
Choose Form URL Encoded and add the following four entries:
-
grant_type→authorization_code redirect_uri→ Mapped to theredirect_uriinput parameter (see below for how to do this)client_id→ Mapped to theclient_idinput parameter-
code→ Mapped to theauthorization_codeinput parameter -
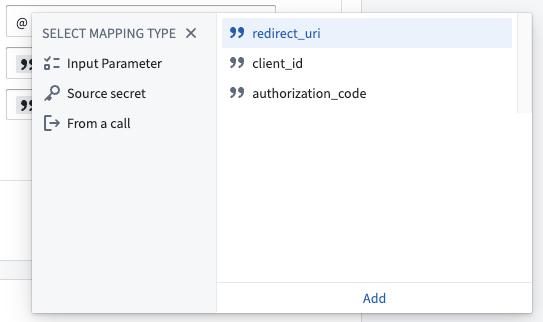
To map an input parameter, type @ into the field and then select Input Parameter. Find the relevant parameter, select it and then select Add beneath.
- The finished Body configuration should look like this:
- Advance to the Responses step.
-
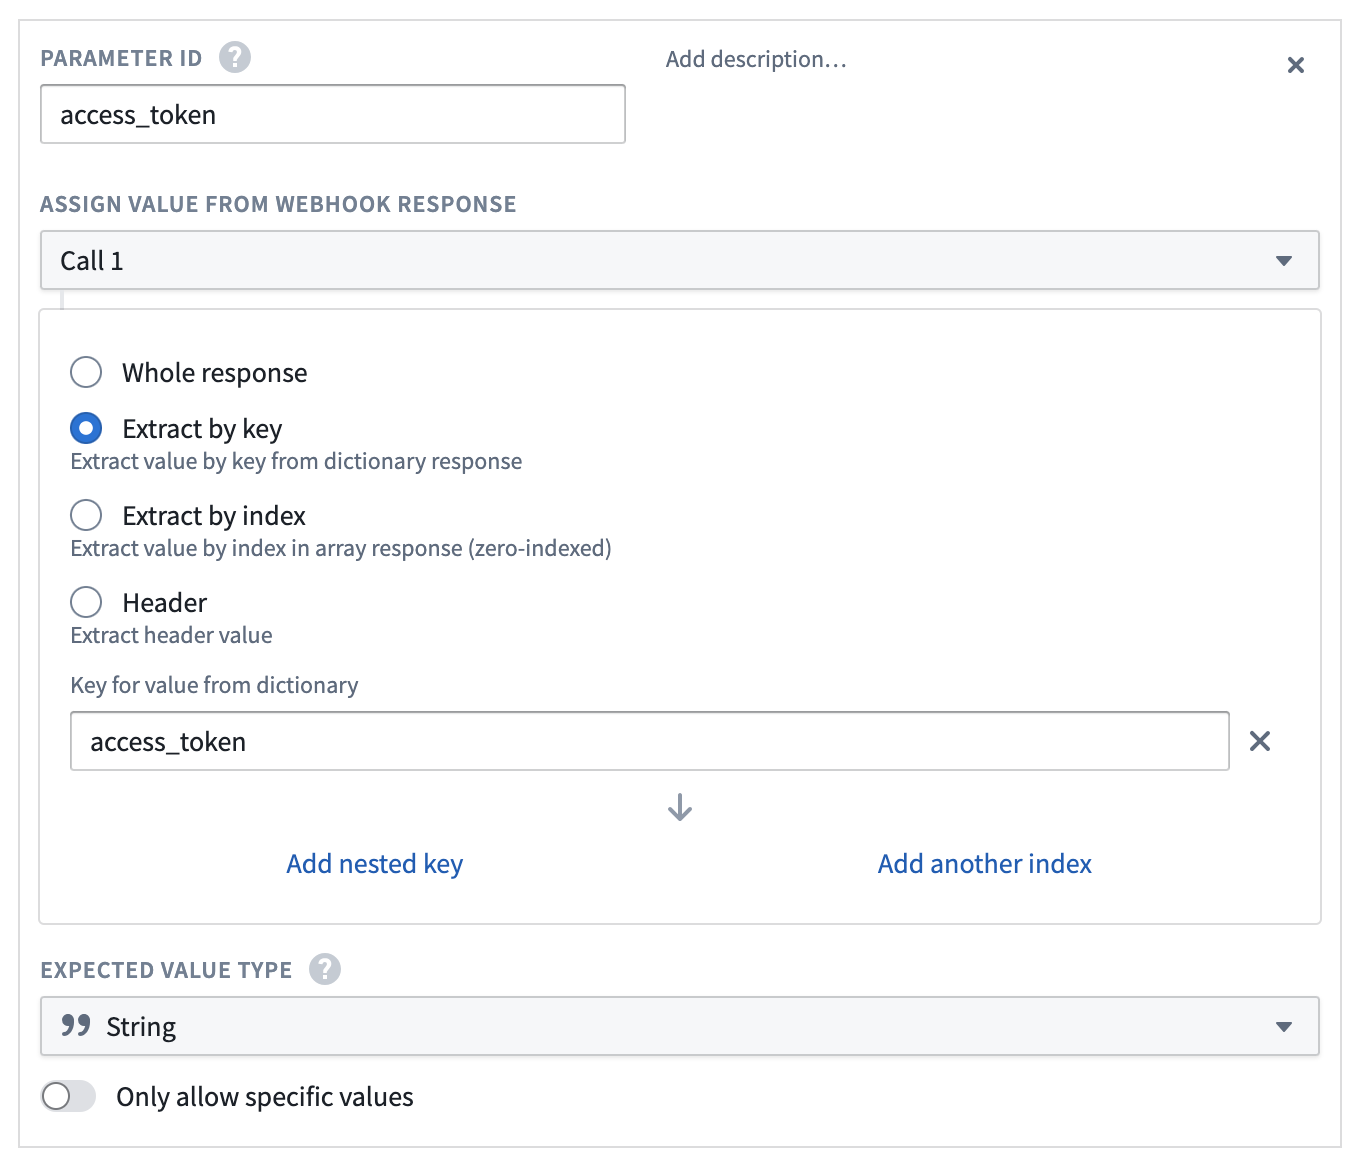
Create the following five Output Parameters. All should be of type string and should be extracted by key from the response.
-
access_token token_typeexpires_inrefresh_tokenscope
This is an example for creating access_token. All output parameters should follow this pattern.
- Save the webhook by selecting Create webhook and continue.
OAuth 2.0 refresh flow webhook setup
- Create a new webhook from the REST API source.
- Give the webhook a distinct name (such as
SAP OAuth2 refresh flow webhook). Ensure that Function Configuration is toggled off. - The request method should again be set to POST and the same path (
sap/bc/sec/oauth2/token) should be used. - As with the previous webhook, set
sap-clientas a Query Param if needed. -
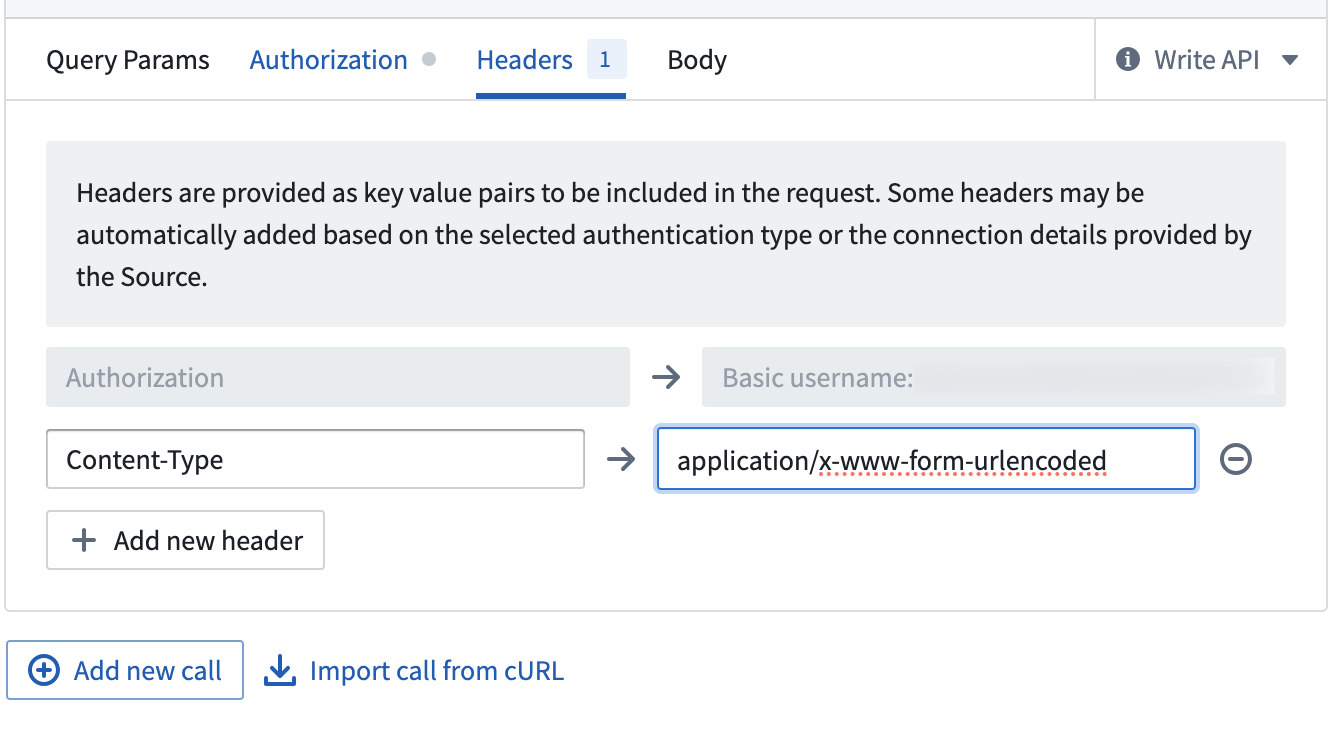
On the Headers tab, add the following header:
-
Content-Type→application/x-www-form-urlencoded
-
Set up these two Input Parameters (both strings):
-
client_id -
refresh_token -
Then under the Body tab, add these three entries:
-
grant_type→refresh_token client_id→ Mapped to theclient_idinput parameter-
refresh_token→ Mapped to therefresh_tokeninput parameter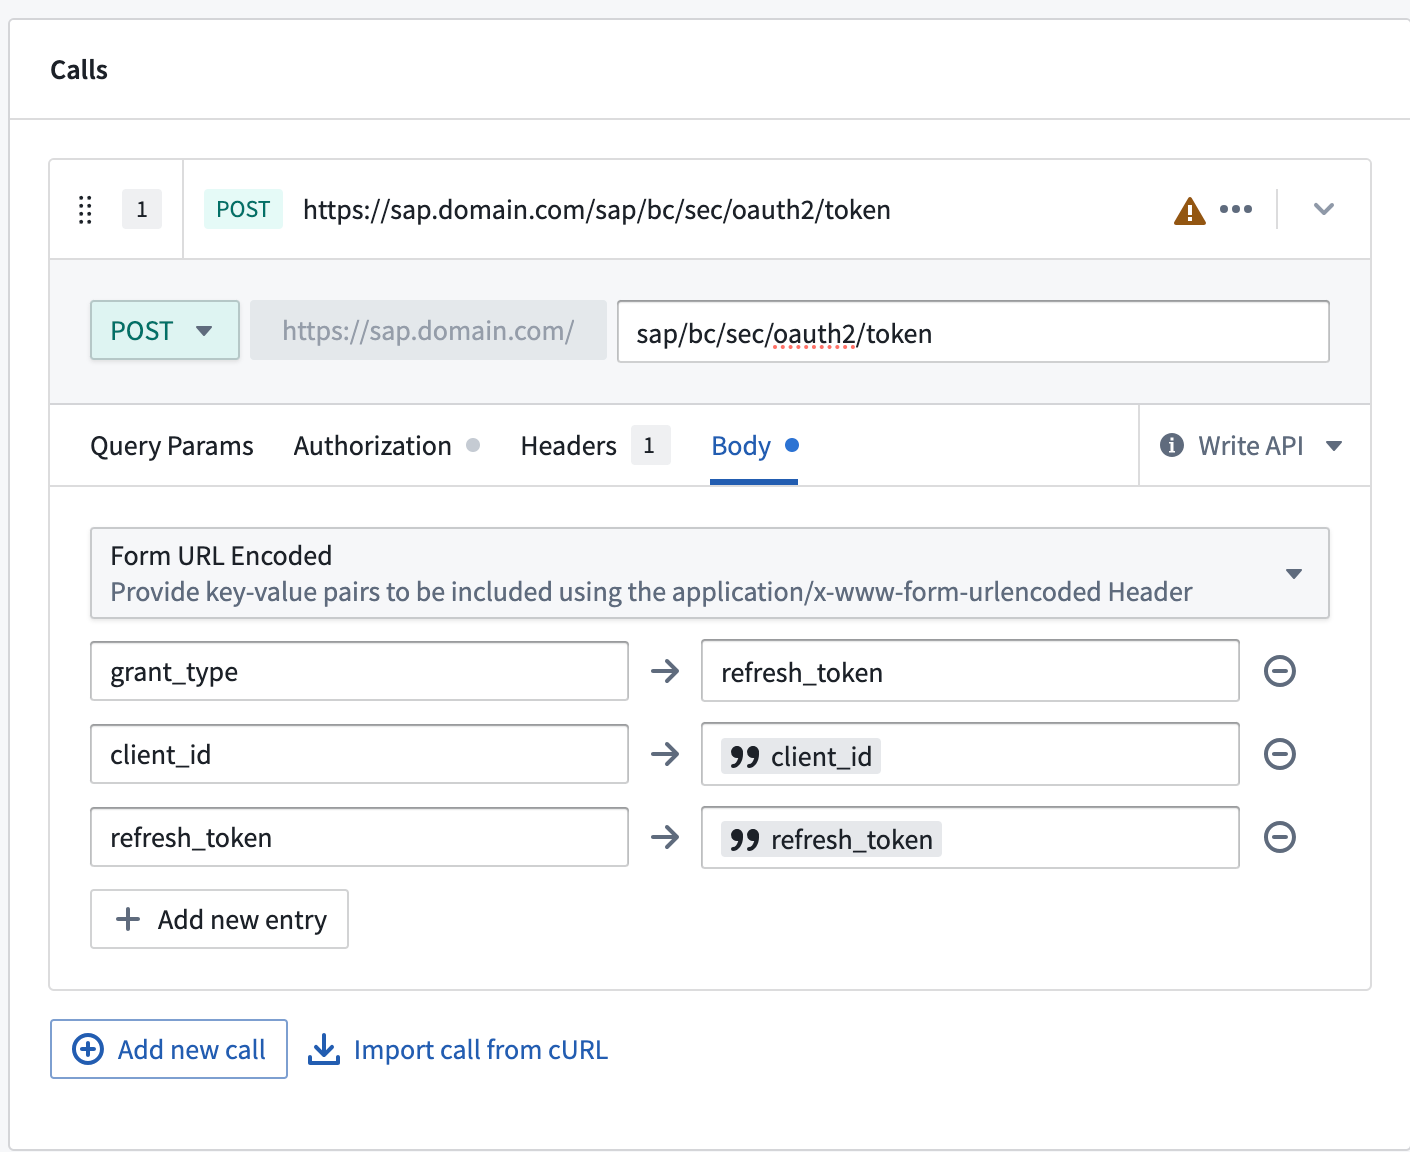
-
Create exactly the same five Output Parameters as for the authorization code flow webhook. All should be of type string and should be extracted by key from the response.
-
access_token token_typeexpires_inrefresh_token-
scope -
Save the webhook by selecting Create webhook and continue.
Legacy outbound application setup
- Navigate to the Foundry Control Panel and select Outbound applications.
- Give the application a name then follow the steps outlined under (Legacy) Custom webhook-based OAuth 2.0 handshakes.
- The two webhooks created earlier should be used as the Token webhook and Refresh token webhook respectively.
- The Authorization page URL should be of the form:
https://<SAP_DOMAIN>/sap/bc/sec/oauth2/authorize
- Under OAuth 2.0 settings, the Client ID should be set to the client ID from the SAP OAuth 2.0 server configuration. Under Scopes, add
/PALANTIR/SRV_0001. - Save the outbound application.
- This outbound application can now be used when creating an SAP webhook.
中文翻译
使用 OAuth 2.0 的用户属性 SAP 回写
本文包含在 SAP 中设置 OAuth 2.0 服务器和在 Foundry 中设置 OAuth 2.0 客户端的说明。
在 SAP 中设置 OAuth 2.0 服务器
前提条件
- Palantir Foundry Connector 2.0 for SAP Applications("连接器")需为 SP21 或更高版本
- SAP 中的 Foundry 技术用户应为
SYSTEM用户 /PALANTIR/OAUTH_CLIENT应分配给 Foundry 技术用户以及任何希望从 Foundry 回写到 SAP 的最终用户/PALANTIR/CONTENT_FUNCTION_ALL应分配给最终用户- 需激活
/sap/public/bc节点下的所有服务(用于 OAuth 2.0 配置) /sap/bc/sec/oauth2*/default_host/sap/bc/webdynpro/sap/oauth2_authority- SAP Gateway 处于活动状态
- SAP_BASIS(技术组件版本,适用于 SAP NetWeaver 和 SAP S/4HANA 系统)需为 7.4 SP09 或更高版本(支持 OAuth 2.0 和 OData)
参考
OAuth 2.0 配置
- 运行
SOAUTH2事务。 - 选择 创建...。
- 将 Foundry 技术用户的用户名输入为 OAuth 2.0 客户端 ID。
- 选择 下一步 >。
- 将 Foundry 技术用户的用户名输入为 用户 ID。
- 确保 客户端用户 ID 和密码 和 SSL 客户端证书 均已勾选。
- 选择 下一步 >。
- 将 重定向 URI 设置为
https://<FOUNDRY_DOMAIN>/workspace/oauth2-clients/callback。 - 选择 下一步 >。
- 添加一个 范围分配,其 OAuth 2.0 范围 ID 为
/PALANTIR/SRV_0001,描述为使用 SAP 功能的 Palantir Foundry 回写。 - 选择 下一步 >,然后选择 完成。
OData 配置
- 在 SAP 的 维护服务 页面中,按照服务层级找到 opu > odata > palantir。
- 右键单击 palantir,然后选择 激活服务。
- 出现提示时选择 是。
- 在 创建/更改服务 选项卡中,选择 交互选项 下的 GUI 配置。
- 添加参数,名称为
~CHECK_CSRF_TOKEN,值为0(零)。 - 按照此处概述禁用 CSRF_TOKEN 验证:https://help.sap.com/doc/saphelp_hba/1.0/de-DE/e6/cae27d5e8d4996add4067280c8714e/content.htm
- 运行
/IWFND/MAINT_SERVICE事务。 - 在 系统别名 下选择 添加系统别名。
- 添加一个具有以下值的系统别名:
- 服务文档标识符:
/PALANTIR/SRV_0001 - 用户角色: 留空
- 主机名: 留空
- SAP 系统别名:
LOCAL - 元数据默认: 未勾选
- 默认系统: 已勾选
- 技术服务名称:
/PALANTIR/SRV - 外部服务名称:
ODATA_SRV - 版本:
1 - 用户名: 留空
在 Foundry 中设置 OAuth 2.0 客户端
这遵循 配置出站应用程序 中概述的通用方法,但专门针对 SAP 系统进行了定制。
出站应用程序设置
- 导航到控制面板,在 组织设置 下选择 出站应用程序。
- 选择 新建应用程序。
- 提供一个 应用程序名称,例如您的 SAP 系统名称。
- 设置 批准提示 以描述授权操作,例如
允许 Foundry 代表您在 SAP 中执行操作?。 - 在 OAuth 2.0 服务器连接 下,选择 Foundry Worker 选项。
- 将 授权页面 URL 设置为 SAP OAuth 2.0 授权端点:
https://<SAP_DOMAIN>/sap/bc/sec/oauth2/authorize
- 将 令牌端点 URL 设置为 SAP OAuth 2.0 令牌端点:
https://<SAP_DOMAIN>/sap/bc/sec/oauth2/token
- 在 OAuth 2.0 设置 下,将 客户端 ID 设置为来自 SAP OAuth 2.0 服务器配置的客户端 ID。在 范围 下,添加
/PALANTIR/SRV_0001。 - 保存出站应用程序。
- 现在可以在创建 SAP webhook 时使用此出站应用程序。
有关出站应用程序配置选项的更多详细信息,请参阅 配置出站应用程序。
(旧版)基于 Webhook 的 OAuth 2.0 配置
:::callout{theme="warning" title="旧版"} 下面描述的基于 Webhook 的 OAuth 2.0 配置处于开发的 旧版 阶段,预计不会再有额外开发。请改用上述的 标准出站应用程序设置。有关旧版方法的更多信息,请参阅 (旧版)自定义基于 Webhook 的 OAuth 2.0 握手。 :::
以前,为 SAP 配置 OAuth 2.0 需要创建一个专用的 REST API 源,并带有 webhook 来手动处理令牌和刷新流程。如果您现有的 SAP 集成使用此方法,它将继续有效。但是,对于新配置,请使用上述的 标准出站应用程序设置。
源连接设置
:::callout{theme="warning" title="警告"} 确保 SAP 源 URL 使用 HTTPS,否则在使用 OAuth 流程时 webhook 将失败。 :::
- 创建一个新的 REST API 源。
- 使用用于 SAP 源的基础域名 URL 和端口配置该源。
- 选择 基本 认证,并添加用于连接到 SAP 的用户名和密码。
- 保存该源。
OAuth 2.0 授权流程 Webhook 设置
:::callout{theme="warning" title="作为函数发布的 Webhook 不兼容"} 作为函数发布的 Webhook 不能用于旧版自定义基于 Webhook 的 OAuth 2.0 出站应用程序。创建令牌和刷新 webhook 时,请确保禁用函数发布。 :::
-
在新的 REST API 源的概览页面上,选择 创建 webhook。
-
为 webhook 命名(例如
SAP OAuth2 authorization code flow webhook)。确保 函数配置 已关闭。 -
进入 请求配置 步骤。
-
在 调用 下,选择 POST 作为请求类型,并输入
sap/bc/sec/oauth2/token作为路径。 -
在 查询参数 下,如果使用的客户端不是默认客户端,则可能需要设置
sap-client。
-
向下滚动到 输入参数,并添加以下三个参数(均为字符串类型):
-
redirect_uri client_idauthorization_code
- 向上滚动回 调用,然后选择 主体 选项卡。
-
选择 表单 URL 编码,并添加以下四个条目:
-
grant_type→authorization_code redirect_uri→ 映射到redirect_uri输入参数(请参阅下文了解如何操作)client_id→ 映射到client_id输入参数-
code→ 映射到authorization_code输入参数 -
要映射输入参数,请在字段中输入 @,然后选择 输入参数。找到相关参数,选择它,然后选择下方的 添加。
- 完成的 主体 配置应如下所示:
- 进入 响应 步骤。
-
创建以下五个 输出参数。所有参数都应为字符串类型,并通过键从响应中提取。
-
access_token token_typeexpires_inrefresh_tokenscope
这是创建 access_token 的示例。所有输出参数都应遵循此模式。
- 选择 创建 webhook 并继续 以保存 webhook。
OAuth 2.0 刷新流程 Webhook 设置
- 从 REST API 源创建一个新的 webhook。
- 为 webhook 指定一个不同的名称(例如
SAP OAuth2 refresh flow webhook)。确保 函数配置 已关闭。 - 请求方法应再次设置为 POST,并使用相同的路径(
sap/bc/sec/oauth2/token)。 - 与之前的 webhook 一样,如果需要,将
sap-client设置为 查询参数。 -
在 标头 选项卡上,添加以下标头:
-
Content-Type→application/x-www-form-urlencoded
-
设置这两个 输入参数(均为字符串):
-
client_id -
refresh_token -
然后在 主体 选项卡下,添加这三个条目:
-
grant_type→refresh_token client_id→ 映射到client_id输入参数-
refresh_token→ 映射到refresh_token输入参数 -
创建与授权码流程 webhook 完全相同的五个 输出参数。所有参数都应为字符串类型,并通过键从响应中提取。
-
access_token token_typeexpires_inrefresh_token-
scope -
选择 创建 webhook 并继续 以保存 webhook。
旧版出站应用程序设置
- 导航到 Foundry 控制面板,然后选择 出站应用程序。
- 为应用程序命名,然后按照 (旧版)自定义基于 Webhook 的 OAuth 2.0 握手 中概述的步骤操作。
- 之前创建的两个 webhook 应分别用作 令牌 webhook 和 刷新令牌 webhook。
- 授权页面 URL 的格式应为:
https://<SAP_DOMAIN>/sap/bc/sec/oauth2/authorize
- 在 OAuth 2.0 设置 下,客户端 ID 应设置为来自 SAP OAuth 2.0 服务器配置的客户端 ID。在 范围 下,添加
/PALANTIR/SRV_0001。 - 保存出站应用程序。
- 现在可以在创建 SAP webhook 时使用此出站应用程序。